ASC Roof Edge Protection Class C User manual
Manual
Roof Edge Protection Class C
Conform NEN-EN 13374
Class A,B en C
Gebruikshandleiding
Rechte dakrandbeveiliging
Conform NEN-EN 13374-A
This manual is property of:
ASC Group
Leerlooierstraat 32
4871 EN Etten-Leur
The Netherlands

Alle rechten voorbehouden.
Niets uit deze uitgave mag worden verveelvoudigd, opgeslagen in een database of openbaar gemaakt, in enige vorm of op enige wijze, hetzij elektronisch,
mechanisch, opnamen, of enig andere manier, zonder voorafgaande toestemming van ASCGroup.
2
Disclaimer
Disclaimer This documentation has been provided with the utmost care by ASC Group.
All rights reserved. No part of this publication may be reproduced, stored in a retrieval system, or
transmitted in any form or by any means, electronic, mechanical, photocopying, recording, or
otherwise, without the prior written permission from ASC Group. This publication may only be used
for ASC Group products. Typesetting and printing errors reserved.
If you have any questions, please contact ASC Group:
Leerlooierstraat 32
4871 EN Etten-Leur
Nederland
www.ASCGroup.nl
+3176 5413019

Alle rechten voorbehouden.
Niets uit deze uitgave mag worden verveelvoudigd, opgeslagen in een database of openbaar gemaakt, in enige vorm of op enige wijze, hetzij elektronisch,
mechanisch, opnamen, of enig andere manier, zonder voorafgaande toestemming van ASCGroup.
3
1
Overview 4
1.1
Application 4
Forces 4
1.2
List of components 6
2
Assembly and use 7
2.1
Positioning 7
Sureface 7
Gutter 7
Roof egde 7
Obstacles 7
Maximum height 7
Weather conditions 7
2.2
Personal protective equipment 8
2.3
Opbouw
Fout! Bladwijzer niet gedefinieerd.
2.4
Assembly Instructions 8
2.5
Use 10
Veilig gebruik 10
After a fall into the net 10
Edge board 10
Security 10
Relocation 10
2.6
Chemical products 10
3
Inspection, care and maintenance 11
3.1
The Health and Safety Law 11
Annual control 11
Self-inspection 11
Damages 11
What to do in the event of damage 11
Repair 11
3.2
Transport 12
3.3
Maintenance 12
3.4
Storage 12
4
Componants 13
Alle rechten voorbehouden.
Niets uit deze uitgave mag worden verveelvoudigd, opgeslagen in een database of openbaar gemaakt, in enige vorm of op enige wijze, hetzij elektronisch,
mechanisch, opnamen, of enig andere manier, zonder voorafgaande toestemming van ASCGroup.
4
1Overview
1.1
Application
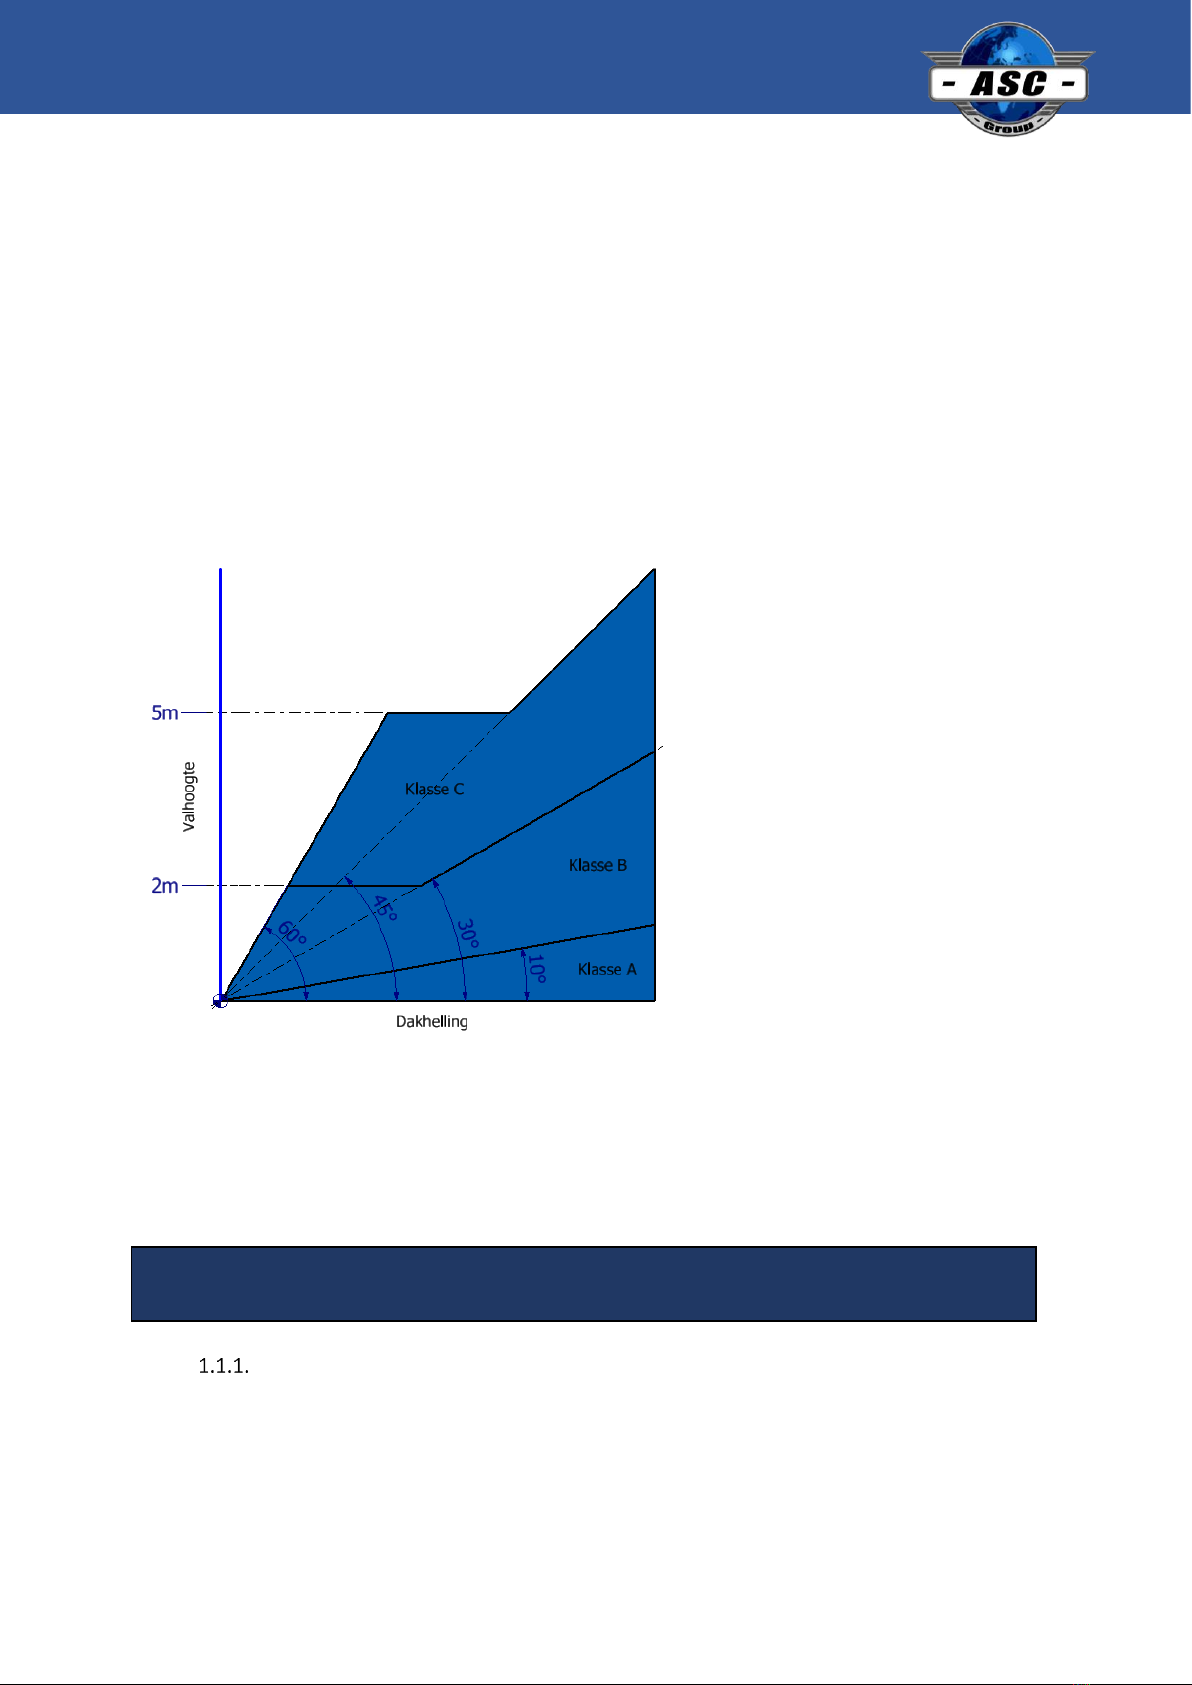
A roof edge protection is a structure with handrails to prevent accidents at height.
The roof edge protection may be placed if:
−The roof slope is no greater than 60°.
−The fall height is not higher than 5 m
−The subsoil can bear the forces (see 1.1.1)
For roofs higher than 5 m, the roof pitch limit is 45° degrees. For class C, however, it is mandatory to
also install the roof bracket and secure it to the roof boarding.
These conditions are adopted and tested according to NEN-EN 13374. The nets comply with EN 1263-
1 and with assembly they are brought to the correct tension.
ASC Group roof edge protection is not intended for leaning against, sitting on or replacing a
permanent balustrade. If in doubt, always consult your supplier or the manufacturer; contact
information can be found at the front of this document.
Forces
From the standard, the following loadings follow: The vertical force includes its own weight.
A roof edge protection should be constructed by secured persons.
Alle rechten voorbehouden.
Niets uit deze uitgave mag worden verveelvoudigd, opgeslagen in een database of openbaar gemaakt, in enige vorm of op enige wijze, hetzij elektronisch,
mechanisch, opnamen, of enig andere manier, zonder voorafgaande toestemming van ASCGroup.
5
Table 1
*= Maximum possible calculated force.
Static Load[kN]
Class
Fh1
Fh2
Fv
A+B*
0,8
2,4
1,8
Roof
Inclination
Dynamic Load[kN]
B 10°
5,5
3,9
0.5
B 30°
5,3
3,8
1.4
B 45°
4,7
3.4
2.8
B 60°
3,8
2,8
3,9
C 30-60°
6,1
4,1
4,3
Fh1
Fv
Roofinclination

Alle rechten voorbehouden.
Niets uit deze uitgave mag worden verveelvoudigd, opgeslagen in een database of openbaar gemaakt, in enige vorm of op enige wijze, hetzij elektronisch,
mechanisch, opnamen, of enig andere manier, zonder voorafgaande toestemming van ASCGroup.
6
1.2
List of components
➢Example set 10meter
Amount
Discription
EAN-Code
5
Roof edge protection - Pitched roof post
8719998993103
2
Roof edge protection - Frame 3m
8719998993080
2
Roof edge protection - Frame 2m
8719998993097
2
Roof edge protection –Safetynet with integrated toe board 3m
8719998993066
2
Roof edge protection –Safetynet with integrated toe board 3m
8719998993073
Nr.
Components
1
Post
2
Standard post
3
Wall bracket Horizontal
4
Wall bracket Vertical
5
Netframe
6
Tube 3 meter
7
Tube 2 meter
8
Net 3 meter

Alle rechten voorbehouden.
Niets uit deze uitgave mag worden verveelvoudigd, opgeslagen in een database of openbaar gemaakt, in enige vorm of op enige wijze, hetzij elektronisch,
mechanisch, opnamen, of enig andere manier, zonder voorafgaande toestemming van ASCGroup.
7
2Assembly and use
2.1
Positioning
Sureface
Always place the roof edge protection on a stable surface. Make sure that the
longitudinal inclination of the roof is no more than 2 degrees. For class B and C,
we recommend also installing the roof edge bracket.
Make sure that the foot plate that leans against the wall always has its entire
surface against the wall.
Gutter
The gutter is large enough that the upright can be stable in it. A plastic gutter is not strong
enough. All other gutters will have to be tested with the forces indicated in Table 1. In principle
all zinc gutters should be able to do the job if they are properly supported.
Roof egde
Make sure the roof edge against which the roof edge protection stands is
sufficiently strong and high enough so that the roof edge protection cannot
slide over the edge or break the roof edge.
Obstacles
Position the roof edge protection in such a way that no danger can arise when working. Make sure
that no tripping hazards can arise from obstacles on the roof.
Maximum height
There is a maximum height of 20 m for placement.
Weather conditions
Consult the weather report to determine safety in various weather conditions. Consider the following
conditions and use common sense.
Wind force
Precipitation
Remove snow and ice from the roof and eave protection before working. If necessary, sprinkle sand
on the roof to prevent slippage.
Cold
Do not use the roof edge protection at ambient temperatures below freezing.
At wind force 5 or higher, a roof edge protection device may not be used.
Alle rechten voorbehouden.
Niets uit deze uitgave mag worden verveelvoudigd, opgeslagen in een database of openbaar gemaakt, in enige vorm of op enige wijze, hetzij elektronisch,
mechanisch, opnamen, of enig andere manier, zonder voorafgaande toestemming van ASCGroup.
8
2.2
Personal protective equipment
Always wear work gloves, safety shoes and safety helmet.
2.3
Assembly
Aluminum roof edge protection devices may only be constructed by competent persons. According
to regulations, each person assembling the roof edge protection must be secured with a fall arrest
line.
For checking for damage: see chapter 3.
No tools are required when assembling a roof edge protection. Roof edge protection devices are
not designed to be lifted or hung as a whole.
2.4
Assembly Instructions
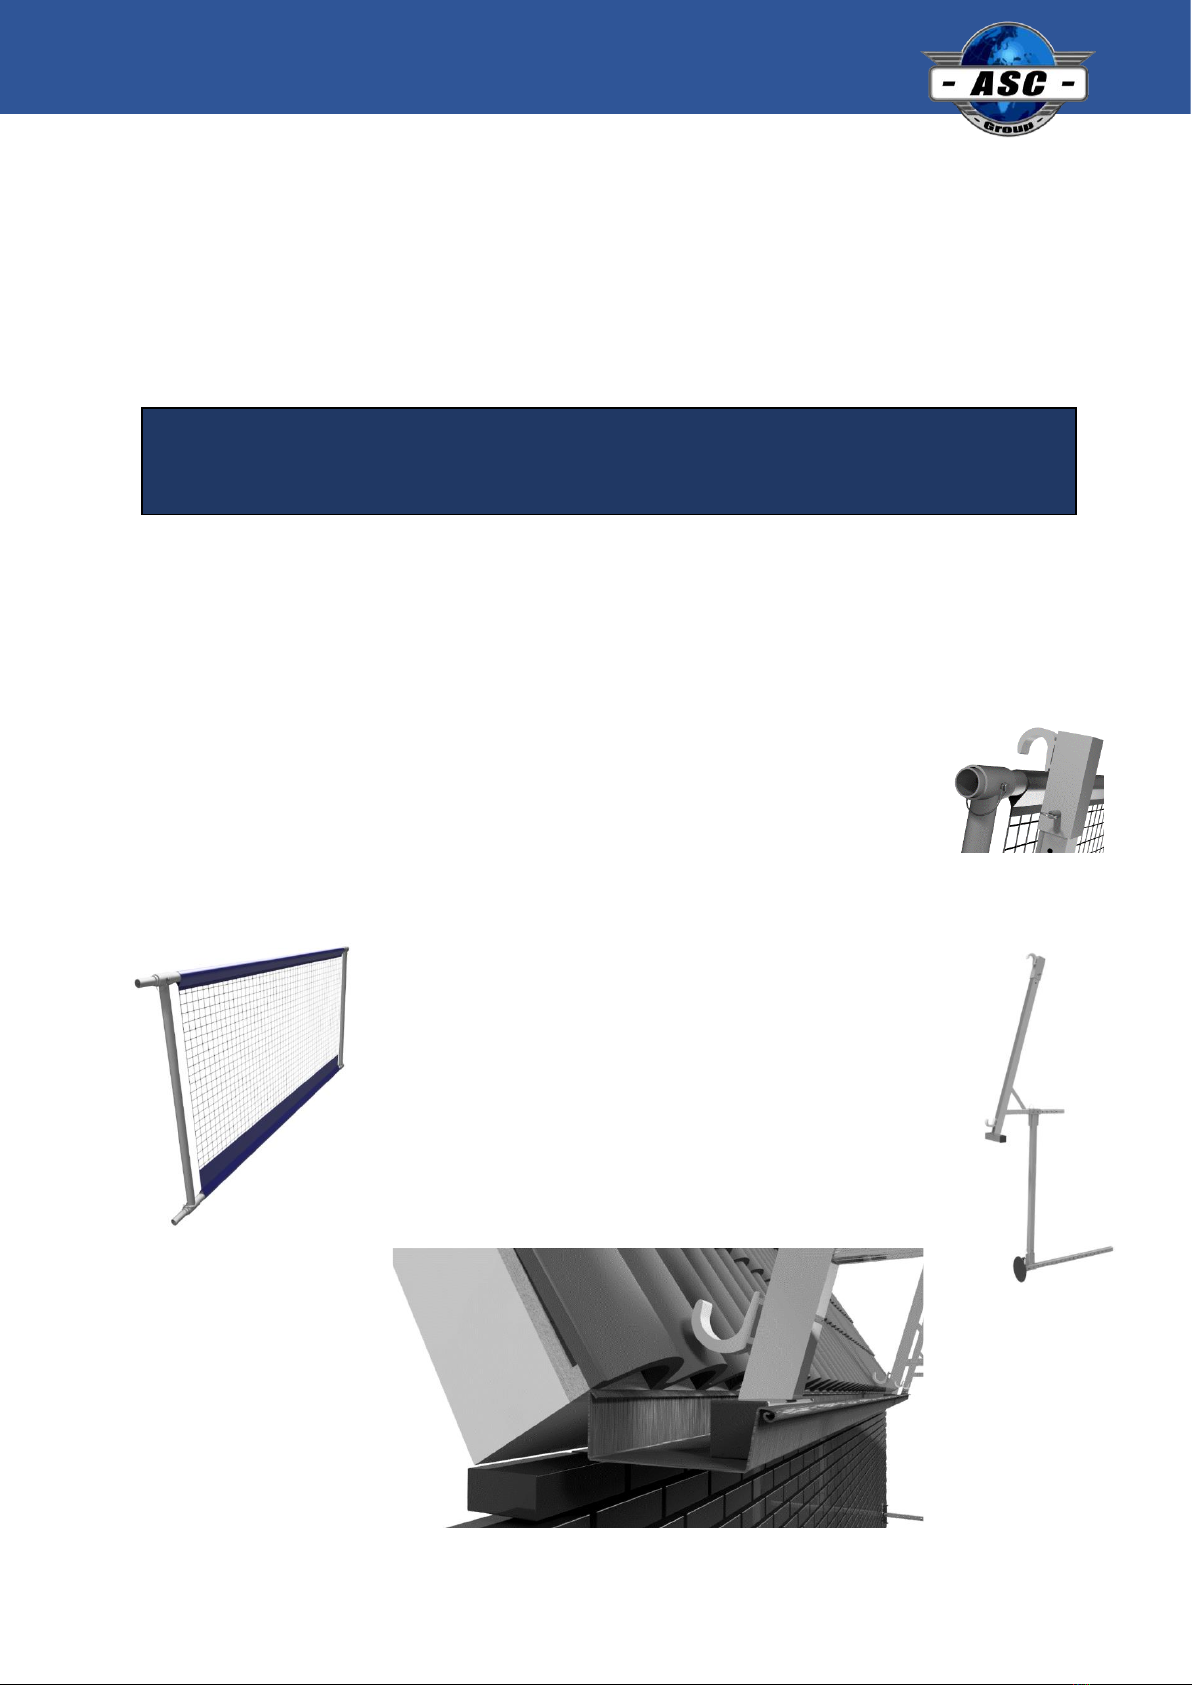
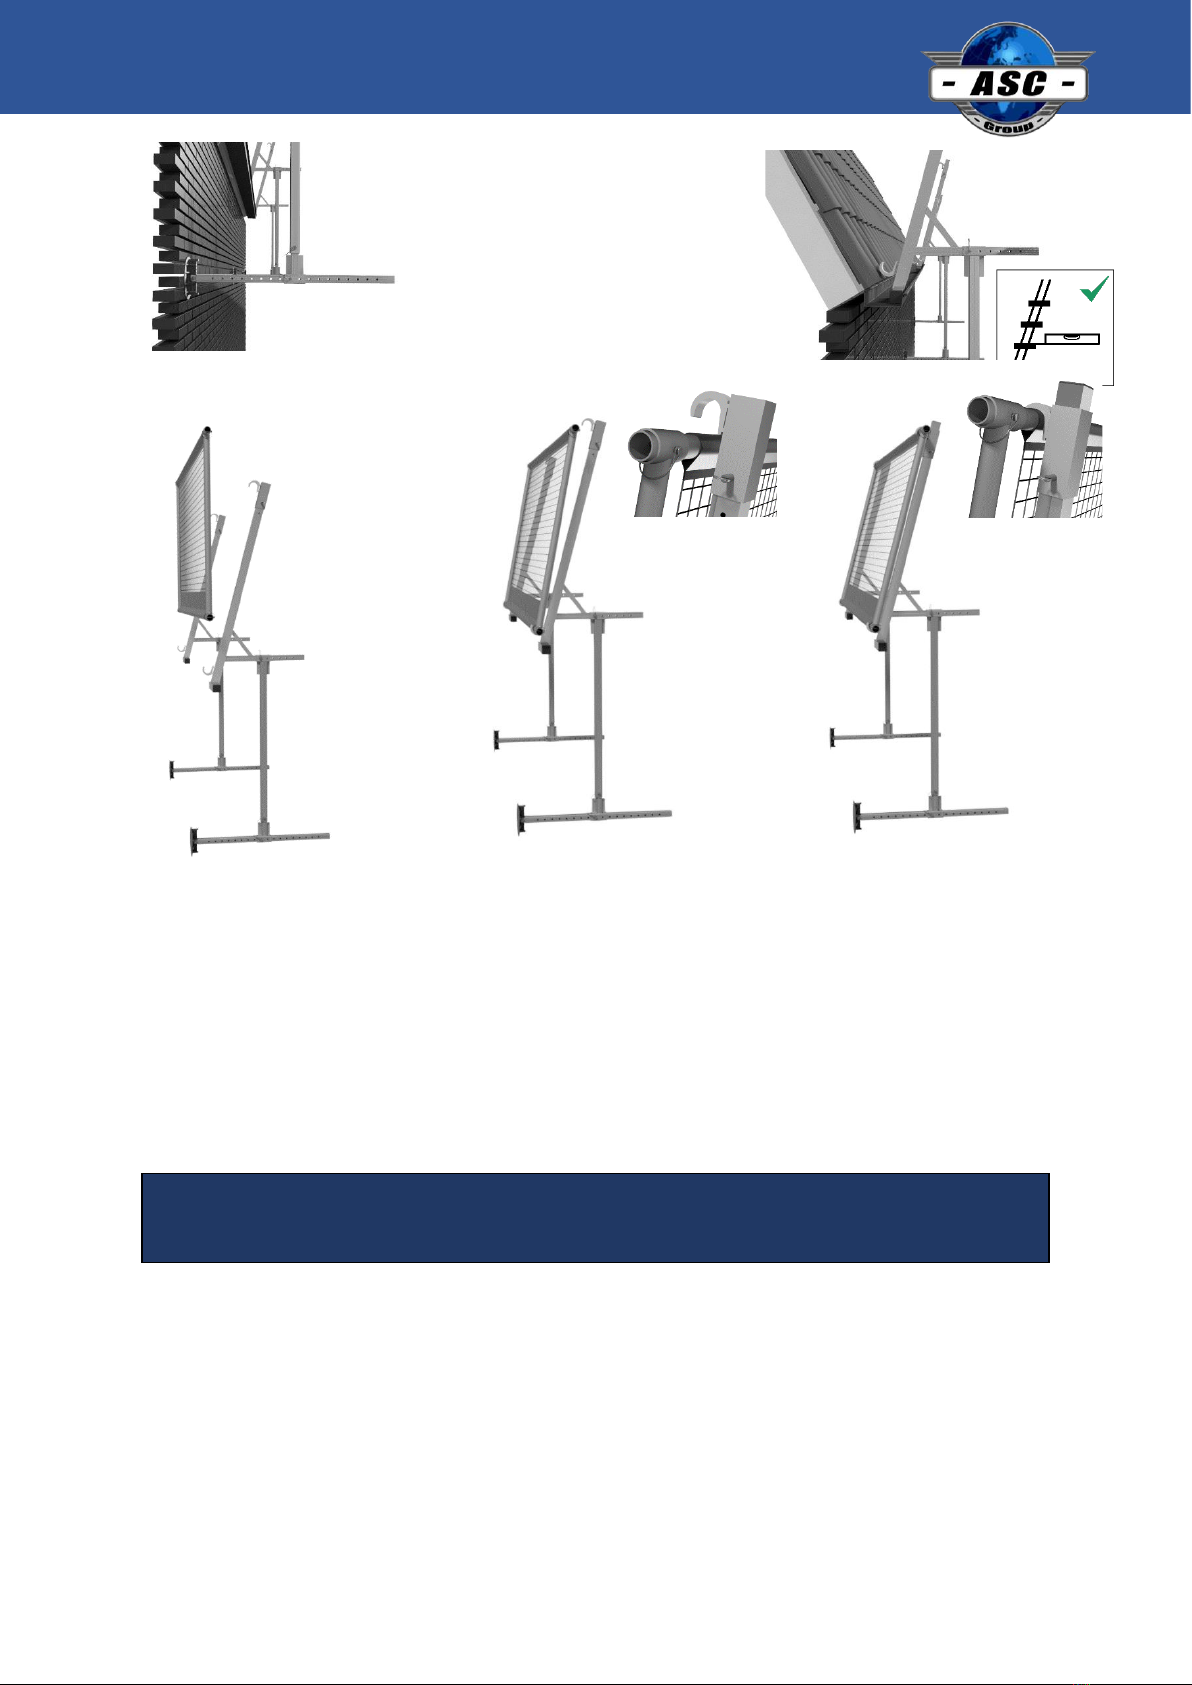
1. Prepare the gutter post for use (see picture on the right).
2. Pull out the locking bolt and slide the clamp cap up about 7.5 cm.
3. Measure the width of the gutter.
4. The distance between the post and the slide bar is approximately the width of
the gutter.
5. Slide the lower stabilizer all the way back until the wall plate falls against the
slide rod.
6. Prepare the net frame for use (see picture on the left)
7. Slide the two tubes into the net with the coupling pins
to 1 side. Make sure there is a piece of tube left at
both ends.
8. Slide the net frames over the tubes on both sides and
secure with 4 locking clips.
9. Place the gutter post in the gutter with the base
placed as close to the roof as possible.
Using the component list, check that all the parts required for the required for
the assembly are present and undamaged. Damaged parts may not be used.
Alle rechten voorbehouden.
Niets uit deze uitgave mag worden verveelvoudigd, opgeslagen in een database of openbaar gemaakt, in enige vorm of op enige wijze, hetzij elektronisch,
mechanisch, opnamen, of enig andere manier, zonder voorafgaande toestemming van ASCGroup.
9
10. Adjust the stabilizer bar to
the correct distance and
secure it again with two
locking pins. This stabilizer
bar must sit horizontally.
11. Place the next post about
2.5 meters further on.
12. Insert the net frame into the lower hook.
When doing so, make sure the flap is on the roof side.
13. Place the net against the post and press the clamp cap with the hook around the top tube.
Make sure the blocking bolt shoots back into the hole.
14. If you want to attach more lengths of net, repeat steps 1 through 13 until you have enough
nets. You only need to add 1 extra upright per net.
15. Connect the tubes by sliding them over the pins and securing them with the locking clip.
Please note that there should never be more than
3 meters between the uprights.
In doubt? Use an additional upright.

Alle rechten voorbehouden.
Niets uit deze uitgave mag worden verveelvoudigd, opgeslagen in een database of openbaar gemaakt, in enige vorm of op enige wijze, hetzij elektronisch,
mechanisch, opnamen, of enig andere manier, zonder voorafgaande toestemming van ASCGroup.
10
2.5
Use
Veilig gebruik
The roof edge protection is not intended for leaning against or sitting on.
After a fall into the net
After the fall protection has done its job, i.e. after every fall into the net, the fall protection must be
inspected again by a certified body.
Edge board
The toe board is incorporated into the net.
Security
After a job, never leave the roof edge unattended.
Relocation
A roof edge protection is movable per section. A section consists of 2 uprights and a net.
Please note:
•Move the roof edge protection preferably with two persons.
•Make sure that you are secured against falling at the edge of the roof.
•Make sure that the roof edge protection cannot touch overhanging cables or other objects.
2.6
Chemical products
Before use, check that:
•All parts are still present
•All parts are still properly attached
•All parts are free of large dents and/or cracks
•There are any changes in the environment that may affect safe use
•All locking clips are correctly in place and the couplings are closed
•The net is free of tears and/or fraying.
Avoid contact with acids and chemical products. These can cause corrosion to
the aluminium, which can affect the strength of the aluminium.
Do not attach a winch, hoist or rope to the roof edge protection.
Never use an eaves guard near
non-insulated, electrical installations or machinery.

Alle rechten voorbehouden.
Niets uit deze uitgave mag worden verveelvoudigd, opgeslagen in een database of openbaar gemaakt, in enige vorm of op enige wijze, hetzij elektronisch,
mechanisch, opnamen, of enig andere manier, zonder voorafgaande toestemming van ASCGroup.
11
3Inspection, care and maintenance
Occupational health and safety law states that you must work safely at heights.
3.1
The Health and Safety Law
The Working Conditions Decree is a concrete elaboration of the Safe Working at Height Act. It states
that everything above 2.50 meters is 'working at height' and is therefore a situation with increased
risk of injury. This also means that all materials must be properly manufactured and checked in a
quality cycle. ASC Group tests all materials and performs strength calculations. The user must also
have the material inspected annually for defects. In addition, an RI&E must be conducted for each
project. It should determine whether this form of roof edge protection is suitable for the intended
use.
Annual control
Make sure all your roof edge protection devices are inspected annually by an approved inspector.
ASC Group can perform this inspection for you. In the net, in accordance with 1263-1, there are extra
pieces of net. These pieces of netting are intended to remain attached and should be checked every
year by a competent person. After four years, the net must be replaced.
Self-inspection
You can also inspect your ASC roof edge protection devices yourself. Before each use, you should at
least check the parts for damage (see section 2.5). We definitely recommend larger companies to do
a monthly inspection of all components and to record this inspection. If you are in doubt about any
damage, consult an authorized inspector.
Damages
Examples of the most common damages in aluminum roof edge protection:
•Loose parts: if a welded part is loose, the protection is rejected.
•Dents and/or holes: if there is a large dent in the aluminum or even a crack or hole in it, the
protection is rejected.
•Contamination: If there is too much concrete, paint or other non-removable contamination
on the parts, the security is rejected. You can no longer judge whether the parts are still in
one piece.
What to do in the event of damage
If you find any damage and you feel it is not repairable, you should discard the part and replace it. If
a repair is possible, contact ASC Group for further information.
Repair
Repairing a component must be carried out by a certified body or person.

Alle rechten voorbehouden.
Niets uit deze uitgave mag worden verveelvoudigd, opgeslagen in een database of openbaar gemaakt, in enige vorm of op enige wijze, hetzij elektronisch,
mechanisch, opnamen, of enig andere manier, zonder voorafgaande toestemming van ASCGroup.
12
3.2
Transport
•Always transport parts in accordance with legislation.
•Stack the parts correctly when transporting; never put heavier parts on top of the stack.
•Never place (sharp) objects in the net and do not use the net as a lashing strap to secure
other materials.
•Preferably transport parts standing up by securing them to the wall.
•Handle the material with care. Do not drop parts on a hard surface; this may reduce the
quality of the material.
3.3
Maintenance
•Make sure the material is clean, especially the connecting pins. The tubes should go in and
out of each other easily.
•Replace missing and broken parts in a timely manner.
3.4
Storage
Store components of the scaffolding preferably in a dry, clean, dark and frost-free place.
Alle rechten voorbehouden.
Niets uit deze uitgave mag worden verveelvoudigd, opgeslagen in een database of openbaar gemaakt, in enige vorm of op enige wijze, hetzij elektronisch,
mechanisch, opnamen, of enig andere manier, zonder voorafgaande toestemming van ASCGroup.
13
4Componants
Post 4,5 Kg
Hanger 1 4,2 Kg
Hanger 1 1.9 Kg
Netframe
Weight
Net
Frame
3000
2,1
11,5
Kg
2000
1.4
8,0
Kg
Table of contents
Popular Home Safety Product manuals by other brands

AOSafety
AOSafety Eye Gear Lexa Specifications

AOSafety
AOSafety Nassau Rave ANSI Z87.1 Specifications

Jippie's
Jippie's 836339 Instructions for use
CareTech
CareTech Grace+ Service manual / technical handbook

Honeywell Home
Honeywell Home PROSiSHOCK Installation and setup guide

AJAX Systems
AJAX Systems HomeSiren quick start guide


