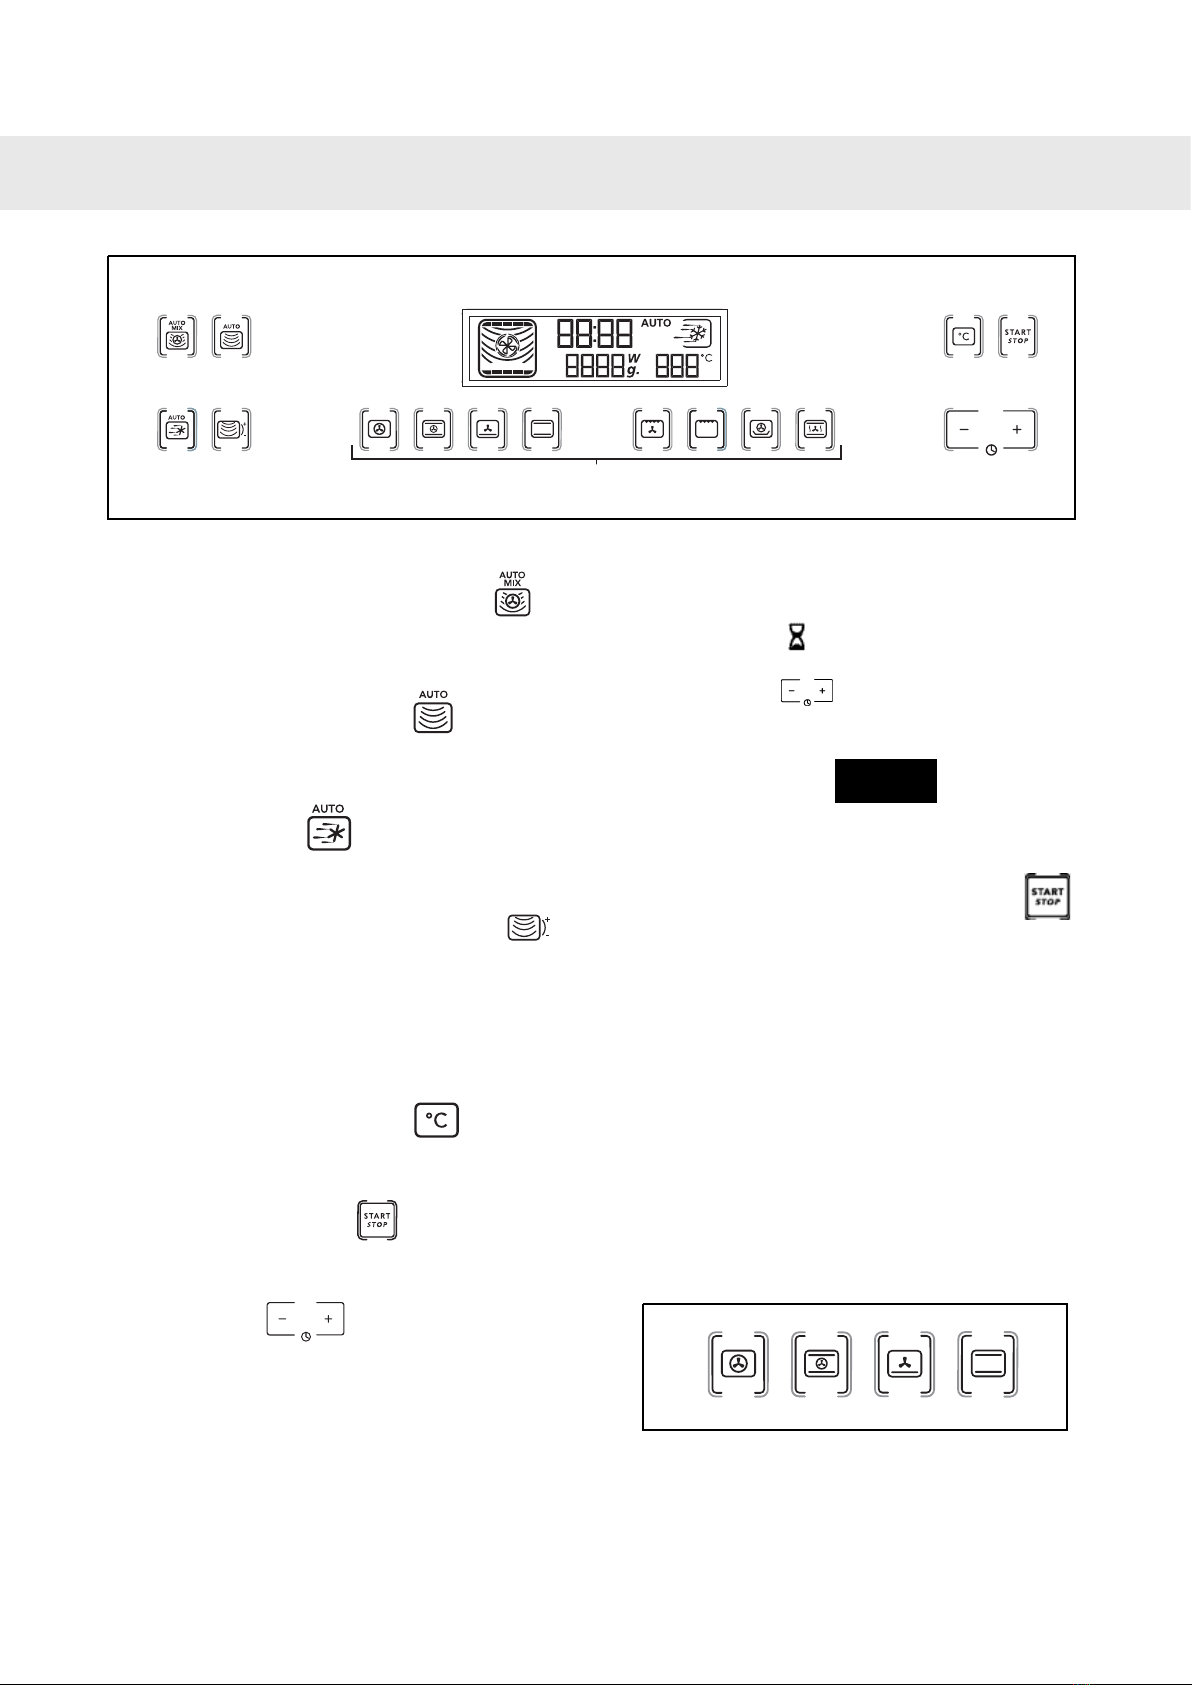
Asco OC8431 User manual

O
p
eratin
g
instructions OC843
1

Dear customer,
Thank you for choosing this quality product from ASKO.
We hope it will meet all of your expectations and full fill your
needs for many years to come.
The Scandinavian design is a combination of clean lines,
everyday functionality and high quality. This is the hallmarks
for all of our products and this is why they are so highly
appreciated all over the world.
To get the most out of your new ASKO product, we
recommend that you read the installation and operating
instructions before using the machine.
Guide to installation
and use
Combi-Polyfour Oven
OC84311

3
Important information for the
user
3Safety instructions
3Operating principle
4Their behaviour:
4Protecting the environment
5Installing your appliance
5Before hook-up
6Location
7Description of Your Appliance
7The Appliance
7Accessories
9The timer
9Traditional functions
10Combined Microwave Functions
11The display
12Using Your Appliance
12Setting and adjusting the time
12Demo mode
13Programming
14The microwave function
15Express microwave programming
16Automatic cooking
19Defrosting
20The DEFROST function
21Defrosting guide
23Automatic microwave cooking
23
Automatic microwave cooking
guide
24Cooking in traditional mode
24Heat circulation function
28
Caring for and cleaning your
oven
29Troubleshooting
30Customer Service
30Customer Service
30Original Parts
31Functional suitability tests
2
Contents

WARNING!
Keep this user guide with your appliance. If the
appliance is ever sold or transferred to another
person, ensure that the new owner receives this
user guide. Please read these guidelines before
installing and using your appliance. They were
written for your safety and the safety of others.
Safety instructions
Children must be supervised to prevent Your
appliance is designed for standard them from
playing with the appliance. household use for
cooking, reheating and Never allow children to
use the microwave defrosting foods. The
manufacturer unsupervised, unless appropriate
declines any responsibility in the case of
instructions have been given so that the
inappropriate use.
This appliance is not intended for use by persons
(including children) with impaired physical,
sensory or mental capacities, or by inexperienced
or untrained persons, except if they have been
instructed in its operation by a person responsible
for their safety.
Ensure that the cookware is suitable for use in a
microwave oven. Do not leave any accessories
in your oven when it is switched off. To avoid
damaging your appliance, never operate it while
empty or the turntable.
Do not interfere with the orifices on the lock on
the front of the appliance; this could cause
damage to your appliance that would require a
service call. The seal and frame of the door must
be regularly examined to ensure that they have
not become damaged. If these areas are
damaged, discontinue use of the appliance and
have a specialised technician check it.
When heating food items in plastic or paper
containers, monitor the microwave’s contents due
to the risk of combustion.
For the microwave and microwave + circular
heating functions, the use of metallic cookware,
forks, spoons, knives or metal staples or fasteners
for frozen foods is not recommended.
The contents of baby bottles and baby food jars
should be shaken or stirred and their temperature
checked before consumption to avoid burns.
Never heat a baby bottle with the nipple on (risk
of explosion).
Children must be supervised to prevent them from
playing with the appliance. Never allow children
to use the microwave unsupervised, unless
appropriate instructions have been given so that
the child can use the oven safely and understands
the dangers of incorrect operation.
Always use oven gloves to remove dishes from
the oven. Some dishes absorb the heat from food
and are therefore very hot.
Liquids and other foods should not be heated in
sealed containers because they may explode. It
is recommended that you avoid heating eggs in
their shells and whole hard-boiled eggs in the
microwave oven because they run the risk of
explosion, even after cooking is complete.
Heating beverages in the microwave oven can
cause sudden and/or delayed splattering of boiling
liquid, so precautions must be taken when
handling their containers.
In the case of small quantities (a sausage,
croissant, etc.) place a glass of water next to the
food. Excessive cooking times may dry out foods
and burn them. To avoid such incidents, never
use the same times recommended for cooking in
a traditional oven.
If smoke appears, stop or unplug the oven and
leave the door closed to smother any flames that
may appear.
Operating principle
The microwaves used for cooking are
electromagnetic waves. They are commonly found
in our environment in the form of radio waves,
light and infrared rays. Their frequency is in the
2,450 MHz range.
3
Important information for the user

Their behaviour:
•They are reflected by metals.
•They travel through all other materials.
•They are absorbed by water, fat, and sugar
molecules.
When food is exposed to microwaves its
molecules begin moving rapidly, causing it to heat
up.
The penetration depth of waves into the food is
approximately 2,5 cm; if the food is thicker, the
centre of the food will be cooked by conduction,
as in conventional cooking. Note that microwaves
cause a simple thermal phenomenon within food
and are not harmful to health.
Protecting the environment
This appliance’s packing materials are recyclable.
Please recycle the packaging and help protect
the environment by placing it in the recycling bins
provided by your local council.
Your appliance also contains various
recyclable materials. It therefore carries this logo
to indicate that used appliances should not be
disposed of with other waste. The manufacturer
will arrange for the appliance to be recycled
properly, in accordance with European directive
2002/96/EC on Waste Electrical and Electronic
Equipment. Contact your local council or your
retailer to find out details of your closest used
appliance collection point. We thank you for your
help in protecting the environment.
4
Important information for the user

Before hook-up
WARNING!
Ensure that your appliance has not been
damaged during transport (broken seal or door,
etc.). If you notice any kind of damage, contact
your retailer before using the appliance. In order
to easily locate the make, model number, etc. of
your appliance, we recommend that you note
this information on the “Customer Service” page.
Electrical connections
Ensure that:
•The electrical installation has sufficient voltage.
•The electrical wires are in good condition.
•The diameter of the wires complies with the
installation requirements.
•Your electrical installation is equipped with
16-ampere thermal-sensitive protection.
In case of doubt, consult your electricianinstaller.
Electrical connections should be completed
before the appliance is placed in the wall unit.
The appliance must be recess-fitted correctly to
ensure electrical safety. During recess fitting and
maintenance operations, the appliance must be
unplugged from the socket; fuses must be cut off
or removed.
The oven must be connected with a
(standardised) power cable with three 1.5 mm2
conductors (1 ph +1 N + ground) that must be
connected to a monophase 220-240 V network
via a IEC 60083 standardised receptacle (1 ph
+1 N + ground lead) or in accordance with
installation rules.
The safety wire (green-yellow) is connected to
the appliance’s terminal and must be
connected to the installation ground.
In the case of connections with an electric
receptacle, it must remain accessible after
installation of the appliance.
The oven’s neutral (blue wire) must be connected
to the network’s neutral. In the electrical
connection, ensure there is a means available to
the user to ensure they are able to disconnect the
appliance from the outlet, either by pulling the
plug from the outlet or by turning off a switch, in
compliance with installation rules.
If the power cable is damaged, it should be
replaced by the manufacturer, its aftersales
service department or by a qualified person to
avoid danger.
WARNING!
We cannot be held responsible for any accident
resulting from a non-existent, defective or
incorrect earth lead.
If the oven malfunctions in any way, unplug the
appliance or remove the fuse corresponding to
the sector where the oven is hooked up.
It is dangerous for anyone other than a qualified
person to perform maintenance or repair that
requires the removal of the cover providing
protection against exposure to microwave power.
5
Installing your appliance

Location
The oven may be installed either under a worktop
or in a column of cabinetry (open or closed) that
has the appropriate dimensions for built-in
installation.
Do not use your appliance immediately (wait
approximately 1 to 2 hours) after having
moved it from a cold location to a hot location
because the condensation may cause a
malfunction.
6
Installing your appliance

The Appliance
4
3
2
1
Lamp3Control slot1
Wire shelf supports4Programmer2
Accessories
Your appliance is equipped with a flat grid and a
glass dish.
The grill
The grill should never be used with other metal
cookware when using the microwave function.
However, you can heat food in an aluminium tray
providing it is separated from the shelf by a plate.
Glass drip tray:
It can also be used half-full of water for
double-boiler cooking methods using the
circulating heat function. It can be used as a
cooking dish.
NOTE!
Take care to place the drip tray in the centre of
the side grills to avoid modifying the circulation
of air.
7
Description of Your Appliance

Rack + glass drip tray
To roast and retain the cooking juices, place the
rack on the drip tray.
The side grills
2 two shelf supports for attaching allow you to use
the grid at three heights.
Three insertion heights are available for different
types of cooking and food. For the
Grill or Grill + Microwave functions you use
the rack at placement level
1
for thick foods
such as roasts and at placement level
3
for
thinner foods such as chops or sausages.
For the circular heating or microwave + circular
heating function you place the rack at level
1
or
2
depending on preparation.
8
Description of Your Appliance

12
3 4 5
67
89
Combination button microwave
9 programmes
1
Auto button microwave
3 programmes
2
The defrost
frost.
buttons buttons are
used to defrost. 3 programmes
3
The adjustable microwave power
djustab
button is used to set the power of the
microwaves in 100W increments.
4
The traditional function buttons are used
to run one of the cooking functions.
5
Temperature button for changing
the temperature for traditional functions.
6
Setting the timer
er
program
or stops an ex-
press, timer programme mode.
7
Buttons that regulate cooking
duration for the timer, cooking temperat-
ure by microwave power and weight.
8-9
The timer
You can also program the “TIMER” function on
your microwave oven.
1Press the button.
Press the buttons to adjust the
programme time, e.g. 10 minutes.
10 minutes.
10:00
2Confirm by pressing START/STOP
The
stop a programme or timer.
.
3The countdown of the entered time begins.
Three beeps are sounded to announce the
end of the programme. To cancel the timer
during the countdown, set the timer back to
0 by pressing the + / - buttons.
Traditional functions
1 2 3 4
CIRCULATING HEAT1
TRAD FAN2
9
Description of Your Appliance

BASE FAN3
TRADITIONAL4
5 6 7 8
GRILL WITH FAN5
HIGH GRILL6
KEEPING THINGS WARM7
DEFROSTING8
Combined Microwave Functions
1 2
3 4
COMBINED MICROWAVES
9 PROGRAMMES
1
AUTO MICROWAVE
3 PROGRAMMES
2
DEFROST
3 PROGRAMMES
3
100W to 1000W MICROWAVES4
10
Description of Your Appliance

The display
The display guides you through programming the various settings: Time, programme time, microwave
power (Watts), weight of food (grams), stopping the turntable, automatic programs.
1 2 3 4
6
5
COOKING ANIMATION depending on the
selected function
1000W MICROWAVE TRADITIONAL
MODES
1
TIME/PROGRAMMING TIME/TIMER2
AUTOMATIC PROGRAM3
DEFROST4
MICROWAVE POWER/WEIGHT OF
FOOD/CHILD SAFETY
5
TEMPERATURES/ PROGRAMMES6
Child safety
You can set the “CHILD SAFETY” function to
prevent unauthorised use of your microwave oven.
Open the door and press the START/STOP
The
stop a programme or timer.
button for five seconds, until the key symbol
appears in the display.
key symbol appears in the display.
Two beeps are sounded to confirm that your
microwave oven is temporarily locked. No
programmes are then available.
To cancel, follow the same procedure.
Press and hold the START/STOP
The
stop a programme or timer.
button
for five seconds with the door open. The key
symbol disappears and the clock is displayed.
Two beeps sound to confirm the procedure.
11
Description of Your Appliance

Setting and adjusting the time
After connecting your appliance or after a
prolonged power outage, “12:00” will flash in the
display
1 2 : 0 0
To set the time on the clock
1Press the
6:30.
buttons to set the time,
e.g 6:30.
2
0 6 : 3 0
1
2Confirm by pressing
A beep sounds to confirm that the time has
been set.
To change the time
1Press the
time
buttons for five seconds.
The time display flashes.
2
0 6 : 3 0
1
2Set the new time (such as 7:30), by
simultaneously pressing the
by simult
buttons.
3
0 7 : 3 0
2
3Confirm by pressing button.
A beep sounds to confirm that the new time
has been set.
Comments
If you do not press the
The
stop a programme or timer.
button, the time
adjustment is cancelled.
Demo mode
•Access demo mode by: set the clocktime to
0:00.
•Confirm clocktime 0:00 by pressing Start/Stop.
•Maintain Start/Stop and + pressed until "Demo
on" is displayed.
•Exit Demo: Repeat the instruction. "DEMO
OFF" is displayed.
12
Using Your Appliance

Programming
Your appliance is now hooked up and the correct
time is set.
Open the door using the handle. Place food
inside, then close the door.
If the door is not closed properly, the appliance
will not work.
Opening the door during operation does not
cancel the current programme but simply pauses
it. To restart the oven, close the door and press
the START/STOP
en, clo
button.
0 6 : 3 0
If programming is not followed by any action after
one minute, three beeps are sounded to invite
you to start or modify the programme.
If you do not give any instructions, after one
minute the settings are cancelled and you will
have to reprogram.
Press the START/STOP
en, clo
button when the
door is closed to interrupt the programme.
To cancel a programme, press and hold the
START/STOP
en, clo
button for 2 seconds with
the door closed.
Three beeps sound to signal the end of each
programme and the time appears again in the
display.
0 6 : 3 0
If the door is left open, the light turns off after 3
minutes.
To remove moisture, your appliance has a
delayed fan function. The oven’s ventilation
continues to function after the end of the
programme. It will stop automatically.
13
Using Your Appliance

The microwave function
1000W Direct programming
1Press the
e
functi
button.
Turn the function selector to choose the
maximum power micro-wave function.
The corresponding display lights up.
1000W appears in the display.
flashing in the
1 0 0 0 w
The clock’s digits start
flashing in the display.
Press the
2
0 0 : 0 0
2Press the
ramme tim
buttons to adjust the
programme time, e.g. 10 minutes.
2
1 0 : 0 0
3Confirm by pressing START/STOP
.
.
The oven lights up and the programme
starts.
Programming by power level
1Press the
by pow
button to choose the
variable power microwave function.
The maximum power level (1000 W) flashes
on the display.
on
1 0 0 0 w
2Press the
he mic
buttons in order to reduce
the microwave's power, e.g. to 500 W.
3
2
5 0 0 w
3The clock's digits start flashing in the
display.
4
3
0 0 : 0 0
4Press the
time, e.g. 1
buttons to adjust the
programme time, e.g. 10 minutes.
5
1 0 : 0 0
5Confirm by pressing START/STOP
Con
.
prog
.
The oven lights up and the programme
starts.
Comments
If the door is opened during cooking, the oven
stops and the remaining time flashes in the
display. To continue the programme, simply close
the door and press START/STOP
the do
P
.
The duration can be adjusted at any time by
simply pressing the
e adjusted
buttons.
14
Using Your Appliance

Express microwave programming
Express programming
1Make sure your oven is off.
2Press START/STOP
The
stop a programme or timer.
for 1 second to
set an express 15 second programme.
The microwave operates at its maximum power
level (1000 W). The oven lights up and the
programme starts.
You can enter an express programme lasting up
to 2 min 30 sec.
lasting up to 2 min 30 sec.
0 0 : 1 5
Each time you press START/STOP
The
stop a programme or timer.
adds
15 seconds to the programme, up to one minute.
After that, each time it is pressed adds 30 seconds
until the maximum time of 2 min 30 sec is reached.
Comments:
After starting the programme, you can modify its
duration by pressing the buttons for up to 2 min
30 sec.
0 2 : 3 0
Heating on 2 levels
When using the 500W microwave power function,
you can reheat two dishes at the same time.
Recommendations
Cover the plates with plastic microwave food wrap
or with an upside-down plate. The times indicated
below apply if you are heating refrigerated food
or food stored at room temperature.
TimeQuantityFood
4 – 6 minTwo 200 g
plates
Foods with an even
texture (purée, peas,
celery, etc.)
4 – 6 minTwo 300 g
plates
Foods with an uneven
texture, such as cas-
soulet, stews, ravioli
etc.
Heat and hold
If you leave your dish in the oven at the end of a
microwave programme without opening the door,
a function called "heat and hold" starts after 2
minutes to keep your dish warm. Three beeps are
sounded after 15 minutes to announce the end of
the “heat and hold” programme.
15
Using Your Appliance

Automatic cooking
Using the automatic cooking function, the cooking
mode and duration are automatically programmed
based on the type of food and the weight. 9
automatic cooking positions are available using
button
PORK, VEAL, TURKEY A1
BEEF A2
POULTRY A3
READY-MADE MEALS A4
FROZEN READY-MADE MEALS A5
PIZZA A6
FROZEN PIZZA A7
FRESH QUICHE A8
FRESH TART A9
Programming automatic cooking time
based on food weight
1Select the AUTO cook function of your
choice, for example:
A2 Beef
2The corresponding display lights up.
500 g flashes in the display.
5 0 0 9
3Press the
ht, e.g. 55
buttons to adjust the
weight, e.g. 550 g.
5 5 0 9
Confirm by pressing START/STOP
P .
.
The required programme time is calculated
automatically, e.g 15 min 35 secs.
The time is shown in the display.
1 5 : 3 5
The programme begins.
16
Using Your Appliance

Guide to automatic functions
A1> Pork, Veal, Turkey (500 g to 2000 g)
A2>Beef
This function is used to cook and brown roasts
weighing between 500 g and 2000 g . Cooking is
carried out through a combination of the
microwave + circulating heat and microwave.
Use a heat-resistant, microwave-safe dish,
preferably earthenware (fewer splashes than with
a glass dish). If possible, cook roasts without fatty
outer layers to prevent smoke and spatters of fat.
You will get the best results with roasts that are
not very thick.
Remove meat from the refrigerator and let it come
to room temperature for one hour before putting
it in the oven.
Place the dish on the rack placed at level 2.
After cooking, wrap the roast in aluminium foil and
leave it to rest for 10 minutes
The roast will be juicier.
A3>Poultry
This function allows you to cook and brown a
whole chicken or chicken pieces (legs) weighing
between 500 g and 2000 g .
Cooking is done using a combination of
microwave + circulating heat or grill modes.
Use a heat-resistant, microwave-safe dish,
preferably earthenware (fewer splashes than with
a glass dish). Chicken legs may be placed directly
on the glass drip tray. Before cooking, pierce the
skin to avoid spitting.
Add oil, salt and pepper to the poultry and sprinkle
with spices, if desired.
Whole chicken: Place the dish on the rack at the
level 1.
Chicken thighs: up to 900 g , place the dish on
the rack at level 2.
Once cooked, leave the chicken in the oven for
five minutes before serving.
A4>Ready-made meals (500 g to 2000 g)
A5>Frozen ready-made meals
This function allows you to reheat refrigerated
ready-made meals (lasagna, potatoes au gratin,
cottage pie, fish gratin, etc.) weighing 250 g to
1000 g.
The dishes are reheated using the microwave +
grill function.
Remove the product from its packaging and place
in a suitably-sized, heat-resistant, microwave-safe
dish. For better results, cover the microwave-safe
dish with microwave food wrap or an inverted
plate.
Place the dish on the turntable.
Wait two minutes before serving for even heat
distribution.
A6>Fresh pizza
Microwave + grill function is used.
Cooking time 0 and 60 min.
Remove the pizza from its packaging and place
it directly on the rack placed at level 2.
A7>Frozen pizza
The frozen pizza function is used for pizzas
weighing between 100 g and 750 g it uses the
microwave + grill function.
17
Using Your Appliance

A8>Fresh quiche
This function allows you to cook and brown fresh
quiches from 27 cm to 30 cm in diameter.
Cooking is done using the combined microwave
+ heat circulation mode. Use a heat-resistant,
microwave-safe tart mould (Pyrex, porcelain, etc.).
When you use ready-made pastry, do not remove
the grease-proof paper.
Cut the excess paper to the dimensions of the
dish.
Place the tart mould on the rack at level 2.
TIP!
Do not use a metallic mould.
Begin cooking the quiche as soon as the filling
has been poured into the pastry. Never let the
pastry soak or it will not cook properly.
A9>Fresh tart
This function allows you to cook and brown fresh
tarts from 27 cm to 30 cm in diameter.
Cooking is done using the combined microwave
+ heat circulation mode. Use a heat-resistant,
microwave-safe tart mould (Pyrex, porcelain, etc.).
When you use ready-made pastry, do not remove
the grease-proof paper. Cut the excess paper to
the dimensions of the dish.
Place the tart mould on the rack at level 2.
TIP!
Do not use a metallic mould.
18
Using Your Appliance

Defrosting
Defrosting frozen vegetables in your microwave
oven saves you a great deal of time. To defrost
food, use the AUTO DEFROST function or
the MICROWAVE function
or the M
with the power
set to 1000 W (defrosting).
TIP!
Small cuts of meat and fish can be cooked
immediately after defrosting. Larger cuts such
as meat roasts or whole fish will still be slightly
frozen at the end of the defrost programme.
We recommend that you let the food stand for a
period of time at least equal to the defrost time
to ensure an even temperature. Food covered
with ice crystals will take longer to defrost. In this
case, you should increase the defrost time.
Recommendations
The defrost time depends on the type of
appliance. It also depends on the shape, size,
starting temperature and quality of the food.
In most cases, the food must be removed from its
packaging. Remember to remove any metal
fastenings from the packaging. Half way through
defrosting, the pieces of food must be turned,
stirred and separated if they were frozen together.
If you defrost large pieces of meat or fish use the
turntable stop function to turn the food regularly.
Defrost meat or fish by putting it on an
upside-down saucer on top of a plate to prevent
the juices running. If it stays in contact with the
food, it will overheat.
Never refreeze food before cooking it.
Defrost programmes times
Defrost programme times were calculated based
on food frozen at -18 °C. This gives you an
indication of the required defrosting time, but the
actual duration may vary based on the thickness,
shape, size and packaging of the food.
Choosing a programme
3 defrost programmes are available: d1,d2,d3
d1>Defrost of meat, poultry, fish, vegetable 100
g to 500 g
d2>Bread 100g to 500 g
d3>Ready-made meals 100 g to 500 g
19
Using Your Appliance
Table of contents