Asko BO4SM3L1-77 OM8456S User manual

Dear customer!
Thank you for choosing this quality product from ASKO. We hope it will
meet your expectations and fulfil your needs for many years to come.
Scandinavian design combines clean lines, everyday functionality and
high quality. These are key characteristics of all our products and the
reason they are greatly appreciated throughout the world.
Operating instructions
MICROWAVE OVEN
BO4SM3L1-77 OM8456S

2
We thank you for your trust and the
purchase of our appliance.
This detailed instruction manual is supplied to make the
use of this product easier. The instructions should allow
you to learn about your new appliance as quickly as
possible.
Make sure you have received an undamaged appliance.
If you do find transport damage, please contact the
seller from which you purchased the appliance, or the
regional warehouse from which it was supplied. The
telephone number can be found on the invoice or on the
delivery note.
Instructions for installation and connection are supplied
on a separate sheet.
Instructions for use are also available at our website:
www.asko.com / < http://www.asko.com />
Important information
Tip, note

3
MICROWAVE OVEN 4
TECHNICAL SPECIFICATIONS 4
CONTROL UNIT 6
IMPORTANT SAFETY INSTRUCTIONS 7
BEFORE CONNECTING THE OVEN: 8
BEFORE USING THE APPLIANCE FOR
THE FIRST TIME 9
SWITCHING ON THE APPLIANCE FOR
THE FIRST TIME 10
STEPS OF THE COOKING PROCESS
(1–7) 11
STEP 1: CHOOSING THE BASIC COOKING
MENUS AND SETTINGS 11
STEP 2: TIMER FUNCTIONS –DURATION 14
STEP 3: STEP COOKING 15
STEP 4: START THE COOKING PROCESS 16
STEP 5: END OF COOKING AND SWITCHING
OFF THE OVEN 16
STEP 6: SELECTING ADDITIONAL FUNCTIONS 17
STEP 7: CHOOSING THE GENERAL SETTINGS 19
DESCRIPTIONS OF SYSTEMS (COOKING
MODES) AND COOKING TABLES 20
MAINTENANCE & CLEANING 24
CONVENTIONAL OVEN CLEANING 24
USING THE AQUA CLEAN FUNCTION TO
CLEAN THE OVEN 25
REMOVING AND CLEANING THE WIRE GUIDES 26
REPLACING THE BULB 27
TROUBLESHOOTING TABLE 28
DISPOSAL 29
COOKING TEST 30
CONTENTS

4
(DESCRIPTION OF THE OVEN AND EQUIPMENT – DEPENDING ON THE MODEL)
The figure represents one of the built-in appliance models. Since the appliances for which these instructions were drawn
up may have different equipment, some functions or equipment may be described in the manual that may not be present
in your appliances.
Control unit
Oven door
Oven handle
Guides
- Cooking levels
4
3
2
1
TECHNICAL SPECIFICATIONS
(DEPENDING ON THE MODEL)
The rating plate indicating the basic information about
the appliance is located at the edge of the oven and it is
visible when the oven door is opened.
A Serial number
B Code/ID
C Type
D Brand
E Model
F Technical data
G Compliance symbols
MICROWAVE OVEN

5
WIRE GUIDES
The wire guides allow preparation of the food on four
levels (please note that the levels/guides are counted
from the bottom up).
OVEN DOOR SWITCH
The switches deactivate the microwave heating when
the oven door is opened during the cooking process.
When the door is closed, the switches turn the
microwaves back on.
COOLING FAN
The appliance is fitted with a cooling fan that cools the
housing and the appliance control panel.
EXTENDED OPERATION OF THE COOLING FAN
After the oven is switched off, the cooling fan continues
to operate for a short while in order to provide additional
cooling for the oven. (Extended operation of the cooling
fan depends on microwave operation time.)
OVEN EQUIPMENT AND ACCESSORIES
GLASS BAKING DISH is used for cooking with all oven
systems and for cooking with microwaves. It can also be
used as a serving tray.
The grid or the tray should always be inserted into the
groove between the two wire profiles.
Never use the grid, the shallow baking sheet or the
deep baking tray or any other metal part or accessory
when operating a system with microwaves!

6
AUTOMATIC QUICKIES
MICROWAVES MY RECIPES
EXTRA
FUNCTIONS
GENERAL
SETTINGS
NOTE:
The keys will respond better if you touch them with a larger area of your fingertip. Each time you press a key, this will be
acknowledged by a short acoustic signal.
1ON/OFF KEY 2OVEN
LIGHTING
ON/OFF KEY
3BACK KEY
Touch briefly to
return to previous
menu.
Touch and hold
to return to main
menu.
4Selection and
CONFIRMA-
TION KNOB
Select the setting
by rotating the knob.
Confirm your
selection by
pressing the knob.
5MINUTE
MINDER/
ALARM
6CHILD LOCK
KEY
Locking the
control unit
7START/STOP
KEY
Long touch: START
Long touch during
operation: STOP
8DISPLAY –
displays all
settings
CONTROL UNIT

7
CAREFULLY READ THE INSTRUCTIONS AND SAVE THEM FOR FUTURE REFERENCE.
This appliance may only be used by children aged 8 years and above and persons with
reduced physical, sensory or mental capabilities or lack of experience and knowledge
if supervision or instructions are provided to them concerning use of the appliance in a
safe way and if they understand the hazards involved. Do not let the children play with
the appliance. Cleaning and user maintenance shall not be made by children without
supervision.
WARNING: The appliance and some of its accessible parts may become very hot during
use. Be careful not to touch the heaters. Children younger than 8 years should be constantly
supervised.
The appliance becomes very hot during use. Be careful not to touch the oven heaters.
WARNING: The accessible parts of the appliance may become hot during use. Children
should be kept away from the oven.
WARNING: Accessible parts will become hot when in use. To avoid burns and scalds
children should be kept away.
Only use the temperature probe recommended for use in this oven.
WARNING: Before replacing the light bulb, make sure the appliance has been disconnected
from the power mains, in order to prevent the hazard of an electric shock.
Do not use abrasive cleaners or sharp metal scrapers to clean the oven as they may damage the
finish or the protective enamel coating. Such damages may lead to cracking of the glass.
Do not use steam cleaners or high pressure cleaners to clean the appliance as this may
result in an electric shock.
The appliance is not intended to be controlled with external timers or special control
systems.
The appliance is intended for household use. Do
not use it for any other purpose, such as room heating,
drying of pets or other animals, paper, fabrics, herbs etc.
as this may lead to injury or fire hazard.
The appliance may only be connected to the power
mains by an authorized service technician or expert.
Tampering with the appliance or non-professional repair
thereof may result in risk of severe injury or damage to
the product.
If the power cords of other appliances located near
this appliance are caught in the oven door, they may
be damaged, which may in turn result in a short circuit.
Therefore, keep the power cords of other appliances at a
safe distance.
If the power cord is damaged, it should be replaced by
the manufacturer or an authorized service technician, in
order to avoid hazard.
Do not line the oven walls with aluminium foil and do
not place baking trays or other cookware on the oven
bottom. Aluminium foil would prevent air circulation
in the oven, hinder the cooking process, and ruin the
enamel coating.
Oven door become very hot during operation. A
third glass is installed for extra protection, reducing
the temperature of the outside surface (only with some
models).
Oven door hinges may be damaged when under
excessive load. Do not place heavy pans on open oven
door and do not lean against open oven door when
cleaning the oven cavity. Never stand on the open oven
door and do not let children to sit on it.
Make sure the vents are never covered or obstructed in
any other way.
IMPORTANT SAFETY INSTRUCTIONS

8
Safe use of the microwave oven
WARNING: If your oven allows combined operation (microwaves combined with other cooking
modes), do not allow the children to use the oven without supervision of an adult person since the
oven will reach very high temperatures in such operation modes.
WARNING: If the door or door sealing is damaged, do not use the oven until it is repaired by an
adequately trained service technician.
WARNING: It is hazardous for anyone other than a competent person to carry out any service or
repair operation which involves removal of the cover that protects against exposure to microwave
radiation.
WARNING: Liquids and other foods must not be heated in sealed containers since they are liable
to explode.
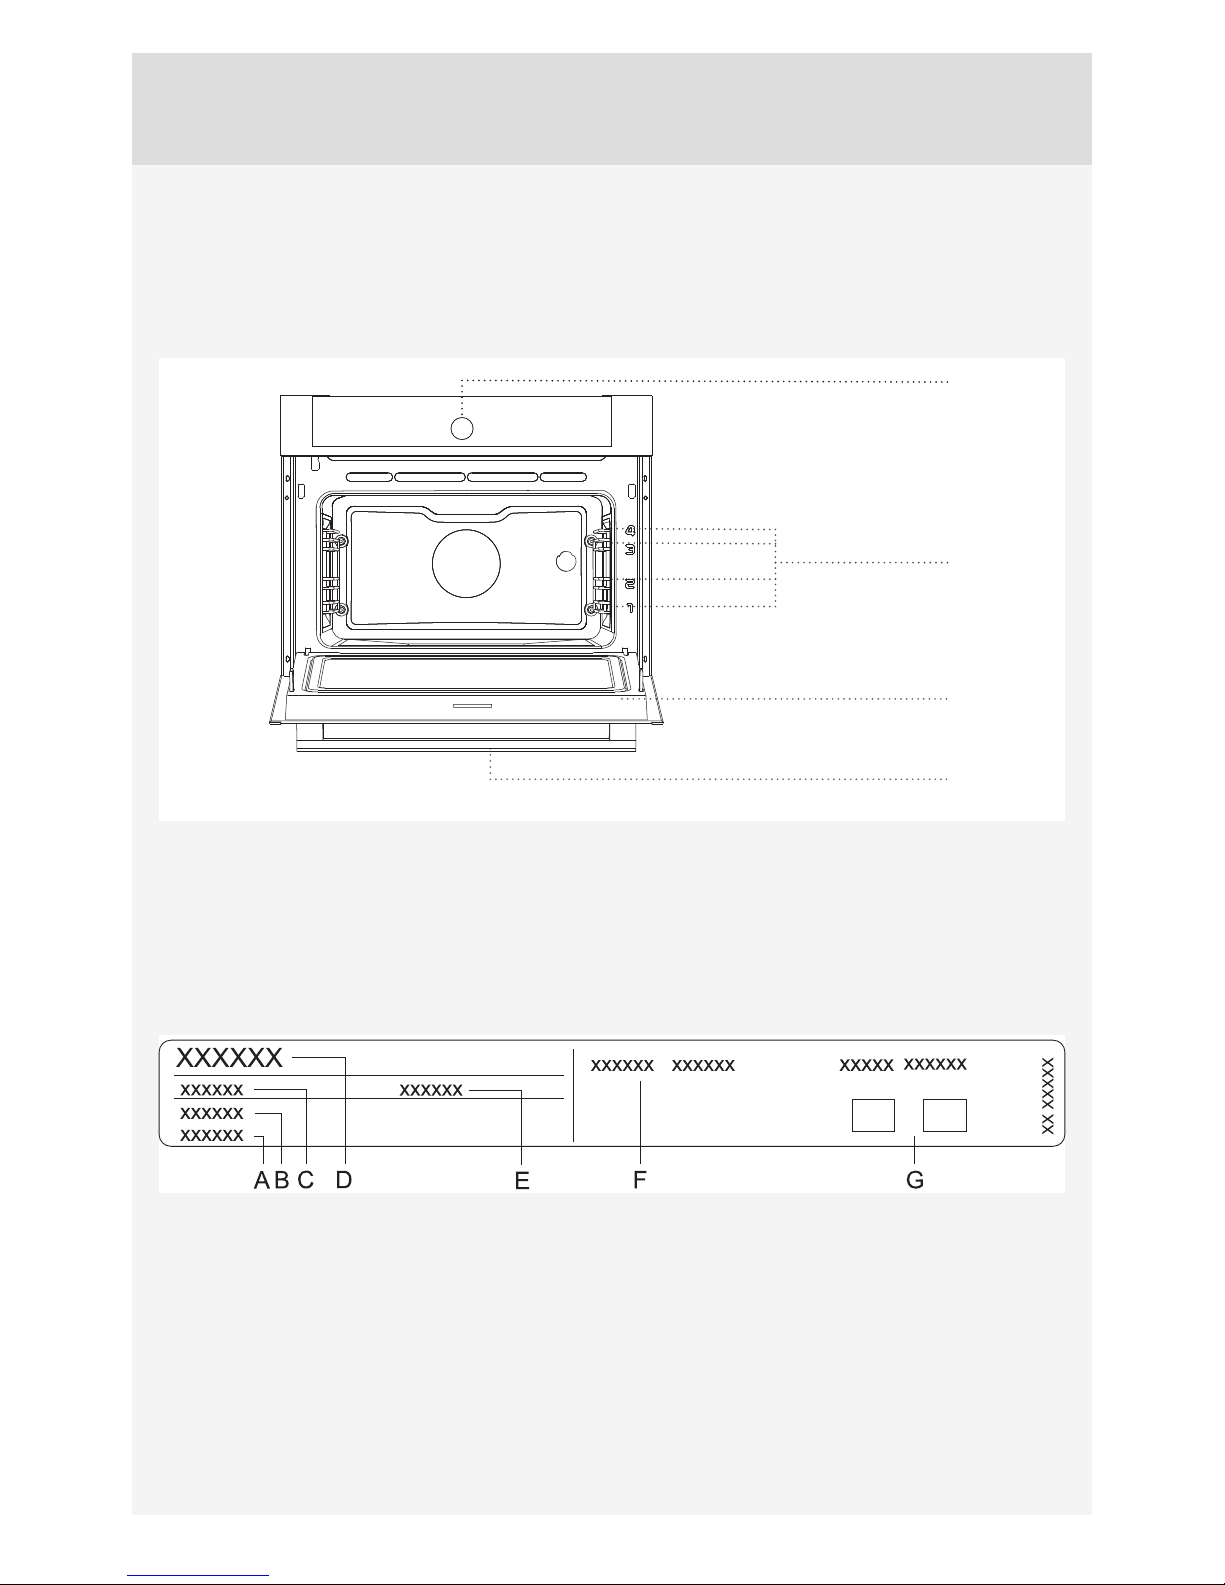
Heed the minimum distance between the upper edge of the
oven and the nearest object above it.
The appliance is intended for use in households and similar
environments, such as:
- staffpantries in stores and other working environments;
- family farms;
- accommodation units for guests at hotels, motels, and other
accommodation or lodging establishments;
- bed and breakfast establishments.
The microwave oven is intended for heating food and
beverages. Drying food or clothing and heating of hot packs
or pads, slippers, sponges, moist cloths etc. may result in
injury, ignition, or fire.
Only use utensils suitable for use in microwave ovens.
When heating food in plastic or paper containers, keep an
eye on the oven as such packaging may ignite.
Microwave heating of beverages can result in delayed
eruptive boiling; therefore take care when handling the
container with the heated beverage.
The contents of baby bottles and baby food jars should
be shaken or stirred and their temperature checked before
feeding in order to avoid burns.
Eggs in their shell should not be heated in microwave ovens
since they may explode even after microwave heating has
ended.
If you observe smoke, switch offor unplug the appliance and
keep the oven door closed in order to stifle any flames.
Always use oven mitts to remove dishes from the oven.
Some pots, pans, or trays absorb the heat of foods and
therefore become very hot.
Make sure to only use the cookware that is suitable for use
in a microwave oven. Do not use cookware made of steel or
cookware with golden or sliver rims.
Do not leave any accessories or utensils in your oven
when it is off. To avoid damage, do not switch on an empty
oven.
Do not use receptacles made of porcelain, ceramics, or clay,
if there are pores in the material or if the inside is not glazed.
Once heated up, the moisture that would penetrate these
pores could cause cracking. Only use the cookware intended
for use in a microwave oven.
Always read and observe the instructions for heating in a
microwave oven, specified on the food packaging.
Be careful when heating alcohol-containing food, as a
combustible mixture of alcohol and air may form inside the
oven. Open the door carefully.
When using the microwave or the combined microwave
and convection functions, use of metallic cookware, forks,
spoons, knives or metal clips/fasteners for frozen food is not
recommended.
After heating, stir the food or leave it to rest until the heat is
evenly distributed.
Regularly clean the oven and remove any food residues.
Failure to maintain cleanliness in the oven may result in
deterioration of its surfaces. This can negatively affect the
useful life of the appliance and lead to potentially dangerous
situations.
BEFORE CONNECTING THE OVEN:
Carefully read the instructions for use before
connecting the appliance. Repair or any warranty
claim resulting from incorrect connection or use of the
appliance shall not be covered by the warranty.

9
Remove all equipment, accessories, and utensils from
the oven and clean them with warm water and regular
detergent. Do not use any abrasive cleaners.
Before using the oven for the first time, heat it with
the upper and lower heater system at 200 °C for
approximately one hour.The characteristic »new
appliance« scent will be released; make sure the room is
well ventilated.
MICROWAVE FUNCTION
Microwaves are used for cooking, roasting, and
defrosting of food. They allow quick and efficient cooking
without changing the colour or shape of the food.
Microwaves are used for cooking, roasting, and
defrosting of food. They allow quick and efficient cooking
without changing the colour or shape of the food.
1
Their behaviour:
–They are reflected by metals.
–They travel through all other materials.
–They are absorbed by water, fat and sugar molecules.
When food is exposed to microwaves, the molecules
begin to move rapidly, thereby generating heat.The
microwaves penetrate approximately 2.5 centimeters
deep into the food. If the food is thicker, the core of the
food will be cooked by conduction, as in conventional
cooking.
Never use or activate a microwave system if the oven
is empty.
BEFORE USING THE APPLIANCE FOR THE FIRST TIME

10
SETTING THE CLOCK
After connecting your appliance or after an extended power outage, 12:00 will flash on the display. Set the time of day.
Confirm each setting by pressing the KNOB.
Press the KNOB to set the time.
Turn the KNOB and first set the TICK.
The oven will also work if the clock is not set. However, timer functions are not available in this case (see chapter
SETTING THE TIMER FUNCTIONS). After a few minutes of idling, the appliance will switch to standby mode.
CHANGING THE CLOCK SETTING
Clock settings may be changed when no timer function is activated (see chapter CHOOSING THE GENERAL
SETTINGS).
SELECTING THE LANGUAGE
If you are not happy with the language in which the messages on the display are presented, select another one. English
is the preset language.
Rotate the KNOB and select your language from
the list. CONFIRM the selection.
The main menu will appear.
SWITCHING ON THE APPLIANCE FOR THE FIRST TIME

11
STEP 1: CHOOSING THE BASIC COOKING MENUS AND SETTINGS
The process of preparing food in your oven can be controlled in several ways:
Rotate the KNOB and select the symbol. The
symbol will turn white. The NAME of the selected
menu will appear at the top.
Confirm each setting by pressing the KNOB.
Automatic mode
In this mode, first select the type of food and the desired dish. This is followed by automatic setting of
the quantity and level of doneness. The program offers a large choice of preset recipes reviewed by
professional chefs and nutrition experts.
Quickies
This mode offers a selection of preset cooking procedures for particular dishes. The cooking procedures
can also be changed.
Microwaves
This mode is suitable for cooking, roasting, and defrosting of food.
STEPS OF THE COOKING PROCESS (1–7)

12
1234 5
A) COOKING BY SELECTING THE TYPE OF FOOD (Auto mode)
Confirm each setting by pressing the KNOB.
Rotate the KNOB and select the Auto mode.
Confirm the setting by pressing on the KNOB.
Select the type of food and the dish. Confirm the
selection.
Preset values will appear. Rotate the KNOB and
confirm by pressing the KNOB to change these
settings.
1 Amount
2 Doneness
3 Delayed start
4 Cooking duration
5 Cooking system and recommended level
When in the Auto and Rapid mode, choose the duration or system symbol to open the Professional mode (see
section on COOKING BY SELECTING THE OPERATING MODE).
Touch the START/STOP key to start oven operation.
All selected settings are indicated on the display.

13
B) COOKING WITH MICROWAVES
Confirm each setting by pressing the KNOB.
Rotate the KNOB and select Microwaves. Confirm
the setting by pressing on the KNOB.
Select the settings by rotating the KNOB and
pressing it to confirm.
1 Microwave system
2 Cooking power
3 Cooking duration
4 Delayed start
5 Step mode (see section STEP COOKING)
In microwave systems, the timer function –delayed start is not available.
Touch the START/STOP key to start oven operation.
Selected settings and the time counting down will be displayed on the display unit.
POWER LEVEL USE
1000 W • Quickly reheating beverages, water and dishes containing a large volume of liquid.
• Cooking dishes with high water content (soups, sauces etc.).
750 W • Cooking fresh or frozen vegetables.
600 W
• Melting chocolate.
• Cooking fish and seafood; reheating on two levels.
• Cooking dried beans at low heat.
• Reheating and cooking of delicate egg-based dishes.
360 W • Low-heat cooking of dairy products or jams.
180 W • Manual defrosting; softening butter or ice cream.
90 W • Defrosting cream-filled pastry.
1234 5

14
STEP 2: TIMER FUNCTIONS –DURATION
The »Duration« setting can be selected in the basic
Microwave mode.
Setting the cooking time
In this mode, you can define the duration of oven operation (cooking time). Set the desired cooking time
and confirm the setting. (Maximum operating time is 10 hours.)
Cooking end time is adjusted accordingly.
Press START to start the cooking process. All selected settings are indicated on the display.
All timer functions can be cancelled by setting the time to ”0”.
After the set time expires, the oven will automatically stop operating (end of cooking). An acoustic signal will be
heard which you may turn offby pressing the ALARM key. After one minute, the acoustic signal will be switched off
automatically.
After a few minutes of idling, the appliance will switch to standby mode. The time of day will appear.

15
STEP 3: STEP COOKING
This mode allows you to combine three different cooking modes successively in a single cooking process.
Choose different settings to cook your food just the way you want it.
The »Step Cook« setting can be selected in the basic
Microwave mode. Confirm the setting by pressing on
the KNOB.
Select: Step 2, Step 3
Confirm the settings by pressing on the KNOB.
The first step is already selected.
Set the cooking power and time. Confirm the
selection with the check mark by pressing the
KNOB.
Total cooking time –end..
Current step
Touch the START symbol to turn on the oven. The oven starts operating immediately, with the settings defined in Step 1.
(A strip at the bottom of the display indicates the cooking step currently in progress.)After the set cooking time elapses,
Step 2 and then Step 3 are activated, if specified.
If you wish to delete a step during operation, turn the KNOB, choose the step and cancel it by confirming the X mark.
This can only be done with steps that have not started yet.
Cooking power and duration of
the selected step

16
STEP 4: START THE COOKING PROCESS
The START/STOP key will flash before the start of the cooking process.
Start the cooking process by briefly touching the START/STOP key.
Rotate the KNOB to change the current settings during cooking.
STEP 5: END OF COOKING AND SWITCHING OFF THE OVEN
Start the cooking process by pressing the START/STOP key and holding it for a while.
Turn the KNOB to display the End menu with a
display of symbols.
End!
Select the icon and complete the cooking process. Main menu will appear on the display.
Extend the cooking time
Cooking time can be extended by selecting the icon. New cooking end time can be selected (see chapter
Timer Functions).
Add to my recipes
This mode allows you to save the selected settings into the oven memory and use them again at a later
time.

17
SAVING USER-DEFINED PROGRAMS (MY RECIPES)
Choose the symbol and enter the name by
rotating the KNOB and confirming respective
letters. If necessary, delete a character using the
arrow; use the check mark or touch the START/
STOP key to confirm the name. Select the type of
food.
Select the type of food. Press the KNOB to save
your settings.
Your favourite recipes that you have previously stored in the memory can be retrieved and used at any time. Choose
the process and the settings in the main menu by selecting the symbol.
Preset values will appear which you can still
change.
Up to 10 recipes can be stored in the memory.
DELETING A RECIPE
Select the recipe to be deleted. Press and hold the KNOB to delete the recipe; an acoustic signal will be sounded.
STEP 6: SELECTING ADDITIONAL FUNCTIONS
Choose Extra in the main menu to display the
extra/additional function menu.
Some functions are not available with some
systems; an acoustic signal will indicate such
cases.
Aqua clean
Use it to remove stains. Pour 0.6 l water into the deep baking tray and place it in the lower guide. After
4 minutes, food residues on the enamel surfaces will have softened and they will be easy to wipe off
with a damp cloth. Use this function when the oven has fully cooled down! (See chapter CLEANING AND
MAINTENANCE.)
Defrosting
In this mode, the air will circulate without any heaters operating. Only the fan will be activated. Use this function to
slowly defrost frozen food (cakes, pastry, bread, rolls, and deep-frozen fruit).By selecting the relevant symbol you
may specify the type of food, weight, or defrosting start and end time.Halfway through the defrost time, the pieces
should be turned over, stirred and separated if they were frozen together.
When the cooking process is complete, the display will read: ”Program complete. Bon appétit!”
Turn the KNOB to display the End menu with a
display of symbols.

18
CHILD LOCK
Activate it by touching the LOCK key (key symbol). The following message will appear on the display:
»Child lock activated.« Touch the key again to deactivate the child lock.
If the child lock is activated with no timer function engaged (only clock is displayed), then the oven
will not operate.If the child lock is activated after a timer function has been set, then the oven will operate
normally; however, it will not be possible to change the settings.
When the child lock is activated, systems (cooking modes)or additional functions cannot be changed. Only
the cooking/baking/roasting process can be stopped or switched off.
Child lock remains active after the oven is switched off. To select a new system, the child lock must first be
deactivated.
OVEN LIGHTING
Oven lighting is switched on automatically when the door is opened or when the oven is switched on.
After the end of the cooking process or when the door is closed, the light will remain on for another minute.
The light inside the oven can be switched on or offby pressing the LIGHT key.
SETTING THE MINUTE MINDER
The minute minder can be used independently of the oven operation. Activate it by pressing the key. The
longest possible setting is 10 hours. When the time expires, an acoustic signal will be heard which you
may turn offby touching any key. After one minute, the acoustic signal will be switched offautomatically.

19
STEP 7: CHOOSING THE GENERAL SETTINGS
Choose Settings in the main menu to display
the menu for various settings.
Rotate the KNOB to navigate the menu.Confirm
each setting by pressing the KNOB.
Language
Select the language for the text on the display.
Time
Set the time of day after the appliance is connected to the power mains for the first time or after being disconnected
from the power mains for a longer period of time (more than one week). Set the CLOCK –time. Set the display mode in
the ”Time Design” field: digital or analogue.
Sound
Loudness of the acoustic signal can be set when no timer function is activated (only the time of day is displayed). In this
menu, you can set the following: loudness.
Display
In this menu, you can set the following:
Lighting
Night mode - set the time by which you wish the display to be dimmed.
Setting during the cooking process
In this menu, you can set the following:
Oven lighting during operation - oven lighting is switched offwhen oven door is opened during operation.
Other settings
Factory setting
After a power outage or after switching offthe appliance, all extra
user settings are restored.

20
If your desired food cannot be found in the cooking table,
find information for similar food.
The information displayed applies to cooking in a single
level.
Cooking times are rough estimates and may vary subject
to some conditions.
When cooking larger chunks of meat, vegetables, or
pastry, a lot of steam will be generated inside the oven,
which in turn may condense on the oven door. This is a
normal phenomenon which will not affect the operation
of the appliance. After the cooking process, wipe the
door and the door glass dry.
DESCRIPTIONS OF SYSTEMS (COOKING MODES) AND COOKING
TABLES
Table of contents
Other Asko Microwave Oven manuals