Asko OM8334S User manual

Instructions for use
MICROWAVE OVEN
OM8334S / BD22GCL2

EN User manual EN 3 - EN 30
Pictograms used
Important information
Tip

EN 3
CONTENTS
Your microwave oven
Introduction 4
Description of the appliance 5
Control panel 6
Display 6
First use
Before first use 7
Microwaves 7
Guidelines for cookware 8
Operation
Please note! 9
Explanation of the knobs and the keys 9
Using the microwave oven 12
Temporary stop 12
Description of the functions 13
Program table defrosting by weight 14
Program table auto functions 14
Using the baking tray 15
Using the grill rack 16
Tips and cooking tables
Warming up and cooking 19
Factors that influence the cooking process 19
Basic techniques 20
Defrosting with the microwave function 20
Cooking vegetables with the microwave function 22
Cooking fish with the microwave function 23
Maintenance
Cleaning the appliance 24
Cleaning the oven ceiling 24
Cleaning the baking tray 25
Replacing the oven light 25
Malfunctions
Troubleshooting 26
Sparks in the microwave oven 26
Technical specifications
Technical specifications 27
Installation
Installation 28
Environmental aspects
Disposal of the appliance and packaging 30

EN 4
YOUR MICROWAVE OVEN
Introduction
Congratulations on choosing this ASKO microwave oven. This product is designed with simple
operation and optimum comfort in mind.
This manual shows how you can best use this microwave. In addition to information about
operating the appliance, you will also find background information that may be useful when using
the appliance.
Please read the separate safety instructions carefully before
using the appliance!
Read this manual before using the appliance and keep it in a safe place for future use.

EN 5
Description of the appliance
1. Door
2. Control panel
3. Grill rack
4. Baking tray
5. Glass of the door
6. Drop-down grill
7. Ceramic base
Always place the dish / grill rack / baking tray in the center of the ceramic base!
YOUR MICROWAVE OVEN
1
7
2
3
4
5
6

EN 6
Control panel
1 765432
1. Function knob
2. Start key / Stop key
3. Ok key
4. Display
5. Timer key
6. Door release key
7. Selection knob
Push the knobs to let them come out of the control panel.
The keys respond best if you touch them shortly with a large area of your fingertip.
Display
The display shows:
• the time of the day if the appliance is not operating;
• the symbols and settings of the several functions if you turn the function knob;
• the symbols and settings of the chosen function when the appliance is in operation;
• the remaining operating time when the appliance is in operation;
• the end of a cooking process.
YOUR MICROWAVE OVEN

EN 7
FIRST USE
Before first use
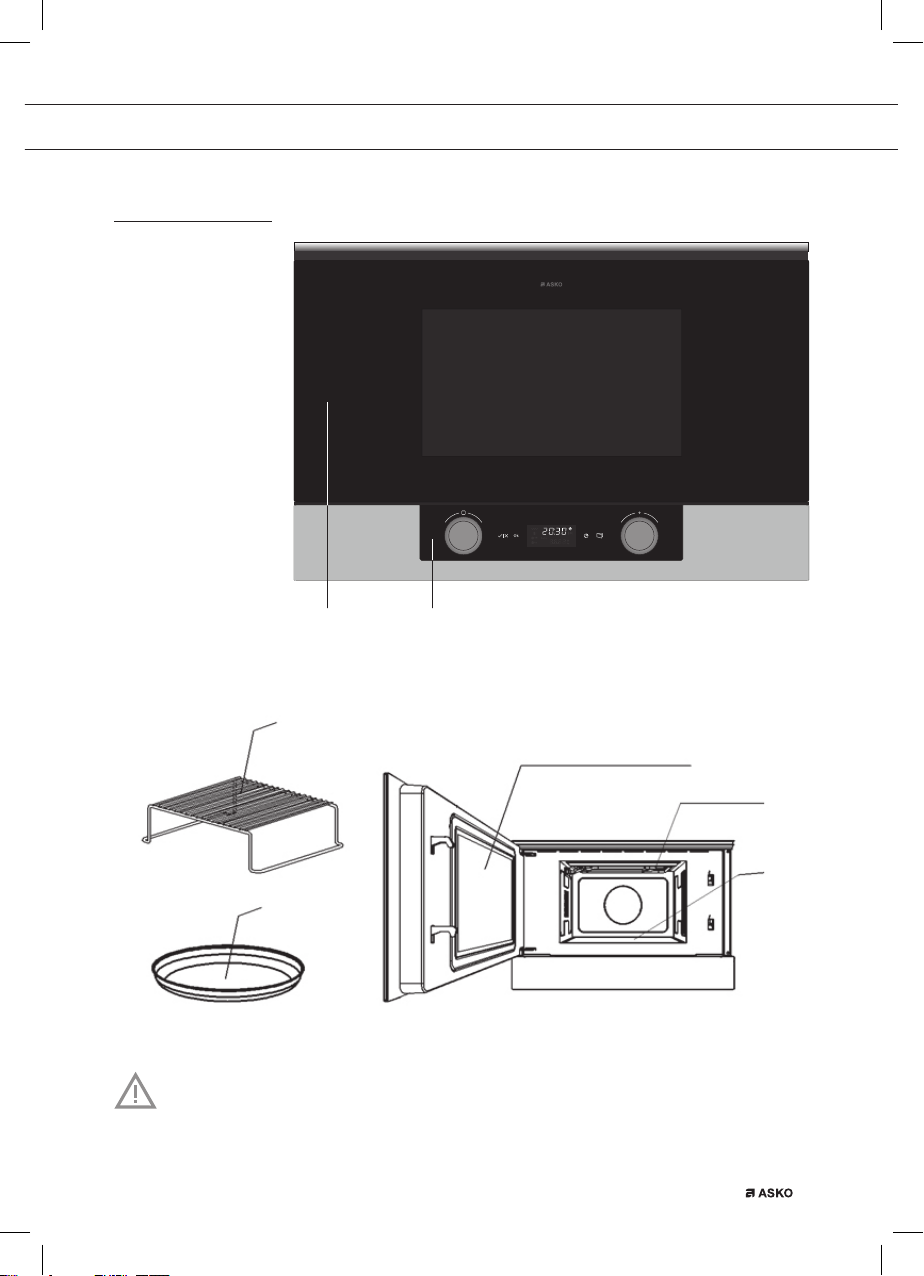
• Open the door, remove the packaging and check the oven for damage.
• Do not use the oven if it is damaged, but contact your supplier.
• Remove the protective film from the stainless steel parts.
• Clean the oven interior and accessories with a damp cloth. Do not use any abrasive cleaner
or strong-smelling cleaning products.
• The oven will emit a strange smell when the grill is used for the first time; this is normal. You
should ensure that there is good ventilation during initial use.
Microwaves
Microwaves are high-frequency electromagnetic waves. The energy makes it possible to cook
or warm up a dish without affecting the form or colour.
Cooking principle
• The microwaves the microwave generates are spread evenly by a distribution system.
This cooks the dish evenly.
• The food absorbs the microwaves to a depth of approximately 2.5 cm. Cooking then
continues, because the heat is spread in the dish.
• The cooking times vary and depend on the dish you use and the properties of the food:
▷Quantity and density
▷Moisture content
▷Starting temperature (whether or not it is chilled)
Please note!
The dish is cooked from the inside out by means of heat distribution. The cooking
continues even when you take the dish from the oven. Standing times in recipes and
in this book should therefore be adhered to, in order to ensure:
• Even heating into the middle of the dish.
• Equal temperatures in all parts of the dish.

EN 8
FIRST USE
Guidelines for cookware
The table gives you a general idea of what type of cookware is suitable for each situation.
Cookware
Microwave
Grill6
Microwave
+
Grill6
Defrosting
Heating Cooking
Glass and china1
Home use, not flame resistant, can be
used in the dish washer
yes yes no no
Glazed china
Flame resistant glass and china yes yes yes yes
China, stone ware2
Unglazed or glazed without metallic
decorations
yes yes no no
Clay plates2
Glazed
Unglazed
yes
no
yes
no
no
no
no
no
Plastic plates2
Heat resistant to 100°C
Heat resistant to 250°C
no
yes
no
yes
no
no
no
no
Plastic films3
Plastic film for food
Cellophane
no
yes
no
yes
no
no
no
no
Paper, cardboard, parchment4yes no no no
Metal
Aluminium foil
Aluminium wrappings5
yes
no
no
yes
yes
yes
no
yes
Accessories
Grill rack
Baking tray
Grill rack + baking tray
yes
yes
no
yes
yes
no
yes
yes
no
yes
yes
no
1. Without any gold or silver leaf edging; no lead crystal.
2. Keep the manufacturer’s instructions in mind!
3. Do not use metal clips for closing bags. Make holes in the bags. Use the films only to cover
the food.
4. Do not use paper plates.
5. Only shallow aluminium containers without lids/tops.
▷The aluminium must not come into contact with the cavity walls.
▷Put an aluminium container directly on top of the ceramic base. If you use the rack, put
the container on a china plate. Never put the container directly on the rack!
6. The cookware you use must be resistant to a temperature of at least 300 °C.

EN 9
Please note!
Warning!
Heating liquids in the microwave can result in delayed boiling. This means that the
liquid may start to boil furiously after it is removed from the microwave, with the risk
of scalding. You can offset the delayed boiling effect by placing a plastic or glass spoon
in the liquid prior to heating it in the microwave.
Warning!
Take care with baby food:
• Shake or stir the content of babies’ bottles or pots of baby food after heating.
• Check the temperature of the food carefully prior to consumption to prevent
scalding injuries.
Warning!
Cutlery and tableware may become hot after using the microwave.
Explanation of the knobs and the keys
Function knob
Select a function
Turn this knob to select the desired function.
• See ‘Description of the functions’ for more information.
Selection knob
Change the settings
Turn this knob to change the settings that are blinking in
the display.
Select a program
Turn this knob to select another program.
• See ‘Program table defrosting by weight’ and
‘Program table auto functions’ for more information.
OPERATION

EN 10
Start key / Stop key
Quick Start
Touch this key to start the appliance immediately for
30 seconds with 600 Watt power.
Start
Touch this key to start the operation of the appliance with
the displayed settings.
Temporary stop
Touch this key during operation for a temporary stop of a
cooking process.
Stop
Touch this key after the end of a cooking process.
• The display will show the time of the day.
• The audible signal will stop.
• The fan will continue to run; this is normal.
Cancel
Touch and hold this key for several seconds to cancel the
operation of the appliance.
• You will hear three short audible signals.
Ok key
Confirm
Touch this key to confirm a chosen or adapted setting,
belonging to a chosen function.
Select a setting to change
Touch this key if you want to change a setting, belonging
to a chosen function.
• The setting will start blinking and can be changed by
turning the selection knob.
Child lock
Touch and hold this key for several seconds to lock/
unlock the appliance (child lock).
• You will hear a long audible signal.
OPERATION

EN 11
Timer key
Set the time of the day
Touch this key to make it possible to set the hours and
minutes after connecting the appliance to the mains (or
after a power failure).
Change the time of the day
Touch this key to make it possible to change the hours
and minutes.
Confirm the setting of hours/minutes
Touch this key to confirm the hours and minutes that have
been set.
Hide and show the time of the day in the display
Touch and hold this key for several seconds to hide/show
the time of the day in the display.
• You will hear a long audible signal.
Door release key
Open the door
Touch this key to open the door.
Temporary stop
Touch this key during operation for a temporary stop of a
cooking process.
Stop
Touch this key after the end of a cooking process.
• The display will show the time of the day.
• The audible signal will stop.
• The fan will continue to run; this is normal.
OPERATION

EN 12
Using the microwave oven
1. Connect the appliance to the mains.
2. Set the time of the day.
3. Touch the door release key to open the door.
4. Place the dish in the appliance.
5. Close the door.
6. Turn the function knob to set the desired function.
▷The display shows the symbols and settings of the functions.
Take a look at the several tables in this manual for more information about the functions.
7. Turn the selection knob if you want to change a blinking setting in the display.
▷Touch the ok key to confirm a setting;
▷Touch the ok key to select a setting that is not blinking.
8. Touch the start key to start the operation with the displayed settings.
▷Once the set time has expired, you will hear an audible signal.
▷‘End’ appears in the display.
9. Touch the stop key or open the door.
▷The audible signal stops.
▷The time of the day will be shown in the display.
Temporary stop
While the appliance is operating, you can touch the stop key or open the door for a temporary
stop.
• The microwave emission is stopped immediately.
• The grill is de-activated but is still very hot. Danger of burning!
• The display shows the remaining operating time.
• The fan will continue to run; this is normal.
Now you can:
• Turn or stir the food to ensure it will be evenly cooked.
• Change the displayed settings.
▷Touch the ok key once/twice.
▷Turn the selection knob to change the time, power or weight.
• Cancel the process; touch and hold the stop key for several seconds.
• Restart the process; close the door and touch the start key.
OPERATION

EN 13
OPERATION
Description of the functions
Symbol Function
Microwave
power
output
Foods Display
Microwave
90 W Slowly defrosting delicate foods.
Keeping food hot.
180 W
Cooking with little heat.
Boiling rice.
Rapid defrosting.
360 W Melting butter.
Heating baby food.
600 W
Cooking vegetables and food.
Cooking and heating carefully.
Heating and cooking small portions
of food.
Heating delicate food.
850 W Cooking and rapidly heating liquids
and pre-cooked foods.
Grill Grilling food.
Microwave
+ Grill
90 W Toasting food.
180 W Grilling poultry and meat.
360 W Cooking pies and cheese-topped
dishes.
Defrosting
by time
(manual)
Quickly defrost any type of food.
• Turn the food when you hear an
audible signal; the display will
show ‘turn’.
Defrosting
by weight
(automatic)
Quickly defrost meat, poultry, fish,
fruit and bread; see program table.
• Turn the food when you hear an
audible signal; the display will
show ‘turn’.
Auto
cooking
Cook various types of food; see
program table.
• Turn the food when you hear an
audible signal; the display will
show ‘turn’.

EN 14
Program table defrosting by weight
Program Food Weight (kg) Time (min.) Standing time (min.)
Pr 1 Meat 0.1 - 2.5 3 - 75 20 - 30
Pr 2 Poultry 0.1 - 2.5 3 - 75 20 - 30
Pr 3 Fish 0.1 - 2.5 3 - 83 20 - 30
Pr 4 Fruit 0.1 - 1.0 3 - 26 10 - 20
Pr 5 Bread 0.1 - 1.5 2 - 36 10 - 20
Turn the food when you hear an audible signal; the display will show ‘turn’.
Program table auto functions
Program Food Weight
(g)
Time
(min.)
Added
water (ml) Instructions
P 1 Cook
potatoes 500 10 150
Put the sliced potatoes
(15-20 mm) with the water in
a heat resistant container with
a lid and place them on the
ceramic base.
P 2
Slow boiled/
stewed
dishes
550 19 ---
Put the ingredients to be slow
cooked in a heat resistant
container with a lid and place
them on the ceramic base.
P3
Fish (frozen) 700
30 300
Put the ingredients to be
cooked and gratin in a heat
resistant container and place
them on the ceramic base.
Fish (fresh) 800
Vegetables
(frozen) 1000
Put the ingredients to be
cooked in a heat resistant
container with a lid and place
them on the ceramic base.
Turn the food when you hear an audible signal; the display will show ‘turn’.
OPERATION

EN 15
Important notes!
Always use plates for use in the microwave oven and a lid or cover to avoid loss of
liquids.
Stir or mix the foods several times during heating.
The time required to heat the food will depend on its initial temperature. Food taken
straight from the fridge will take longer to heat up than food that is at room temperature.
If the food temperature is not what is wanted, select a greater or lesser weight next time
you heat up the food.
After heating, stir the food and then leave the food to stand for some time to allow the
temperature to become uniform throughout the food.
Warning!
After heating the container may be very hot. Although microwaves do not heat up most
containers, these may heat up through heat transmission from food.
Using the baking tray
Normally when cooking food, such as pizzas or pies, on a grill or in a microwave oven, the
dough or pastry becomes soggy. This can be avoided by using a baking tray. A high temperature
is reached quickly on the bottom of the baking tray, so the crust turns crispy and brown. The
baking tray can also be used for bacon, eggs, sausages, etc.
Warning!
Ensure that the baking tray never comes in contact with the oven cavity, in order to avoid
any damages.
Place the baking tray in the center of the ceramic base of your microwave oven.
Use oven gloves at all times because the baking tray will become very hot.
Do not place any recipients on the baking tray that are not heat-resistant (plastic bowls
for example).
OPERATION

EN 16
How to cook with the baking tray
1. Preheat the baking tray by selecting the microwave + grill function for 3 to 5 minutes with a
360 W microwaves power level.
2. Brush the baking tray with oil in order to brown the food nicely.
3. Place the fresh or frozen food directly on the baking tray. You can place defrost food (like
frozen pizza) without a previous defrosting.
4. Place the baking tray on the ceramic base of your microwave oven.
5. Select the microwave + grill function and the cooking time as described in the table.
Food Weight
(g)
Cooking
time (min.)
Standing
time (min.) Instructions
Pizza (thin)
200 5 2 If the pizza is thick, increase the
cooking time by 1-2 minutes.
300 6 2
400 7 2
Quiches and pies 200 5 2 A temperature compensation is
achieved through the standing time.
300 6 2
Hamburgers --- 8 2 Turn 2x.
Oven chips 400 5 --- Turn 1x.
Note!
The teflon layer of the baking tray can be damaged if you use it incorrectly. Never cut the
food on the baking tray. Use a plastic or wooden spoon to turn over the food.
Using the grill rack
For good results with the grill, use the grill rack supplied with the oven.
Warning!
Ensure that the grill rack never comes in contact with the oven cavity, in order to avoid
any damages.
Place the grill rack in the center of the ceramic base of your microwave oven.
Use oven gloves at all times because the grill rack will become very hot.
Do not place any recipients on the grill rack that are not heat-resistant (plastic bowls for
example).
OPERATION

EN 17
OPERATION
How to cook with the grill rack
1. Preheat the grill for 2 minutes.
2. Place a bowl or plate (resistant to a temperature of at least 300 °C) on the ceramic base for
use as a drip tray during grilling.
3. Place the food on the grill rack.
4. Select the grill function and the cooking time as described in the tables.
▷Check on how the cooking is going and, if necessary, turn the food over half way the
grilling time.
Tips
Fish and meat taste great if, before grilling, you brush them with vegetable oil, spices and
herbs and leave to marinate for a few hours. Only add salt after grilling.
Sausages will not burst if you prick them with a fork before grilling.
The grill is especially suitable for cooking thin portions of meat and fish.
Thin portions of meat only need to be turned once, but thicker portions should be turned
several times.
Grill without microwave
The times shown are merely indicative and can vary as a function of the composition and
quantity of the food, as well as the final condition wished for.
Food Quantity Time (min.) Instructions
Bass 800 g 18-24 Spread lightly with butter. After half of cooking
time turn and spread with seasoning.
Sardines/gurnard 6-8 15-20
Sausages 6-8 22-26 Prick after half of the cooking time and turn.
Frozen hamburgers 3 18-20
Spare rib
(approx. 3 cm thick) 400 g 25-30 After half of the cooking time, baste and turn.
Toast 4 1.5-3 Watch the toasting.
Toasted sandwiches 2 5-10 Watch the toasting.

EN 18
Grill + microwave
The microwave + grill function is ideal for cooking quickly and, at the same time, browning foods.
Furthermore, you can also grill and cook cheese covered food.
Use the ceramic base for cooking, unless indicated otherwise.
Please note!
The plate that is used in the combined function must be suitable for microwave and grill
use.
The values given in the table are valid when the oven cavity is cold (it is not necessary to pre-heat
the oven). Keep in mind that the figures given are merely indicative and can vary as a function of
the initial state, temperature, moisture and type of food.
Food Quantity Cookware Power
(W)
Time
(min.)
Standing
time (min.)
Cheese topped pasta 500 g Low plate 180 12-17 3-5
Cheese topped potatoes 800 g Low plate 360 20-22 3-5
Lasagne approx.
800 g Low plate 360 15-20 3-5
Grilled cream cheese approx.
500 g Low plate 180 18-20 3-5
2 fresh chicken legs (grilled) 200 g each Low plate 180 10-15 3-5
Chicken approx.
1000 g
Low and
wide plate 180 35-40 3-5
Cheese topped onion soup 2 x 200 g Soup bowls 180 2-4 3-5
If the time is not enough to brown the food well, put it under the grill for another 5 or
10 minutes.
OPERATION

EN 19
Warming up and cooking
• The microwave always heats with the same intensity. The more you place in the microwave,
the longer the cooking time.
• Flat, level dishes heat up more quickly than narrow, tall dishes.
• Covering dishes with microwave film or a fitting lid prevents spattering, reduces cooking
time and helps retain moisture levels. After cooking, remove the foil or lid carefully. Please
note! The steam released can be extremely hot!
• Dishes that dry out quickly can be moistened. Briefly place potatoes and vegetables in cold
water before you place them in the microwave. This prevents a skin forming.
• For an even result it is best to stir or turn a dish a few times.
• For warming up dishes that have already been cooked, always use the highest
microwave setting.
• You don't need much water, salt or herbs for the cooking. Salt is best added after cooking.
This prevents moisture from being removed from the food.
• After the microwave has been switched off, the dish continues cooking for a short time.
Take this into account and don't heat up the dish for too long.
Please note!
When heating small quantities of powdery products (such as when drying herbs), always
place a small cup of water in the microwave. Otherwise there is a possibility of self-
combustion if small quantities are heated.
Factors that influence the cooking process
• The temperature of the ingredients influences the cooking time. A cold meal needs more
cooking time than a meal at room temperature.
• Lighter dishes cook faster than heavier and solid dishes, such as stews or rolled meats. Take
care in preparing light, porous dishes. The edges will quickly become dry and tough.
• Smaller dishes are warmed more evenly if you place them in the microwave separate from
each other, preferably in a circle.
• Bones and fat conduct heat better than meat. Aluminium foil blocks the microwaves.
By covering thinner areas of dishes (such as chicken legs and wings), you prevent them
from cooking too quickly.
• Grease-proof paper prevents spattering and helps retain the heat.
TIPS AND COOKING TABLES

EN 20
Basic techniques
Stirring
Stirring dishes regularly distributes the stored heat. Always stir from the outside in, since the
outside of the dish always heats up first.
Turning over
Large, thick dishes should be turned over regularly. They then cook more evenly and quickly.
Pricking
Dishes with a skin or shell (such as egg yolks, seafood and fruit) burst open in the microwave.
Prevent this by pricking it with a fork or satay stick a few times before cooking.
Checking
Dishes cook quickly. That's why you should check them regularly. Take them out of the
microwave just before they're ready.
Continued cooking
In general, allow dishes to stand covered for 3 to 10 minutes after removing them from the
microwave. The dishes continue to cook. Don't cover dishes that have a dry crust, such as cake.
Freezing
When freezing food you should take defrosting in the microwave into account by not using
aluminium foil or trays and by freezing in flat portions.
Defrosting with the microwave function
• The defrosting time depends on the quantity and thickness of the food. Distribute the food
evenly. The thickest parts should be turned towards the outside. You can protect the most
delicate parts of food with pieces of aluminium foil.
• Thick portions of food should be turned several times.
• To accelerate the defrosting process, it is advised to separate the food into sections after
a certain amount of time.
• When defrosting an irregularly formed dish, you can cover thin areas halfway through
the defrosting process or wrap them with aluminium foil.
TIPS AND COOKING TABLES
This manual suits for next models
1
Table of contents
Other Asko Microwave Oven manuals
Popular Microwave Oven manuals by other brands

Beko
Beko MGC20100W user manual

Daewoo
Daewoo KOR-6167 operating instructions

Daewoo
Daewoo KOR-6C6R Operating instructions & cook book

Montgomery Ward
Montgomery Ward 765294 instruction manual

Samsung
Samsung ME16H702SEB installation instructions

Siemens
Siemens BF520LMR0 User manual and installation instructions