manuals.online logo
Brands
  1. Home
  2. •
  3. Brands
  4. •
  5. ASL INTERCOM
  6. •
  7. Motherboard
  8. •
  9. ASL INTERCOM 165 FUSION User manual

ASL INTERCOM 165 FUSION User manual

Installation of the ASL 165 FUSION Display and Programmer and the programming of the wheelchair
electronics should only be conducted by a specialist with an in depth technical knowledge of the ASL
165 FUSION Display and Programmer and the wheelchair electronics. All testing and verification of
the completed wheelchair equipment with the ASL 165 FUSION Display and Programmer is to ISO/
RESNA or applicable standards for the completed wheelchair, including RFI compatibility testing, is
the sole responsibility of the wheelchair manufacturer.
ATOM Technology
Powered by
PATENT PENDING
Adaptive Switch Laboratories, Inc. www.asl-inc.com PH: 800-626-8698, FX: 830-798-6221
Rev 2-2021
TOP VIEW
ASL 165 FUSION Display and Programmer*
Adaptive Switch Laboratories, Inc. www.asl-inc.com
The ASL 165 FUSION Display and Programmer is warranted to be free from manufacturing
defects for two years from date of purchase.
WARRANTY
This warranty shall not cover equipment modified or repaired by unauthorized personnel. ASL cannot be held responsible for damage
caused by incorrect installation or incorrect use of the product. Misuse, mishandling, or storage is not covered by this warranty. The
foregoing express warranty is exclusive and in lieu of any other warranties of any kind, whether express or implied, including the implied
warranties of merchantability or fitness for a particular purpose, and is the sole and exclusive remedy for any defective product. The health
care professional is responsible for understanding the intended use of the ASL equipment and the specification and safe programming
parameters of the chair it is going on. The wheelchair manufacturer is responsible for testing and verification of the completed wheelchair
equipped with the ASL 165 FUSION Display and Programmer to ISO, RESNA or other applicable standards including RFI compatibility. RFI
interference can impact the proper functioning of the wheelchair. Route and secure all cables in such a way in order to prevent damage
by crushing, cutting or snagging. Incorrect installation, configuration, or programming could result in unsafe set up of the wheelchair for
the user. ASL accepts no liability for losses of any kind which result for such conditions.
SCAN FOR PROGRAMMING
INFORMATION
SECURITY MEASURES
The ASL 165 FUSION Display and Programmer is susceptible to moisture. If moisture contacts
the Display and Programmer, the touch screen may not work properly. Do not operate the ASL
165 FUSION Display and Programmer without instruction. The ASL 165 Display and Programmer
should be mounted in a secure location. When using as a display the ASL 165 should be mounted
so it is visible to the patient.
CONNECTOR
6 FT WIRE LENGTH
3.50”
2.13” 0.84”
* The 165 FUSION DIsplay and Programmer is to
be used with the ASL 110 FUSION Proportional
and Digital Head Array
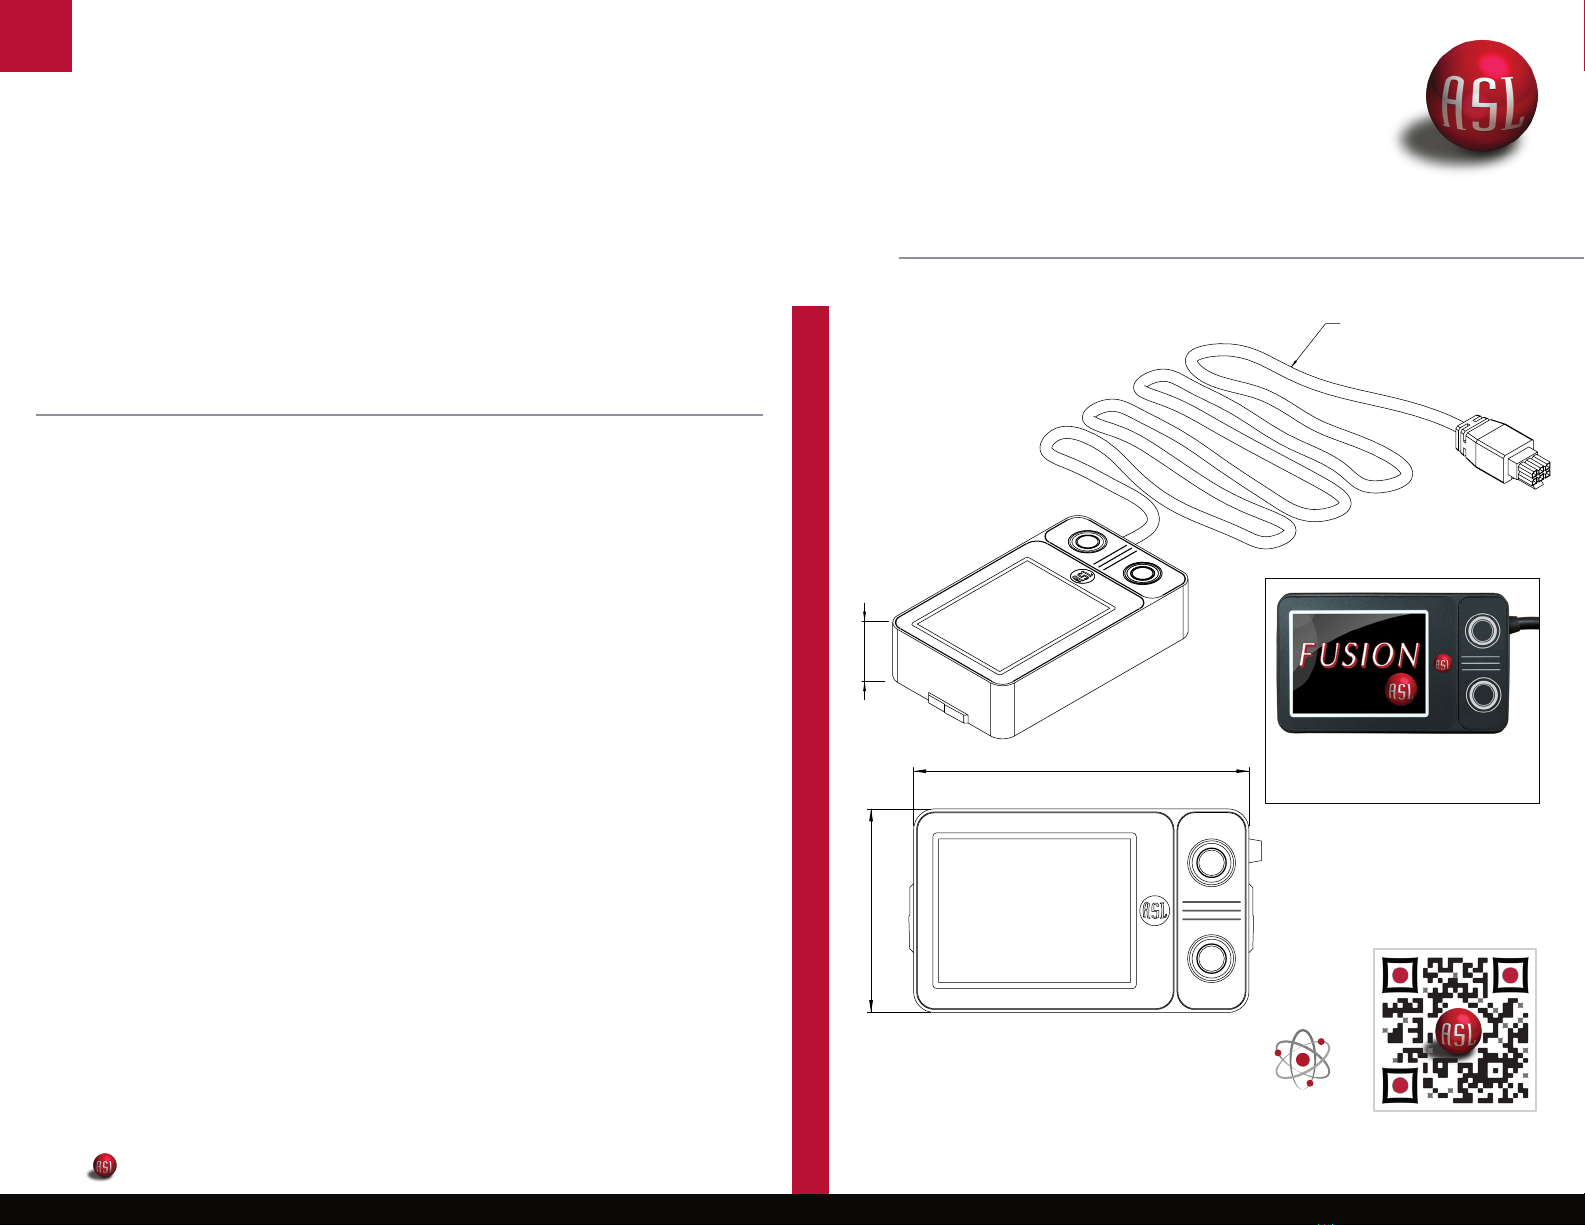
EXPLANATION OF PARTS
FUSION 165 DISPLAY AND PROGRAMMER
R-NET FEATURES IN FUSION
When theToggle F/R is highlighted,
a momentary press of the switch in
the user port will toggle the Drive
Control from forward to reverse.
MAIN USER - TOGGLE F/R
A momentary press of the switch
while in R-Net Seating will turn
the back pad of the FUSION O.
This will automatically change the
left and right pad to work in Digital
for easy access and navigation.
A momentary activation of the
switch will turn the back pad on
and take you back to the User
Menu where a momentary switch
activation will exit the menu, so
you can go back to driving.
MAIN USER - SEATING
When User Menu is highlighted
a momentary press will put the
R-Net Omni into the User Menu
which will allow someone to
access the list of modes such as,
Seating, Speed and Adjust Lights.
The backpad of the FUSION will
scroll you through the list of
modes. To select a desired mode
like Seating, you activate the right
pad which gives you access to the
Seating Options. A long hold will
take you to the Seating Mode.
MAIN USER - USER MENU
When the R-Net Feature is en-
abled, it displays the R-Net Main
User Screen. This indicates that
the system will be set up to be
used with R-Net electronics. A
long press will advance to the next
feature.
R-NET ENABLED
The R-Net Main User Screen shows
all the Functions available on the
FUSION with the R-Net Feature
Enabled and Power On/O Feature
Active. When the patient holds the
switch to the adjusted time, the
system will move to the next line
item in the FUSION display. When
the same switch is then activated
in a momentary activation, it will
activate that selection.
R-NET MAIN USER
When the Power On/O is
highlighted a momentary switch
activation will turn the FUSION
o and on. When the FUSION is
O, the screen will change color
to indicate the Head Array is o
and will not react to any pad
activation.
POWER OFF
R-NET MAIN USER
BLUETOOTH
In Bluetooth Mode the FUSION will
connect to one of (3) three ASL
Accessories:
557-3 Bluetooth
Switch Interface
558 Mouse Emulator
545 Tecla E
Once in the Bluetooth Mode
the FUSION will automatically
connect to the selected powered
receiver and the FUSION Head
Array will be the activation for
that accessory.
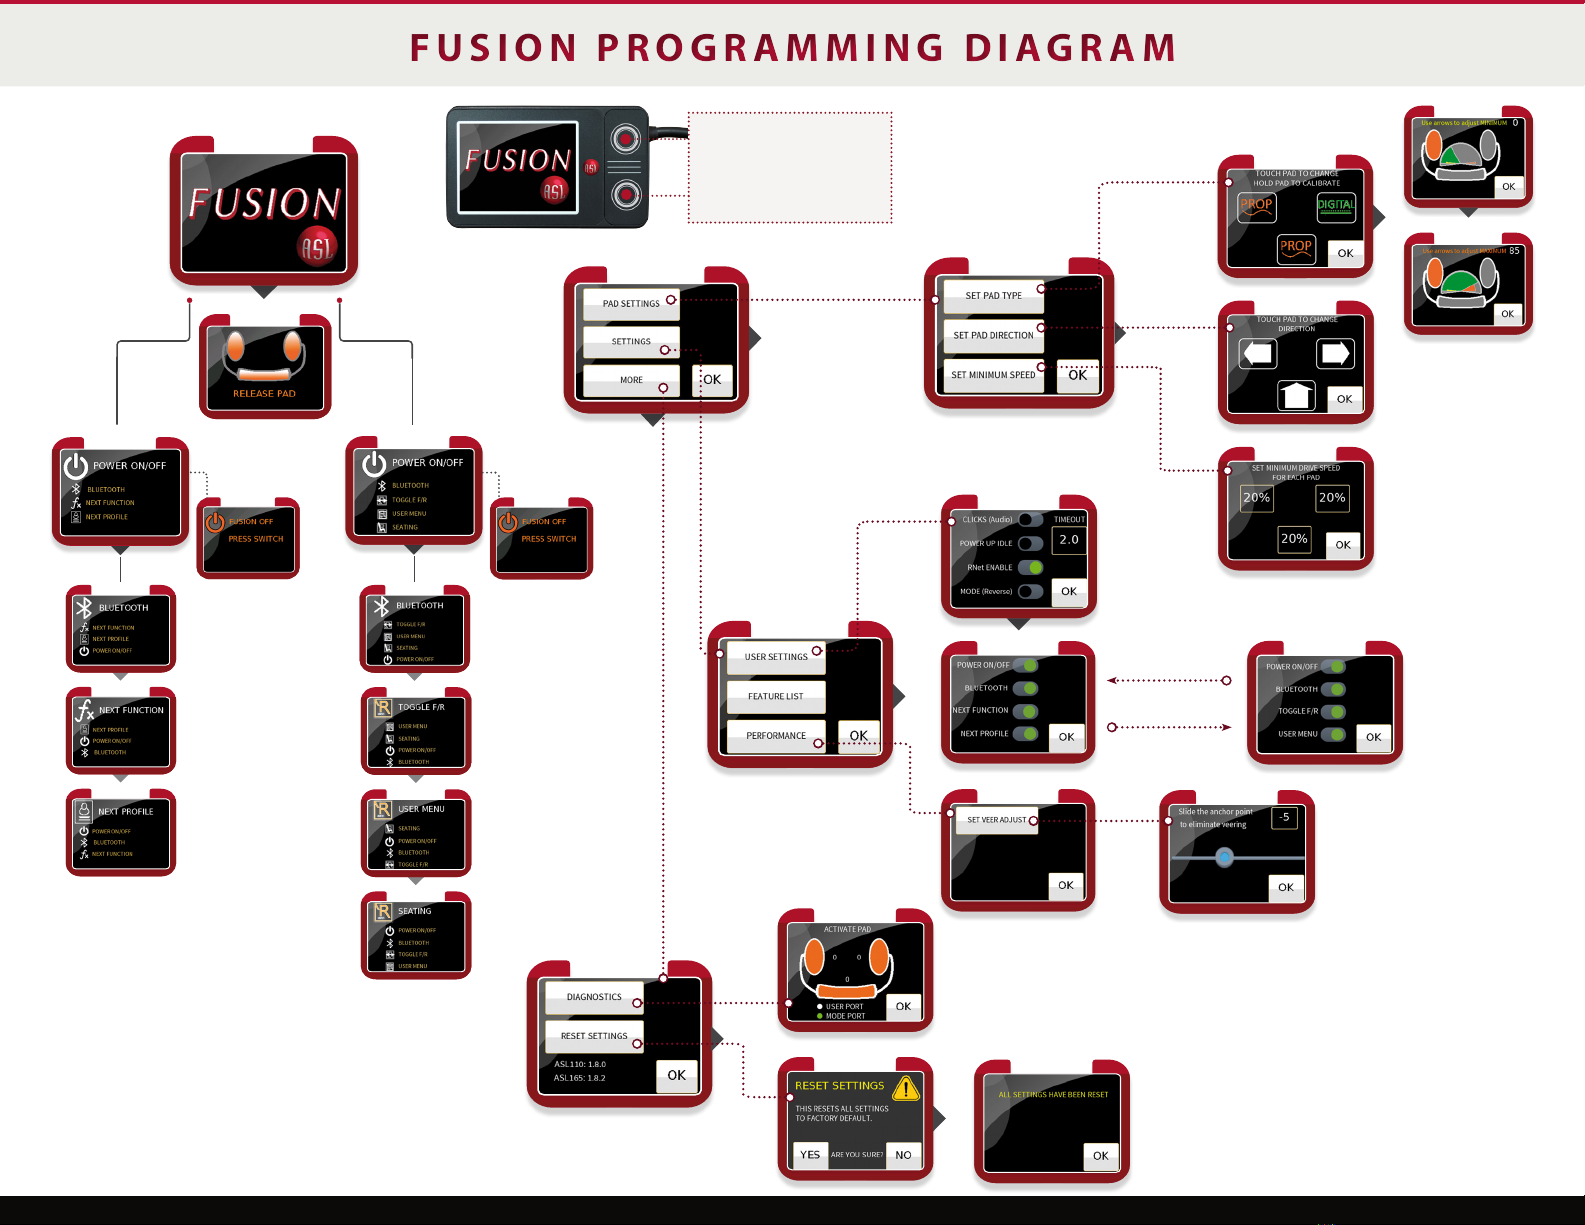
PROGRAMMING THE DISPLAY
Activating the 165 Display Programming Screen: Simultaneously
press down on both top and bottom circular buttons on the right side
of the display. This will activate the screen to begin programming.
When Next Function is highlighted,
a momentary switch activation
will move through the functions
programmed within a prole.
MAIN USER - NEXT FUNCTION
When Next Prole is highlighted a
momentary switch activation will
move through the proles that are
turned on in the chair.
MAIN USER - NEXT PROFILE
In Bluetooth Mode the FUSION will
connect to one of (3) three ASL
Accessories shown below.
Once in the Bluetooth Mode the
FUSION will automatically connect
to the selected powered receiver and
the FUSION Head Array will be the
activation for that accessory.
MAIN USER - BLUETOOTH
557-3 Bluetooth
Switch Interface
558 Mouse Emulator 545 Tecla E
When the Power On/O is highlighted a momentary switch
activation will turn the FUSION o and on.
When the FUSION is O, the screen will change color to indicate the
Head Array is o and will not react to any pad activation.
POWER OFF
The Main User Screen shows all the features available on the FUSION. When
aswitch is plugged into the User Port of the FUSION interface, a momentary
activation of the switch will activate the highlighted top selection.
When the patient holds the switch to the adjusted time, the system will move to
the next line item in the FUSION display. When the same switch is then activated
in a momentary activation, it will activate that selection.
MAIN USER
PROGRAMMER MENU
momentary activation of the switch will activate the highlighted top
selection. When the patient holds the switch to the adjusted time,
The Startup Screen will
appear while the system is
booting up for 2 seconds.
When a switch is plugged
into the User Port of
the FUSION Interface a
The ASL 165 FUSION Programmer and Display has multiple features. It can be used to personalize
the FUSION to the specic patients’ needs and it can be used as a display, so the patient will know what
they are controlling, such as: Bluetooth, Next Function, Next Prole, and On/O of the Head Array.
The Out of Neutral Screen will
appear if any of the pads are
activated while the FUSION
is powering up and when
Power Up Idle is off. As a safety
precaution, it will instruct the
user to move away from the
activated pad.
OUT OF NEUTRAL
CONNECTION PORT
USER PORT
the system will move
to the next line item
that is turned on in
the FUSION display. An
Auditory tone will be
heard:
One (1) beep for On/O , two (2) beeps for Bluetooth , three (3) beeps for
Next Function, and four (4) beeps for Next Prole. 
The Veer Adjust will help a chair drive in a
straight line by adjusting the signal from
the FUSION Input to the Controller.
The range is from -12 to +12. This image
illustrates what setting is provided as a
Default. It is a suggested setting for R-Net
and Q-Logic. Each chair will have a slightly
dierent setting.
VEER ADJUSTMENT
The Pad Performance screen is displayed
when the “PERFORMANCE” button is
pressed from the Pad Settings screen.
PAD PERFORMANCE
MAIN PROGRAMMING
FUSION 165 DISPLAY AND PROGRAMMER
When the Proportional Programmed Pad is held for 2 seconds a calibration screen
will appear.You will be guided to set up the Minimum and Maximum force required
to gain proportionality. When you push on the pad the green color is a real time
guide for the pressure that a person is pushing on the pad. This can be set by
each direction. The Minimum (in yellow) sets the force required to initiate the
proportional movement. The Maximum (in red) sets the force to reach 100% of
the programmed speed.
CALIBRATION MIN CALIBRATION MAX
The Initial Programming Screen is
activated by pressing the top and bottom
buttons simultaneously for 2 seconds.
When Pad Settings is selected a new
screen will appear.
PROGRAMMING
Set “Pad Type” directs you to the
Proportional Digital Selection.
PAD SETTINGS
Tapping “Prop” on the pad will change it
from Proportional to Digital by each pad
or direction.
In this example, the Left and Center Pad
are set to Proportional and the Right Pad
is set to Digital.
PAD TYPE
FEATURE SETTINGS
This will allow the FUSION Features that a
person is Not Using to be turned O.
If someone is not using Bluetooth through
the FUSION, or is not changing Proles,
you can slide them to O and they will not
appear on the Main Menu.
This will allow the FUSION Features in
R-Net that a person is Not Using to be
turned O.
If someone is not using Bluetooth through
the FUSION, or does not need access to the
R-Net User Menu, you can slide them to
O and they will not appear on the main
screen.
FEATURE SETTINGS IN R-NET
This screen is shown when the USER
SETTINGS button is pressed from the Main
Programming screen.
SETTINGS SETTINGS
Timeout: The length of time that the User Switch has to be held to move to the next setting.
The adjustment range is in seconds: 1 sec, 1.5, 2, 2.5, 3, 4, 5, and OFF.
R-Net Enable: Changes the User Screen to R-Net features for easier access.
Mode (Reverse): The Slide switch will change the how the switch responds to activation.
The choices are Mode and Reverse.
The Settings Screen will allow the Auditory beeps to
be turned on and o.
Power Up Idle: When this setting is on it will allow
the FUSION to stay o when the chair is turned on. An
activation of the User Switch will turn the system on
when a patient is ready to move.
This screen is shown in response to
pressing the RESET SETTINGS button on
the MORE settings screen.
The Reset Screen will take the FUSION
back to the Factory Settings. You will be
prompted to be double sure that you want
to do this.
If NO is pressed, settings will not be
changed, and no action is performed.
RESET SETTINGS
If YES is pressed, the parameters are reset
to Factory Default and this screen is shown.
The system will tell you when all of the
settings have been changed to Factory
Settings.
The OK button will return the user to the
Main Programming screen.
ALL SETTINGS RESET
The Pad’s illuminate in orange when the Pad is set
to Proportional and green when set to Digital (not
shown). A green light next to the Mode or User
Port will indicate the switch is working properly.
This tests the Mode and User Port for activation.
The light is green when activated.
DIAGNOSTIC
This screen is shown in response to
pressing the MORE button on the
PROGRAM SETTINGS screen.
The version of the ASL 110 FUSION and
the ASL 165 Programmer and Display is
also shown.
MORE SETTINGS
Diagnostic: This screen shows the pad’s, switch
port, and user port activations. The“0”next to the
Pad indicate the percentage of Drive Demand.
The back pad will move from Forward, Right, O, Left and
then back to Forward. This is helpful for a patient that needs
the back pad for a rest.
You can turn o the back pad, change the right switch to be
forward, and move the right direction to another location
such as, a hand or knee.
PAD DIRECTION
This allows the driving
direction to change by pad.
Touching the direction will
scroll clockwise starting
with the factory set
direction.
Set Minimum Speed: This setting will
allow each pad on the FUSION to change
the percentage of Digital to start the
movement of the chair.
The factory setting in each pad is set to
20%. This will start the initial movement
of the chair for the rst 20% of the speed
to be Digital. Pressing into the pads will
make the chair move proportionally.
The selections are 15, 20, 25, 30, 35, 40
and OFF.
MINIMUM SPEED
FUSION
PROGRAMMING
OUT OF NEUTRAL
FUSION
START SCREEN
Standard
Main User Menu
POWER OFF
BLUETOOTH
NEXT FUNCTION
NEXT PROFILE
R-Net
Main User Menu
POWER OFF
BLUETOOTH
TOGGLE F/R
USER MENU
SEATING
ACTIVATE PROGRAMMING
SCREEN:
Simultaneously Press Down
on Both Buttons on the Display
SETTINGS RESET
MORE
PROGRAMMING
DIAGNOSTICS
RESET SETTINGS
PROP
CALIBRATION MAX
PROP
CALIBRATION MIN
SET PAD TYPE
PAD SETTINGS
SET PAD
DIRECTION
SET MINIMUM
SPEED
SETTINGS
USER SETTINGS
FEATURE LIST R-NET ENABLED
SET VEER ADJUST
PERFORMANCE
IF R-NET IS NOT ENABLED
IF R-NET IS ENABLED
FUSION PROGRAMMING DIAGRAMFUSION PROGRAMMING DIAGRAM
For more assistance, visit the 165 FUSION
Display and Programmer Interactive
Guide on the ASL website.

Popular Motherboard manuals by other brands

Fujitsu Siemens Computers D1534 Technical manual

Fujitsu Siemens Computers

Fujitsu Siemens Computers D1534 Technical manual

Asus PRIME Z390-P manual

Asus

Asus PRIME Z390-P manual

Intel DP67BA specification

Intel

Intel DP67BA specification

Texas Instruments TPS628436-7-8EVM-167 user guide

Texas Instruments

Texas Instruments TPS628436-7-8EVM-167 user guide

Micrel MIC4724YMME manual

Micrel

Micrel MIC4724YMME manual

BCM BC57Q user manual

BCM

BCM BC57Q user manual

Intel H61 Series user manual

Intel

Intel H61 Series user manual

Biostar M6VCG user manual

Biostar

Biostar M6VCG user manual

Supero X8SIA user manual

Supero

Supero X8SIA user manual

ASROCK IMB-181-D user manual

ASROCK

ASROCK IMB-181-D user manual

Texas Instruments LMP90100 user guide

Texas Instruments

Texas Instruments LMP90100 user guide

NXP Semiconductors S08P-LITE quick start guide

NXP Semiconductors

NXP Semiconductors S08P-LITE quick start guide

Gigabyte GA-7ZMM user manual

Gigabyte

Gigabyte GA-7ZMM user manual

Asus MAXIMUS III FORMULA user guide

Asus

Asus MAXIMUS III FORMULA user guide

Intel D945PAW Product guide

Intel

Intel D945PAW Product guide

JETWAY JBC390F841VGU Technical manual

JETWAY

JETWAY JBC390F841VGU Technical manual

Microchip Technology SAMA5D2-PTC-EK user guide

Microchip Technology

Microchip Technology SAMA5D2-PTC-EK user guide

Infineon TriBoard TC3 6 Series manual

Infineon

Infineon TriBoard TC3 6 Series manual

manuals.online logo
manuals.online logoBrands
  • About & Mission
  • Contact us
  • Privacy Policy
  • Terms and Conditions

Copyright 2025 Manuals.Online. All Rights Reserved.