ASROCK MultiBook F24 User manual

MultiBook F24
User Manual
MEGA
1.3

2
Contents
Tableof Contents
Tableof Contents (Cont.)
1. Introducing the Notebook PC
About This User Manual............................................................................................. 6
Notes For This Manual...........................................................................................6
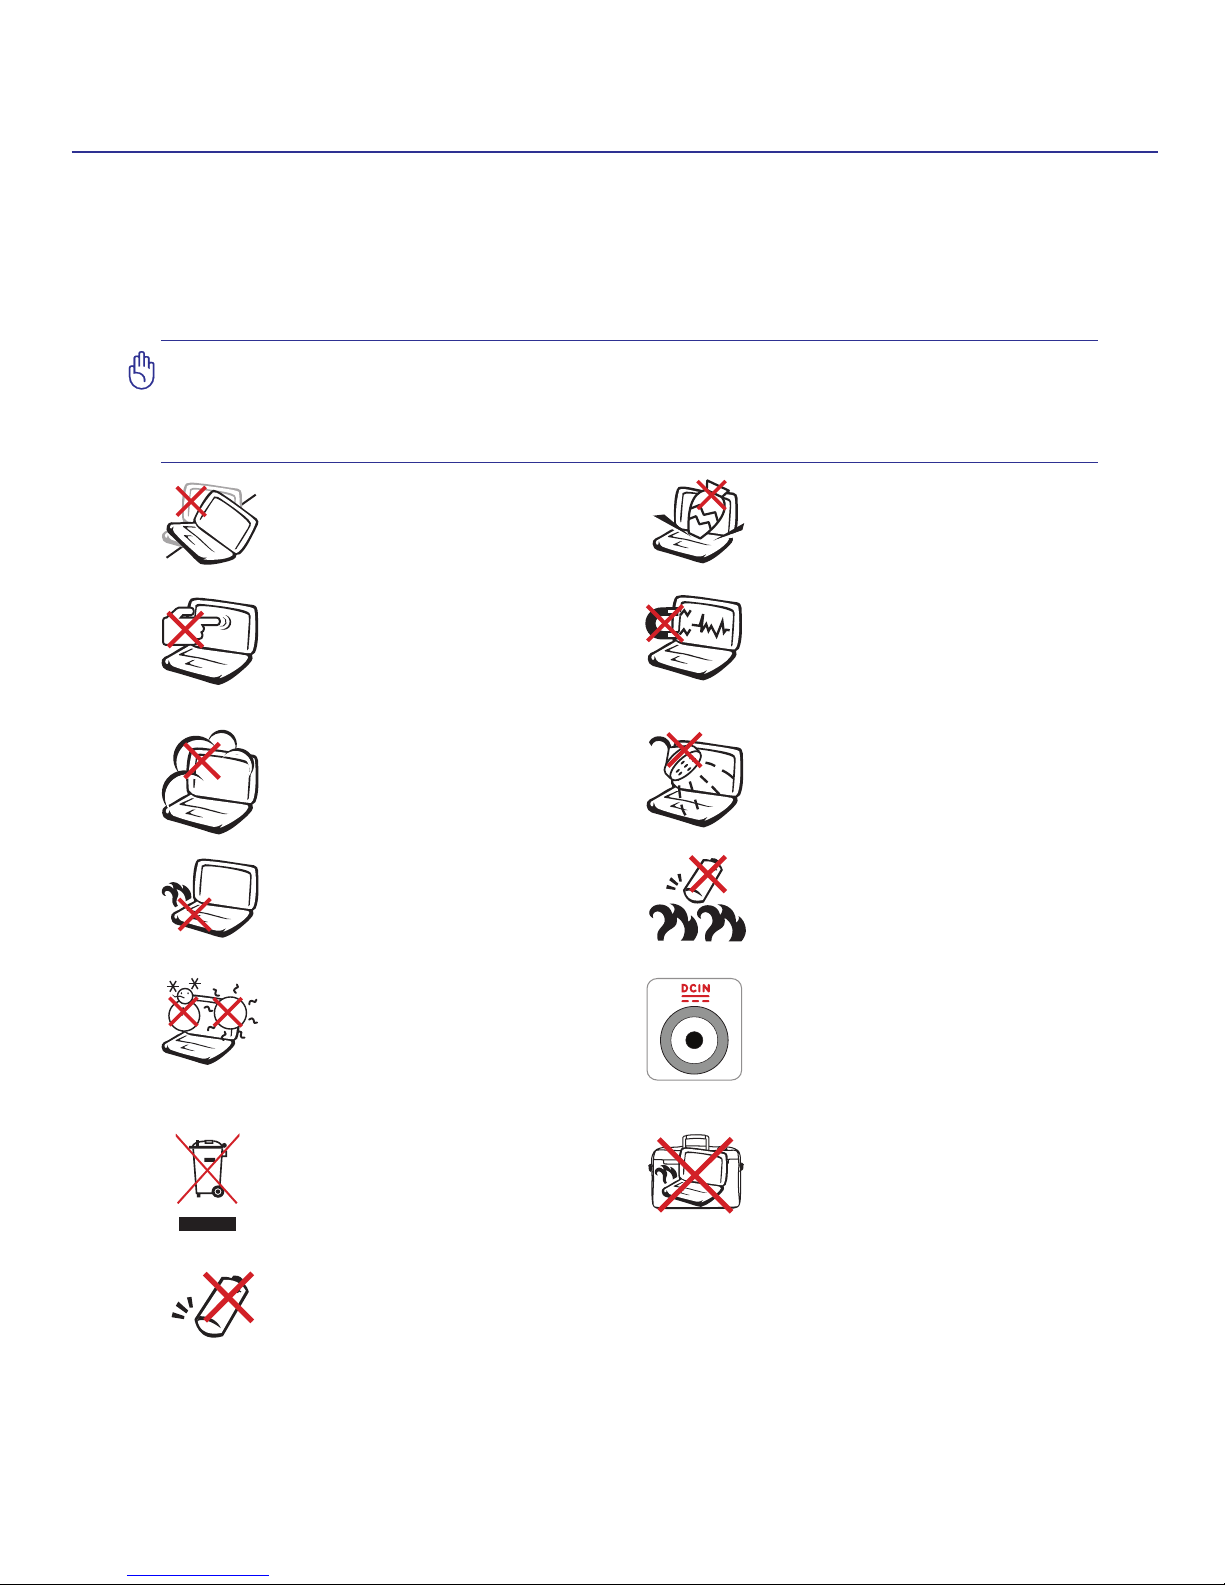
Safety Precautions ..................................................................................................... 7
2. Knowing the Parts
Top Side.................................................................................................................... 10
Front Side................................................................................................................. 11
Rear Side.................................................................................................................. 11
Right Side ................................................................................................................. 12
Left Side ................................................................................................................... 12
3. Getting Started
Power System .......................................................................................................... 14
Using AC Power................................................................................................... 14
Using Battery Power ............................................................................................ 15
Powering ON the Notebook PC ........................................................................... 16
Checking Battery Power ......................................................................................17
Charging the Battery Pack...................................................................................17
Power Options ..................................................................................................... 18
Power Management Modes.................................................................................19
Special Keyboard Functions..................................................................................... 20
Colored Hot Keys.................................................................................................20
Microsoft Windows Keys...................................................................................... 22
Keyboard as a Numeric Keypad ......................................................................... 22
Keyboard as Cursors ........................................................................................... 22
Switches and Status Indicators ................................................................................ 23
Switches............................................................................................................... 23
Status Indicators .................................................................................................. 24
Table of Contents

3
Contents
4. Using the Notebook PC
Pointing Device......................................................................................................... 26
Using the Touchpad ............................................................................................. 26
Multi-touch Gesture Usage ................................................................................. 27
Caring for the Touchpad.......................................................................................28
Automatic Touchpad Disabling............................................................................. 28
Storage Devices ....................................................................................................... 29
Hard Disk Drive.................................................................................................... 29
Memory (RAM)..................................................................................................... 30
Optical Drive ........................................................................................................ 31
Flash Memory Card Reader ................................................................................33
Connections.............................................................................................................. 34
Modem Connection.............................................................................................. 34
Network Connection ............................................................................................ 35
Wireless LAN Connection....................................................................................36
Bluetooth Wireless Connection............................................................................ 38
Table of Contents (Cont.)

4
Notes

5
1. Introducing the Notebook PC
About This User Manual
Safety Precautions
Transportation Precautions
Preparing your Notebook PC
NOTE: Photos and icons in this manual are used for artistic purposes only and do not
show what is actually used in the product itself.

6
1Introducing the Notebook PC
About This User Manual
You are reading the Notebook PC User Manual. This User Manual provides
information on the various components in the Notebook PC and how to use
them. The following are major sections of this User Manual:
1. Introducing the Notebook PC
Introduces you to the Notebook PC and this User Manual.
2. Knowing the Parts
Gives you information on the Notebook PC’s components.
3. Getting Started
Gives you information on getting started with the Notebook PC.
4. Using the Notebook PC
Gives you information on using the Notebook PC’s components.
Notes For This Manual
A few notes and warnings in bold are used throughout this manual that you should be aware of
in order to complete certain tasks safely and completely. These notes have different degrees
of importance as described below:
NOTE: Tips and information for special situations.
TIP: Tips and useful information for completing tasks.
IMPORTANT! Vital information that must be followed to prevent damage to data,
components, or persons.
WARNING! Important information that must be followed for safe operation.
Text enclosed in < > or [ ] represents a key on the keyboard; do not actually type the
< > or [ ] and the enclosed letters.
< >
[ ]

7
Introducing the Notebook PC 1
Safety Precautions
The following safety precautions will increase the life of the Notebook PC. Follow all precautions
and instructions. Except as described in this manual, refer all servicing to qualied personnel.
Do not use damaged power cords, accessories, or other peripherals. Do not use strong solvents
such as thinners, benzene, or other chemicals on or near the surface.
IMPORTANT! Disconnect the AC power and remove the battery pack(s) before cleaning.
Wipe the Notebook PC using a clean cellulose sponge or chamois cloth dampened
with a solution of nonabrasive detergent and a few drops of warm water and remove
any extra moisture with a dry cloth.
CAUTION! Danger of explosion
if battery is incorrectly replaced.
Replace only with the same or
equivalent type recommended by
the manufacturer.
Battery safety warnings:
DO NOT throw the battery in re.
DO NOT disassemble the battery.
DO NOT short circuit the contacts.
DO NOT expose to dirty or dusty
environments. DO NOT operate
during a gas leak.
DO NOT expose to or use near
liquids, rain, or moisture. DO NOT
use the modem during an electri-
cal storm.
DO NOT leave the Notebook PC
on your lap or any part of the body
in order to prevent discomfort or
injury from heat exposure.
DO NOT place on uneven or unsta-
ble work surfaces. Seek servicing if
the casing has been damaged.
DO NOT expose to strong magnetic
or electrical elds.
DO NOT press or touch the display
panel. Do not place together with
small items that may scratch or
enter the Notebook PC.
DO NOT place or drop objects on
top and do not shove any foreign
objects into the Notebook PC.
DO NOT throw the Notebook
PC in municipal waste. Check
local regulations for disposal of
electronic products.
SAFE TEMP: This Notebook PC
should only be used in environ-
ments with ambient temperatures
between 5°C (41°F) and 35°C
(95°F).
DO NOT carry or cover a Notebook
PC that is powered ON with any
materials that will reduce air
circulation such as a carrying
bag.
INPUT RATING: Refer to the rating
label on the bottom of the Notebook
PC and be sure that your power
adapter complies with the rating.

8
Notes

9
2. Knowing the Parts
Basic sides of the Notebook PC
NOTE: Photos and icons in this manual are used for artistic purposes only and do not
show what is actually used in the product itself.

10
2Knowing the Parts
Top Side
Refer to the diagram below to identify the components on this side of the Notebook PC.
NOTE: The keyboard will be different for each territory.
MEGA
1.3
5
6
3
2
4
5
8
9
7
1 0
1
2
3
5
1
Camera
Camera Indicator
Microphone (Built-in)
Display Panel
Audio Speakers
4
Status Indicators (top)
Function Switches
Keyboard
Touchpad and Buttons
Status Indicators (front)
7
8
6
9
10

11
Getting Started 3
Front Side
Refer to the diagram below to identify the components on this side of the Notebook PC.
Headphone Output Jack
1
2
3
Memory Card Reader (MMC/SD)
Microphone Input Jack
MMC.SD
3
2
1
Rear Side
Refer to the diagram below to identify the components on this side of the Notebook PC.
5
4678
4
5
6
7
8
Power (DC) Input
Kensington®Lock Port
HDMI Port
HDMI
Display (Monitor) Output
Modem Port
IMPORTANT! The built-in modem does not support the voltage used in
digital phone systems. Do not connect the modem port to a digital phone
system or else damage will occur to the Notebook PC.

12
2Knowing the Parts
9
Right Side
Refer to the diagram below to identify the components on this side of the Notebook PC.
11
910
2 . 0
USB Ports (2.0/1.1)
LAN Port
E-SATA Port
E-SATA
10
11
12
Left Side
Refer to the diagram below to identify the components on this side of the Notebook PC.
12
Optical Drive

13
3. Getting Started
Power System
Special Keyboard Functions
Switches and Status Indicators
NOTE: Photos and icons in this manual are used for artistic purposes only and do not
show what is actually used in the product itself.

14
3Getting Started
IMPORTANT! Damage may occur if you use a different adapter to power the Notebook
PC or use the Notebook PC’s adapter to power other electrical devices. If there is smoke,
burning scent, or extreme heat coming from the AC-DC adapter, seek servicing. Seek
servicing if you suspect a faulty AC-DC adapter. You may damage both your battery
pack(s) and the Notebook PC with a faulty AC-DC adapter.
NOTE: This Notebook PC may come with either a two or three-prong plug depending
on territory. If a three-prong plug is provided, you must use a grounded AC outlet or
use a properly grounded adapter to ensure safe operation of the Notebook PC.
WARNING! THE POWER ADAPTER MAY BECOME WARM TO HOT WHEN IN USE. BE
SURE NOT TO COVER THE ADAPTER AND KEEP IT AWAY FROM YOUR BODY.
TIP: You can buy travel kits for the Notebook PC that includes power and modem
adapters for almost every country.
Power System
Using AC Power
The Notebook PC power is comprised of
two parts, the power adapter and the battery
power system. The power adapter converts
AC power from a wall outlet to the DC power
required by the Notebook PC. Your Notebook
PC comes with a universal AC-DC adapter.
That means that you may connect the power
cord to any 100V-120V as well as 220V-240V
outlets without setting switches or using power
converters. Different countries may require that
an adapter be used to connect the provided
US-standard AC power cord to a different
standard. Most hotels will provide universal outlets to support different power cords as well
as voltages. It is always best to ask an experienced traveler about AC outlet voltages when
bringing power adapters to another country.
1
2
3

15
Getting Started 3
IMPORTANT! Never attempt to remove the battery pack while the Notebook PC is
turned ON, as this may result in the loss of working data.
3
1 12
3
1
2
To install the battery pack: To remove the battery pack:
WARNING! For safety reasons, DO NOT throw the battery in re, DO NOT
short circuit the contacts, and DO NOT disassemble the battery. If there is
any abnormal operation or damage to the battery pack caused by impact,
turn OFF the Notebook PC and contact an authorized service center.
Using Battery Power
The Notebook PC is designed to work with a removable battery pack. The battery pack consists
of a set of battery cells housed together. A fully charged pack will provide several hours of battery
life, which can be further extended by using power management features through the BIOS setup.
Additional battery packs are optional and can be purchased separately through a Notebook PC
retailer.
Installing and Removing the Battery Pack
Your Notebook PC may or may not have its battery pack installed. If your Notebook PC does not
have its battery pack installed, use the following procedures to install the battery pack.
IMPORTANT! Only use battery packs and power adapters supplied with this Notebook
PC or specically approved by the manufacturer or retailer for use with this model, do
not use incorrect battery types or else damage may occur to the Notebook PC.

16
3Getting Started
IMPORTANT! If warnings are still given during bootup after running a software disk
checking utility, you should take your Notebook PC in for servicing. Continued use
may result in data loss.
IMPORTANT! To protect the hard disk drive, always wait at least 5 seconds after
turning OFF your Notebook PC before turning it back ON.
NOTE: Before bootup, the display panel ashes when the power is turned ON. This is
part of the Notebook PC’s test routine and is not a problem with the display.
WARNING! DO NOT carry or cover a Notebook PC that is powered ON with any materials
that will reduce air circulation such as a carrying bag.
Powering ON the Notebook PC
The Notebook PC’s power-ON message appears on the screen when you turn it ON. If necessary,
you may adjust the brightness by using the hot keys. If you need to run the BIOS Setup to set
or modify the system conguration, press [F2] upon bootup to enter the BIOS Setup. If you
press [Tab] during the splash screen, standard boot information such as the BIOS version can
be seen. Press [ESC] and you will be presented with a boot menu with selections to boot from
your available drives.

17
Getting Started 3
NOTE: You will be warned when battery power is low. If you continue to ignore the low battery
warnings, the Notebook PC eventually enters suspend mode (Windows default uses STR).
WARNING! Suspend-to-RAM (STR) does not last long when the battery power is depleted.
Suspend-to-Disk (STD) is not the same as power OFF. STD requires a small amount of
power and will fail if no power is available due to complete battery depletion or no power
supply (e.g. removing both the power adapter and battery pack).
NOTE: Screen captures
shown here are examples
only and may not reect what
you see in your system.
Checking Battery Power
The battery system implements the Smart Battery standard under the Windows environment,
which allows the battery to accurately report the amount of charge left in the battery. A fully-
charged battery pack provides the Notebook PC a few hours of working power. But the actual
gure varies depending on how you use the power saving features, your general work habits,
the CPU, system memory size, and the size of the display panel.
Left-click the battery icon
Cursor over the battery icon without
power adapter.
Cursor over the battery icon with
power adapter.
Right-click the battery icon
WARNING! Do not leave the battery pack discharged. The battery pack will discharge
over time. If not using a battery pack, it must continued to be charged every three
months to extend recovery capacity or else it may fail to charge in the future.
NOTE: The battery stops charging if the temperature is too high or the battery voltage
is too high.
Charging the Battery Pack
Before you use your Notebook PC on the road, you will have to charge the battery pack. The
battery pack begins to charge as soon as the Notebook PC is connected to external power using
the power adapter. Fully charge the battery pack before using it for the rst time. A new battery
pack must completely charge before the Notebook PC is disconnected from external power. It
takes a few hours to fully charge the battery when the Notebook PC is turned OFF and may take
twice the time when the Notebook PC is turned ON. The battery status indicator on the Notebook
PC turns OFF when the battery pack is charged.

18
3Getting Started
IMPORTANT! To protect the hard drive, wait at least 5 seconds after turning OFF your
Notebook PC before turning it back ON.
IMPORTANT! Do not use emergency shutdown while data is being written; doing so
can result in loss or destruction of your data.
Emergency Shutdown
In case your operating system cannot properly turn OFF or restart, there is a manual way to
shutdown your Notebook PC:
Power Options
The power switch turns ON and OFF the Notebook PC or putting the Notebook PC into sleep
or hibernation modes. Actual behavior of the power switch can be customized in Windows
Control Panel “Power Options.”
For other options, such as “Switch User, Restart, Sleep, or Shut Down,” click the arrowhead
next to the lock icon.
Restarting or Rebooting
After making changes to your operating system, you may be
prompted to restart the system. Some installation processes will
provide a dialog box to allow restart. To restart the system manually,
choose Restart.
Hold the power switch over 4 seconds

19
Getting Started 3
Sleep and Hibernate
Power management settings can be found in the Windows > Control
Panel > Power Options. In System Settings, you can dene “Sleep/
Hibernate” or “Shut Down” for closing the display panel or pressing
the power button. “Sleep” and “Hibernate” saves power when your
Notebook PC is not in use by turning OFF certain components.
When you resume your work, your last status (such as a document
scrolled down half way or email typed half way) will reappear as
if you never left. “Shut Down” will close all applications and ask if
you want to save your work if any are not saved.
Hibernate is the same as Suspend-to-Disk (STD) and stores your current data and status
on the hard disk drive. By doing this, RAM does not have to be periodically refreshed and
power consumption is greatly reduced but not completely eliminated because certain wake-up
components like LAN needs to remain powered. “Hibernate” saves more power compared to
“Sleep”. Click the Start button and the arrowhead next to the lock icon to see this option. Recover
by pressing the power button. (NOTE: The power indicator will be OFF in this mode.)
Sleep is the same as Suspend-to-RAM (STR). This function stores
your current data and status in RAM while many components are
turned OFF. Because RAM is volatile, it requires power to keep
(refresh) the data. Click the Start button and the arrowhead next to the
lock icon to see this option. You can also use the keyboard shortcut
[Fn F1] to activate this mode. Recover by pressing any keyboard key
except [Fn]. (NOTE: The power indicator will blink in this mode.)
Power Management Modes
The Notebook PC has a number of automatic or adjustable power saving features that you can
use to maximize battery life and lower Total Cost of Ownership (TCO). You can control some of
these features through the Power menu in the BIOS Setup. ACPI power management settings
are made through the operating system. The power management features are designed to save
as much electricity as possible by putting components into a low power consumption mode as
often as possible but also allow full operation on demand.
Thermal Power Control
There are three power control methods for controlling the Notebook PC’s thermal state. These
methods cannot be congured by the user and should be known in case the Notebook PC should
enter these states. The following temperatures represent the chassis temperature (not CPU).
• The fan turns ON for active cooling when temperature reaches the safe upper
limit.
• The CPU decreases speed for passive cooling when the temperature exceeds
the safe upper limit.
• The system shuts down for critical cooling when temperature exceeds the maximum safe
upper limit.

20
3Getting Started
Special Keyboard Functions
Colored Hot Keys
The following denes the colored hot keys on the Notebook PC’s keyboard.
The colored commands can only be accessed by rst pressing and holding
the function key while pressing a key with a colored command.
MEGA
1.3
NOTE: The Hot Key locations on the function keys may vary depending on model but
the functions should remain the same.
“Zz” Icon (F1): Places the Notebook PC in suspend mode (either Save-to-RAM or
Save-to-Disk depending on sleep button setting in power management setup).
Filled Sun Icon (F5):
Decreases the display brightness
Open Sun Icon (F6):
Increases the display brightness
“e” Icon (F4): Pressing this button will launch your Internet browser application
while Windows is running.
Envelope Icon (F3): Pressing this button will launch your Email application
while Windows is running.
LCD Icon (F7): Toggles the display panel ON and OFF. (On certain models; stretches
the screen area to ll the entire display when using low resolution modes.)
LCD/Monitor Icons (F8): Toggles between the Notebook PC’s LCD display and an external
monitor in this series: Notebook PC LCD -> External Monitor -> Both. (This function does
not work in 256 Colors, select High Color in Display Property Settings.) NOTE: Must
connect an external monitor “before” booting up.
Radio Tower (F2): Wireless Models Only: Toggles the internal wireless LAN ON or
OFF with an on-screen-display. When enabled, the corresponding wireless indicator
will light. Windows software settings are necessary to use the wireless LAN.
Crossed-out Touchpad (F9): Toggles the built-in touchpad LOCKED (disabled) and
UNLOCKED (enabled). Locking the touchpad will prevent you from accidentally
moving the cursor while typing and is best used with an external pointing device
such as a mouse. NOTE: Selected models have an indicator between the touchpad
buttons will light when the touchpad is UNLOCKED (enabled) and not light when
the touchpad is LOCKED (disabled).
(continued on next page)
Table of contents
Other ASROCK Laptop manuals