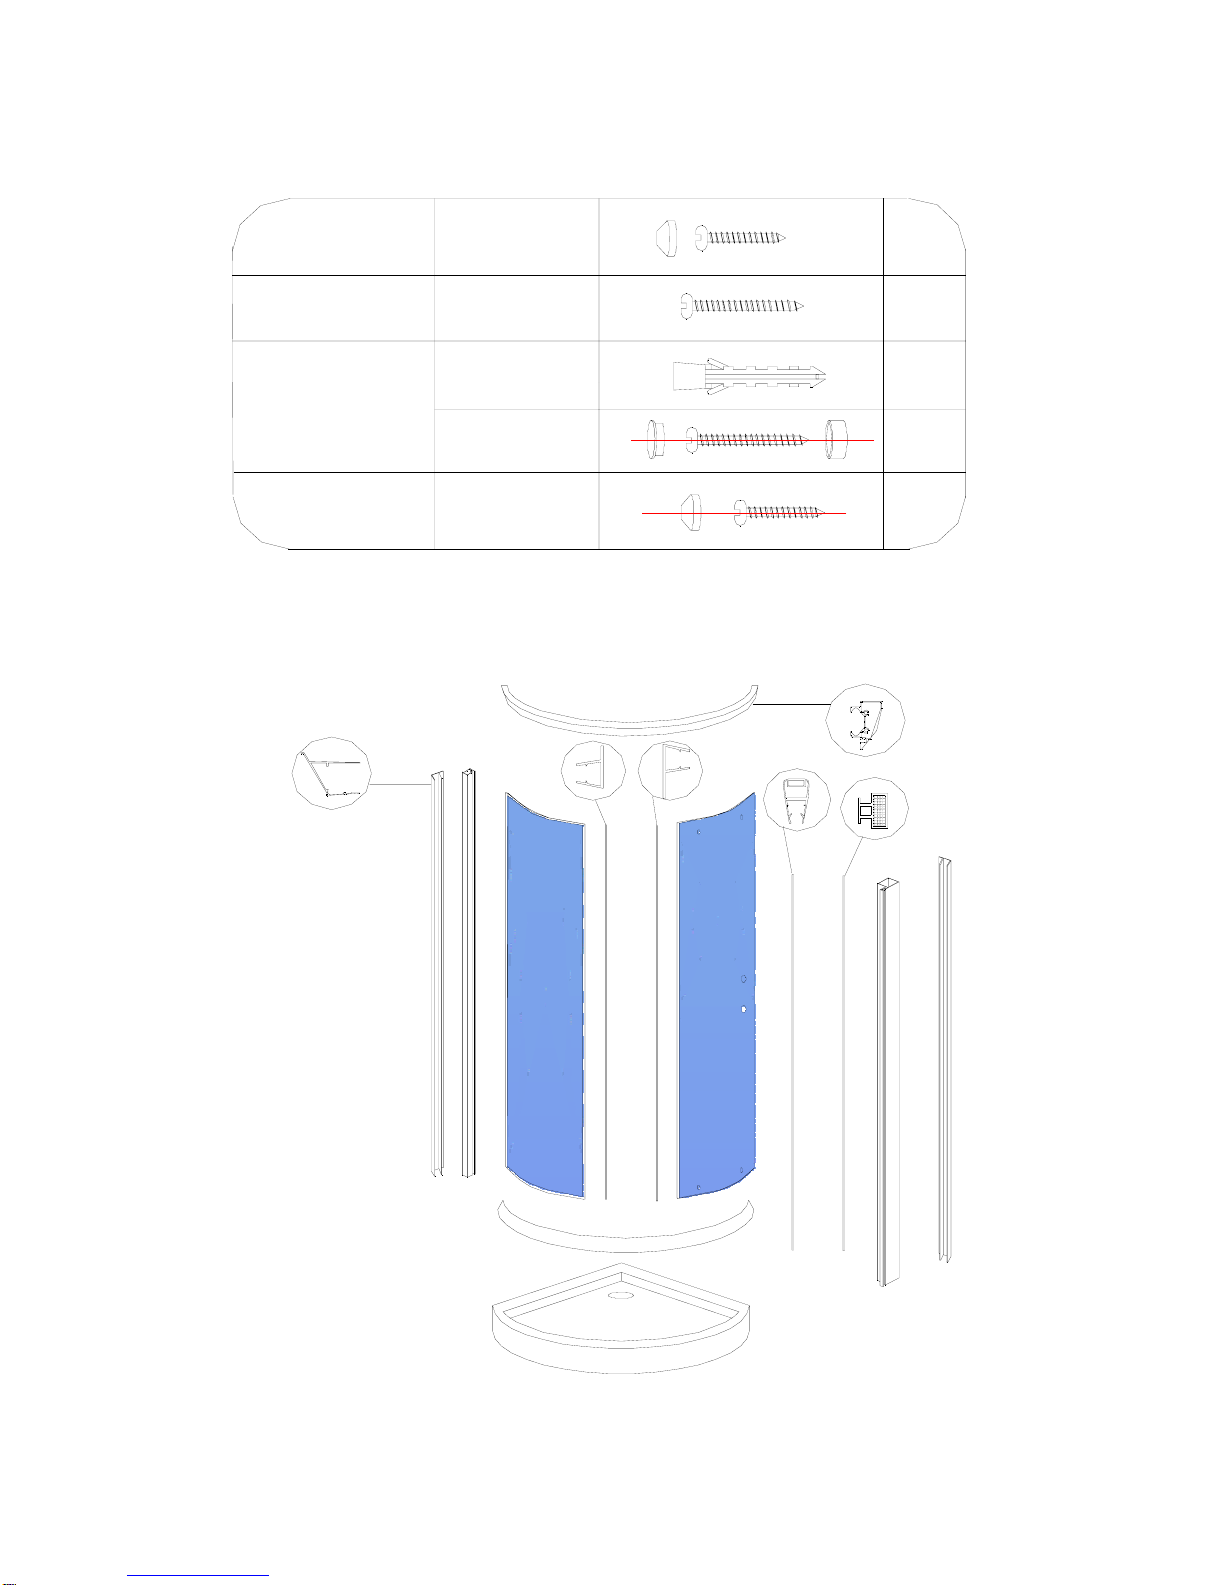
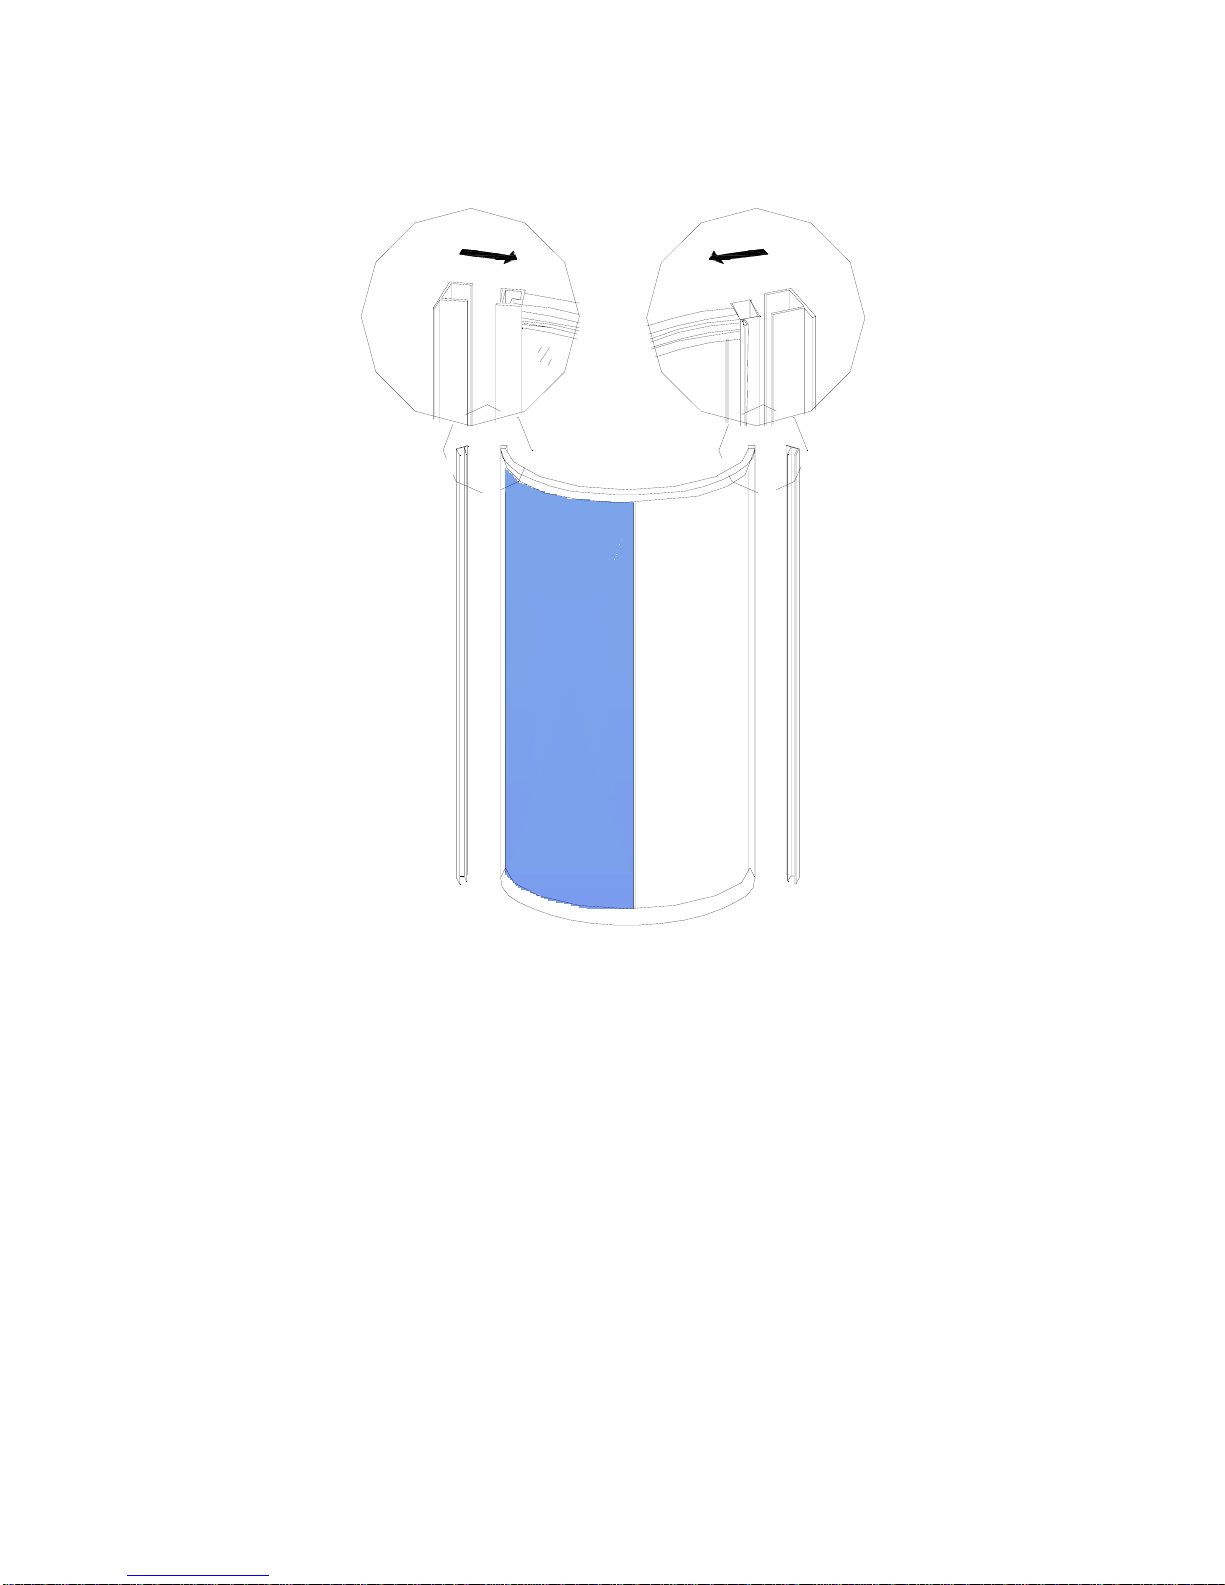
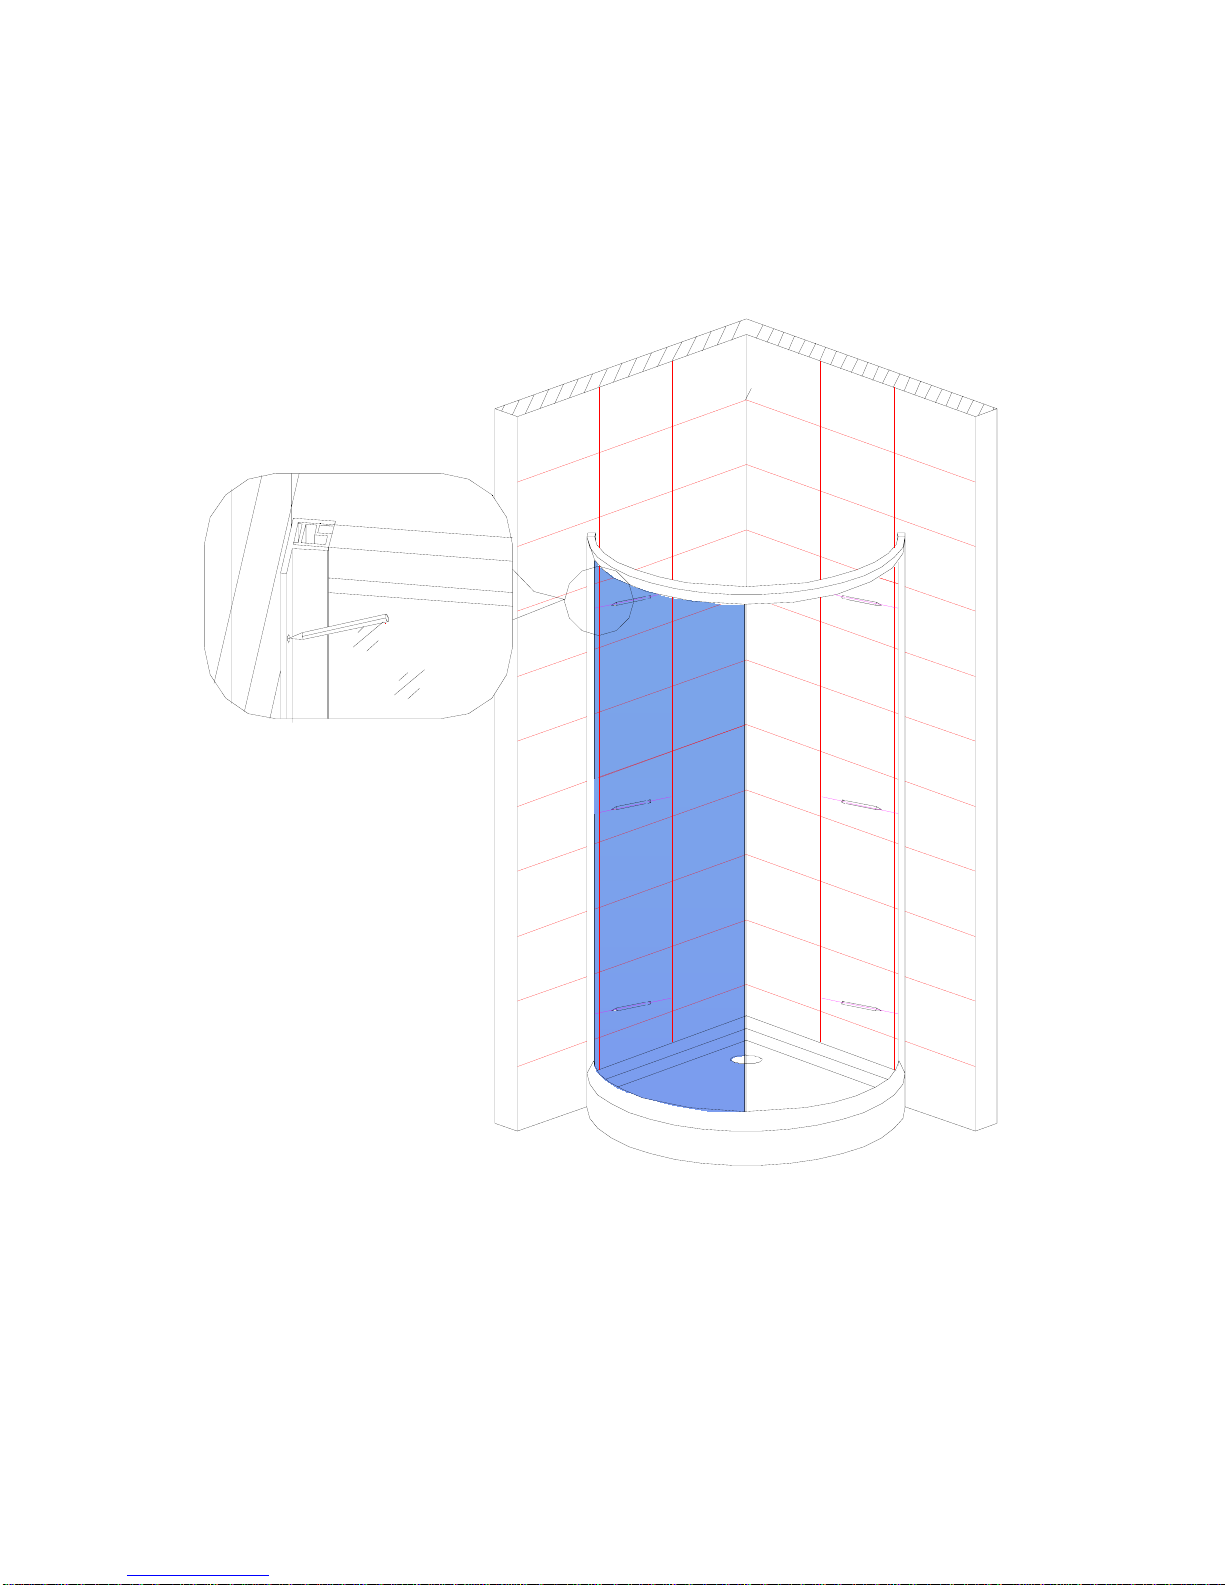
Aston Global SD908 Installation instructions

Shower Door Model Number :SD908
INSTALLATION AND OWNER'S MANUAL
Please carefully read these instructions before you begin to install the products.
01/12 Rev B
P/N:10055-06

Thank you for purchasing your Aston shower door and tray. We hope that it will
provide you with years of satisfying use and enjoyment.
Please read this manual carefully because it contains information and instructions
about the proper installation of the unit. If you do not follow certain conditions of
installation and maintenance, your warranty may be affected.
Aston Shower door's and shower tray's feature:
ϒ⁄ Tempered Safety Glass
ϒ⁄ High quality hardware
ϒ⁄ Easy maintenance durable fiberglass reinforced acrylic
Before you start
1

SUPPLIED HARDWARE
SUPPLIED PARTS
2
6
SCREW PACK
(2)
SCREW PACK
(3)
M5x16.5
SCREW PACK
(4)
M4x40
expand tube
M4x12
SCREW PACK
(1) 8
M4x30 8
6
6

Please read and follow the installation instructions and guidelines in this section.
Failure to follow the recommended instructions and installation techniques may
lead to possible damage to the unit or the surrounding area and can affect
warranty claims.
ATTENTION: This unit requires assembly. A minimum of two people are
required for assembly, as several of the sections can be large and unstable until
assembled.
You will need the following tools:
ϒ⁄ Drill with screwdriver attachments
ϒ⁄ Caulk gun
ϒ⁄ Level (3 foot or longer is recommended)
ϒ⁄ Tape measure
ϒ⁄ Phillips head screw driver
ϒ⁄ Flat head screw driver
Installation Guide
3
75"
212"
36"
36"
1235"
1235"

ϒ⁄ Bathroom rated silicone sealant
Before starting the installation, please ensure that you have inspected all
components of the unit and check for broken or damaged sections. If you find
damage, please contact your dealer or the manufacturer.
Locate the accessory and manual box and remove the individual screw and
hardware packages and lay them out in sequential order to aid in completing
the rest of the installation
4

The shower tray needs to sit on a flat level base for proper support. Ensure that
the area for the shower tray is properly prepared for installation.
Using the drawing provide place the floor drain in the proper location so that the
shower tray drain and the floor drain are in line after final installation.
Place the shower tray in the final installation position line up the drain holes and
check for level. If not level make adjustments to the floor at this time.
Preparation of base
for installation of shower tray
5

1. Remove and inspect all of the glass panels. If any are broken, please contact
your dealerorthe manufacturer.
NOTE: Theglasspanels are labeled to indicate the direction for the topofthe
glass panels.
2. Remove and inspect the aluminum top and bottom rails for the glass
assembly.
NOTE: Thealuminumrailsare labeledtodistinguish the top and bottom railand
their orientation within the assembly.
IMPORTANT: Please take note that Screw Pack contains several different
lengths of screws each for a specific location within the glass assembly.
During the next steps of assembly, pay close attention so the correct screw
length is used in the correct location. Failure to do this cancausedamage to
the glass panels and possibly result in leaks.
Assemble the glass panel
6
M5x16.5mm
M5x16.5mm
SCREW PACK
(1)

3. Place the bottom aluminum rail on the floor with correct orientation up to
receive the glass panel.
4. Apply a liberal bead of sealant on the bottom rail from the slot that receives
the glass panel out to the end oftherail.
NOTE: The next steps of assembly will require two people.
5. Side glass panel and insert it into the slot onthebottomrail.
6. Take the top aluminum rail and apply a liberal bead of sealant from the slot
for the glass panel out to the end oftherail.
7. Line up the slot on the top rail with the receiving tabs on the glass panel and
insert the top rail on to the glasspanels.
8. Apply some sealant to the end of the aluminum channels, then u sing the
screws provided follow the diagram to insert the correct screw length in to the
correct location.
7
M4X30mm
M4X30mm
SCREW PACK
(2)

9. After all the screws are in place and secure, wipe any excessivesealant and
use the excess to fill any cracks or gaps betweenthejoints.
10. Cover the exposed screw heads with decorative plastic screwheadcovers
8

Place the assembled glass wall panel onto the shower tray and mark the predrilled
holes onto the wall. Remove after marking the walls.
Mark the Glass panel mounting holes
9

Using the appropriate drill bit for your wall surface drill each hole location with a
5/16” diameter drill bit. Install the plastic wall anchors provided into the drilled
holes
NOTE: If your surface is prone to cracking or chipping then it is
recommended that you pilot drill first using a smaller drill bit, and then step
up to the final size.
Drilling and installing the wall anchors
10
?8mm

Using the screws provided secure the glass wall panel to the walls.
Secure the glass wall panel to the walls
11
SCREW PACK
(3)

Use a ?1/8 inch diameter drill bit and drill 3 equally spacedholesalongeach wall
channel on the inside of the shower. Do not drill all the way thru to the otherside
drill only until the drill bit enters the void in the wall channel. Using the hardware
provided secure the fixed glass panel to the wall channel. Repeat ontheother
side. Decorative covers are also provided to cover the screw heads
Secure the glass wall panel
12
?3.2
M4x12mm
SCREW PACK
(4)
C
B

1. Remove and inspect the glass door. If anyaredamaged or broken, please
contact your dealer orthemanufacturer.
2. Four roller mount assemblies for the door arelocatedinsideontheunitonthe
upper and lower aluminumrails.
3. Carefully disassemble each doorrollermountassembly.
IMPORTANT: Note the disassembly order of the rollermountassembly.Itis
critical that the order be repeated for proper adjustmentsofthedoors.Pleasesee
the illustration provided.
Install glass sliding door
13

4. Remove the decorative nut, locking nut, and plastic washer. Leave the plastic
tube and back plastic washer on the door roller.
5. Taking the door, and slide the door over the top two-door roller mounts.
IMPORTANT: The plastic tubes must be inserted into the two top mounting holes
in the door.
6. Reinstall the plastic washers onto the top roller and then install the metal
locking nuts. Hand tighten the locking nuts.
7. Repeat the process on the two lower roller mounts ensuring that the plastic
tubes are inserted in the glass door and then reinstall the plastic washer and metal
locking nut and hand tighten.
8. Check the door seal down the length of the seal. If it is not in full contact, use
a flat head screw driver and adjust the top roller mounts so that the door seal is in
contact for the entire length of the door.
NOTE: A cam roller inside of the door roller is used for adjustments of the door. By
turning this cam, you will raise or lower the door by adjusting the seal.
9. After making the final adjustments, tighten all of the metal locking nuts.
10. Install the decorative nut covers.
11. Install the vinyl door “F” type seals on each door so that the squeegee flaps
will wipe the glass when opening and closing.
14

1. The door handles are located within theaccessorymanualbox.Removethem
from the packaging and note the end with the knob on it. The door knob will be
located to the top after finalinstallation.
2. Remove the doorknob and one of the vinyl washers,but leave the plastic tube
and the other vinylwasher.
NOTE: Sometimes when removing the doorknob the threaded stud will come out.
If this happens, remove the stud from the doorknob and thread it back into the
door handle at least two or three turnsoruntilitbottomsout.
Install the door handles
15

3. Insert the door handle with the threaded stud into the top hole on the glass
door with the plastic tube in the hole and the vinyl washer between the glass and
the door handle.
2. Install the remaining vinyl washer onto the stud and then install the doorknob.
Located within the packaging for the door handles you will find:
a.2 Vinyl washer
b.2 Screws
c.1 Hard plastic washers
d.1 Decorative covers
3. Insert one of the screws through the hard plastic washers and then install the
screw with the plastic washer into the door handle with one of the vinyl washers in
between the hard plastic washer and the glass door.
4. After the door handle is secure, install the decorative cover over the screw
and hard plastic washer.
16

Using bathroom rated silicone sealant or caulk seal the bottom of each fixed glass
panels to the shower tray and seal along each wall channel where the wall
channel meets the wall.
Final sealing
17

As with any other luxury item, maintenance and care are critical to the long lasting
quality and enjoyment of your shower door and tray. The proper care and
maintenance outlined in this section are necessary to ensure the longevity of the
unit. Damage caused by not following the care and maintenance guidelines in this
section is not covered under the manufacturer's warranty.
The unit is constructed from high quality acrylic and with proper care the unit will
maintain its nice look and finish.
IMPORTANT: Never use an abrasive cleaner such as Comet or Ajax to clean the
acrylic surface. These cleaners will scratch the surface and dull the finish. In
addition, do not use any of the following products to clean the acrylic surface:
ϒ⁄ Acetone
ϒ⁄ MEK
ϒ⁄ Mineral spirits
ϒ⁄ any other solvent based cleaner
You can clean the acrylic surface with a mild non-abrasive cleaner such as Soft
Scrub or other cleaning products formulated for acrylic surfaces.
You can buff and polish the acrylic surface using any good polishing compound
such as Maguire's #10 Mirror glaze, toothpaste, or automotive polishing paste.
Using these types of products will help maintain the shine and luster of the acrylic
surface.
If you happen to discover any small minor surface scratches in the acrylic, you can
use 600# grit wet sand paper to lightly buff out any scratches, and then use a
surface polish to restore the shine and luster.
For deep scratches or chips where material has been removed, purchase an
acrylic repair kit, which is available through hardware stores and home centers.
Read and follow all of the instruction contained in the kit.
The glass doors and panels can be cleaned using any commercially available
glass cleaner.
We recommend that you clean the glass daily and squeegee the glass with a
silicone or rubber squeegee after each use to help prevent water spots.
Care and Maintenance
18

PLEASE READ THESE WARRANTY TERMS AND CONDITIONS CAREFULLY
BEFORE USING YOUR ASTON GLOBAL BATHROOM PRODUCT. BY USING
THE PRODUCT, YOU ARE CONSENTING TO BE BOUND BY THE FOLLOWING
WARRANTY TERMS AND CONDITIONS.
SHOWER DOOR/SHOWER TRAY
Aston Global Inc. Parts-Only Limited Warranty 5 years
Aston Global, Inc. (“Aston Global”) warrants to the original retail purchaser (“Owner”)
of any Shower Door/Tray product (“Product”), at the original installation site, for a
period of Five (5) years from date of purchase (whether directly from Aston Global
or an authorized reseller) that the Product manufactured by Aston Global is free
from manufacturing defects in materials and workmanship, when used under normal
conditions and when such Product has not been modified or changed in any manner
after leaving Aston Global's warehouse or plant. If any Product manufactured by
Aston Global is found to have manufacturing defects in materials or workmanship,
such Product will be repaired or replaced by Aston Global. This warranty applies
only against defects discovered within the warranty period and extends only to the
original purchaser of the Product. Parts repaired or replaced under the terms of this
Warranty will be warranted for the remainder of the original warranty period only.
Proof of purchase is required to exercise this Warranty. Aston Global may, at its
option, examine and inspect the alleged defective Product, and Aston Global may
request that parts be returned to Aston Global at Owner's expense for factory
inspection. The determination as to whether Product shall be replaced, or in the
alternative, repaired, shall be made solely by Aston Global. If a Product is
determined to be covered by the above Warranty, Aston Global will ship the
replacement part(s) to Customer by either ground shipping or US postal service.
Increased costs for expedited delivery, if requested by Customer, are the
responsibility of Customer. Parts not currently in stock may require up to a 6 week
delivery time after placement of order.
The above warranty is subject to the following conditions: (1) the Product
must be installed in a single family dwelling unit where the original purchaser
of the Product resides; and (2) the Product must be maintained as described
in the owner's manual supplied with the Product.
For glass and acrylic panels, the customer must (a) open and inspect the
Product upon delivery (without releasing the delivery driver until visual
verification that the Product arrived in a good and acceptable condition); and
(b) clearly notate damage on the delivery acknowledgment receipt. Failure to
do so, and any damage discovered to glass or acrylic panel after delivery, will
be repaired or replaced at the sole discretion of Aston Global.
Warranty
19
Table of contents
Popular Door manuals by other brands

American Standard
American Standard Acrylux 6000Y1.BE5 Specifications

Sterling Plumbing
Sterling Plumbing VISTA PIVOT II 1505D-48 Specifications

Honeywell
Honeywell RPWL302A instruction manual

Sterling Plumbing
Sterling Plumbing BATH CLASSICS 5901 Specifications

GE
GE 19204 installation guide

Heat & Glo LifeStyle
Heat & Glo LifeStyle Cerona-36 Cleaning instructions

Doorson
Doorson 300 THALES user manual

Ives
Ives Flush Knob Pull 428 installation instructions

BFT
BFT VISTA SL Installation and user manual

Sterling
Sterling Designer Pivot Shower Doors 1505D-42 Specifications

Ives
Ives Offset Top Pivot 7215/15F installation instructions

Dormakaba
Dormakaba CS 80 MAGNEO Mounting and operation manual