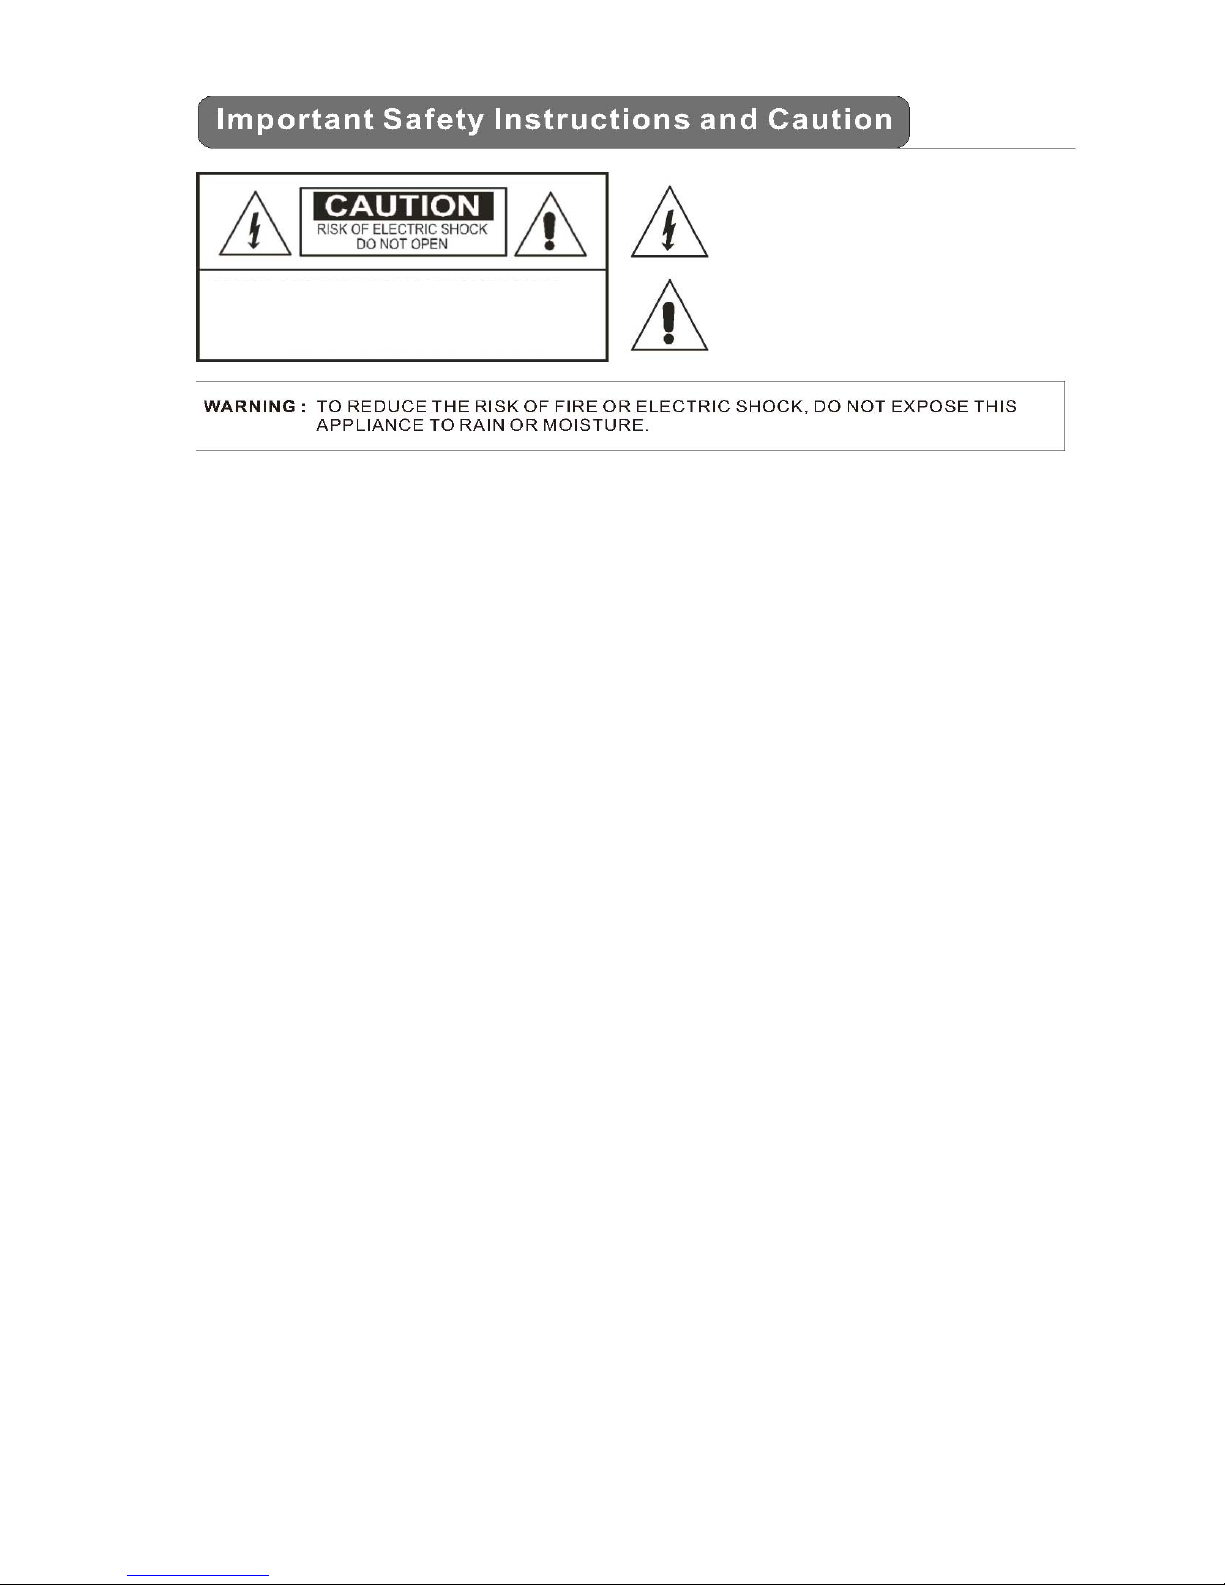
Asuka Hawk Ranger 6 User manual

Hawk Ranger 6
Car-use HD DVB-T Diversity
Receiver with CONAX CA
and Common Interface
User Manual

2
Please read all of these instructions regarding your unit and retain them for future reference.
Read this manual fully and carefully before operating this in-car DVB-T receiver.
Keep this manual handy as a reference for operating procedures and safety information.
Pay close attention to all warnings in this manual and follow the instructions carefully.
Do not allow other people to use this system until they have read and understood the
operating instructions.
Do no block or cover the slots and openings in the cabinet. These openings are provided
for ventilation, to ensure reliable operation of the product and to protect it from
overheating.
Do not operate this in-car DVB-T receiver in any way that will divert your attention from
your vehicle. Always observe safe driving rules and follow all traffic regulations. If you
experience difficulty in operating the system or reading the display, park you vehicle in a
safe location and make necessary adjustment.
Do not push objects of any kind into this product through openings as they may touch
dangerous voltage points or short-out parts that could result in a fire or electric shock.
Do not place this unit near liquids. Electrical shock could result. Also, damages result
from splashing liquids on receiver., can cause smoke, and overheat
Be sure to run the vehicle engine while using this unit to avoid battery exhaustion.
CAUTION: TO REDUCE THE RISK OF ELECTRIC SHOCK –
DO NOT REMOVE COVER (OR BACK)
NO USER-SERVICEABLE PARTS INSIDE REFER SERVICING
TO QUALIFIED SERVICE PERSONNE;
The lighting flash with arrowhead symbol within an
equilateral triangle is intended to alert the user to the
presence of uninsulated dangerous voltage within the
product’s enclosure that may be of sufficient magnitude to
constitute a risk at electric shock to persons.
The exclamation point within an equilateral triangle is
intended to alert the user to the presence of important
operating and maintenance (servicing) instructions in the
literature accompanying the appliance

3
On Safety
Do not attempt to install or service your DVB-T receiver by yourself. Installation or servicing
by people without training and experiences in both electronic equipment and automotive
accessories may be dangerous and could expose you to the risk of electric shock or other
hazards.
If the receiver does not work properly, please pull out the electrical plug for safety. Contact
us for further technical support.
If any solid object or liquid fall into the cabinet, unplug the unit and have it checked by
qualified personnel before operating it any further.
On Placement
Do not install the in-car DVB-T receiver where it may (i) obstruct the driver’s vision, (ii)
impair the performance of any of the vehicle’s operating systems or safety features,
including air bags, hazard lamp buttons or (iii) impair the driver’s ability to safely operate the
vehicle.
On Operation
The unit may not work because of improper operation. The limited warranty does not cover
consequent losses that rise from improper usage.
Precaution

4
Table of Contents
Unit Description & Installation Guide ....................................................... 6
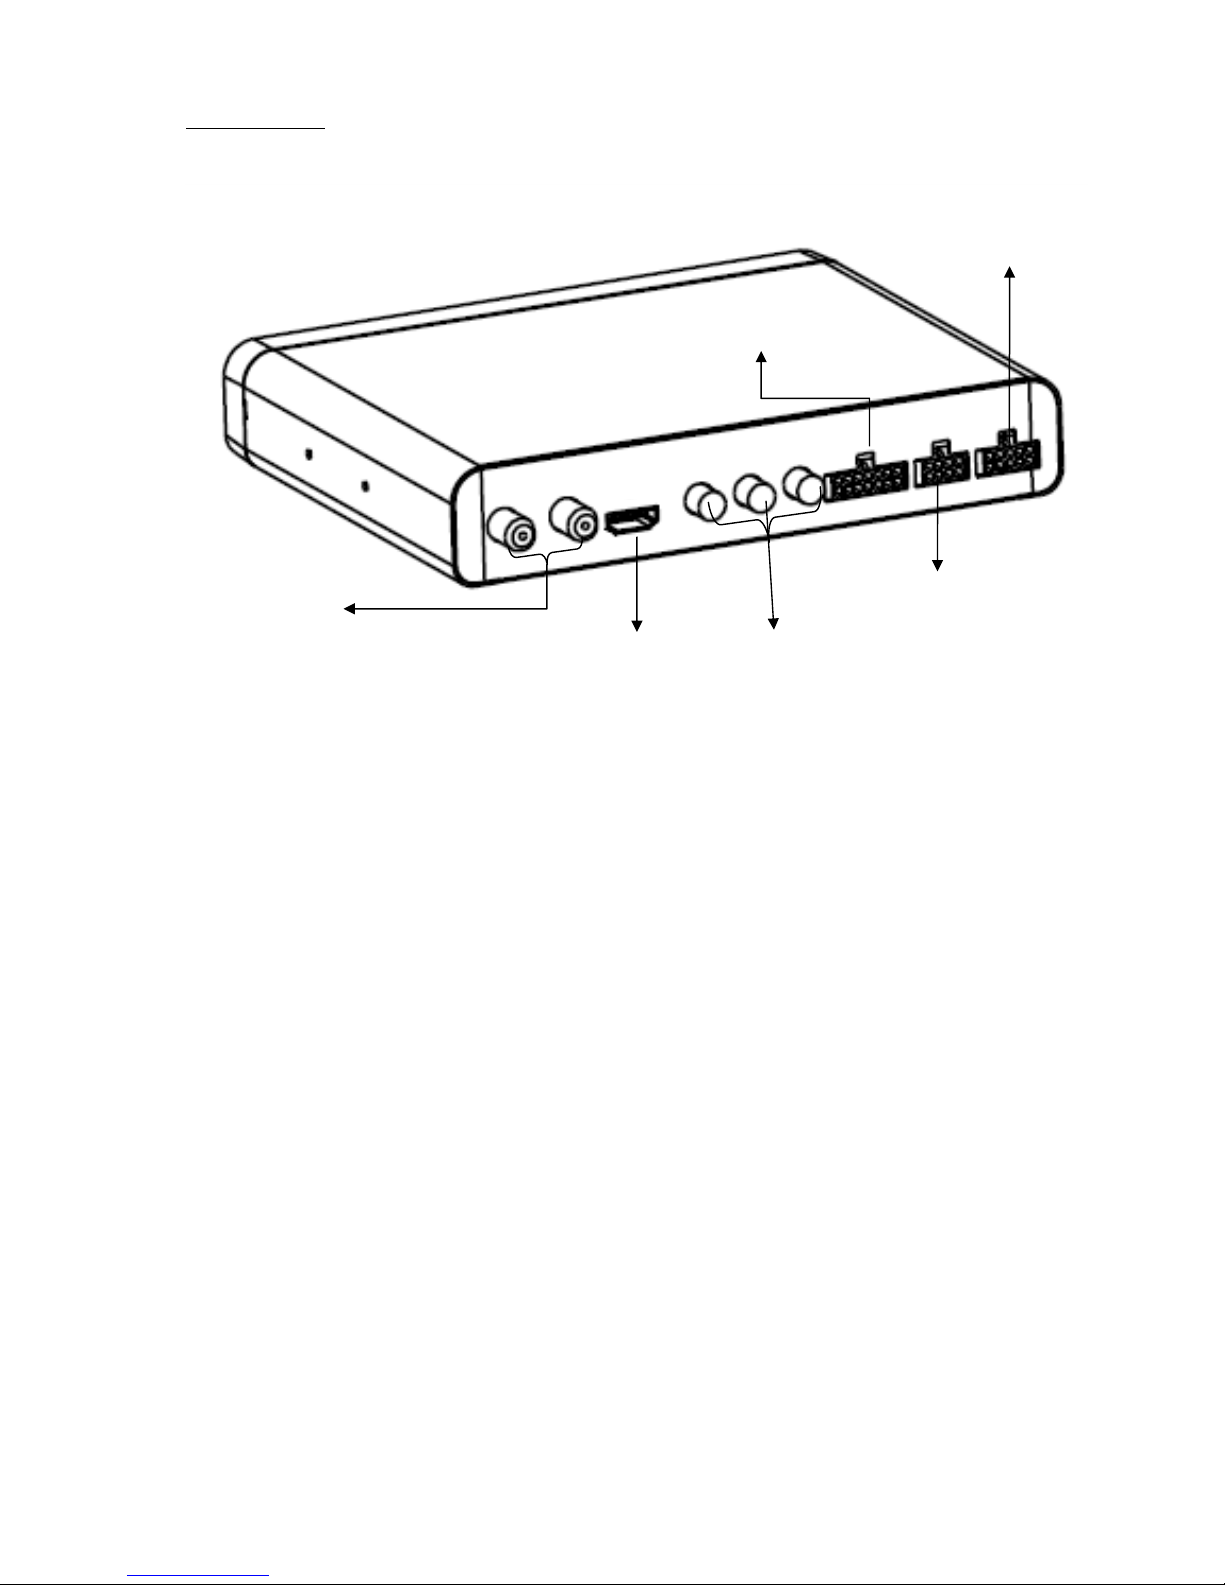
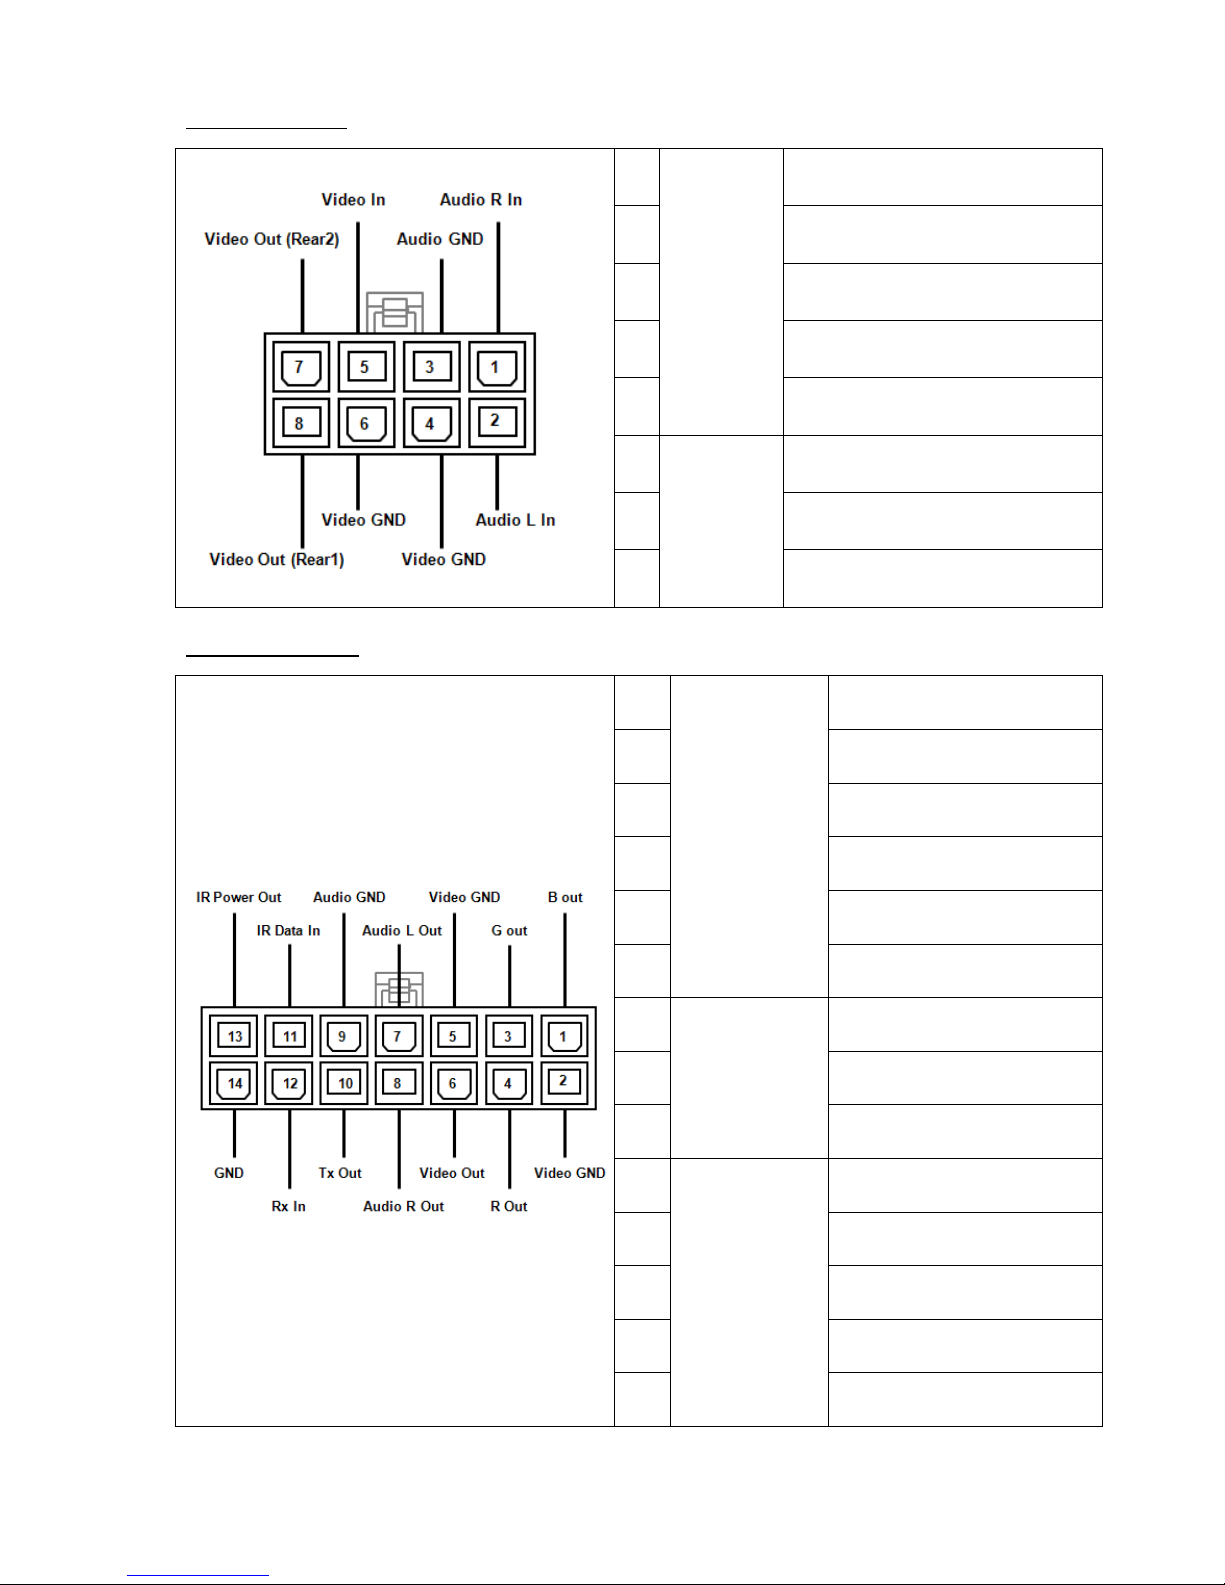
I/O Ports Definition............................................................................... 9
Remote Control Operations ...................................................................11
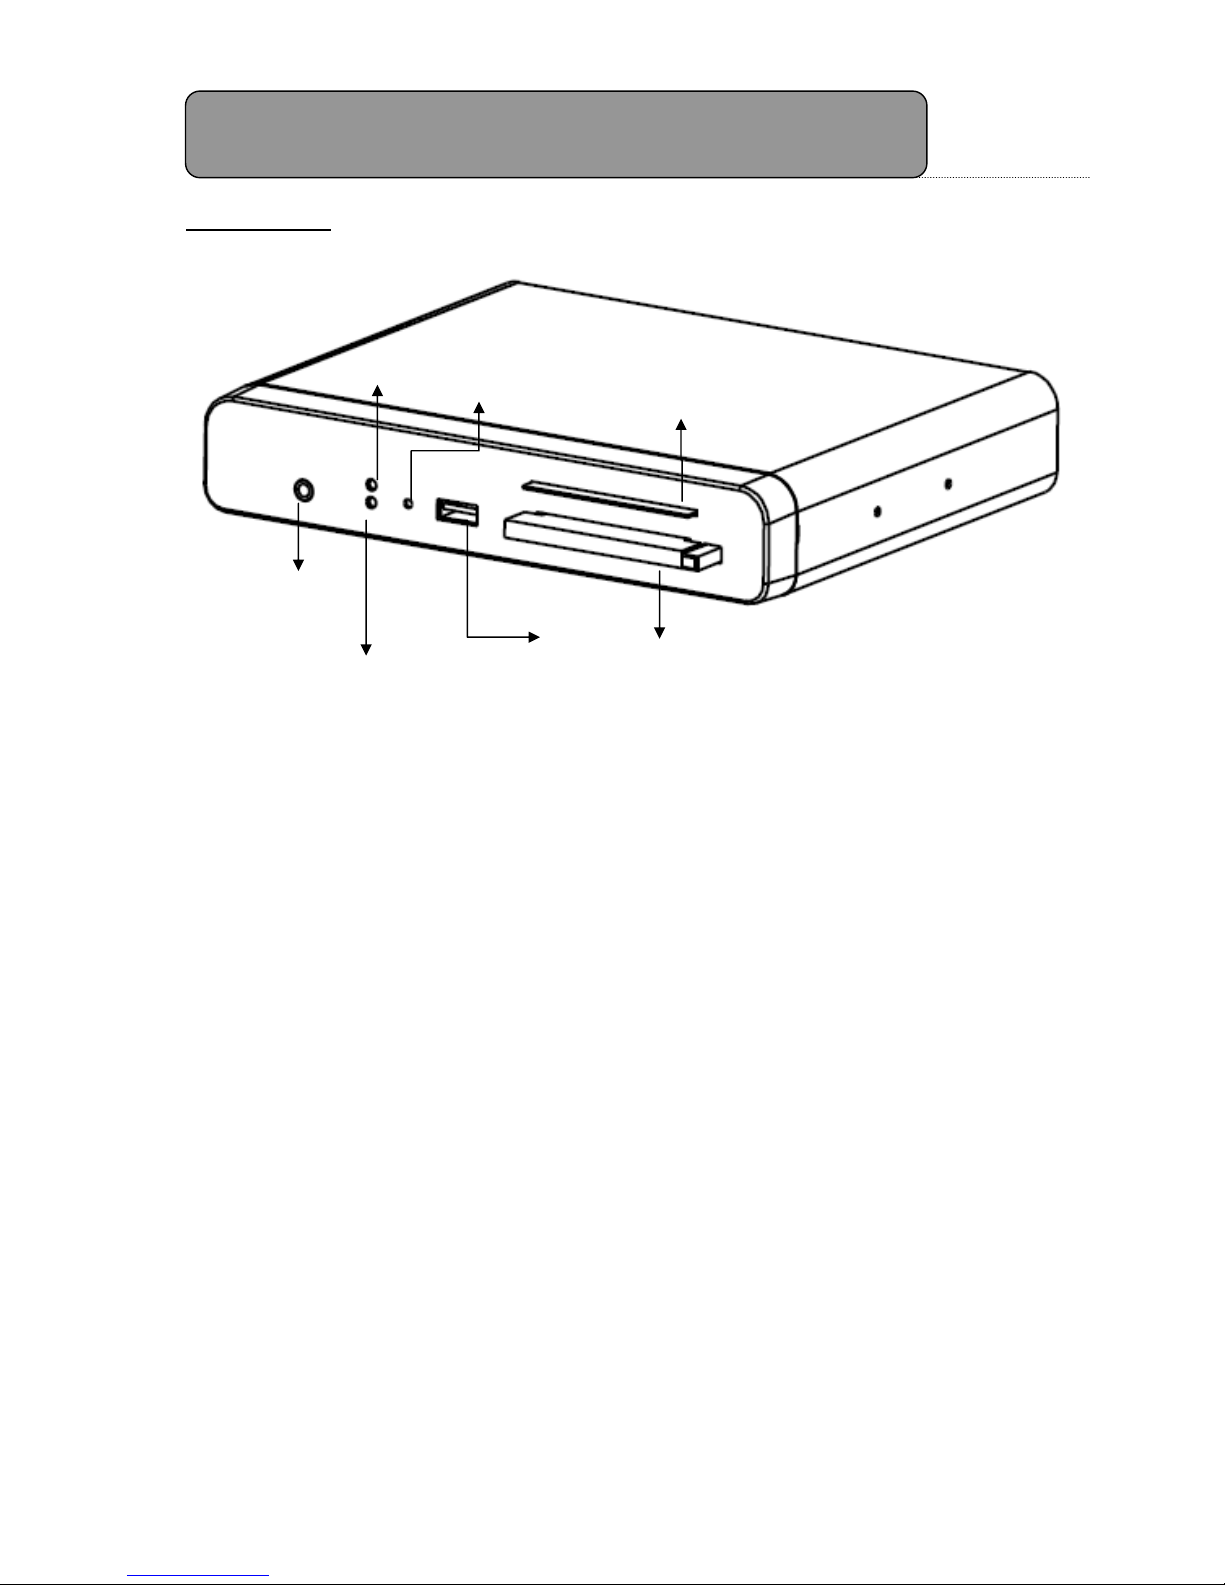
Unit Description & Installation Guide ......................................................11
Remote Control Battery Installation .......................................................11
Accessories ........................................................................................12
I.Home Menu ..................................................................................13
II.Quick Guide for First-time User ........................................................14
II.1.DVB-T TV Watching ................................................................14
II.2.DVB-T Radio Listening............................................................16
II.3.Record Function .....................................................................17
II.4.Movie Watching......................................................................19
II.5.Music Listening ......................................................................20
II.6.Photo Viewing ........................................................................21
III.Using the Menu .............................................................................23
III.1.DVB-T TV/Radio Menu .........................................................23
III.1.1Channel List ......................................................................23
III.1.2Channel Management ........................................................24
III.1.3Auto Search.......................................................................25
III.1.4DVB-T Audio Settings ........................................................25
III.1.5Channel Information .........................................................26
III.1.6Aspect Ratio......................................................................26
III.1.7Subtitle .............................................................................27
III.1.8Teletext.............................................................................27
III.1.9AFS Setting* .....................................................................27
III.1.10Common Interface.............................................................29
III.1.11CONAX CA .........................................................................30
III.2.System Settings...................................................................31
III.2.1Country/Language ............................................................31
III.2.2Display Setting..................................................................31
III.2.3Monitor Port Setting..........................................................32
III.2.4HDMI Setting.....................................................................32
III.2.5Antenna Power Output (+5V)............................................32
III.2.6Version Upgrade................................................................33
III.2.7Reset Default ....................................................................33
III.3.Photo Menu..........................................................................34
III.4.Music Menu..........................................................................34

5
III.5.Movie Menus........................................................................35
III.5.1Menu.................................................................................35
III.5.2Audio Selection .................................................................35
III.5.3Subtitle .............................................................................35
IV.Trouble Shooting Q&A.....................................................................36
V. Specification .................................................................................38

6
Front Side
(1) AV In (3.5 Φearphone jack): audio/video signal input ports for external
devices such as DVD, GPS, i-Pod, i-Phone, etc.
(2) Operating: the “Operating” LED indicates if the system is working.
(3) Power: the “Power” LED indicates if the 12V or 24V power supply has
been successfully applied to the device.
(4) Reset: Press the reset button to reset the device
(5) USB port: Plug the USB memory stick and HDD to USB port for
multimedia playback and TV recording.
(6) Conax Slot: Plug the Conax smart card in slot to enable pay-TV service
(7) CAM Slot: Plug the CAM card and smart card in slot to enable pay-TV
service
Unit Description & Installation Guide
(1) AV In
(3) Power
(2) Operating
(4) Reset
(5) USB
(6) Conax Slot
(7) CAM slot

7
Back Side
(8) Ant. In: antenna connection port (NOTE: this unit provides +5V antenna
power through this connection port.)
(9) TV Out: Connect the TV output ports (CVBS, Audio L, and Audio R) to
monitor.
(10) AV I/O port (RCA jack)*: 2 sets of video output ports of rear monitors
and one set of audio/video signal input ports for external
devices such as DVD, GPS, etc.
(11) Monitor Port (optional)*: for advanced integration with 2-Din monitor
which supports touch operation controlled through UART and
IR interface.
(12) Power/IR Port*: it is connected to vehicle’s battery and external
extension cable of infrared receiver.
(13) HDMI Port : HDMI output port.
*Please see next chapter for further information
Warning: Make sure the power supply jack is correctly connected.
When The unit is intended to use +12/24V power supply provided via ACC route, please make
sure the red wire is correctly connected with the ACC ignition for proper system operations.
Warning: Connect antennas into the unit before turning on.
Please connect the antennas first and then turn on the unit. The device will not detect the active
antenna and provide antenna power if it is installed the other way around.
(8) Ant-in
(9) TV Out
(11) Monitor Port
(10) AV I/O port
(12) Power/IR port
(13) HDMI port

8
Antenna Connection
DVB-T reception will vary from vehicle to vehicle and you may have to try several
mounting positions to determine which position provides the strongest signal in your
vehicle.
We recommend for one antenna to be mounted at the front and one at the rear of the
vehicle.
Please refer to the Diagram below for some of our recommendations:
Rear Location FrontLocation
(1) Behind the Rear Bumper. (providing it’s not Metal)
(2) Bottom of Rear Windscreen
(3) Top of Rear Windscreen
(4) Top of Front Windscreen
(5) Bottom of Front Windscreen
(6) Behind the Front Bumper. (providing that it’s not Metal)
Once a suitable position is found, carefully route the antenna cables to the receiver unit
and then connect to the Antenna Inputs.
1 2 3 4
6
5

9
Power I/O Port
1 Ground (black wire). Connect this cable to vehicles chassis ground.
2 - Reverse status (orange wire). Connect this cable to reverse gear to see
the image of rear view camera image on front monitor.
- Keep the cable grounded if the reverse mode is not enabled.
3 +12 ~ 24 V DC input (yellow wire). Connect this cable to (+) pole of the
battery
4 -Parking status (green wire). Connect this cable to handbrake switch of
your vehicle.
- Keep the cable floating if the parking mode is not enabled.
5 ACC (red wire). Connect this cable to ACC ignition of your vehicle.
6 IR (Infrared) LED power. Power for the LED of the IR receiver.
7 +12V output to turn on active antennas or amplifier.
8 IR (Infrared) data input. Infrared data of the IR receiver.
9 IR (Infrared) power. Power of IR LED.
10 IR ground. Ground for IR LED.
I/O Ports Definition

10
AV I/O Port
1
External
AV Input
Audio R input
2
Audio L input
3
Audio ground
4
Video ground
5
Video input
6
Video
Output
Video ground
7
Video out for rear monitor
8
Video out for rear monitor
Monitor Port
1
RGB
Component
Video Out
B output
2 Video GND
3 G output
4 R output
5 Video GND
6 CVBS Video out
7
Audio Out
Audio L output
8 Audio R output
9 Audio ground
10
Operating
Command
UART Tx output
11
IR data input
12
UART Rx input
13
IR power output
14
Ground

11
Button name Function
1 POWER Select power-on or stand-by
2 MUTE Mute control
3 SOURCE Select a video source from DTV/AV1/AV2
4 PREVIEW No function
5 AUDIO Select second language and stereo audio
6 ENTER To enter the selected channel number
7 INFO Display digital TV system information
8 Digital keys Digit buttons to select channels
9 RECALL Return to the last selected channel
10 OK Select the highlighted item
11 VOLSelect volume up or move the cursor right
12 VOLSelect volume down or move the cursor left
13 CH▲Select channel up or move the cursor up
14 CH▼Select channel down or move the cursor down
15 Home Go to home screen
16 EPG Electronic Program Guide
17 MANUAL No function
18 MENU Enter the setup menu
19 EXIT Exit the current setup
20 AUTO SCAN To scan channels automatically
21 PLAY
/
PAUSE Select play or pause
22 FR Fast Rewind
23 FF Fast Forward
24 REC●Start record TV/Radio program or exit recording
25 Replay No function
26 TTX To display teletext content
27 RED BUTTON Subtitle key in normal operation mode or the hot
28 GREEN BUTTON Hot key to enter Teletext pages in Teletext mode
29 YELLOW BUTTON Select page up in the EPG mode or the hot key to
30 BLUE BUTTON Select page down in the EPG mode or the hot key
If the battery in remote controller is low on power, please install the battery as
described below.
1. Rotate the battery cover to the ‘open’ side and remove the cover.
2. Replace old battery with new one.
3. Set cover back based on the indentation.
(1) (2)
(5)
(6)
(8)
(10)
(12)
(13)
(14)
(15)
(17)
(20)
(23)
(22)
(25)
(27) (28) (30)
(29)
(16)
(7)
(9)
(3)
(4)
(11)
(18)
(19)
(21)
(24)
(26)
Remote Control Operations
Remote Control Battery Installation

12
Basic accessories:
oPower cord
oRemote controller
oAV port cord
oIR extension cable
Optional accessories:
oActive antennas
oMonitor port cord
Accessories

13
I. Home Menu
This is the home menu screen. You can highlight
the DVB-T TV mode, the DVB-T Radio mode, the
video playback mode, the music playback mode,
the picture viewing mode, and the system
settings. Use [CH] and [CH] buttons to
highlight the desired item and press [OK] button
to select it.
DVB-T TV Mode
To enter DVB-T TV mode.
DVB-T Radio Mode
To listen to DVB-T radio broadcasting.
Movie Playback Mode
To enter movie playback mode and watch movie files.
Music Playback Mode
To enter audio playback mode and listen to music.
Photo Viewing Mode
To enter photo viewing mode and watch pictures.
System Settings
To configure the device settings.
Note: Press the [HOME] key to go back to the home screen anytime.
Press the [SOURCE] key to switch AV source anytime.

14
II. Quick Guide for First-time User
II.1.DVB-T TV Watching
Step 1: Turn on the device
1. Turn on the vehicle’s ACC or IGN. (or start the vehicle)
2. When the device has power, the POWER LED indicator will illuminate RED.
3. Press the POWER button to turn the device on. Operating LED on the device
will illuminate Green when system is ON.
NOTE: If the Operating LED does not turn on, please check if the battery is
inserted properly in the remote control or battery has sufficient power.
Step 2: Press [CH]/[CH]buttons to select “TV” options and press
[OK] button to enter the TV mode. After that, the setup wizard screen
shows up.
Operating LED
Power LED

15
Step 3: Select your own OSD language, your located region, whether it’s
summer time at present.
1. Use [CH]/[CH] buttons to highlight the item.
2. Use [VOL] button to set the highlight item.
3. Press [CH]/[CH] buttons to scroll up and down the options.
4. Select one by pressing the [OK] button or exit the setting by pressing
the [MENU] button.
NOTE: Time zone setting will be automatically updated once the Region
setting is changed.
Step 4: Perform auto search to find available DVB-T channels.
1. Use [CH]/[CH] buttons to highlight the “start” option.
2. Press [OK] button to start auto searching.
Step 5: Job well-done! You can now sit back and enjoy your mobile TV.
NOTE: Keep [OK] button pressed to change the aspect ratio of current TV
program.

16
II.2.DVB-T Radio Listening
1. Press [CH]/[ CH]] buttons to select the
Ratio item and then press [OK] button to
enter the radio mode.
2. Press [CH]/[CH]buttons to select your
preferred radio channel.
3. The radio service will start instantly.

17
II.3.Record Function
NOTE: HR-VI supports both DVB-T TV and DVB-T Radio recording.
1. During TV or Radio mode, press [REC] to
start recording TV/Radio programs. The
timer menu will appear on the lower left
screen. This timer menu will disappear
automatically when no operation is
performed within 10 seconds.
NOTE:
a. Please ensure that a USB Storage device is connected to the unit before
recording.
b. While ACC/IGN is turned off, the unit will continue to record within preset
recording time. The unit will automatically turn itself off after the
recording is finished.
2. In the timer menu, you may use [CH] /
[CH] to select the recording time. Then
press [OK] to start the recording with
selected timer. icon will appear on the
left upper screen. The information of current
recording time will be shown beside the
icon.
3. You can simply call the timer menu out with press [REC] again.
4. To stop recording, please select the STOP
item in timer menu.
5. Recorded TV programs can be played back
in Movie mode. And the recorded Radio
programs can be played back in Music
mode.

18
Important notes:
i. A recorded program will be stored in a default folder named
“Recorded_Program”. The file types will be “.TSV” file for TV program
and “.TSA” file for Radio.
ii. The file is named as (Channel Name) + (Recorded Date Recorded Time)
iii. Maximum file size of FAT/FAT32 is 4 GB, if the file exceeds this size, the
system will cut the recorded file into 2 parts.
iv. 1 GB storage can record TV program for approximately up to 45 minutes.
v. Storage files system can support FAT/FAT32/NTFS format.
vi. Generally all USB 2.0 flash drive can be used as recorded file storage.
However, there are cases when the USB flash drive can’t store recorded
programs from DVB-T receiver unit. It’s strongly suggested to format
the USB storage device by PC or laptop before it’s inserted into the
DVB-T receiver unit.
vii. WARNING! Please do not edit the “*.PLT” & “RECORD.TMP” files.
Modifying/deleting this file will cause error on recorded file.

19
II.4.Movie Watching
This section below will explain how to quickly play a video file stored on USB
device.
1. After selecting movie playback mode on
the home screen, file browser screen will
appear. Press [OK] button to select the
root folder.
2. The available video files will appear on
screen. Use [CH] and [CH] buttons to
scroll up and down through files, and then
select the desired file by pressing [OK]
button. The video file will instantly start
playing.
NOTE: Users can only choose video files under
this mode. System will not support music or photo files under this mode.
3. Press [EXIT] button to return.
NOTE:
1. Press the FR / FF button to increase or decrease the playing speed.
2. Press the [PLAY/PAUSE] button to pause or resume music playing.
3. Press [RED] button to delete highlighted file/folder.

20
II.5.Music Listening
The section below will explain how to quickly play a music file stored on USB
device.
1. After selecting music playback mode on
the home screen, file browser screen will
appear. Press [OK] button to select the
root folder.
2. The available audio files will appear on
screen. Use [CH] and [CH] buttons to
scroll up and down through files, and then
select the desired file by pressing the [OK]
button. The audio file will instantly start
playing.
NOTE: users can only choose music files
under this mode. Video or photo files are
not supported under this mode
3. Press [EXIT] button to return.
NOTE:
1. Press the FR / FF button to increase or decrease the playing speed
2. Press the [PLAY/PAUSE] button to pause or resume music playing.
3. Press [RED] button to delete highlighted file/folder.
Table of contents
Other Asuka Car Receiver manuals