Asuka PTA-100TV User manual

PTA-100TV
7-inch WiFi Multimedia Navi 2DIN
User Manual

2
Table of Contents
I. Introduction.............................................................................................................. 4
II. Quick Start Guide..................................................................................................... 5
II.1 Turning the Power On.............................................................................................. 5
II.2 User Interface.......................................................................................................... 6
II.3 Common Screen Operation..................................................................................... 7
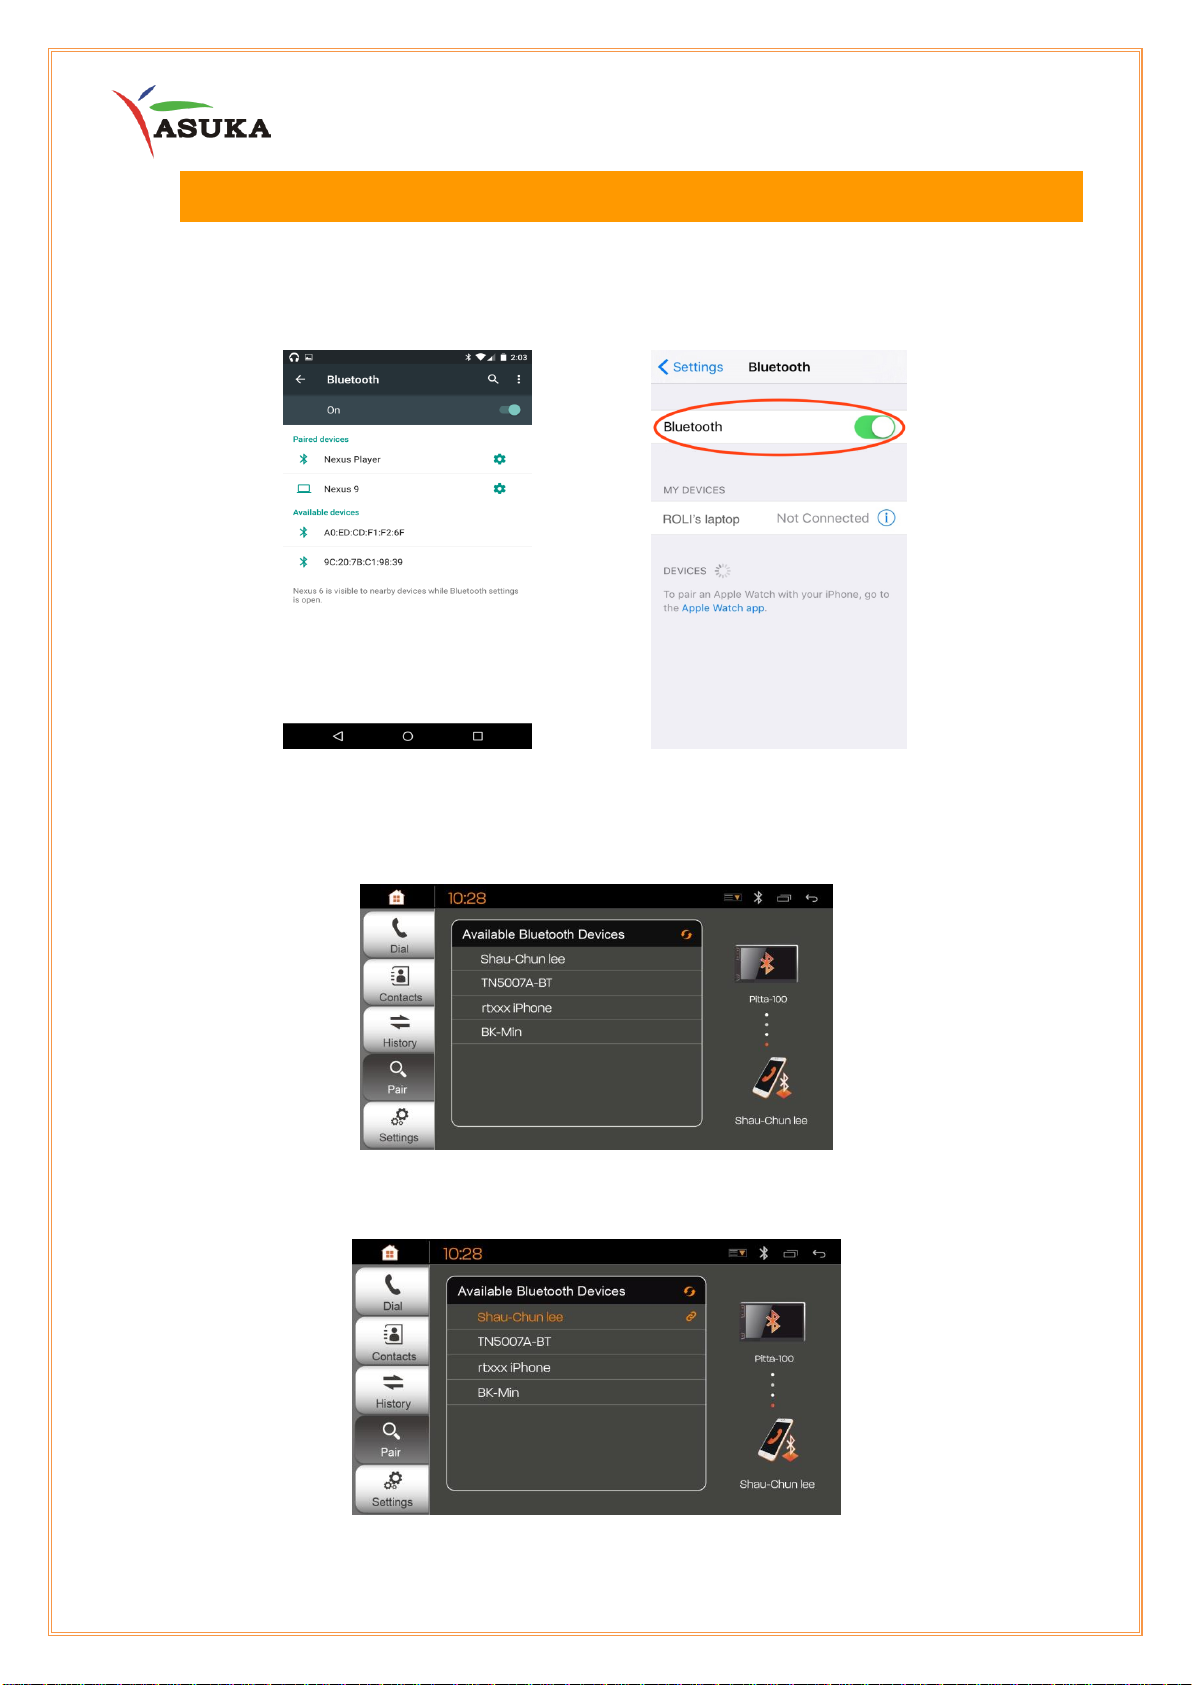
III. Bluetooth.................................................................................................................. 8
III.1 Connect to Bluetooth.............................................................................................. 8
III.2 Bluetooth Dialing .................................................................................................... 9
IV. Internet Access .......................................................................................................10
V. Mirroring..................................................................................................................11
V.1 Android...................................................................................................................11
V.2 Apple iOS ...............................................................................................................11
VI. Radio........................................................................................................................13
VII. Music........................................................................................................................14
VIII. Video........................................................................................................................16
IX. Digital Television.....................................................................................................17
X. Steering Wheel Control ..........................................................................................19
XI. Reference ................................................................................................................20
XI.1 Maintenance..........................................................................................................20
XI.2 Troubleshooting.....................................................................................................20
XII. Installation/ Wire Connection Guide .....................................................................21
XII.1 Precautions on installation and connection..........................................................21
XII.2 Wiring Information................................................................................................22
XII.3 Installation procedure...........................................................................................23
XIII. GPS Antenna...........................................................................................................23
XIV. Customer Service ...................................................................................................25

3
PRECAUTIONS
IMPORTANT
To ensure proper use, please read through this manual before using this product. It is especially important that
you read and observe WARNINGS and CAUTIONS in this manual. Please keep the manual in a safe and
accessible place for future reference.
WARNINGS:(To prevent accidents and damage)
DO NOT install any unit or wire any cable in a location where:
•It may obstruct the steering wheel and gearshift lever operations.
•It may obstruct the operation of safety devices such as air bags.
•It may obstruct visibility.
DO NOT operate the unit while driving.
•If you need to operate the unit while driving, be sure to look around carefully.
•The driver must not watch the monitor while driving.
CAUTION
For safety
•Do not raise the volume level too much, as this will make driving dangerous by blocking outside sounds, and
may cause hearing loss.
•Stop the car before performing any complicated operations.
For a longer service life, be sure to read the following cautions:
•If you have parked the car for a longtime in hot or cold weather, wait until the temperature in the car becomes
normal before operating the unit.
•Do not disassemble or modify the set in any way. Doing so may result in damage.
•If a problem should occur, have the set inspected at your store of purchase
•Small black and shiny spots inside the liquid crystal panel are normal for LCD products.

4
I. Introduction
ASUKAPTA-100 is a revolutionary In-car entertainment product designed to satisfy all users’
desire to access the internet while in car. On-line entertainment is beyond traditional
broadcasting services & pre-recorded media contents; it brings you more entertaining and
smarter user experience than ever before.
PTA-100TV Product Overview
• 7” In Dash WiFi Multimedia Navi 2 DIN Head-unit
• ASUKA-style User-Defined User Interface
• Multi-touch Control (for volume adjustment and display off)
• On-line Entertainment & Pre-recorded Media Contents
• Smartphone Mirroring via Cable HDMI in and Wireless Miracast
• Built-in Bluetooth technology for hands-free talking and audio streaming

5
II. Quick Start Guide
II.1 Turning the Power On
1. Turn on the ACC or IGN of the vehicles.
2. When the head unit is activated, you will see a reminder after startup screen
3. Now you can touch any icon on the screen to activate the corresponding
function.

6
II.2 User Interface
User Interface Introduction
On the left side of the screen, there are three touch keys.
Home Screen

7
II.3 Common Screen Operation
Touch
Touch the screen gently to select the item on the screen.
Touch and Hold
Touch the screen and keep your finger in place until display changes allow you to drag
the icon to the position you want it to be.
Swipe
Swipe your finger left or right on the screen to change the page.
Swipe your finger up or down on the screen to scroll the screen.
Multi-touch
Swipe left or right with two fingers to adjust the volume.
Pinch three or five fingers together to turn off the display.

8
III. Bluetooth
III.1 Connect to Bluetooth
1. Turn on the Bluetooth function of your mobile devices.
Example of Android Devices iOS Devices
2. Select “Bluetooth” under Settings.” Select the device you want to pair.
3. When the mobile device is paired with PTA-100TV successfully, the indicator on the
screen will turn to orange.

9
III.2 Bluetooth Dialing
Dial out using keypads and contact list.
Option 1
Keypads
Option 2
Contact List

10
IV. Internet Access
1. Turn on the hotspot of your mobile device.
Example of Android Devices iOS Devices
2. Select “WiFi” under “Settings” of PTA-100TV home menu
3. Select the name of hotspot shared by the mobile phone and key in the requested
password.
4. Wi-Fi connected.

11
V. Mirroring
This function allows users to cast the mobile device to the screen of the head unit.
PTA-100TV supports two ways of Mirroring: via Miracast for Android and via HDMI for
iPhone.
V.1 Android
Step 1: Make sure your mobile device is Miracast-compatible.
Step 2: Select “Miracast” under “Mirroring”.
Connecting your Android device
Step 1: Select Application
Step 2: Select Setting
Step 3: Under Connect and Share tap Screen Mirroring
Step 4: Select PTA-100TV
Step 5: Once connected, your mobile device’s screen will now be displayed on PTA-100T
V.2 Apple iOS
Connecting your iOS device
Step 1: Select mirroring application on PTA-100TV. Select HDMI.
Step 2: Be sure the iOS device is powered on.
Step 3: Connect the Apple Lightning DigitalAV Adapter /Apple 30-pin DigitalAV Adapter, to
iOS devices.
Step 4: Connect the HDMI cable to the Apple Lightning AV adapter / Apple 30-pin Digital AV

12
Adapter
Step 5: You should be able to see your iOS image on PTA-100TV.

13
VI. Radio
1. Scan Button
2. Add to Favorite
3. Equalizer Settings
4. Mute
5. Drag to change frequency
6. AM/FM band Switch.
7. Manual tune backward
8. Display current frequency
9. Manual tune forward
10.Searches for stations
11.Preset list button
12.Favorite list button

14
VII. Music
There are two options to choose to play music
[USB] and [Bluetooth]
Basic Music Interface

15
Listen to Music by Bluetooth
Before selecting Bluetooth, pair PTA-100TV to your mobile device. [See Page8]

16
VIII. Video
Video Interface

17
IX. Digital Television
Digital Television is an optional for countries except United States of America.
Select TV icon to watch DTV
DTV Interface
To change language by select [Setting]

18
Select [CH Scan] to search for the available channels automatically
Use [CH] / [CH] or Select CH List to change channels

19
X. Steering Wheel Control
Steering wheel controls allow drivers to keep their eyes on the road.
Step 1: Select [SETUP ICON] then [SWC]
Step 2: Select VOL+ on PTA-100TV
Step 3: Press and hold the function button on the steering wheel, wait until the display shows
paired.
Step 4: Repeat this process until all relevant functions are programmed.
Step 5: Once all functions have been set, exit the SWC interface and back to Home screen
Step 6: Double check if programming was successful by pressing the VOL+ and VOL –on
the steering wheel.

20
XI. Reference
XI.1 Maintenance
• Do not use any solvent (for example, thinner, benzene, etc.), detergent, or insecticide. This
may damage the monitor or the unit.
• Cleaning the Liquid Crystal Display Screen
The liquid crystal display screen tends to collect dust, so wipe it off occasionally with a soft
cloth. The surface is easily scratched, so do not rub it with hard objects.
XI.2 Troubleshooting
What appears to be trouble is not always serious.
Check the following points before calling dealers/ASUKA.
General
No sound comes out of the speakers.
• Adjust the volume to the optimum level.
• Check the cords and connections.
No picture is displayed on the screen.
• Turn on the screen.
Playback does not start.
• The format of files is not supported by the unit.
No picture appears on the external monitor.
• Connect the video cord correctly.
• Select the correct input on the external monitor.
USB
“Reading” does not disappear from the screen.
• Turn the power off and on again.
While playing a track, sound is sometimes interrupted.
• The tracks are not properly copied into the USB device. Copy the tracks again, and try to
play again.
Table of contents
Other Asuka Car Receiver manuals
Popular Car Receiver manuals by other brands

Clarion
Clarion FZ501 Owner's manual & installation manual

Krüger & Matz
Krüger & Matz KM2009 owner's manual

Blaupunkt
Blaupunkt Pasadena DJ operating instructions

Pioneer
Pioneer DEH-1300R Operation manual

New One
New One AR360BT user manual

Panasonic
Panasonic CQVD7001U - CAR A/V DVD NAV operating instructions