Asus A33 User manual

ASUS DAV Center
User Manual
A33/A31/A33L/A31L

2 ASUS DAV Center
Contents
Safety information.................................................................................................................................................................... 4
Notes for this manual.............................................................................................................................................................. 5
Welcome.........................................................................................................................................................6
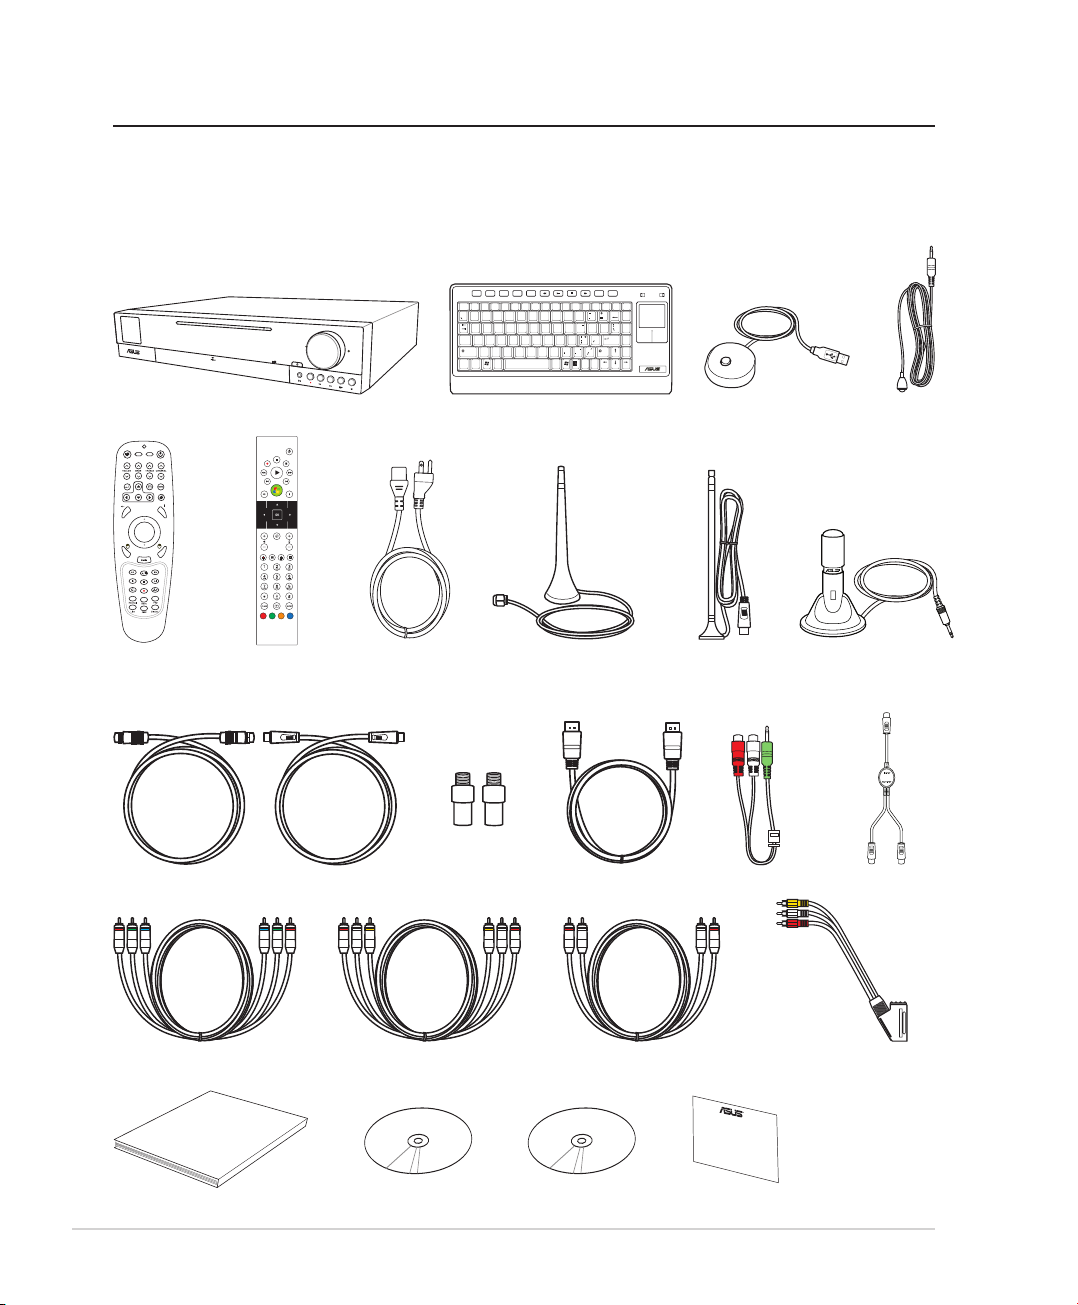
Package contents...................................................................................................................................................................... 6
Overview...................................................................................................................................................................................... 7
Features........................................................................................................................................................................................ 7
Getting started ..............................................................................................................................................8
Preparing your DAV Center setup....................................................................................................................................... 8
Internet connection ...................................................................................................................................................... 8
Video source .................................................................................................................................................................... 8
Front view.................................................................................................................................................................................... 8
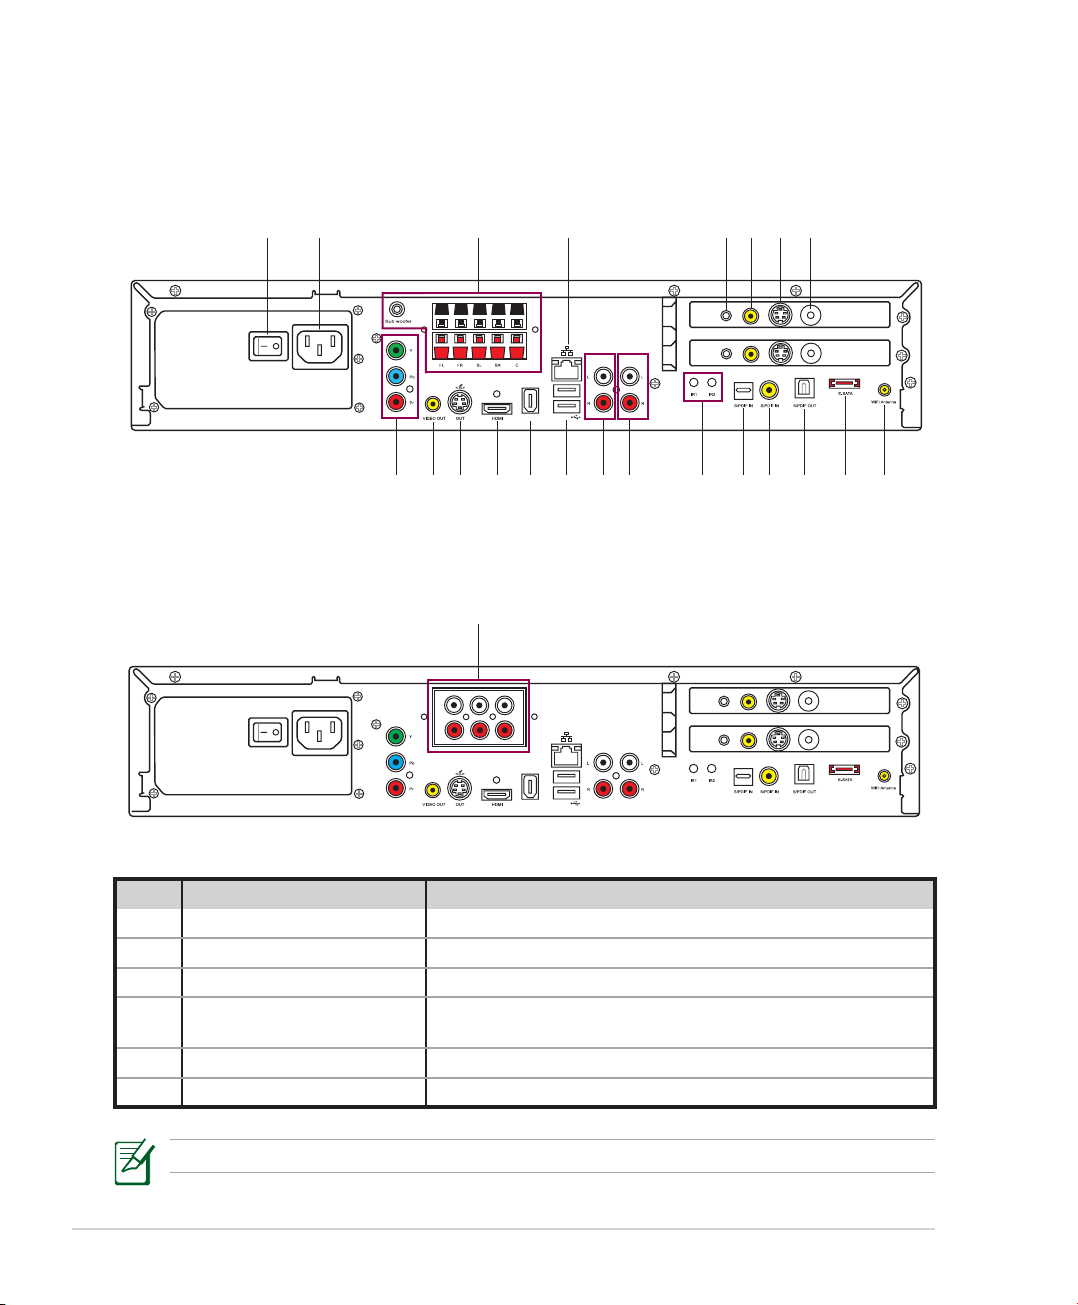
Rear view....................................................................................................................................................................................10
Using the Media Center remote control.........................................................................................................................12
Using the amplifier remote control..................................................................................................................................14
Using the wireless keyboard...............................................................................................................................................16
Setting up the wireless keyboard ..........................................................................................................................16
Using the keyboard buttons....................................................................................................................................16
Setting up your DAV Center........................................................................................................................18
Connecting to the TV signal source.................................................................................................................................18
Connecting to the TV signal using S-Video/Composite.................................................................................18
Connecting to the TV signal using a coaxial cable ..........................................................................................19
Connecting the TV signal source to an existing setup...................................................................................20
Using the TV as a Monitor....................................................................................................................................................22
Cables for connecting to a TV..................................................................................................................................22
Connecting to a TV......................................................................................................................................................22
Connecting Infrared Receiver to external devices......................................................................................................25
Installing the wireless LAN antenna.................................................................................................................................25
Installing the digital TV/FM antenna ...............................................................................................................................26
Connecting to a digital video camera.............................................................................................................................26
Connecting to other devices..............................................................................................................................................26
Configuring audio output...........................................................................................................................27
Speaker configurations.........................................................................................................................................................27
Speaker types................................................................................................................................................................27
Connecting to speakers .......................................................................................................................................................28
Connecting to a home audio system ..............................................................................................................................29
Configuring audio output settings ..................................................................................................................................30
Configuring audio output via a speaker system...............................................................................................30
Configuring audio output via an HDMI device .................................................................................................32

ASUS DAV Center 3
Contents
Amplifier features........................................................................................................................................33
LEO (Listening Environment Optimizer).........................................................................................................................33
Midnight mode .......................................................................................................................................................................34
Preset EQ modes.....................................................................................................................................................................34
Using Windows Media Center.....................................................................................................................35
Starting Windows Media Center .......................................................................................................................................35
TV + Movies ..............................................................................................................................................................................35
Watching TV...................................................................................................................................................................35
Recording TV programs.............................................................................................................................................35
Playing TV recordings.................................................................................................................................................35
Watching DVDs.............................................................................................................................................................35
Music ...........................................................................................................................................................................................36
Adding music CDs to music library .......................................................................................................................36
Playing Music.................................................................................................................................................................36
Pictures + Videos ....................................................................................................................................................................36
Viewing pictures...........................................................................................................................................................36
Watching videos...........................................................................................................................................................36

4 ASUS DAV Center
Safety information
Your ASUS DAV Center A33/A31/A33L/A31L is designed and tested to meet the latest safety standards for
information technology equipment.However, to ensure your safety, it is important that you read the following
safety instructions.
Setting up your system
• Read and follow all the instructions in the documentation before operating your DAV Center.
• Do not use this product near water or a heated source such as a radiator.
• Set up the system on a stable surface.
• Openings on the chassis are for ventilation. Do not block or cover these openings. Make sure you leave
plenty of space, 15 cm (6 inches) at least, around the system for ventilation.Never insert objects of any
kind into these openings.
• If you use an extension cord, make sure that the total ampere rating of the devices plugged into the
extension cord does not exceed its ampere rating.
• Since your DAV Center is connected to a TV tuner, cable, or satellite receiver, make sure that the antenna or
cable system is electrically grounded to provide protection against voltage surges and static electricity.
Care during use
• Do not walk on the power cord or allow anything to rest on it.
• Do not spill water or any other liquids on your DAV Center.
• When the DAV Center is turned off, a small amount of electrical current still flows. Always unplug all power,
modem, and network cables from the power outlets before cleaning the system.
• If you encounter the following technical problems with the product, unplug the power cord and contact a
qualified service technician or your retailer.
• The power cord or plug is damaged.
• Liquid has been spilled into the system.
• The system does not function properly even if you follow the operating instructions.
• The system was dropped or the cabinet is damaged.
• The system performance changes.
Note to CATV System Installer
This reminder is provided to call the CATV systems installer’s attention to section 820-93 of the National
Electric Code, which provides guidelines for proper grounding and in particular, specifies that the coaxial cable
shield shall be connected to the grounding system of the building, as close to the point of cable entry as
possible.

ASUS DAV Center 5
Lithium-Ion Battery Warning
CAUTION: Danger of explosion if battery is incorrectly replaced. Replace only with the same
or equivalent type recommended by the manufacturer. Dispose of used batteries according
to the manufacturer’s instructions.
CD-ROM Drive Safety WARNING
CLASS 1 LASER PRODUCT
Notes for this manual
To make sure that you perform certain tasks properly, take note of the following symbols used throughout this
manual.
WARNING: Vital information that you MUST follow to prevent injury to yourself.
IMPORTANT: Instructions that you MUST follow to complete a task.
TIP: Tips and useful information that help you complete a task.
NOTE: Additional information for special situations.
Macrovision Corporation Product Notice
This product incorporates copyright protection technology that is protected by method claims of certain U.S.
patents and other intellectual property rights owned by Macrovision Corporation and other rights owners.
Use of this copyright protection technology must be authorized by Macrovision Corporation, and is intended
for home and other limited viewing uses only unless otherwise authorized by Macrovision Corporation.
Reverse engineering or disassembly is prohibited.

6 ASUS DAV Center
Welcome
Congratulations on your purchase of the ASUS DAV Center A33/A31/A33L/A31L.The following illustration
displays the package contents of your new ASUS DAV Center. Contact your retailer if any item is damaged or
missing.
Package contents
OFF ON
K/BSwitch T/PSwitch
OFF ON
WWW
Esc
Tab
F1 F2 F3 F4 F5 F6 F7 F8 F9 F10 F11 F12 Num
Lock
Caps
Lock
IDFn
Link
PrtSc
SysRq Scroll
Lock
Back
Space
Pause
Break
Home
Vol- Vol+ Mute Eject Sleep
E-
Mail
PgUp
PgDnEnter
End
Shift
~
!
@
#$
^&
( )
**
%
09
9
8
8
754321
Q
7
4
6
5
2 31
6
0
Shift
Ctrl Alt
W E R T Y U I O P
A S D F G H J K L
Z X C V B N M
Alt Ins Del
"
< >
?
{
[
}
]
Warranty card
User Guide
User Guide Support DVD Recovery DVD
A33/A31/A33L/A31L Wireless keyboard
Microphone
Amplifier
remote
Media Center
remote
Wireless LAN
antenna
Digital TV/FM
antenna
SCART to composite cable
HDMI cableTV signal cables
TV signal
cable converter RCA adapter
composite cables Audio (RCA) cablesComponent cables
IR blaster
cable
RF receiver
Splitter
Power cord
R

ASUS DAV Center 7
Overview
The ASUS DAV Center features rich entertainment and powerful computing capabilities.You can either run the
Windows® Media Center with other programs or enjoy it in full-screen mode.With the Media Center remote,
you can watch and record TV programs, play videos as well as music, and view pictures.You can also adjust the
audio effects like bass, treble, and EQs using the amplifier remote.The wireless keyboard with touchpad and
the trackball on the amplifier remote further facilitate your control of the DAV Center.
Features
• AV Entertainment
• High Definition video/audio support
• Class D amplifier with 5.1 channel
• Analog and Digital TV signal capability
• Watching and recording live TV programs with the Time Shift function
• Playing DVDs and home videos
• Listening to music files
• Viewing and editing pictures
• Connectivity
• HDMI
• Component
• Composite Video
• S-Video
• SCART (with adapter)
• 5.1 channel amplifier (Y cable): for A33/A31 models only
• Stereo: In & Out
• SPDIF: In & Out
• USB
• IEEE 1394: 4-pin & 6-pin
• WiFi
• Bluetooth: for A33/A33L models only
• Multi card reader

8 ASUS DAV Center
Getting started
Preparing your DAV Center setup
Before you start setting up your ASUS DAV Center, make sure that all of the following connections are
available.
Internet connection
Your DAV Center requires an Internet connection to update the EPG (Electronic Program Guide) and to access
the Internet. Make sure that you have access to a wired/wireless network before starting your Windows®
Media Center software setup. Contact your Internet service provider (ISP) for more information.
Video source
Make sure that you have access to a video source before starting your ASUS DAV Center setup.Your DAV
Center receives video input from a coaxial/S-video/composite cable.The video source usually comes from an
antenna, a direct cable TV connection, a cable box, or a satellite receiver. Cable boxes and satellite receivers are
also known as set-top boxes.
Front view
Press to open the front panel cover.
<OJKU
;9(
/+++
33)9*
396XU*[U6XU*[U
1 2 34 5
10 9 8 7 61213 11
*
1415161718192021

ASUS DAV Center 9
No. Name Description
1. TFT-LCD Displays system information.
2. Recordable Super Multi Drive Supports CD-ROM, CD-R, CD-RW, DVD-ROM (D5 & D9), DVD-R &
DL, DVD-RW, DVD+R & DL, DVD+RW, and DVD-RAM.
3. Super Multi Drive eject button Press to eject the disc.
4. Power button Press to turn on/off your DAV Center.
5. Volume knob Rotate to increase/decrease the volume.
6. Stop button Press to stop playing a media file.
7. Play/Pause button Press to play/pause a media file.
8. Fast Forward button Press to fast-forward a media file.
9. Rewind button Press to rewind a media file.
10. Record button Press to start recording TV.
11.* EQ button (A31/A33 only) Press to select an equalizer setting from Normal, Rock, Pop, Live,
Jazz, and Classic.
12. MMC/SD card reader Supports MMC, MMC 4.0, RS-MMC, RS-MMC 4.0, SD, Mini SD, Micro
SD (through adapter), and SDHC.
13. MS/Pro/Duo/Pro Duo card
reader
Supports Sony Memory Stick (high-speed type included), MS PRO,
MS Duo,and MS Pro Duo.
14. Card reader LED Lights up to indicate that data is being transferred from a digital
device to your DAV Center.
15. CF card reader Supports CF I/II and IBM Microdrive.
16. IEEE 1394 port Plug an IEEE 1394 device (such as a digital camrecorder) into this
4-pin IEEE 1394 port.
17. USB port Plug USB devices (such as a USB printer, camera, scanner, or
keyboard) into this port.
18. Headphone jack Plug amplified speakers or headphones into this jack.
19. Microphone jack Plug a microphone into this jack to record or transmit voice files.
20. Composite Video In jack Connect to a video source using a yellow RCA cable.
21. Stereo Audio In jacks Connect to a stereo audio source using a white (left) and a red
(right) RCA cables.

10 ASUS DAV Center
Rear view
A33/A31
A33L/A31L
/+++
;9(
/4 5;:
';*/5
)536
9</*
:</4
';*/5
)536
9</*
:</4
91112 101314151617
18
19202122
1 2 3A 4 5* 6* 8*7*
/+++
;9(
/4 5;:
';*/5
)536
9</*
:</4
82
92
)KTZKX
=UULKX
98
88
';*/5
)536
9</*
:</4
3B
No. Name Description
1. Power switch Press to turn on/off the DAV Center.
2. Power connector Plug the power cord into this connector.
3A.** 5.1 channel amplifier Connect passive speakers to this amplifier.
3B.** RCA Audio Out jacks Connect active speakers to these jacks plus Stereo Audio Out
jacks (No.15) to achieve 7.1 channel effects.
4. LAN port Plug a network cable into this port.
5.* Audio In jack Plug an analog audio device into this jack on the tuner card.
**Refer to the“Configuring audio output” section for detailed speaker configurations.

ASUS DAV Center 11
No. Name Description
6.* Composite Video In jack Plug a yellow RCA cable from a video source into this jack on the
tuner card.
7.* S-Video in jack Plug an S-Video cable from a video source into this jack on the tuner
card.
8.* TV In jack Plug a TV signal cable into this jack on the tuner card.
9. WiFi Antenna connector Plug a wireless LAN antenna into this connector.
10. ESATA port Connect to an external drive.
11. S/PDIF Out port (optical) Plug an optical (Toslink) digital audio cable into this port for digital
audio transfer.
12. S/PDIF In port Plug an RCA cable into this jack for digital audio transfer.
13. S/PDIF In port (optical) Plug an optical (Toslink) digital audio cable into this port for digital
audio transfer.
14. IR1/IR2 ports Plug the IR control cables into these ports to send input from the
remote control to a set-top box to change channels.
15. Stereo Audio Out jacks Plug a white (left speaker) and a red (right speaker) RCA cables from
a stereo into these jacks.
16. Stereo Audio In jacks Connect to a stereo audio source using a white (left) and a red (right)
RCA cables.
17. USB ports x 2 Plug USB devices, a printer, camera, scanner, or keyboard for example,
into these ports.
18. IEEE 1394 port Plug an IEEE 1394 device,a digital camrecorder for example, into this
6-pin IEEE 1394 port.
19. HDMI Plug an HDMI (High Definition Multimedia Interface) device into this
port.
20. S-Video Out jack Plug an S-video cable into this jack to connect to a display, a TV for
example.
21. Video Out port Plug an RCA cable into this jack to connect to a TV.
22. Component video ports Plug a component video cable into this jack to connect to a VCR,
set-top box, or DVD player.
*For models with one TV tuner card, there is only one set of these four jacks

12 ASUS DAV Center
Using the Media Center remote control
Use the remote to launch the Media Center program to watch TV, record TV programs, play video recordings
or other media files such as music and movies.
Refer to the table on the next page to familiarize yourself with the functions of the remote control buttons.
1
2
3
4
5
6
8
7
9
11
12
10
13
14*
15
16
17
18
19
20
21
22
23
24
25
26

ASUS DAV Center 13
No. Button Description
1. Power Press to turn on/off the power of the screen and the speakers.
2. Pause Press to pause a playback.
3. Stop Press to stop playing a media file.
4. Play Press to play a media file.
5. Fast-foward Press to fast-forward a media file.
6. Next track Press to go to the next track.
7. Windows® Media Center Press to launch the Media Center program.
8. Information Press to display program information under Media Center or
other menu options.
9. OK Press to confirm an action.
10. Channel up/down Press to change TV channels.
11. Live TV button Press to watch live TV programs.
12. DVD button Press to switch to DVD source.
13. Enter Press to confirm a selection.
14.* Teletext buttons Available on European models only.
15. Shift Toggles between numerical and alphabetical input.
16. Clear Press to clear input information.
17. Numeric keys Press to enter a channel number.
18. Recorded TV Press to display a list of your recorded TV programs.
19. EPG (Electronic Program Guide) Press to display the electronic program guide screen.
20. Volume up/down Press to increase/decrease the volume.
21. Mute Press to disable audio output.
22. Four-way navigation keys Press to scroll through on-screen display menus.
23. Return Press to return to the previous page.
24. Previous track Press to go back to the previous track.
25. Rewind Press to rewind a media file.
26. Record Press to start recording TV.

14 ASUS DAV Center
Using the amplier remote control
The amplifier remote control allows you to activate all the amplifier-related functions to adjust the audio
effect. Some of the Media Center functions are repeated on this remote.You can also use the trackball like a
mouse.
Refer to the table on the next page to familiarize yourself with the functions of the remote control buttons.
1
2
3
4
5
6
8
7
9
11
12
10
13
14
15
16
17
18
19
20
21
22
23
24
25
26
27
28
29
30
31
32

ASUS DAV Center 15
No. Name Description
1. Power Press to turn on/off the power of the screen and the speakers.
2. Treble up/down Press to adjust the treble sound.
3. Channel up/down Press to change TV channels.
4. Desktop Press to go back to the desktop.
5. Windows switch Press to shift among the windows being opened.
6. IE Press to open Internet Explorer.
7. Information Press to display program information under Media Center or other
menu options.
8. Right click Functions as the right click button of a mouse.
9. Media Press to launch the Media Center program.
10. Fast-foward Press to fast-forward a media file.
11. Stop Press to stop playing a media file.
12. Next track Press to go to the next track.
13. LEO (Listening
Environment Optimizer)
Press to automatically adjust your audio system setup to optimize
your listening environment.
14. Pop Press to enter the mode suitable for pop music.
15. Classical Press to enter the mode suitable for classical music.
16. Jazz Press to enter the mode suitable for jazz music.
17. Live Press to enter the mode suitable for live shows.
18. Normal Press to enter the mode for general use.
19. Rock Press to enter the mode suitable for rock music.
20. Midnight mode Press to enter the midnight mode.
21. Record Press to start recording TV.
22. Previous track Press to go back to the previous track.
23. Rewind Press to rewind a media file.
24. Play/Pause Press to play/pause a media file.
25. Left click Functions as the left click button of a mouse.
26. Track ball Scrolls in all possible directions like a mouse.
27. Return Press to return to the previous page under Media Center.
28. Four-way navigation keys Press to scroll through on-screen display menus under Media Center.
29. OK Press to confirm a selection under Media Center.
30. Volume up/down Press to increase/decrease the volume.
31. Bass up/down Press to adjust the bass sound.
32. Mute Press to disable audio output.

16 ASUS DAV Center
Using the wireless keyboard
Your DAV Center comes with a wireless keyboard that facilitates your control of the system.To enhance the
wireless keyboard connection, we recommend that you install the bundled RF receiver.
Setting up the wireless keyboard
1. Plug the USB cable of the RF receiver into any of the USB ports on
your DAV Center. Place the receiver wherever you want.
2. Press the Connect button on the RF receiver and the ID Link button
on the lower left corner of the keyboard to make a connection.
Using the keyboard buttons
The type of wireless keyboard varies with territories.
1 2 3 4 5 109876 12 1311
14
15
16
OFF O N
K/B Switch T/P Switch
OFF O N
WWW
Esc
Tab
F1 F2 F3 F4 F5 F6 F7 F8 F9 F10 F11 F12 Num
Lock
Caps
Lock
ID Fn
Link
PrtSc
SysRq Scroll
Lock
Back
Space
Pause
Break
Home
Vol - Vol + Mute Eject Sleep
E-
Mail
PgUp
PgDnEnter
End
Shift
~
!
@
#$
^&
( )
**
%
09
9
8
8
754321
Q
7
4
6
5
2 31
6
0
Shift
Ctrl Alt
W E R T Y U I O P
A S D F G H J K L
Z X C V B N M
Alt Ins Del
"
< >
?
{
[
}
]
1 2 3 4 5 109876 12 1311
14
15
16

ASUS DAV Center 17
No. Feature Description
1. Internet Press to open your Internet browser.
2. E-mail Press to open your e-mail box.
3. Mute Press to disable audio output.
4. Volume down Press to decrease the volume.
5. Volume up Press to increase the volume.
6. Rewind Press to rewind a media file.
7. Play/Pause Press to play or pause a media file.
8. Stop Press to stop playing a media file.
9. Forward Press to fast-forward a media file.
10. Eject Press to open the DVD tray.
11. Turbo/Silent Press to toggle between the Turbo/Silent mode
12. Keyboard power switch Turns on/off the keyboard power.
13. Touchpad switch Enables/disables the touchpad function.
14. Touchpad Allows mouse movement by dragging your fingertip across the
surface.
15. Left/right click buttons Act as the left/right click buttons of a regular mouse.
16. ID Link button Press to connect the wireless keyboard to the DAV Center.
• Your DAV Center features two operating modes:
Silent mode (default): In Silent mode, the system automatically reduces the DVD-ROM transfer rate and the
speed of the CPU and GPU.This provides a quiet working environment.
Turbo mode: In Turbo mode, the system will use the highest DVD-ROM, CPU and GPU speeds to achieve
optimum performance.This is ideal for system-demanding performance, such as video games or multi-
function media processing.
• The wireless keyboard is equipped with a power saving mode to reduce power consumption.When the
wireless keyboard is left idle for more than three minutes, it enters the power saving mode. Press any key
(except the touchpad and the left/right click buttons) to return to the normal state.

18 ASUS DAV Center
Setting up your DAV Center
Connecting to the TV signal source
Your DAV Center has connectors for S-Video/Composite/Coaxial input. If you use an S-Video or a Composite
jack, you also need to connect the audio source using RCA stereo plugs. For Coaxial input,both the video andthe video and
audio signals are carried on one cable.
Connecting to the TV signal using S-Video/Composite
1. For S-Video: Connect an S-Video cable (not provided) from a video source such as a cable set-top box, a
satellite set-top box, or other video source device, to the S-Video jack on the DAV Center rear panel.OR
For Composite: Connect the yellow RCA cable provided from a video source mentioned above to the
Composite jack on the DAV Center rear panel.
2. Connect the stereo audio cables from the Audio Out jacks on the video device to the RCA adapter, and
then connect it to the Audio In jack on the DAV Center rear panel.
';*/5
)536
9</*
/+++
;9(
/4 5;:
';*/5
)536
9</*
:</4
';*/5
)536
9</*
:</4
OR

ASUS DAV Center 19
Connecting to the TV signal using a coaxial cable
Connect a coaxial cable from a video device, such as a direct cable connection, a cable set-top box, a satellite
set-top box, or an antenna, to the TV IN jack on the back of your DAV Center.
TV I N
/+++
;9(
/4 5;:
';*/5
)536
9</*
:</4
';*/5
)536
9</*
:</4
For models with two TV tuner cards, connect a coaxial cable from the TV signal source to the input of the
provided splitter, and then connect the splitter outputs to the two TV IN jacks on the DAV Center rear panel.
TV I N
TV I N

20 ASUS DAV Center
Connecting the TV signal source to an existing setup
This section describes how to connect the DAV Center to an existing setup for your TV signal source.
Wall to VCR to TV using coaxial cable
1. Remove the coaxial cable from the input to the VCR, and then connect it to the input of a coaxial cable
signal splitter (not provided).
2. Connect two coaxial cables to the splitter outputs.
3. Connect one of these cables to the input of the VCR and the other to the TV connector on the back of the
DAV Center.
B G
C
B D
C
EF
C
D
I
H
H
C
C
E F
C
A
A
Existing setup
Connect to DAV Center
A. Wall
B. Cable outlet
C. Coaxial cable
D. VCR In
E. VCR Out
F. TV In
G. Splitter In
H. Splitter Out
I. TV In jack on the back of the DAV Center
Other manuals for A33
1
This manual suits for next models
3
Table of contents
Other Asus DVD Player manuals