Atag VA 6411 User manual

VA 6411
VA 9411
instructions for use


en Index
Safety instructions 4.. . . . . . . . . . . .
Getting to know your appliance 5. .
Water softener 6. . . . . . . . . . . . . . . .
Filling the salt dispenser 7. . . . . . . .
Adding rinse aid 8. . . . . . . . . . . . . . .
Utensils 9. . . . . . . . . . . . . . . . . . . . . .
Detergent 12. . . . . . . . . . . . . . . . . . . .
auto 3in1 13. . . . . . . . . . . . . . . . . . . . .
Overview of programmes 15. . . . . . .
Washing dishes 16. . . . . . . . . . . . . . .
Additional functions 18. . . . . . . . . . . .
Maintenance and care 18. . . . . . . . . .
Fault finding 20. . . . . . . . . . . . . . . . . .
Customer Service 23. . . . . . . . . . . . .
Information 23. . . . . . . . . . . . . . . . . . .
Installation 24. . . . . . . . . . . . . . . . . . . .
Waste disposal 25. . . . . . . . . . . . . . . .

en
4
Safety instructions
Delivery
Immediately check the packaging and
dishwasher for any damage which may
have been caused in transit. Do not use
a damaged appliance, but consult your
supplier.
Please dispose of packaging material
properly.
Installation
Install and connect the appliance
according to the installation and
assembly instructions.
The dishwasher must NOT be
connected to the power supply during
installation.
Ensure that the protective conductor
system of the domestic electricity
supply has been installed correctly.
Electrical connection conditions must
correspond with the specifications on
the rating plate of the dishwasher.
If the dishwasher is to be installed
in a high-sided unit, ensure that the unit
is attached properly and also at the
rear.
Built-under and built-in appliances
should always be installed under a
continuous work surface which is
attached to the adjacent cupboards, in
order to ensure that the appliance is
entirely stable.
After the appliance has been installed,
the mains plug should still be easily
accessible.
Not on all models:
The plastic housing on the water input
contains an electrically operated valve.
The connecting wires are inside the
inlet hose. Do not cut through this hose
and do not immerse the plastic housing
in water.
Warning
For safety reasons, if the appliance is not
fitted in a recess, thereby making a side
wall accessible, the door hinge area
should be covered at the side.
(Risk of injury)
Covers are available as optional
accessories from customer services or
specialist stores.
In daily use
Warning
Knives and other sharp-pointed utensils
must be placed with the points down
in the cutlery basket or horizontally in
the utensils basket.
Use the dishwasher only in the
household and only for its designed
purpose, i.e. for washing domestic
dishes.
Do not lean or sit on the open door.
The appliance could tip.
Please note that free-standing
appliances may tip over if the baskets
are overloaded.
The water in the appliance is not
drinking water.
Do not add any solvents to the washing
chamber. Danger of explosion!
Open the door carefully when
the programme is still running. There
is a risk of hot water spraying out of
the appliance.
To prevent injuries, e.g. caused
by stumbling, open the dishwasher
only briefly in order to load and unload
the dishwasher.
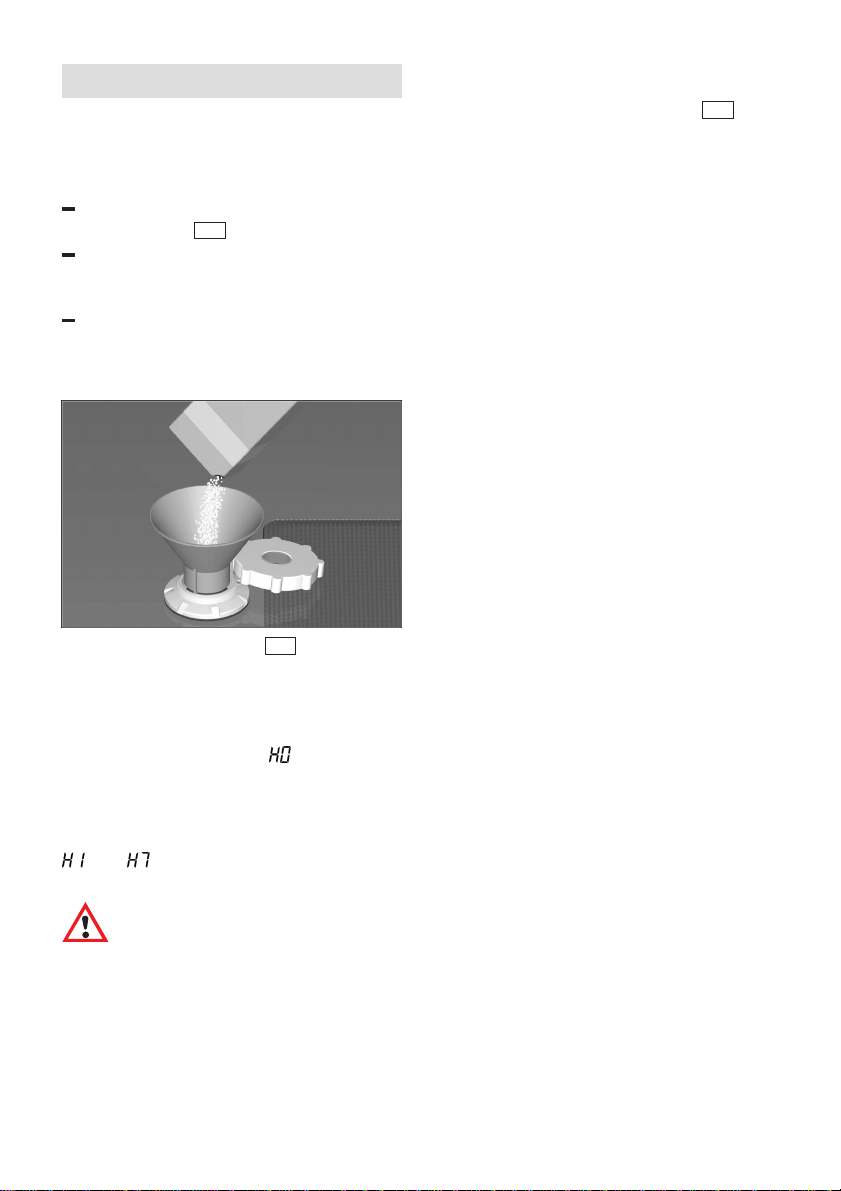
Read and observe the safety
nformation and instructions for use on
the packaging for cleaning and rinsing
agents.

en
5
Children in the household
If fitted, use the childproof lock. An
exact description can be found in the
back of the envelope.
Do not allow children to play with
or operate the appliance.
Keep children away from detergents
and rinse aid. These may cause
chemical burns in the mouth, throat and
eyes or asphyxiation.
Keep children away from an open
dishwasher. There could still be
detergent residue inside.
If the appliance is installed at eye-level,
ensure when opening and closing the
door that children are not caught
or crushed between the appliance door
and the cupboard door situated below.
Damage
The appliance may be repaired and
opened up by a technician only. First
disconnect the appliance from the
power supply. Pull out the mains plug
(do not tug the power cord!) or switch
off the fuse. Turn off the tap.
Disposal
Make redundant appliances unusable
to prevent subsequent accidents.
Dispose of the appliance in an
environmentally friendly manner.
Warning
Children could get locked in the appliance
(risk of suffocation) or get stuck in other
positions.
Therefore: Remove the mains plug, cut the
mains wire and set aside. Damage the
door lock so that the door can no longer
be closed.
Getting to know your
appliance
Diagrams of the control panel and the
interior of the appliance can be found
in the envelope at the front.
Individual positions are referred to in
the text.
Control panel
1Main switch
2Additional options *
3Time delay
4“Check water supply” indicator *
5Salt refill indicator
6Rinse-aid refill indicator
7Programme buttons
8Door Opener
9Digital display
* some models
Appliance interior
20
Upper basket with 2-tiered cup rack
21
Additional cutlery basket for the top
basket *
22
Upper spray arm
23
Lower spray arm
24
Container for special salt with level
indicator *
25
Filters
26
Cutlery basket
27
Lower basket
28
Lock for detergent dispenser
29
Container for rinse-aid, with level
indicator
30
Detergent compartment
31
Nameplate
* not on all models

en
6
You will need to purchase the
following before using the
dishwasher for the first time:
–special salt for use in dishwashers
– detergent
– rinse-aid
Only use products, which are suitable for
dishwashers.
Water softener
In order to rinse dishes and glasses
satisfactorily, the dishwasher requires soft
water, i.e. containing little or no lime,
otherwise water stains will be left behind
on crockery and glasses, etc.
If the tap water exceeds a certain level of
hardness, it must be softened, i.e.
decalcified, so that it can be used in the
dishwasher.
This is achieved by adding a special salt
to the water softener inside the
dishwasher.
The water softener, that is the required
amount of salt, is set up according to how
hard the tap water is.
Setting up the water softener
Determine the level of hardness of your
tap water. Your local water company or
service agent can help you with this.
Identify setting from the following water
hardness table.
Water hardness table
Hold down programme button Band
switch on the
1
main switch, then
release both buttons.
The LED for button Bflashes and the
digital display displays the factory
setting .
To change the setting,
press programme button B.
Each time the button is pressed, the set
value increases by 1; after , the
setting goes back to .
Switch off the main switch
1
.
The chosen setting has now been
stored.
Approx. 4 litres of water are required for
regenerating the water softening system.
The overall water consumption per load
can therefore be increased by between 0
and a maximum of 4 litres according to the
water hardness setting.

en
7
Filling the salt dispenser
Salt must always be filled before the
appliance is switched on, so that excess
salt solution is immediately flushed away
to prevent corrosion.
Open the screw-type cap of the
compartment 24 .
Before using the appliance for the first
time, pour about 1 litre of water in the
salt container.
Then refill with salt (not cooking salt)
until the salt container is full
(max. 1.5 kg). When you refill the salt,
water is being displaced and drains off.
The LOW SALT indicator
5
on the front
panel will light up initially but will extinguish
again after a short period when the salt
solution has become sufficiently
concentrated.
When the control is set to , it is not
necessary to fill up with salt as none will
be consumed while the dishwasher is
operating. The LOW SALT indicator is
switched off. If the control is set between
and , then salt must be added to
the dispenser.
Warning
Do not pour detergent into the container
for special salt. This would destroy the
water softener.
Salt refill indicator
As soon as the salt refill indicator
5
is lit
on the control panel, refill with salt
immediately before the next rinse cycle.
Depending on the washing frequency and
the hardness setting, the regeneration salt
may not have to be topped up for several
months.

en
8
Adding rinse aid
Rinse aid is used in the rinsing cycle to
ensure clear glasses and stain-free
utensils.
Open the lid of the rinse-aid dispenser
29 by pressing the button on the
rinse-aid lid and lifting up the lid.
Pour the rinse-aid into the filler hole
until the level indicator turns dark.
Close the lid, ensuring that you hear it
snap closed.
rinse–aid control
Use only rinse aid for domestic
dishwashers. Spilt rinse aid may result in
excessive foam formation in the next rinse
cycle. Therefore, remove any spilt rinse
aid with a cloth.
Convenient rinse-aid filling
procedure with half-open door
Open the rinse-aid lid and pull out the
hinged filling aid until it locks into
position.
Slowly fill with rinse aid but do not
overfill.
Close the rinse-aid lid until it clicks shut.
Set Amount of Rinse Aid
The amount of rinse aid is set at the
factory to 4.
Only change this setting if streaks bor
water stains yremain on the dishes.
Hold the Programme button
3
and
press the main switch
1
.
Release both buttons.
In order to change the setting, press the
Programme button
3
.
Each time you press the button the
value increases by one step; once
a value of is reached the indicator
jumps back to (Off: The rinse aid
fill indicator
6
does not show a need
to refill).
Switch off the main switch
1
. The set
value is stored within the device.
Note
Only switch off the rinse aid indicator if you
are using cleaning products with
integrated rinse aid!

en
9
Utensils
Not suitable
Cutlery and utensils made of wood.
Fragile decorative glasses,
hand-crafted and antique utensils.
These decorative items are not
dishwasher-proof.
Plastic parts sensitive to hot water.
Copper and tin utensils.
Utensils which are soiled with ash,
wax, lubricating grease or ink.
Absorbent materials such as sponges
and cloths.
Aluminium and silver parts have a
tendency to discolour and fade during the
wash cycle. Even some types of glass
(e.g. crystal glass objects) may turn cloudy
after many wash cycles.
Recommendation:
In future buy utensils which are identified
as dishwasher-proof.
Damage to glassware and other
dishes
Possible causes:
type of glass or manufacturing process
chemical composition of detergent
water temperature and duration of
dishwasher programme.
Suggested remedy:
Use glassware or porcelain dishes that
have been marked ’dishwasher–proof’
by the manufacturer.
Use a mild detergent that is described
as ’kind to dishes’. If necessary, seek
further information from detergent
manufacturers.
Select a programme with as low a
temperature and as short a duration as
possible.
To prevent damage, take glass and
cutlery out of the dishwasher as soon
as possible after the programme has
ended.
Loading the dishwasher
Remove large food remnants.
It is not necessary to rinse them off
under running water.
When loading the dishwasher, ensure
that
Dall utensils are secure and cannot
fall over.
Dthe openings of all receptacles are
face down.
Dcurved or indented utensils are at
an incline, allowing water to drain.
Dthe two spray arms can rotate freely.
Very small items should not be washed in
the dishwasher as they could easily fall out
of the baskets.
Removing the dishes
To prevent water dripping from the top
basket onto the dishes in the lower basket,
we recommend that you empty the lower
basket first and then the top basket.
Cups and glasses
Upper basket 20
*not included with all models

en
10
Pots and pans
Lower basket 27
Cutlery
Cutlery should be placed in the
dishwasher always unsorted and with the
eating surface pointing downwards. The
spray jet is then better able to reach the
individual parts.
To prevent injuries, place long, pointed
accessories and knives on the étagère
(some models) or on the knife shelf
(available as an accessory).
Folding spikes *
*on applicable models
To improve stacking of pots and pans, the
spikes can be folded down.
Shelf *
*not on all models
Lean tall glasses and those with long
stems against the shelf – not against other
items to be washed.
Long items, serving cutlery, salad servers
or knives should be placed on the shelf so
that they do not obstruct the rotation of the
spray arms. The shelf can be folded back
when not required for use.
Small accessories holder*
*some models
Light-weight plastic accessories, e.g. cups,
lids, etc. can be held securely in the small
accessories holder.

en
11
Adjusting the height
of the basket *
* some models
If required, the height of the upper utensils
basket can be adjusted to provide more
space for tall utensils either in the upper
or lower basket.
Appliance height in cm 81 86
Max. ø in cm upper 20/25* 20/25*
max. ø in cm lower 30/25* 34/29*
Select one of the two following procedures
according to the design of the top basket
for your appliance model:
Top basket with upper and
lower roller pairs
Pull out the top basket.
Remove the top basket and re-attach
it to the upper or lower rollers.
Top basket with side levers
(Rackmatic)
Pull out the top basket.
To lower the basket, press in one lever
and then the other situated on the left
and right of the basket exterior, holding
the basket firmly on the sides of the
upper edge to prevent it from falling
down.
To raise the basket, hold the basket on
the sides of the upper edge and lift it
up.
Before re-inserting the basket again,
ensure that it is at the same height
on both sides. Otherwise, the appliance
door cannot be closed and the upper
spray arm will not be connected to
the water circuit.

en
12
Detergent
You can use commercially available liquid
or powder proprietary detergents for
dishwashers or TABS (do not use
handwash!).
If phosphate-free detergents are used with
hard tap water, white deposits may be
deposited more easily on utensils and
the container walls. This can be remedied
by adding more detergent.
See detergent packaging to determine
whether a detergent is suitable for silver
parts.
If you have any other questions, we
recommend that you contact the helplines
of the detergent manufacturers.
Detergent dispenser with
dosing aid
The graduated detergent dispenser helps
you add the correct amount of detergent.
The lower and middle lines in the
dispenser indicate15 ml and 25 ml of
detergent respectively. The dispenser can
be filled with 40 ml of detergent when the
door is opened horizontally.
Filling with detergent
You can add detergent either when the
appliance door is completely open or –
for a more comfortable posture – when
the door is half open.
If the detergent dispenser is still closed,
open it by pressing the catch .
When the door is half open, press the
button on the right side of the detergent
dispenser. Swivel up the detergent
compartment and cover. The detergent
compartment can easily be locked into
position by lifting it slightly.
Pour detergent into the dispenser.
Please follow the manufacturer’s
instructions on the detergent packet
for correct dosage.
Note
The cleaning tabs from various
manufacturers exhibit differing dissolving
properties, so washing power may not
develop fully during short programmes and
there may be undissolved cleaning agent
residue. It is recommended to use
washing powder for these programmes.
The Intensive programme (on some
models) requires one tab only. When using
washing powder, you can apply some
of this cleaning agent to the inside of
the appliance’s door.

en
13
Reduce costs!
If your dishes are only moderately dirty,
you may be able to use less detergent
than recommended.
If using washing tablets, please refer to
the washing tablets box where to place
the tablets in the appliance (e.g. in the
cutlery basket, detergent dispenser).
Close the detergent dispenser. Slide
the dispenser cover completely over
the detergent compartment (1) and then
press down firmly (2) until the catch
“clicks” into position.
Close the detergent dispenser when the
door is completely open.
Close the detergent dispenser when
the door is half open.
During the washing cycle the cover of
the detergent dispenser is automatically
opened and the detergent is washed
out. The cover is therefore open when
the programme ends.
auto 3in1
The use of so-called combined detergent
products may make the use of rinse aid
and/or salt unnecessary.
There are currently several types of
combined detergent products available.
2in1: They contain detergent and rinse
aid or salt function.
3in1: They contain detergent, rinse aid
and salt function.
4in1: They contain a detergent,
rinse-aid, salt function and an additional
glass protection component.
In addition, other combined products with
a comparable effect are offered according
to the manufacturer.
>>> Always check the type of detergent
or combined product which you
are using!
Always follow the operating instructions
or the information on the packaging.
The rinse programme is automatically
adjusted in order to obtain the best
possible rinsing and drying result.
Observe the following important
information if using combined cleaning
products:
Regeneration salt is not required up to
a water hardness of 21_dH (37_fH,
26_Clarke, 3.7 mmol/l) only. No other
settings on the appliance are required.
Salt is still required if the water
hardness is above 21_dH (37_fH,
26_Clarke, 3.7 mmol/l). Fill the salt
dispenser with salt
24
and select
setting 6 on the water softening system.
If in doubt, please contact the detergent
manufacturer, especially if:
the utensils are very wet at the end
of the programme.
limescale forms.

en
14
Note
Optimum rinsing and drying results can be
obtained by using standard detergents in
conjunction with separate application of
salt and rinse aid.
Observance of the operating instructions
or information on the packaging of the
combined detergents determines their
effectiveness.
Note
Even if the rinse aid and/or salt refill
indicator is lit, the rinse programme runs
correctly when 3in1 products are used.
If the rinse aid refill indicator
6
or salt
refill
5
indicator is defective and you
would like to switch it off, proceed as
follows:
Switching the rinse aid refill
indicator off and on
Hold down the programme button
3
and press the main switch
1
until the
digital display lights up, then release the
buttons.
9
is indicated on the digital
display .
Each time the button
3
is pressed,
the set value increases by one; when
the value is reached, the display
jumps back to . To switch off,
select the position.
Switch off the main switch
1
;
the setting is saved.
Switching the salt refill
indicator / water softening
system off and on
Hold down the programme button B
and switch on the main switch
1
,
then release the buttons.
The illuminated button Band the
factory-set value on the digital
display flash.
To change the setting: press the
programme button B.
Each time the button is pressed, the set
value increases by one; when the value
is reached, the display jumps back
to (the salt refill indicator / water
softening system has been switched
off).
Switch off the main switch
1
.
The set value is stored within the
device.
Approx. 4 litres of water are required to
regenerate the water softening system.
As a result, the water consumption per
rinse cycle increases by 0 to maximum
4litres depending on the water hardness
setting.
Note
If you use the detergent and rinse aid
separately or switch from combined
detergents to standard cleaning products,
ensure that the rinse aid refill indicator has
been switched on and the water softening
system has been set to the correct water
hardness.

en
15
Overview of programmes
The max. possible number of programmes is illustrated in this overview.
The corresponding programmes for your appliance can be found on the fascia.
Coffee, cake, milk,
sausage, cold drinks,
salads
Soups, soufflés,
potatoes, pastries,
rice, eggs,
fried food
Delicate
Type of Dishes
e.g. porcelain,
pans,
cutlery,
glasses, etc.
Type of food
remnants e.g.
Programme-
sequence
Dry
Clean
55_
Clean
40_
Prerinse
Clean
55_
Clean
45_
Soups,
potatoes,
pastries,
rice, eggs,
fried food
Wash
programme
Very little
LittleLarge
Amount of
food remnants
State of food
remnant
Intensive
70_
Eco
50_
Gentle
40_
Quick
45_
Prerinse
MixedMixedNon-sensitive
Medium Lightly Adhesive
Very
adhesive
Dry
Clean
65_
Clean
50_
Prerinse
Dry
Clean
70_
Dry
Clean
70_
Prerinse
40_
The programme sequence is
optimised and adjusted according
to the degree of soiling on the
utensils.
Auto
55_-65_
Prerinse
Rinse off if
the dishes
have been
stacked
for several
days in
the
dishwash
er prior to
washing.
Inter-
mediate
rinse
Inter-
mediate
rinse
Inter-
mediate
rinse
Inter-
mediate
rinse

en
16
Programme selection
The most appropriate programme can be
identified by comparing the type of
crockery, cutlery, etc., as well as the
amount and condition of food remains,
with the details contained in the
programme overview.
You will find the appropriate programme
information in the introduction.
Washing dishes
Reduce costs!
If only a small number of dishes have
been loaded into the dishwasher, selecting
a programme that operates at the next
lowest temperature will usually suffice.
Programme data
The programme specifications can be
found in the summary of instructions.
Programme specifications refer to normal
conditions. Greater deviations may occur
due to:
different amounts of dishes
temperature of mains water supply
pressure of mains water supply
ambient temperature
fluctuations in mains voltage
machine-related factors (e.g.
temperature, water volume, ...).
Energy and water consumption is reduced
by up to 1/4 when dishes are washed in
the upper basket only.
Water consumption values are based on a
water hardness setting of 4.
Aqua sensor *
* some models
The Aquasensor is an optical measuring
device (light barrier) which measures
the turbidity of the rinsing water.
The Aqua sensor is used according
to the programme.
When the Aqua sensor is active, “clean”
rinsing water may be transferred into the
next rinsing bath and/or the temperature
adjusted. If the turbidity is greater, the
water is drained and is replaced with fresh
water. In this way water consumption can
be reduced by approx. 4 litres.
Switching the dishwasher ON
Turn on the tap.
Set main switch
1
to ON.
Indicators light up according to the last
programme that was selected.
This same programme will run again if
no other programme button
7
is
pressed
The numerical display
9
shows the
expected duration of the programme.
Close door.
The programme starts automatically.
Optical indicator during
operation *
*With some models
During the rinse programme a light point
appears on the floor below the device’s
door. Only open the dishwasher door
when the light point has disappeared.
In the case of built-in dishwashers with
flush front the light point will not be visible.
Remaining running time display
When the appliance has started, the
expected programme running time is
displayed. The programmed running time
is affected by the water temperature, the
number of dishes, as well as the degree
of soiling. If these conditions are changed,
the running time (depending on the
selected programme) can vary greatly.
As the effect is not detected until a
programme is running, the time may
be longer or shorter than expected.
Time delay *
*on applicable models
You can delay the start of the programme
in 1-hour steps up to 19 hours.

en
17
Switch on the appliance.
Press the timer programming button
3
until the digital display
9
jumps
to .
Keep pressing the timer programming
button until the required time is
displayed.
To delete the timer programming,
keep pressing the button until
is displayed.
You can change your programme
selection at any time until the
programme starts.
End of programme
The end of the programme is indicated by
a buzzer. This function can be changed as
follows:–
Hold down Function button C
pressed and switch on main switch
1
, then let the buttons go.
Function Button Cflashes, and the
digital display indicates the value
which was set at the factory
(semi-loud).
To change the setting:
Press Function button C.
Each depression of the button
increases the set value by one,
when is reached, the display
jumps back to (off).
Switch off the main switch
1
.
The set value is stored in the appliance.
Switching the dishwasher OFF
Several minutes after the programme has
ended:
Open the door when the programme
has ended.
Set main switch
1
to OFF.
Turn the water tap off.
(Does not apply when Aqua-Stop unit
has been fitted)
Remove dishes, etc. when they have
cooled down.
At the end of the programme please open
the door fully and not partially when
emptying the dishwasher. Any escaping
water vapour could damage sensitive
worktops.
Interrupting the programme
Open the door. Caution! There is a risk
of water squirting out from inside the
appliance. Do not open the door fully
until the spray arm has stopped
rotating.
Set main switch
1
to OFF.
Indicator lights extinguish. The
programme is retained in the dish-
washer memory.
If the hot water was switched ON or the
appliance has already heated up and then
the appliance door opened, leave the door
ajar for several minutes and then close.
Otherwise, the appliance door may fly
open due to expansion.
In order to continue with the stored
programme, set the main switch to ON
again and close the door.
Terminating the programme
(Reset)
Simultaneously press programme
buttons Aand Cfor approx. 3 sec.
The numerical display indicates .
Close the door.
The programme sequence lasts
approx. 1 min.
Switch off the main switch
1
.
Changing the programme
When the appliance is switched on, the
programme can be changed
within minutes.
If the programme is changed
subsequently, programme sections
(e.g. Cleaning) which have already started
run to the end. The new remaining time
consists of the remaining time of the
previous programme section and the
remaining time of the newly selected
programme.

en
18
Intensive drying
In the final rinse the appliance operates
at a higher temperature and therefore an
improved drying result is obtained.
(Caution if utensils are fragile!)
Hold down programme button Aand
press main switch until
1
the digital
display illuminates.
Release both buttons.
The LED for button Aflashes and
the digital display
9
displays the factory
setting (off) or (on).
To change the setting, press
programme button A.
Switch off the main switch
1
.
Additional functions
*on some models additional functions
2
can be set with the buttons.
Soaking *
The soaking cycle runs before the main
programme and must be selected before
the programme starts. In this additional
programme cooking utensils, e.g. pans,
bowls, etc., can be soaked and prerinsed
in the bottom basket.
It is recommended to put approx. 5 g of
detergent on the door.
Reduce/save time*
The rinsing times and the drying phase
are reduced. The reduced time lowers
the rinsing and drying performance.
Half load*
If you have only a few items to wash (e.g.
glasses, cups, plates), you can switch to
“Half load”. The “half load” additional
function saves water, energy and time. It is
recommended to put a little less detergent
in the detergent dispenser than for a full
load.
Maintenance and care
Aregular inspection and maintenance of
your machine will help to prevent faults.
This saves time and prevents problems.
Overall condition of the
machine
Check washing chamber for grease
and limescale deposits.
If you find such deposits:
Fill the detergent dispenser with
detergent, start the appliance without
utensils in the programme which has
the highest wash temperature.
Clean the appliance with detergents/
appliance cleaners which are particularly
suitable for use with dishwashers.
Regularly wipe the door seal with a
damp cloth.
Never use a steam cleaner to clean your
dishwasher. The manufacturer is not liable
for any consequential damage.
Regularly wipe the front of the appliance
and panel with a damp cloth; water and
a little washing-up liquid will suffice.
Do not use sponges with a rough surface
or abrasive detergents, as these could
scratch the surfaces.
Attention!
Never use other chlorinated household
detergents! Health hazard!
Salt and rinse aid
Check the refill indicators
5
6
.
If required, top up the salt and/or rinse
aid.
Filters
The filters 25 prevent larger remnants of
food or other objects from getting inside
the pump. This residue can occasionally
clog up the filters.
The filter system consists of a filter
cylinder, a flat fine filter and, depending on
the model, a microfilter (*).

en
19
Inspect the filters for obstructions every
time the dishwasher has been used.
By unscrewing the filter cylinder, you
can remove the filter system. Remove
any food remnants and clean the filters
under running water.
Reassembly:
Insert the filter system and screw down
with the filter cylinder.
Spray arms
Lime and remnants of food in the washing
water can block the nozzles in the spray
arms 22 and 23 and the arm
mountings .
Inspect the nozzles in the spray arms
for blocked holes due to remnants of
food.
If necessary, pull the lower arm 23
upwards and lift it off.
Unscrew the upper spray arm 22 .
Clean both spray arms under running
water.
0
1
23
Refit the spray arms. Ensure that the
lower arm has locked into place and the
upper one is screwed tight.

en
20
Pump *
*on applicable models
Larger remnants of food that have not
been trapped by the filters and have been
left in the water can cause a blockage in
the pump. The water is no longer pumped
out of the dishwasher and it can be seen
covering the filter.
Proceed as follows:
First, always disconnect the appliance
from the power supply.
Ladle out as much water as possible.
Remove the filters 25 .
Undo the screw in the cover (Torx T 20)
and remove the cover.
Inspect the inside and remove any
obstructions that you find.
Re-insert the cover and screw down.
Re-insert the filters and screw down.
Torx T20
2
1
Fault finding
Resolving minor problems
yourself
Experience has shown that you can
resolve most problems that arise during
normal daily usage yourself, without
having to call out a service engineer. Not
only does this save costs, but it also
means that the appliance is available for
use again that much sooner. The following
list of common occurrences and their
remedies should help you identify the
causes of most problems.
Problems ...
Attention
Remember: Repairs may be carried out by
a technician only. If a component has to be
replaced, ensure that only original spare
parts are used. Improper repairs or use of
non-original spare parts may cause
considerable damage and put the user at
considerable risk.
... when the appliance
is switched on
The appliance does not start.
The mains fuse has tripped.
The appliance plug has not been
inserted.
The appliance door has not been
shut properly.
The tap has not been turned on.
This manual suits for next models
1
Table of contents
Other Atag Dishwasher manuals

Atag
Atag VW6055ST User manual

Atag
Atag VA9611RT User manual

Atag
Atag VA6111AFUU/A02 Operation manual

Atag
Atag VA7214SLR User manual

Atag
Atag VA8018TT User manual

Atag
Atag VA7214LQ User manual

Atag
Atag VA7015QT User manual

Atag
Atag VA7114RT User manual

Atag
Atag VA6011AF User manual

Atag
Atag VA98211RT User manual

Atag
Atag VA6111AF User manual

Atag
Atag VA8215LR User manual

Atag
Atag VA7016RT User manual

Atag
Atag VA63111ST User manual

Atag
Atag VA98211QT/A08 User manual

Atag
Atag VA63315VT User manual

Atag
Atag VA6811QT User manual

Atag
Atag VA2214MP User manual

Atag
Atag VA5114BT User manual

Atag
Atag VA6611NTUU/A01 User manual