ATEN UN-101 User manual

86(560$18$/
81
4GCFVJKUIWKFGVJQTQWIJN[CPFHQNNQYVJGKPUVCNNCVKQPCPF
QRGTCVKQPRTQEGFWTGUECTGHWNN[VQRTGXGPVCP[FCOCIGVQVJGWPKV
CPFQTCP[QHVJGFGXKEGUKVEQPPGEVUVQ
The UN-101 package contains:
75$0GVYQTM%C NG
&TKXGT
7UGT/CPWCN
l
%QR[TKIJV #6'0
s
+PVGTPCVKQPCN %Q .VF
/CPWCN 2CTV 0Q 2#2'
#NN DTCPF PCOGU CPF VTCFGOCTMU CTG VJG TGIKUVGTGF RTQRGTV[ QH VJGKT TGURGEVKXG QYPGTU
USB Network Cable

System Requirements
Intel Compatible CPU: 486DX4-100 or Higher
One Standard USB Port
Windows: 98 SE, 2000
Features
USB Based Peer Networking - Up To 17 Computers - Perfect for
SOHO networks
Easy, Fast Installation
Share Files and Resources (Printers, Scanners, Modems, CD-
ROM Drives, etc.)
Internet Sharing Via Dialup Connection
Ethernet LAN Linkup With Direct Internet Connection Capability
Supports TCP/IP, NetBEUI, and IPX/SPX protocols
Standard, Familiar, Windows Explorer User Interface
High Speed USB Bandwidth - Maximum Data Transfer Rate of
More Than 5 Mbps
Power Management - Current Drops To 450µA During Suspend
Mode
True Plug-n-Play Compatibility - Hot Swapping

Overview
The UN-101 USB Network Cable represents an innovative
breakthrough in peer group networking. Peer-to-peer networking is
often the best choice in small office situations, or among small
workgroups, where computers share their resources and peripherals
without the use of a dedicated server.
Prior to the UN-101, this type of networking was either carried out on
a very limited basis through slow parallel port connections, or
required setting up an expensive network, including the complicated
installation and configuration of network expansion cards.
Now, with the UN-101 USB Network Cable, building a home or small
office network is as easy as plugging cables into the computers' USB
ports. Opening the case to install network cards and troubleshooting
IRQ conflicts have all been replaced by simple plug and play
connections. Slow parallel port transfers among a small number of
computers have been replaced by more than 5 Mbps USB data
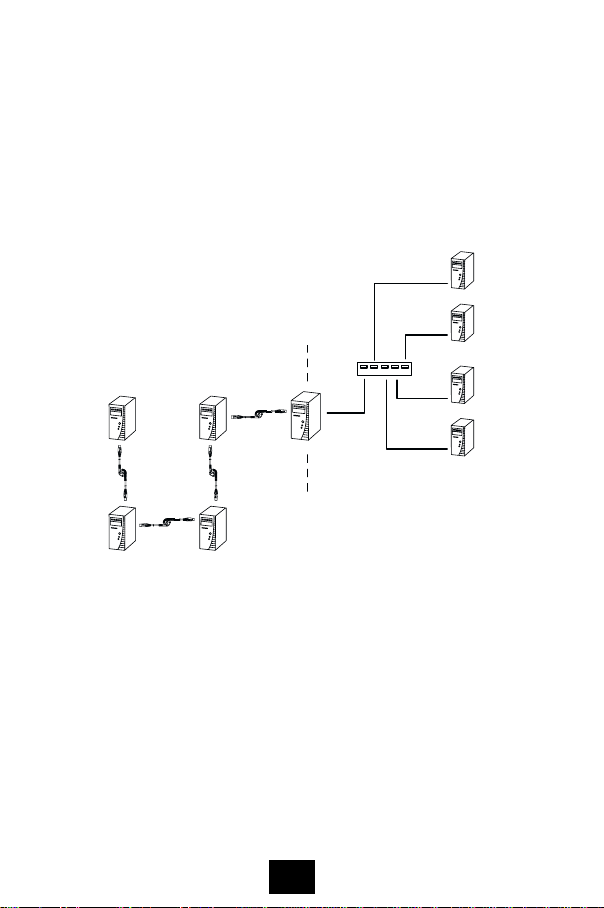
transfers among up to 17 computers. Since the UN-101 uses the
familiar Windows interfaces, such as Windows Explorer, there is no
new interface or software to learn, making operation smooth and
easy.
The UN-101 offers three types of USB based networking. In addition
to basic peer-to-peer workgroup networking, the UN-101 provides the
workgroup with shared dialup Internet access, and also has a feature
that allows the workgroup to link to an Ethernet based client/server
LAN - making all the resources of the Ethernet LAN available to the
group - including the company Intranet, as well as providing a direct
connection to the Internet.
Thanks to plug and play and the USB bus, there is no easier, faster,
more efficient way for a small to medium sized workgroup to share all
their resources (data, programs, printers, scanners, etc.), than with a
UN-101 USB Network Cable based network.
1

Driver Installation
Before you Begin
Before you begin, please note the following:
1. Don't plug the USB Network Cable into the computer before
installing the driver.
2. Before you install the USB Network Cable driver, Client for
Microsoft Networks must be installed on your system. To check if
it has already been installed, open Windows Explorer ÎControl
Panel ÎNetwork. If Client for Microsoft Networks is installed you
will see an entry for it in the Installed Network Components panel.
If there is no entry, you will need to install it:
a) Click on Add
b) Click on Client; Click on Add
c) In the left panel Click on Microsoft; in the right panel Click on
Client for Microsoft Networks
d) Click on OK
e) Follow the on-screen instructions to complete the installation.
2

Basic Peer To Peer
To set up a computer as a station on a basic Peer-to-Peer network
do the following:
1. Power up the computer and insert the distribution diskette in the
floppy disk drive.
2. Run the Setup program found on the distribution diskette, and
follow the step-by-step procedure that the InstallShield Wizard
takes you through. (Click on Next when you are ready to move on
to the next step.)
Note: You may need to have your Windows 98 SE installation CD
handy in case Windows prompts you for it.
a) For Choose Destination Location, you can leave the default
folder choice, or specify a directory of your choice.
b) When asked for the Computer Name, key in a unique name -
each computer in the workgroup (peer network) must have a
name that is different from all the others.
c) When asked for the Workgroup name, key in the name that the
peer network uses. Make sure that all the computers in the
peer network have the same Workgroup name.
d) When asked if you want to install the Network Bridge, Click on
No. That is only used to connect to an Ethernet LAN.
e) When asked, Click on Finish to complete the driver installation
process. Several networking related files are installed on your
hard disk.
f) When the driver installation process has completed, Windows
directs you to reboot the computer.
3. Remove the distribution diskette from the floppy drive; plug the
USB Network Cable into the computer's USB port, and restart
Windows.
4. When Windows comes back up, it may display a login dialog box.
If it does, be sure to fill in the information and Click on OK, or else
you will not be able to access your network.
3

Setup Complete
Once the Setup has been completed, members of the Peer network
can:
See all the computers on the USB Peer LAN in the Network
Neighborhood folder.
Share programs, files, and peripheral devices via the standard
Windows interfaces (i.e., Windows Explorer and Network
Neighborhood).
Sharing Resources
To share resources, do the following:
1. Open Windows Explorer
2. Navigate to the drive, folder, file, or peripheral (printer, scanner,
etc.), that you want to share; Right Click on it; select Sharing.
3. Select Shared As, and key in the Shared Name that the other
computers will use to select it.
4. Select the access rights type for this resource (Full, Read Only,
etc.)
5. Click on OK to finish up.
6. Repeat steps 2 - 5 for any other resources you wish to share.
4

Peer-To-Peer With Shared Dialup Internet
Access
The Host System
For the peer network to share dialup Internet Access, one computer
(the one with the modem) is designated as the Host, the others are
designated as Remote. Windows 98 SE makes shared dialup
Internet Access possible through its Internet Connection Services,
which must be installed on the Host. To install Internet Connection
Services on the Host, do the following:
1. Open the Control Panel: My Computer ÎControl Panel
2. Select Add/Remove Programs ÎWindows Setup ÎInternet
Tools
3. Check Internet Connection Sharing; Click on OK.
4. The ICS Installation Wizard copies files; when it is done, Click on
Next.
5. Select Dial Up Adapter; Click on Next.
6. Select PC-Linq/Net USB Network Adapter
The Wizard now wants to create a client configuration disk; Click
on Next and follow the on-screen instructions. When the Wizard is
done you are asked to reboot
After Windows comes back up, check the following:
1. Open the Network folder: My Computer ÎControl Panel Î
Network
2. In the Installed Network Components panel:
a) Select TCP/IP (Home) - PC-Linq/Net USB Network Adapter,
and make sure that the IP address has been set for
192.168.0.1, and the Subnet Mask has been set for
255.255.255.0
b) Check to be sure that TCP/IP (Shared) - Dial Up Adapter was
installed.
5

The Remote Systems
The Remote systems are the workgroup computers that share the
dial up Internet connection provided by the Host system. To
configure the Remote systems, do the following:
1. Open the Internet Options folder: My Computer ÎControl Panel
ÎInternet Options:
a) Select: Always dial my default connections.
With this selected, whenever a program that requires the
Internet is started (IE, for example), the Host automatically dials
up (assuming it is not already connected).
b) Click on Sharing to check that PC-Linq/Net USB Network
Adapter is selected.
2. Open the Network folder: My Computer ÎControl Panel Î
Network
3. In the Installed Network Components panel:
a) Click on TCP/IP ÎPC-Linq/Net USB Network Adapter
b) Click on the WINS tab; select Use DHCP for WINS Resolution
With this selected, the computer will automatically be given an
IP address when it starts up.
Setup Complete
Once the Setup has been completed, members of the Peer network
can:
See all the computers on the USB Peer LAN in the Network
Neighborhood folder.
Share programs, files, and peripheral devices via the standard
Windows interfaces (i.e., Windows Explorer and Network
Neighborhood).
Access the Internet and make use of Internet applications, such
as WWW, Email, FTP, Telnet, Gopher, etc.
6

Peer-To-Peer With Ethernet LAN Connection
For the peer network to connect to an Ethernet LAN and access all
the services made available to the LAN such as file and print,
Intranet, and direct Internet access (not dial up), one - and only one -
computer must be set up as the Bridge between the peer workgroup
and the Ethernet LAN. The Bridge is a member of both the Peer USB
LAN and the Ethernet LAN.
Note: The Bridge computer must already be set up as a workstation
on the LAN.
There are three possible configurations for the workgroup to
establish an Ethernet LAN connection:
1. USB Peer LAN to Ethernet LAN
2. USB Peer LAN to the Internet via Ethernet LAN Using Static IP
Addresses
3. USB Peer LAN to the Internet via Ethernet LAN Using Internet
Connection Sharing Services
The three configurations are discussed, below:
7
USB LAN
Ethernet LAN
Bridge

1. USB to Ethernet:
The Bridge Computer:
1. Install the USB Network Cable driver according to the instructions
for Basic Peer to Peer installation, above, except for step 2-d.
2. When asked if you want to install the Network Bridge (step 2-d),
Click on Yes.
The Remote Computers:
The Remote systems are the workgroup computers that connect to
the Ethernet LAN via the Bridge computer. For each system, install
the USB Network Cable driver according to the instructions given for
Basic Peer to Peer installation, above.
Setup Complete
Once the Setup has been completed, members of the Peer network
can:
See all the computers on both networks (the USB Peer LAN and
the Ethernet LAN), in the Network Neighborhood folder.
Share programs, files, and peripheral devices via the standard
Windows interfaces (i.e., Windows Explorer and Network
Neighborhood).
2. USB to Internet via Ethernet LAN Using Static IP
Addresses
The Bridge Computer:
1. Install the USB Network Cable driver according to the instructions
given for Basic Peer to Peer installation, above, except for step 2-
d.
2. When asked if you want to install the Network Bridge (step 2-d),
Click on Yes.
3. When done, open the Network folder: My Computer ÎControl
Panel ÎNetwork
8

4. In the Installed Network Components panel:
a) Click on TCP/IP Î[Network Adapter]*
b) Click on the WINS tab; select Disable WINS Resolution
c) Click on the IP Address tab; select Specify an IP Address; enter
the IP Address and the Subnet Mask (if they are not already
specified), that the Bridge computer uses on the Ethernet LAN.
If you do not know what the IP Address and Subnet Mask
numbers are, get them from your network administrator.
d) Click on the Gateway tab; enter the Gateway address from the
LAN to the Internet (if it is not already specified). If you do not
know what the Gateway address is, get it from your network
administrator.
* Network Adapter refers to the network adapter card protocol that
the computer uses. The name of the actual network card protocol
(NE2000 Compatible, for example) will appear here.
The Remote Computers:
1. Install the USB Network Cable driver according to the instructions
given for Basic Peer to Peer installation, above.
2. Open the Network folder: My Computer ÎControl Panel Î
Network
3. In the Installed Network Components panel:
a) Click on TCP/IP ÎPC-Linq/Net USB Network Adapter
b) Click on the WINS tab; select Disable WINS Resolution
c) Select Specify an IP Address; enter a unique IP Address and
the Subnet Mask for each computer on the installation. If you
do not know what the IP Address and Subnet Mask numbers
are, get them from your network administrator.
d) Click on the Gateway tab; enter the Gateway address from the
LAN to the Internet. If you do not know what the Gateway
address is, get it from your network administrator.
9

Setup Complete
Once the Setup has been completed, members of the Peer network
can:
See all the computers on both networks (the USB Peer LAN and
the Ethernet LAN), in the Network Neighborhood folder.
Share programs, files, and peripheral devices via the standard
Windows interfaces (i.e., Windows Explorer and Network
Neighborhood).
Access the Internet and make use of Internet applications, such
as WWW, Email, FTP, Telnet, Gopher, etc.
3. USB to Internet via Ethernet LAN Using Internet
Connection Sharing Services
The Bridge Computer:
1. Install the USB Network Cable driver according to the instructions
given for Basic Peer to Peer installation, above, except for step 2-
d.
2. When asked if you want to install the Network Bridge (step 2-d),
Click on Yes.
3. When done, open the Control Panel: My Computer ÎControl
Panel
4. Select Add/Remove Programs ÎWindows Setup ÎInternet
Tools
5. Check Internet Connection Sharing; Click on OK. The ICS
Installation Wizard comes up:
a) For Type of Connection, specify High Speed Connection
b) For Type of Adapter, specify the adapter card protocol that the
computer uses (NE2000 Compatible, for example).
The Wizard now wants to create a client configuration disk;
Click on Next and follow the on-screen instructions. When the
Wizard is done you are asked to reboot.
10

After Windows comes back up:
1. Open the Network folder: My Computer ÎControl Panel Î
Network
2. In the Installed Network Components panel:
a) Click on TCP/IP (Shared) Î[Network Adapter]*
b) Click on the WINS tab; select Disable WINS Resolution
c) Click on the IP Address tab; select Specify an IP Address; enter
the IP Address and the Subnet Mask (if they are not already
specified), that the Bridge computer uses on the Ethernet LAN.
If you do not know what the IP Address and Subnet Mask
numbers are, get them from your network administrator.
d) Click on the Gateway tab; enter the Gateway address from the
LAN to the Internet (if it is not already specified). If you do not
know what the Gateway address is, get it from your network
administrator.
* The term Network Adapter refers to the network adapter card
protocol that the computer uses. The name of the actual
network card protocol (NE2000 Compatible, for example) will
appear here.
3. In the Installed Network Components panel, Click on TCP/IP
(Home) ÎPC-Linq/Net USB Network Adapter, and make sure
that the IP address has been set for 192.168.0.1, and the Subnet
Mask has been set for 255.255.255.0
4. Open Control Panel ÎInternet Options:
a) Select the Connections tab
b) Click on the LAN Settings button
c) Enable Automatically detect settings
11

The Remote Computers:
1. Install the USB Network Cable driver according to the instructions
given for Basic Peer to Peer installation, above.
2. Open the Network folder: My Computer ÎControl Panel Î
Network
3. In the Installed Network Components panel:
a) Click on TCP/IP ÎPC-Linq/Net USB Network Adapter
b) Click on the WINS tab; select Use DHCP for WINS Resolution
c) Select Specify an IP Address; choose Obtain an IP address
automatically
d) Click on the Gateway tab; delete the gateway address
4. Open Control Panel ÎInternet Options:
a) Select the Connections tab
b) Click on the LAN Settings button
c) Enable Automatically detect settings
Setup Complete
Once the Setup has been completed, members of the Peer network
can:
See all the computers on both networks (the USB Peer LAN and
the Ethernet LAN), in the Network Neighborhood folder.
Share programs, files, and peripheral devices via the standard
Windows interfaces (i.e., Windows Explorer and Network
Neighborhood).
Access the Internet and make use of Internet applications, such
as WWW, Email, FTP, Telnet, Gopher, etc.
Note: The Bridge computer must be up and logged on to the
Ethernet LAN before powering the Remote computers up.
12

Uninstalling the Driver
If you should ever need to uninstall the driver files, simply do the
following:
1. Open the Control Panel: My Computer ÎControl Panel
2. Select Add/Remove Programs
3. Select the Install/Uninstall tab; select PC-Linq/Net Driver V1.2a
4. Click on the Add/Remove button; then Click on OK
5. Reboot the computer.
Cable Installation and Operation
After all the drivers have been installed and configured, with the
computer up and running, plug the cable into the computer's USB
port. Windows will recognize the component and install the
necessary USB hardware drivers.
When Windows is done, and you have rebooted you can open
Network Neighborhood and see all the available computers in your
network: those on the USB peer LAN as well as those on the
Ethernet LAN (if you performed an Ethernet Bridge installation).
You can share programs, files, and peripheral devices through the
standard Windows methods (i.e., Windows Explorer and Network
Neighborhood). Likewise, if you have established Internet
connectivity - either through shared dial up, or via the Bridge to a
direct connection - you can execute all Internet applications (WWW,
Email, FTP, Telnet, etc.).
13

Specifications
Function Specificiation
Connectors 2 USB Type A Plugs
Cable Length 1.8 m (.9 m per segment)
Data Transfer Rate Up To 5 Mbps
Network Protocol TCP/IP, NETBEUI, IPX/SPX
Power Consumption 120 mW (max.)
Operating Temperature 5 ~ 40oC
Storage Temperature -20 ~ 60oC
Humidity 0 ~ 80% RH, Noncondensing
Casing Material Plastic
Weight 160 g
Limited Warranty
IN NO EVENT SHALL THE DIRECT VENDOR'S LIABILITY FOR
DIRECT, INDIRECT, SPECIAL, INCIDENTAL, OR
CONSEQUENTIAL DAMAGES RESULTING FROM THE USE OF
THE PRODUCT, DISK, OR ITS DOCUMENTATION EXCEED THE
PRICE PAID FOR THE PRODUCT.
The direct vendor makes no warranty or representation, expressed,
implied, or statutory with respect to the contents or use of this
documentation, and especially disclaims its quality, performance,
merchantability, or fitness for any particular purpose.
The direct vendor also reserves the right to revise or update the
device or documentation without obligation to notify any individual or
entity of such revisions, or update. For further inquiries, please
contact your direct vendor.
Radio & TV Interference
This equipment has been tested and found to comply with the limits
for a Class B digital device, pursuant to Part 15 of the FCC Rules.
These limits are designed to provide reasonable protection against
harmful interference in a residential installation. This equipment
generates, uses and can radiate radio frequency energy and if not
installed and used in accordance with the instructions, may cause
harmful interference to radio communications. However, there is no
guarantee that interference will not occur in a particular installation.
14
Table of contents
Other ATEN Network Cables manuals
Popular Network Cables manuals by other brands

Tripp Lite
Tripp Lite 302-003 Specification sheet

Tripp Lite
Tripp Lite 320-20M-RD Specification sheet

Tripp Lite
Tripp Lite N316-07M Specification sheet

Tripp Lite
Tripp Lite N306-23M Specification sheet

Tripp Lite
Tripp Lite N201-001-WH Specification sheet

Tripp Lite
Tripp Lite N261-007-AQ Specification sheet

Tripp Lite
Tripp Lite P781-016 Specification sheet

Tripp Lite
Tripp Lite N304-004 Specification sheet

National Instruments
National Instruments FIELD POINT installation guide

Viavi
Viavi T-BERD 5800 Quick Card User Guide

BTR
BTR UTP modul System Mounting instructions

ADInstruments
ADInstruments AD8108 Instrument manual