Athletica Sport Systems Moose 1.1 User manual

Ice Puck Freezer
3/2021
Athletica user manual

Ice Puck Freezer
Product User Manual
554 Parkside Drive, Waterloo, Ontario, Canada N2L 5Z4 TEL 519-747-1856
720 Innovation Drive, Shakopee, Minnesota, USA 55379 TEL 763-249-7465
Thank you for purchasing the
Ice Puck Freezer.
For your safety, please ensure you read these instructions
carefully.
This manual details safety warnings, operation,
cleaning, maintenance and troubleshooting.
Warranty
This Athletica Sport Systems product is warranted to
be free of defects in materials and workmanship for
a period of 1 year from the date of purchase. Please
contact Athletica Sport Systems with any questions
about the performance of this product.
Contact Us
Canada and International
554 Parkside Drive. Waterloo ON Canada N2L 5Z4
519-747-1856
USA
720 Innovation Drive. Shakopee MN USA 55379
763-249-7465
Contents
Safety Warnings & Usage Tips
Operation
Cleaning & Maintenance
Troubleshooting
Technical Data
Customer Service
Warnings
Do not use your unit if any wiring is visibly damaged
or frayed.
Do not attempt to continue to operate the unit if it
is wet.
When using the portable refrigerated cooler in a
vehicle, make sure the circuit being used is fused.
DC 12V 15 amp. DC 24V 7.5 amp.
Ensure the voltage is within the correct range for
both the socket and cable. Correct voltage can be
found on the Technical Data label on the side of
the unit.
Do not place any electrical devices inside the unit.
Usage Tips
Ensure there is good ventilation around the back
of the unit. Allow a gap of at least 1 inch around
all sides.
Avoid frost build-up on the inside walls as this will
impair cooling.
To defrost, turn the unit off and allow the frost to
melt, then wipe out any water and moisture.
For maximum efficiency, keep the unit in a cool
location out of direct sunlight.
Keep the unit on a flat surface, but it will operate
at angles up to 30º.

Operation
Power: DC 12V and DC 24V
Included: INPUT: 110VAC, OUTPUT: 12VDC adapter
Battery Protection: Selecting either LOW, MED or
HIGH positions (Switch next to the DC power socket),
you can adjust the battery protection for the unit.
Refer to the table below for the voltages and settings.
Battery Protection Pre-Configured Settings
Cable Length Specifications
The DC cables must have a suitable cross-section for
their length (measured from the battery to the unit).
Please refer to the table below.
Temperature Setting Range: -20ºC to 10ºC
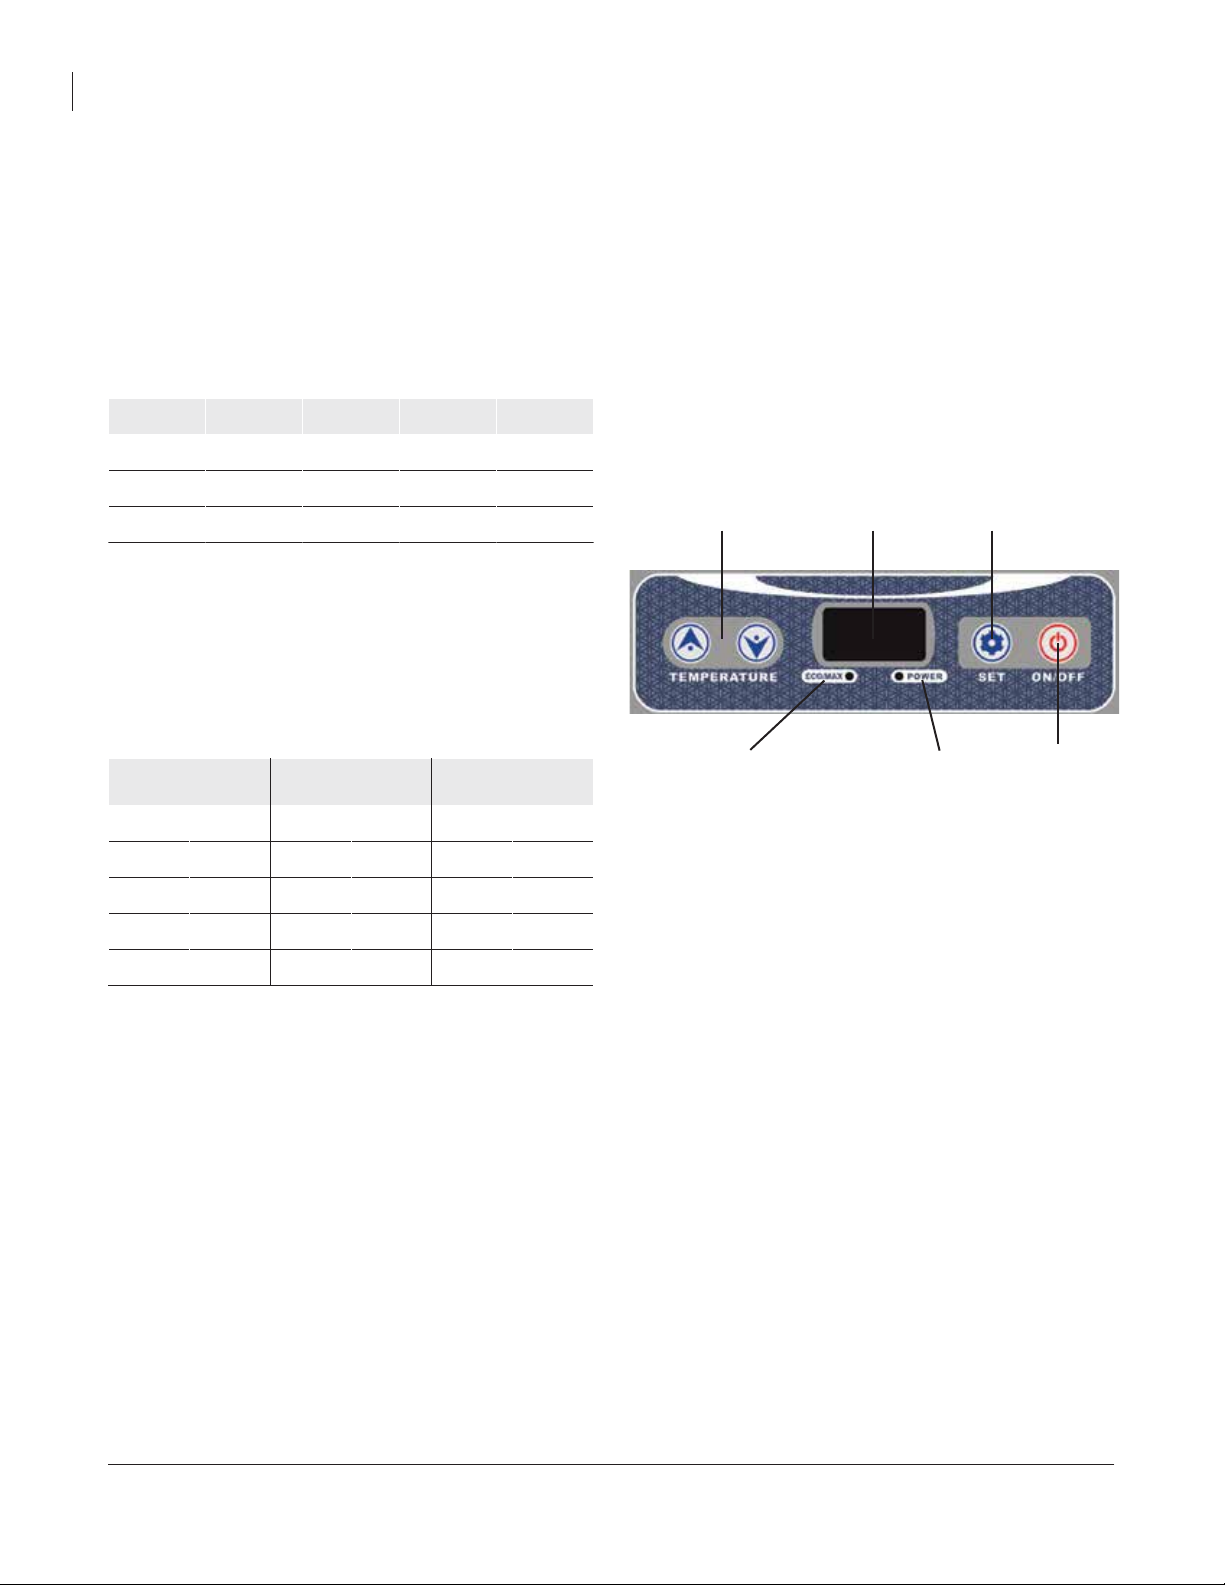
Plug in the DC power cable. Press the ON/OFF button
to turn the unit on.
The LED display on the control panel will illuminate
and display the current interior temperature.
Press the UP button to increase the set temperature,
or press the DOWN button to decrease the temperature.
Pressing the SET button will toggle the temperature
display between ºC and ºF.
Press the SET button to begin Economy run mode.
The ECO indicator light (green) will turn on. Press the
button again; the unit will start Maximum Running
Mode (HH) and the MAX indicator (red)
will illuminate.
Economy mode runs the compressor at a lower
speed to save power. Maximum mode runs the
compressor at a higher speed, increasing power.
Economy mode is useful if the ambient temperature
is over 30ºC, or if fast cooling is required.
If the power supply is cut off or disconnected, the
unit will switch off automatically. Once the power
supply is restored, it will automatically turn on again.
Cleaning and Maintenance
Clean the unit inside and out with a clean, damp soft
cloth each week.
If it is dirty, use baking soda or table salt dissolved in
tepid water.
Never use abrasive products, harsh detergents or
soaps.
After cleaning, wipe down with a clean cloth and dry
carefully.
Do not store perishable food products inside the unit
if the unit is not powered on.
Ensure the interior of the unit is totally dry before
closing the lid and storing it.
Never clean the unit under running water, and never
submerge in water.
Do not clean in the dishwasher.
Do not use sharp objects or abrasive materials
during cleaning as this will damage the unit.
Ice Puck Freezer
Product User Manual
554 Parkside Drive, Waterloo, Ontario, Canada N2L 5Z4 TEL 519-747-1856
720 Innovation Drive, Shakopee, Minnesota, USA 55379 TEL 763-249-7465
Setting 12V Stop 12V Start 24V Stop 24V Start
Low 10.2V 11.2V 21.6V 23.0V
Medium 10.7V 11.7V 22.6V 24.0V
High 11.7V 12.7V 24.6V 26.0V
Cable Thickness
(mm2) 12V Max Length 24V Max Length
(mm2) AWG (m) (ft.) (m) (ft.)
2.5 14 2.5 8 5 16
412413826
6 10 6 20 12 39
10 8 10 33 20 66
Temperature
Controls
ECO / MAX
Mode Indicator Controls
LED Display
Power
Indicator
SET Switch
ON / OFF
Switch

Ice Puck Freezer
Product User Manual
554 Parkside Drive, Waterloo, Ontario, Canada N2L 5Z4 TEL 519-747-1856
720 Innovation Drive, Shakopee, Minnesota, USA 55379 TEL 763-249-7465
Troubleshooting
n The unit is not turned on:
Check if the unit has been turned on.
Check the power supply - try a different power
source, for example, a different vehicle or power
outlet.
Ensure the plug and socket are connected properly.
Check if the fuse has been burned out or blown.
n Low refrigeration performance:
Ensure the unit isn’t over-filled with items.
Ensure the items inside the unit aren’t very warm
or hot.
Check if the lid is unlatched or open.
Check the integrity of seal on the lid, ensure it is
not damaged.
Make sure there is enough space around the unit
for proper ventilation (minimum of 100mm around
all sides).
Is the ambient temperature too high?
Is the temperature setting too high?
n Can hear running water inside the unit:
This is normal - due to the flow of refrigerant inside
the unit.
If unusual noise persists, ensure the unit is placed
on a level surface.
Error Protection Function
When the electronic control module of the
compressor malfunctions, the LED display will show:
ER1 / ER2 / ER3 / ER4 / ER5
and the compressor will stop working. If you are
able to identify the fault, remove it and then wait 3
minutes before starting the unit again.
NTC - display sensor failure detected.
ER0 / ER9 - after removing the fault, the internal
temperature will display within 2 seconds.
International Certification Approvals
Technical Data (DC)
Code Problem Solution
ER0
Temperature sensor short
circuit. The compressor
enters a regular operating
mode, on for 30 min /
off for 30 min.
Change the temperature
sensor line.
ER1
Input under-voltage
protection.
1. Change the battery.
2. Lower battery
protection switch.
ER2 DC fan over-current
protection.
Change the fan.
ER3 Compressor start-up
problem.
Power off. Wait 30 mins.
Restart.
ER4 Rotation speed of
compressor is abnormal.
Change the main
controller.
ER5
Temperature of control
module is abnormal.
Move the unit into a cool
place. Cool off the unit
and restart.
ER9
Temperature sensor open
circuit. The compressor
enters a regular operating
mode, on for 30 min /
off for 30 min.
1. Tighten the
temperature sensor line.
2. Change the
temperature sensor line.
Model Moose 1.1
Climate Category T / ST / N / SN
Protective Classification of
Electric Shock Resistance Class III
Rated Volume DC (V) 12 / 24V
DC Amps (A) 15A
Watts 50W
Rated Current for DC (A) 4.2A / 2.1A
Refrigerant 32g
Foam / Vesicant C5H10/C-Pentane

Ice Puck Freezer
Product User Manual
554 Parkside Drive, Waterloo, Ontario, Canada N2L 5Z4 TEL 519-747-1856
720 Innovation Drive, Shakopee, Minnesota, USA 55379 TEL 763-249-7465
Accessories
Included with the unit are the following attachments
for AC and DC power connectivity:
Guidelines For Disposal
DO NOT dispose this product into municipal waste.
Electrical appliances disposed in landfills or dumps
will leak hazardous material into the ground water,
damaging the environment.
Contact your local municipal government for more
information on how and where to dispose of this
type of electrical unit.

554 Parkside Drive, Waterloo, Ontario, Canada N2L 5Z4 TEL 519-747-1856
720 Innovation Drive, Shakopee, Minnesota, USA 55379 TEL 763-249-7465
athletica.com
Table of contents
Other Athletica Sport Systems Freezer manuals