Athlon CF Series Installation guide

Tripod & Ball Head
User Manual and
Care Instructions

TABLE OF CONTENT
TRIPOD
Leg Angle Adjustment ............................................................6
Leg Section Length Adjustment.............................................7
Installing Spike Feet................................................................8
Attaching/Removing A Head..................................................9
BALL HEAD
Tilt ...........................................................................................10
Pan ..........................................................................................11
Friction Control.......................................................................12
Attachments...........................................................................13
LEVELING HEAD
Installation..............................................................................14
Warranty .................................................................................15
INCLUDED ACCESSORIES
LEG WRAPS
WITH MOLLE
SHOULDER PAD
TRIPOD
HAMMOCK
CARRYING
SLING
CARRYING
BAG

A
B
A
B
A
B
A
B
A
B
A
B
4 | ATHLONOPTICS.COM
QUICK RELEASE
BUTTON
BUBBLE LEVEL
LOCKING LEVER
LEG ANGLE CATCH
LEG LOCKS
INTERCHANGEABLE
WITH INCLUDED
SPIKED FEET
INTERCHANGEABLE
RUBBER OR
SPIKED FEET
BUBBLE LEVEL
ATHLONOPTICS.COM | 5
QUICK-RELEASE
LOCKING KNOB
BUBBLE LEVEL
FRICTION
CONTROL
QUICK-RELEASE
PLATE BASE
BALL HEAD
LOCK
COUNTERWEIGHT HOOK
In unstable or windy conditions, hang
addition weight to dampen vibrations.
FLUID PAN
LOCK
HANDLE
BOWL MOUNT
LEVELING
HEAD
QUICK-RELEASE
PLATE

LEG ANGLE ADJUSTMENT
Each of the four tripod leg sections can be adjusted to three
different angles, 80º, 55º or 25.º
To adjust the angle of the legs:
Pull the Leg Angle Catch out and adjust the leg to the
desired angle.
Push the Leg Angle Catch back in and pull the leg out
to the nearest angle stop.
6 | ATHLONOPTICS.COM
ANGLE STOPS
PULL THE LEG ANGLE CATCH OUT
TO ADJUST THE ANGLE OR PUSH
IN TO LOCK IN PLACE.
ATHLONOPTICS.COM | 7
LEG SECTION LENGTH ADJUSTMENT
Each of the four tripod leg sections can be adjusted to
different tripod height.
To adjust the length of a leg section:
Rotate the Leg Lock clockwise (when viewing from top)
to loosen the tension.
Extend the leg section out to the desired length and
rotate the Leg Lock counter-clockwise (when viewing
from top) to lock in place.
TIP: For the best stability extend legs from the top section down.
ROTATE LEG LOCK TO
LOOSEN OR TIGHTEN

INTERCHANGEABLE
RUBBER OR
SPIKED FEET
INSTALLING SPIKE FEET
The Midas Tripod comes with spike feet that can be
installed for use on soft grounds and/or difficult terrain to
provide more stability.
To install the spike feet:
Unscrew the rubber feet (counter-clockwise) from
the bottom of the tripod legs.
Screw the spike feet into the bottom of the tripod
legs (clock-wise).
TIP: Use hex wrench that’s included to torque down the spike feet for added
force to prevent unintentional loosening.
8 | ATHLONOPTICS.COM ATHLONOPTICS.COM | 9
LOCKING LEVER
ATTACHING/REMOVING A HEAD
To mount a head to the tripod:
Flip up the Locking Lever on the tripod to unlock.
Press and hold the Quick-Release Button and insert the
head into the tripod. Once fully inserted, the head can
rotate in any direction.
Flip the Locking Lever down to the locked position.
Follow these steps in reverse order to remove the head.
PRESS THE
QUICK-RELEASE
BUTTON ON THE
TRIPOD TO SEAT
THE HEAD.

TILT
The ball head can be tilted in differenct angles and vertical
orientation to position your optics for best viewing.
Twist the Ball Head Lock knob to adjust different angle
positions and orientation.
TO CHANGE ANGLES:
TWIST THE BALL HEAD LOCK
KNOB UNTIL IT IS LOOSENED.
THEN ADJUST THE BALL
HEAD TO THE DESIRED
ANGLE/ORIENTATION
AND ROTATE THE KNOB
CLOCKWISE TO SECURE NEW
POSITION.
PAN
The ball head can be adjusted to pan left and right while
maintaining the desired ball head angle/orientation.
To use the Fluid Pan Lock knob:
Unlock the Fluid Pan Lock knob by twisting knob
counter-clockwise.
Lock the Fluid Pan Lock knob by twisting knob
clockwise. You can also adjust the tension of the
panning base by not locking it completely to have
smooth panning.
TWIST THE FLUID PAN
LOCK KNOB TO PAN OR
LOCK IN PLACE.
10 | ATHLONOPTICS.COM ATHLONOPTICS.COM | 11

FRICTION CONTROL
Friction Control adjusts the ball tension. This is useful
during fast paced transitioning as it allows you to pan
and tilt the ball head when the Ball Head Lock is in the
unlocked position while maintaining the last position when
unsupported (low tension).
Adjust the ball tension by twisting the Friction Control knob
counter clockwise to decrease the ball tension.
Twist the Friction Control knob clockwise and this will
increase ball tension.
Once in a position you want to maintain, tighten the Ball
Head Lock knob clockwise to prevent further movement.
TWIST THE FRICTION
CONTROL KNOB TO ADJUST
BALL HEAD TENSION.
ATTACHMENTS
Adjust the Quick-Release Locking knob
counter-clockwise to remove the Quick-Release Plate.
Align the plate to your accessory. Tighten the mounting
bolt from the bottom side of the plate.
Put the Quick-Release Plate back into the tripod head
and rotate the Quick-Release Locking Knob clockwise
to securely lock the plate in the head.
TIP: Alternatively, attach your arca rail equipped rifle or accessory directly to the
tripod head.
QUICK-RELEASE
LOCKING KNOB
QUICK-RELEASE
PLATE
12 | ATHLONOPTICS.COM ATHLONOPTICS.COM | 13
MOUNTING BOLT

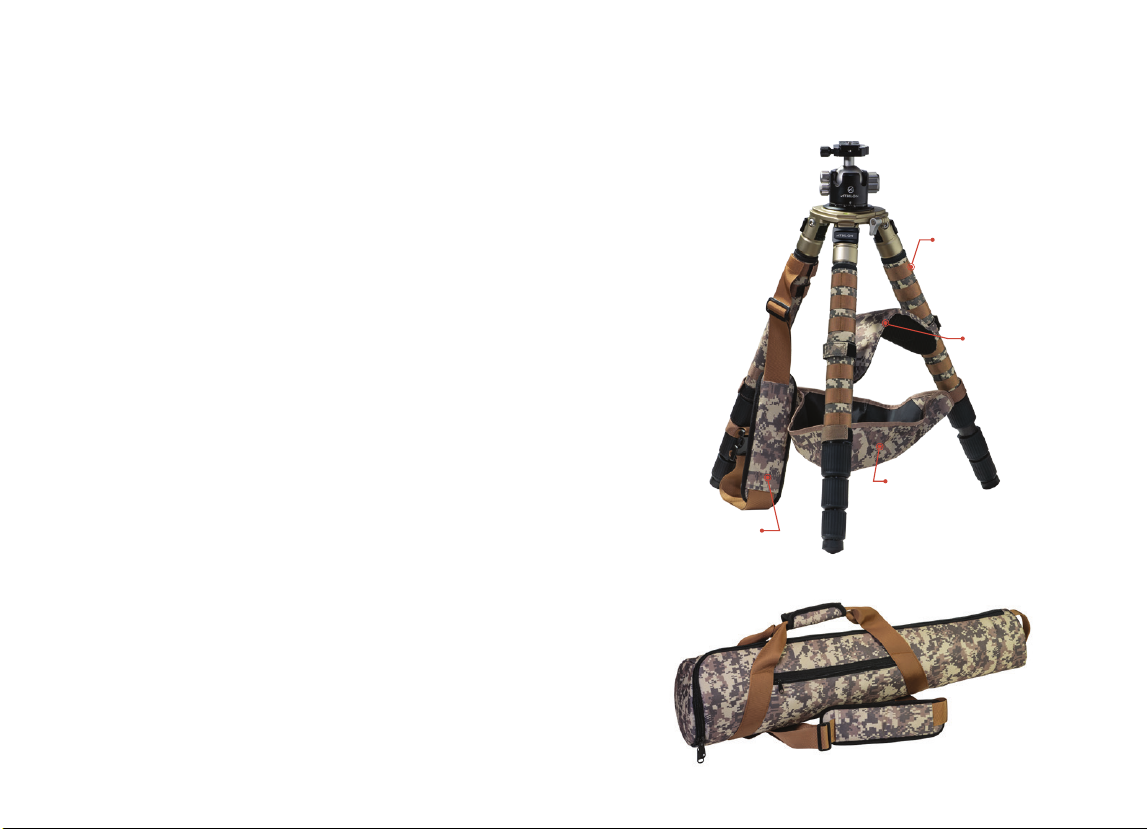
14 | ATHLONOPTICS.COM ATHLONOPTICS.COM | 15
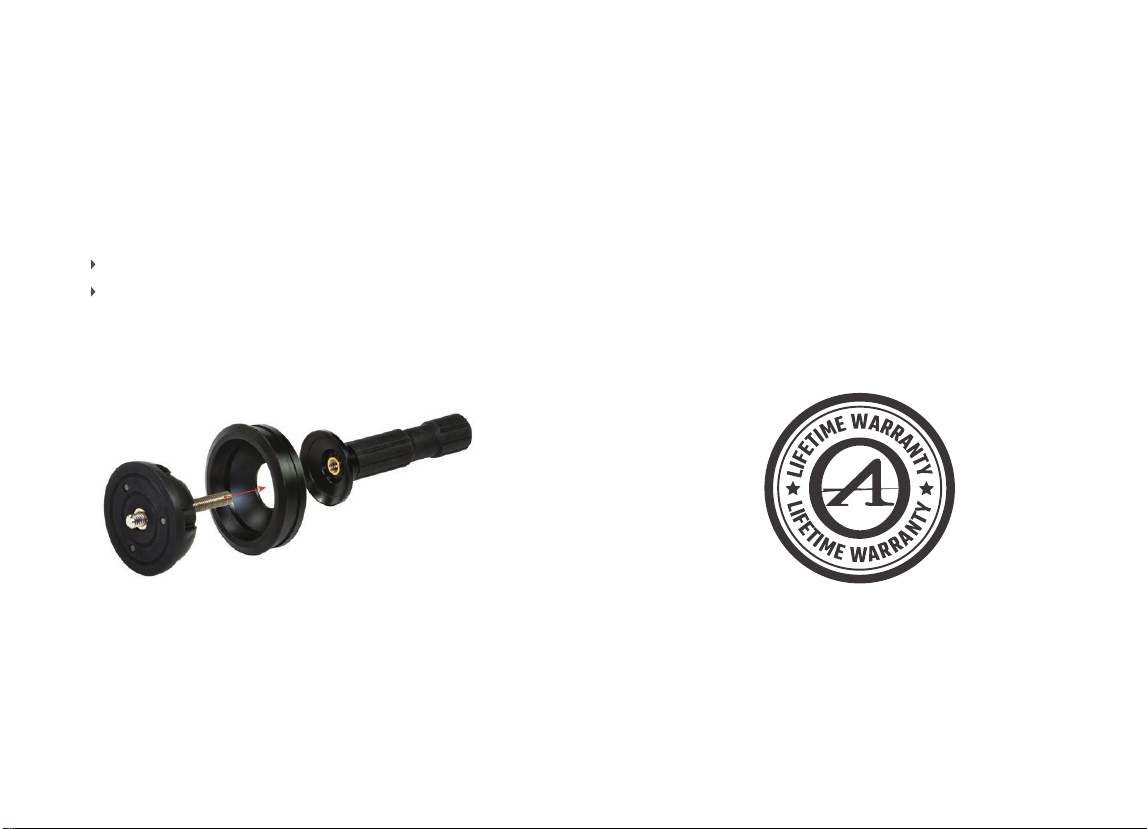
LEVELING HEAD INSTALLATION
Leveling heads are ideally suited for one-hand adjustment
on rifles or larger attachments. The leveling head features a
3/8 inch stud to attach your desired accessory such as an
arca mount.
To insert the leveling head into the tripod, follow the same
procedure used for the ball head (see page 9).
Using the leveling head:
Turn the handle clockwise to loosen the leveling head.
Turn the handle counter-clockwise to lock the leveling
head in place.
TIP: If the bowl mount rotates with the leveling head, tighten the locking lever
on the tripod to secure the bowl mount independently from the leveling head.
THE LEVELING HEAD IS UNASSEMBLED FOR COMPACT STORAGE. TO ASSEMBLE,
INSERT THE SHAFT OF THE HALF-BALL MOUNT INTO THE CONVEX SIDE OF THE BOWL MOUNT.
THREAD THE HANDLE ONTO THE HALF-BALL SHAFT.
THE ATHLON GOLD MEDAL
LIFETIME WARRANTY*
Your Athlon product is not only warranted to be free of
defects in materials and workmanship for the lifetime of the
product. Athlon will aslo repair or replace, at no charge to
you, your product if you should damage it through normal
use. No receipt is needed, no registration is required. This
is a commitment that Athlon Optics will be the best product
you can buy for your money.
*This warranty does not cover damages caused by deliberate damage, misuse,
theft or maintenance provided by someone other than the Athon Authorized
Service Department.

1.855.913.5678
CONTACT@ATHLONOPTICS.COM
801 N MEADOWBROOK DR.
OLATHE, KS 66062
SHARP, TIGHT
AND PRICED
JUST RIGHT!
ATHLONOPTICS.COM
Table of contents
Other Athlon Camera Accessories manuals
Popular Camera Accessories manuals by other brands

KERN
KERN EOB-A02B Assembly manual

Harbor Freight Tools
Harbor Freight Tools 02893 Assembly & operating instructions

Videotec
Videotec NXM36 instruction manual

Interlogix
Interlogix TruVision TVC-OH3-HT installation instructions

Deity
Deity Smart Slate TC-SL1 product manual

CyberOptics
CyberOptics Imagenation PXD1000 Configuration