Atlantic CCPL1 User manual

1.330.274.8317
www.ATLANTIC-OASE.com
CCPL CCPL
L
Product Manual | Manuel du Produit | Manual del Producto

2
Introduction
Thank you for purchasing Atlantic Color Changing Pond Lights. Atlantic’s Pond Lights feature
high impact cases and silicone gaskets for dependability and longevity. Whether underwater
or in open air applications, Pond Lights impart a soothing, warming glow after the sun
goes down. Available in single light or triple light kits with included removable photo cell
and transformer.
Prior to Operation and Installation
Caution:
• DO NOT operate this product under any conditions other than those for which it is
specified. Failure to observe these precautions can lead to electrical shock, product failure,
or other problems.
• Follow all electrical codes when installing Atlantic Lighting.
• To reduce the risk of electrical shock, connect transformer to a 120 volt receptacle protected
by a ground fault circuit interrupter (GFCI).
• Always verify that the lens is tightly secured before submersing the fixture
• Quick-connect plugs are gasketed for outdoor use and must be fully tightened to prevent
water infiltration. Quick-connect plugs are not waterproof and should not be submersed.
• Always use dielectric grease on all connections and verify that the lens ring is tightly secured
before submersing the fixture.
• Never shorten or cut the cord on Atlantic Color Changing Lights. Cutting/shortening the cord
will damage the LED and void the warranty.
• The InfiColor Smart Module is weatherproof, but must be mounted above the ground on a
wall or post within reach of a properly grounded GFCI outlet. Do not submerse the
Control Module or expose it to heavy rainfall. Failure to do so will void the warranty.
• The InfiColor Smart Module can be connected to an existing 12 volt AC lighting system by
cutting and splicing the flat low voltage wire that supplies power to the Module.
Installation
Pond Lights oer two dierent mounting options for your convenience:
• Adjustable stand: for placement on rock ledges, under waterfalls or for
highlighting streambeds
• Nestled: without the stand amongst the pond stones
Proper light placement is important for every project. Whenever possible, lights should be
positioned facing away from the viewing area to minimize hot spots. When camouflaging the
light cord with rocks and gravel, always leave enough slack in the cord so that the fixture can
be raised above water level for servicing.
Color Changing Pond Lights
The Single Zone InfiColor Smart Module is weatherproof, but must be mounted above the
ground on a wall or post within reach of a properly grounded GFCI outlet. Do not submerse
the Control Module or expose it to heavy rainfall.
• Install the Smart Module in a well-ventilated area to ensure that the Module operates within
its specified working temperature.
• Verify that the Smart Module input voltage is 12 volt AC. We recommend that you use the
transformer provided with this unit.
• Use dielectric grease on all connections and ensure that all cable connections are secure.
• Do not connect the power before the cord connections are finished.
• Do not cut or alter any round cords. Cutting or damaging any round cord will void
the warranty.

3
Connecting Lighting To Module
Apply dielectric grease to the pins of the plugs on the InfiColor Smart Module and light cords.
Line up the keys; the plugs will only fit one way. Connect the plugs and tighten the threaded
ring. Complete the tightening process by wiggling the connection and retightening the
threaded ring 2-3 times until firmly seated.
INFICOLOR MOBILE APP
To connect your mobile device to the Smart Module, be sure the Module is plugged in and
open the InfiColor App. The app should populate your Smart Module on the opening screen.
Simply select the Module name. Please note the Module can be connected to one mobile
device at a time. The Single Zone Module will only modify the settings of Zone 1 on the app.
To Configure Zone Name and Timer
Click dropdown menu. Edit the name of the zone on the “Zone Settings” page. This zone
name will be visible throughout the app. The zone has a timer function to turn the zone on
and o at set times. Click the “Save” button to save changes. A box will come up confirming
the settings have been saved. Click the “Back” button once configuration is complete.
Color Tab
Use the Color tab to choose colors using either the color picker or the red, green and blue
sliders at the bottom. Choose the brightness of the color by adjusting the slider.
Favorites Tab
The Favorites tab stores preset color changing sequences. Choose a sequence of colors, then
choose the transition between them, the speed of the sequence and the brightness. The Edit
button deletes stored Favorites.
Custom tab
The Custom tab creates and stores a custom color changing sequence. Move the red, green
and blue sliders to choose a color, or select it from the color picker. Click the “Plus” button to
add it to the sequence. Repeat as desired. Add up to 10 colors to a sequence. Once the
sequence has been created it can be named and saved. The saved sequence will be available
on the Favorites page.
Maintenance
Replacement LED diode assemblies are available for Pond Lights. Loosen clear plastic lens and
remove diode assembly. Install new LED diode assembly and align gasket. Tighten clear plastic
lens. Ensure that all components are installed correctly after servicing. Ensure that the clear
plastic lens is tightly
secured before submersing
the fixture.
Light
Body
Silicone Gasket
Clear Plastic Lens
LED Diode
Assembly
Winterization
Pond Lights may not be left where water freezes solid. If lights are installed in shallow streambed
waters or close to the surface, they should be removed from the pond for the winter or relocated
to deeper areas that do not freeze.
Warranty
All Atlantic Pond Lights carries a one-year limited warranty.
All Atlantic Wiring Components carry a one-year limited warranty.
This limited warranty is extended solely to the original purchaser commencing from the date on
the original purchase receipt and is void if any of the following apply:

Problem Possible Cause Possible Solution
Lights will not
turn on
No input power to the
transformer Verify power to the outlet is on / Check GFCI reset
No outlet power from the
transformer Test with multi-tester
Photocell malfunction
Cover the photocell with a piece of dark tape to
check function
Unplug photocell and plug light directly into transformer
Lights will not
turn o Photo cell is covered Clean sensor and outer clear covering
Make sure nothing is shading the sensor
LED color diers
from app
Improper connection
between LED light and
Smart Module
Inspect connections / realign plugs
Smart Module failure Contact Dealer for repair / replacement
Individual lights
within a larger
system not
working
Improper connection
to Smart Module Verify connections are aligned
Loose connection
Moisture or corrosion
in connections
Inspect quick-connected plugs for moisture,
corrosion or missing gasket.
Clean/ dry and reassemble.
Failed LED diode
If possible, switch out the LED diode assembly with one
from a working light of the same model to determine if
the driver has failed.
If driver has failed, replace light.
If test diode works, replacement LED diode assemblies
are available.
Smart Module is
not responding
to app
App is not synced with
Smart Module Reconnect Smart Module through Bluetooth
Lights
intermittently
responding
to app
Loose connection.
Moisture or corrosion
in connections
Inspect quick-connected plugs for moisture or corrosion.
Clean/dry/apply dielectric grease and reassemble.
• The light body/LED components have been misused or abused.
• The light body/LED components have been disassembled or modified other than as
described in this manual.
• The light has been damaged by freezing water
• Any round cord has been cut or altered.
• The Smart Module and quick-connect plugs have not been adequately protected from
moisture with dielectric grease.
This warranty excludes labor/cost of labor for removal or installation of any product.
Warranty Claims
In case of warranty claims, the complete product should be returned to the place of purchase
accompanied by original receipt.
Troubleshooting Guide
Always turn o power before inspecting the lights. Failure to observe this precaution can result
in a serious accident. Before ordering repairs, carefully read through this instruction booklet. If
the problem persists, contact your dealer.
4

5
Introduction
Merci d’avoir fait l’achat des Luminaires d’Étang de Changement de Couleur Atlantic. Les
Luminaires d’Étang Atlantic comportent des boîtiers à haute résistance et des joints de silicone
pour davantage de fiabilité et de longévité. Que ce soit sous l’eau ou à l’air libre, les éclairages
d’étang procurent une lueur apaisante et chaleureuse après le coucher du soleil. Oert en
ensemble d’éclairage simple ou triple avec cellule photo et transformateur inclus.
Avant l’utilisation et l’installation
Mise en garde
• N’utilisez PAS ce produit sous aucune autre condition que celles précisées. Ne pas
respecter ces précautions peut entraîner des chocs électriques, la défaillance du produit
ou d’autres problèmes.
• Suivez toutes les directives des codes de l’électricité au moment d’installer l’éclairage.
• Pour réduire le risque de choc électrique, branchez le transformateur à une prise de 120 volts
protégée par un disjoncteur de fuite de terre.
• Assurez-vous que le couvercle de lentille est bien serré avant d’immerger le luminaire.
• Les lampes blanc chaud sont branchées à l’aide d’une fiche à branchement rapide à
deux broches équipée d’une garniture pour usage à l’extérieur. Les fiches à branchement
rapide ne sont pas étanches et ne doivent pas être immergées.
• Les éclairages Atlantic peuvent être connectés à un système d’éclairage
extérieur plus grand.
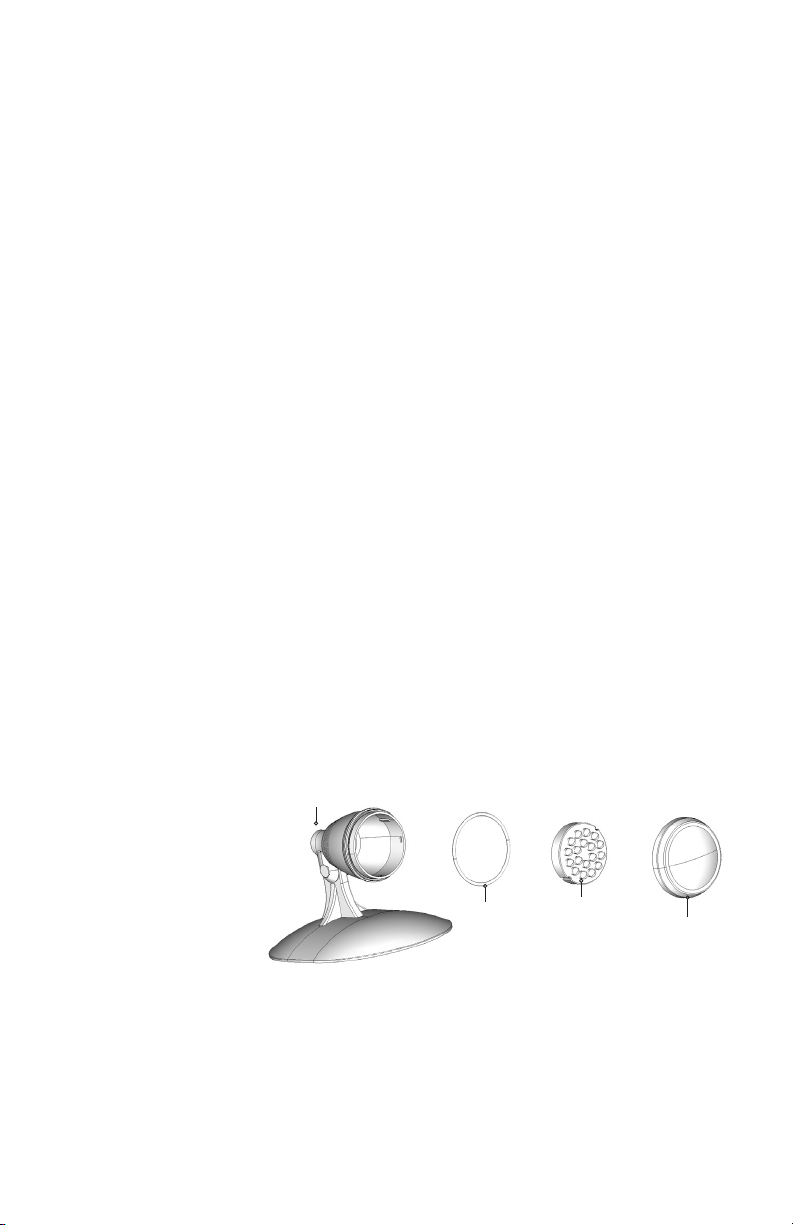
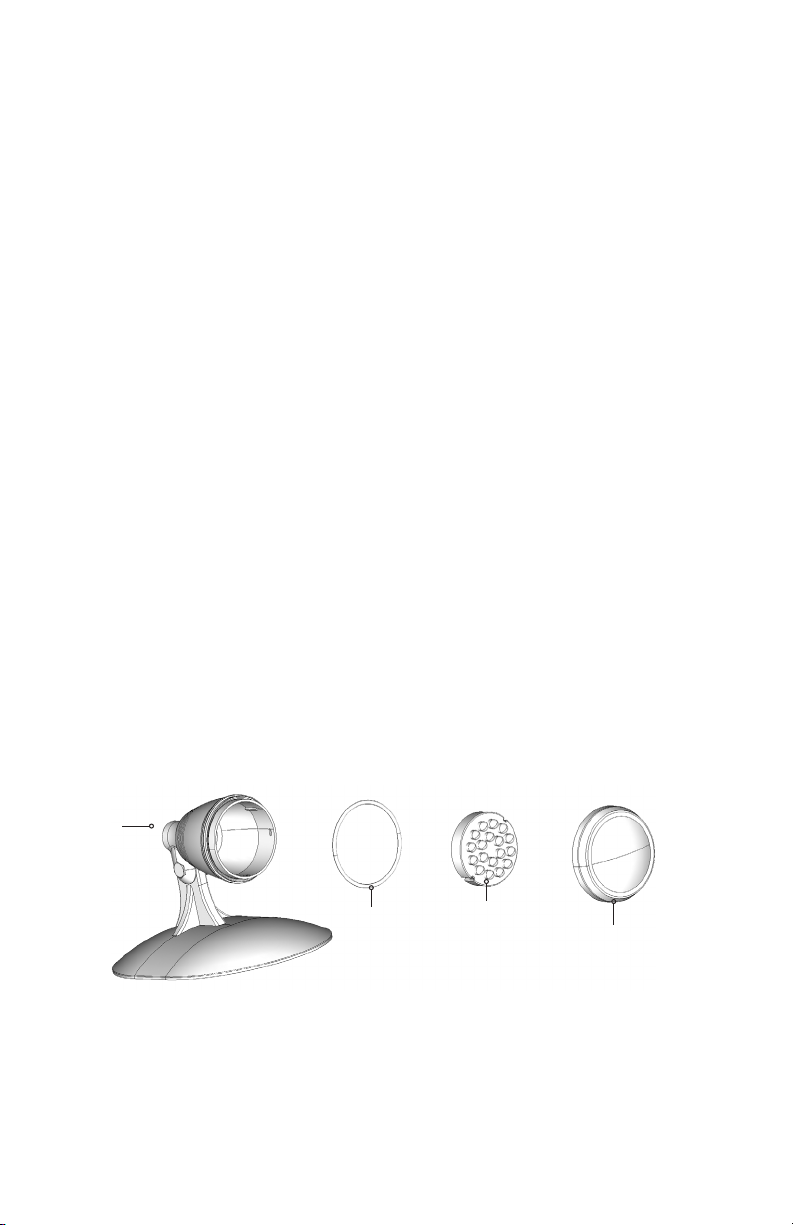
Installation
Les Luminaires d’Étang sont oerts en deux options de fixation, pour plus de commodité:
• Support réglable: pour un positionnement sur des rebords de pierre, sous des
chutes ou pour éclairer des cours d’eau
• Intégré: sans support, parmi les pierres de l’étang
Dans tout projet, le bon positionnement des lampes est important. Lorsque c’est possible, les
luminaires doivent être positionnées face à l’opposé de la zone de visualisation, afin de
minimiser les points de chaleur. Lorsque vous camouflez le cordon du luminaire avec des
pierres et du gravier, laissez toujours susamment de jeu dans le cordon pour pouvoir élever le
luminaire au-dessus du niveau de l’eau pour l’entretien.
Les Luminaires d’Étang à Changement de Couleur
Le InfiColor Smart Module à Zone Unique résiste aux intempéries avec un classement de
protection IP54. Ne pas le submerger ou l’exposer à de fortes précipitations. Il doit être monté
bien au-dessus du sol, près de la source d’alimentation. Dans le cas contraire, la garantie
sera annulée.
• Installez le module dans un endroit bien ventilé pour vous assurer qu’il fonctionne à la
température de fonctionnement spécifiée.
• Vérifiez que la tension d’entrée du InfiColor Smart Module est de 12V CA. Nous vous
recommandons d’utiliser le transformateur fourni avec cet appareil.
• Utilisez de la graisse diélectrique sur toutes les connexions et assurez-vous que toutes les
connexions des câbles sont sécurisées.
• Ne branchez pas l’alimentation avant la fin des connexions du cordon.
• Ne coupez ni ne modifiez les cordons ronds. Couper ou endommager un cordon rond
annulera la garantie.
Connexion D’éclairage À Des Modules
Appliquez de la graisse diélectrique sur les broches des fiches du InfiColor Smart Module et des
cordons d’éclairage. Alignez les clés; les bouchons ne tiendront que dans un sens. Connectez
les connecteurs et serrez la bague filetée. Terminez le processus de serrage en remuant la
connexion et en resserrant la bague filetée 2 à 3 fois jusqu’à ce qu’elle soit bien en place.
This manual suits for next models
3
Table of contents
Languages: