ATS H2O Acoustics Pinger Dish IV User manual


ATS Pinger Dish IV User Guide R-11-20A
1
1. Overview
This document is intended to provide users with all of the necessary information to understand
and take full advantage of all of the Pinger Dish’s useful features. The Pinger Dish IV is
designed to work with ATS JSATS tags, model SS400. With ATS’ Pinger Dish, it is easy for the
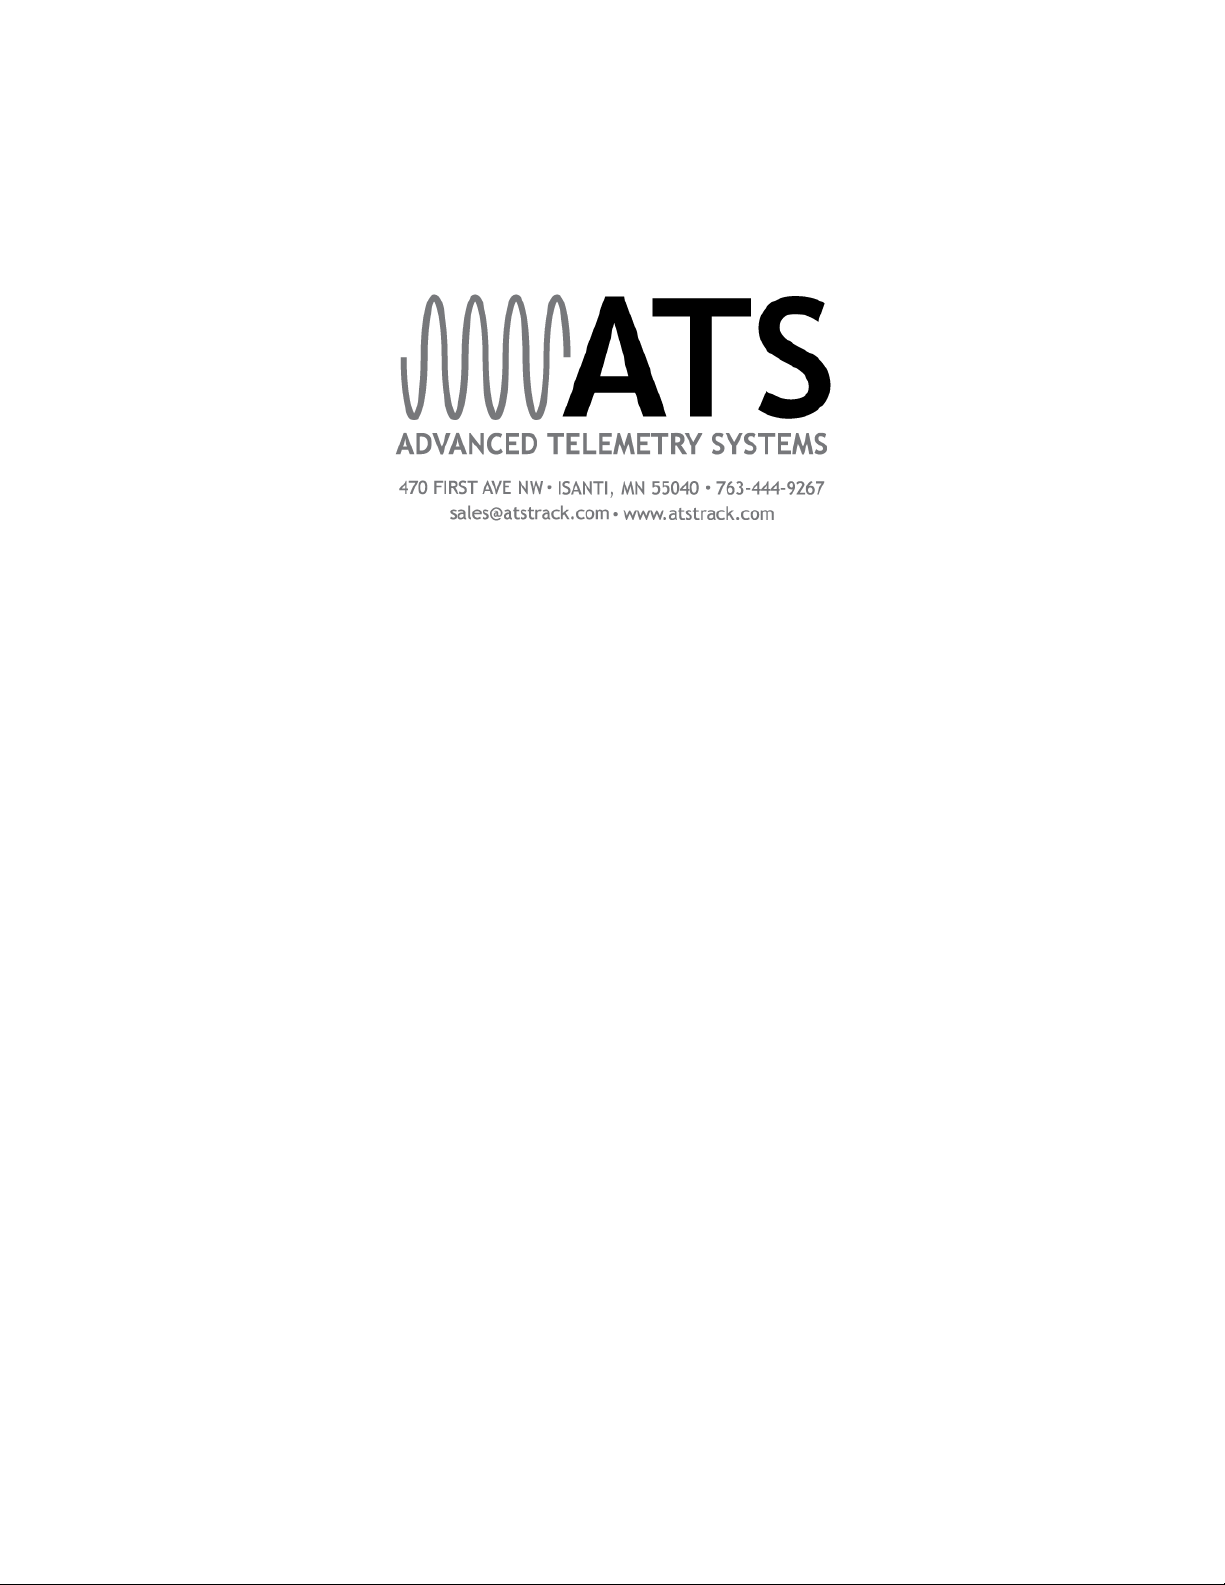
user to activate and deactivate ATS' JSATS tags as well as verify that each tag’s code and
alternating code, pulse rate interval (PRI), temperature setting, and hibernation interval are all set
to their proper values prior to deployment.
Your Pinger Dish shipment should include the following four items:
1. Pinger Dish IV
2. Power converter / cable
3. DB-9 (serial) interconnect cable
4. This Pinger Dish IV User’s Guide
2. Getting Ready to Use the Pinger Dish
Power: The Pinger Dish requires an external 12 Volt DC power source to operate. This power is
intended to be supplied by the included power converter (and cable) when it is connected to a
standard household 120 Volt AC (2-prong) outlet. The 12 Volt DC input power jack, located at
the back end of the dish, is where the supplied power cable connects to the Pinger Dish.
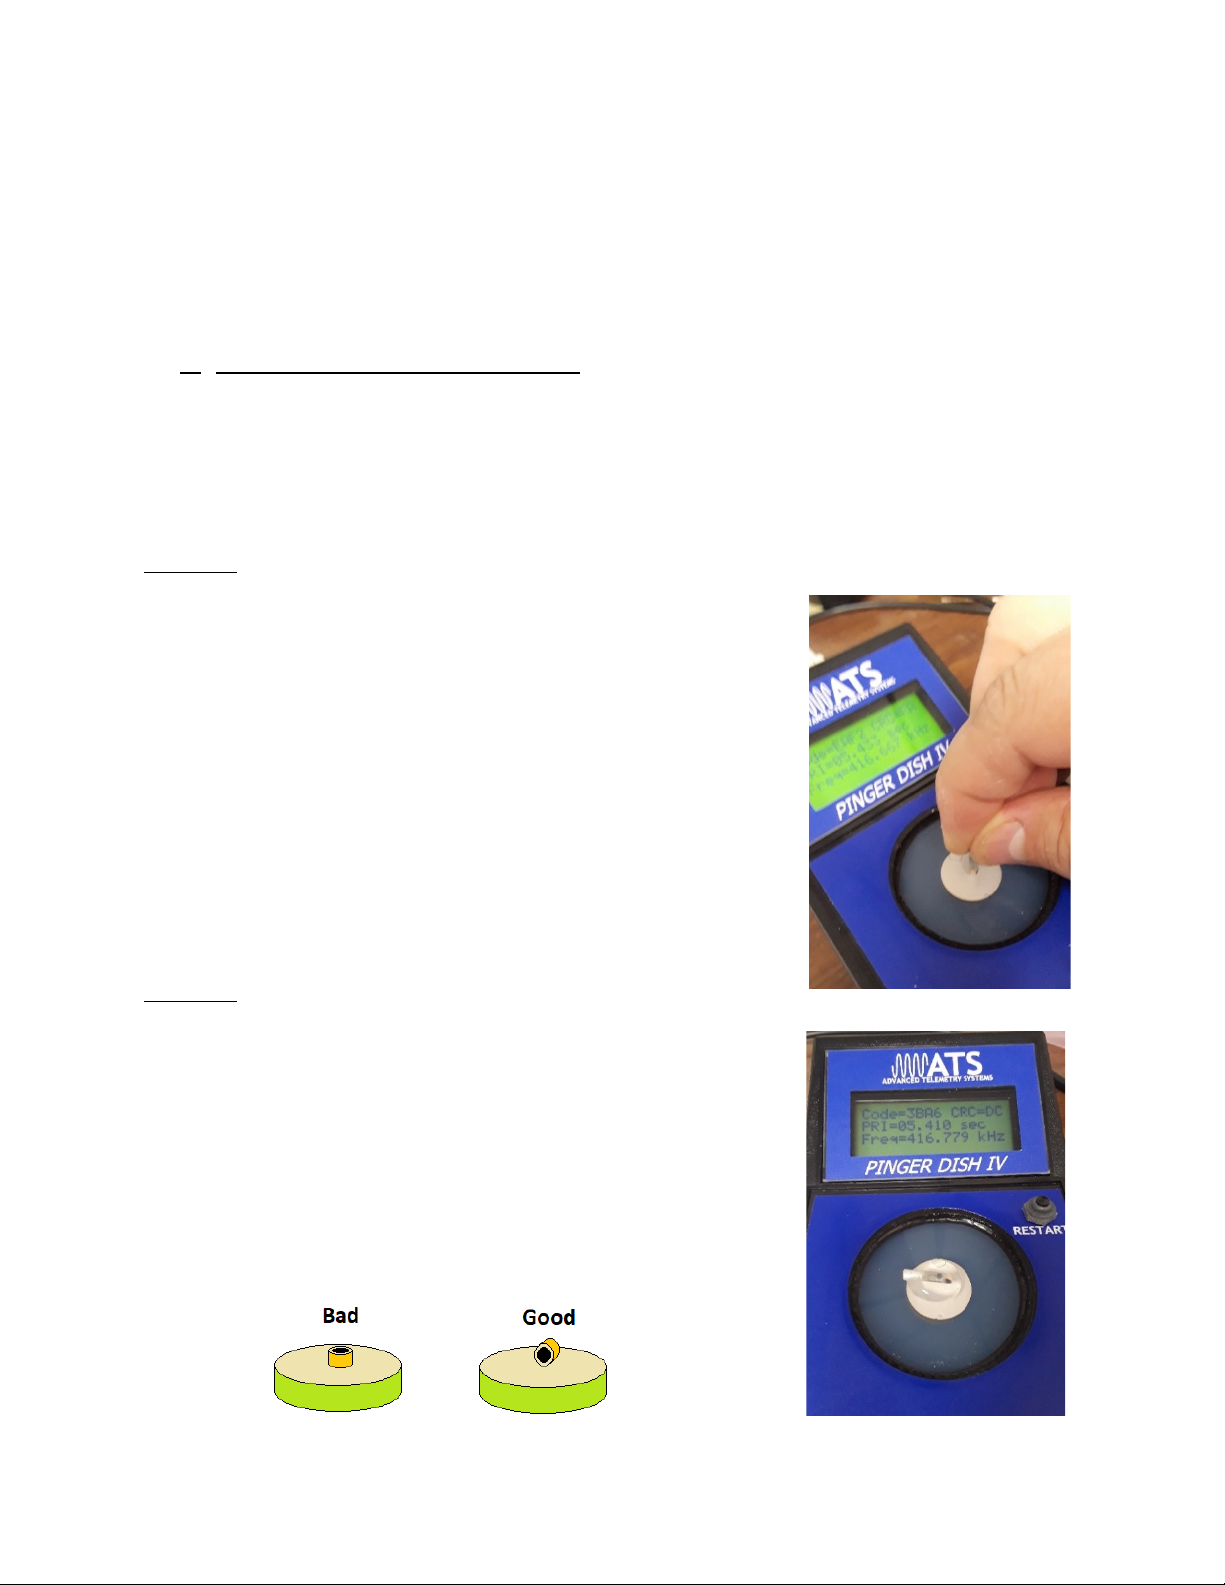
Water: ATS’ newest version of the Pinger Dish cup can be used without any water at all (see
Activation Method #1, Section 3). However, for the optimal acoustic signal conductor (see
Activation Method 2 in Section 3), a few drops of water may be added to the top of the cup.
While the Pinger Dish is designed to be water resistant, it is recommended that you take care to
keep excess water/moisture away from the device as much as possible. Water that may
occasionally spill from the Pinger Dish's cup to the surface near the switches should be wiped up
immediately.
Handling Acoustic Tags: Micro acoustic tags, though encapsulated and specially coated for
protection, are still delicate and should be handled with care. It is recommended that your tags
be held gently using your fingers when placing them in and taking them out of the Pinger Dish.
Basic Operation: The Pinger Dish is designed to operate in one of two modes. In the default
mode of operation, (not connected to a computer) the Pinger Dish operates in a stand-alone
configuration. In this mode, you can choose only one of two possible commands to send to a
JSATS tag: 1) Activate the transmitter and 2) Deactivate the transmitter. A transmitter’s
parameters (code and alternating code value, pulse rate interval, temperature option, and
hibernation interval) may not be modified in this mode. This ensures that the tag's basic

ATS Pinger Dish IV User Guide R-11-20A
2
parameters can't be inadvertently changed by an end user whose task is only to activate tags and
verify their proper operation just prior to deployment.
The second mode of operation requires that the Pinger Dish be connected to a computer (via a
serial cable or USB to serial converter). This allows a JSATS tag’s configuration values to be
modified (described in section 5). Most users will never need to use this second mode.
3. Placing a Tag in the Pinger Dish
ATS’ New Pinger Dishes contain a ‘gel-cup’ which utilizes an elastic compound that propagates
the acoustic wave signals more efficiently between the transducers of the acoustic tag and the
Pinger Dish’s input sensor. This design has the advantage of not requiring any water; only a
physical connection is required. Two different methods for positioning the tag are shown below.
Method 1:
Hold the tag by the battery end and gently press the transducer end
of the tag lightly against the gel directly over the center of the
large, silver transducer in the gel. Very little pressure is needed to
make the physical connection. While holding the tag in this
position, use the RS232 port or the activation switch to send
commands.
Pros: This method requires no water at all.
Cons: Holding the tag while communicating may seem a bit
awkward and could become arduous if large groups of tags are
done this way.
Method 2:
Add only enough water to create a physical connection between
the transducer of the acoustic tag and the surface of the elastic. A
few drops or small “puddle” is sufficient. Place the tag so that its
transducer end is over the center of the Pinger Dish transducer.
The cylinder of the tag transducer should be perpendicular to the
circumference of the Pinger Dish Transducer (see diagram below).
This makes for better communication. Use the RS232 port or the
activation switch to send commands to the tag.

ATS Pinger Dish IV User Guide R-11-20A
3
Pros: This method doesn’t require that the tag be held in position.
Cons: It uses a small amount of water and requires that 3G or 4G tags to be manually positioned
so that their transducers are perpendicular to the transducer of the Pinger Dish.
4. Using the Pinger Dish to Activate/Deactivate Tags
To turn the Pinger Dish on, press the small Restart button on the right side of the top of the unit
(just below the LCD display). When the Restart button is pushed, a short “Beep” can be heard
from the speaker. The Pinger Dish’s title screen will be displayed along with the two firmware
versions (one for the Pinger Dish processor and a separate one for the DSP decoding processor).
The Pinger Dish looks for a JSATS tag’s signal to decode after displaying the message “Waiting
for JSATS Tag Pulses”. If approximately two minutes have elapsed without a tag being detected
(or a computer command being sent), the system turns off automatically. Pushing the Restart
button again turns the Pinger Dish back on. It is unlikely that the Pinger Dish will
unintentionally turn off during normal operation since the time between transmitter’s pulses
should usually be less than the automatic shut-off time of two minutes.
To activate or deactivate a tag, place it on the surface of the cup. Please refer to section 3 on the
various options.
After the tag is positioned on the top of the cup, use the three-position toggle switch (directly
below the cup with the tag) to activate or deactivate the tag. Moving the switch to the left
activates the tag (the green LED will flash) and moving the switch to the right deactivates the tag
(the red LED with flash). The switch is a monetary switch and does not need to be held in the
activate position or deactivate position for a very long period of time. Additionally, holding the
switch in either position for an extended period of time will not extend the time that the
‘activate’ or ‘deactivate commands are sent to the tag (this fixed amount of time should be all
that is necessary, for a properly functioning ATS JSATS tag, to detect the activate/deactivate
commands coming from the Pinger Dish).
A tag in the Pinger Dish is confirmed as being active by an audible “Beep” from the Pinger Dish
whenever the activated tag transmits a JSATS code. The JSATS tag’s pulse specific values are
then displayed on the Pinger Dish’s LCD display:
1) Tag code value (4 digit hexadecimal number: $12DA for example)
2) CRC value (cyclic redundancy check; used for error detection)
3) PRI Measured (pulse rate interval, in seconds with 1000th of a second precision)
4) Estimated tag frequency (in kHz)

ATS Pinger Dish IV User Guide R-11-20A
4
Note that for alternating codes (or when using the temperature option) the Pinger Dish displays
the code of the most recent decode with the PRI time representing the time from the most recent
decode to the previous decode.
Upon activation, the tag first transmits both the alternating codes and normal codes (or the same
code if a tag is not programmed for alternating codes) and then transmits the tag’s software
version. Additionally, after about another 5 detections the Pinger Dish displays the number of
days of hibernation the tag is programmed for. If the hibernation option is not used, the number
of days of hibernation reads as ‘000’ days.
Note that temperature readings of 0C to 31C are output as the lowest five bits of the secondary
code when the tag is programmed with the temperature option enabled. The upper eleven bits of
the secondary code will be unchanged from their programming in the secondary code when a
temperature is transmitted.
If a tag does not appear to have been activated after moving the switch to the activate position,
you may need to remove and replace the tag on the top of the cup, and repeat the tag activation
process (it is possible the tag was not properly positioned within the Pinger Dish).
5. Using the Pinger Dish in Programming Mode
To change the programmable parameters of your JSATS tags (such as the tag’s alternating code
value or pulse rate interval (PRI), etc.), the Pinger Dish must be connected to a computer using
the supplied DB-9 serial cable. If your computer does not have a DB-9 serial port available but
instead uses a USB port, you need to purchase a USB to serial port adaptor (not provided but
available from ‘Keyspan’). The Pinger Dish’s serial DB-9 connector is mounted on the back.
A terminal emulation program (also known as ‘dumb terminal’), such as ‘ProComm Plus’, must
be used in order for your computer to communicate with the Pinger Dish. Various terminal
emulation software packages are available on the internet. Some work quite well and are free of
charge (such as ‘Tera Term’). Older computer operating systems incorporate built in terminal
emulation software (such as ‘Hyper Terminal’ found in pre-‘Windows 7’computers).
After starting one of the terminal emulation program described in the paragraph above, you must
configure the computer’s communication settings. Please select the following:
1) 8 data bits
2) 1 stop bit
3) 19,200 baud
4) No parity
5) Flow control: Xon/Xoff (or None)
Also, be sure to configure your terminal emulations software to allow ASCII characters to be
echoed back onto the terminal’s (computer) screen.

ATS Pinger Dish IV User Guide R-11-20A
5
Once you have connected the Pinger Dish to your computer, press the Restart button. The
characters shown on the LCD should be echoed back to the terminal screen on your computer.
Additionally, on Restart, if the Pinger Dish detects the presence of an RS232 connection, the
following character is momentarily displayed on the Pinger Dish (and computer) screen,
confirming that the Pinger Dish has detected the presence of an external computer:
RS232 Detected:
Use 19.2kb N-8-1
To place the Pinger Dish into the programming mode, type the command letter “r”(or “R”) on
your computer. The following output should then be displayed up on your computer screen:
RS232 Mode:
Awaiting Command
ATS ‘Pinger Dish IV’ RS232 Mode
Available Options:
‘A’ => Activate JSATS Tag
‘D’ => Deactivate JSATS Tag
‘C’ => Code Programming
‘P’ => Pulse Rate Interval Programming
‘H’ => Hibernation Interval Programming
‘Q’ => Query Tag Battery Voltage
‘F’ => Flash Pinger Dish LED
‘X’ => Exit RS232 Mode
Select…
You must now type a character from the list displayed on the computer (‘A’, ‘D’, ‘C’, ‘P’, ‘H’,
‘Q’ ‘F’, or ‘X’) that corresponds to the function you are interested in using. For example, to
change the Tag’s Pulse Rate Interval, type the letter “p” (or ‘P’). This brings up the pulse rate
interval selection menu and the user can then select the desired PRI by typing the appropriate
character:
Enter New Pulse Rate Interval
(Format = XX.X seconds):
The other menu options (alternating code, temperature settings, and hibernation interval) should
be self-explanatory but will probably not be useful for most customers since customer tags
should come preprogrammed with the user’s desired options. These additional options were
designed for internal use to assist in automating the programming/testing of ATS JSATS
transmitters in the production process.

ATS Pinger Dish IV User Guide R-11-20A
6
6. Additional Information:
We’ve tried to make this user’s guide as easy to understand as possible, However, if you have
any questions, please contact ATS Sales at 763-444-9267 and we will be happy to assist you in
getting you started.
Warranty: Your ATS Pinger Dish IV is warranted to be free from defects due to materials or
workmanship for one year.

ATS Pinger Dish IV User Guide R-11-20A
7

Table of contents