AudiAlien SG-04 User manual


Table of Contents
1.Introduction of Products………………………………………………………………… 3
1.1 Package Content ………………………………………………………………3
1.2 System requirements ………………………………………………………… 3
1.3 General Specifications …………………………………………………………3
1.4 Appearance and Function Keys ……………………………………… ……3
2. Operational Instructions …………………………………………………………………5
2.1 Copying files from computer to the MP3 Player………………… ……………5
2.2 Recharging the Battery ………………………………………………… ………5
2.3 Operating in water (swimming mode) …………………………… … …………5
3. Operating Environments…………………………………………………… … …………5
4. Modes ……………………………………………………………………… ……………6
4.1 MP3 music mode ……………………………………………………… ………6
4.2 FM radio mode ……………………………………………………………………8
4.3 E-BOOK …………………………………………………………………………9
4.4 System Setting ……………………………………………………………………10
5. Troubleshooting …………………………………………………………………………12
5.1 Can’ turn on the MP3 player……………………………………………………..12
5.2 After I turn on the MP3 player, it shuts down immediately ……………………12
5.3 I can’t use the USB cable or charger to recharge my MP3 player…………….12
5.4 There is no sound after the player is turned on ……………………………….12.
5.5 Abnormality occurs during operations …………………………………………..12
5.6 I can’ connect my MP3 player to PC ………………………………………………12
6. Safety Instructions …………………………………………………………………………..13
7. Care and Maintenance ……………………………………………………………………..13
8. Specifications ………………………………………………………………………………14
9. Appendix ………………………………………………………………………………… …14
9.1 swimming mode ……………………………………………………………………14
9.2 Resetting the player …………………………………………………………………16
9.3 Recharging/Uploading MP3 player…………………………………………………16
2
List of Introduction
1. Introduction of Products
1.1 Package Content
·Waterproof MP3 + FM player
· Waterproof In-Ear Earphones
· Armband
· USB cable (for uploading files and charging battery,30CM shielded wire with a ferrite core)
· Users manual
1.2 System requirements
·Operating System: Win 2000/ Win XP/ Vista/ Win 7/ MAC.
1.3 Basic Specifications
·Waterproofing international standard IPX 8
·Battery: 6hrs Continues playing time (depends on user’s operation habits)
· Operating temperature: -5℃~+ 40℃
· Size :65MM(length) X40(Width)X20MM(Height)
· Net Weight : 38.4g (Not including earphones)
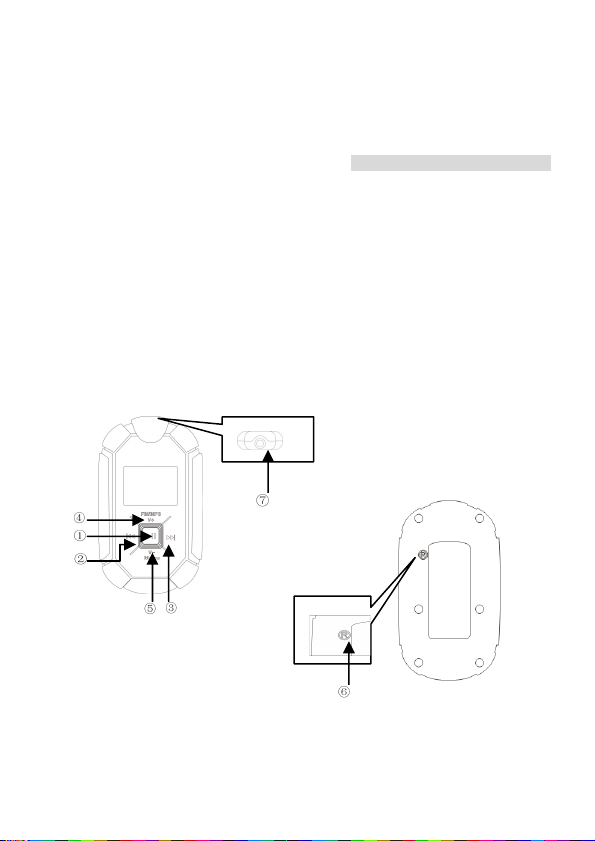
1.4 Appearance and Function Keys
3

Number Name Functions
1 Power/Play/Pause
MP3 music mode
- press and hold for 5 seconds to turn the player N/OFF
- press to Play/Pause the music
FM radio mode
- press to select stored stations
Menu mode
- press to confirm selections
2 Backward
MP3 music mode
- press to go to the previous track
- press and hold to fast-backward FM radio mode
- press and hold to search station with lower frequency
- press to fine tuning backward
Menu mode
- press to browse upward the menu or files
3
Forward
MP3 music mode
- press to go to the next track
- press and hold to fast-forward
FM radio mode
- press and hold to search station with higher frequency
- press to fine tuning forward
Menu mode
- press to browse downward the menu or files
4
FM/MP3
Volume increase
MP3 music mode
- press to increase volume level
- press and hold for 5 seconds to switch to FM radio
mode
FM radio mode
- press to increase level
- press and hold for 5 seconds to switch to MP3 music
mode
5
Menu
Volume reduce
MP3 music mode
- press to reduce volume level
- press and hold for 3 seconds to open the Sub-Menu
of MP3 music mode
- press and hold for 5 seconds to open the Main menu
of the player FM radio mode
- press to reduce volume level
- press and hold for 3 seconds to open the Sub-Menu
of FM radio mode
- press and hold for 5 seconds to open the Main menu
of the player
6 Reset button
-
Press to restore the factory default settings
7
Earphone jack/
USB jack/
Charging connector
-
For earphones connecting to the player
-
For USB cable connecting to computer and recharging
the built-in battery

2. Operational Instructions
2.1 Copying MP3 files from computer to MP3 Player
·Connect the player to the USB port of your computer using the USB cable.
·A “ ” icon appears at the right bottom of the Tool Bar. A “Removable Disk ” icon also appears in
“My Computer”
·Use the File manager function to copy files to the player.
·Then double click the “ ” icon at the right bottom of the Tool Bar to disable the “removable
disk ”. When the “This Disk Has Been Disabled Successfully” dialog box appears, disconnect the
player from the USB port.
2.2 Recharging the Battery
There are two ways to recharge the battery:
·To recharge the battery via USB port of your computer, simply connect the player using the USB
cable to your computer to recharge the battery.
·To recharge the battery using the USB charger (optional), simply connect the player to the charger
using the USB cable, then connect the charger to the power supply.
*Note: When disconnected from the USB port after recharging of files uploading, the player
will switch off automatically.
2.3 Operating in Water (Swimming Mode)
·When operating the player in water, you must use the waterproof earphones and plug it into the
earphone jack.
·Hang the MP3 player onto the swimming goggles and place the MP3 player behind your head.
·Press and hold the “ “ for 5~6 seconds to switch on the player ( The LCD display goes on ) and
select your desire features.
·Remove all water drops on the player surface after use.
·You must plug the waterproof earphones into your ear canal and fix the cable well before going
into water, when you go swimming. Please refer to appendix.
WARNING: Swimming without plugging the waterproof earphones into the ear canal will damage
the waterproof earphones
3. Operating Environments
The player can work properly in the following environments:
·Swimming/Hot spring/Sauna/Spa/surfing/Windsurfing and other water activities.
·Normal environment
5

4. Modes
4.1 MP3 music mode
Operations in MP3 music mode
Number
Name Functions
1 Play/Pause - press and hold for 5 seconds to turn the player ON/OFF
- press to Play/Pause the player
2 Backward - press to go to the previous track
- press and hold to fast-backward
3 Forward - press to go to the next track
- press and hold to fast-forward
4
FM/MP3
Volume
increase
- press to increase volume level
- press and hold for 5 seconds to switch to FM radio mode
5
Menu
Volume
reduce
- press to reduce volume level
- press and hold for 3 seconds to open the Sub-Menu of
MP3 music mode
- press and hold for 5 seconds to open the Main menu of
the player
Sub-Menu of music mode
Press and hold 3seconds of to open the sub-menu of music mode. The sub-menu contains EQ,
Repeat, A-B replay, replay times, Replay Gap, File Browser and Exit and so on.
Number Name Functions
1 Power/Play/Pause
- press to confirm selection
2 Backward - press to browse upward the menu
3 Forward - press to browse downward the menu
EQ Mode
EQ Mode contains Normal, Pop, Rock, Classic, Jazz, Headphone, Live and Bass.
a. Press and hold for 3 seconds to open the sub-menu of music mode, then press or
to choose “EQ”.
b. Press to open the secondary menu.
c. Press or to choose your desire EQ setting.
d. Press and return to music mode interface.
6
Play Mode
Play Mode contains Normal, Folder Repeat, Folder Normal, One, Random, Preview.
· a. Press and hold for 3 seconds to open the sub-menu of music mode, then press
or to choose “Play mode”.
· b. Press to open the secondary menu.
· c. Press or to choose your desire play mode.
· d. Press and return to music mode interface.
A-B repeat mode
AB repeat mode can repeat playing specific A-B interval
a. Press and hold for 3 seconds to open the sub-menu of music mode, then press or
to choose “ A-B repeat mode” and press to confirm selection.
b. “A -B” icon starts blinking on the interface of music mode interface.
c. Press to set START (A) and END (B) point. It will repeat playing the A-B interval.
d. Press to cancel the START (A) and END (B) point setting, then “A-B” icon will start blinking
again. You can press to set START (A) and END (B) point.
e. To cancel repeat mode, press and return to the interface of music mode.
f. Press for 3 seconds can also cancel A-B repeat mode and return to the sub-menu of music
mode.
Repeat Times
a. Press or to choose “Repeat Times”.
b. Press to enter into Secondary menu.
c. Press or to choose 1-10 times.
d. Press to confirm your selection, and then return to the sub-menu of music mode.
Repeat Gap
e. Press or to choose “Repeat Times”.
f. Press to enter into Secondary menu.
g. Press or to choose 1-10 seconds.
h. Press to confirm your selection, and then return to the sub-menu of music mode.
File Browser
Browse and play your desire track
a. Press and hold for 3 seconds to open the sub-menu of music mode, then press or
to choose “ File Browser” and press to confirm selection.
b. Press or to choose your desire track. 7
c. Press to confirm your selection.
d. The player will start playing the track and return to music mode interface.
Delete Files
Delete the current playing track
a. Press and hold for 3 seconds to open the sub-menu of music mode, then press or
to choose “Delete Files” and press to confirm selection.
b. Press or to choose yes or no.
c. Press to confirm your selection.
Delete All
Delete all the files inside the current playing folder
a. Press and hold for 3 seconds to open the sub-menu of music mode, then press or
to choose “Delete All” and press to confirm selection.
b. Press or to choose yes or no.
c. Press to confirm your selection.
4.2 FM radio mode
FM radio mode supports radio frequency from 87MHz to 108MHz.
Operations in FM radio mode
Number
Name Functions
1 Play/Pause - Press to choose the stored stations
2
Backward - press and hold to search station with lower frequency
- press to fine tuning backward
3
Forward - press and hold to search station with higher frequency
- press to fine tuning forward
4
FM/MP3
Volume
increase
- press to increase volume
- press and hold for 5 seconds to switch to MP3 music mode
5
MenuVolume
reduce
- press to reduce volume level
- press and hold for 3 seconds to open the Sub-Menu of FM
radio mode
- press and hold for 5 seconds to open the Main menu of the
player
8

Sub-menu of FM mode
Sub-menu of FM mode contains Save Channel, Auto Scan, Delete Channel, Delete All Channels
and Exit.
Save Channel
To store your desire frequency into memory
a. Press and hold for 3 seconds to open the sub-menu of FM radio mode, then press or
to choose “Save Channel”.
b. Press to save the frequency and return to the main interface of FM radio mode.
Note: Only 30 channels can be stored in the device. If 30 channels have been stored in the device
and you want to store a new station, the new station will automatically cover the 30th channel. The
sequences of the stored channels will follow their corresponding frequency from low to high.
Auto Scan
Automatically store all frequencies searched into memory
a. Press and hold for 3 seconds to open the sub-menu of FM radio mode, then press or
to choose “Auto Scan”.
b. Press to start searching stations. It will automatically save all the frequency with radio
stations as channels and return to the main interface of FM radio mode after searching.
Delete Channel
Delete the current station from the memory
a. Press and hold for 3 seconds to open the sub-menu of FM radio mode, then press or
to choose “Delete Channel” and press to confirm selection..
b. Press or to choose channel which you want to delete.
c. Press to save the station and return to the main interface of FM radio mode.
d. If there is no operation for 10seconds, it will return to the main interface of FM radio mode.
e. If there is no stored station, it will display “No Channel”.
Delete All Channels
Delete all stations from the memory
a. Press and hold for 3 seconds to open the sub-menu of music mode, then press or
to choose “Delete All” and press to confirm selection.
b. Press or to choose yes or no.
c. Press to confirm your selection.
9

4.3 E-BOOK
E-BOOK supports the function of text reading, text files browsing and auto turn pages.
a. Press and hold for 5 seconds to open the main menu of the device, then press or
to choose “ E-Book” and press to confirm selection.
b. Press or to choose your desire text file.
c. Press to confirm your selection.
d. The player will display the text on the display and return to the main interface of E-book.
e. Press or to read the files by manual.
f. You can press to switch between auto turn pages and manual mode.
g. You can press to browse the files directory and choose your desire text file again.
4.4 Settings
The system setting contains replay, backlight time, power off, contrast, language, memory Info,
version, reset settings and exit.
Press and hold for 5 seconds to open the main menu of the device, then press or
to choose “Settings” and press to confirm selection.
Operations in Settings
Number
Name Introduction of function
1 Power/Play/Pause
-- Long press or Short press: OK button
2 Back -- Short press : Page up—browser menu or songs
3
Forward -- Short press : Page down—browser menu or songs
Replay
a. Press or to choose “Replay”.
b. Press to enter into Secondary menu.
c. Press or to choose “Auto Mode” or “Manual Mode”.
d. Press to confirm your selection, and then return to the menu of Settings.
Note: In manual mode, you can set number replay and intervals between each replay.
Backlight Time
a. Press or to choose “Backlight Time”.
b. Press to enter into Secondary menu.
c. Press or to choose 0s (always on), 5s, 10s, 20s, 60s.
d. Press to confirm your selection, and then return to the menu of System Setting.
10

Power Off
a. Press or to choose “Power Off”.
b. Short press to enter Secondary menu.
c. Press or to choose 0s (Cancel), 30min, 60min, 90min.
d. Press to confirm your selection, and then return to the menu of System Setting.
Contrast
a. Press or to choose “Contrast”.
b. Press to enter Secondary menu.
c. Press or to choose 1—16 level, the display contrast will change immediately
according to your setting but it is yet to be saved.
d. Press to confirm your selection, and then return to the menu of System Setting.
Language
1. Press or to choose “Language”.
2. Press to enter Secondary menu.
3. Press or to choose Chinese, English, Traditional Chinese and other 17 languages.
4. Press to confirm your selection, and then return to the menu of System Setting.
Memory Info
1. Press or to choose “Storage Status”.
2. Press to enter Secondary menu.
3. Press to confirm your selection, and then return to the menu of System Setting.
Version
1. Press or to choose “Version”.
2. Press to enter Secondary menu.
3. Press to confirm your selection, and then return to the menu of System Setting.
Reset Settings
1. Press or to choose “Restore the Factory Settings”.
2. Press to enter Secondary menu.
3. Press or to choose “OK” or “Cancel”.
4. Press to confirm your selection, and then return to the menu of System Setting.
11

Exit
1. Press or to choose “Exit”.
2. Press to confirm your selection, and then return to the menu of System Setting.
5. Troubleshooting
This section provides significant information to help you solving common problems you might
encounter when using the product. If you encounter any problems that are not listed below, contact
your dealer for professional advices.
5.1 Can’ turn on the MP3 player
·It possibly results from lack of electricity. Connect to your PC for recharging using the USB cable.
5.2 After I turn on the MP3 player, it shuts down again in no time.
·It possibly results from low level of the battery. Connect to your PC for recharging using the USB
cable.
5.3 can’ use the USB cable to recharge my player
·Make sure that you are using the USB cable in the package for recharging.
·Connect the player to your PC using the USB cable and check that the operating system is picking
up the Mp3 player.
·Using the reset needle to plug into the earphone jack to reset the player.
5.4 There is no sound after the player is switched on.
·Make sure that the earphones are properly plugged into the earphone jack.If you are using the
waterproof earphones, make sure to screw it tightly into the earphone jack.
·The volume might be too low. Press Volume Up "+" button to increase the volume.
·Make sure there is no water drops stuck on the earphone sound ports you can swing the earphones
or knock it onto a harmless surface to remove the water drops.
12

5.5 Abnormality occurs during operations.
·If there is still no sound during operation of the player with the earphones plugged/screwed in the
right position and the LED indicator is flashing normally, Using the reset needle to plug into the
earphone jack to reset the player.
·If the LED indicator stays on but the player does not work, Using the reset needle to plug into the
earphone jack to reset the player.
* Note: The player will not lose the stored files due to the reset.
5.6 I can’ connect my MP3 player to PC
·Make sure that you have connected the player to your PC appropriately using the USB cable.
·Make sure you have plugged the USB cable into the player before lugging the cable into the USB
port of your computer. A reverse plugging sequence may result in failure of connection between
the player and PC.
6. Safety Instructions
·Long time exposure to loud music may cause hearing damage. Please avoid using extreme
volume when using this MP3 Player, especially for an extended period of time. It 抯advisable to
adjust the volume at moderate volume at all time.
·Do not use this MP3 Player while operating a motor vehicle, or in any other instances where failure
to hear outside sounds may represent a danger either to yourself or others.
·Switch off your MP3 player before boarding any aircraft.
7. Care and Maintenance
·Do not place the MP3 player in high temperature, as it will result in explosion.
·Do not expose the MP3 player to contact with sharp objects as this will cause scratches and
damage.
·Avoid charging the MP3 player in extreme high or low temperatures.
·Do not open or mutilate the built-in Li-ion battery, as it will cause the MP3 player into damage.
·You must plug the waterproof earphones into your ear canal and fix the cable well before going into
water, especially you go swimming. Please refer to appendix.
warning: Swimming without plugging the waterproof earphones into ear canal will demage the
waterproof earphones.
13

8. Specifications
Features:
Audio Format MP3、WMA、FM
Bit Rate 32Kbps-320Kbps
Internal Memory built-in 1GB/2GB/4GB
Built-in Rechargeable battery
6hrs Continuous Playing Time
USB interface USB2.0 High Speed
Playback Mode Normal, Random
Operating system Win XP,Win2000,WinME,Linux2.4
and above. MAC OS 9.0 and higher.
Storage Temperature 10℃~ + 50℃
Operating temperature -5℃~ + 40℃
Dimensions(LxWxH) 65MM(length) X40(Width)X20MM(Height)
Net Weight 21grams(not including earphones)
9.Appendix
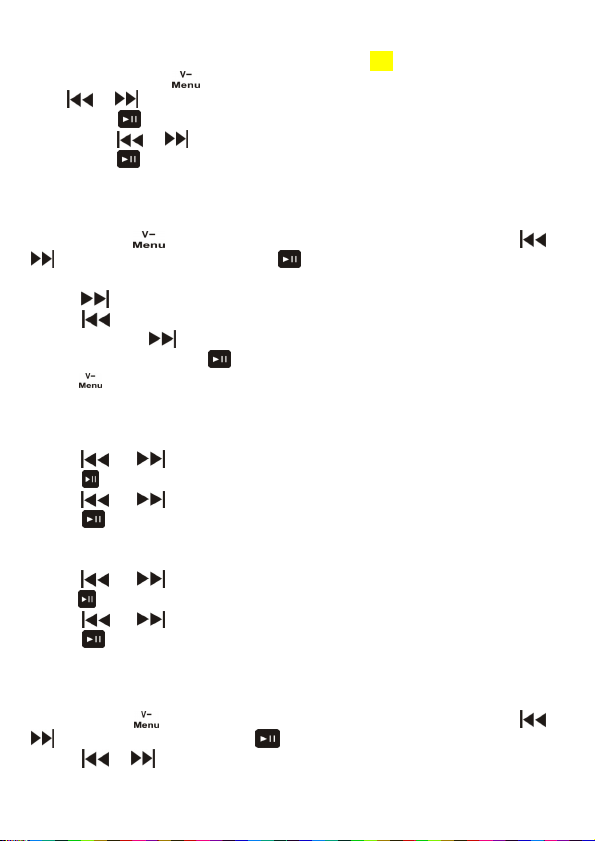
9.1swimming mode
Please follow the steps below to ensure the waterproof protection before swimming:
·waterproof earphones must be used for swimming:
Step 1:
Screw the earphone plug into the earphone jack on the player. Make sure that it is plugged tightly
into the player.
Step2: Step3:
14
Make sure that the
earphone is
screwed tightly into
the earphone jack!
·As shown in the following figures, hang the MP3 player onto the goggles band. (For swimming).
Step4: Step5:
·You must plug the waterproof earphones into your ear canal and fix the cable well before going into
water, especially you go swimming.
Step6:
Warnings: Swimming without plugging the waterproof earphones into ear canal will demage the
waterproof earphones. If the volume of earphones is getting low, make sure there is no water
drops stuck on the earphone sound ports. You can swing the earphones or knock it onto a harmless
surface to remove the water drops.
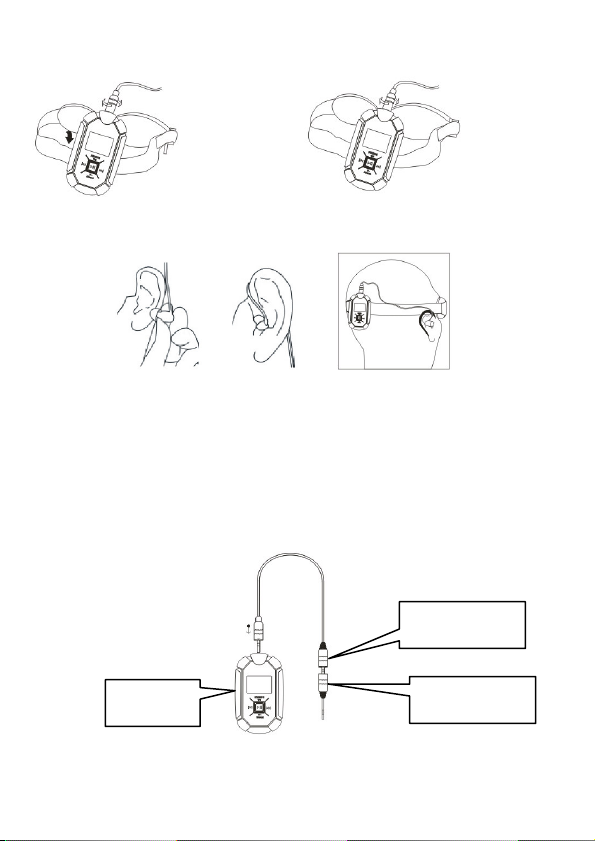
General Applications
·Both waterproof earphones and normal earphones are suitable for general applications. You may put
the MP3 player in your bag or pocket and enjoy music using either the normal earphones or waterproof
earphones, with or without the extension cable.
15
Extensive cable
Headphone plug
Player
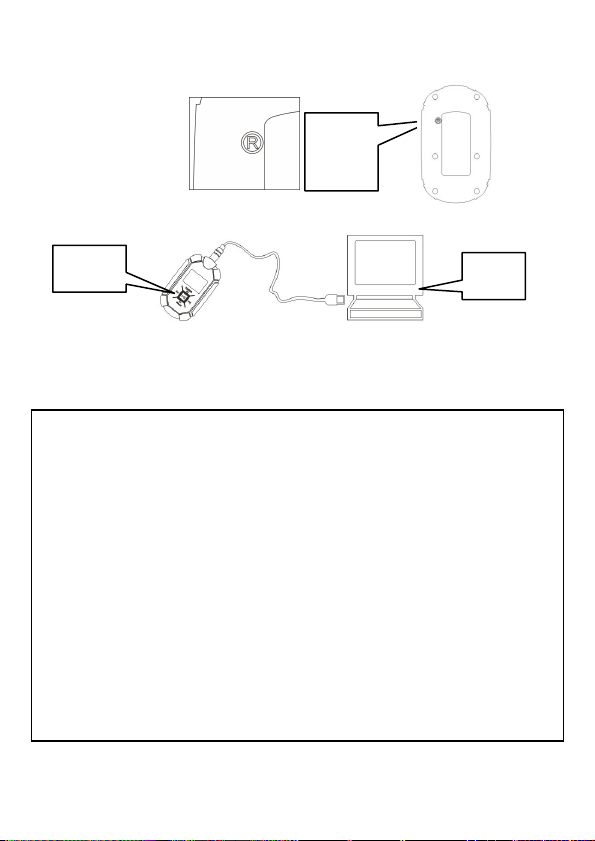
9.2 Resetting the player
Using the reset needle to plug into the earphone jack to reset the player.
9.3 Recharging/Uploading MP3 player
16
PC
player
The key
to reset
the
product
1. This device complies with Part 15 of the FCC Rules. Operation is subject to the following two
conditions (1) this device may not cause harmful interference, and (2) this device must
accept any interference received, including interference that may cause undesired operation.
2. changes or modifications not expressly approved by the party responsible for compliance
could void the user’s authority to operate the equipment.
3. This equipment has been tested and found to comply with the limits for a Class B digital
device, pursuant to Part 15 of the FCC Rules. These limits are designed to provide reasonable
protection against harmful interference in a residential installation. This equipment
generates, uses and can radiate radio frequency energy and, if not installed and used in
accordance with the instructions, may cause harmful interference to radio communications.
However, there is no guarantee that interference will not occur in a particular installation.
4. If this equipment does cause harmful interference to radio or television reception, which can
be determined by turning the equipment off and on, the user is encouraged to try to correct
the interference by one or more of the following measures
Reorient or relocate the receiving antenna.
Increase the separation between the equipment and receiver.
Connect the equipment into an outlet on a circuit different
from that to which the receiver is connected.
Consult the dealer or an experienced radio/TV technician for help.
Table of contents


