KAM KCD400 MP3 User manual


2
TABLE OF CONTENTS
FOR SAFE AND EFFICIENT OPERATION ………………………………. 2
DESCRIPTION OF THE FUNCTIONS (Top View) ………………………………. 3~5
DESCRIPTION OF THE FUNCTIONS (Front View)…………..……………….…. 5
LCD INSTRUCTION ………………….……………………………………..……….. 5~6
DESCRIPTION OF THE FUNCTIONS (Rear View) .…………..…………………. 6
SPECIFICATIONS…………………………………………………………………….. 7

3
DESCRIPTION OF THE FUNCTIONS
Top View:
1. OPEN/CLOSE
Press to eject the disc.
Note: Disc can’t be ejected unless the CUE or PAUSE button has been pushed first.
2.TIME
CD Mode - Press this button to switch Single Elapsed Time, Single Remain Time and Total Remain Time.
MP3 Mode- Press this button to switch Single Elapsed Time and Single Remain TIME.
When pressing this button to switch, the Time Bar is also changing on Display.
3. CONT./SGL
Press this button to switch
﹁
Continue Mode
﹂
/
﹁
Single AUTO CUE Mode
﹂
.
Continue Mode -Playing from the first track to the last track and then going on from the first track continually. When pressing the skip, it pauses and stops at the Main Cue

4
ofthenexttrack.
Pressing skip under this mode, the Main Cue is still set at the first track or the new Main Cue which has just been memorized. It won’t renew to the new
Cue of each track by pressing SKIP.
Single Auto Cue Mode – When going on to the next track or skipping to the next track, it pauses and stops at the Main Cue of the new track.
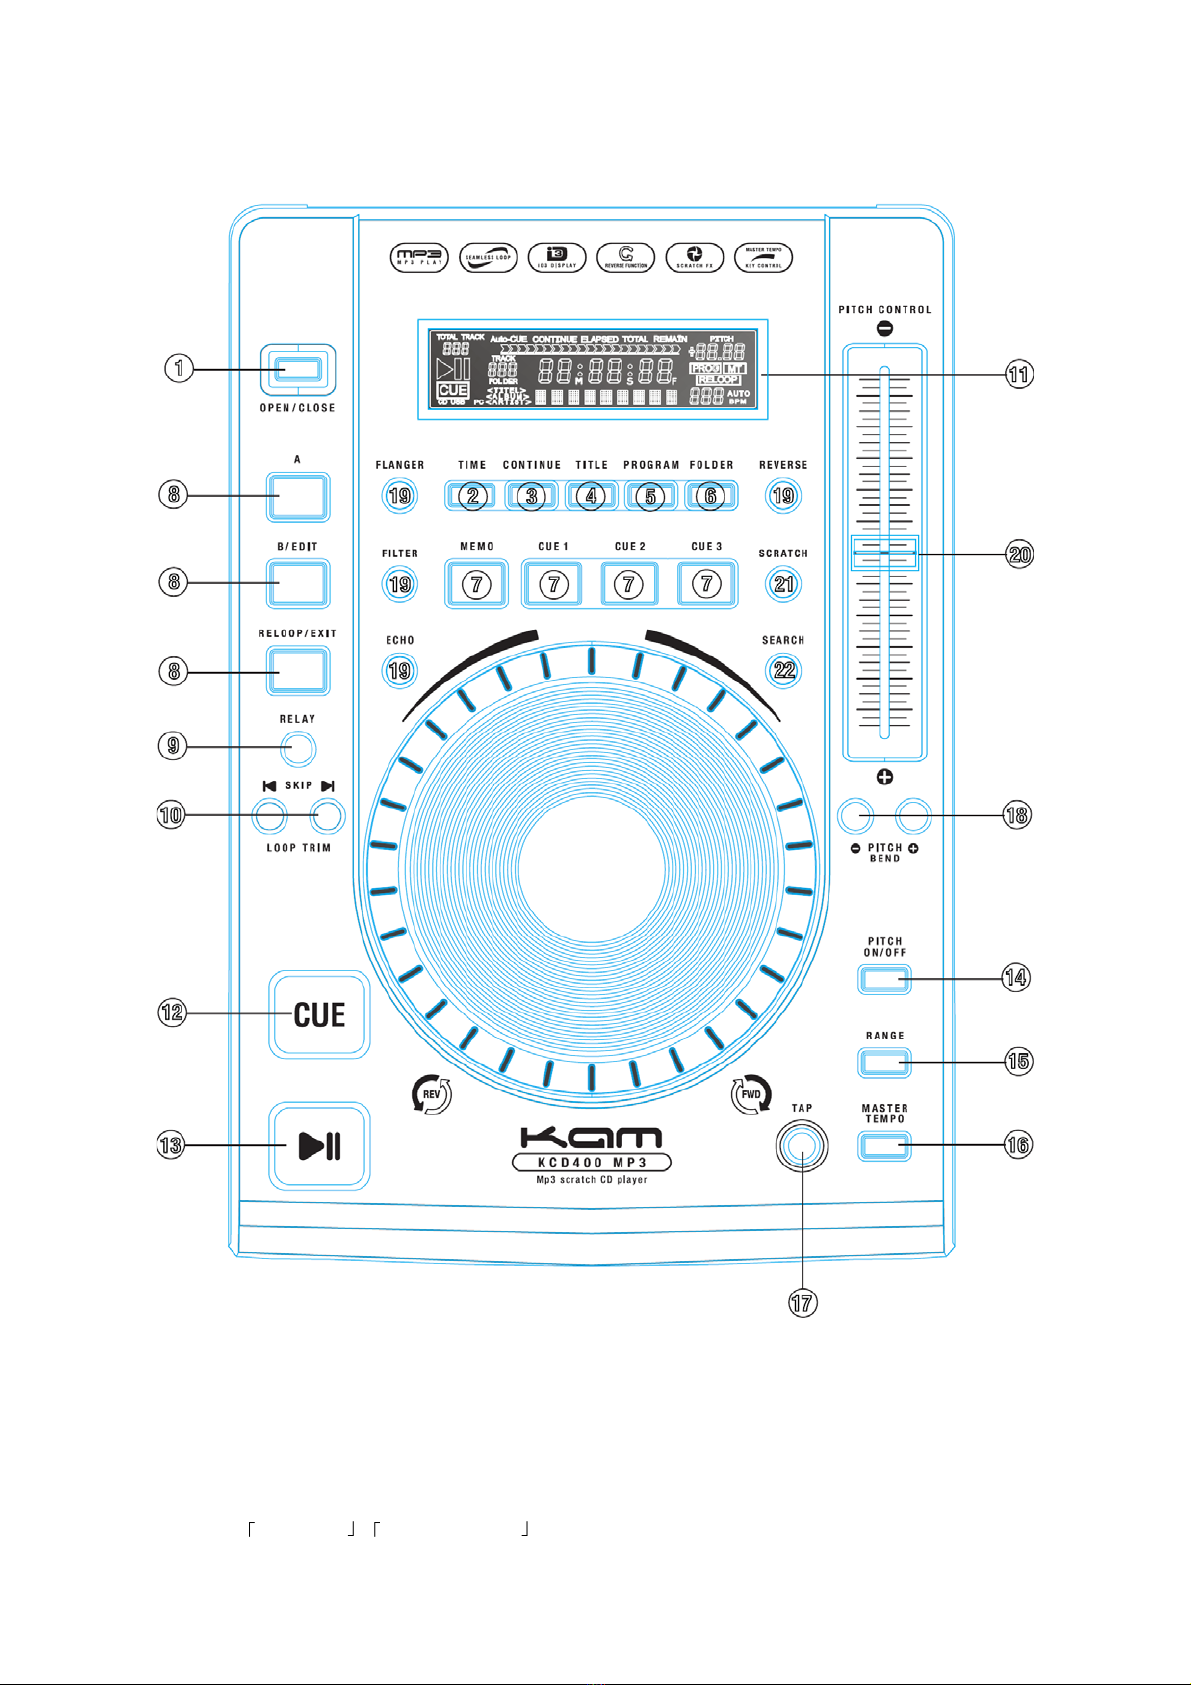
4. TITLE
Press this button to show FILE, TITLE, ALBUM and ARTIST. It only supports MP3 format.
5. PROG
The maximum tracks which you can edit are 99.
Start PROG-Edit:
When under pause mode, press this button to execute program edit. Select the track by pressing SKIP(CD/MP3) or Folder-SKIP(only MP3) and then press the PROG to set the
memory. The display MM:SS:FF shows [P01] -> [P02] means it’s waiting for memorizing the next track. Then press SKIP to select and set a memory again.
Play PROG:
When complete, press PLAY/PAUSE button starting to play your edit. Once pressing the PAUSE button, it can be added the program continually.
Exit PROG Play/Edit:
Under pause mode, pressing PROG button for two seconds can return to the normal mode. Once returning to the normal mode, the memories will be wiped out.
6. FOLDER
Press this button to switch between MP3 Folder and MP3 File.
When under MP3 File mode, Total-Track shows the total MP3 files in the folder.
When under MP3 Folder mode, Total-Track shows the total folders in this CD
7. HOT-CUE
This unit will allow you to play from 3 cue points instantly.
A. Set CUE memory: Press the MEMO button first, and then press the CUE button to complete the CUE setting, then the CUE button will light on.
B. Play” CUE” memory: Pressing specific CUE button to perform this function.
8. LOOP
1. Press A to memorize a start point and press B to memorize an end point. Then the Loop is keep playing.
2. Press B again to enter the Loop edit.The length of the Loop playback can be enlarged or shortened by pressing Skip .
3. Press the RELOOP can exit or call to the Loop playback.
4. The loop function will be limited at the same track. It can’t set the A at track 1 and cross to set the B at track 2.
9. RELAY
Press the “RELAY” button to activate. When one unit is in play mode, and the other unit is in “pause” mode; pause the playing unit, the other unit will
automatically start to play (the button will blink
10. SKIP
1. Press SKIP to select tracks and folders. Keep pressing it and use Jog Wheel to do tracks fast search.
2. When on loop edit, pressing to trim the loop to double and pressing to trim the loop to half.
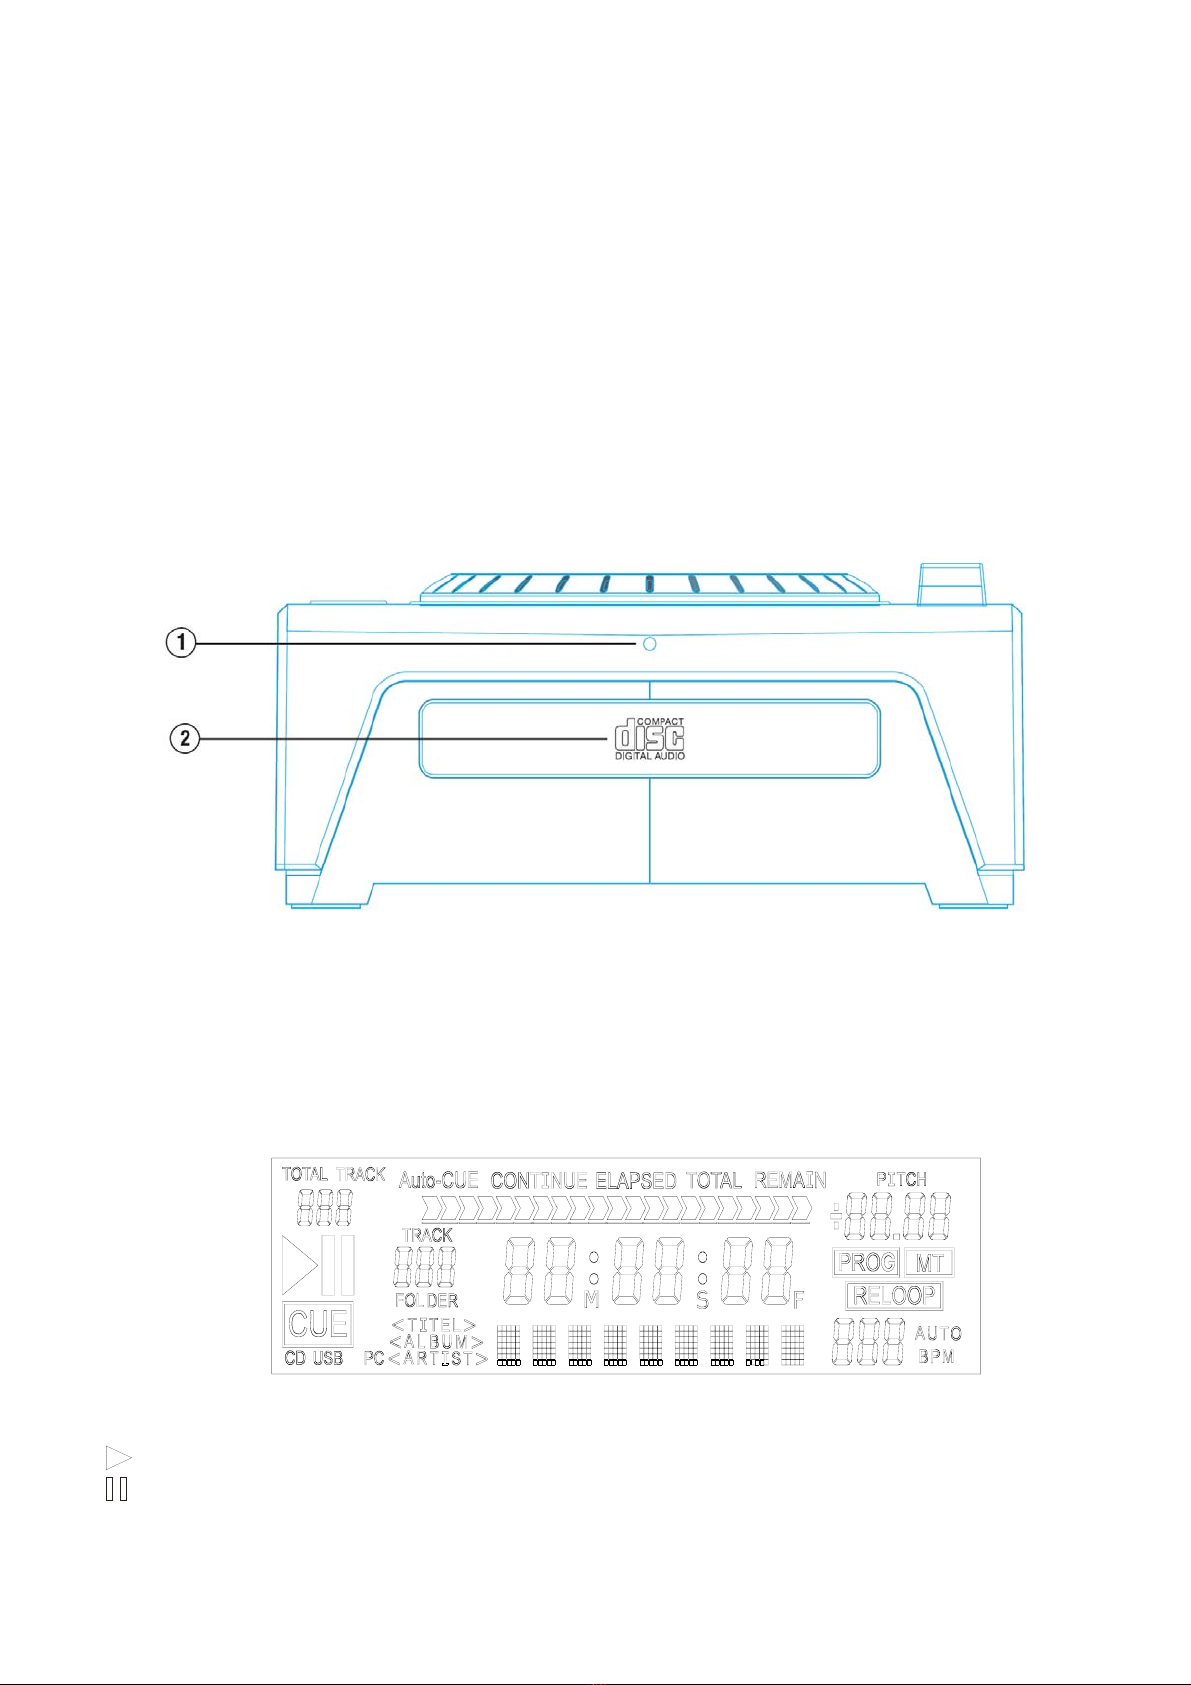
11. DISPLAY
When performing specific function, it will show on Display.
12. CUE
When under PAUSE mode, pressing the CUE button to set the cue point; when under PLAY mode, press this button to pause the music at the memorized point. After
pressing this button to set the new cue, the stutter condition will be eliminated.
13. PLAY/PAUSE
To Press this button can play the music and to press again can make the music pause.
14. PITCH ON/OFF
To push this button first so that the pitch can be adjusted.
15. PITCH RANGE
Switch the pitch range, 8% and 16 % under MP3 mode.
Switch the pitch range, 8%, 16%, and 100% under CDDA mode.
A. When the LED light is off, it sets under 8%.
B. When the LED light is on, it sets under 16%.
C. When the LED light is blinking, it sets under 100%.
16. MT
When this function is on, the key of the song is locked even though the pitch fader is adjusted.
17. TAP
Pressing this button with the beat can count the BPM of the music.
18. PITCH BEND
Press
+
to rise up the speed and Press─to Slow down the speed.
19. SOUND EFFECT
These buttons will activate Flanger, Filter, Echo, Reverse effects on. Using Jog Wheel can adjust the effect parameter. Once the parameter has been adjusted, it
will not return to zero automatically. The variation of parameter value shows on the display when truning the jog wheel.
20. PITCH CONTROL SLIDER
To match the beat of the other music piece you should adjust the Pitch Control to change the speed.
21. SCRATCH
Activate the scratch effect with this button and then perform the scratch effect by Jog Wheel.
22. SEARCH

5
Press this button first and use Jog Wheel to perform searching forward or backward.
23. REMOTE CONTROL
Select Lock, Tack and Cue/Play by using this switch.
LOCK:
When the fader is advanced, a switch starting the replay will be closed in the mixer.
When the fader is closed, the switch will open and set the CD/MP3 player to pause.
TACT:
When the fader is advanced, the replay will start.
When the fader is closed, the CD/MP3 is set to pause.
CUE/PLAY:
When the mixer fader is advanced, the replay will be started by a short control pulse of the mixer. When the fader is closed, the unit is set to pause again by another control pulse.
24. JOG WHEEL
Use the wheel to adjust the speed to get an even close BPM with another track. It also can trim the loop long or short.
25. SLEEP:
Leave the unit unused for 20 minutes; the machine will shut off automatically.
DESCRIPTION OF THE FUNCTIONS
Front View
1. POWER ON LIGHT
It will light when the power turns on.
2. DISC SLOT
Insert and remove the CDDA disc.
LCD INSTRUCTION
1. TOTAL TRACK – It shows the track numbers of this CD. During selecting folders, it shows the total folders of this CD.
2. – The unit is in playing.
3. – The unit is paused
4. CUE – It indicates a cue has been memorized..
5. CD – When inserting a CD, it will automatically light on.

6
6. USB – No Function
7. PC – No Function
8. AUTO-CUE – To auto pause on the CUE point of the next track
9. Continue – When the light is on, it plays continually.
10. TIME MODE (ELAPSED) – Shows the time as it is taking place.
11. TIME MODE (TOTAL) – Shows how much time is left on full CD.
12. TIME MODE (REMAIN) – Shows how much time is left on a particular track
13. TIME BAR – Show the time length depending on the setting of the “TIME” mode.
14. TRACK – Shows the track number that is playing.
15. MINUTES – Shows the minutes elapsed or remaining depending on mode setting.
16. SECONDS – Shows the seconds elapsed or remaining depending on mode setting.
17. FRAMES – The CD Player breaks down a second into 75 frames for accurate cueing. This shows the frames elapsed or remaining depending on mode setting.
18. EFFECT MODE DISPLAY –Show the sound effect name, or MP3 file name. Folder name can not be displayed.
19. THE PARAMETER OF SOUND EFFECT
20. PITCH – The pitch change range
21. PROG – Lighting up when it’s playing the program. Blinking when making the program edit.
22. MT– Lights up when key has been locked.
23. RELOOP – The light is on when performing the loop function.
24. – Press the TAP button with the beat can show a BPM number.
25. BPM – Lighting on when turning on the power.
26. AUTO – No function
DESCRIPTION OF THE FUNCTIONS
Rear View
1. LINE OUT (RCA Jacks)
The analogue audio from each CD player is output from these jacks. Connect to the line input of the mixer.
2. DIGITAL OUT
The digital audio from each CD player is output from this jack. Connect to the line input of the D/A Amplifier.
3. TACT-LOCK option
Select the type of switch in the mixer for FADERSTART wire remote control.
4. Remote
This connector is used for connecting to FADERSTART wire remote control unit.
5. Relay Connector
This connector is used for connecting to another CD player to allow Relay function to work.
6. POWER (Power Switch)
Press the power switch to turn the unit on, and the LED indicator will be light. To switch the POWER off by pressing the POWER switch again.
7. AC Power Cord
Connecting this power cord into an AC wall outlet with the proper AC voltage.

7
Specifications
Structure and Function
•CD TEXT Support (with scrolling display for long names)
•Digital output at constant sampling frequency 44.1 kHz for all functions.
•One Seamless Loop. (A / B / Reloop)
•3 HOT CUE.
•BPM Counter : Only Manual TAP
•2-way pitch bend via jog wheel and buttons.
•Relay
•Remote Control (Tact / Lock /cue start )
•Scratch / Reverse / Filter / ECHO / Flanger Sound Effect
•Elapsed time /Remain time/Total remain time (CDDA) , Elapsed time/Remain time (MP3)
•Single Auto CUE / Continue / Normal
•Pitch Ranges – CDDA (±8%, ±16%, ±100%) /MP3 (±8%, ±16%)
•Master Tempo – CDDA (±8%, ±16%, ±100%) / MP3 (±8%, ±16%)
•Upgradable system program.
•Program list setup
MP3 Feature
•MP3 Folder/File Search Function.
•File name / Folder name /ID Tag <Title , Album , Artist >Display Support .( with scrolling display for long names).
•Support File SKIP / Folder SKIP (Fast SKIP)
•Support Mepg1 layer3 (VBR/CBR) File bit rate=32~320Kbps, sampling frequency=32,44.1,48KHz
Mepg1 layer3 (VBR/CBR) File bit rate=40~160 Kbps, sampling frequency=16,22.05,24KHz
•Support the MP3 format of ISO9660

Table of contents