Audio 2000 AWP6042 User manual

AWP6042
OWNER’S MANUAL
Thank you for purchasing the AWP6042
! For the best results
and the utmost satisfaction from your new unit, please read this manual
thoroughly, and retain it for future reference. For more information,
please visit our website (www.audio2000s.com).
portable wireless
PA system with Lithium-Ion rechargeable battery
Audio2000'S
®
PORTABLE WIRELESS PA SYSTEM WITH LITHIUM -ION RECHARGEABLE BATTERY
AWX6042H
VHF Wireless Headset Transmitter
X1
Handheld Microphone Headset Transmitter
Headset Microphone

Table of Contents
Safety ..................................................................................................Instructions
.................... .......................................................................... ..Features ............ .....
.................... ..........................................................................Specifications ...........
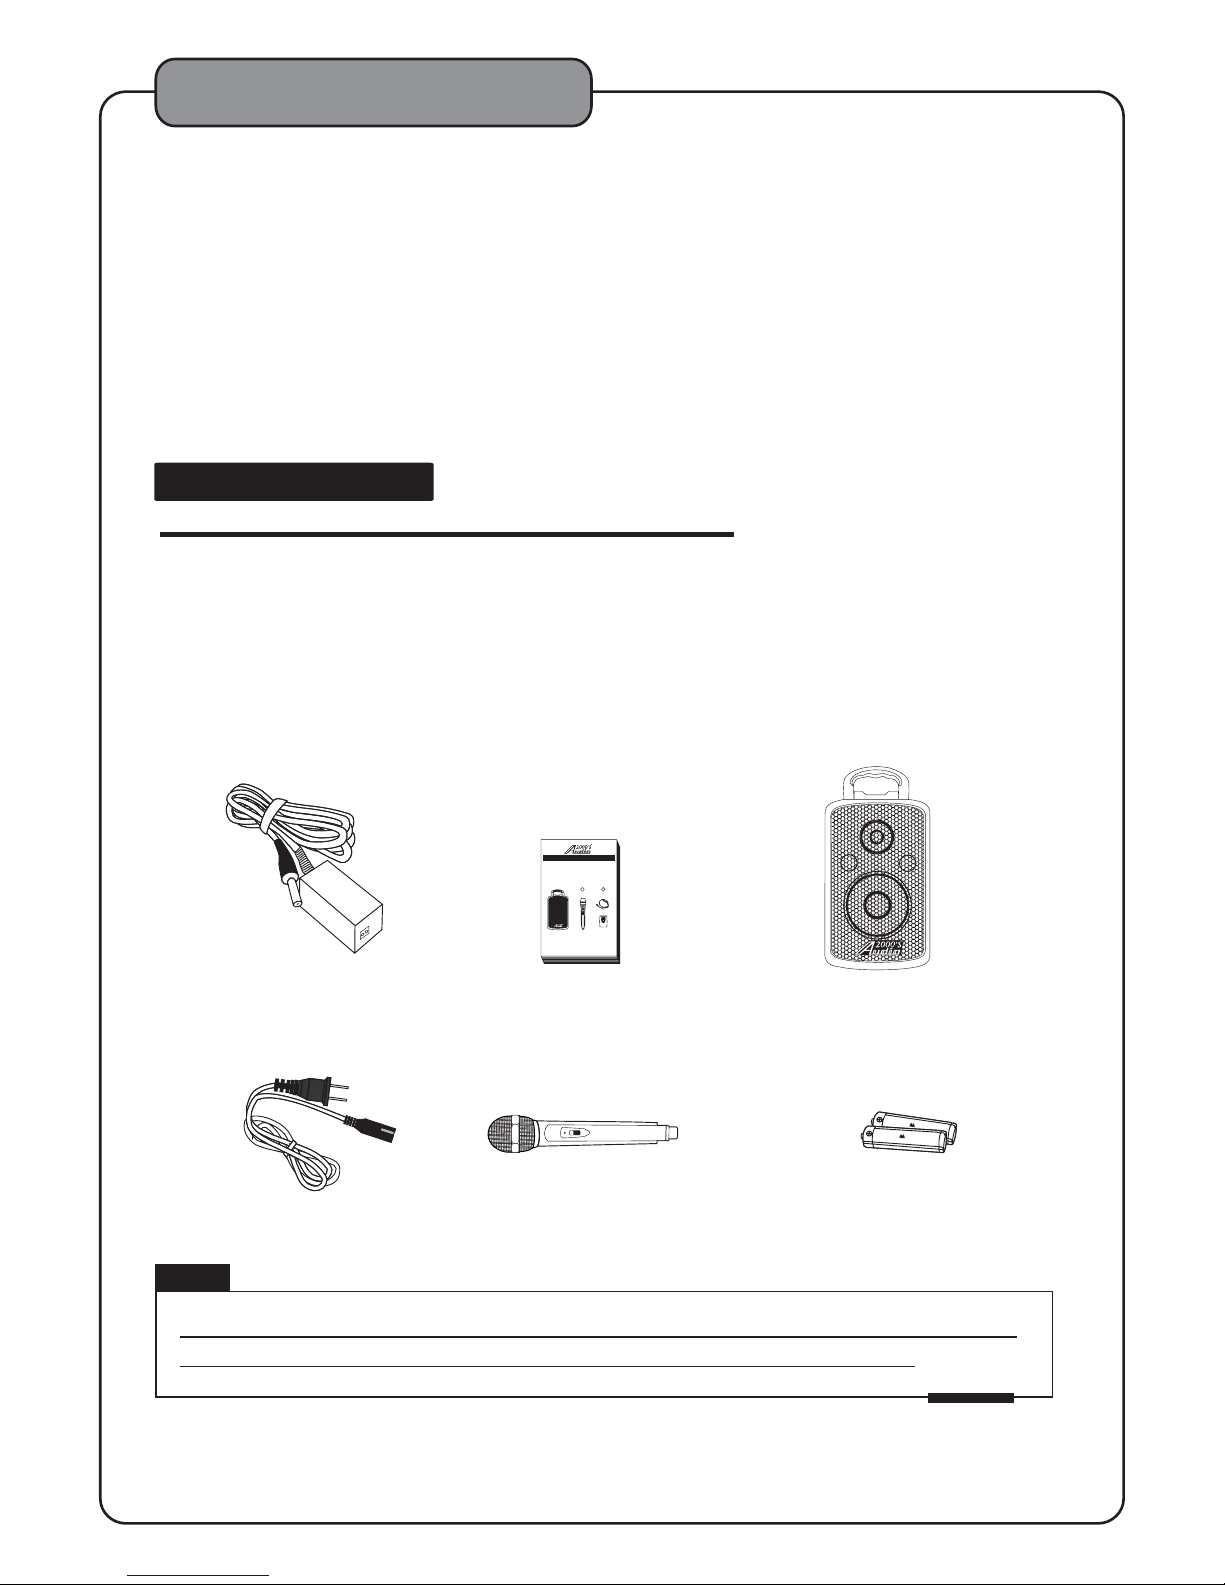
..................................................................................................Package Contents
........................................................................●Turning the AWP6042 On and Off
.....................................................................●Adjusting the Sound Quality.............
......................................................................................●Input Channel Selection
...........................................................................................Microphone Operations
.................................................................................USB and SD Card Operations
......................................................................................................Troubleshooting
.................................................................................................Service Information
..................................................................................................Battery Operations
●Audio Input Connection.........................................................................................
udip Output Connection......................................................................................●A
General Operations
●Microphone Input Connection................................................................................
Descriptions and Functions......................................................................................
1
2
3
3
4
5
5
5
6
6
6
7
7
7
9
10
Connecting to External Devices

* TO PREVENT FIRE OR SHOCK HAZARD. DO NOT EXPOSE THIS APPLIANCE TO RAIN OR MOISTURE.
*THIS APPLIANCE SHALL NOT BE EXPOSED TO DRIPPING OR SPLASHING WATER AND THAT NO
OBJECT FILLED WITH LIQUIDS SUCH AS VASES SHALL BE PLACED ON APPARATUS
.
1) Read these instructions.
2) Keep these instructions.
3) Heed all warnings.
4) Follow all instructions.
5) Do not use this apparatus near water.
6) Clean only with dry cloth.
7) Do not block any ventilation openings. Install in accordance with the manufacturer's instructions.
8) Do not install near any heat sources such as radiators, heat registers, stoves, or other apparatus
(including amplifiers) that produce heat.
9) Do not defeat the safety purpose of the polarized or grounding-type plug. A polarized plug has two
blades with one wider than the other. A grounding type plug has two blades and a third grounding
prong. The wide blade or the third prong are provided for your safety. If the provided plug does not
fit into your outlet, consult an electrician for replacement of the obsolete outlet.
10) Protect the power cord from being walked on or pinched particularly at plugs, convenience
receptacles, and the point where they exit from the apparatus.
11) Only use attachments/accessories specified by the manufacturer.
12) Use only with the cart, stand, tripod, bracket, or table specified by the manufacturer, or sold with the
apparatus. When a cart is used, use caution when moving the cart/apparatus combination to avoid
injury from tip-over.
IMPORTANT SAFETY INSTRUCTIONS
WARNING
S3125A
1
Safety Instructions
13 ) Unplug this apparatus during lightning storms or when unused for long periods of time.
14 ) Refer all servicing to qualified service personnel. Servicing is required when the apparatus has been
damaged in any way, such as power-supply cord or plug is damaged, liquid has been spilled or objects
have fallen into the apparatus, the apparatus has been exposed to rain or moisture, does not operate
normally, or has been dropped.
15) Grounding or Polarization This product may be equipped with a polarized alternating current line plug
(a plug having one blade wider than the other). This plug will fit into the power outlet only one way.
This is a safety feature. If you are unable to insert the plug fully into the outlet, try reversing the plug.
If the plug should still fail to fit, contact your electrician to replace your obsolete outlet. Do not defeat
the safety purpose of the polarized plug.
16) Ventilation Slots and openings in the cabinet are provided for ventilation and to ensure reliable
operation of the product and to protect it from overheating, and these openings must not be blocked
or covered. The openings should never be blocked by placing the product on a bed,
sofa, rug, or other similar surface. This product should not be placed in a built-in
installation such as a bookcase or rack unless proper ventilation is provided or
the manufacturer's instructions have been adhered to.
17) The MAINS plug or an appliance coupler is used as the disconnect device,
the disconnect device shall remain readily operable.

2
Features
1. The built-in USB and SD card readers play Mp3 files in USB and SD card.
2. All-in-one design delivers 50W of power through a 2-speaker cabinet (6.5“ X 1; 1.0“ X 1)
3. One ¼” microphone input with a volume control (MIC LEVEL)
4. One built-in wireless microphone (handheld or headset) with a volume control (WIRELESS LEVEL)
5. One stereo 3.5mm line input (LINE IN)
6. One stereo 3.5mm audio output (PRE OUT)
7. One music tone control and one music volume control
8. One DC input (12-16V / 4A)
9. One ON/OFF switch
10. Built-in high-capacity lithium-ion rechargeable battery (12V / 4AHr)
11. Built-in rechargeable battery level indicator (four LED's; two green + one yellow + one red)
3
AC Power Cord (1)
Handheld Microphone
or
Headset Transmitte
(1)
r(1)
If you find that any of the items mentioned above are missing from
the box, please contact before proceeding.Audio2000’S
Note
Specifications
Specifications and
Package Content
●AC Input Voltage
Audio Output Power
Audio Input Sensitivity
Microphone Input Sensitivity
Output Level
S/N Ratio
Dimensions
Weight
●
●
●
●-
●
●
●
LINE IN
PRE OUT
00 mV
mV
2
5
500 mV
90 dB
9 2"x9 5"x15 2" (LxWxH)
9.26 lbs
.. .
................................
.............................
........................
........................
...................
..............................
..............................
..............................
Items Quantities
AWP6042 Unit
Handheld Microphone or Headset Transmitter
AC Power Cord
AA Batteries
Owner's Manual
AC/DC Adaptor
®
AC 100 240V 50 60Hz
0 W (peak to peak)
-/
5
Owner's Manual
AC/DC Adaptor
AWP6042
OWNER’S MANUAL
Thankyou for purchasing the AWP6042
! For the best results and the utmost
satisfactionfrom your new unit, please read this manual thoroughly,
andretain it for future reference.
Audio2000'S WIRELESS
PORTABLE PA SYSTEM
®
WIRELESS PORTABLE PA SYSTEM WITH RECHARGEABLE BATTERY
AA Batteries (2)
AWP6042 Unit (1)
Package Contents
ON
OFF
(1)
(1)
(1)
(2)
(1)
(1)
AWX6042H
VHFWirelessHeadsetTransmitter
X1
Handheld Microphone HeadsetTransmitter
HeadsetMicrophone

4
Descriptions and Functions
MIC LEVEL
MIN MAX MIN MAX TONE VOLUME
POWER INPUT POWER
ON
OFF
BATTERY LEVEL CHARGING
BATTERY: 12V 4.0AH
CAUTION:
1 Do not expose the battery to high temperature..
2 Keep the battery away from heat source or fire..
Strike the battery with any object.
3 Do not strike the battery against any object or3 Do not strike the battery against any object or...
4 Do not open the battery case..
BATTERY 1X4AH 12V LITHIUM ION:( -)
SERIAL NO.:
3
2
1
4
5
6
7
8
9
10
13
14
15
16
17
21
18
19
20
11
12
1. Battery - 12V/4AH lithium-ion rechargeable battery
2. Battery Level Indicator
3. Charging - The Charging LED Light will be on when
the unit is being charged.
4. DC 12-16V/4A Input Jack
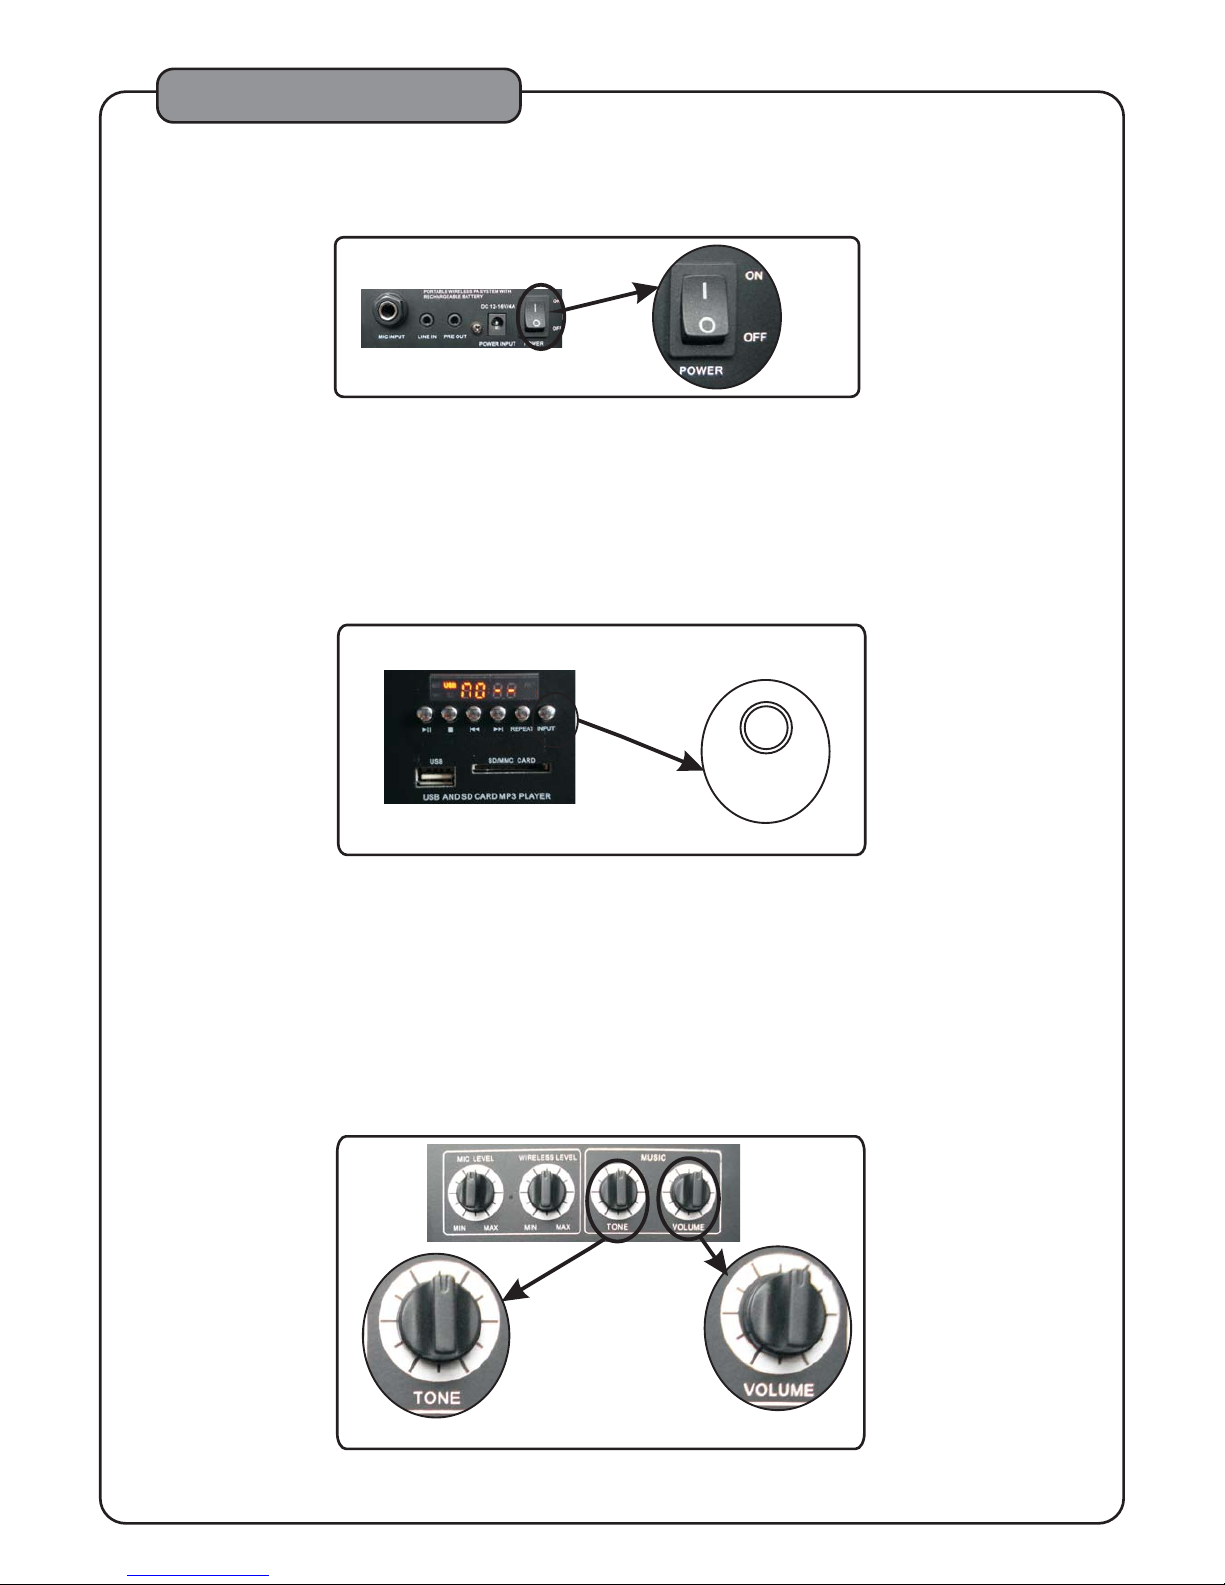
5. Power ON/OFF Switch
6. Music Volume Control - Turn this music volume
control knob clockwise to raise the music
volume and counter-clockwise to lower the music
volume.
7. Music Tone Control - Turn this music tone control
knob clockwise to raise the treble volume and
counter-clockwise to raise the bass volume.
8. REPEAT - Press the REPEAT button once
(showing ONE on the LED display) to repeat the
same music piece. Press the Repeat again
(showing ALL on the LED display) to repeat all
the content in the USB device or the SD card.
Press again to go back to repeat the
same music piece.
9. INPUT - Press this INPUT button to toggle
through all the available input channels
(LINE IN / USB /SD Card). If the USB input and
the SD card are not available, the input selection
will stay at the LINE IN channel.
10. LED Display
11. SD Card Input
12. USB Device Input
13. Next - When the USB or SD card is in use and the
REPEAT function was set to ALL, press this
button to skip the current track and jump to the
next track. If the REPEAT function was set to ONE,
press this button to jump to the starting point of the
current track.
14. Prev - When the USB or SD card is in use and the REPEAT function was set to ALL, press this button to
skip the current track and jump to the previous track. If the REPEAT function was set to ONE, press this
button to jump to the starting point of the current track.
15. Play/Pause - When the USB or SD card is in use, press this button to pause. Press this button again
to replay from the paused point on. If the Stop button (as shown in numeral 16) is pressed when the USB
or SD card is in use, pressing this Play/Pause button will have the replay started from the first track.
16. Stop - Press this button to stop replaying the USB or SD card. The LED display will stop at the last track
of the device being replayed.
17. WIRELESS LEVEL - This is the wireless microphone volume control knob. Turn this WIRELESS LEVEL
control knob clockwise to increase the wireless microphone volume and counter-clockwise to lower
the wireless microphone volume.
18. MIC LEVEL - This is the wired microphone volume control knob. Turn this MIC LEVEL control knob
clockwise to increase the wired microphone volume and counter-clockwise to lower the wired
microphone volume.
19. PRE OUT - This is a 3.5mm stereo audio output jack.
20. MIC INPUT - This is a 1/4" unbalanced microphone input jack.
21. LINE IN - This is a 3.5mm stereo audio input jack.
USB SD MMC CARD/

PRE OUT
Connecting to External
LINE IN
Audio Device
to LINE IN
to PRE OUT
to MIC INPUT
5
Wired Microphone
AUDIO INPUT CONNECTION
Connect an audio sound source or an audio device with an audio output to the LINE IN audio
input on the AWP6042 as follows :
1.Connect one end of the 3.5mm audio cable to the audio sound source or
the audio device with an audio output.
2.Connect the other end of the 3.5mm audio cable to the LINE IN audio input.
The AWP6042 can be connected to various external devices through the LINE IN audio input,
the PRE OUT audio output, and/or the MIC INPUT microphone input.
AUDIO OUTPUT CONNECTION
Connect an external amplifier or an audio device with an audio input to the PRE OUT audio output
on the AWP6042 as follows :
1.Connect one end of the 3.5mm audio cable to the external amplifier or the audio
device with an audio input.
2.Connect the other end of the 3.5mm audio cable to the PRE OUT audio output.
MICROPHONE INPUT CONNECTION
Connect a wired microphone to the MIC INPUT microphone input on the AWP6042 as follows :
1.Inspect a microphone cable with one XLR connector and one 1/4" connector.
Make sure that the microphone cable is free from any defect.
2.Connect the XLR end of the microphone cable to the wired microphone.
3.Connect the other end of the microphone cable to the MIC INPUT on the AWP6042.
from Audio Out
Devices
General Operations
INPUT
6
MUSIC VOLUME
MUSIC TONE
TURNING THE AWP6042 ON OR OFF
Press the power ON/OFF switch on the AWP6042 to turn on or off the unit.
Adjust the sound level and quality by adjusting the MUSIC VOLUME and MUSIC TONE control knobs.
Turn the MUSIC VOLUME control knob clockwise to raise the volume and counter-clockwise to lower
the volume. Turn the MUSIC TONE control knob clockwise to raise the treble volume and
counter-clockwise to raise the bass volume.
ADJUSTING THE SOUND QUALITY
INPUT CHANNEL SELECTION
Use the input selection button (INPUT) on the USB and SD Card MP3 Player to select the desired input
channel (LINE IN / USB / SD Card). When the LINE IN input is selected, the AUX and LINE will be
displayed.

USB and SD Card
Wired Microphone
Wireless Microphone
To install the batteriesAA
Mic Vol
Wireless Mic Vol
Microphone Operations
On/Off switch
On/Off switch
Body-pack
To install the 9V batteries
USB SD MMC CARD/
15V.15V.
With the AWP6042 powered on, the USB AND SD CARD MP3 PLAYER
(Player) will start replaying the content of the USB device or SD card if only the USB device or the
SD card is present in the input. If both the USB and the SD card are present, the Player will replay the
content of the USB device first. With both the USB device and the SD card present, press the INPUT
selection button to select either the USB or SD card as the music source.
For all the operations, please refer to the section of Descriptions and Functions.
Prior to connecting a wired microphone to the MIC INPUT, make sure that the MIC LEVEL control knob
is turned to the MIN position.
Connect the wired microphone to the MIC INPUT. If the wired microphone has an on/off switch, turn on
the switch first and then adjust the MIC LEVEL control knob clockwise to have an optimal microphone level.
Open the battery cover and insert two AA batteries to the wireless microphone or body-pack transmitter.
Prior to turn on the wireless microphone or body-pack transmitter, make sure that the WIRELESS LEVEL
control knob is turned to the MIN position.
Turn on the wireless microphone or body-pack transmitter and adjust the WIRELESS LEVEL control knob
clockwise to have an optimal wireless microphone level.
7
Operations

8
Battery Operations
Power on
Battery level indicator
DC12 16V 4A-/
POWER INPUT
-+AC 100 240V 50 60Hz-/
Adaptor AC Power Cord
TO POWER
INPUT JACK
TO AC INPUT
AC/DC ADAPTOR CONNECTION
Connect the included AC power cord and the included AC/DC adaptor to the POWER INPUT
jack as follows:
1.Connect the female end of the AC power cord to the AC INPUT on the AC/DC adaptor.
2.Connect the AC/DC adaptor to the POWER INPUT jack.
3.Connect the other end of the AC power cord to an available AC outlet.
AC/DC
The battery level indicator comprises four LED lights which include two green LED lights, one yellow
LED light and one red LED light.
When the rechargeable battery is fully charged, all four LED lights will be on. If only the red LED light
is on, the rechargeable battery needs to be recharged. When the rechargeable battery is being recharged,
the power can be either on or off and the CHARGING red LED light will be on all the time.
BATTERY LEVEL INDICATOR

9
Troubleshooting

SHIPPING DAMAGE
If the shipping carton is found to be damaged, notify the delivery company immediately. Save the damaged
carton as evidence for the delivery company to inspect. It is the responsibility of the shipper to file a claim
with the delivery company for any damage that occurs during shipping. In the case that the shipping carton
is in good condition but the unit is damaged or defective, call at 805-523-2759.
FACTORY SERVICE
If the equipment needs factory service, call at 805-523-2759 for a Return Authorization
number (RA number) and the address of the authorized service representatives. Insure and ship the product,
prepaid, in its original carton along with proof of purchase in the form of a bill of sale or receipted invoice to
the above address. Please clearly write the RA number on the shipping carton. Also enclose a note describing
the problem along with any other helpful information such as where and how the unit was used.
LIMITED WARRANTY
H&F Technologies, Incorporated (H&F) hereby warrants that products will be free from defects
in material and workmanship for a period of 1 (one) year from date of purchase. At its option, H&F will repair
or replace the defective product and promptly return it to you.
The Limited Warranty will not cover any item that has been, in H&F's estimation, subject to alteration, misuse,
neglect, accident or improper installation. In addition, any service not performed by H&F or an authorized
service center will terminate terms of this warranty. Normal wear and tear of this product will not be covered
by this or any implied warranty.
No liability will be accepted for damages/loss directly caused from the use of this product. H&F's liability shall
be limited to the repair/replacement of this product if found to be defective.
©2011H&FTechnologies, Incorporated (website: )
Audio2000'S
Audio2000'S
Audio2000'S
www.audio2000s.com
Service Information
®
®
®
Table of contents


 instructions")


