Audio Analogue Crescendo User manual
AUDIO ANALOGUE
CRESCENDO TUNER/USBDAC
AM/FM RDS TUNER AND USBDAC
OWNER’S MANUAL
MANUALE D’ISTRUZIONI
Manual rev1.0

2

3
Dear Audio hile,
congratulations and thank you for choosing Crescendo Tuner/USBDAC.
The Crescendo Tuner/USBDAC is an extremely interesting and innovative roduct. It is not just a Tuner but also includes
an entire high erformance USBDAC section. The Crescendo Tuner/USBDAC can be seen as two different audio
sources combined in a single iece of equi ment, each source corres onding to a different working mode: Tuner Mode and
USBDAC Mode.
The s ecific circuits for each mode are com letely se arated hysically and just one section at a time is su lied, according to the
selected mode (This avoids any kind of interference between the two signal aths). Instead, the analogue out ut stage is the same
for both of the modes. Everything has been realized according to the well known Audio Analogue ex erience. The ower
su ly is based on a toroidal transformer and each section has its own voltage regulator stage.
The tuner is based on a high erformance circuit already used by Audio Analogue on its tuner roducts. The whole tuner
section has been realized in a metallic se arated box to shield the RF interference and a s ecial buffer stage has been ut between
the tuner section and the out ut stage to further decrease the RF noise.
The USBDAC section is com osed by a dedicated section which, working on the USB data, su lies a SPDIF digital audio signal.
The digital audio signal is then converted into an analogue one by a high erformance DA section com osed by: a 96 KHz/24Bit,
very low recovered system clock Burr Brown receiver (residual jitter less than 50 s!) and a 24 Bit/192KHz Enhanced Multilevel Delta
Sigma architecture DAC (The conversion circuit is laced on a se arated board to avoid any high frequency disturbance on the
audio signal).
The Crescendo Tuner/USBDAC is controlled by a microcontroller and both the switches on the front board and the
remote switches have different functions de ending on the mode the unit is working on. The Crescendo Tuner/USBDAC
has a very reliable low emission dis lay to not interfere with the audio signals.
All the com onents, assive and active have been chosen considering their electrical characteristics and sound erformance too.
The USBDAC ermits you to connect the Hi-Fi system to the PC or MAC via a USB connection. In this way the PC/MAC sees the Hi-
Fi system as its audio board and everything which is layed on the PC/MAC is re roduced by the Hi-Fi System. This o ens u a
wide s read of ossibilities which we think will be soon a reciated by every, also “old style”, audio hile:
•Listening to tracks in any format (MP3, WMA, FLAC, APE and so on…..) which you have in your PC via a software layer.
In such cases, according to the layer, you can also control the PC (Next track, Previous track, Play, Sto , Pause) by the
Crescendo Tuner/USBDAC front switches or remote.
•Listening to an on-streaming tuner. On the web there are a lot of tuner stations which transmit on-streaming, so a lot of
stations from everywhere in the word can be listened to.
•Listening to audio movie tracks which are laying on the PC.
The Crescendo Tuner/USBDAC has also a SPDIF Out which can be sent to an external DA converter.
The Crescendo Tuner/USBDAC has both the Trigger In and Trigger Out connections so it can be switched on/off by
another unit of the chain and also can switch on/off another unit of the audio chain.

4
Caro Audiofilo,
congratulazioni e grazie er aver scelto il
Crescendo Tuner/USBDAC
.
Il
Crescendo Tuner/USBDAC
non è solo una radio ma include anche una sezione USBDAC ad alte restazioni. Pertanto
il
Crescendo Tuner/USBDAC
uò essere visto come due differenti sorgenti audio in un solo a arecchio, ciascuna
corris ondente a due diverse modalità di funzionamento: Tuner Mode e USBDAC Mode.
I circuiti s ecifici er ciascuna modalità sono fisicamente se arati e ciascuna sezione viene alimentata a seconda della modalità in
funzione (questo er evitare qualsiasi ti o di interferenza tra i due differenti ercorsi di segnale). Invece lo stadio analogico di uscita
è comune. Il tutto secondo la ormai nota es erienza di
Audio Analogue.
L’alimentazione è basata su un trasformatore
toroidale e ciascuna sezione ha il ro rio regolatore di tensione.
La radio si basa su un circuito ad alte restazioni già utilizzato da
Audio Analogue
er i suoi rodotti Tuner. L’intera
sezione è realizzata all’interno di un contenitore metallico se arato al fine di schermare la radiofrequenza e tra la sezione tuner e il
circuito di uscita è stato inter osto uno s eciale buffer er ridurre ulteriormente il rumore RF.
L’USBDAC è realizzato con una sezione a se stante che lavorando sul flusso di dati USB ricava un segnale digitale audio SPDIF.
Tale segnale viene quindi convertito in analogico da una sezione di conversione digitale-analgico ad alte restazioni com osta da:
un ricevitore 96 KHz/24Bit, very low recovered system clock (jitter residuo inferiore di 50 s!) e un convertitore digitale analogico Burr
Brown 24 Bit/192KHz ad architettura Enhanced Multilevel Delta Sigma. Il circuito di conversione è realizzato su una scheda se arata
in modo da evitare qualsiasi disturbo ad alta frequenza sul segnale audio analogico).
Il
Crescendo Tuner/USBDAC
è controllato da un microcontrollore che gestisce i vari comandi sul frontale e il
telecomando. Sia i tasti sul telecomando che i tasti e comandi sul frontale hanno diverse funzioni a seconda della modalità di
funzionamento dell’a arecchio. Il
Crescendo Tuner/USBDAC
è dotato di un dis lay molto affidabile e a bassa emissione
al fine di non interferire con il segnale audio.
Tutti i com onenti, sia assivi che attivi, sono stati scelti considerando sia le loro caratteristiche elettriche che le loro ro rietà
sonore.
L’USBDAC ermette di collegare l’im ianto Hi-Fi al PC o al MAC utilizzando la connessione USB. In questo modo il PC/MAC vede
l’im ianto Hi-Fi come la sua scheda audio. Pertanto, qualunque segnale audio sul PC/MAC, verrà ri rodotto dall’im ianto Hi-Fi.
Questo a roccio a re nuove e innumerevoli ossibilità, che saranno sicuramente a rezzate anche dagli audiofili “vecchio stile”.
Ad esem io:
- Ri rodurre brani di qualsiasi formato (MP3, WMA, FLAC, APE, ecc…..) che avete nel vostro PC/MAC. A seconda del Player
utilizzato, è anche ossibile controllare il PC/MAC inviando i comandi di: Next track, Previous track, Play, Sto , Pause,
tramite il
Crescendo Tuner/USBDAC
.
- Ascoltare Web Radio in streaming. Nel web vi sono molte stazioni radio che trasmettono in streaming. Possono ertanto
essere ascoltate stazioni radio da tutto il mondo.
- Ri rodurre nell’im ianto Hi-Fii brani audio di film in ri roduzione sul PC.
Il
Crescendo Tuner/USBDAC
è inoltre dotato di un’ uscita digitale er collegare un convertitore DA esterno.
Nel
Crescendo Tuner/USBDAC
sono inoltre resenti entrambi i collegamenti di Trigger IN e Trigger OUT così da oter
accendere un altro a arecchio della catena ed esserea sua volta acceso da un altro a arecchio.

5
INTRODUCTION
AUDIO ANALOGUE does not take any res onsibilities in the following cases:
Whenever the o erational rocedures related to the use and the maintenance of the equi ment as described in this manual are not
res ected.
Whenever damages to the equi ment occur because of fixing and modifications made form non-authorized staff or because of
normal deterioration of the system.
No art of this manual can be re roduced by any means, transmitted or co ied for rivate or ublic use without rivate authorization
from AUDIO ANALOGUE.
The information contained in this manual is related to the data ke t by AUDIO ANALOGUE at the moment of the issue o f this
ublication; AUDIO ANALOGUE has the right to make changes to this document without rior notice.
The equi ment has been rojected and manufactured according to the Regulations of the Community 89/336/CEE and is marked CE.
This equi ment can’t be used for different ur oses other than those for which it has been manufactured.
AUDIO ANALOGUE does not take any res onsibilities for accidents or damages due to im ro er use of the equi ment.
WARNING
Please do res ect the safety standards contained in this manual before starting to o erate the equi ment.
Do not o en the equi ment. No further interventions than those described in this manual should be made. For technical assistance,
lease consult a qualified technician or an AUDIO ANALOGUE dealer.
Not res ecting the instructions contained in this manual will invalidate the terms and conditions of the guarantee.
NECESSARY PRECAUTIONS FOR SAFETY AND MAINTENANCE
ATTENTION: before starting any o eration, use or maintenance of the equi ment it is strictly necessary to understand the following
manual.
To avoid any accidents or hazards it is necessary to follow the following regulations.
Activate the equi ment only rior checking if the installation has been ro erly made, and if it is related to the instructions contained
in this manual.
Avoid installing the equi ment in laces subjected to extremely high tem eratures or humidity.
Check that the labels containing information about safety are always visible and in good conditions.
Ensure to not obstruct ventilation, to avoid excessive overheating. The equi ment should be ke t to a minimal distance of 15 cm
from any object and not to lace on car et or other soft surfaces. Also the installation close to radiators or in close environments
without ventilation should be avoided.
Do not switch on the equi ment until it has not been correctly and com letely installed.
Only su ly the equi ment with the kind of the electric su ly as stated on the a ro riate label. If in doubts about the kind of su ly
available, lease consult an ex ert technician for technical assistance.
The equi ment needs to be wired to an earth terminal. The external case is metal made; a defective connection with the earth may
be dangerous.
In case damages occurs to the su ly cable, it should be immediately re laced with the same kind of cable. This o eration should be
only made rior to disconnecting the main su ly.
Do not lace objects on the su ly cable and check that this is not ositioned in way through. The cable should not be knotted or
curly.
Re lace the fuses always with other of the same kind.
Do not use the equi ment close to the water or other liquids. If liquid entered the equi ment, the lug should be disconnected from
the socket avoiding to touch the metal arts. Com etent technical staff should be asked to check the equi ment before o erating it
again.
Do not lace reci ients containing liquids on the equi ment. Even when it is switched off.
Kee the equi ment far from sources of heat such as the solar light, kitchens, radiators etc…
Always un lug the su ly cable during rainy weather.
Always Switch off and un lug the su ly cable before cleaning the equi ment externally.: this o eration should be made using a dry
and soft cloth. Never use alcohol based cleaning material.
If the am lifier was carried from an extremely cold environment to and extremely hot one, it could create internal condensation,
causing ossible bad functioning.
If this occurs, lease wait for at least an hour before using it again, to allow it to gradually reach room tem erature.
When not used for long eriods, lease un lug the equi ment.
INSTRUCTIONS TO PUT IT OUT OF SERVICE
Consult qualified staff
Follow the regulations of the current legislation regarding recycling and waste dis osal.

6
PREMESSA
AUDIO ANALOGUE non accetta res onsabilità nei casi in cui:
Le rocedure o erative di utilizzo e manutenzione dell’a arato descritte nel manuale non siano ris ettate.
I danni si verifichino in seguito a ri arazioni o modifiche dell’a arato eseguite da ersonale non autorizzato o a seguito di normale
deterioramento dell’a arato.
Nessuna arte del resente manuale uò essere ri rodotta con alcun mezzo, trasmessa o co iata er usi ubblici e/o rivati senza
la revia autorizzazione di AUDIO ANALOGUE. Le informazioni contenute nel resente manuale sono relative ai dati in ossesso di
AUDIO ANALOGUE al momento della ubblicazione; AUDIO ANALOGUE si riserva il diritto di a ortare cambiamenti al resente
documento senza alcun reavviso.
L’a arato è rogettato e realizzato in conformità alle Direttive Comunitarie 89/336/CEE e 72/23/CEE e risulta marcato CE.
L’a arato non uò essere utilizzato er sco i diversi da quelli er cui è stato rogettato.
AUDIO ANALOGUE non si assume alcuna res onsabilità er incidenti o danni causati da un utilizzo im ro rio dell’a arato.
AVVERTENZA
Prima di com iere qualunque o erazione attenersi alle norme di sicurezza contenute all’interno del manuale
Non a rire l’a arecchio. Nessun ulteriore intervento oltre a quelli descritti in questo manuale dovrebbe essere effettuato. Per
l’assistenza tecnica, rivolgersi a un tecnico qualificato o a un rivenditore AUDIO ANALOGUE.
Il mancato ris etto delle rescrizioni del seguente manuale im lica il decadimento della garanzia.
PRECAUZIONI PER LA SICUREZZA E MANUTENZIONE
ATTENZIONE: rima dell’utilizzo o manutenzione dell’a arato o di qualsiasi o erazione sullo stesso è necessario rendere visione
del seguente manuale.
Al fine di revenire ogni ericolo di incidente si im ongono le seguenti rescrizioni:
Attivare l’a arato solo do o aver verificato l’adeguatezza dell’installazione e la conformità alle indicazioni contenute nel resente
manuale.
Non installare l’a arecchiatura in luoghi soggetti a sbalzi eccessivi di tem eratura e umidità.
Verificare che le etichette contenenti informazioni sulla sicurezza siano sem re ben visibili ed in buono stato.
Le fessure di ventilazione non devono assolutamente essere ostruite er evitare surriscaldamento dell’a arato. A tal fine,
osizionare l’unità ad una distanza minima di 15 cm da ogni altro ostacolo e non su ta eti, moquette o altre su erfici morbide.
Evitare inoltre di installarlo nei ressi di caloriferi o in ambienti chiusi, rivi di una a ro riata ventilazione.
Non accendere l’a arato finché non è com letamente installato in maniera corretta.
Alimentare l’a arato con il ti o di alimentazione elettrica ri ortato sull’a osita targhetta. In caso di dubbi sul ti o di alimentazione
dis onibile, consultare il servizio di assistenza tecnica.
L’a arecchio deve essere sem re collegato a terra. Poiché l’involucro è costituito in metallo, una connessione di terra difettosa o
mancante otrebbe essere ericolosa.
In caso di danneggiamenti al cavo di alimentazione, rovvedere immediatamente alla sostituzione con un altro dello stesso ti o.
Questa o erazione deve essere effettuata do o aver disconnesso l’alimentazione rimaria.
Non osizionare oggetti sul cavo di alimentazione e verificare che questo non si trovi in una zona di assaggio. Il cavo non deve
essere arrotolato o annodato.
Sostituire i fusibili sem re con altri dello stesso ti o.
Non usare l’a arato in rossimità di acqua o altri ti i di liquidi. Se nell’unità dovesse entrare del liquido, scollegare immediatamente
il cavo di rete dalla resa a muro evitando di toccare le arti metalliche dell’a arecchiatura e rivolgersi al ersonale tecnico er un
controllo rima del riutilizzo.
Non a oggiare reci ienti contenenti liquidi di qualsivoglia natura so ra l’a arato. Anche quando questo è s ento.
Tenere l’a arecchio lontano da fonti di calore come la luce solare, cucine, radiatori, etc…
Scollegare sem re il cavo di alimentazione dalla resa durante i tem orali.
S egnere e scollegare sem re l’alimentazione rima di effettuare la ulizia esterna dell’a arato: questa o erazione deve essere
effettuata utilizzando un anno asciutto e morbido. Non usare mai solventi o detergenti a base di alcool.
Se l’am lificatore viene tras ortato da un ambiente freddo ad un altro caldo, si otrebbe formare condensa al suo interno, causando
ossibili malfunzionamenti. Se ciò si dovesse verificare, si rega di attendere almeno un’ora rima dell’uso in modo da ermettergli
di raggiungere la tem eratura ambiente gradualmente.
In caso di lunghi eriodi di inutilizzo, staccare la s ina dalla resa di rete.
ISTRUZIONI PER LA MESSA FUORI SERVIZIO
Rivolgersi a ersonale s ecializzato.
Seguire le rescrizioni della corrente legislazione in materia di riciclaggio e smaltimento dei rifiuti

7
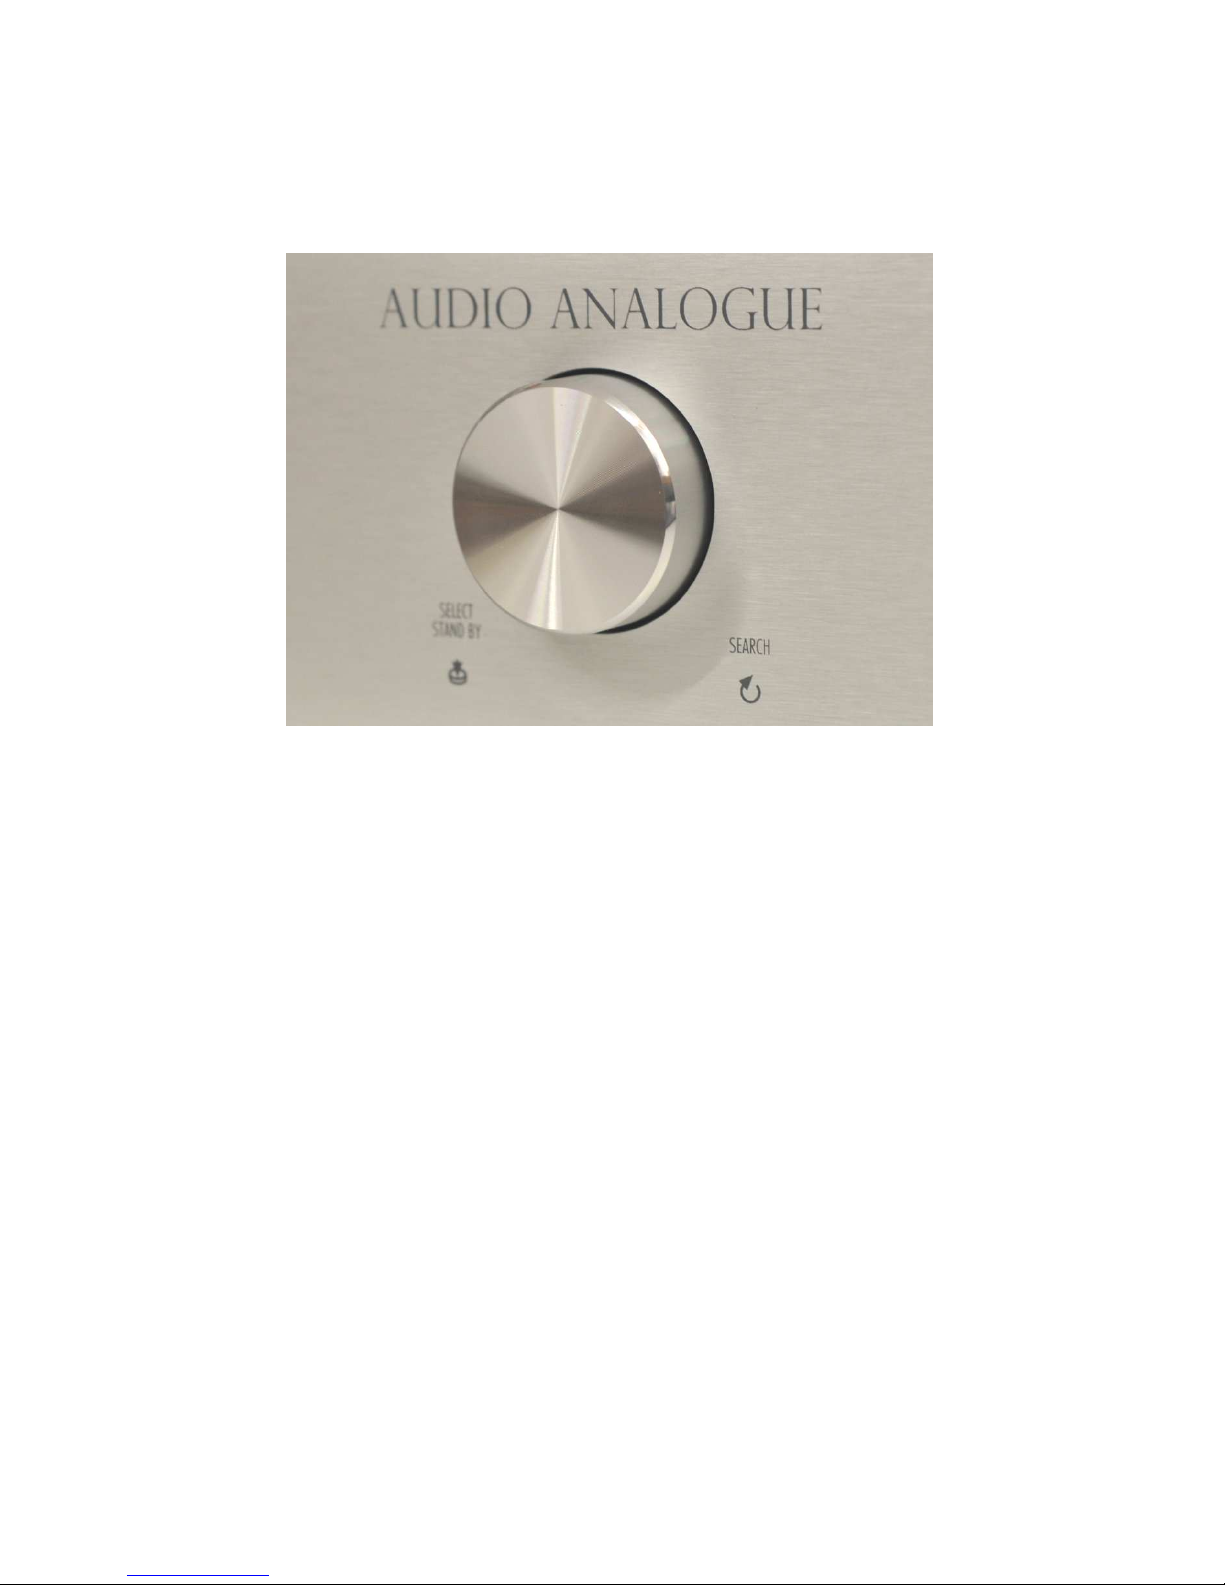
FRONT PANEL
1) Main voltage switch
2) SEARCH UP or DOWN / SELECT - STANDBY [Knob / Switch]:
Clockwise rotation: (SEARCH UP). When the knob is rotated clockwise, the frequency is increased by one ste (SEARCH function). This
function is active just in Tuner mode.
Anti-clockwise rotation: (SEARCH DOWN). When this knob is rotated anti-clockwise the frequency is decreased by one ste (SEARCH
function). This function is active just in Tuner mode.
Push (SELECT): One ress and release of the knob switches between TUNER or USBDAC mode.
Push (STANDBY): Kee ing this button ushed for some seconds uts the unit in Stand By mode. In Stand By mode the Trigger Out
signal is set to zero, so if a unit is connected via the Trigger Out it is switched off. (STANDBY MODE)
3) STORE / STOP: multifunction key, the function de ends on the mode the unit is working in: Tuner or USBDAC.
TUNER mode (STORE): Pressing this button uts the unit in “Storage” mode and is ossible to ermanently store the current radio station
in the unit’s memory. It is ossible to store u to 18 AM and 18 FM stations. Please refer to the “Radio stations storage” aragra h for
further details about storage rocedure.
USBDAC mode (STOP): During layback Sto s track layback (the availability of this function de ends on the software layer used)
4) PREV TRACK / MEMORY DOWN: multifunction key, the function de ends on the mode the unit is working in: Tuner or USBDAC
TUNER mode ( MEMORY DOWN): Pressing this button when the unit is in normal mode tunes the radio on the station stored in the
memory allocation that recedes the last selected allocation. When the unit exits the Standby mode and when changing modulation ty e,
ressing this button tunes the radio on the station stored in the 18th memory allocation. Pressing the button again tunes the radio on the
station n° 17, 16,…, 1 then back to n° 18. If no radio station is stored into the selected allocation, an EMPTY signal shows on the dis lay
and the radio switches back to the revious station. When in “Storage” mode, ressing this button allows you to choose the memory
allocation where you would like to store the selected radio station. Please refer to “Radio stations storage” aragra h for further details
about storage rocedure. Please refer to “Stored Radio stations tuning” aragra h for further details about radio station tuning.
USBDAC mode ( PREVIOUS TRACK): During layback, starts revious track layback on your lay list, when layback is sto ed it
allows you to choose the revious track on your lay list. (the availability of this function de ends on the software layer used).
5) NEXT TRACK / MEMORY UP: multifunction key, the function de ends on the mode the unit is working in: Tuner or USBDAC
TUNER mode (MEMORY UP): Pressing this button when the unit is in normal mode tunes the radio on the station stored in the memory
allocation that follows the last selected allocation. When the unit exits the Standby mode and when changing modulation ty e, ressing this
button tunes the radio to the station stored in the 1st memory allocation. Pressing the button again tunes the radio on the station n° 2, 3,…,
18 then back to n° 1. If no radio station is stored on the selected allocation, an EMPTY signal shows on the dis lay and the radio switches
back to the revious station. When in “Storage” mode, ressing this button allows you to choose the memory allocation where to store the
selected radio station. Please refer to “Radio stations storage” aragra h for further details about storage rocedure. Please refer to
“Stored Radio stations tuning” aragra h for further details about radio stations tuning.
USBDAC mode ( NEXT TRACK): During layback, starts next track layback on your lay list, when layback is sto ed it allows you to
choose the next track on your lay list. (the availability of this function de ends on the software layer used)
6) AM/FM /► PLAY/PAUSE: multifunction key, the function de ends on the mode the unit is working in: Tuner or USBDAC
TUNER mode (AM/FM): Pressing this button changes modulation ty e.
USBDAC mode (► PLAY/PAUSE): Starts/Pauses track layback (the availability of this function de ends on the software layer
used).
7) IR receiver.
8) LCD dis lay.
8
3
4
5
6
7
1
2

8
DESCRIZIONE DEL PANNELLO FRONTALE
1) Interruttore rinci ale.
2) SEARCH UP o DOWN / SELECT - STANDBY [Mano ola / Pulsante]:
Rotazione in senso orario: (SEARCH +). Quando si ruota la mano ola in senso orario viene incrementata di uno ste la frequenza
sintonizzata (funzione SEARCH). Questa funzione è abilitata solo in modalità Tuner.
Rotazione in senso anti orario: (SEARCH -). Quando si ruota la mano ola in senso anti orario, viene decrementata di uno ste la
frequenza sintonizzata (funzione SEARCH). Questa funzione è abilitata solo in modalità Tuner.
Premere (SELECT): remere e rilasciare la mano ola er assare da modalità TUNER a USBDAC e viceversa.
Premere (STANDBY): mantenere remuta la mano ola er alcuni secondi er ortare l’a arecchio in STANDBY MODE. In modalità
StandBy l’uscita Trigger Out viene ortata a zero, quindi un eventuale a arecchio connesso a tale uscita verrà s ento.
3)
STORE /
STOP: tasto multifunzione,
la funzione di ende dalla modalità di lavoro Tuner o USBDAC.
in modalità TUNER (STORE): Premendo e rilasciando questo ulsante si entra in modalità “memorizzazione” ed è ossibile memorizzare
in modo non volatile la stazione selezionata al momento della ressione del tasto. Si ossono memorizzare fino a 18 stazioni radio AM e
18 FM. Per maggiori dettagli circa la rocedura er memorizzare le stazioni radio si veda il aragrafo: ”Memorizzazione delle stazioni
radio”.
in modalità USBDAC (STOP): Interrom e la ri roduzione della traccia se il software layer sul PC è in ri roduzione. (La dis onibilità di
questa funzione di ende dal software layer utilizzato)
4) PREV TRACK / MEMORY DOWN: tasto multifunzione, la funzione di ende dalla modalità di lavoro Tuner o USBDAC.
in modalità TUNER ( MEMORY DOWN): In modalità “normale” la ressione e rilascio di questo tasto ermette di sintonizzare la
stazione radio memorizzata nella locazione di memoria recedente all’ultima selezionata. Quando l’a arecchio esce dallo Standby e
quando si commuta da un ti o di modulazione all’altra, la rima ressione del tasto MEMORY DOWN orterà alla sintonia della stazione
radio memorizzata nell’ultima locazione (la diciottesima). Le ulteriori ressioni del tasto orteranno alla sintonia delle stazioni memorizzate
nelle locazioni 17,16,15…1, er oi ri artire dalla diciottesima. Se nella locazione selezionata non risulta memorizzata una stazione radio,
a arirà sul dis lay la scritta “EMPTY” e verrà nuovamente sintonizzata la frequenza resente al momento della ressione del tasto. La
ressione del tasto in modalità “memorizzazione” ermette di selezionare la osizione in cui memorizzare la stazione radio selezionata.
Per maggiori dettagli circa la rocedura er memorizzare le stazioni radio si veda il aragrafo “Memorizzazione delle stazioni radio”.
in modalità USBDAC ( PREV TRACK ): Durante la ri roduzione di una traccia, la ressione di questo tasto rovoca il salto alla traccia,
resente nella laylist, recedente a quella ri rodotta in quel momento. Quando il layer sul PC non è in ri roduzione (modalità sto ), è
ossibile utilizzare questo ulsante er decidere da quale traccia iniziare la ri roduzione o er scorrere in ordine decrescente le tracce
resenti nella laylist. (La dis onibilità di questa funzione di ende dal software layer utilizzato).
5) NEXT TRACK / MEMORY UP: tasto multifunzione, la funzione di ende dalla modalità di lavoro Tuner o USBDAC.
in modalità TUNER ( MEMORY UP): In modalità “normale” la ressione e rilascio di questo tasto ermette di sintonizzare la stazione
radio memorizzata nella locazione di memoria successiva all’ultima locazione selezionata. Quando l’a arecchio esce dallo Standby e
quando si commuta da un ti o di modulazione all’altra, la rima ressione del tasto MEMORY UP orterà alla sintonia della stazione radio
memorizzata nella rima locazione. Le ulteriori ressioni del tasto orteranno alla sintonia delle stazioni memorizzate nelle locazioni 2, 3,
4….18, er oi ri artire dalla rima. Se nella locazione selezionata non risulta memorizzata una stazione radio, a arirà sul dis lay la
scritta “EMPTY” e verrà nuovamente sintonizzata la frequenza resente al momento della ressione del tasto. La ressione del tasto in
modalità “memorizzazione” ermette di selezionare la osizione in cui memorizzare la stazione radio selezionata. Per maggiori dettagli
circa la rocedura er memorizzare le stazioni radio si veda il aragrafo “Memorizzazione delle stazioni radio”.
in modalità USBDAC ( NEXT TRACK): Durante la ri roduzione di una traccia, la ressione di questo tasto rovoca il salto alla traccia,
resente nella laylist, successiva a quella ri rodotta in quel momento. Quando il layer sul PC non è in ri roduzione (modalità sto ), è
ossibile utilizzare questo ulsante er decidere da quale traccia iniziare la ri roduzione o er scorrere in ordine crescente le tracce
resenti nella laylist. (La dis onibilità di questa funzione di ende dal software layer utilizzato).
6) AM/FM / ► PLAY/PAUSE: tasto multifunzione, la funzione di ende dalla modalità di lavoro Tuner o USBDAC.
in modalità TUNER (AM/FM): la ressione e rilascio di questo tasto consente di commutare tra modulazione di am iezza e modulazione di
frequenza.
in modalità USBDAC (► PLAY/PAUSE): La ressione di questo tasto attiva la ri roduzione da arte del layer sul PC o ure ne attiva
o disattiva la ausa durante la ri roduzione. (La dis onibilità di questa funzione di ende dal software layer utilizzato).
7) Ricevitore IR
8) Dis lay LCD

9
Back Panel
1) S/PDIF DIGITAL OUT: Digital out ut connector.
2) RIGHT OUT: Unbalanced right analogue out ut connector.
3) LEFT OUT: Unbalanced left analogue out ut connector.
4) In ut USB: connect it to a USB ort of your PC or MAC using a USB cable.
5) Trigger OUT: Trigger Out connector, See note on Trigger OUT Out ut.
6) 75 Ohm FM antenna connector.
7) 300 Ohm AM antenna connector.
8) Trigger IN: Trigger In connector, see note on Trigger IN In ut.
9) Fuses. If necessary, re lace them with others of the same kind (see back anel).
10) IEC standard ower inlet. Connect here the rovided ower cord.
Descrizione del pannello posteriore
1) S/PDIF DIGITAL OUT: Connettore di uscita digitale.
2) RIGHT OUT: Connettore di uscita analogica right.
3) LEFT OUT: Connettore di uscita analogica left.
4) In ut USB: connettere questo ingresso a una orta USB del vostro PC o MAC utilizzando un cavo USB.
5) Trigger OUT: vedi nota sull’uscita Trigger OUT.
6) Connettore er antenna FM da 75Ohm.
7) Connettore er antenna AM da 300Ohm.
8) Trigger IN: vedi nota sull’ingresso Trigger IN.
9) Fusibili. Se necessario, ri ristinare con fusibili dello stesso ti o (come indicato sul annello osteriore).
10) Presa di rete a norma IEC. Collegare il cavo di alimentazione di rete fornito in dotazione.
1
3
2
4
5
6
7
8
10
9

10
Description of the remote controller TUNER Functions:
•STANDBY TUNER: multifunction key: one ress of this button switches the mode
between TUNER and USBDAC. Kee ing the button ushed for some seconds uts the unit
in stand by mode.
•SEARCH +: the tuning frequency is increased by one ste .
•SEARCH : the tuning frequency is decreased by one ste .
•MEMORY+ (NEXT TRACK): multifunction key, the function de ends on the mode the unit is
working in: Tuner or USBDAC:
TUNER mode: for the descri tion of this function refer to the front anel descri tion.
USBDAC mode: NEXT TRACK, for the descri tion of this function refer to the front
anel descri tion. (the availability of this function de ends on the software layer used).
•MEMORY (PREV TRACK): multifunction key, the function de ends on the mode the unit is
working in: Tuner or USBDAC:
TUNER mode: for the descri tion of this function refers to the front anel descri tion.
USBDAC mode: PREV TRACK, for the descri tion of this function refer to the front
anel descri tion (the availability of this function de ends on the software layer used).
• STORE (STOP): multifunction key, the function de ends on the mode the unit is working
in: Tuner or USBDAC:
TUNER mode: for the descri tion of this function refer to the front anel descri tion.
USBDAC mode:
STOP, for the descri tion of this function refer to the front anel
descri tion (the availability of this function de ends on the software layer used).
•SCAN +: the tuning frequency is increased to reach the first radio station which has a higher
frequency than the one it started from; if this is not ossible a com lete scansion of the
band is carried out and the resent frequency is tuned again by just ressing the button.
•SCAN : the tuning frequency is decreased to reach the first radio station which is has a lower
frequency than the one it started from; if this is not ossible a com lete scansion of the
band is carried out and the resent frequency is tuned again by ressing the button.
• AM/FM (PLAY): multifunction key, the function de ends on the mode the unit is working
in: Tuner or USBDAC:
TUNER mode: it ermits you to commute from AM and FM.
USBDAC mode: ►
PLAY/PAUSE, for the descri tion of this function refer to the
front anel descri tion (the availability of this function de ends on the software layer
used).
• MONO: Pressing this button forces the unit into mono honic layback. When this o tion is
enabled, the letter “S” (Stereo) isn’t shown on the dis lay. To return to normal mode, just
ress this button once. When the unit is in stereo honic mode, the letter “S” is shown on
the dis lay when the incoming signal is stereo honic.

11
Descrizione del telecomando Funzioni del TUNER:
• STANDBY TUNER: tasto multifunzione: la singola ressione commuta la modalità tra
TUNER e USBDAC e viceversa, la ressione rolungata del tasto ( er alcuni secondi)
orta l’a arecchio in STANDBY.
•SEARCH +: la frequenza selezionata viene incrementata di uno ste .
•SEARCH : la frequenza selezionata viene decrementatat di uno ste .
•MEMORY+ (NEXT TRACK): tasto multifunzione, la funzione di ende dalla modalità: Tuner o
USBDAC:
in modalità TUNER: fare riferimento alla descrizione del annello frontale
in modalità USBDAC: NEXT TRACK fare riferimento alla descrizione del annello
frontale (La dis onibilità di questa funzione di ende dal layer software utilizzato).
•MEMORY (PREV TRACK): tasto multifunzione, la funzione di ende dalla modalità :Tuner o
USBDAC:
in modalità TUNER: fare riferimento alla descrizione del annello frontale.
in modalità USBDAC: PREV TRACK,fare riferimento alla descrizione del annello
frontale (La dis onibilità di questa funzione di ende dal layer software utilizzato).
• STORE (STOP): tasto multifunzione, la funzione di ende dalla modalità di lavoro Tuner o
USBDAC.
in modalità TUNER: funzione STORE fare riferimento alla descrizione del annello
frontale
in modalità USBDAC:
STOP, fare riferimento alla descrizione del annello frontale.
(La dis onibilità di questa funzione di ende dal layer software utilizzato).
•SCAN+: incrementa la frequenza sintonizzata fino a raggiungere la rima stazione radio di
frequenza su eriore a quella di artenza, se ciò non è ossibile viene eseguita una
scansione com leta della banda e quindi nuovamente sintonizzata la frequenza resente
alla ressione del tasto.
•SCAN : decrementa la frequenza sintonizzata fino a raggiungere la rima stazione radio di
frequenza inferiore a quella di artenza, se ciò non è ossibile viene eseguita una
scansione com leta della banda e quindi nuovamente sintonizzata la frequenza resente
alla ressione del tasto.
• AM/FM (PLAY): tasto multifunzione, la funzione di ende dalla modalità di lavoro Tuner o
USBDAC.
in modalità TUNER: consente di commutare tra modulazione di am iezza e
modulazione di frequenza.
in modalità USBDAC: ► PLAY/PAUSE, fare riferimento alla descrizione del
annello frontale (La dis onibilità di questa funzione di ende dal software layer
utilizzato).
• MONO: la ressione di questo tasto forza il tuner in ri roduzione mono. Quando questa
o zione è abilitata, sul dis lay non viene visualizzata la lettera “S” (stereo). Per ritornare
alla modalità normale basterà remere il tasto MONO. Quando il tuner è in modalità stereo,
sul dis lay viene visualizzata la lettra “S” qualora il segnale ricevuto fosse stereofonico.

12
UNPACKING AND CHECKING Crescendo tuner/usbdac PACKAGE
Carefully o en the ackage to avoid damaging the content. The ackage should contain:
•1 Crescendo tuner/usbdac
•1 remote controller
•1 ower cord
•2 AAA batteries
•1 instruction manual
•1 AM 300Ohm antenna
•1 FM 75Ohm antenna
•1 USB cable
If one of the items listed above is missing, lease contact your Audio Analogue retailer. After extracting the smallest items from the
ackage, ull out the unit carefully. Se arate the ackage from the anti-shock ex anded-foam rotections. If batteries are not already laced in the
remote controller battery slot, o en the slot, insert batteries according to the indicated olarity, then close the battery slot.
APERTURA E ISPEZIONE DELL’IM ALLO
A rire la scatola di cartone con cautela er non danneggiare il contenuto. L’imballo deve contenere:
•Un
Crescendo tuner/usbdac
•Un telecomando
•1 Cavo di alimentazione
•Due batterie AAA
•Questo manuale
•1 Antenna AM 300Ohm
•1 Antenna FM 75Ohm
•1 Cavo USB
Se qualcuno degli oggetti so ra elencati dovesse mancare, contattate il Vostro rivenditore
Audio Analogue
di fiducia.
Do o avere estratto le arti di minori dimensioni, estrarre con cautela l’a arecchio dall’imballo. Se arare l’imballo dalle imbottiture antiurto in
schiuma es ansa. Se le batterie non si trovano già all’interno del telecomando, a rire il co erchio del vano orta ile del telecomando ed inserirle
nelle osizioni corrette; quindi chiudere il co erchio del vano orta ile.
WHERE TO PLACE THE Crescendo tuner/usbdac
Place the unit on a flat and hard surface and in a well-ventilated lace. Avoid ex osing the unit to high tem eratures and moisture. Be sure that the
ventilation grids laced on the bottom and on the back anel of the unit are not obstructed.
SCELTA DEL LUOGO IN CUI POSIZIONARE IL
Crescendo tuner/usbdac
L’a arecchio deve sem re essere sistemato in orizzontale su una su erficie dura e iana. Si rega di assicurare sem re una o ortuna
ventilazione ed evitate di es orre l’a arecchio ad elevate tem erature e umidità. Sul fondo dell’a arecchio e nel annello osteriore, sono
resenti dei fori er la ventilazione, assicurarsi che il osizionamento scelto non ostacoli il assaggio dell’aria attraverso tali fori.
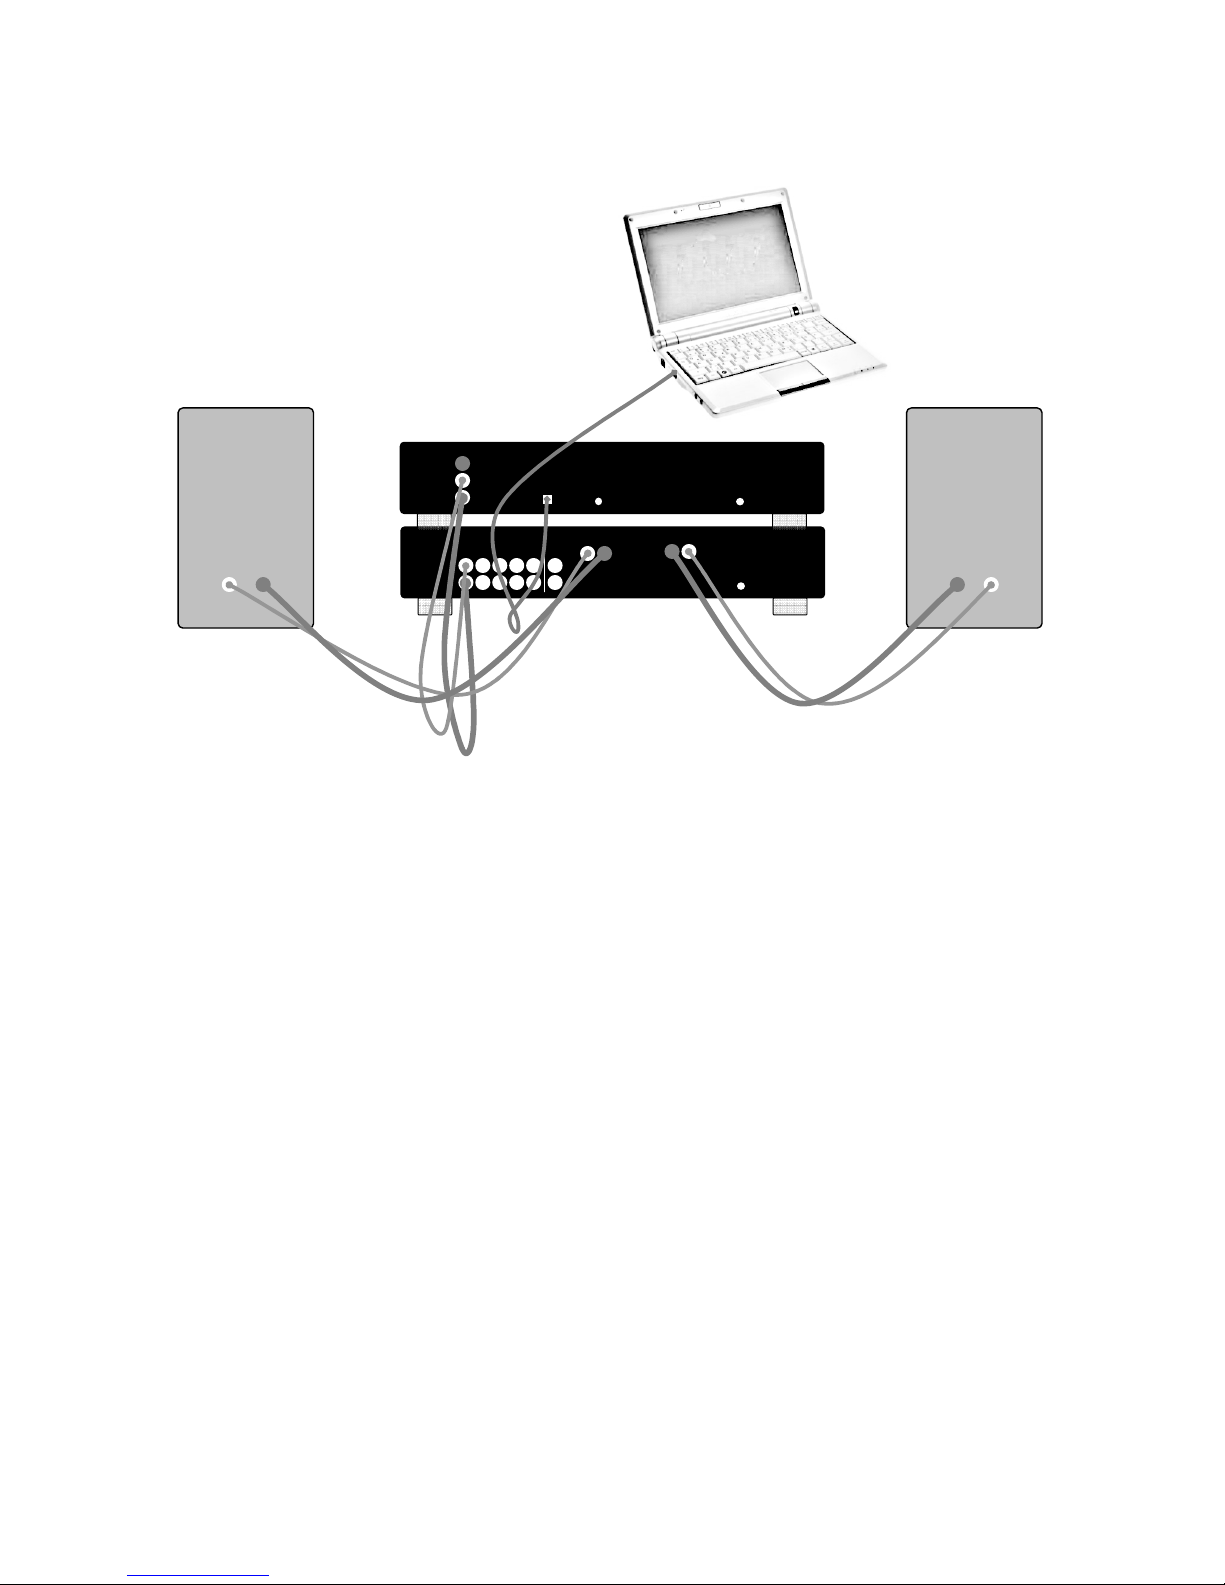
PLUGGING AND CONNECTING THE Crescendo tuner/usbdac
Before connecting Crescendo tuner/usbdac to other equi ment, lease be sure they are all (your PC/MAC too) un lugged from wall
outlets. First of all, connect the antennas to their in uts. Unroll the FM antenna as much as ossible. Be sure the main switch is in the OFF osition.
Connect Crescendo tuner/usbdac analog outs to an integrated am lifier or ream lifier line in uts. Connect the Crescendo
tuner/usbdac digital out ut to a DAC converter if available, and connect your PC/MAC USB ort to the Crescendo
tuner/usbdac USBDAC in ut via the USB cable.
Then lug Crescendo tuner/usbdac and all the other units (the PC/MAC too) to the main ower.
COLLEGAMENTO DEL
Crescendo tuner/usbdac
Prima di collegare
Crescendo tuner/usbdac
ad altri a arecchi, verificare che essi, com reso il PC/MAC, siano scollegati dalla rete
elettrica e che l’interruttore rinci ale del
Crescendo tuner/usbdac
sia in osizione OFF. Collegare le antenne ai relativi connettori.
Dis orre l’antenna FM in modo che risulti il iù ossibile distesa. Collegare le uscite del
Crescendo tuner/usbdac
ad un ingresso linea
dell’am lificatore integrato o del ream lificatore e collegare l’uscita digitale all’ingresso dell’eventuale convertitore DA. Connettere quindi la orta
USB del vostro PC/MAC all’ingresso USBDAC con il cavo USB. Collegare quindi il cavo di alimentazione fornito in dotazione al
Crescendo
tuner/usbdac
all’a osita vaschetta e collegare tutti gli a arecchi, com reso il
Crescendo tuner/usbdac
e il PC/MAC alle
rese di rete.
13
PLeft Channel
settanta
PRight Channel
settanta
Use of USBDAC mode: example of connection to a LAPTOP Notebook
Utilizzo della modalità US DAC: esempio di collegamento ad un LAPTOP- Notebook
POWERING UP THE Crescendo tuner/usbdac
Turn on the main switch on the front anel of the unit, then ush the Knob (Select) on the frontal anel or ush the “STANDBY TUNER” button on
the remote. The dis lay turns on and a resentation message is shown, then the frequency is set and the unit is fully o erative.
If the unit doesn’t turn on, lease refer to the troubleshooting section of the resent manual. Turn on the PC/MAC and DA converter and then the
integrated am lifier or the ream lifier and ower am .
ACCENSIONE DEL Crescendo tuner/usbdac
Premere l’interruttore rinci ale osto sul annello frontale, quindi, remere la mano ola (Select) sul annello frontale o ure il ulsante
“STANDBY TUNER” sul telecomando. Il dis lay si accende visualizzando un messaggio di resentazione, do o di che, viene sintonizzata la
frequenza e l’a arecchio è ronto a ris ondere ai comandi che riceve dal telecomando o dai tasti osizionati sul frontale.
Qualora l’a arecchio non si dovesse accendere, consultare la sezione dedicata alla risoluzione dei roblemi. Accendere quindi il PC/MAC e il
convertitore DA e do o, accendere l’am lificatore integrato o il ream lificatore e il finale.
Standby mode
You can ut the Crescendo tuner/usbdac in standby mode kee ing the “STANDBY TUNER” button on the remote ushed for some
seconds or kee ing the Knob (SELECT) on the front anel ushed for some seconds. When the unit is in standby mode, the analogue circuits and
their ower su lies are off reducing ower consum tion. You can set the unit in stand-by mode when unused for short eriods and Switch the unit
off with the main switch on the back anel when unused for longer eriods. When in Stand by Mode the Trigger Out ut voltage is set to zero and so
the unit connected is turned off.
Stand-by
Il
Crescendo tuner/usbdac
uò essere osto in stand-by mantenendo remumto il ulsante “STANDBY TUNER” sul telecomando er
alcuni secondi o ure tenendo remuta la mano ola (Select) sul annello frontale er alcuni secondi. Quando l’a arecchio è in stand-by, i circuiti
analogici e le relative alimentazioni sono s ente er minimizzare i consumi. Si consiglia di tenere l’a arecchio in stand-by tra un ascolto e l’altro, e
di s egnerlo con l’interruttore rinci ale osto sul annello osteriore quando l’a arecchio non viene usato er eriodi iù lunghi. Quando
l’a arecchio entra in Standby mode la tensione dell’uscita Trigger Out viene ortata a zero s egnendo l’a arecchio connesso al trigger stesso
Note on Trigger OUT Output
The Crescendo tuner/usbdac has a Trigger Out out ut that gives 12VDC voltage and a 160mA maximum current. That out ut can be
used to switch on and off a unit which has a ro er Trigger In connector with ro er electrical requirements. The Trigger Out gives 12VDC when
the unit is in normal function mode and doesn’t give any voltage when the unit is in Stand By mode.
Nota sul’ uscita Trigger OUT
Il
Crescendo tuner/usbdac
è dotato di una uscita Trigger out che fornisce una tensione continua di 12VDC e una corrente massima di
160mA. Tale uscita uò essere utilizzata er accendere un a arecchio che sia dotato di un ingresso trigger o ortuno e con o ortune
Back View
Visione Posteriore
Crescendo
Integrated
Amplifier
L
R
_______ Input ________ Out
1 2 3 4 5/ByP REC
Right Out Left Out
Trigger
IN
CRESCENDO
TUNER
USBDAC
SPDIF
L
R
Out
USB
Trigger
IN
Trigger
OUT

14
caratteristiche elettriche. La uscita trigger Out fornisce una tensione di 12VDC quando l’a arecchio è in modalità di normale funzionamento
mentre nessuna tensione è resente sull’uscita quando il
Crescendo tuner/usbdac
è in Stand By.
Note on TRIGGER IN:
The Crescendo tuner/usbdac has a Trigger In in ut which can be used by another iece of equi ment to turn the Crescendo
tuner/usbdac on or off. For such a ur ose the main voltage switch in the rear anel must be in OFF osition. A continuous DC 12V
voltage and a 70mA current is required to switch on the unit while when such a voltage is not resent the toroidal ower transformer of the
Crescendo tuner/usbdac is disconnected from the main voltage so no ower consum tion exists. The maximum allowed in ut current
is 160mA which is internally limited by a fuse.
Nota sull’ingresso Trigger IN
Il
Crescendo tuner/usbdac
è dotato di un ingresso Trigger In che uò essere utilizzato da un a arecchio esterno er accenderlo o
s egnerlo
.
A tal fine è necessario che l’interruttore rinci ale di alimentazione osto nel annello osteriore sia in osizione OFF. Per accendere il
Crescendo tuner/usbdac
è necessaria una tensione continua di 12V DC ed una corrente di circa 70mA. Quando tale tensione non è
resente, il trasformatore toroidale del
Crescendo tuner/usbdac
risulta sconnesso dalla rete elettrica quindi non c’è nessun consumo
di energia elettrica. La massima corrente in ingresso sulla connessione di Trigger In è fissata internamente da un fusibile a 160mA.
TUNED and STEREO Indicators
The dis lay can show two letters "T" and "S". “T" (TUNED) is shown when a radio station with ro er signal ower is detected while “S”
(STEREO) is shown when the incoming signal is stereo honic and the unit is not forced in MONO mode. Otherwise if the unit is forced in MONO
mode the "S" letter is never dis layed.
Indicatori TUNED e STEREO
Sul dis lay vengono visualizzate due lettere ad indicare: “T” er TUNED e “S” er STEREO. La lettera “T” viene visualizzata sul dis lay quando alla
frequenza sintonizzata è resente una stazione radio. La lettera “S” viene visualizzata sul dis lay quando il segnale in arrivo è stereofonico, mentre
quando si forza il segnale in modalita monofonica mediante il comando MONO/STEREO la lettera “S” non viene visualizzata sul dis lay.
RADIO STATION TUNING
It is ossible to tune in a radio station by two different functions: SEARCH (it is activated by rotating the knob on the front anel of the unit or
ressing the same function switches on the remote controller) and SCAN (it is activated by ressing one of the SCAN buttons on the remote
controller or by ressing the same function switches on the front anel). The SEARCH function allows you to modify the selected frequency by one
ste , while the SCAN function increases/decreases the frequency according to the button you ressed until the unit finds a valid radio station (if this
is not ossible, the whole bandwidth is scanned to get back to the frequency level revious to the ressure of the SCAN). The quickest way to tune
in a radio station is to use the SCAN function first then the SEARCH function for fine tuning.
SINTONIA DI UNA STAZIONE RADIO
La frequenza di sintonia uò essere modificata secondo due diversa funzioni: SEARCH (attivabile ruotantdo la mano ola osta sul annello
frontale, o ure remendo uno dei tasti SEARCH sul telecomando) e SCAN (attivabile remendo uno dei tasti SCAN del telecomando o ure
remendo l’equivalente tasto sul annello frontale). La funzione SEARCH ermette di modificare di uno ste la frequenza selezionata, mentre la
funzione SCAN modifica la frequenza di sintonia nel verso indicato, aumentandola o diminuendola a seconda del comando im artito, fino a trovare
una frequenza er la quale viene rilevata una stazione radio (se ciò non è ossibile viene effettuata una scansione com leta della banda, e quindi
nuovamente selezionata la frequenza resente al momento dell’attivazione della funzione SCAN). Pertanto il metodo iù veloce er sintonizzare
una stazione radio è quello di effettuare una ricerca SCAN e oi affinare la sintonia mediante la funzione SEARCH.
RADIO STATION STORING
It is ossible to store u to 18 AM and 18 FM radio stations following this rocedure:
1. Tune the radio station you’re interested in.
2. Enter in “memorizing” mode by ressing and leaving the STORE button on the remote controller or by ushing the “STORE” switch on
the front anel. Then on the dis lay you can visualize the content of the first location along with two dots “:” before the location number
that will be flashing. If no radio station has been memorized in this location, you can see the “EMPTY” notice on the dis lay, otherwise
you can visualize the frequency of the radio station memorized, and if ossible the relative RDS message which indicates the Station
Name.
3. Pressing and leaving the keys MEM+ and MEM- on the remote controller or the MEMORY▲ and MEMORY▼ switches on the front
anel, run over the various locations and sto on the osition where you want to memorize the radio station; it is ossible to select the
osition directly using the numeric keys. For each location the dis lay will indicate, both the location number and the indication EMPTY
if the location doesn’t contain any memorized station or the frequency and eventual RDS message (if available) of the memorized
station.
4. Press and Leave the STORE button on the remote control or the STORE switch on the front anel to memorize the station in the
selected location and exit from “memorizing” mode; at this oint the number of the memorized location will flash for a few seconds on the
dis lay and after the message “Stored” will a ear, to indicate that the memorizing rocedure has been com leted and normal
functioning has been restored.
MEMORIZZAZIONE DELLE STAZIONI RADIO
Si ossono memorizzare fino a 18 stazioni radio FM e 18 er la AM. Per la memorizzazione seguire la seguente rocedura:
1. Sintonizzare la stazione radio di interesse.
2. Entrare in modalità “memorizzazione” remendo e rilasciando il tasto STORE sul telecomando o il tasto Store sul annello frontale. Sul
dis lay viene visualizzato il contenuto della rima locazione e i due unti “:” rima del numero della locazione iniziano a lam eggiare. Se

15
in tale locazione non è stata memorizzata alcuna stazione radio viene visualizzata sul dis lay la scritta “EMPTY”, altrimenti viene
visualizzata la frequenza della stazione memorizzata e, se dis onibile, il relativo messaggio RDS indicante il Name Station.
3. Premendo e rilasciando i tasti MEM+ e MEM- sul telecomando o ure i tasti MEMORY▲ e MEMORY▼sul annello frontale, scorrere
le varie locazioni di memoria e fermarsi nella osizione dove si intende memorizzare la stazione radio, o ure è ossibile selezionare
direttamente la osizione utilizzando i tasti numerici del telecomando. Per ogni locazione il dis lay indicherà, oltre al numero della
locazione, l’indicazione EMPTY se nella locazione non è stata memorizzata alcuna stazione o la frequenza e l’eventuale messaggio
RDS (se dis onibile ) della stazione memorizzata.
4. Premere e rilasciare il tasto STORE sul telecomando o il tasto STORE sul frontale, er memorizzare la stazione nella locazione
selezionata e uscire dalla modalità “memorizzazione”; a questo unto sul dis lay il numero della locazione memorizzata lam eggerà er
alcuni secondi e successivamente verrà visualizzato il messaggio “Stored”, ad indicare l’avvenuta rocedura di memorizzazione
ritornando alla normale esecuzione di funzionamento.
RADIO STATION SELECTION
It is ossible to quickly jum from stored station to another by ressing the MEMORY▲/ MEMORY▼ buttons on the front anel of the unit or the
MEM+/MEM- buttons on the remote controller. When the unit is in AM mode it is ossible to jum from one of the 18 AM stored radio station to the
other: the same thing is ossible for FM radio station when the unit is in FM mode. When the unit is turned on or the AM/FM button on the front
anel of the unit or on the remote controller is ressed, the unit will be automatically tuned to the first radio station of the selected mode. It is
ossible to select the memory allocations by ressing the MEMORY▲/MEMORY▼ buttons on the front anel of the unit or the MEM+/MEM-
buttons on the remote controller. If the memory allocation is em ty, an EMPTY message is shown on the dis lay and the unit goes back to the
reviously selected frequency.
SINTONIA DELLE STAZIONI RADIO MEMORIZZATE
E’ ossibile accedere velocemente alle stazioni radio memorizzate mediante l’uso dei ulsanti MEMORY▲ e MEMORY▼ sul frontale o remendo
i tasti MEM+, MEM- sul telecomando. In modalità AM si ossono sintonizzare le stazioni radio AM memorizzate nelle 18 locazioni di memoria
riservate alla AM e analogamente er la modalità FM. Alla accensione o in seguito ad una ressione e rilascio del ulsante AM/FM sul frontale o
alla ressione del tasto AM/FM del telecomando, l’accesso alla memoria ri artirà dalla rima locazione della banda selezionata. Mediante i ulsanti
MEMORY▲, MEMORY▼sul frontale o i tasti MEM+, MEM- sul telecomando sarà ossibile selezionare le varie locazioni di memoria. Se la
locazione di memoria selezionata risulta vuota, il dis lay mostrerà la scritta “EMPTY” e l’a arecchio sintonizzerà nuovamente la frequenza
resente rima della selezione della locazione.
DESCRIPTION OF THE INFORMATION SHOWN ON THE DISPLAY:
The information shown on the dis lay de ends on the mode the unit is working on.
DESCRIZIONE DELLE INFORMAZIONI MOSTRATE SUL DISPLAY:
Le informazioni mostrate sul dis lay di endono dalla modalità di funzionamento.
TUNER Mode:
Modalità TUNER
:
USBDAC Mode:
Modalità USBDAC:
(*) The command is sent by ushing a button on the remote control or a switch on the front, which is dis layed for a while on the dis lay and then
disa ears. The command can be or not be executed by the layer running on the PC/MAC de ending on the layer used.
(*) Il comando inviato remendo un tasto sul telecomando o un tasto sul frontale viene visualizzato er qualche secondo sul dis lay. Tale comando
uò essere o non essere eseguito dal layer in esecuzione sul PC/MAC a seconda del Player che si utilizza.
101.20 FM T S
RTL102.5
It indicates that
the incoming signal
is
stereo honic.
Indica che il segnale in arrivo è stereofonico
It indicates that there is a radio station on the selected frequency
Indica che alla frequenza sintonizzata è resente una stazione radio
Modulation (AM or FM)
Modulazione (AM o FM)
RDS
message
Messaggio RDS
Frequency
Frequenza
USB DAC MODE
PLAY
USB DAC MODE
It shows the command (*)
Visualizza il comando (*)

16
Installing the USBDAC and selecting USBDAC mode
To select the USBDAC mode, ush and release the front “Select” knob or ush the “STANDBY TUNER” switch on the remote. The
Crescendo tuner/usbdac will check if there is a valid signal on the USB connection. In the case of an invalid signal the message:”
Error USB cable not connected” is shown on the dis lay and the unit will be waiting for a valid signal on the USB connection. When there is a valid
signal on the USB connection the Crescendo tuner/usbdac will start to initialize the USB connection and a message to communicate
it will be shown on the dis lay.
Installazione/Selezione della modalità US DAC
Per selezionare la modalità USBDAC si deve remere e rilasciare la mano ola “SELECT” sul frontale o remere il tasto “STANDBY TUNER” sul
telecomando. Il
Crescendo tuner/usbdac
controllerà se sia o no resente segnale sulla connessione USB. In caso negativo
indicherà “Error USB cable not connected” e rimarrà in attesa del segnale sull’ingresso USBDAC. Altrimenti rocederà alla inizializzazione della
connessione, visualizzando il messaggio sul dis lay.
If it is the first time the Crescendo tuner/usbdac is connected to the PC or MAC via the USB, the initialization could require some
minutes because the PC/MAC has to detect the new device and to find and install the required software drivers.
For exam le, if a Windows o erative system is used, when the Crescendo tuner/usbdac is connected the first time to the PC, the
message “Find New Hardware” will be shown on the PC monitor and then the rocedure to find and install the required drivers will be started by
the PC. The initialization com letion must be waited and a message “Your new hardware is installed and ready to use” shown at the end. After that,
the message “Active” will be shown on the Crescendo tuner/usbdac dis lay.
Se è la rima volta che il
Crescendo tuner/usbdac
viene collegato al PC o al MAC, la inizializzazione otrebbe richiedere qualche
minuto erché è necessario che il PC/MAC rilevi la nuova eriferica e trovi e installi i driver necessari.
Ad esem io nel caso si utilizzi Windows quale sistema o erativo quando viene collegato er la rima volta il
Crescendo
tuner/usbdac
verrà visualizzato sul monitor del PC il messaggio: “Trovato nuovo hardware” e verrà quindi avviata la rocedura di ricerca
e installazione dei driver. Si dovrà ertanto attendere la fine della inizializzazione che verrà comunicata dal messaggio: “Il nuovo hardware è
installato e ronto all’uso”. Do odichè sul dis lay del
Crescendo tuner/usbdac
verrà visualizzato il messaggio “Active”.
After the USB connection is active every sound from your PC or MAC will be layed by the Hi-Fi system. So by using any audio/video layer on
your PC/MAC you’ll be able to lay the music on your PC/MAC on the Hi Fi system. De ending on the layer it is also ossible to use the HID
functions (Human Interface Device). It means that is ossible to send the Play/Pause, Sto , Next e Prev track commands to the software layer
running on your PC/MAC via the front switches laced on the Crescendo tuner/usbdac front anel or by its remote control.
Utilizzando un layer audio/video sarà quindi ossibile ri rodurre qualsiasi segnale audio roveniente dal vostro PC/MAC mediante la connessione
USB con il
Crescendo tuner/usbdac
. A seconda del layer è ossibile utilizzare le funzioni HID (Human Interface Device) ossia
inviare comandi quali Play/Pause, Sto , Next e Prev track direttamente dai tasti osizionati sul frontale o dai relativi tasti del telecomando, er
comandare il layer audio/video sul PC/MAC.
•Windows PC System requirements
Hardware requirements: Crescendo tuner/usbdac has been designed to work with any PC having a USB ort and a
Windows o erative System.
Software requirements: the USB interface is available just for: Windows 98, 98 SE, ME, Windows 2000, XP and Vista. Windows 95 or
NT 4.0. is not su orted
Note: If a Windows 98 original revision is used, the minimal requirements to u date it to the second Edition are the ro er USB drivers.
For Windows 98SE and Windows Me, the HID functions, de ending on the layer, are not erfectly functional.
oRequisiti er PC Windows
Requisiti Hardware: Il
Crescendo tuner/usbdac
è stato rogettato er lavorare con qualsiasi PC con sistema o erativo
WINDOWS che abbia una orta USB.
Requisiti Software: Il su orto er l’USB Audio è dis onibile solo er Windows 98, 98 SE, ME, Windows 2000, XP e Vista. Non è
su ortato su Windows 95 or NT 4.0.
USB DAC MODE
ACTIVE

17
Nota: Se si utilizza la versione originale di Windows 98, è necessario aggiornarla almeno alla Second Edition er avere i driver USB che
ermettano il corretto funzionamento. Per le versioni Windows 98SE e Windows Me, la funzione HID non è erfettamente funzionante.
•Mac’s requirements:
Hardware requirements: Crescendo tuner/usbdac has been designed to work with any MAC having a USB ort.
(G3/G4/G5, Mini, iMac, iBook, and so on).
Software requirements: the su ort for the audio USB is available for: Mac OS 9.0.4 and its higher revision, and Mac OS X, with driver
USB Audio 1.0.4fb or higher.
oRequisiti er Mac
Requisiti Hardware: Il
Crescendo tuner/usbdac
è stato rogettato er lavorare con qualsiasi Mac che abbia una orta USB
(G3/G4/G5, Mini, iMac, iBook, etc).
Requisiti Software: Il su orto er l’USB Audio è dis onibile solo er Mac OS 9.0.4 e su eriori, o er Mac OS X, con driver USB Audio
1.0.4fb o su eriori.
•Software you can use with the Crescendo tuner/usbdac
Any software able to re roduce an audio signal on your PC or MAC can be used with
Crescendo
VT TUNER/USBDAC. For
exam le: iTunes, Windows Media Player, Foobar2000.
oSoftware che uò essere utilizzato con il
Crescendo tuner/usbdac
Può essere utilizzato qualsiasi software in grado di ri rodurre file Audio/Video sul vostro PC o Mac. Ad esem io: iTunes, Windows Media
Player, Foobar2000.
For advice about the
Crescendo tuner/usbdac, for information about the available resources to download music for free and for
information and about the free software layers, lease refer to the Audio Analogue website: www.audioanalogue.com in the
Crescendo tuner/usbdac
section.
Per suggerimenti sull’utilizzo del
Crescendo tuner/usbdac
, er informazioni circa le risorse dis onibili er scaricare musica
gratuitamente e legalmente e er avere informazioni sull’uso di software gratuiti er la ri roduzione di musica su PC si rega di consultare il sito
Audio Analogue
: www.audioanalogue.com nella sezione dedicata al
Crescendo tuner/usbdac
.
18
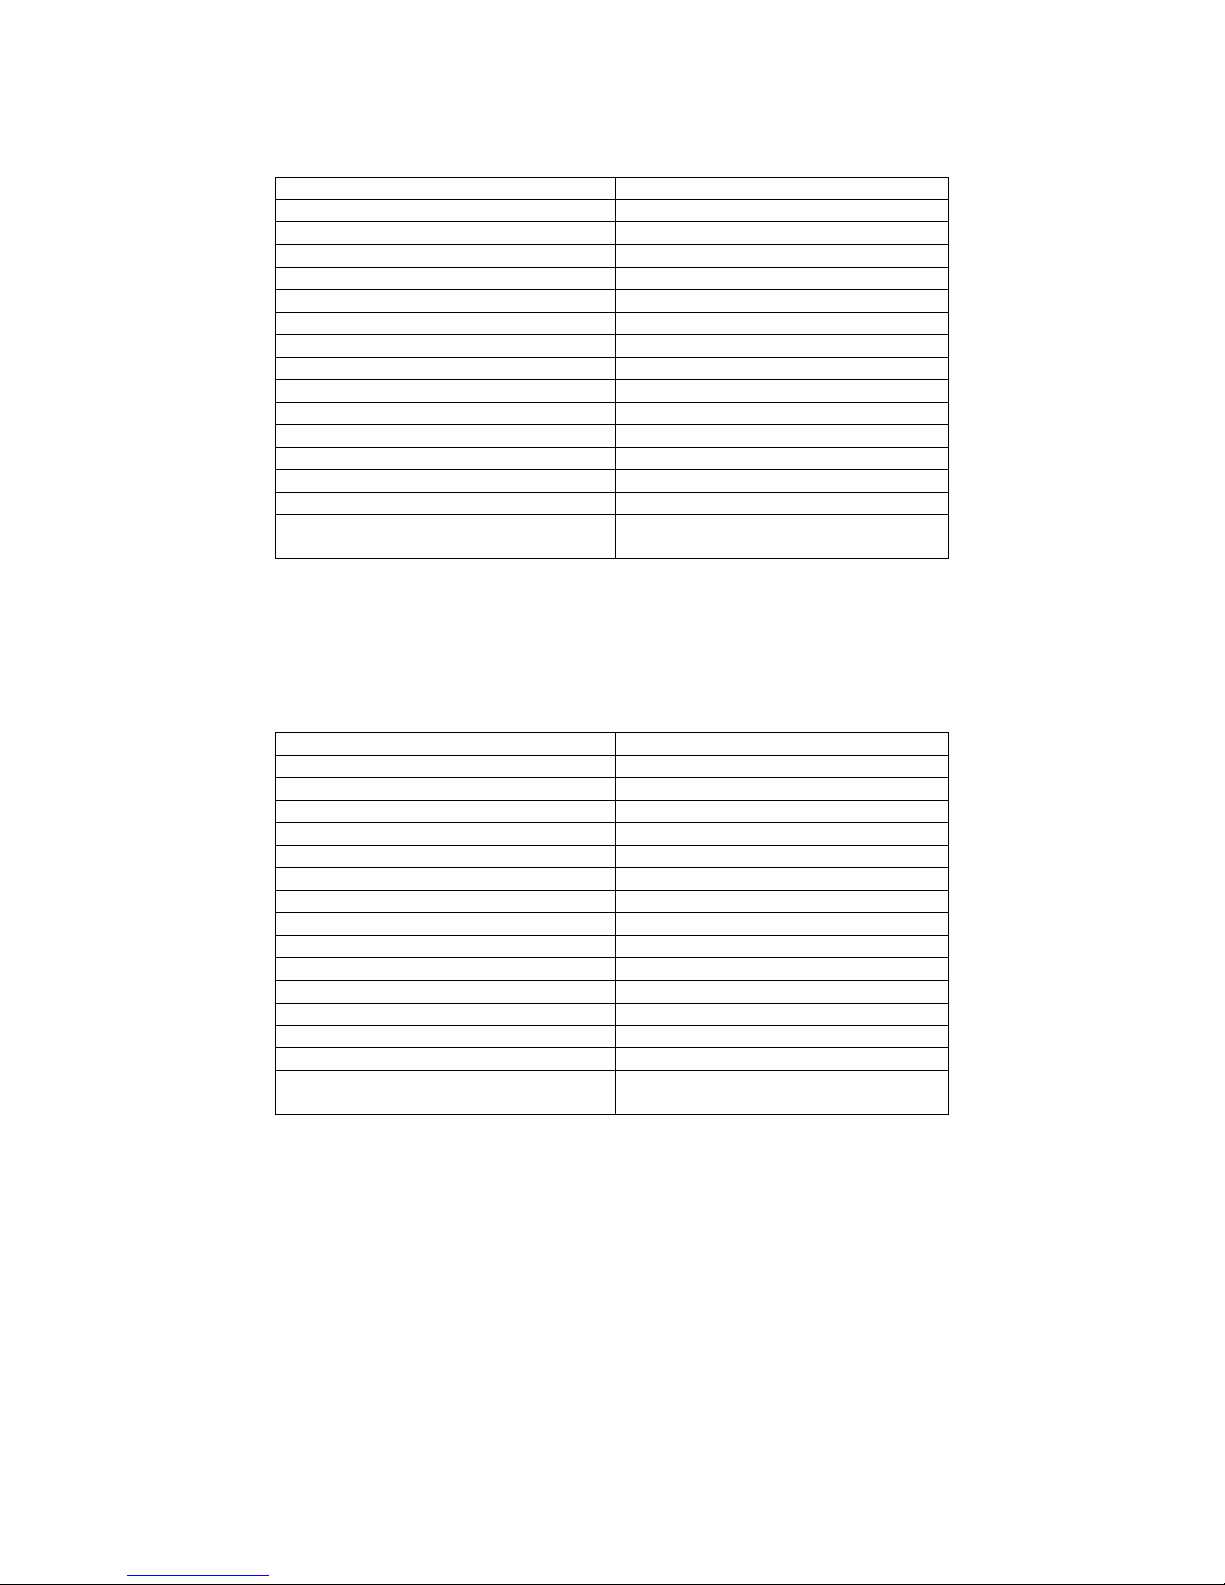
SPECIFICATIONS
Parameter Value
Tuner Mode
Channels: 2
Out ut level FM: 500-700mV; AM: 115-215mV
Image rejection FM: 70dB min; AM: >40dB min
Auto Sto Sens FM: 18-28dBu; AM: 45-65dBu
Usable sens FM: 12dBu max; AM: 60dBu max
Signal/noise ratio: FM: 60dB min; AM: 40dB min
FREQ. FM:87.5MHz-108MHz; AM:567kHz-1.6MHz
USBDAC Mode
Maximum Out ut voltage (Note1) 2,00
Noise level(Nota2) -120dBV
Supply
Power requirements: 115V-220V-230V-240V 50-60Hz
Power consum tion (On State) 12VA
Power Consum tion Trigger In driver, Trigger
IN = 12V 12V @ 160mA (1.9VA)
Note1:
Maximum rms voltage out ut value
Note2:
Band limits 0Hz-22KHz
SPECIFICHE TECNICHE
Parametro Valore
Tuner Mode
Numero di canali: 2
Out ut level FM: 500-700mV; AM: 115-215mV
Image rejection FM: 70dB min; AM: >40dB min
Auto Sto Sens FM: 18-28dBu; AM: 45-65dBu
Usable sens FM: 12dBu max; AM: 60dBu max
Ra orto segnale/rumore FM: 60dB min; AM: 40dB min
FREQ. FM:87.5MHz-108MHz; AM:567kHz-1.6MHz
USBDAC Mode
Massima tensione di uscita(Nota1) 2,00
Letto di rumore(Nota2) -120dBV
Alimentazione
Tensioni di rete: 115V-220V-230V-240V 50-60Hz
Assorbimento (A arecchio acceso) 12VA
Assorbimento (Pilotato da Trigger In con
Trigger In a 12V) 12V @ 160mA (1.9VA)
Nota1:
Valore massimo rms della tensione di uscita
Nota2:
Limiti di Banda 0Hz-22KHz

19
TROUBLESHOOTING
Symptom Cause Remedy
The unit is in STANDBY mode
Press the STANDBY button on the front
anel of the unit or the STANDBY button
on the remote controller
Incorrectly lugged ower cord Make sure the ower cord is correctly
lugged into the wall outlet
Dis lay is off
No sound
No res onse from the unit
Burned-out fuses Contact your Audio Analogue retailer for
fuse check/re lacement
Faulty or incorrectly lugged connectors
between Crescendo
tuner/usbdac and the am lifier
Check cables and their connection
Dis lay is on
No sound
Incorrectly selected source on the am lifier
Check that Crescendo
tuner/usbdac is correctly selected
through the am lifier in ut
The unit is on but there is no sound
The unit is in “Storage” mode
Com lete storage rocedure by ressing
the STORE button on the front anel or on
the remote controller
It is im ossible to tune in a radio station Faulty or incorrectly lugged antennas.
Check that the antennas are correctly
lugged and laced (FM antenna has to
be unrolled as much as ossible). Try
re lacing both the antennas.
Crescendo tuner/usbdac
works but the dis lay is off
Faulty or incorrectly lugged front anel.
Contact your Audio Analogue retailer for
connections check and front anel
re lacement
No battery/ worn-out battery Place/re lace battery (2 ‘AAA’ batteries)
Remote controller doesn’t work You’re standing too far or on an exceeding
angle from the front anel Get closer to the unit or reduce angle
If the suggested remedies should not work or the problem is not shown in the list above, please contact your local Audio
Analogue retailer.

20
RICERCA GUASTI
Sintomo Causa Rimedio
L’a arecchio è in stand by
Togliere l’a arecchio dallo stato di
standby remendo il tasto STANDBY sul
annello frontale o ure STANDBY sul
telecomando
Cavo di alimentazione non correttamente
collegato
Controllare che la s ina del cavo di rete
sia ben inserita nella resa di rete
Dis lay s ento
Nessun suono
Nessuna ris osta ai comandi
Fusibile bruciato all’interno
dell’a arecchio
Contattare il vostro rivenditore Audio
Analogue er una verifica ed eventuale
sostituzione del fusibile
Cavi di segnale tra Crescendo
tuner/usbdac e am lificatore
connessi non correttamente o ure
difettosi
Controllare lo stato dei cavi e/o la corretta
connessione
Dis lay acceso
Nessun suono
Sorgente non selezionata correttamente
sull’am lificatore
Controllare che il Crescendo
tuner/usbdac sia selezionato
correttamente con il selettore degli ingressi
dell’am lificatore
L’a arecchio è acceso ma non si sente
nessun suono L’a arecchio è in modalità memorizza
Concludere la rocedura di
memorizzazione remendo il ulsante
Store sul frontale o il tasto Store sul
telecomando.
Non è ossibile sintonizzare alcuna
stazione
Antenne collegate in modo non corretto o
difettose.
Controllare il corretto collegamento delle
antenne e la loro dis osizione (la antenna
Fm deve essere il iù distesa ossibile) .
Eventualmente rovare a sostituire le
antenne.
Il VT Tuner funziona
ma il dis lay è s ento
Scheda frontale non collegata
correttamente o ure difettosa
Contattare il vostro rivenditore Audio
Analogue er una verifica dei collegamenti
ed eventuale sostituzione della scheda
Batterie scariche o mancanti Inserire o sostituire le batterie (2 ministilo
ti o ‘AAA’)
Il telecomando non funziona Eccessiva distanza dal annello frontale
dell’a arecchio o angolo non corretto
Avvicinarsi di iù all’a arecchio o
cambiare angolo
Se i rimedi suggeriti non dovessero funzionare oppure il problema non è riportato nella lista, contattate il vostro rivenditore
Audio Analogue
Other manuals for Crescendo
3
Other Audio Analogue Tuner manuals


