Audio Authority 1821 User manual

Tech Manual
Model 1821
Digital Audio Demonstrator
Introduction
The Audio Authority®1821 delivers digital audio to four devices such as A-V receivers or sound bars. It provides digital Toslink®
connections for input, bus output (for expansion capabilities), and four product outputs. In distribution mode, all outputs are active.
In switching mode, outputs may be selected via push-buttons, TouchSelect panels, or compatible RS-232 control device.
Features
• Digital audio switching for four output positions
• Distribution mode: one in, four out, all positions active
• Digital audio bus output, always active
• RS-485 control (compatible touch panels sold seperately)
• RS-232 control
Easy Plug blue push-button with RJ9
connector (PN 013-100).
POWER
INPUT
POWER
BUS
FIRMWARE
UPDATE
MICRO SD
RS-232
PORT A
RS-485
BUS
RS-232
PORT B
DIGITAL
AUDIO
INPUT
DIGITAL
AUDIO
BUS
DIGITAL AUDIO
OUTPUTS
PUSH-BUTTONS
FEATURE
SWITCHES
RS-232 A
NULL/STRAIGHT
SWITCH
RS-232 B
NULL/STRAIGHT
SWITCH
Push-Buttons
To use push-buttons for product
selection, connect RJ9 style Easy
Plug switches to each position.
Push-buttons and cables in
several colors and lengths are
available from Audio Authority.
Example of a custom overlay for a
touch panel (sold seperately).
Switch Settings
Choose the desired features and select using the Feature Switches as shown. If a switch is shown with a dash, it can be ON or
OFF while using the feature. After making changes to the Feature Switches, cycle power to the 1821.
Timeout Mode
The timeout interval is the length of time after the last button press until the demo ends and all outputs are off. Adjust the timeout
interval using the switch settings below. The demo never stops playing when switches 1, 2, and 3 are all OFF, or in distribution
mode (1, 2, and 3 = ON).
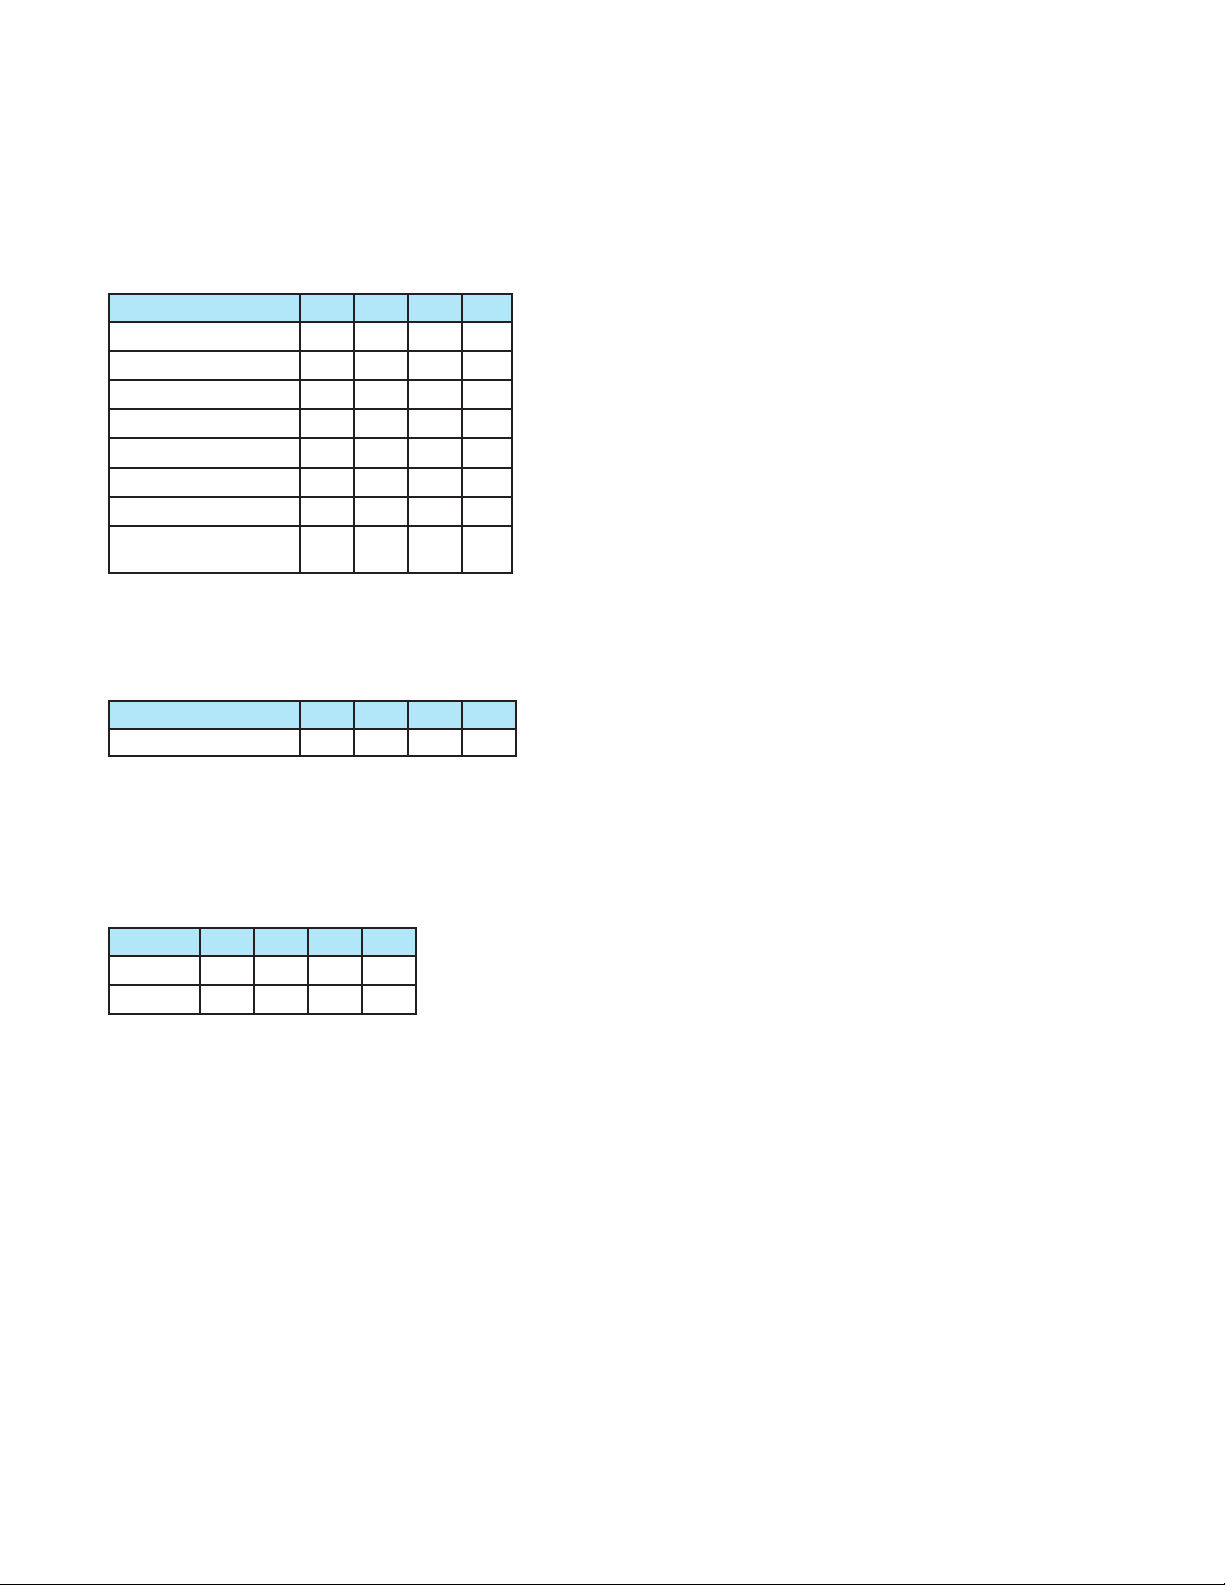
TIMEOUT SWITCH SETTINGS:
SECONDS 1 2 3 4
No Timeout OFF OFF OFF -
15 OFF OFF ON -
30 OFF ON OFF -
45 OFF ON ON -
60 ON OFF OFF -
75 ON OFF ON -
90 ON ON OFF -
DISTRIBUTION MODE
(No Timeout)
ON ON ON -
Distribution Mode
When Switches 1, 2, and 3 are ON the 1821 is in Distribution Mode. All audio positions are active, and timeout is not active.
DISTRIBUTION MODE SWITCH SETTINGS:
1234
DISTRIBUTION MODE ON ON ON -
RS-232 Ports
RS-232 ports A & B may be set for Null or Straight using the switch located beside the port. By default Port A is set to null modem,
and Port B is set to straight modem. The ports are modular RJ-45 jacks; adapter cables are available for connection to 3.5mm or
DB-9 serial ports. Select the Baud rate using Feature Switch 4 as shown.
BAUD RATE SWITCH SETTINGS:
1234
57600 - - - OFF
115200 ---ON
RS-485 Bus and TouchSelect Panels
TouchSelect panels may be used to select product positions. TouchSelect panels transmit the touch location and panel address
over the bus to the 1821. By default, button commands match up with the TouchSelect touch positions, therefore TouchSelect
position 1 triggers the command for output 1.
Digital Audio Input / Outputs
Connect an optical cable from the audio source to the Digital Audio Input of the 1821. An optical cable can be routed from the
Digital Audio Bus connector to an additional 1821 or other device. Connect an optical cable from each of the Digital Audio Outputs
to each sound bar or AVR.
12V DC Power
Connect 12V power adapter to Power Input. The Power Bus port may be connected to the 1803, or other device sharing the power
adapter provided the power supply is adequate.

E-198
Rev. 20190925
2048 Mercer Road, Lexington, KY 40511-1071 USA
800-322-8346 • 859-233-4599 • Fax: 859-233-4510
support@audioauthority.com • www.audioauthority.com
Example
Demo four sound bars with push-buttons. Each button triggers a specic audio track for each product via the RS-485 communication
between the 1821 and the media player.
+
VOLUME
1
2
3
4
BUTTON
1803 1821
RS-485
–
RJ9 CABLE
CAT5/6 CABLE
OPTICAL CABLE
LEGEND
Installation
• Attach the 1821 to a at surface with the screws provided.
• Connect push-buttons, if used.
• Connect RS-485 cable from the 1821 to touch panel, if used.
• Connect RS-232 cable from the 1821 to the control device if applicable.
• Connect a digital audio source to the 1821.
• Connect digital audio output cables from the 1821 to product inputs.
• Connect power adapter to AC power, then to the 1821 power port.
Other Audio Authority Stereo System manuals


