Audio enhancement BEAM User manual

1
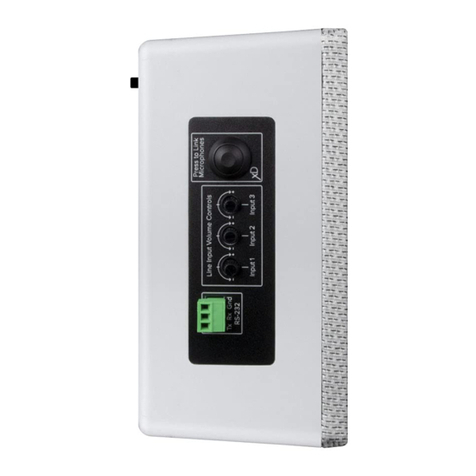
BEAM Front
www.AudioEnhancement.com • 800.383.9362www.AudioEnhancement.com • 800.383.9362
BEAM
Quick Start Guide
Green Power LED
Microphone 1 LED
BEAM LED Status Indicators visible through the front grille
Mounting screws
Microphone 2 LED XD Microphone LINK LED
Note: Green Power LED
must be ON indicating
the BEAM is plugged
into AC outlet
TONE CONTROLS
VOLUME
High—controls boost or cut of treble frequencies
The VOLUME knob controls the level of Media sources
(computer, monitor, DVD player, etc.) connected via 3.5
mm audio cable or TOSLINK optical cable.
It has no eect on the Microphone or Bluetooth levels.
The UP and DOWN buttons on the microphone, when
“LINE” has been SELECTED, will also control the level of
the MEDIA sources.
Remember, the output level from your source needs to
be turned on and at an appropriate level.
Mid—controls boost or cut of vocal frequencies
Low—controls boost or cut of bass frequencies
BEAM Rear
• XD Teacher Microphone Included
• Mic360 Optional

Assistive Listening (ALD)
External Line Input
The BEAM has an output connection and level control designed
to with work with a student’s personal assistive listening device.
This is typically a small battery-powered FM transmitter and can
be plugged directly into the Assistive Listening Output. A 3.5 mm
to 3.5 mm cable is required to connect between the BEAM and
student’s device. The Assistive Listening Output allows the level
to be optimized for the student’s device.
Set the Assistive Listening volume here
Plug in student FM device here
Plug in phone or MP3 here
Headphone output
on phone
Input on student
FM transmitter
Bluetooth Pairing button
XD Linking button
Side Panel Connections
(Left end—viewed from the front)
You will need to go into the menu of the student’s
device and select the external line input.
2
www.AudioEnhancement.com • 800.383.9362
Side Panel Connections

Press & hold the PWR button to turn the mic on or o.
A momentary press of the PWR button will mute or unmute the
microphone audio. If muted for more than 5 minutes, the
microphone will turn o automatically.
Step 1—Connect the micro-USB plug of
the charger to the DC input terminal of
the microphone.
Step 2—The charger indicator light will
blink at 2-second intervals.
Step 3—The charger indicator light will
remain on once fully charged.
Step 1—Connect the micro-USB plug of
the charger to the DC input terminal of
the microphone.
Step 2—The charger indicator light will
blink at 2-second intervals.
Step 3—The charger indicator light will
remain on once fully charged.
3
www.AudioEnhancement.com • 800.383.9362
Basic Operation of Microphones Charging the Teacher/Mic360
and Handheld Microphones
UP
Volume
DOWN
Volume
Teacher Microphone
(OWN) Level Adjustment
Mic360 or Handheld Microphone
(OTHER) Level Adjustment
Teacher/Mic360 Microphone
Handheld Microphone
The “SELECT” button determines which level
will be controlled by the UP/DOWN buttons
Media Input
(LINE) Level Adjustment
Press either the UP or DOWN
arrow button to increase or
decrease the level of the Teacher
microphone. A blue LED under the
OWN label (for own microphone)
will ash with each press.
To adjust the Mic360 or Handheld
Microphone (OTHER) volume, rst
press the SELECT button so that
the LED under the OTHER label
comes on. Now press the
UP/DOWN buttons to control the
level of the OTHER microphone,
which is typically the Mic360.
Selecting the LINE audio source
will control the volume of audio
from devices that are connected to
the BEAM via 3.5 mm audio cable
or TOSLINK optical cable.

Bluetooth Pairing
Activate Bluetooth on your Bluetooth-enabled device.
Press the Bluetooth pairing button on the side of the
speaker (the blue LED in the switch will start ashing).
Select “AE_BLUE” from the menu on your Bluetooth device.
Volume of the Bluetooth input is controlled from the user’s
device. Typically this is the volume control on your phone.
To pair a new device to the BEAM, rst disconnect the paired
device, then follow the directions above for the new device.
Please Note: The BEAM pairing button must be pressed each time a
previously paired device is brought back into range of the BEAM.
Ensure that two microphones are already paired to the
BEAM and turned on.
Turn mic o: ip the TALK switch down.
The green BATT light will turn o.
Press and release the XD LINK button on the side of
the speaker.
Press and hold the PWR/LINK button and TALK
pushbuttons together on the Media Microphone until a
beep is heard from the speaker. Pairing will take longer
than usual—approximately 10 seconds.
The LINK LED will now function as the Media Channel
power indicator.
*
DC-40716.01
Pairing Microphones to the BEAM Pairing Media Microphone to the BEAM
Teacher/Mic360 Microphone
Handheld Microphone
4
Any microphones purchased with the BEAM
should already be paired. You can check this
by turning on your Teacher, Mic360 and
Handheld Microphones (Teacher Mic: press
PWR for 1 second; Handheld Mic: ip TALK
switch up). If the LED under the BATT
indicator turns green, the mic is paired. If the
LED blinks another color (orange), then turn
o your microphones and use the following
instructions to pair them to the BEAM.
Turn mic o: ip the TALK switch down.
The green BATT light will turn o.
Press and release the XD LINK button on
the side of the speaker.
Press and hold the PWR/LINK button and
TALK pushbuttons together on the
Handheld Microphone until a beep is
heard from the speaker.
Turn mic o: press and hold PWR/MUTE until
the green BATT light turns o.
Press and release the XD LINK button on the
side of the speaker.
Press and hold the PWR/MUTE and REC
buttons on the Teacher/Mic360 Microphone
until a beep is heard from the speaker.
www.AudioEnhancement.com • 800.383.9362
Teacher Mic Handheld Mic
Other Audio enhancement Stereo System manuals
