AUDIO FOCUS ARES 8 User manual

FR-X user’s manual
www.audiofocus.eu
ARES 8 Line Array
USER MANUAL
Insta
Tube
You

ARES 8 user’s manual ARES 8 user’s manual
2 3
Welcome to AUDIOFOCUS©
Thank you for choosing the AUDIOFOCUS©ARES 8 line array.
This user manual contains essential information for rigging and deploying ARES 8 elements to their full capability.
Carefully read this document in order to become familiar with the system.
Whether you’re using 4 elements or 24, pole mounted or own, we’re sure you will nd the ARES 8 to be highly versatile units
in your professional sound reinforcement inventory.
I. Physical features and hardware description
ARES 8 line array system is suitable for a wide range of sound reinforcement applications from small scale concerts to theaters
where sound quality is crucial.
Audiofocus ARES 8 offers all the benets of real line array respecting all WST criteria. Dual 8’’ Faital Pro handles low-mid frequen-
cy range while a 1,4’’ exit compression driver coupled to a waveguide provides smooth top end.
ARES 8 is available in 3 versions to ensure versatility of choice.
II. Rigging instructions
1. Rigging ARES 8
The ARES8 hardware seeks to simplify rigging procedures and is designed in such a way that just one person is able to rig up
to eight ARES 8 cabinets at a time.
For this explanation, we’re hanging 4 x ARES 8 per side in a J-shape to cover an open eld of 15 x 25 m (see section 6).
a) Use Ease Focus software to analyze your venue, model your required coverage and to generate conguration para-
meters :
b) Place the bottom ARES 8 cabinet on the oor with the magnet pin in the ‘oor’ position as illustrated below.
• The Bi-amplied version can be managed with Lake, XTA, Matrix Media or Q-Sys but we recommend Powersoft ampli
ers with custom presets especially developed for AUDIOFOCUS ARES 8.
• Plug & Play version is compact, wide dispersion, two way line array that offers the highest performance in its category. It’s
equipped with Powersoft Class D module amplier with four clever presets.
• For more customised needs a Fine tuning version is equipped with RS485 interface module working with Armonia
software for remote control and monitoring ampliers. Armonia constitutes series of new and unique tools for system desi-
gners and sound engineers who want to signicantly boost sonic performance and system reliability.
Remember to repeat the process on both sides of the cabinet to ensure stability.
A
A
A
ARES 8 user’s manual ARES 8 user’s manual
45
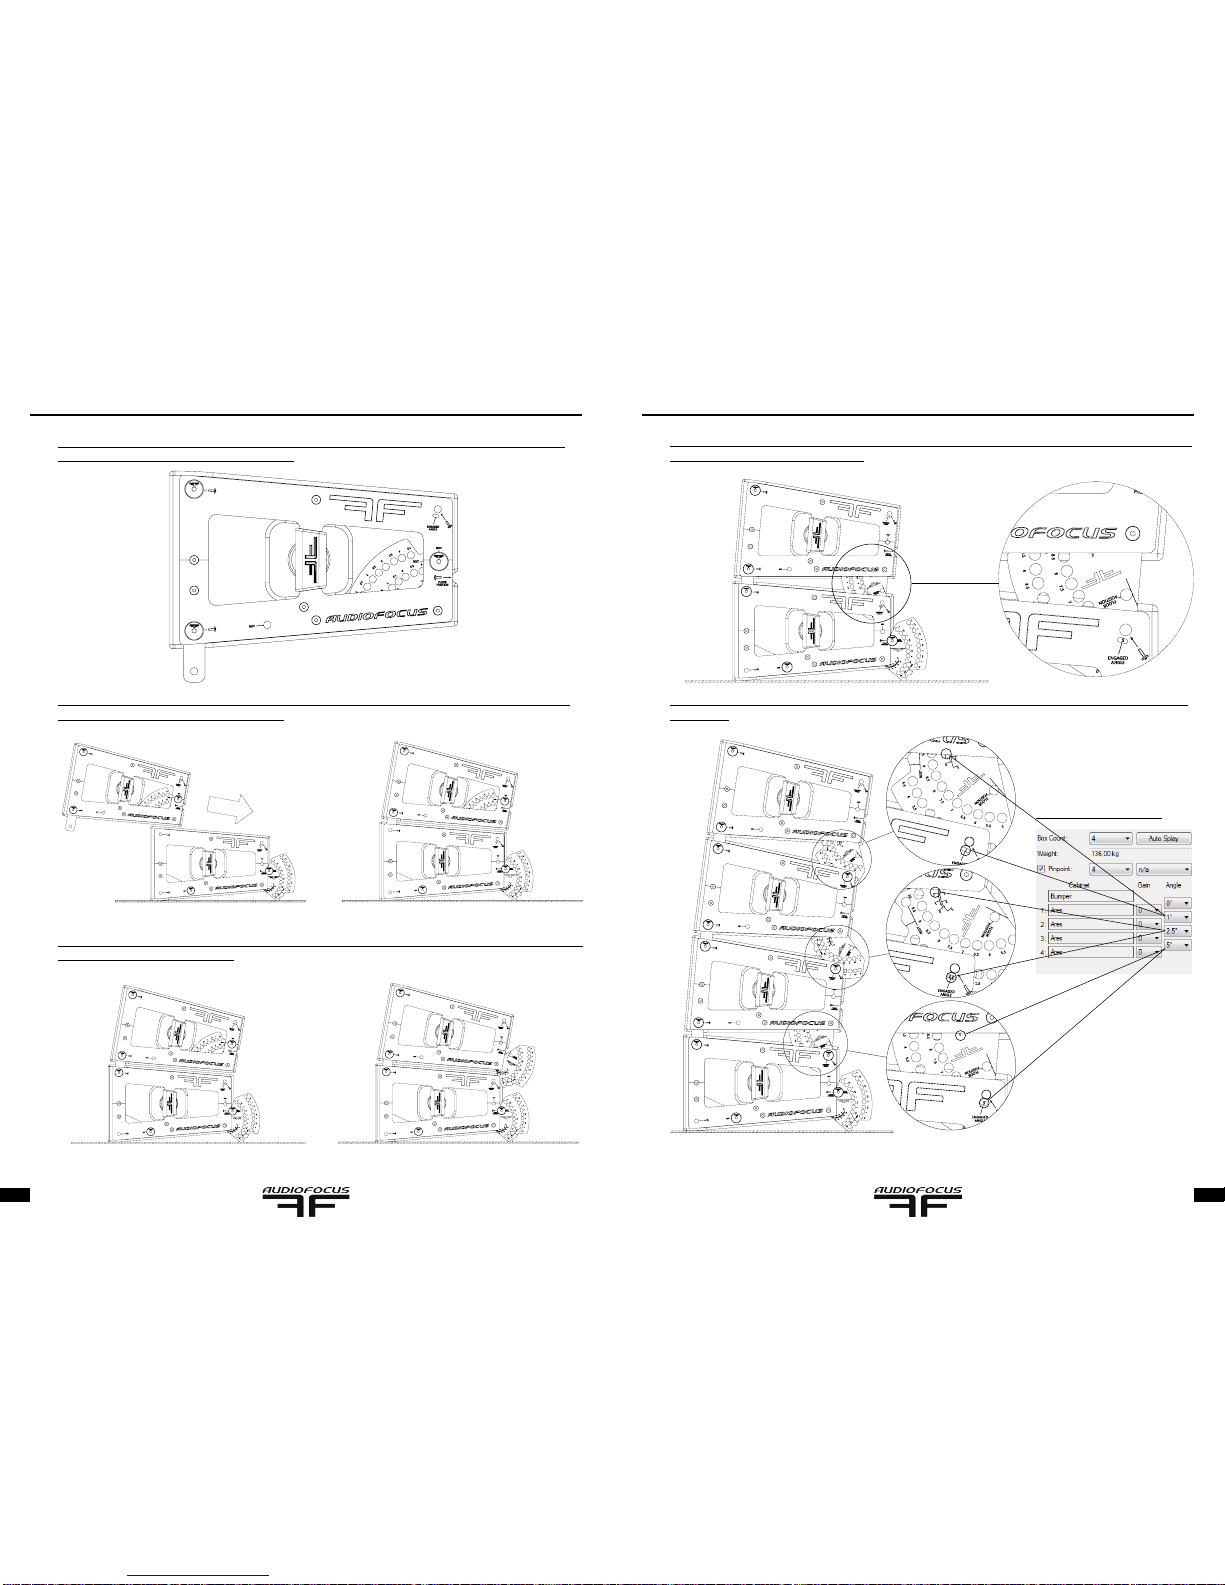
c) Prepare the rest of the ARES 8 cabinets by releasing the bottom pins on each side, rotating the front plates to the
down position and securing them by replacing the pin.
f) Using the angle markings, rotate the rear plate to 5° and pin in place using the top pin on the bottom cabinet. Repeat
this process on the other side of the cabinet.
d) Slide the second ARES 8 onto the bottom one. The auto-lock system will ‘catch’ the top cabinet and ensure it does
not slide back. This adds to the stability of the array.
g) Repeat the steps above to secure the third and fourth ARES 8 cabinets using the angles provided in your initial Ease
conguration.
e) Lock the front on the second ARES in place using the top bin of the cabinet below it. Adjust the rear plate to the angle
calculated in Ease, in this example « e ».
A
A
A
A
A
A
A
A
A
A
A
A
B
A
A
EaseFocus calculated angles
C
D
E
C
D
E
C
D
E

ARES 8 user’s manual ARES 8 user’s manual
67
i) Ease Focus will also inform you which pin point to use on the y bar, in this case the 4th. Using this hanging point
of the system attach and lift the array slightly. Reset the bottom back plate to the rest position and secure it with the
magnet pin.
j) With the system suspended slightly, wire the system. Once all signal and power cable links are in place, you can
power up the cabinets for a preliminary sound check. Remembering to:
- Set the correct presets on the ARES 8 (see Section 4 in this manual)
- Set the correct levels on the ARES 8. As this can be affected by the ration of ARES 8 to subs, we recommend
setting all ARES 8 at +6dBu on the rear ampliers and running them of a balanced master from your mixing desk.
By then running a second balanced master for the subwoofers your System Technician or FOH engineer will be
able to further balance the system as required.
Following EaseFocus Filter Settings, you can adjust the right preset and make a checksound before lifting the system at
the needed height (here 3.5m).
h) Once the array has been assembled, carefully conrm the angles macth the Ease conguration data. The ARES8
angle markings on the rear plate are easy reference points. The image below (left) shows a 5 ARES 8 array assembled
on the oor by one person in less than 10 minutes.
Your array is now ready to be mounted on the ying frame (bumper) which can be easily attached to the front and rear
pins on the top ARES cabinet as illustrated below.
A
A
Audio inout signal
Balanced 2+ / 3- /1GND
Power supply
(240V-50Hz)

ARES 8 user’s manual ARES 8 user’s manual
8 9
2. Rigging ARES 8 from Flight Case
One of the benets on an AUDIOFOCUS supplied ARES 8 ightcase is the ability to precongure your cabinets before you leave
the warehouse, further minimizing on-site rigging time.
Let’s use the following specication for this example: 4 x ARES 8 per side, J shape for 15 x 25 m audience area in free eld
(see section 6).
a) Use Ease Focus software to analyze your venue, model your required coverage and to generate conguration parame-
ters :
b) Using the parameters supplied in Ease, rig your ARES 8 array in the ightcase as per the instructions in Steps 2 to 7
in Section 1.
c) Remove the ying frame from the ightcase and mount it using the front and rear pins on the top ARES 8 cabinet to
secure. Rig the frame via the hanging point indicated in Ease and lift to at least 50mm off the oor.
d) Release the bottom magnetic pins to free the ightcase, wire your system and perform a preliminary soundcheck. See
Step 10 in Section 1 for more information.
A
A
A
A
A
A
A
A
A
A

ARES 8 user’s manual ARES 8 user’s manual
10 11
3. Ground-stacking ARES 8
Using the same rear plate used to prepare an array hang, ARES 8 can easily be ground-stacked on the oor, a stage or on top
of a subwoofer. This solution allows the use of ARES 8 in venues without suitable load hanging points or load capacity.
ARES 8 can also be mounted on top of MTSub218’s and with its compact format can be setup by just one person. Factor in
the 110° horizontal dispersionand you have a versatile, high performance, ground-stacked FOH system.
ARES 8 can also be used directly on MTSub218a. It creates a high performances plug’n play FOH system.
ARES 8 own over MTSub218MKII (using ying frame)
ARES 8 mounted above MTSub218MKII on a T-Yoke
ARES 8 mounted on MTSub218MKII using an Over Hat
ARES 8 own under B18a
A
A

ARES 8 user’s manual ARES 8 user’s manual
12 13
III. Presets and electronics
ARES 8 are powered by highly efcient Powersoft digital ampliers. These green energy ampliers feature 4 presets suitable
for most common applications.
* 0dBu in EaseFocus equals +6dBu on ARES 8. This is the max position of the volume control.
1. The main voltage must ALWAYS be earthed to protect the user (shock hazard).
2. ALWAYS replace the fuse with the same type and value (T3.15A/240V).
3. Make sure that the power switch is set to “OFF” before you connect the devices.
4. A high quality cable improves the sound quality, keep input cables as short as possible.
5. If long cables are necessary, always use balanced cables.
!
Diagnosis and status Leds:
Limit ON: Output signal is @+3dBspl of the peak.
Temp ON: Working temperature is too high. This will force electronics into protection
(attenuation of signal) and cut out if temperature increases further.
Signal ON: Input signal detected.
Ready ON: System ready for use.
The ARES 8 line array is an easy plug ’n play system that features 4 presets. Each preset manipulates the ampliers on board
processing to best suit the number of coupled ARES 8.
Preset1: used for front lls situations (1 ARES 8)
Preset2: <= 4 ARES; used if 4 or less ARES 8 are coupled
Preset3: 5>8 ARES; used if 5 to 8 ARES 8 are coupled
Preset4: +8 ARES; if more than 8 ARES 8 are coupled
Onboard presets decrease on-site conguration time by taking care of up to 80% of the work needed to pair the system with
your venue. This leaves the FOH engineer able to ensure the perfect sound through a nal EQ process.
In this example, with four ARES 8, we would choose Preset 2 in Ease Focus to generate an suitable simulation and congura-
tion report.
A
A
In our case of 4 ARES, we have to choose
Preset 2 in ‘’Ease Focus’’ to create the
good simulation and technical report
Balanced input XLR connector (male, 2+, 3-, 1GND)
Preset selection switch
OUT main power supply connector (powercon)
Preset table
Volume control
from -∞ to +6dBu *
Diagnosis and
status Leds. Balanced output XLR
connector (male, 2+, 3-,
1GND).
IN main power supply connector (powercon)

ARES 8 user’s manual ARES 8 user’s manual
14 15
IV. ARES 8 with RS485
ARES 8 is also available with a RS485 interface which allows the management of the sound system as a complete network.
Similar to the DMX protocol used in lighting systems, each ARES 8 has its own address (given at rear of the cabinet) and the
user daisy chains the cabinets using RJ45 connectors.
The link is then connected to a computer allowing the complete system to be controlled by Armonia software (see section 6).
This allows for adjustment of the input levels and of 5 input EQ’s as well as diagnostic abilities that can check the impedance
of each individual driver, internal operating temperatures as well as output voltages and currents.
1. RS485 interface description:
2. USB to RS485 adapter wiring:
D-Sub 9 pins connector wiring (adapter side): 6 to 9 are not wired
Add the usb/rs485 adapter as follow (see section 6)
Balanced input XLR connector (male, 2+, 3-, 1GND)
OUT main power supply connector (powercon)
Volume control
from -∞ to +6dBu *
RS485
interface
Diagnosis and
status Leds.
Balanced output XLR connec-
tor (male, 2+, 3-, 1GND).
IN main power supply connector (powercon)
Preset table
White board
(stage informations)
RS485 ON led
RX/TX RS485 Leds
Adress encoders RJ45 connectors
D-Sub 9 RJ-45 Color (rj45)
13 + 6 Green white / Green
24 + 5 Blue / Blue white
3NC
4NC
51 + 8 Orange white / Brown
6 NC
7NC
8NC
9NC

ARES 8 user’s manual ARES 8 user’s manual
16 17
3- Daisy chain connection and computer wiring:
Each cabinet is connected in serial with the next one to create the RS485 network, the system can be managed by Armonia
software (see section 6)
V. Important links:
Ease database (including ares):
http://focus.afmg.eu/index.php/loudspeaker-data.html
===> .gll les for simulations
Ease free download (application for AreS simulations):
http://focus.afmg.eu/index.php/fc-downloads-en.html http://focus.afmg.eu/index.php/tools.html
===> to install for simulations
Rigging demonstration:
https://www.youtube.com/watch?v=_mrcHMjEDXc
EaseFocus tutorial:
https://www.youtube.com/watch?v=-Ceblae-6uo
RS485:
Armonia software download:
http://www.powersoft-audio.com/en/software/armonia-pro-audio-suite
Armonia tutorial:
http://www.powersoft-audio.com/en/software/armonia-tutorial
USB-RS485 adapter example:
http://www.powersoft-audio.com/en/accessories?idaccessorio=9&idp=22
https://www.elfa.se/elfa3~eu_en/elfa/init.do?item=25-791-10&toc=25065&q=112887
Use the usb/
rs485 adapter

ARES 8 user’s manual ARES 8 user’s manual
18 19
CAUTIONS!
CAUTION: Turn the amplier on last and off rst!
Keep this device away from rain and moisture!
Every person involved with the installation, operation and maintenance of this device has to:
- be qualied.
- follow the instructions of this manual.
- consider this manual to be part of the total product.
- keep this manual for the entire service life of the product.
- pass this manual on to every further owner or user of the product.
- download the latest version of the user manual from the Internet.
Safety instructions:
That device has been CE approved. All the subsets are fully RoHS and CEM compatible.
This speaker-system has left our premises in absolutely perfect condition. In order to maintain this condition and to ensure a safe opera-
tion, it is absolutely necessary for the user to follow the safety instructions and warning notes written in this user manual.
Important:
Damages caused by the disregard of this user manual are not subject to warranty. The dealer will not accept liability for any resulting
defects or problems.
Please make sure that there are no obvious transport damages. Should you notice any damages on the connection panel or on the
casing? Do not take the speaker-system into operation and immediately consult your local dealer.
DANGER OF BURNING!
The materials used in this speaker-system are normally ammable. If B1 is required at the installation place, the surface must be treated
with an appropriate re retardant in regular intervals.
DANGER TO LIFE!
A crashing speaker-system can cause deadly accidents. All safety instructions given in this manual must be observed.
Before the speaker-system is switched on all faders and volume controls have to be set to «-∞» or «min» position.
HEALTH HAZARD!
By operating speaker-systems with an amplier, you can produce excessive sound pressure levels that may lead to permanent hearing
loss.
Keep away children and amateurs!
There are no serviceable parts inside the speaker-system. Maintenance and service operations are only to be carried out by authorized
dealers.
Operating determinations:
This audio system is a passive or active system which can be used for permanent installations or for mobile use.
This product is only allowed to be connected with appropriate power amplier and sources. It was designed for indoor use only.
The maximum power of the speaker system must never be exceeded. When operating the speaker system, please make sure that the
loudspeakers always sound well. When distortions can be heard, the amplier or the loudspeaker is overloaded, or signal is very poor qua-
lity. Overloads can quickly lead to amplier, speaker or hears damage.
In order to avoid damage, please reduce the volume immediately when distortions can be heard. When speaker systems are destroyed by
overload, the guarantee becomes void.
By operating speaker systems with an amplier, you can produce excessive sound pressure levels that may lead to permanent hearing
loss. Please refer to the explanations under «Legal instructions».
!!
!
WARNING!
Speaker systems must only be operated by trained persons.
Danger of Life due to crashing speaker systems or hearing loss due to excessive sound pressure levels! The different local conditions have to be
considered in terms of safety rules.
When using smoke machines, make sure that the speaker system is never exposed to the direct smoke jet and is installed in a distance of 0.5 meters
between smoke machine and speaker system.
The ambient temperature must always be between +3° C and +45° C. Keep away from direct insulation(particularly in cars) and heaters.
This speaker system must only be installed at a solid, plane, anti-slip, vibration-free, oscillation-free and re-resistant location.
LEGAL INSTRUCTIONS:
Operating an amplication system can produce extremely high noise levels that may cause a permanent hearing loss. The legal ins-
tructions for using an amplication system vary from country to country. The user must always inform himself on the legal instructions
valid in his country and apply them to his situation. Always monitor the sound pressure level when operating an amplication system in
discotheques, concerts etc. Never exceed the permissible noise level exposures as specied by your authorities. The monitoring of the
noise levels must be documented in an appropriate way.
Hearing damage caused by high noise levels can be treated as physical injury and persecuted by law. Please note that the organizer is
responsible for keeping to a specied noise level. If this noise level will be exceeded, the event may be cancelled immediately.
If the organizer does not fulll his safety duties, he is reliable by civil law for any damages occurred, e.g.: Pay the treatment costs of the
damaged person, pay a smart money to the damaged person.
Economic damage caused can be demanded from the operator of the amplication system. If hired persons work with amplication sys-
tems: the noise levels of music events are almost always too high. This is why the entrepreneur has to set up warning signs and provide
hearing protectors. The staff has to use these.
AudioFocus© cannot be made liable for damages caused by incorrect installations and excessive noise levels.
Please note:
When using this speaker system in public or industrial areas, a series of safety instructions have to be followed that this manual can only give in part.
The operator must therefore inform himself on the current safety instructions and consider them.
Before installing the system, make sure that the installation area can hold a minimum point load of 8 times the system’s load (e.g. weight 20 kg - point
load 160 kg).
The speaker system must never be installed higher than 100 cm without secondary attachment.
For overhead use (mounting height >100 cm), always x the speaker system with an appropriate safety rope.
DANGER!
This speaker system must only be suspended by experienced and trained persons - Danger to Life due to crashing speaker systems!
If the original speaker system is equipped with an appropriate ange, this speaker system can be installed on top of a subwoofer (satellite system), on a
speaker stand, an appropriate stand or an appropriate wall-mounting. The carrying capacity of the distance-tube, the speaker
stand, the stand or the wall-mounting must never be exceeded.
The Top units must always provide enough stability. The Sub unit base surface must always be sufciently dimensioned in relation to the top speaker in
order to prevent tilting over.
Operate the speaker system only after having familiarized with its functions. Do not permit operation by persons not qualied for operating the speaker
system. Most damages are the result of unprofessional operation!
Speaker systems must never be transported with cranes. Never stack heavy objects on this speaker system. Persons must never climb onto this spea-
ker system.
Never use solvents or aggressive detergents in order to clean the speaker system! Rather use a soft and damp cloth.
Please consider that unauthorized modications on the speaker system are forbidden due to safety reasons!
If this speaker system will be operated in any way different to the one described in this manual, the product may suffer damages and the guarantee
becomes void. Furthermore, any other operation may lead to dangers like crashes, hearing loss etc.
!
!

FR-X user’s manual
Rue du Polissou, 17
5590 Achêne - Belgium
Tel: +32 83 21 80 54
Email: [email protected]
Web: www.audiofocus.eu
Table of contents
Other AUDIO FOCUS Speakers manuals


