Audio Pro AVD-303 User manual

Instruction Manual
Thank you for purchasing an Audio Pro DVD Receiver
Please read this manual thoroughly before making
connections and turning on the power.
Following the instructions in this manual will enable you
to obtain optimum performance and listening enjoyment
from your new DVD Theater System.
Please retain this manual for future reference.
Contents
Getting Started 6
Facilities and Connections 12
Function Setup 27
Basic Operations 32
Advanced Operations 49
Others 59
DVD Receiver
AVD-303
English

2
Important Safety Instructions
1. Read these instructions.
2. Keep these instructions.
3. Heed all warnings.
4. Follow all instructions.
5. Do not use this apparatus near water.
6. Clean only with dry cloth.
7. Do not block any ventilation openings. Install in
accordance with the manufacturer’s instructions.
8. Do not install near any heat sources such as radia-
tors, heat registers, stoves, or other apparatus
(including amplifiers) that produce heat.
9. Do not defeat the safety purpose of the polarized or
grounding-type plug. A polarized plug has two
blades with one wider than the other. A grounding
type plug has two blades and a third grounding
prong. The wide blade or the third prong are pro-
vided for your safety. If the provided plug does not
fit into your outlet, consult an electrician fording)
replacement of the obsolete outlet.
10. Protect the power cord from being walked on or
pinched particularly at plugs, convenience recepta-
cles, and the point where they exit from the appara-
tus.
11. Only use attachments/accessories specified by the
manufacturer.
12.
Use only with the cart, stand,
tripod, bracket, or table spec-
ified by the manufacturer, or
sold with the apparatus.
When a cart is used, use cau-
tion when moving the cart/
apparatus combination to
avoid injury from tip-over.
13. Unplug this apparatus during lightning storms or
when unused for long periods of time.
14. Refer all servicing to qualified service personnel.
Servicing is required when the apparatus has been
damaged in any way, such as power-supply cord or
plug is damaged, liquid has been spilled or objects
have fallen into the apparatus, the apparatus has
been exposed to rain or moisture, does not operate
normally, or has been dropped.
15. Damage Requiring Service
Unplug the apparatus from the wall outlet and refer
servicing to qualified service personnel under thee
following conditions:
A. When the power-supply cord or plug is dam-
aged,
B. If liquid has been spilled, or objects have fallen
into the apparatus,
C. If the apparatus has been exposed to rain or
water,
D. If the apparatus does not operate normally by
following the operating instructions. Adjust only
those controls that are covered by the operating
instructions as an improper adjustment of other
controls may result in damage and will often
require extensive work by a qualified technician
to restore the apparatus to its normal operation,
E. If the apparatus has been dropped or damaged in
any way, and
F. When the apparatus exhibits a distinct change in
performance this indicates a need for service.
16. Object and Liquid Entry
Never push objects of any kind into the apparatus
through openings as they may touch dangerous volt-
age points or short-out parts that could result in a
fire or electric shock.
The apparatus shall not be exposed to dripping or
splashing and no objects filled with liquids, such as
vases shall be placed on the apparatus.
Don’t put candles or other burning objects on top of
this unit.
17. Batteries
Always consider the environmental issues and fol-
low local regulations when disposing of batteries.
18. If you install the apparatus in a built-in installation,
such as a bookcase or rack, ensure that there is ade-
quate ventilation.
Leave 20 cm (8") of free space at the top and sides
and 10 cm (4") at the rear. The rear edge of the shelf
or board above the apparatus shall be set 10 cm (4")
away from the rear panel or wall, creating a flue-like
gap for warm air to escape.
WARNING:
TO REDUCE THE RISK OF FIRE OR ELECTRIC
SHOCK, DO NOT EXPOSE THIS APPARATUS
TO RAIN OR MOISTURE.
CAUTION:
TO REDUCE THE RISK OF ELECTRIC SHOCK,
DO NOT REMOVE COVER (OR BACK). NO
USER-SERVICEABLE PARTS INSIDE. REFER
SERVICING TO QUALIFIED SERVICE
PERSONNEL.
The lightning flash with arrowhead symbol, within an
equilateral triangle, is intended to alert the user to the
presence of uninsulated “dangerous voltage” within
the product’s enclosure that may be of sufficient
magnitude to constitute a risk of electric shock to
persons.
The exclamation point within an equilateral triangle is
intended to alert the user to the presence of important
operating and maintenance (servicing) instructions in
the literature accompanying the appliance.
WARNING
RISK OF ELECTRIC SHOCK
DO NOT OPEN
RISQUE DE CHOC ELECTRIQUE
NE PAS
OUVRIR
AVIS
PORTABLE CART WARNING
S3125A

3
Precautions
1. Regional Restriction Codes (Region Number)
Regional restriction codes are built into DVD receivers and DVD
videos for each sales region. If the regional code of the DVD
receiver does not match one of the regional codes on the DVD
video, playback is not possible.
The regional number can be found on the rear panel of the DVD
receiver. (e.g. for Region 2)
2. About This Manual
This manual explains the basic procedures for operating the DVD
receiver. Some DVD videos do not support the full potential of
the DVD technology. Your DVD receiver may therefore not
respond to all operating commands. Refer to instruction notes on
discs.
A “ ” mark may appear on the TV screen during operation. It
means that the operation is not permitted by the DVD receiver or
the disc.
3. Recording Copyright
Recording of copyrighted material for other than personal use is
illegal without permission of the copyright holder.
4. AC FUSE
The fuse is located inside the chassis and is not user-serviceable.
If power does not come on, contact your Audio Pro authorized
service center.
5. Power
WARNING
BEFORE PLUGGING IN THE UNIT FOR THE FIRST TIME,
READ THE FOLLOWING SECTION CAREFULLY.
The voltage of the available power supply differs according to
country or region. Be sure that the power supply voltage of the
area where the unit will be used meets the required voltage (e.g.,
AC 230V 50 Hz) written on the rear panel.
6. Do not touch the unit with wet hands
Do not handle the unit or power cord when your hands are wet or
damp. If water or any other liquid enters the case, take the unit to
an authorized service center for inspection.
7. Location of the unit
• Place the unit in a well-ventilated location.
Take special care to provide plenty of ventilation on all sides of
the unit especially when it is placed in an audio rack. If
ventilation is blocked, the unit may overheat and malfunction.
• Do not expose the unit to direct sunlight or heating units as the
unit’s internal temperature may rise and shorten the life of the
pickup.
• Avoid damp and dusty places and places directly affected by
vibrations from the speakers. In particular, avoid placing the
unit on or above one of the speakers.
• Be sure the unit is placed in a horizontal position. Never place
it on its side or on a slanted surface as it may malfunction.
• When you place the unit near a TV, radio, or VCR, the playback
picture may become poor and the sound may be distorted. In
this case, place the unit away from the TV, radio, or VCR.
8. Care
From time to time you should wipe the front and rear panels and
the cabinet with a soft cloth. For heavier dirt, dampen a soft cloth
in a weak solution of mild detergent and water, wring it out dry,
and wipe off the dirt. Following this, dry immediately with a
clean cloth.
Do not use rough material, thinners, alcohol or other chemical
solvents or cloths since these could damage the finish or remove
the panel lettering.
9. Notes on Handling
When shipping the unit, use the original shipping carton and
packing materials. For maximum protection, repack the unit as it
was originally packed at the factory.
• Do not use volatile liquids, such as insect spray, near the unit.
Do not leave rubber or plastic products in contact with the unit
for a long time. They will leave marks on the finish.
• The top and rear panels of the unit may become warm after a
long period of use. This is not a malfunction.
• When the unit is not in use, be sure to remove the disc and turn
off the power.
• If you do not use the unit for a long period, the unit may not
function properly in the future. Turn on and use the unit
occasionally.
10.Notes on Moisture Condensation
Moisture condensation damages the unit.
Please read the following carefully.
• What is moisture condensation?
Moisture condensation occurs, for example, when you pour a
cold drink into a glass on a warm day. Drops of water form on the
outside of the glass. In the same way, moisture may condense on
the optical pick-up lens inside the unit, one of the most crucial
internal parts of the unit.
• Moisture condensation occurs in the following cases.
– When you bring the unit directly from a cold place to a
warm place.
– When you use the unit in a room where you just turned on
the heater, or a place where the cold wind from the air
conditioner directly hits the unit.
– In summer, when you use the unit in a hot and humid place
just after you move the unit from an air conditioned room.
– When you use the unit in a humid place.
• Do not use the unit when moisture condensation may
occur.
If you use the unit in such a situation, it may damage discs and
internal parts. Remove the disc, connect the power cord of the
unit to the wall outlet, turn on the unit, and leave it for two or
three hours. After a few hours, the unit will have warmed up and
evaporated any moisture. Keep the unit connected to the wall out-
let and moisture condensation will seldom occur.
DANGER:
VISIBLE LASER AND INVISIBLE RADIATION WHEN
OPEN AND INTERLOCK FAILED OR DEFEATED. DO
NOT STARE INTO BEAM.
CAUTION:
THIS PRODUCT UTILIZES A LASER. USE OF
CONTROLS OR ADJUSTMENTS OR PERFORMANCE
OF PROCEDURES OTHER THAN THOSE SPECIFIED
HEREIN MAY RESULT IN HAZARDOUS RADIATION
EXPOSURE.
This unit contains a semiconductor laser system and is
classified as a “CLASS 1 LASER PRODUCT”. So, to use
this model properly, read this Instruction Manual carefully. In
case of any trouble, please contact the store where you
purchased the unit. To prevent being exposed to the laser
beam, do not try to open the enclosure.
This label on the rear panel states that:
1. This unit is a CLASS 1 LASER PRODUCT and employs
a laser inside the cabinet.
2. To prevent the laser from being exposed, do not remove
the cover. Refer servicing to qualified personnel.
2

4
Table of Contents
Important Safety Instructions / Precautions / Table of Contents ............................................... 2
Features ........................................................................................................................................... 6
Notes on Copyright
Supplied Accessories..................................................................................................................... 7
Supplied Accessories
Preparing the Remote Controller................................................................................................... 9
Inserting the Batteries / Pointing the remote controller in the right direction
Notes on Discs .............................................................................................................................. 10
Playable Discs / MP3/JPEG compatibility / Handling Discs /
Cleaning Discs / Storing Discs / Differences in Disc Composition
Control Position and Names ........................................................................................................ 12
Front Panel / Display / Rear Panel / Remote Controller
Connecting Your AV Components .............................................................................................. 16
Before making any connections / AV cables & connectors / Connecting to a TV /
Connecting a Video Device / Connecting a VCR for Recording
Connecting Speakers ................................................................................................................... 21
About wall-mounted speakers / Standard speaker placement and speaker functions /
Connecting the subwoofer, front (left and right), center, and surround speakers
Connecting the Antenna............................................................................................................... 24
Connecting the Indoor FM Antenna / Connecting the AM Loop Antenna /
Connecting an Outdoor FM Antenna / Connecting an Outdoor AM Antenna
Connecting the Power/Turning on the DVD receiver................................................................. 26
Customizing Function Settings ..................................................................................................
.27
To set the TV system / Setting Steps / General Setup / Audio setup / Preferences
Getting Started
Facilities and Connections
Function Setup

5
Basic Operation .............................................................................................................................32
Adjusting the Volume / Muting the Sound / Playing the connected source
Speaker Setup................................................................................................................................33
Adjusting Each Speaker’s Relative Volume Balance - Test Tone / Setting the Distance From the
Listening Position to Each Speaker/ Level setting using a music source
Playing DVDs (Basic Playback)....................................................................................................36
Playing DVDs / Resuming playback from where you stopped / Stopping playback /
To display the top menu / To display the menu / Locating a title using the title menu /
Locating a specific chapter consecutively /
Locating a specific title and chapter by entering the numbers / Searching
Playing CDs (Basic Playback)......................................................................................................39
Playing / Playback without using the menu playback function /
CDs
Searching / Locating a specific track consecutively /
Stopping Playback and Switching Power Off / Locating a specific track directly
Playing MP3/JPEG Files (Basic Playback) ..................................................................................41
Playing back MP3/JPEG / Selects the files to be played back directly /
Rotating a picture (JPEG files only)
Listening to the Radio ...................................................................................................................43
Tuning Manually / Presetting Radio Stations
Enjoying the Sound Effects..........................................................................................................47
Selecting Surround Mode / Checking the Sound System of the Playing Source /
Adjusting the Subwoofer Level Control
Playing DVDs (Various Playback) ................................................................................................49
Repeating a Title or Chapter / Repeating a Specific Segment / Viewing a still frame /
Viewing slow playback / Changing the Camera Angle / Selecting a Subtitle /
Selecting a Playback Audio Setting / Viewing information
Playing CDs (Various Playbacks) ................................................................................................52
Repeating a Track / Repeating a Specific Segment /
Random play / Setting Tracks in a Favorite Order /
Viewing information
Playing a MP3/JPEG (Various playbacks) ...................................................................................57
MP3/JPEG program playback / MP3/JPEG Repeat Play / MP3/JPEG Random play
DVD Menu Language Code List ...................................................................................................59
Troubleshooting ............................................................................................................................60
Specifications ................................................................................................................................63
Basic Operations
Advanced Operations
Others
RDS functions and display

6
Features
AVD-303 Integrated Receiver/DVD
Player
Receiver Section
> DTS
*1 , Dolby
*2 Digital, Dolby Pro Logic II Decoding
> A-Form-Auto Format Sensing
> Linear PCM 96 kHz/24-bit D/A Converters
> Built-in 64-bit DSP Processor
> Color-Coded Speaker Terminals
DVD/CD Player Section
> MP3 CD/CD/CD-R/RW/JPEG CD Playback
> 2-Mode Search Function (Title/Track)
> Random Playback (CD Only)
> Set Up Menu Audio Language
> Set Up Menu Subtitle Language
> Multi-Aspect Ratio (16:9, 4:3)
*1 “DTS” and “DTS Digital Surround” are trademarks of Digital
Theater Systems, Inc.
*2 Manufactured under license from Dolby Laboratories. “Dolby”,
“Pro Logic” and the double-D symbol are trademarks of Dolby
Laboratories.
It is forbidden by law to copy, broadcast, show, broadcast on cable,
play in public, and rent copyrighted material without permission.
DVD videos are copy protected, and any recordings made from these
discs will be distorted.
This product incorporates copyright protection technology that is
protected by U.S. patents and other intellectual property rights. Use
of this copyright protection technology must be authorized by
Macrovision, and is intended for home and other limited viewing
uses only unless otherwise authorized by Macrovision. Reverse
engineering or disassembly is prohibited.
Notes on Copyright
Memory Preservation
This unit does not require memory preservation batteries. A built-
in memory power backup system preserves the contents of
memory during power failures and even when the power cord is
Unplugged.
The memory preservation period after the unit has been turned off
Varies depending on climate and placement of the unit.
On average, memory contents are protected over a period of a few
weeks after the time the unit has been turned off.
This period is shorter when the unit is exposed to a very humid
climate.
> 5 x 65 W/Channel at 6 WW, 80 W at 4 (Subwoofer)

7
Supplied Accessories
Supplied Accessories
Make sure your box contains everything listed below.
If any pieces are missing, contact your Audio Pro dealer.
The number of accessories is indicated in brackets. Remote controller (R-303) [1]
Batteries (size AAA/R03) [2]
Indoor FM antenna [1] AM loop antenna [1]
Scart Video connection cable [1]
(For RGB Video and Audio)

8

9
Preparing the Remote Controller
1Detach the battery cover.
2Insert the two size AAA/R03 batteries.
Be sure to match the + and - ends of the batteries with the
diagram inside the battery compartment.
3Attach the battery cover.
Notes
> Do not mix new batteries with old batteries or different kinds of
batteries.
> To avoid corrosion, remove the batteries if the remote controller is
not to be used for a long time.
> Remove dead batteries immediately to avoid damage from
corrosion. If the remote controller does not operate smoothly,
replace both batteries at the same time.
> The life of the batteries supplied is about six months but this varies
depending on usage.
Point the remote controller toward the remote control sensor.
Notes
> Place the unit away from strong light such as direct sunlight or
inverted fluorescent light which can prevent proper operation of the
remote controller.
> Using another remote controller of the same type in the same room
or using the unit near equipment which uses infrared rays may
cause operational interference.
> Do not put any object such as a book on the remote controller. The
buttons of the remote controller may be pressed by mistake and
drain the batteries.
> Make sure the audio rack doors do not have colored glass. Placing
the unit behind such doors may prevent proper remote controller
operation.
> If there is any obstacle between the remote controller and the
remote control sensor, the remote controller will not operate.
Inserting the Batteries
Pointing the remote controller in the
right direction
Remote control sensor
Approx. 5 m

10
Notes on Discs
This DVD receiver can playback the following discs.
*1
This unit can play CD-R and CD-RW discs recorded in CD Audio
Format, with MP3 audio files or with JPEG image files.
However, there may be some discs that cannot be played
back with this unit. The causes of this include incomplete disc
finalization, recording characteristics of the recorder as well as
disc properties, damage or stains on the disc in use, and stains or
condensation on the pickup lens of this unit. For details, please
refer to the instruction manual of the recorder.
• You cannot playback discs other than those listed above.
• This unit can play DVD-R, DVD+R, DVD-RW, and DVD+RW
discs, but depending on the recording unit, the disc manufacturer,
etc., playback sometimes may not be possible.
• This DVD receiver uses the PAL/NTSC color system
• Avoid using heart-shaped or octagonal discs. Playing irregularly
shaped discs may damage the internal mechanism of the DVD
receiver.
• Do not use discs that have residue from adhesive tape, rental discs
that have peeling labels, or discs that have custom labels or
stickers. Otherwise, you may not be able to eject the discs or the
DVD receiver may become inoperative.
About playing copy-controlled CDs
Some audio CDs feature copy protection that doesn’t conform to the
official CD standard. Since these are nonstandard discs, they may not
play properly.
Notes on Copyright
It is forbidden by law to copy, broadcast, show, broadcast on cable,
play in public, and rent copyrighted material without permission.
DVD videos are copy protected, and any recordings made from these
discs will be distorted.
This product incorporates copyright protection technology that is
protected by U.S. patents and other intellectual property rights. Use
of this copyright protection technology must be authorized by
Macrovision, and is intended for home and other limited viewing
uses only unless otherwise authorized by Macrovision. Reverse
engineering or disassembly is prohibited.
• This unit will play CD-R, and CD-RW discs containing files
saved in the MPEG-1 Audio Layer 3 (MP3) format with a
sampling rate of 32, 44.1 or 48 kHz, and JPEG format.
Incompatible files will not play. Disc may be ejected
automatically or “NO DISC” will be displayed.
• Fixed bit rate MP3 files are recommended. Variable bit rate
(VBR) MP3 files are playable, but playing times may not be
shown correctly.
• MP3/JPEG discs must be ISO 9660 Level 1 or 2 compliant. CD
physical format: Mode1, Mode2 XA Form1. Romeo and Joliet
file systems are both compatible with this receilver.
• Use CD-R or CD-RW media for recording your files. The disc
must be finalized (i.e., the session must be closed) in order to play
in this unit.
• This receiver only plays tracks that are named with the file
extension .mp3, .MP3, .jpg or .JPG.
• When naming MP3 and JPEG files, add the corresponding file
name extension (.mp3 or .jpg). Files are played according to the
file extension. To prevent noise and malfunctions, do not use
these extensions for other kinds of files.
• Folder and track names (excluding the file extension) are
displayed.
• There are many different recording bit rates available to encode
MP3 files. This unit was designed to be compatible with all of
them. Audio encoded at 128 Kbps should sound close to standard
audio CD quality. This receiver will play lower bit rate files, but
please note that the sound quality becomes noticeably worse at
lower bit rates.
• The AVD-303 can play Exif format pictures supporting JPEG. It is
capable of playing at the maximum resolution of 5120x3840 for
the baseline format, 2048x1536 for the progressive JPEG format.
When saving files onto media
Ensure that the session is closed or finalized when data has been
written on media. There are cases where media on which the session
has not be closed or finalized will not be played back correctly with
this equipment.
• There are cases where the folder names and file names will not be
displayed correctly depending on the software used to save them.
• Do not store files or folders other than MP3 or JPEG on media to
be played back with this equipment.
• It is recommended that ten or less sessions are stored when
recording MP3 files onto a media.
• In case of a multisession disc, some time may be required until
playback begins.
Playable Discs
Disc Mark
DVD Videos
Audio CDs
CD-Rs
*1
CD-RWs
*1
Discs with shapes such as
these cannot be played.
MP3/JPEG Compatibility

11
• There are cases where playback is not possible when MP3/JPEG
files (CD-ROM) and music CD information (CD-DA) are saved
on the same media.
• Do not touch the playback side of the disc.
• Do not attach paper or tape to discs.
• Fingerprints and dust on the disc cause picture and sound
deterioration. Wipe the disc from the center outwards with a soft
cloth. Always keep the disc clean.
• If you cannot wipe off the dust with a soft cloth, wipe the disc
lightly with a slightly moistened soft cloth and finish with a dry
cloth.
• Do not use any type of solvent such as thinner, benzine,
commercially available cleaners or antistatic spray for vinyl LPs,
as these may damage the disc.
• Do not store discs in a place subject to direct sunlight or near heat
sources.
• Do not store discs in places subject to moisture and dust such as a
bathroom or near a humidifier.
• Store discs vertically in a case. Stacking or placing objects on
discs that are outside of their case may cause warping.
DVD
All discs are divided into smaller, more manageable sections so that
you can find specific content more easily. DVDs are divided into one
or more titles. Each title may be further divided into several chapters.
Occasionally, a chapter may contain index points, effectively
dividing the chapter into several parts.
CD
Cds are divided into a number of tracks. In rare cases, a track
may contain a number of index points, effectively
dividing the track into several parts.
MP3/JPEG
MP3 (MPEG1 Audio Layer 3) is compressed audio file formats.
JPEG is a format for saving image files, such as those containing
digital photographs or illustrations. Tracks within folders are
automatically numbered T_001, T_002, etc.
Handling Discs
Cleaning Discs
Storing Discs
Playback side
Differences in Disc Composition
Title 1 Title 2
Chapter 1 Chapter 2 Chapter 3 Chapter 4
DVD
Track 2 Track 3 Track 4
Track 1 Track 5
CD
Folder 1 Folder 2
File 2 File 3 File 4
File 1 File 5
MP3/JPEG

12
Control Position and Names
For operational instructions, see the page indicated in brackets [ ].
1POWER switch [26]
When POWER switch is pressed to ON, the DVD receiver turns
on.
2STANDBY indicator [26]
3Disc tray [36]
When loading a disc, place discs in the disc tray with the label
side facing up.
4Display
5Remote control sensor [9]
Point the remote control toward the remote sensor to operate the
DVD receiver.
6MASTER VOLUME control [32]
The MASTER VOLUME dial is used to control the volume level.
7button [36, 39, 40]
Press to open and close the disc tray.
button [37, 40, 41]
8
Press to stop playback. Pressing once enables playback to resume
from a point shortly before the location where it was stopped.
Pressing twice causes the disc to return to the beginning of the
disc when playback starts again.
button [36-37, 39]
9
Press to start playback. Press again to pause playback, then once
more to resume playback.
buttons [38, 40-41]
10
Press to go back or advance to previous chapters/tracks.
11 TUNING/PRESET
buttons [43-44,46]
Use these buttons to change the tuner frequency and to select
preset channels.
12 SURROUND button [27, 48]
Press to select a surround mode.
13 INPUT selector [32, 43]
Press to select the input source other than DVD.
1Disc indicator [36]
Indicates the type of current disc that is loaded.
2Source/Listening mode indicators
One of the source indicators lights to show the format of the
current source.
3TITLE, CHP (Chapter) indicators
Indicate display mode of the current title or chapter of DVD.
4MEM. (Memory) indicator [44, 57]
5ST (Stereo), TUNED, AUTO indicators [43]
Indicate the reception mode.
6REPEAT indicator [49, 54, 58]
Illuminates during repeat playback.
7A-B indicator [49, 52]
8FOLDER/TRACK indicator
9RANDOM indicator [54, 58]
indicators [36]
10
Lights up in play or pause mode.
11 Parental Lock indicator [31]
12 Multipurpose display
13
Input/Speaker indicator [33-34, 48]
Front Panel
Display
12 3 4 5 6
78910 11 12 13
/II
/
12
35
4678
910 11 12 13
/II

13
For operational instructions, see the page indicated in brackets [ ].
Shapes of jacks vary depending on the area where they are
purchased.
1FRONT SPEAKERS, CENTER SPEAKER, SUBWOOFER
and SURROUND SPEAKERS terminals [23]
These terminals are for connecting to the front, surround speakers,
Center speaker and a passive subwoofer (without amplifier).
2VIDEO2 IN (AUDIO IN) jacks [20]
This jack is for connecting to the Video Output jack on your video
device.
3VIDEO1 IN/OUT (AUDIO IN/OUT) jacks [20]
The IN jack is for connecting to the Audio Output jack on your
video device, while the OUT jack is for connecting to the Audio
Input jack.
4VIDEO2 (VIDEO IN) jacks [20]
This jack is for connecting to the Audio Output jack on your
video device.
5VIDEO1 (VIDEO IN/OUT) jacks [20]
The IN jack is for connecting to the Video Output jack on your
video device, while the OUT jack is for connecting to the Video
Input jack.
6MONITOR OUT jack [17]
Connect a video cable to this jack and to the Video Input jack on
your TV.
7
OPTICAL INPUT
Connect an optical cable to connect an external digital source
DVD OUT (RGB or COMPONENT) jack [17,19]
If your TV has component input, you can connect a component
video cable to your TV and to your DVD Player for ideal video
quality. If you connect a TV that is compatible with a Progressive
scan signal, you can enjoy both Interlaced and Progressive scan.
Rear Panel
SUBWOOFER OUT jack [23]
Connect an active Subwoofer (with amplifier) to this jack.
8
10
Connect the enclosed Scart Video connector cable
Note that the connectors are both for Audio and Video.
Check their marking before connection.
between your TV set and this DVD Receiver. The Scart
connector to your TV and the other marked connectors
to this terminal.
You can choose RGB or COMPONENT OUT in the menus.
(RGB is default setting)
Note: When the RGB is selected as video out, the S-video output
is not available.
ANTENNA terminals [24, 25]
These terminals are for connecting the FM
antenna and AM antenna.
11
DVD OUT (S VIDEO jack) [18]
If your TV has a S-Video jack, you can connect an S-Video cable
to your TV and to your DVD Player for improved video quality.
9
14
Control Position and Names
For operational instructions, see the page indicated in brackets [ ].
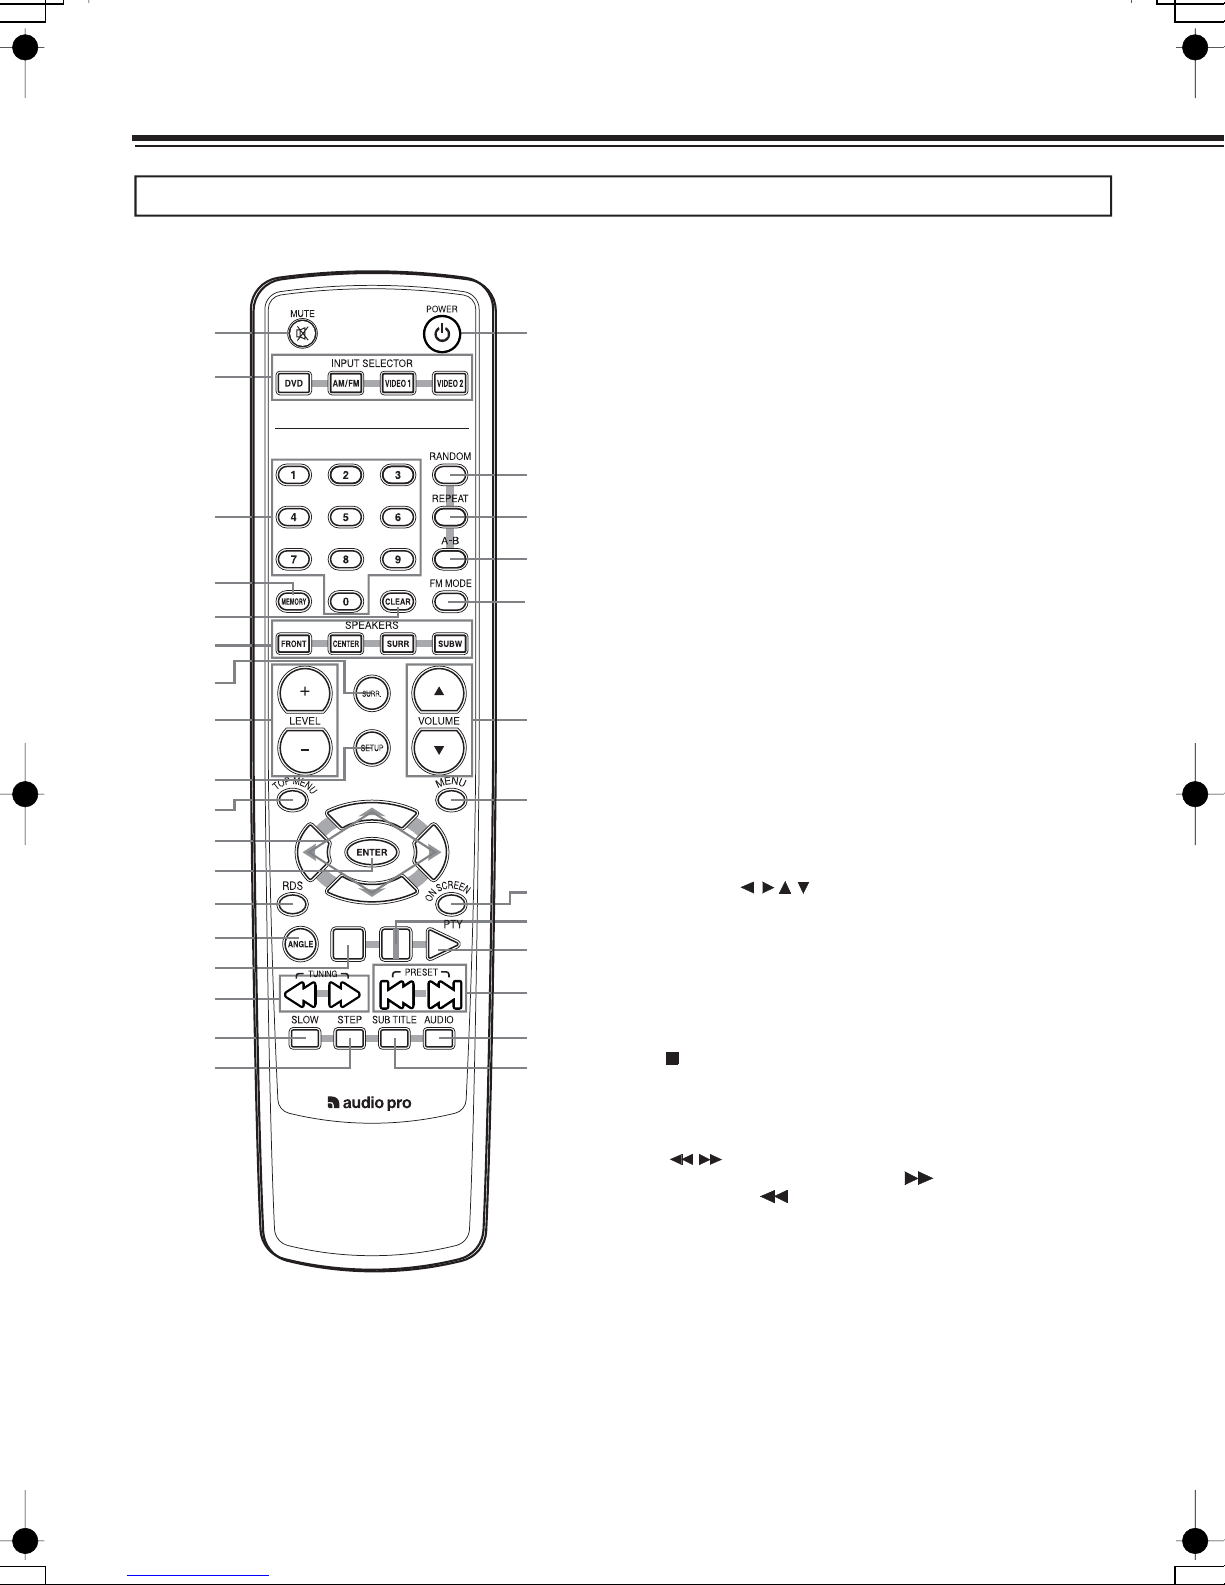
MUTING button [32]
Activates the mute function.
2INPUT selector buttons (DVD/AM/FM/VIDEO1/VIDEO2)
[32, 43]
Press to select the input source.
3Numeric buttons (1-9, 0) [38, 40, 42, 44]
Use to perform direct title/folder and track searches, and to input
numerical values.
4MEMORY button [44, 57]
You can program tracks to play back in desired order. When AM
or FM is selected, use to preset radio stations.
5CLEAR button [56]
6SPEAKERS buttons [35]
Selects a speaker for changing the speaker output level.
7SURROUND button [48]
Press to select the sound mode.
LEVEL +/- buttons [33-35, 48]
Press to adjust the value.
SETUP button [20, 33-34]
Press and hold down during speaker set up.
TOP MENU button [37]
Press to call up the top menu programmed on the DVD.
Depending on the DVD, the top menu may be identical to the
DVD menu.
Cursors [27, 41, 54]
Use to move through the options on menu screens.
ENTER button [27, 41, 55]
Press to choose a selected item or function.
RDS button [45]
ANGLE button [50]
Press to select various camera angles on a disc.
/ Stop Button [37, 40-41]
Press to stop playback (DVD). Pressing once enables playback to
resume from a point shortly before the location where it was
stopped. Pressing twice causes the disc to return to the beginning
of the disc when playback starts again.
buttons [38, 40, 42, 43, 45, 46]
During playback of DVD , press to perform fast forward
scanning or
to perform fast reverse scanning of DVD.
When a CD or MP3 is loaded, audio scanning is performed.
When AM or FM is selected, press for Tuning.
SLOW button [50]
Press to play slow playback.
STEP button [50]
Press during playback to view still frame.
POWER button [26, 40]
Use to toggle standby on and off.
Remote Controller
1
15
16
17
18
19
20
25
27
28
29
30
26
24
21
22
2
3
4
5
6
8
11
13
14
12
10
7
1
9
31
8
9
10
///
()
11
12
13
14
15
16
/
17
18
19
23
In Video 2 mode, switch between Digital (optical) or
Analog audio input.
In Dolby ProLogic II music mode, to adjust desired effects.

15
20 RANDOM button [52, 58]
Press to activate random playback.
REPEAT button [49, 52, 58]
Use to set the repeat mode.
A-B button [49, 52]
Press at the beginning and end of the section you want to repeat
or to mark a location you want to return to.
VOLUME buttons [32]
For adjusting the volume.
MENU button [27, 37]
Use to display or close the DVD menu.
ON SCREEN / PTY button [46, 51, 56-57]
Press to display information about the disc set in the unit.
button [36, 39]
Press to pause disc playback.
button [35-37, 39]
Press to start or resume playback.
buttons/ TUNER PRESET [38, 40, 41, 44]
During playback of DVD and CD, press to go back to a
previous chapter/track and to advance to the next
chapter/track. When AM or FM is selected, press to select preset
Channels.
AUDIO button [51]
Press to select various audio languages on a disc.
SUBTITLE button [27, 51]
Press to select various subtitle language on a disc.
21
22
24 /
25
26
II
27
28
29 //
31
30
For FM input, press to switch between FM Stereo auto and mono.
23 FM Mode button [43]

16
Connecting Your AV Components
• Read the manuals supplied with your AV components.
• Don’t connect the power cord until you’ve completed all audio
and video connections.
RCA/phono AV Connection Color
Coding
RCA/phono AV connections are usually color coded: red, white, and
yellow. Use red plugs to connect right-channel audio inputs and
outputs (typically labeled “R”). Use white plugs to connect left-
channel audio inputs and outputs (typically labeled “L”). Further, use
yellow plugs to connect composite video inputs and outputs.
> Push the plugs in all the way
to make a good connection.
> To prevent interference, keep
audio and video cables away
from power cords and speaker
cables.
Video
Audio
Before making any connections
Right (red)
Left (white)
Right (red)
Left (white)
Incomplete
Inserted completely
AV cables & connectors
Component
video
Component video separates the luminance (Y) and color
difference signals (P
R,P
B), providing the best picture
quality. Some TV manufacturers label their component
video inputs differently.
S-Video
S-Video provides better picture quality than composite
video.
Composite
video
Composite video can be found on virtually all TVs,
VCRs, and video equipment.
Analog RCA/phono analog audio connectors can be found on
virtually all AV components.
C
R
C
B
Y
C
R
C
B
P
R
P
B
P/ /
//
R
P
B
Y
YPBRP
S VIDEO
VIDEO
LR
AUDIO
TV DVD Receiver
Scart
Adaptor
YPBRP
LR
AUDIO VIDEO
This scart adaptor is enclosed with this unit. The
scart is connected to your TV set and the RCA jacks
are connected to corresponding jack on the receiver.
Both Audio and Video is connected easily.
(Option)
(Option)
(Option)
(Option)
Optical Optical audio connectors can be found on
virtually all digital components.
(Option)

17
Before Connecting
Connect the DVD receiver to the TV or AV component directly. If you connect the DVD receiver to a VCR, TV/VCR combination, or video
selector, the playback picture may be distorted as DVD Video images are copy protected.
This player has 3 kinds of video output jacks.
• Video jack connection: Use optional Video Connection Cable to connect.
• S-Video jack connection (optional): For higher quality video than video jack connection.
• Component jack connection (optional): For higher quality video than S-video jack connection.(factory setting isdefault RGB )
If your TV has Video Input connector
Using the video connection cable (option), make video connection from the MONITOR OUT jack to the corresponding video input jack on
the TV.
The video signal input from VIDEO1 and VIDEO2 jacks is output from MONITOR OUT jack only.
Note
When using this type of connection, make sure Progressive Output is set to OFF (page 19). If Progressive Output is set to ON, the picture will
not appear on the TV screen.
Connecting to a TV
VIDEO
Video connection cable
(Optional)
If your TV has Scart Input connector (RGB)
Using the scart connection cable (supplied), make video connection from the MONITOR OUT jack, COMPONENT jacks and AUDIO OUT
Jacks. Each RCA connector is clearly marked.
When using this type of connection, make sure Progressive Output is set to OFF (page 19). If Progressive Output is set to ON, the picture will
not appear on the TV screen.
Note

18
Connecting Your AV Components
If your TV has S-Video Input connector
If the TV or monitor has an S-video input, making this type of video connection will produce improved picture quality. Using an
S-video cable
(sold separately), connect the DVD OUT jack to the corresponding S-video input jack on the TV.
The video signal input from VIDEO1 and VIDEO2 jacks is not output from DVD OUT S VIDEO jack.
Note
When using this type of connection, make sure Progressive Output is set to OFF (page 19). If Progressive Output is set to ON, the picture will
not appear on the TV screen.
S VIDEO
S-video connection cable
(not supplied)
Before using S-Video make sure COMPONENT is selected in the Preferences / Video output menu.

19
If your TV has Component Input
connector
If the TV or monitor has component video inputs, making this type of
video connection will produce ideal picture quality for the
presentation of DVD-Video. Using a component video cable (sold
separately), connect the DVD OUT COMPONENT jacks to the
corresponding component video input jacks on the TV.
Actual labels for component video inputs may vary depending on the
TV manufacturer. (e.g., Y, R-Y, B-Y or Y, CB
,C
R)
In some TVs or monitors, the color levels of the playback picture
may be reduced slightly or the tint may change. In such a case, adjust
the TV or monitor for optimum performance.
This connection is necessary to use progressive function.
To view Progressive scan video, you need a TV with Progressive
scan capability. Please check your Tv’s manual.
Notes
> If the connected TV supports the progressive function, Progressive
Output is available for selection.
> The DVD Player can output NTSC or PAL format video depending
on the setting on page 27. Make sure your TV supports the disc’s
video format.
Tip
When the TV has a COMPONENT terminal, the DVD image will be played back with higher picture quality in case of COMPOSITE
connection. Connect the COMPOSITE video cable also in this case.
Select the scanning method (Progressive/Interlace) of the Component Video output using the button on the front panel.
During stop mode, while pressing the
button on this unit, press and hold the SURROUND button for 5 or more seconds. Each time the
button is held down, the setting changes as follows:
P SCAN ON
P SCAN OFF
P SCAN ON:
When progressive scanning is unavailable with certain discs, the scanning method is switched automatically to interlaced
scanning. When the scanning method is changed, the scanning status will be displayed for a few seconds.
P SCAN OFF: Scanning method is fixed at interlaced scanning.
P
B
PR
Y
Component video connection
cable (not supplied)
> In the MENU Preferences - Video output, the default RGB
setting must be changed to COMPONENT.
/II
/II
Note
The P-scan mode is automatically recovered when the CD/MP3/Jpeg disc is ejected.
Tip

20
Connecting Your AV Components
Video Connections
Use a composite video cable to connect the AVD-303’s VIDEO
VIDEO 2 IN to a composite video output on your satellite tuner, etc.,
as shown. Your TV must also be connected via composite video.
Analog Audio Connections
Use an RCA/phono audio cable to connect the AVD-303’s L/R
VIDEO 2 IN connectors to the analog audio outputs on your satellite
tuner, etc. as shown.
Use a composite video cable to connect the AVD-303’s VIDEO 1
VIDEO OUT to a composite video input on your VCR, use another
composite video cable to connect the AVD-303’s VIDEO 1 VIDEO IN
to a composite video output on your VCR as shown.
Use an RCA/phono audio cable to connect the AVD-303’s L/R
VIDEO 1 AUDIO OUT connectors to the analog audio inputs on
your VCR, use another RCA/phono audio cable to connect the AVD-
303’s VIDEO 1 AUDIO IN connectors to the analog audio outputs
on your VCR as shown.
Notes
> The AVD-303 must be turned on (not Standby) in order to record.
> When you record signal from VIDEO AUDIO OUT jack on the
unit, do not change the surround mode.
Connecting a Video Device
LR VIDEO OUT
AUDIO
OUTPUT
Satellite tuner,
etc.
Connecting a VCR for Recording
LR
AUDIO
OUTPUT
LR
AUDIO
INPUT
VIDEO INVIDEO OUT
VCR
Digital Audio Connections (Video 2 mode)
Use an optical audio cable to connect the AVD-303’s OPTICAL
IN connector to the digital audio output on your Digital satellite tuner,
OUT
MP3 player, Mini Disc etc.
VIDEO OUT
DIGITAL
Notes
> Press short on the SETUP key to switch between ANALOG/
DIGITAL audio input mode (in Video 2 mode). Status is
shown in the display.
Digital Satellite
Tuner
Other manuals for AVD-303
1
Table of contents
Other Audio Pro Receiver manuals


