Audio TT 2021 Instruction Manual

Quick Questions & Answers
2021 TT |TTS |TT RS

1
4
5
6
7
8
2
3
10
9
11
Introduction to Your TT
1. Engine Start/Stop
With key fob in the vehicle, simultaneously depress
the brake and press this button to start the engine.
Pressing this button when the vehicle is in Park shuts
the engine o.
2. MMI®Controls and Touchpad
The control knob/touchpad with integrated joystick
allows you to browse menus, zoom in and out of
map views and select items by pressing the knob.
Control and function buttons allow you to select and
personalize settings, and the MMI touchpad allows you
to input information by writing letters or characters.
3. Infotainment Control Knob
Press and hold the control knob to turn the
Infotainment system on. Turn control knob right or left
to adjust the volume. Tilting the knob to the right or
left will move you through audio tracks or preset radio
stations. Briefly press the control knob to mute the
audio. Press and hold the knob to turn the system o.
4. Voice Recognition
Once activated, a short press of the Voice Recognition
button will activate the MMI voice recognition,
and a long press will activate voice recognition with a
paired phone.
5. Climate Control
Set preferences for temperature, airflow distribution
and recirculation. Use in AUTO or manual mode.
6. Electromechanical Parking Brake
Pulling up on the switch engages the parking brake.
To release, depress the brake pedal and push the
switch down.
7. USB Ports
USB ports located in the storage area enable
connections to the MMI and Audi smartphone
interface, as well as device charging.
8. Media
Select the MEDIA function to access available media
from connected sources (e.g., Bluetooth audio, USB
and more).
9. Steering Wheel Controls
Assist with navigating through a variety of vehicle
functions. To select a menu item, press the
thumbwheel.
10. Audi Virtual Cockpit (Instrument Cluster)
Displays vehicle systems and function information.
Menu selections can be accessed using either the
MMI control knob or the multifunction steering wheel
controls.
11. Cruise Control
The stalk allows you to set and automatically maintain
a speed above 15 mph.

Automatic Climate Control
AUTO Setting
The AUTO setting of your climate control system will help the cabin maintain your selected temperature by regulating the
temperature, fan speed and airflow. When AUTO is selected, the climate control system will come on automatically to
condition and dehumidify the air. Changing the air distribution or fan speed will turn o the AUTO function.
1 3
5
4
2
6
7
System Controls
The three combination knob/vents control fan speed, temperature, air distribution and airflow.
1. Temperature and AUTO
Select an appropriate temperature by turning the knob left for cold and right for warm. Then, press the AUTO button
to activate automatic temperature control.
2. Fan and A/C
Turn the knob left or right to adjust fan speed. Turning the knob all the way to the left will turn o the fan. Press the
center button to turn A/C on or o.*
3. Air Distribution and Recirculation
Turn the knob for windshield, footwell or panel vent distribution. Arrows in the button’s display will indicate the
distribution of airflow. Press the button to recirculate air in the cabin and to prevent outside air from entering.
4. Airflow
Turn the outer ring of the vents to adjust direction. Move the lever below the vent either left or right to adjust airflow
intensity. To shut o airflow, move the lever all the way to the left.
*When A/C is o, the air is neither cooled nor dehumidified, and windows may fog as a result.
Defrost
5. MAX Defrost
Clears the windshield of fog or frost as quickly as possible. Air will be directed to the windshield vents. The
temperature is regulated automatically. Once clear, select AUTO or manually adjust the settings.
6. Rear Defrost
Activates an electric heater embedded in the glass. Depending on outside temperature, the heater will automatically
turn o within 10-20 minutes.
Seat Heating
7. Pressing the button turns the seat heating on at the highest level. To reduce the temperature, press the button again.
To switch seat heating o, press the button repeatedly until the LED turns o. On the TT Roadster, this knob also
controls the optional neck-level heating within the seat. Rotating the knob turns the neck-level heating on/o and
adjusts the heat level from low to medium and high.
Roadster Climate Setting with Convertible Top Open/Closed
When you turn the climate control system on, it automatically detects whether the top is open or closed, and reverts to the
last saved setting for that position.
Automatic Climate Control
Warnings: Climate Control System
See Climate Control System in your Owner’s Manual for more detailed information and for important safety warnings.

Cruise Control
Activate
To activate, pull the control stalk toward you to the ON position.
Set Cruising Speed
At your desired speed, press the SET button at the end of the stalk.
The set speed and the CRUISE indicator light are shown in the Audi
virtual cockpit.
Changing Speed
There are several ways to change your speed:
• Accelerate or decelerate, then press the SET button again.
• Push the stalk up or down one detent to increase/decrease speed in 1 mph increments.
• Hold the stalk up or down to increase/decrease speed; release when desired speed is reached.
Cancel/Resume
1. To cancel, press the brake pedal or push the stalk slightly away from you to the CANCEL position.
2. The CRUISE light will go o.
3. To resume, pull the stalk toward you and you will return to your last set speed.
Your most recently set speed remains in memory until you turn the cruise control or your Audi o.
Audi Side Assist
Side assist can help monitor your blind spot and the trac behind
your vehicle. Within the limits of the system and when activated, it
can warn you about vehicles that are coming closer or those that are
near you within sensor range. If a lane change is classified as critical,
the display in the exterior mirror will turn on.
Turning the system on or o and adjusting the brightness can be
found in the Infotainment system. To adjust or turn on/o, press the
MENU button select Vehicle Left Control button Driver
assistance Audi side assist.
Driver Assistance Features
Warnings: Driver Assistance
See Cruise Control System and Driver Assistance in your Owner’s Manual for more detailed information and for important safety warnings.

MMI Controls
Warnings: Multi Media Interface
See Multi Media Interface in your Owner’s Manual for more detailed information and for important safety warnings.
Steering Wheel Controls
Preset Buttons
1. Voice Recognition
Press to activate voice recognition. Speak available commands
after confirmation tone. Press and hold to cancel voice recognition.
2. Telephone
Press to answer or end a phone call. Press to display call list when
there is no active call.
3. Programmable Button
Allows selection of a custom command defined by the user.
To change function, press the MMI Left Control button Vehicle
settings Steering wheel button.
4. Advance/Replay
Pressing the Forward arrow advances to the next track or radio station. Back arrow returns to the previous track or
station. Pressing and holding the arrows will either fast forward or rewind an audio track.
5. Thumbwheel
Turn volume up or down. Press to mute or pause. Press again to unmute or play.
6. NAV
While route guidance is active, pressing this button will repeat the last navigation cue.
Virtual Instrument Cluster Controls
7. Tab Arrows
Switch between available functions in the Audi virtual cockpit.
8. Control Buttons
Left/Right Control buttons operate the same as the Left/Right
Control buttons in the MMI console.
9. Thumbwheel
Used to move through menus in the Audi virtual cockpit. Press
thumbwheel to make your selection. It can also adjusts map size
when in NAV view.
10. VIEW
Switches between Classic and Expanded view in the Audi virtual
cockpit.
11. Back Arrow Button
Operates the same as the BACK button in the MMI console.
1
4
5
6
2
3
7
8
10
911
MMI®Controls
The Audi Multi Media Interface (MMI) can be controlled from the
center console as well as the steering wheel controls. There are
input redundancies that allow you to access MMI functions in the way
that best suits you.
1. MMI Control Knob/Touchpad
The control knob/touchpad allows you to browse menus and zoom
in and out of map views by rotating the knob, and select items by
pressing the knob. It also allows you to enter alphanumeric
information by writing with your finger on the touchpad.
• To enter a space, swipe left-to-right. To delete a character, swipe right-to-left.
The knob can also be shifted in four directions:
Up: Opens the speller to enter alphanumeric information (e.g., navigation address).
Down: Moves down through a menu.
Left/Right: Opens Selection and Options menus.
2. Control Buttons
Left: The Left Control button opens the Selection menu to call up further functions for individual menu items
(e.g., Radio).
Right: The Right Control button opens the Options menu to select and confirm specific functions for individual
menu items.
3. NAV/MAP/TEL Function
NAV/MAP: Toggle up repeatedly on NAV/MAP to switch the display between navigation input mode and map mode.
TEL: Toggle down to open the Telephone menu and access the Contact directory.
4. MENU Button
Opens the Selection menu in a given function (e.g., RADIO, TEL, NAV, etc.).
5. RADIO/MEDIA Function
RADIO: The RADIO menu allows you to select or manage radio options, including presets and equalization.
Toggle up repeatedly to move through radio bands AM, FM, and SAT.
MEDIA: Allows you to select auxiliary devices and manage music and video content in folders, playlists and tracks.
Toggle down repeatedly to move through the available media sources like Bluetooth, SD, DVD, etc.
6. BACK Button
Moves back through the menu hierarchy in reverse order of your recent selections. When entering text, pressing BACK
will delete a character. Pressing and holding the BACK button will remove all characters on a line.
1
4
5
6
2
3
2
Steering wheel right side controls shown
Steering wheel left side controls shown

Navigation
Setting a Destination
Your Navigation system has extraordinary capabilities to enhance your
drive with user-definable views, routing options and more. Get started
with setting destinations and discover more as you become familiar with
the interface.
1. Using the MMI controls, toggle the NAV/MAP switch to open the
Destination entry input screen.
2. Use the touchpad to write the address or Point of Interest name.
• Or shift the control knob forward to open the speller and
enter information by manually selecting letters and numbers. Press the BACK button to return to writing mode.
3. Available addresses will appear as information is entered, filtering to show only addresses meeting the currently
entered information.
4. Select the appropriate address, then select Start route guidance.
• Additional destination features can be seen by pressing the Left Control button.
• To cancel route guidance, select the Right Control button and select Cancel route guidance from menu.
Alternative Routes
The navigation system can display additional alternative routes based on speed, economy and trac congestion. When this
feature is enabled, alternative routes will be displayed when route guidance is active.
Alternative routes:
1. Press the NAV/MAP function button.
2. Press the Right control button and choose Navigation settings.
3. Select Show alternative routes to place a check mark in the box and to enable this feature.
Alternative routes while route guidance is active:
1. Press the Right control button choose Show alternative routes.
2. If available, up to three route suggestions will be displayed and can be selected via the control knob
(Route type: fast 1, fast alternative 2, economic route 3).
Additional Settings
Additional settings can be configured within the Options menu using
the Right control button.
• Map settings include display settings to change between Standard
and Google Earth view, as well as 2D and 3D modes.
• Route criteria allows you to set the mode of travel to include or
avoid roads such as HOV lanes, toll roads and more.
• Voice guidance allows you to configure responses from Complete
to Shortened, along with voice guidance volume.
Points of Interest: Online Destination Search
You can also perform an online Point of Interest search using
Google Voice™Local Search.
1. Press the Voice Recognition button on the steering wheel.
2. After the tone say “Google Search” or “Online destinations,”
followed by keywords like coee shop, bookstore, museum or
pizza.
3. Make your selection from the displayed list:
• By speaking the line number.
• Or saying “Next page” to view additional results.
4. After the tone say “Start route guidance” to begin navigation to your destination or say “Call,” which will call the
location.
Navigation
Warnings: Navigation
See Navigation in your Owner’s Manual for more detailed information and for important safety warnings.
Call an Audi Technologist to learn more. 1-855-750-TECH (8324)
TEXT 2021TT to 38981
Learn more about the feature operations of your Audi.
Always pay careful attention to the road, and do not drive while distracted. Message and data rates apply.

Audi Smartphone Interface
Warnings: Audi Smartphone Interface
See Audi Smartphone Interface in your Owner’s Manual for more detailed information and for important safety warnings.
Android Auto™Operation
If you have not previously paired your phone with Bluetooth,
it will be paired automatically with the MMI.**
Using the MMI control knob:
• Shifting the control knob down will change usage from
within an open app to allow you to select another app.
• Turning the knob and pressing will open the selected app.
• Shifting left or right within an active app will open additional
features or settings. For example, shifting to the right will activate Google Assistant.
Use your fingers to “pinch” or “spread” the view using the MMI touchpad. Press to select a location to begin route guidance.
When connected:
• A long press of the Voice Recognition button on
the steering wheel will activate Google Assistant.
• Make and receive calls.
• Send and receive text messages.
**The Android phone may prompt you to acknowledge additional requests.
Note: Not all apps will work with the Audi smartphone interface, and some functions may be limited. The functions that can be used depend on
the operating system version and the software of the app being used. Some MMI functions may not be available when Android Auto is active.
Refer to android.com/auto/ for additional information. Google, Android, Android Auto and Google Play are trademarks of Google LLC.
Access to Apple CarPlay®& Android Auto™
If you have an active Apple CarPlay or Android Auto session and have accessed another MMI function and wish to return:
1. Select the MENU function button.
2. Scroll using the MMI control knob to select Apple CarPlay or Android Auto from the menu.
Connection Manager
If your device is presently using MMI media as the source and you wish
to activate Apple CarPlay or Android Auto instead:
1. Select the MENU function button.
2. Scroll using the MMI control knob and select Audi smartphone
interface.
3. Select Change to connection manager.
4. Scroll to select Audi smartphone. A check in the box for the
device will activate Apple CarPlay & Android Auto.
The Connection manager can also be accessed by pressing Menu Settings Connection manager.
• Set reminders.
• Get turn-by-turn navigation.
• See recent places.
• Listen to music.
Audi Smartphone Interface
Connecting
You can connect a compatible iPhone®or Android™phone to the
Infotainment system. Certain content on your phone will be adapted to
the Infotainment system display and can be operated through the MMI
controls,* giving you easy access to your smartphone’s information and
apps. To connect:
1. Switch ignition on with the vehicle in Park.
2. Ensure your smartphone is running the most current operating
system.
• Make sure your iPhone is unlocked.
• Before using Android Auto™, you must have an active Google account and Internet connection, and you must
download the Android Auto app* from the Google Play Store if you are running older than Android 10.
3. Connect your smartphone with a manufacturer-approved cable to either USB port.
4. You will see a connection prompt in the Infotainment system display in the Virtual Cockpit.
5. Using the control knob, select to activate the device.
6. Respond to prompts as necessary from both the Infotainment system display, as well as your smartphone.
Once connected, you will have access to the apps displayed on the screen.
Apple CarPlay®Operation
• If a Bluetooth connection is active when Apple CarPlay is activated,
it will disconnect Bluetooth and use Apple CarPlay exclusively for
telephone connectivity.
• Using the MMI control knob:
• Turn the knob and press to open selected apps and control
functions within that app.
• Shift the knob down or up to change levels to access apps
more quickly.
• Shift the control knob continuously to the right to advance to the next screen.
• Press and hold the BACK button to return to the main Apple CarPlay screen.
When connected:
• Long press the Voice Recognition button
on the steering wheel to activate Siri.
• Make and receive calls.
• Send and receive text messages.
Short access to Apple CarPlay after accessing MMI:
• Select the TEL function select Switch to Apple CarPlay option from screen.
*Not all apps will work with the Audi smartphone interface, and some functions may be limited. The functions that can be used depend on the
operating system version and the software of the app being used. Some MMI functions may not be available when Apple CarPlay is active. Refer
to apple.com/ios/carplay/ for additional information.
• Set reminders.
• Get turn-by-turn navigation.
• See recent places.
• Listen to music apps.

Bluetooth®Pairing
Pairing a Compatible Device
Bluetooth pairing is a one-time procedure. Once paired, your
phone will automatically connect when you start your vehicle.*
Your contact list will automatically synchronize, allowing you to
access contacts, and make and receive calls through the Infotainment
system. For information regarding phone compatibility, visit
audiusa.com/bluetooth.
1. Switch ignition to Accessories mode.
2. Activate your phone’s Bluetooth and set to pairing or discovery mode.
3. In the list of available devices, select the Audi MMI listing for the vehicle.
4. When the prompt appears in the display, select Accept using the control knob.
5. Confirm the PIN matches and select Yes in response to the prompt.
6. Select Pair on your device.
*To allow for connectivity, some phones may require you to respond to additional prompts.
Two active phones can be connected simultaneously to receive calls through the Multi Media Interface, giving you primary
and secondary devices. To change the order of devices:
1. Select the TEL function.
2. Press the Right control button.
3. Select Switch main and Additional phone.
4. This will also make the contact list from the new primary phone active.
If the primary phone is in use, the secondary phone will only receive calls from the phone, and not the MMI.
Voice Recognition
Call by Name
When using voice recognition, speak in a normal voice, facing forward.
Keep cabin noise to a minimum.
1. Press the Voice Recognition button on the steering wheel.
A beep will sound.
2. Say “Call” <Name from directory> (e.g., “Call John Smith”).
3. After system response, confirm request by saying “Yes”. The
number will be dialed. You may also say “Cancel” to cancel
the call.
• If multiple numbers are stored for a given contact, the system will ask which you wish to dial.
To avoid this, indicate this in your initial request (e.g., “Call John Smith, mobile”).
Refer to your Owner’s Manual for additional commands.
Voice Recognition Address Entry
1. Press the Voice Recognition button on the steering wheel and
wait for the confirmation tone.
2. Say “Enter Address.” (See Owner’s Manual for complete list of
commands.)
3. After the tone, say the entire address using single digits. For
example say “Eight eight five nine Wilshire Boulevard, Los
Angeles.”
• If your destination is in another state say “Change
State” when prompted to enter an address.
4. The system will repeat the address for confirmation and ask if you would like to start route guidance. After the tone,
say “Yes” and guidance will begin.
There are three ways to cancel voice recognition address entry:
• Say “Cancel” at any voice prompt.
• Press any of the MMI control buttons.
• Press and hold the Voice Recognition button on the steering wheel until you hear “Cancel.”
No navigation prompts or trac announcements are given when a dialog is running. Refer to your Owner’s Manual for additional voice
recognition commands.
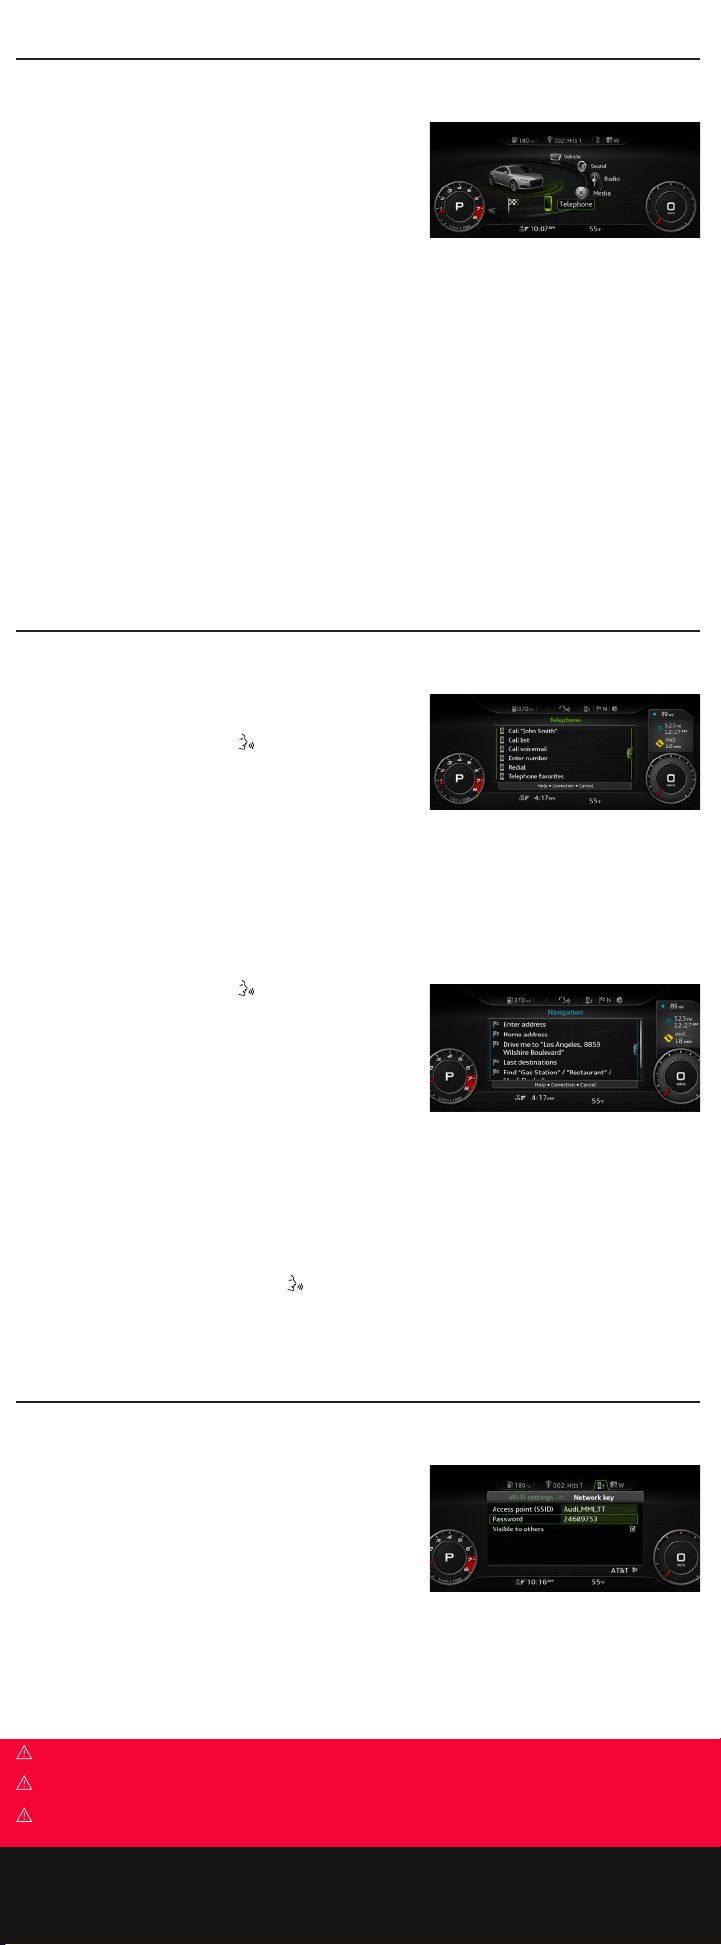
Wi-Fi
Configuration
Get easy access to fuel prices, weather and travel information, as well as
personal feeds with a subscription to either Audi Connect PRIME or Audi
connect Plus. Audi Connect can provide you with Google Earth, Google
Voice Local search, Wi-Fi Hotspot, Online Services and myAudi
Destinations.*
1. Press the TEL function button.
2. Press the Right control button.
3. Select Wi-Fi Settings; ensure that Wi-Fi mode is on.
4. Select Network key and enter an eight character long password or use the default password. Use the touchpad to
enter characters or shift the control knob forward to open the speller.
5. When password has been entered, press any button to save password and exit the screen.
*To use Wi-Fi, you must have an active subscription to www.myAudiconnect.com. Some features are only available when vehicle is paired to a
registered myAudi account and the Audi MMI connect app is installed on a compatible device in the vehicle.
Warnings: Bluetooth®Audio Player
See Bluetooth Audio Player in your Owner’s Manual for more detailed information and for important safety warnings.
Warnings: Voice Recognition System
See Voice Recognition System in your Owner’s Manual for more detailed information and for important safety warnings.
Warnings: Wi-Fi Hotspot
See Wi-Fi Hotspot in your Owner’s Manual for more detailed information and for important safety warnings.
Bluetooth®, Voice Recognition & Wi-Fi

www.myAudiIQ.com
Visit myAudiIQ to watch short tutorial videos demonstrating the features of your new Audi.
Brake system
Electromechanical
parking brake
Cooling system
Engine oil pressure
Electrical system
Engine stop
Safety belt
Steering
Steering lock
Central indicator light
Engine start system
Transmission
malfunction
Rear spoiler
Anti-lock Braking
System (ABS)
Safety systems
Brake pads
Electromechanical
parking brake
Tire Pressure
Tire Pressure
Monitoring System
Engine speed
limitation, Drive
system
Emissions control
system
Engine speed
limitation
Engine oil level (MIN)
Engine oil sensor
Electrical system
Tank system
Washer fluid level
Windshield wipers
BRAKE
WEAR
Convenience key
Battery in remote
control key
Bulb failure indicator
Headlight range
control system
Adaptive light
Light/rain sensor
Transmission
Steering lock
Engine start system
Central indicator light
Electromechanical
steering
Suspension control
Rear spoiler
Turn signals
Convenience key
Electromechanical
parking brake
Active lane assist
Side assist
Transmission
Electromechanical
parking brake
Start/Stop system
Start/Stop system
Speed warning system
High beams
Indicator Lights
For additional information on indicator lights, refer to your vehicle’s Owner’s Manual.
MY21-TT-01
Audi Customer Support (800) 822-2834
The information within this guide must be used in conjunction with the information in the Audi Owner’s Manual. You
should refer to your vehicle’s Owner’s Manual, and Infotainment System Booklet for all information, warnings, and feature
limitations. Always pay careful attention to the road and do not drive while distracted. Some Infotainment features can
only be accessed and operated when the vehicle is standing still. © 2021 Audi of America, Inc. All rights reserved.
Hood
Electronic
Stabilization Control
(ESC)
Electronic
Stabilization Control
(ESC)
Engine warm-up
request
Start/Stop system
Cruise control system
This manual suits for next models
2
Table of contents