audiodata ArtTwo User manual

User Manual

ArtTwo Page 2
1st edition, January 2019 © AUDIODATA Salzburg GmbH
TABLE OF CONTENTS
1Safety instructions....................................................................................................................3
2Unpacking and checking ........................................................................................................ 6
3Setting the speakers up.......................................................................................................... 7
4Spikes ............................................................................................................................................ 9
5Running in ................................................................................................................................... 9
6Connection to the amplifier................................................................................................. 10
7Cleaning and care ................................................................................................................... 15
8Technical data ......................................................................................................................... 16
9 Guarantee declaration
…………………………………………………………………………………………………………….15

ArtTwo Page 3
1st edition, January 2019 © AUDIODATA Salzburg GmbH
1Safety instructions
Please read this guide carefully and follow every stepstated in relation to getting
started. Also heed and follow all warnings and safety notices!
The stability (especially that of large loudspeakers) is heavily dependent on the
nature and condition of the floor. Carpet floors can considerably reduce stability.
Even a knock of relatively moderate force can cause a loudspeaker to fall over
and therefore carries a risk of injury for any people or animals in the vicinity. The
stability can be significantly improved by using the spikes supplied with the
product. However, care is called for when fitting these, as there is a risk of injury
from the sharp tips of the spikes and a possibility of damaging floor.
Loudspeakers must under no circumstances be used as seats or climbing aids
(ladder substitutes)!
For putting/setting up the speakers use only loudspeaker stands, wall fixtures or
products designed for the purpose.
Please note that any tables, shelves or boxes on which the products are placed
must be moved very carefully in order to avoid any damage or injuries due to
them toppling over. When wall mounting, particular care should be taken to
ensure that all components are adequately and securely screwed in place.
Additional safety devices (chains, etc.) should be fitted.
When choosing the loudspeakers' location, take heed of the fact that this should
be dry and not too cold. Permanently high air humidity and strong sunlight (UV
radiation) can cause your loudspeakers to age prematurely and consequently
impair their functionality. Protect this product from splashes. Please make sure
that nothing containing liquids (e.g. a vase) is placed on top of the speakers. Do
not set up the loudspeakers close to any source of heat, such as electric fires,
radiators or ovens.
Do not put any source of open flame, e.g. lit candles, onto the equipment.
Very high volume levels over a prolonged period can have harmful effects on the
user's health.
In the event of overloading of the loudspeakers and excessively high volume
levels it is not wholly impossible that individual components on the frequency-
separating filters or even individual loudspeakers may burn out. In particularly
unfavourable situations it is even possible for a fire to start inside the loudspeaker
if it is operated at its limits unattended.
At high volume levels voltages of 30–50 volts can be present at the loudspeaker
terminals and components. When they are in use, be certain therefore to avoid
touching any of the loudspeakers' uninsulated connection contacts.
Danger! If the warning is not heeded there is a risk of immediate danger leading to serious
injury or death.
Note! If the warning is not heeded there is a possible risk of danger that could lead to
minor injury or damage.
These notes give you useful additional information.

ArtTwo Page 4
1st edition, January 2019 © AUDIODATA Salzburg GmbH
Also, due to the risk of injury, never put your hands or arms into the sound
emission openings (bass reflex ports).
Never open up the speaker yourself. Please leave the servicing of your product
solely to people authorised to do this. Servicing is necessary in the event of any
kind of damage, i.e. in the event of damage to the loudspeaker jacks, after the
penetration of any liquids, after any objects have fallen onto a speaker or after it
has itself fallen over.
To clean the speakers without harming them it is best to use the micro-fibre cloth
supplied with them. If the speakers are particularly dirty, use a moist cotton cloth.
Aggressive cleaning agents must not be used!
Keep the packaging for any potential future transportation.
Passive loudspeakers, such as ArtTwo, must not be connected to the electrical
mains, as this leads to damage to the speakers and to all connected devices.
Please avoid putting any of the following down on the loudspeakers: credit cards,
audio or video cassettes, other magnetic storage devices, etc. The information
stored on them could be destroyed. Magnetic tape devices should also not be
used in the immediate proximity of either speaker.

ArtTwo Page 5
1st edition, January 2019 © AUDIODATA Salzburg GmbH
The beryllium calotte should under no circumstances be subjected to any form
of abrasion.
If the calotte becomes damaged, you should immediately stick on a large piece
of adhesive tape in order to completely cover the entire front of the tweeter.
Contact your dealer and inform them about the situation, so that a trained
technician can replace the damaged tweeter with a new one.
If the calotte is physically damaged in any way and breaks into loose pieces,
collect these up carefully using adhesive tape, put them into a sealed container
or bag and send this back to your dealer. The dealer will dispose of the material
properly.
Be certain not to breathe in any beryllium dust! Avoid any skin contact!
Warning note about the beryllium tweeter –highly toxic!
The MASTER series and the ART series use a tweeter fitted with a beryllium
calotte. While in its solid form beryllium is harmless, in this form of use you
should nevertheless take heed of certain special precautionary rules in order
to avoid any unnecessary damage or risks.
ArtTwo Page 6
1st edition, January 2019 © AUDIODATA Salzburg GmbH
2Unpacking and checking
First check the loudspeakers for any damage incurred in transit and to make sure that
no accessories are missing.
The originally packed loudspeaker boxes contain the two loudspeakers and the
following accessories:
4 x cable jumpers
Manual
Gloves
Microfibre cleaning cloth
If after unpacking them, you notice any damage caused in transit, do not under any circumstances
start using the loudspeakers. Please get in touch immediately with your dealer.
When the loudspeakers are transported in cold weather, it is possible that condensation may form
on the metallic surfaces. Therefore let the speakers acclimatise for a few hours in a heated room.
ArtTwo Page 7
1st edition, January 2019 © AUDIODATA Salzburg GmbH
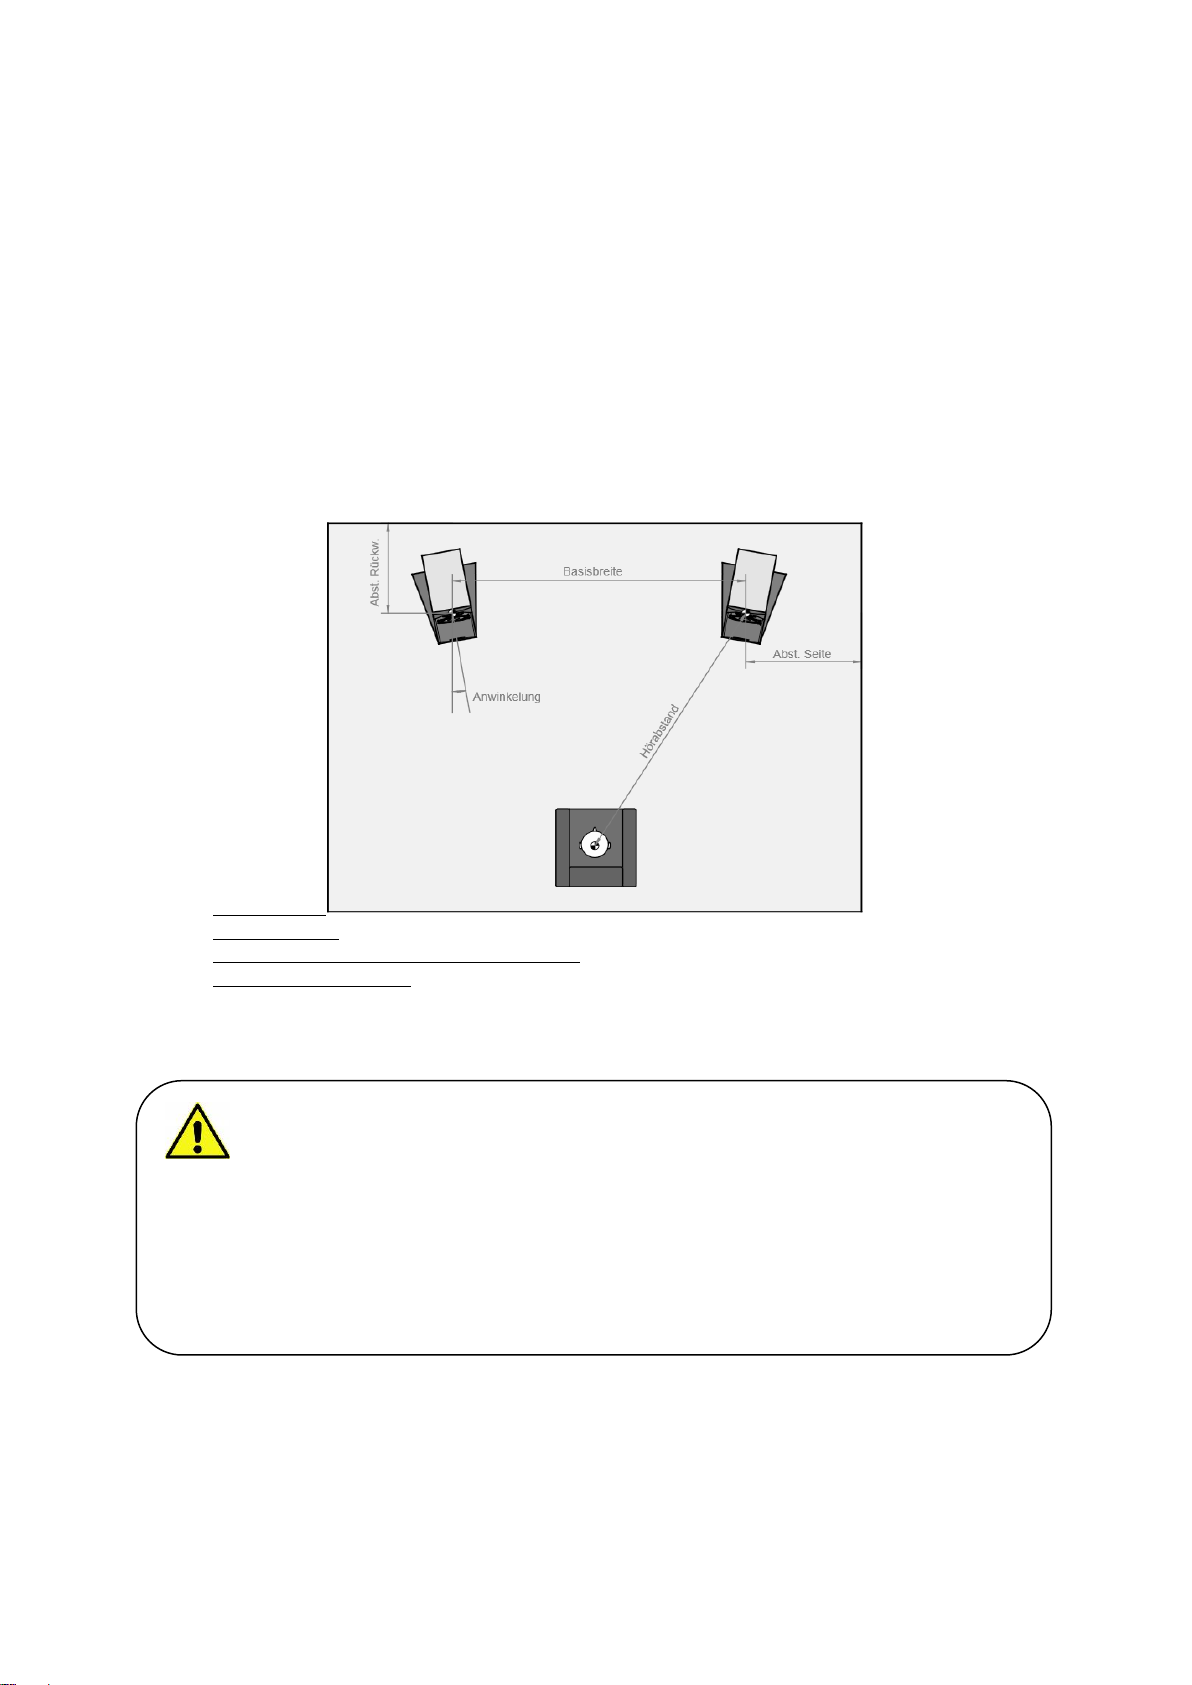
3Setting the speakers up
Spatial acoustics is a complex subject, on which some very good and detailed literature
is available from specialist retailers. More precise details would go beyond the scope
of this manual. Using the following basic knowledge, you will, however, quickly achieve
good results.
In essence, the arrangement of the loudspeakers within the room as well as the latter's
shape, furnishings and fixtures have a decisive influence on the sound quality. The aim
is to achieve a balanced frequency response and good spatial reproduction at the spot
where the listener is positioned.
We would encourage you to experiment a bit with the set-up of the loudspeakers and
the listening position. The drawing below shows the basic loudspeaker set-up. Even
minor shifts or angling in of the loudspeakers can produce an audible improvement in
the reproduction.
Recommendation:
Basic width > 2 metres
Distance from wall - side / to rear > 0.5 metre
Listening distance > 2 metres
A few tips and recommendations for fully utilising the acoustic potential:
Position the loudspeakers within the room as clear of any obstructions as
possible. Wherever possible, the distance from the walls should be at least 0.5
The speakers should be set up in such a way that there is no risk of them toppling over or
of tripping over a cable.
Pick a stable, level surface.
Ensure that the surrounding area is dry and free of dust.
Avoid proximity with any sources of heat and with direct sunlight.
Do not put any heavy objects on top of the cables or loudspeakers.
Make sure that the loudspeakers sit firmly on the surface in order to avoid any vibrations.

ArtTwo Page 8
1st edition, January 2019 © AUDIODATA Salzburg GmbH
metre. If you are able to do so, position the loudspeakers on the long side of the
room. This minimises the influence of any reflections.
Set up the loudspeakers in such a way that the listening position and the pair of
speakers form an equilateral or at least an isosceles triangle.
When setting up, make sure that the distance from the loudspeakers to the
listener is at least two metres.
By angling the speakers in towards the listening position you may also achieve
acoustic benefits.
These notes serve merely as a recommendation.
For any given room and listening position it is well worth experimenting with the set-up. The
performance of the loudspeakers naturally benefits from the level of quality of the attached
components and the accessories being used. Qualified spatial acoustics experts can help you with
your planning and thus improve the results still further.

ArtTwo Page 9
1st edition, January 2019 © AUDIODATA Salzburg GmbH
4Spikes
Spikes are primarily used to ensure a stable, low-resonance set-up. The small contact
area of the spike tips achieve a link to the floor or speaker stand and ensure that the
loudspeaker sits stably in its set-up position.
Floors that are vibratory and have a tendency to resonate, i.e. typical older hall and
parquet floors, are an exception to the above recommendation. Any connection of the
loudspeaker to the unsuited flooring here would increase the tendency to boom in the
bass range and also not provide the desired stability.
In these situations use either spikes with tips pointing up (available as an option), which
physically achieve a decoupling from the floor or use shock-absorbing pads (e.g.
rubber pucks), as offered in their range of accessories by your Hi-Fi retailer.
5Running in
All Hi-Fi components, especially high-quality loudspeakers like the ArtTwo, require a
certain running-in time to deploy their full acoustic qualities.
During this time, mechanical parts of the loudspeaker chassis in particular, such as
surrounds and diaphragms, increasingly lose an initial stiffness that they have due to
the manufacturing process. Over the course of the first c. 20–100 hours of total playing
time, the sound gains as a result in subtlety, pliancy and warmth.
On a good system this development can be clearly noticed.
Take care when positioning the spikes under the loudspeakers: there is a high risk of the speaker
toppling over, as on the ArtTwo there are no slots or any other provisions made for the use of
spikes.

ArtTwo Page 10
1st edition, January 2019 © AUDIODATA Salzburg GmbH
6Connection to the amplifier
Your new loudspeaker can essentially be used connected to any amplifier with a load
impedance of 4 ohms. All popular Hi-Fi amplifiers generally fulfil this requirement.
Your loudspeaker is fitted with a bi-wiring connection terminal. This creates several
different connection options.
1. Single-wiring (see point. 6.1, page 10)
2. Bi-wiring (see point. 6.2, page 11)
3. Horizontal bi-amping (see point. 6.3.1, page 12)
4. Vertical bi-amping (see point. 6.3.2, page 13)
Between amplifier and loudspeakers there is, however, a series of interactions that are
very important for a truly perfect interplay.
You should therefore give due attention to the subject of loudspeaker cable, as indeed
you did to your choice of new loudspeakers.
With our Audiodata LS CU 4 loudspeaker cables, we offer within our a product range
an expedient solution in what has become a very cluttered cable market.
Increased attentiveness is called for in the case of some valve amplifiers that possess differing
load impedances with different output terminals. Please proceed in such cases in accordance
with the amplifier manufacturer's guidance.

ArtTwo Page 11
1st edition, January 2019 © AUDIODATA Salzburg GmbH
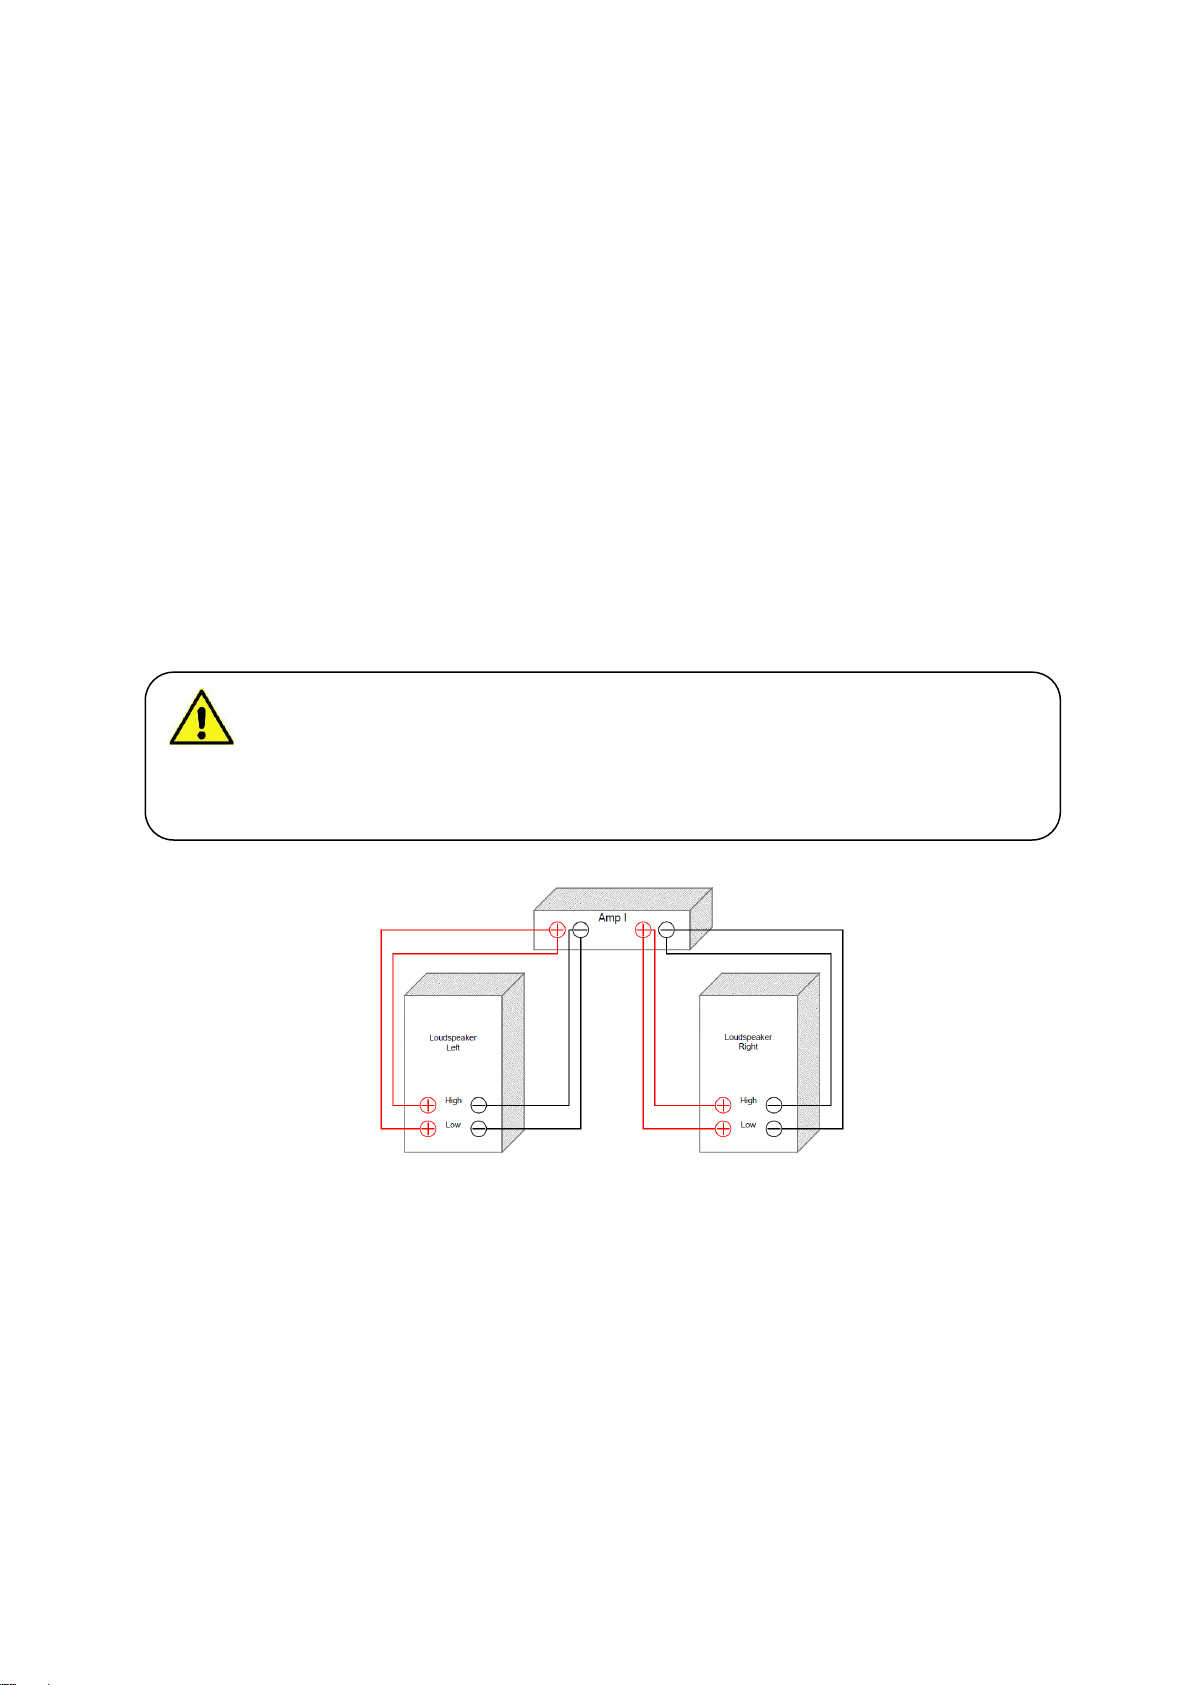
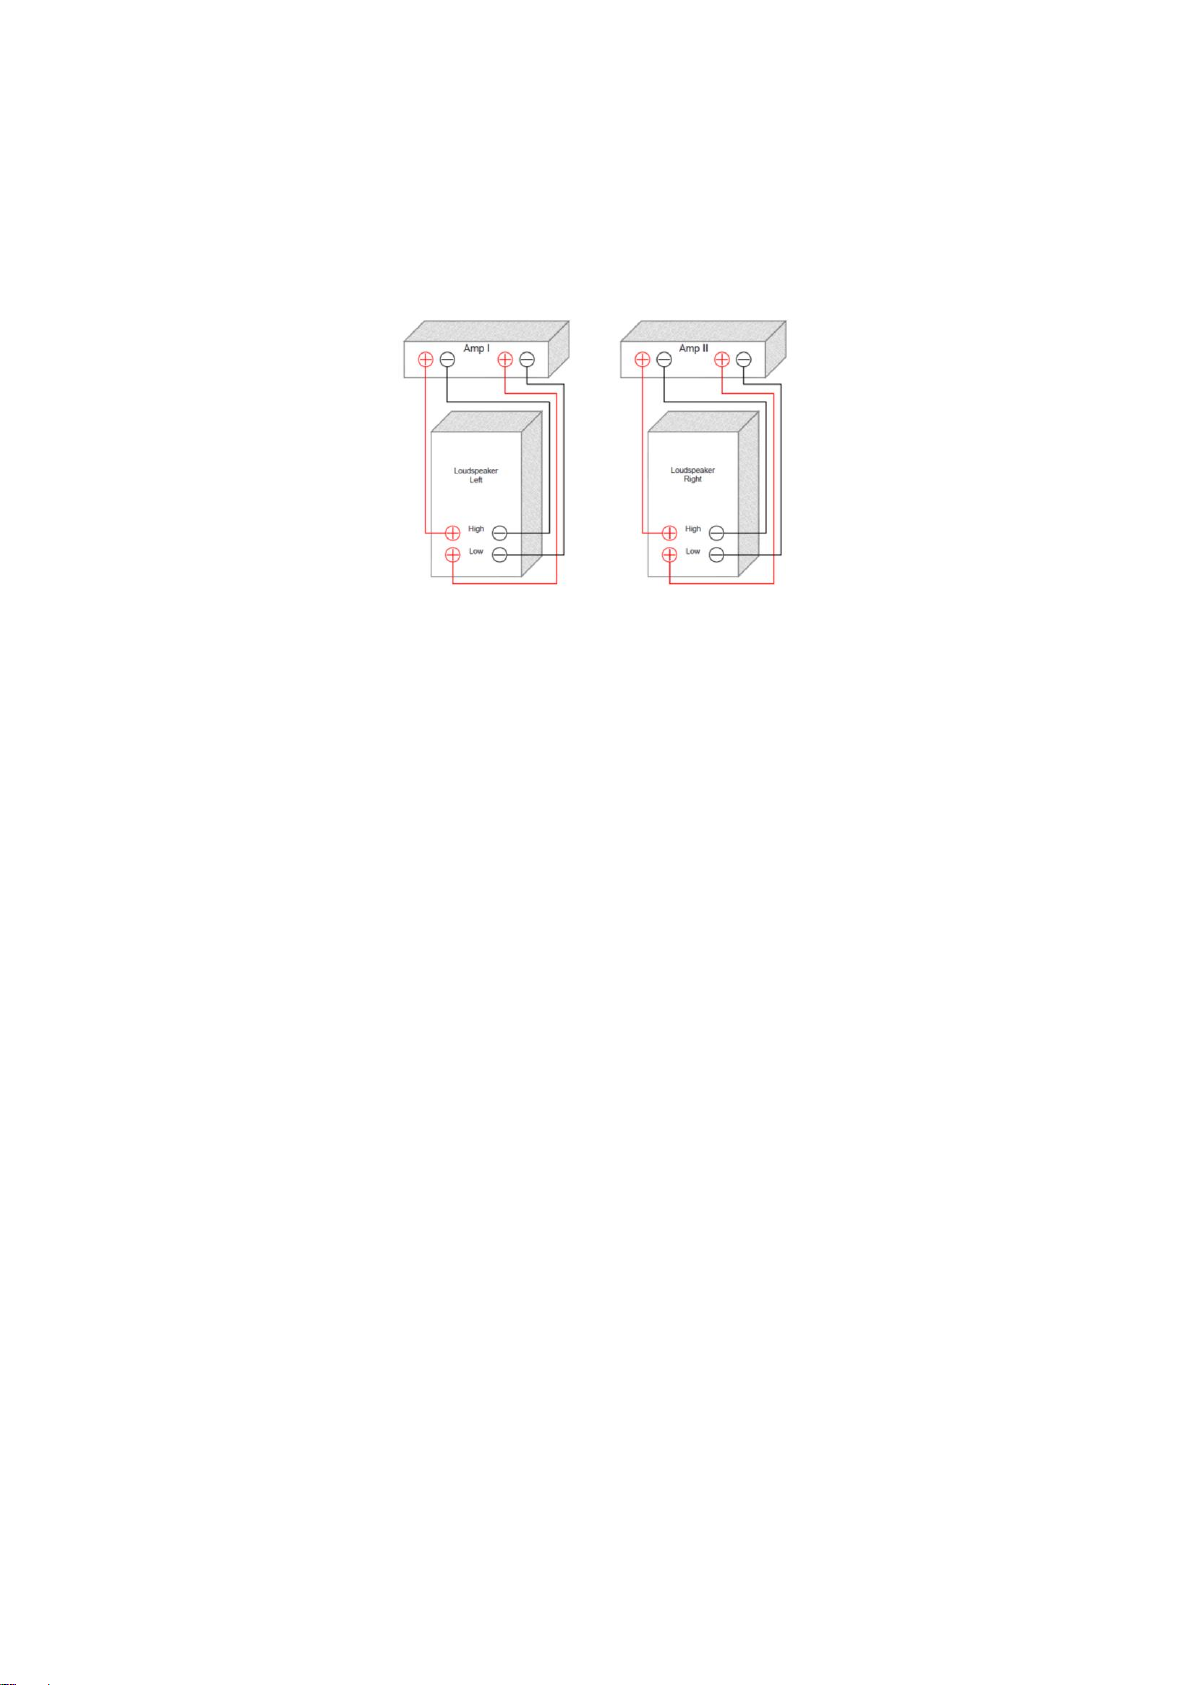
6.1 Single-wiring connection option
1. On both loudspeakers connect the cable jumpers supplied to the connection
terminals for 'High' and 'Low'.
a. To do this, connect the plus low frequency connection (red) to the right-
hand speaker's plus high frequency connection (red).
b. Then, connect the minus low frequency connection (black) to the right-
hand speaker's minus high frequency connection (black).
2. Using the right channel's plus cable (red), connect your amplifier's right-hand
plus terminal '+' to the plus connection '+' on your right-hand speaker.
3. Using the right channel's minus cable (black), connect your amplifier's right-
hand minus terminal '–' to the minus connection '–' on your right-hand speaker.
4. Proceed as above in the same way with your left-hand channel's loudspeaker.
For connecting the loudspeaker cables and/or cable jumpers, turn off your amplifier.
Ensure that both loudspeakers are correctly wired up and connected in phase.
Never join '+' and '-' connections together, as depending on its design this can seriously damage
your amplifier.
ArtTwo Page 12
1st edition, January 2019 © AUDIODATA Salzburg GmbH
6.2 Bi-wiring connection option
Bi-wiring is a term used to describe a connection variant for loudspeakers where
separate cables are used for the signals of the low-frequency range and of the high-
frequency range. With this variant low- and high-frequency range each have one
terminal and are each connected to the amplifier with one cable.
From an acoustic perspective, the bi-wiring method offers some clear advantages. As
a result of the separation of the low- and high-frequency range, powerful low-
frequency pulses no longer influence high-frequency structures conveyed at the same
time. The sound gains in this way in detail resolution and depth. The musical rendition
also gains greater peace and serenity.
Ideally use cables of the same type and length for the low- and high-frequency range
(ideally our Audiodata LS CU 4), as otherwise there is a danger of inhomogeneity. If
your power amp has only one pair of connection terminals per channel, connect both
the low-frequency cable and the high-frequency cable to these terminals on the
amplifier.
If the power amp has two pairs of connection terminals per channel (speaker A/B),
you can also connect in each case one cable to one pair of terminals respectively.
In this case you must always remember when using the loudspeakers to switch on both
speaker connections (A+B) on the amplifier.
1. Remove all cable jumpers from the loudspeakers
2. Connect the right-hand channel's plus low frequency cable (red) to your amplifier's
right-hand positive terminal “+“ and to the plus low frequency connection '+' on
your right-hand speaker.
3. Connect the right-hand channel's plus high frequency cable (red) to your
amplifier's right-hand positive terminal “+“ and to the plus high frequency
connection '+' on your right-hand speaker.
4. Connect the right-hand channel's minus low frequency cable (black) to your
amplifier's right-hand negative terminal “+“ and to the minus low frequency
connection '+' on your right-hand speaker.
5. Connect the right-hand channel's minus high frequency cable (black) to your
amplifier's right-hand negative terminal “+“ and to the minus high frequency
connection '+' on your right-hand speaker.
Any bi-wiring operation with cable jumpers in use is ineffective!
Remove the cable jumpers between low- and high-frequency range.
Keep hold of the cable jumpers for any future re-use.

ArtTwo Page 13
1st edition, January 2019 © AUDIODATA Salzburg GmbH
6. Proceed as above in the same way with your left-hand channel's loudspeaker.
ArtTwo Page 14
1st edition, January 2019 © AUDIODATA Salzburg GmbH
6.3 Bi-amping connection option
Bi-amping is a term used to describe a connection variant for loudspeakers where
separate cables and separate amplifiers are used for the signals of the low-frequency
range and of the high-frequency range.
The speaker's low- and high-frequency range each have one connection terminal and
are each connected to the respective amplifier with one cable.
From an acoustic perspective the bi-amping connection option is the best variant. As
a result of the separation of the low- and high-frequency range, powerful low-
frequency pulses no longer influence high-frequency structures conveyed at the same
time. The sound gains in this way even more clearly in detail resolution and depth. The
musical rendition also gains greater peace and serenity.
For the low- and high-frequency range it is best to use cables of the same type (ideally
our Audiodata LS CU 4) and length and identical power amps, as otherwise there is a
danger of inhomogeneity.
There are two types of bi-amping operation:
Horizontal bi-amping
Vertical bi-amping
Which variant you choose has no effect on the acoustic experience.
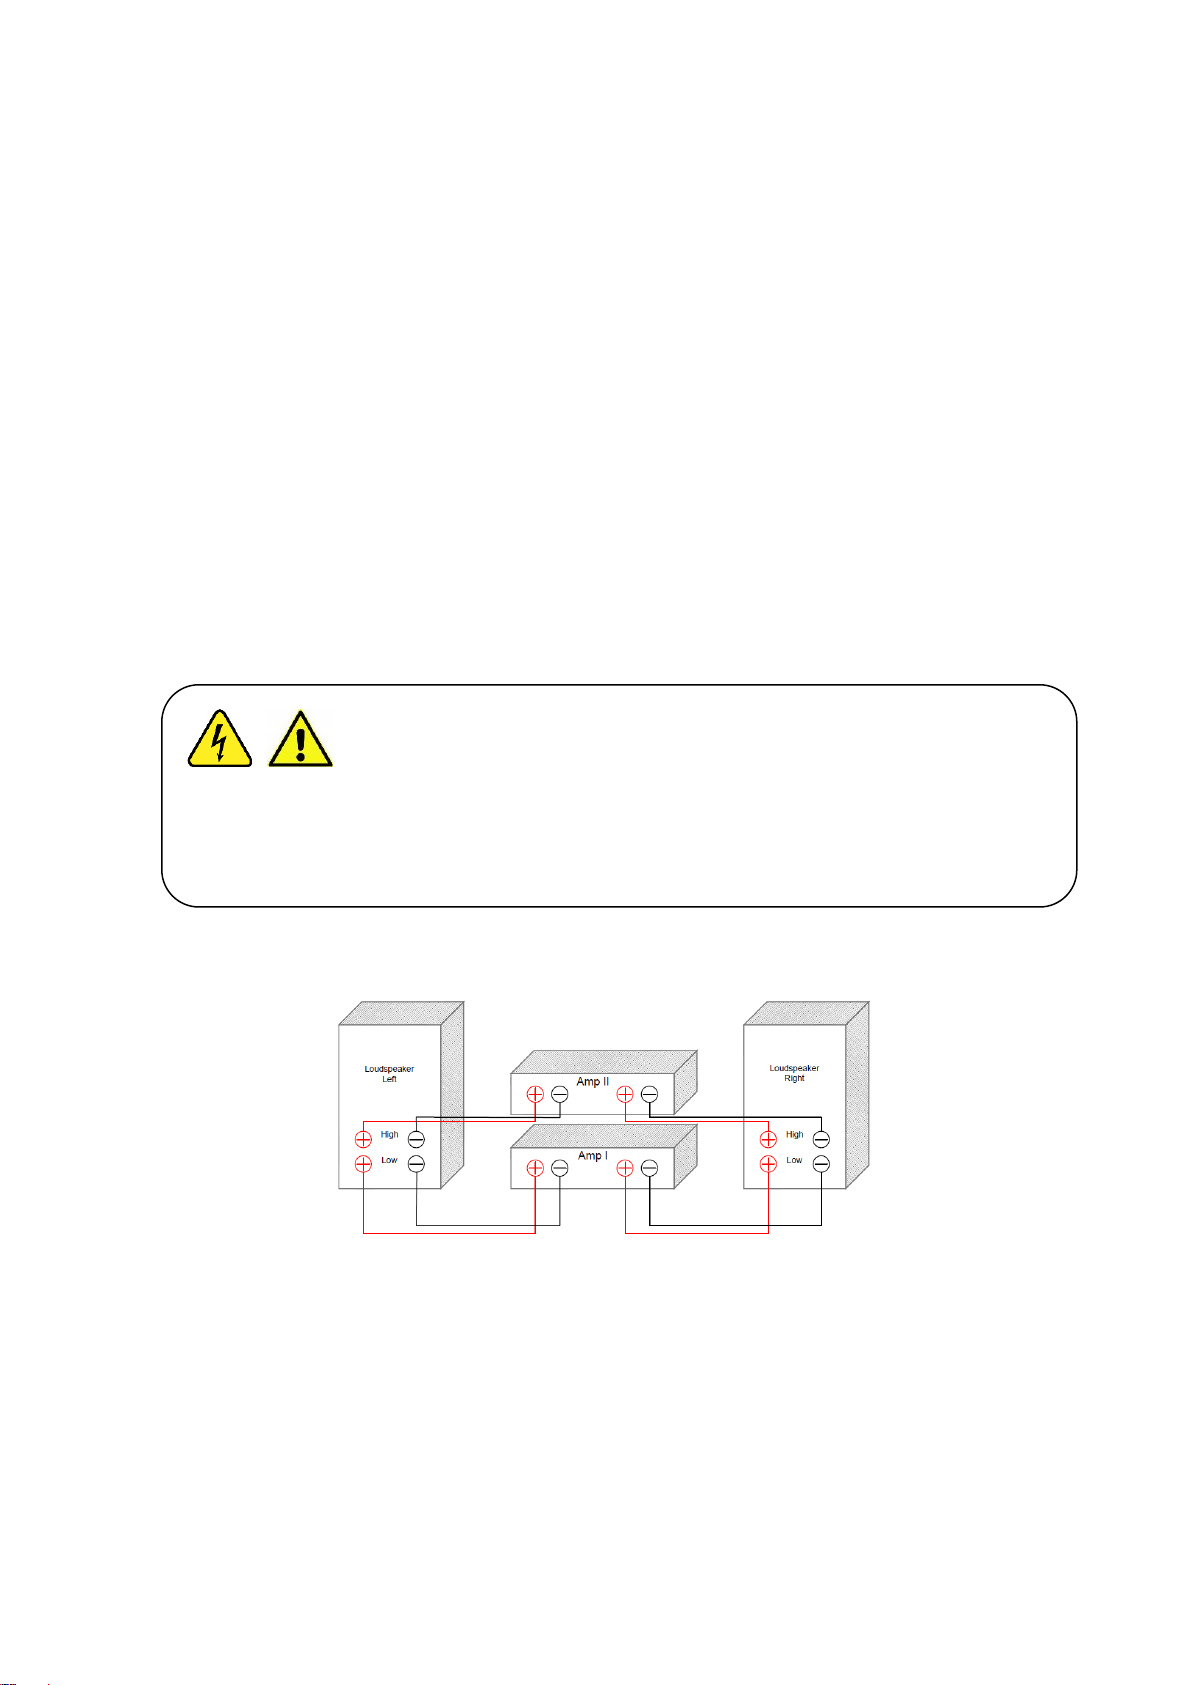
6.3.1 Horizontal bi-amping
1. Remove all cable jumpers from the loudspeakers
2. Connect the right-hand channel's plus low frequency cable (red) to your amp 1's
right-hand positive terminal “+“ and to the plus low frequency connection '+' on
your right-hand speaker.
3. Connect the right-hand channel's plus high frequency cable (red) to your amp 2's
right-hand positive terminal “+“ and to the plus high frequency connection '+' on
your right-hand speaker.
4. Connect the right-hand channel's minus low frequency cable (black) to your amp
1's right-hand negative terminal “+“ and to the minus low frequency connection '+'
on your right-hand speaker.
Any bi-amping operation with cable jumpers in place is very dangerous, as it can lead to the
amplifiers short-circuiting.
The connection must be carried out very carefully. Mistakes can have very serious
consequences.
ArtTwo Page 15
1st edition, January 2019 © AUDIODATA Salzburg GmbH
5. Connect the right-hand channel's minus high frequency cable (black) to your amp
2's right-hand negative terminal “+“ and to the minus high frequency connection
'+' on your right-hand speaker.
6. Proceed as above in the same way with your left-hand channel's loudspeaker.
6.3.2 Vertical bi-amping
1. Remove all cable jumpers from the
loudspeakers
2. Connect the right-hand channel's plus low frequency cable (red) to your amp 2's
right-hand positive terminal “+“ and to the plus low frequency connection '+' on
your right-hand speaker.
3. Connect the right channel's plus high frequency cable (red) to your amp 2's left-
hand plus terminal '+' and to the plus high frequency connection '+' on your right-
hand speaker.
4. Connect the right-hand channel's minus low frequency cable (black) to your amp
2's right-hand negative terminal “+“ and to the minus low frequency connection
'+' on your right-hand speaker.
5. Connect the right channel's minus high frequency cable (black) to your amp 2's
left-hand minus terminal '–' and to the minus high frequency connection '–' on your
right-hand speaker.
6. Proceed as above in the same way with your left-hand channel's loudspeaker.
7Cleaning and care
Do not under any circumstances use aggressive cleaning agents, methylated
spirit, thinners, petroleum or similar. Such cleaning agents can damage the
cabinet surface.
Ideally remove dust and minor marks with the micro-fibre cloth included.
Rub off more stubborn marks using a damp cloth. Make sure that no fluid gets
into the loudspeaker.
Subsequently wipe down the surfaces at once with a soft, dry cloth, without
exerting any pressure.

ArtTwo Page 16
1st edition, January 2019 © AUDIODATA Salzburg GmbH
8Technical data:
Construction
2-way loudspeaker with a coaxial chassis
Bass reflex cabinet
Multiplex multilayer board construction with wall damping by means of inner chambers filled
with steel balls
Different high-quality cabinet materials matched for optimum resonance
Chassis
1 bass/mid-range driver, Ø 175 mm, magnesium membrane,
1 coaxial tweeter, Ø 25 mm, beryllium membrane
Connection
Bi-wiring terminal panel
Crossover frequency
2500 Hz
Frequency range
40–25.000 Hz
Weight
15 kg
Dimensions (W x H x D)
215 x 460 x 385 mm incl. spikes
Impedance
Nominal value 8 ohms
Pair alignment
+/- 0.5 dB (left/right loudspeaker)
Power rating
100 watts sine wave
Efficiency
87.5 dB (1 Watt/1 m)
Finishes
Cabinet and baffle: varnished in your choice of colour or
cabinet in all available wood veneers,
baffle always varnished
Guarantee period
36 months full guarantee
Subject to technical changes.
9 Guarantee declaration
The guarantee period begins upon purchase of the product and is valid only for
the first owner.

ArtTwo Page 17
1st edition, January 2019 © AUDIODATA Salzburg GmbH
During the guarantee period we will rectify any deficiencies that are
demonstrably due to defective materials or fabrication errors. It will be our choice
as to whether we replace or repair the defective parts. No further claims, in
particular in relation to price reduction, cancellation, compensation or
consequential losses, will be entertained.
You must not tamper with the product.
When wishing to claim on the guarantee, please first contact your specialist
retailer. Should it prove necessary to send the product to us, please ensure
othat it is sent in undamaged original packaging
oand that the purchase receipt is enclosed.
The following are not covered by the guarantee:
oConsumables
oDamage caused in transit, visible or invisible (complaints about any such
damage must be made to the courier firm without delay)
oScratches to metal parts, loudspeaker covers, etc. (complaints about any
such defects must be made directly to your dealer within five days of
purchase)
oFaults that have arisen due to incorrect set-up, connection or operation,
undue loading or external violence
oIncorrectly repaired or modified appliances opened by anyone other than
us
oConsequential damage to third-party devices
oReimbursement of costs where damage has been repaired by a third
party without our prior agreement
Table of contents


