Audiofrog BMH-1 User manual
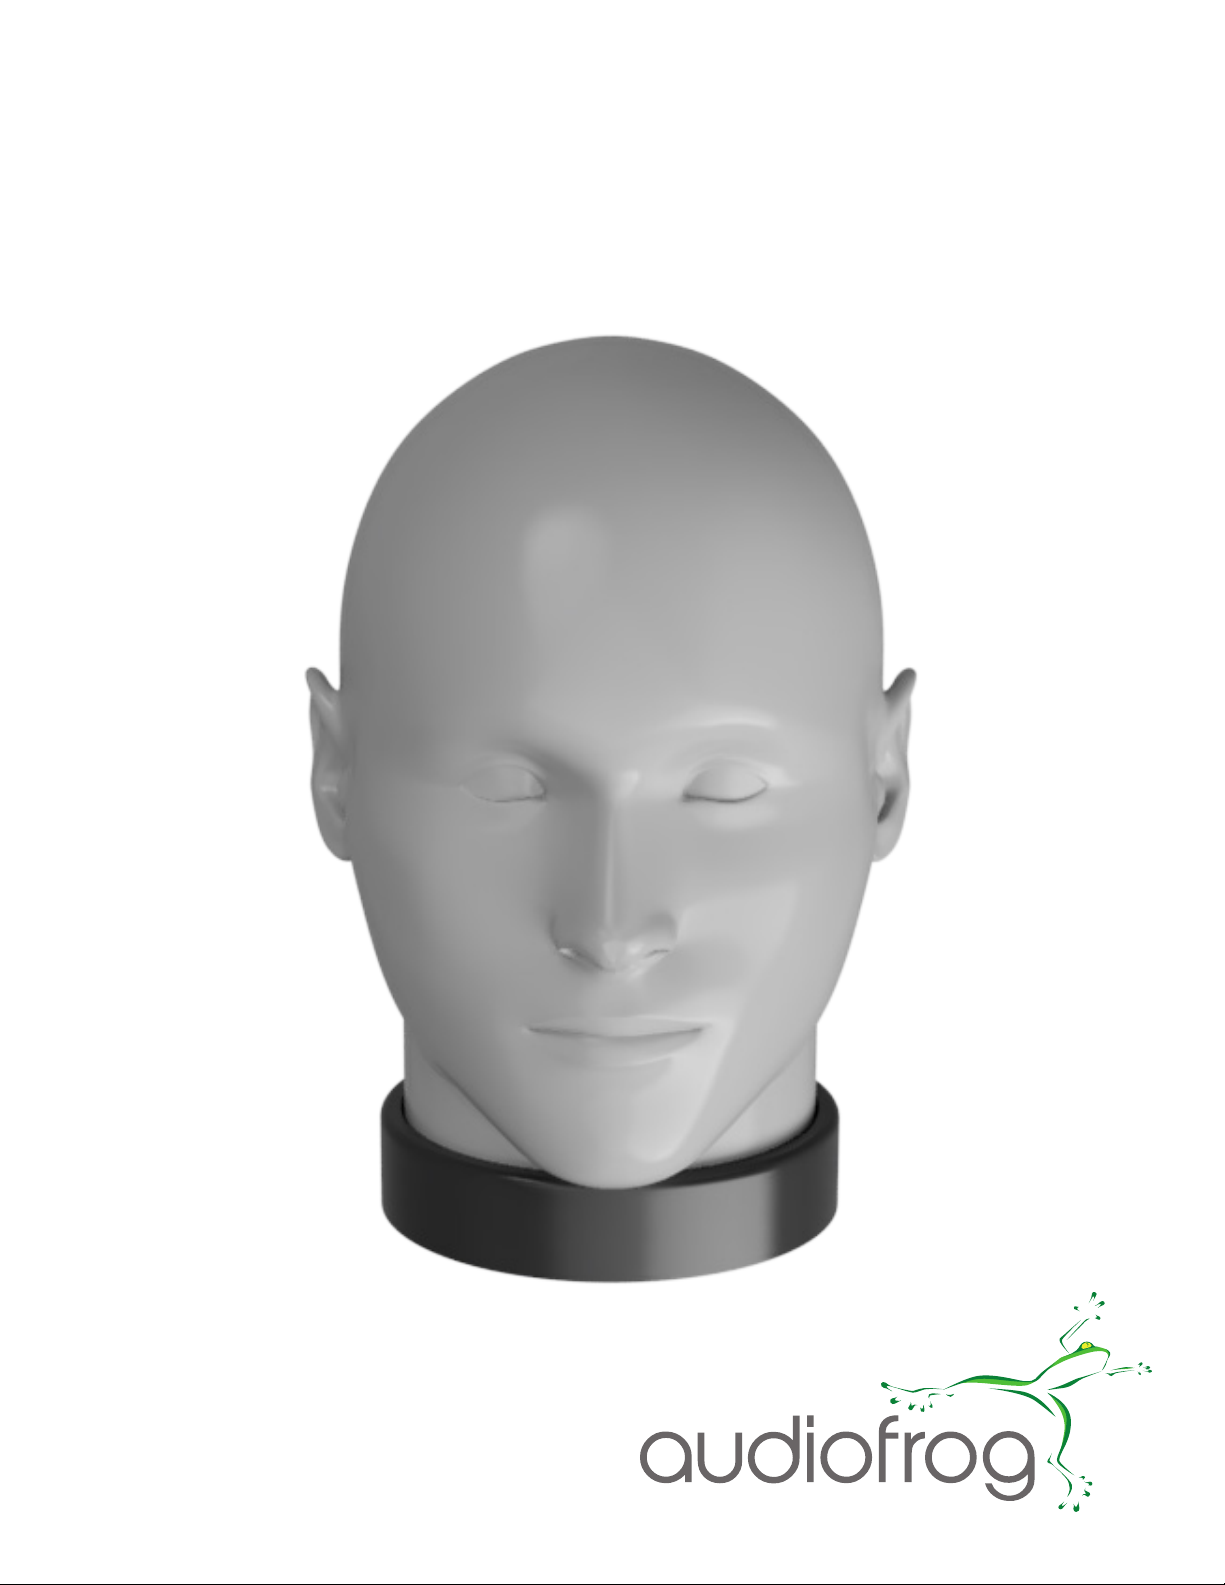
BMH-1
Binaural Head Microphone
User Guide

Audiofrog BHM-1 Binaural Head Microphone
Thanks for purchasing your new BHM-1. We hope it will provide years of fun and reliable service. Your BHM-
1 has been designed to make it easy to capture the sound of spaces in recordings to be played back over
headphones. To ensure the best performance, use over the ear headphones or high quality in-ear monitors for
playback.
For playback over loudspeakers, we suggest equalizing the recording for a diuse eld rather than free eld.
Please see “Equalization for playback over loudspeakers” in the Appendix for appropriate equalization settings
for use in your DAW (digital audio workstation) or in an equalizer included in your playback system if you wish
to play back the recording over loudspeakers. Playback over loudspeakers will provide some sense of the
recording space, but the best performance can be had using headphones.
Your BHM-1 has been designed for use with three dierent types of audio gear. First, your BHM-1 can be
connected to the inputs of professional audio interfaces or recording equipment that provides 48-volt phantom
power using the XLR outputs in the base of the head. Your BHM-1 can also be connected to the inputs of a
video camera or a consumer grade soundcard with a stereo microphone input that provides a bias voltage of
2-9 VDC. For this connection, you may need to use a Y adapter. Finally, your BHM-1 includes a pair of mic
preamps powered by an on-board 9V battery for use with any stereo audio input found in most consumer audio
products. Details and diagrams of each of these connections are provided later in this user guide.
Your BHM-1 includes a 1/4-20 threaded insert in the base for mounting the head microphone on a camera
tripod, a gimbal or a microphone stand. A 1/4” to 5/8” adapter is included.
Caution:
Your BHM-1 is made of PLA plastic and UV resin. Please do not expose the BHM-1 to temperatures above
110° F (43°C) for long periods because the plastic will soften at high temperatures.
For storage of your BHM-1, please remove the 9V battery (if installed) to prevent corrosion of the terminals.
The 9V battery is only required when using the stereo line output of the BHM-1.
Maximum SPL input for your BHM-1 is 110dB. Recording sounds louder than 110dB will result in distortion.
The microphones are mounted in the ears. Microphones are delicate objects. Please do not push on the micro-
phones. Do not poke the microphones with any object.
Do not expose the head, the base or the microphones to harsh cleaners or liquids. Do not submerge the head
in water. Do not use compressed air to clean the inside of the ears or the microphones. Do not blow into the
ears or the microphones.
Never plug a pair of headphones into the stereo output of your BHM-1. Headphones require more current than
the preamp is designed to provide. The preamp is designed for equipment with an input impedance of or high-
er than 1kΩ.
If you suspect a problem with your BHM-1, please contact us through the contact form at www.audiofrog.com,
Your BHM-1 is warranted against manufacturing defects for a period of one year from the date of purchase.
Please retain your purchase receipt for submission with any warranty claim.
2

What can I do with a binaural microphone?
Anytime you want to capture the spatial qualities of a sound event, a binaural head microphone makes it easy.
Some examples:
1. Capture the spatial qualities of an audio system set up in a room or a car so a listener can experience those
qualities over headphones in a remote location or at a dierent time. This can be very useful for presenting
the benets of audio equipment or advanced system optimization using a previously optimized system as an
example.
2. Capture a soundscape to serve as a sonic environment when making industrial, training or informative
videos.
3. Capture the sound of ambient noise so that equalization can be designed into an audio system to mask the
eects of such noise.
4. Capture the sound of environmental noise for analysis.
5. Add realism to a recording of any live event—birthday parties, hikes, school plays or concerts. Your
imagination is the limit.
6. Make eld recordings of natural events or the sounds of animals.
7. Learn about the eects of Head Related Transfer Function (HRTF) and sound localization.
Making binaural recordings with the BHM-1
A binaural head microphone makes it easy to capture the spatial aspects of sound in dierent environments
and to experience those spatial aspects when listening to playback over a good pair of headphones.
Compared to other means such as: a) binaural rendering of standard stereo recordings, b) synthesizing of a
space using a recording made with an ambisonics microphone and a digital audio workstation plug-in or some
other computer program, a direct binaural recording made with a head mic is faster and easier and doesn’t
include a steep learning curve. You just place the mic, record the event and play it back.
How does the head mic capture all of the spatial qualities?
We hear spaces because sounds that arrive at our ears from sources placed at various distances and angles
in 360-degree space arrive at our ears at dierent times and at dierent levels. In addition, the shape of our
head and torso and the shapes of our ears changes the frequency response of the sound when it arrives from
dierent angles of azimuth and elevation. Making a recording using a microphone shaped like a head with
microphones in its ears captures all of those dierences automatically.
The frequency response changes that are the result of dierent orientations in elevation and azimuth are
commonly referred to as Head Related Transfer Function, or HRTF. We have documented the HRTF of the
BHM-1 at 15° increments in both azimuth and elevation and those measurements are included in the appendix
of this manual. The measurements have been saved as simple .txt les and can be easily imported into many
measurement and analysis programs. The complete set of measurements is available for download on the
BHM-1 section of www.audiofrog.com.
When we listen to a binaural recording (made with a head microphone) through headphones, the timing of the
arrival of sounds and their frequency responses recorded by the head microphone--the head microphone’s
HRTF-- replaces the HRTF of our own head. The result is an astonishingly believable recreation of the
recording space.
Making the recording is simple. Attach the BHM-1 to a tripod or a microphone stand and place the stand so
the head is in the same place and in the same orientation as a listener’s head would be if the listener was
3

present. Plug the BHM-1 into your chosen audio interface. Press record in your recording program or app and
record the event. Once you have made the saved the recording, you may want to import it into a digital audio
workstation to adjust levels, clip out silence at the beginning or the end of the track or edit or remix the track in
some other way.
Some notes:
1. The BHM-1 does not include an on-board high pass lter. Low frequency sounds that exist in the recording
space will be captured and their level can be deceptively high. You may want to enable a lter in your app or
digital audio workstation before recording or you may want to attenuate these low frequency sounds in a post
process.
2. The maximum input sound pressure level for your BHM-1 is 110dB. Sounds louder than 110dB may cause
the microphone to clip and cause distortion in your recording. 110db should be suciently high for most
applications, but potentially not high enough for capturing the sound of industrial processes or other events
(rocket launches, airplane takeo, etc.).
3. The BHM-1 will capture both elevation and azimuth, so be sure to place the BHM-1 at the same height as an
imaginary listener’s head and point the BHM-1 in the same direction.
4. The recording made with the BHM-1 will likely be suitable for immediate playback over headphones. If
you wish to listen to the recording over loudspeakers, you’ll need to apply some equalization to convert the
response to a response suitable for a diuse eld (a room with speakers in it). See the appendix for the details
of such a lter. You’ll need to apply that lter in your recording app (if possible), or in a digital audio workstation
or in an equalizer included in your playback system.
5. The microphones in the BHM-1’s ears are high quality omnidirectional electret capsules. They have a
frequency response of 20Hz – 20kHz. This is the limit of human hearing. When setting the parameters of the
recording in your recording app or your digital audio workstation, a sample rate of 44.1k or 48k is sucient to
capture all the sound humans can hear. If you will be recording quiet sounds or if you will be post processing
your recording or mixing it with other audio tracks, you may nd a bit rate of 24 or 32 bps to be better than 16
bps.
Specications:
Microphone Element Type: Electret
Microphone Element Pattern: Omnidirectional
Microphone Element Sensitivity: -42 +/-3dB
Microphone Element Frequency Response: 20Hz – 20kHz, +2 to -2dB
Bias Voltage for Separate 3.5mm Outputs: 2V-9VDC
Maximum Output Voltage for 3.5mm Stereo Output: 2V
Battery for Stereo Preamp Output: 9V
Expected Battery Life: 100 Hours
Phantom Power: 48V
Mic Stand Adapter: 1/4” 20 thread, 5/8” to 1/4” adapter included
4

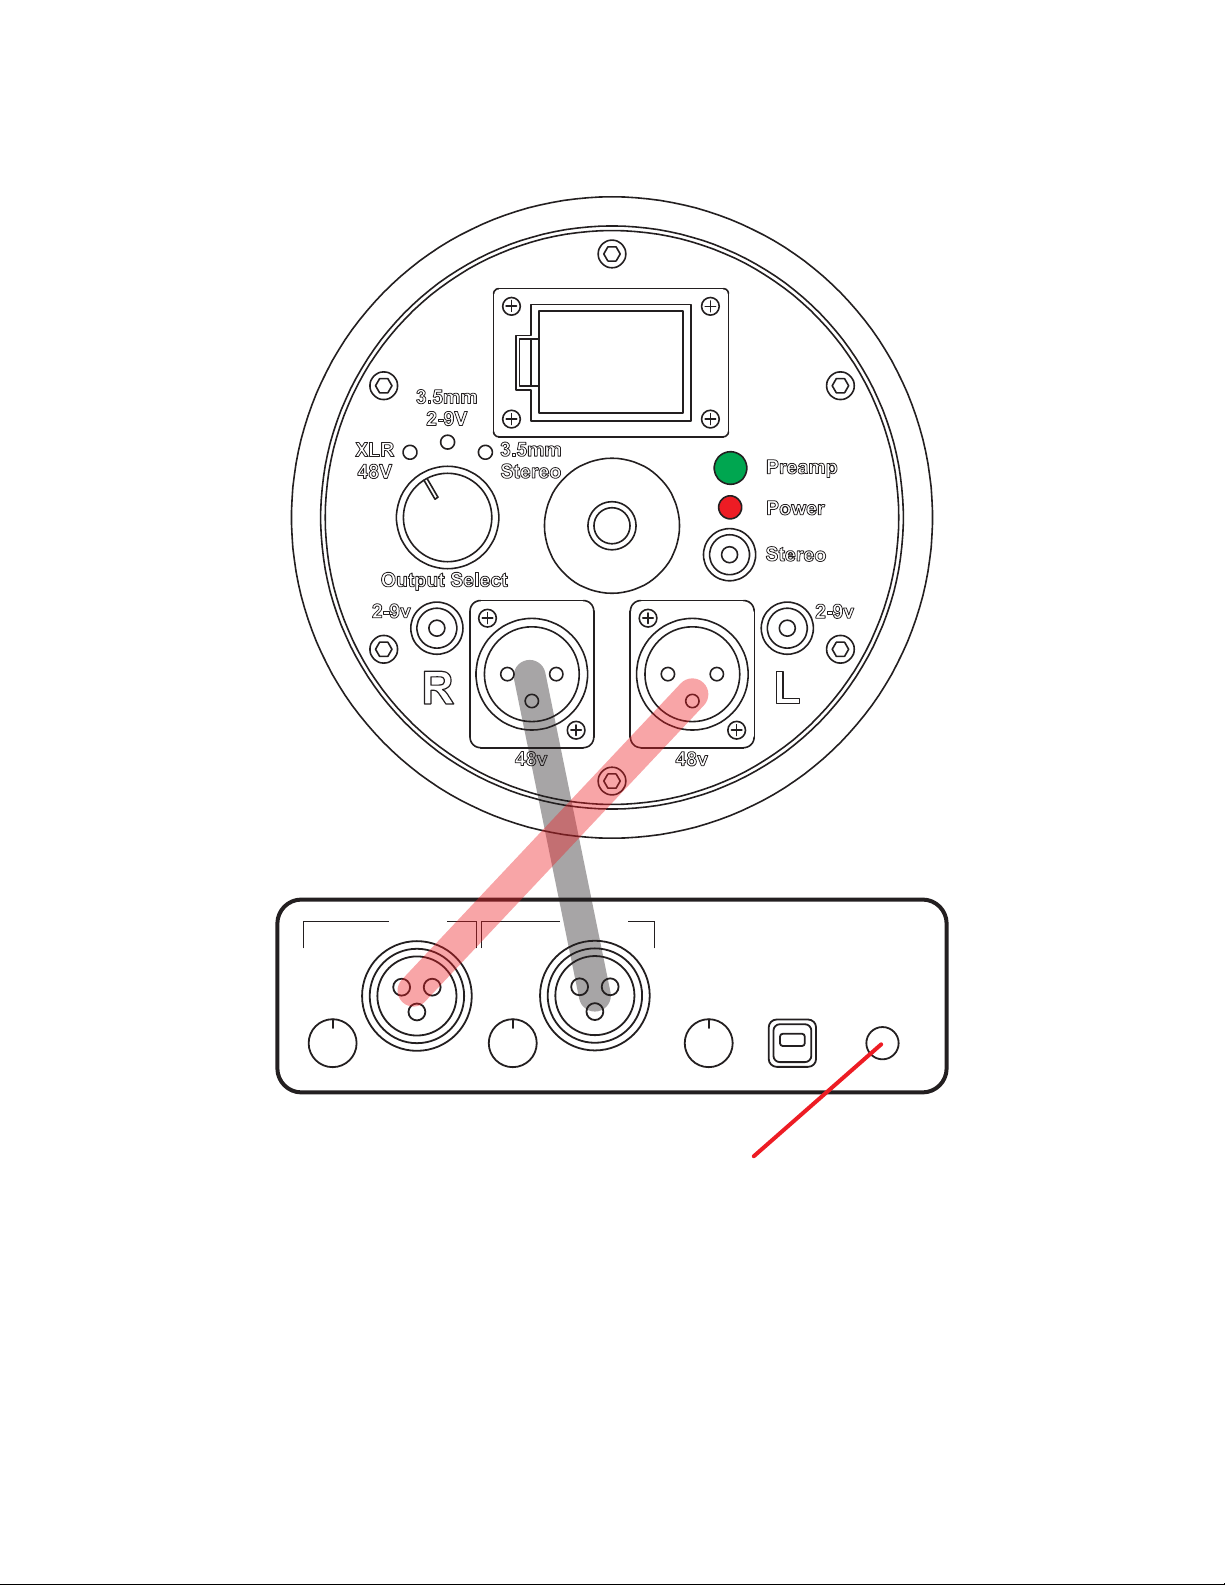
Connections:
1. 9V Battery Compartment: 9 V battery is only necessary if you intend to use the 3.5 mm stereo line output
(4). Press to release the clip and slide the battery drawer away from the base to install the battery.
2. Stereo Preamp On/O Switch: Turns the preamp for the 3.5 mm line output on and o.
3. Stereo Preamp Power Indicator LED: Glows red to indicate the preamp is on.
4. 3.5 mm Stereo Line Output TRS Jack: Provides line level (1 V) stereo output for connection to consumer
grade audio gear. Do NOT connect headphones to this jack. 9 V battery must be installed and the preamp
must be switched on to use this output.
5. 3.5 mm Left Output TRS Jack: Left microphone output for use with cameras or consumer grade stereo
soundcards that provide the required 2-9 VDC bias voltage.
6. Left XLR Output Jack: Left microphone output for use with professional audio interfaces or recorders that
provide 48 V phantom power. You must engage the 48 V phantom power in the interface to use this output.
7. Right XLR Output Jack: Left microphone output for use with professional audio interfaces or recorders that
provide 48 V phantom power. You must engage the 48 V phantom power in the interface to use this output.
8. 3.5mm Right Output TRS Jack: Left microphone output for use with cameras or consumer grade stereo
soundcards that provide the required 2-9 VDC bias voltage.
9. Output Selector Switch: Use this switch to select between the three output types: XLR 48V, 3.5mm 2-9V,
or Stereo.
10. 1/4-20 Tripod/Mic Stand Mounting Attachment: Attach a mic stand, tripod or gimbal here. A 1/4” to 5/8”
adapter is included with your BHM-1.
10
67
85
4
3
2
9
1
5

Connection pin out diagrams:
Tip
Sleeve
Tip: Signal +
Sleeve: Signal - (ground)
3.5mm (2-9V)
Tip
Ring
Sleeve
Tip: Left Signal +
Ring: Right Signal +
Sleeve: Signal - (ground)
3.5mm (Stereo)
1 2
3
1: Ground (Shield)
2: Positive (Hot)
3: Negative (Cold)
XLR (48V)
Refer to the drawings above when considering how you will connect your BHM-1 to other equipment. We have
made every eort to use standard connections and congurations, but there are many possibilities.
For connections to cameras and video cameras that provide a bias voltage for the microphones, you MUST
use the separate 3.5 mm jack on your BHM-1 and not the stereo output. Consult the owner’s manual for your
camera to conrm the connection type. You will probably need a 3.5 mm stereo to dual 3.5 mm mono adapter.
The 3.5 mm Stereo connector provides a standard analog audio output and is suitable for connection to the
input of any consumer grade stereo recording device. The microphone input to most phones is a mono input.
Stereo recording with your phone will require a USB interface device with a stereo input. These are available in
congurations that provide a bias voltage for a stereo microphone. Use these devices with the 3.5 mm (2-9 V)
jack. They are also available in congurations that will accept a standard stereo input. Use these devices with
the 3.5 mm Stereo output included in your BHM-1. Shop carefully! We recommend the Rode AI Micro for use
with phones. It’s also compatible with any PC or Mac with a USB connection.
Never plug a pair of headphones or non-amplied speakers of any kind into the 3.5mm (Stereo) output of the
BHM-1. This will damage the preamp.
When using the XLR outputs to connect to the BHM-1 to a professional USB audio interface, you must turn on
the interface’s 48 V phantom power to provide the bias voltage to the BHM-1’s microphones. The XLR pin out
is a standard conguration.
Connecting the BHM-1 to Recording Equipment:
In order to capture the space in which the recorded event happens, it is imperative that a stereo recording
is made. Be sure that the soundcard or the audio interface to which you attach the BHM-1 provides a stereo
input. Many consumer grade soundcards that include a microphone input and a headphone output provide only
a single input channel for the microphone. Using this with the stereo output of the BHM-1 will make a mono
recording since the single input channel will add the left and right outputs of the BHM-1 together.
6
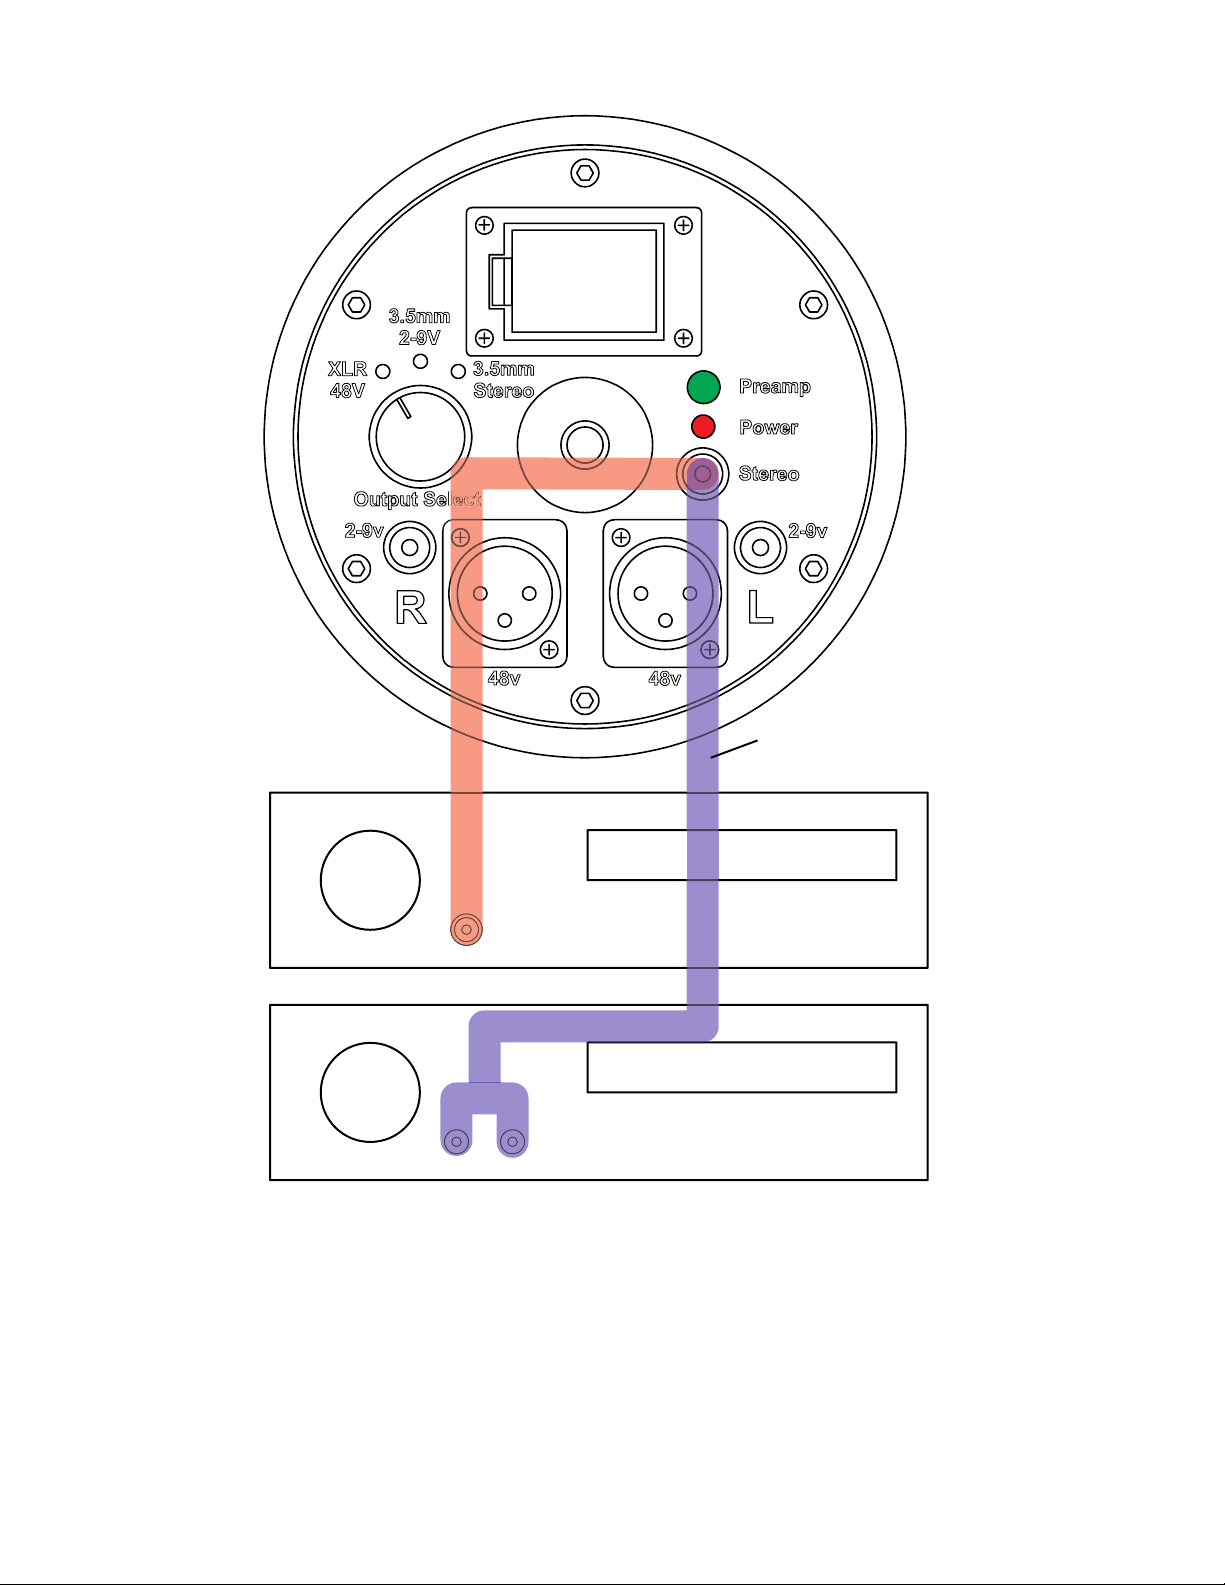
Connecting to a pro-audio USB interface for use with PC or MAC based digital audio workstations or
recording apps:
Set Phantom Power to “ON”
Left Right
LevelLevel Level
Input Input
USB Audio Interface
Output
USB
Phantom
Power
1. Connect R and L XLR outputs to R and L XLR inputs of the interface.
2. Set BMH-1’s output switch to “XLR 48V”.
3. The interface phantom power will power the microphones, so there is no need to turn on the pre-
amp.
4. Make sure the USB interface Phantom Power is turned on.
5. Connect USB connector on interface to PC (or MAC) USB.
6. Use left and right input gain controls if necessary to increase or decrease level. Be sure the adjust-
ment controls are set equally.
7
Connecting to a consumer audio device’s line level input:
1. Connect the Stereo output to the stereo line level input of the consumer device. A “Y” adapter or a 3.5
mm to stereo RCA adapter may be required.
2. Set BHM-1’s output switch to “3.5mm Stereo”.
3. Be sure a 9 V battery is installed in the battery compartment.
4. Turn on the preamp by pressing the “Power” button.
8
Stereo 3.5mm
Stereo RCA
OR
3.5mm to Stereo RCA Adapter

Connecting the BHM-1 to a camera or a video camera:
Stereo (TRS) to two Mono (TS) adapter
MIC
1. Consult your camera’s owner’s manual to conrm that the microphone input is a stereo input. If your camera
has an input labeled “mic” it probably includes bias voltage sucient for the BHM-1 Left and Right 3.5 mm
Outputs. You can conrm this indirectly by checking to see if a stereo electret microphone is available as an
accessory for your camera from the camera’s manufacturer (Canon DM-E1 microphone for Canon EOS D6, for
example).
2. Once you have conrmed the microphone input is stereo, connect the BHM-1 using a 3.5 mm Stereo (TRS)
to dual 3.5 mm Mono (TS) adapter as shown below.
3. Set BHM-1’s output switch to 3.5mm (2-9V).
9

Connecting to a phone using a Rode AI Micro (available from Rode Microphones at www.Rode.com)
Rode Microphones makes a handy solution that will connect your BHM-1 to a phone using a USB connection.
It will work with PCs and Macs, too. It comes with a convenient phone app to make recording and saving les
on your phone easy. Those les can be transferred to a PC or MAC based digital audio workstation for editing
or there are some basic editing tools included in the app. See https://rode.com/en-us/interfaces-and-mixers/ai-
series/ai-micro for details.
1 2 1 2
OR
1. Connect the 3.5 mm Stereo output to either of the AI Micro’s 3.5 mm inputs.
2. Turn on your BHM-1’s preamp to provide the bias voltage for the microphones.
3. Connect your phone or PC to the AI Micro using one of the USB cables provided with the AI Micro.
4. Set BHM-1’s Output switch to 3.5mm Stereo.
Or
1. Connect the two 3.5 mm (2-9V) outputs of your BHM-1 to each of the two 3.5 mm inputs of the Rode Micro
using two TS or TRS cables.
2. Connect your phone or PC to the AI Micro using one of the USB cables provide with the AI Micro.
3. Set BHM-1’s Output switch to 3.5mm 2-9V.
10
Appendix:
Equalization for playback over speakers:
Recordings made with a binaural head work when we listen to them over headphones, because the
headphones play sound directly into our ears without the inuence of our own HRTF. The head microphone’s
HRTF is substituted for our own. If you want to listen to the binaural recordings you make with the BHM-1
over loudspeakers in a room, there will still be some, however greatly reduced, spatial eect. In addition, the
dramatic high frequency boost caused by the shape of our ears and the changes in midrange response should
be removed from the recording. This will improve the tonal aspects of the playback. Equalization settings to be
used in an equalizer included in the playback system or to be used in post processing your recording in your
digital audio workstation are included as correction lter settings, below.
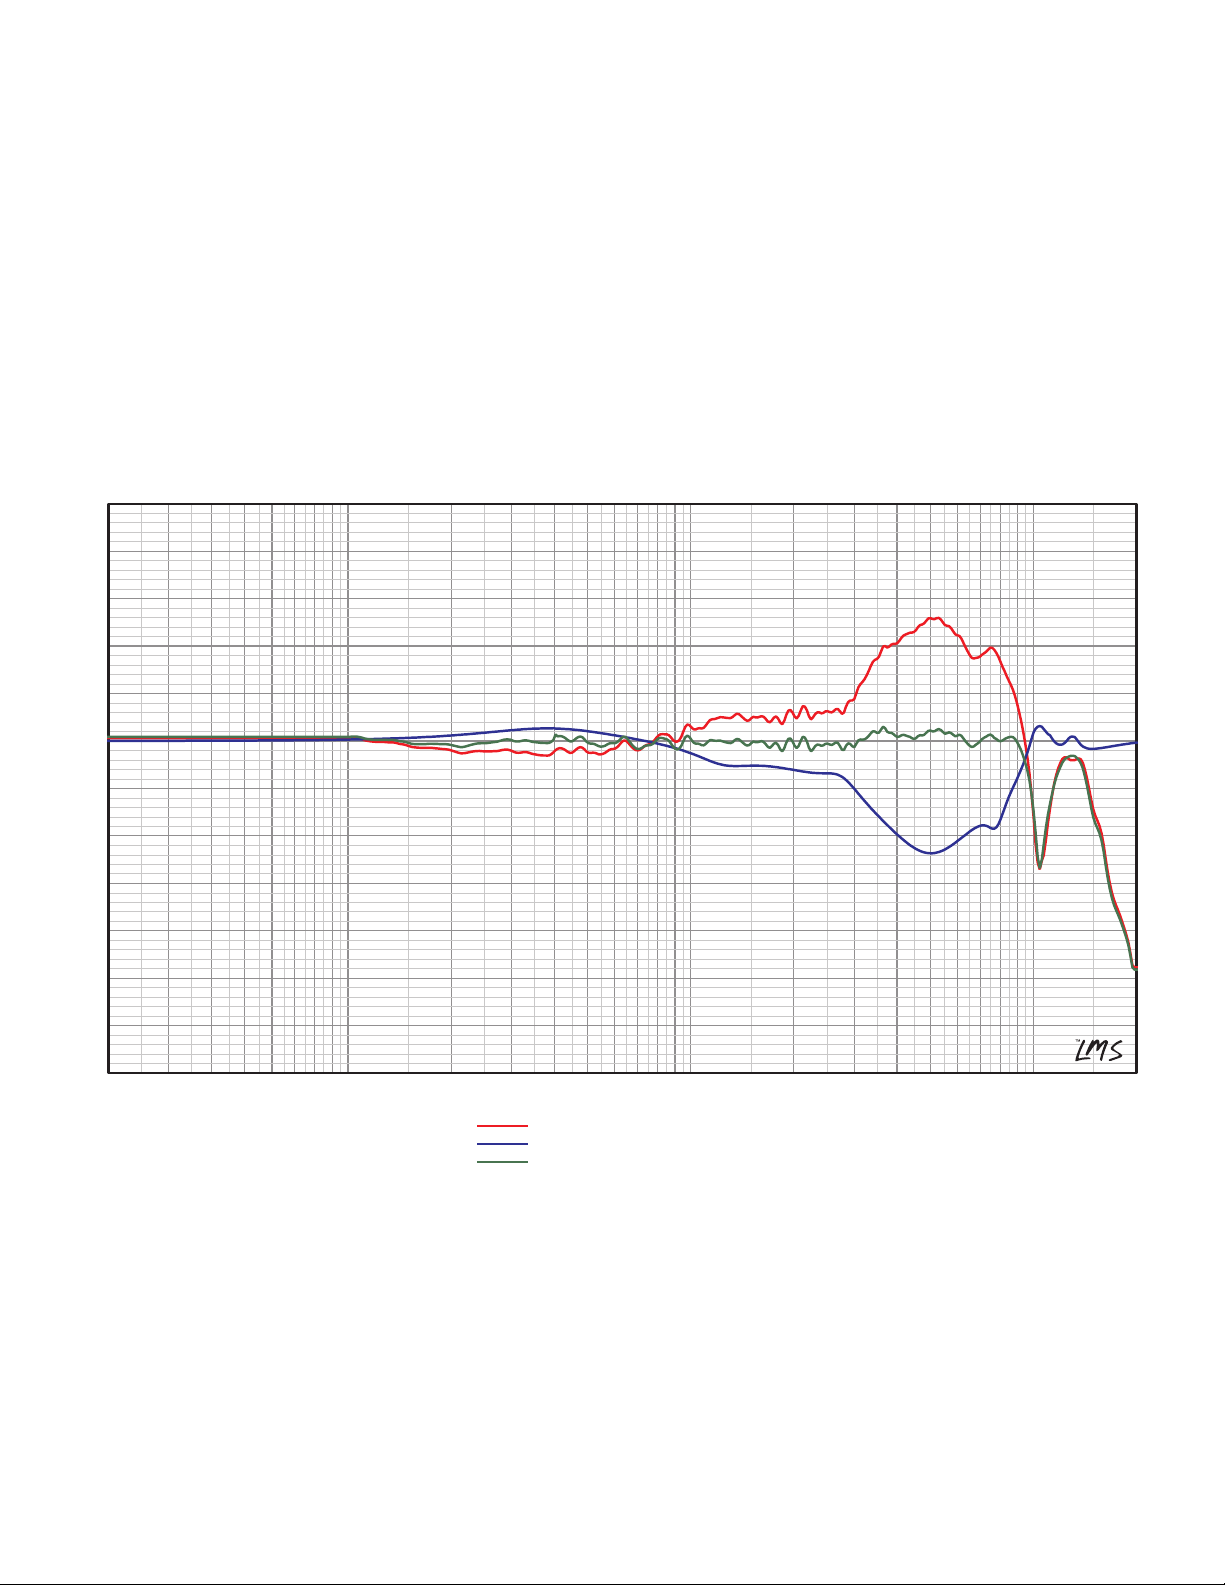
20 Hz50 100 200 500 1K 2K 5K 10K 20K
dBSPL
-35
-30
-25
-20
-15
-10
-5
0
5
10
15
20
25
Diffuse Field Equalization
1: Microphone Response 0E 0A
2: Diffuse Field Correction Filter
3: Diffuse Field Microphone Response
Correction Filter Settings:
1. Fc: 1,250 Hz Gain: -1.5 dB Q: 2.0
2. Fc: 400 Hz Gain: 1.5 dB Q: 0.8
3. Fc: 5,000 Hz Gain: -12 dB Q: 0.8
4. Fc: 2,750 Hz Gain: 2 dB Q: 3
5. Fc: 7,800 Hz Gain: -3 dB Q: 6
6. Fc: 10,400 Hz Gain: 4 dB Q: 4
7. Fc: 13,000 Hz Gain: 2 dB Q: 6
11
HRTF measurements:
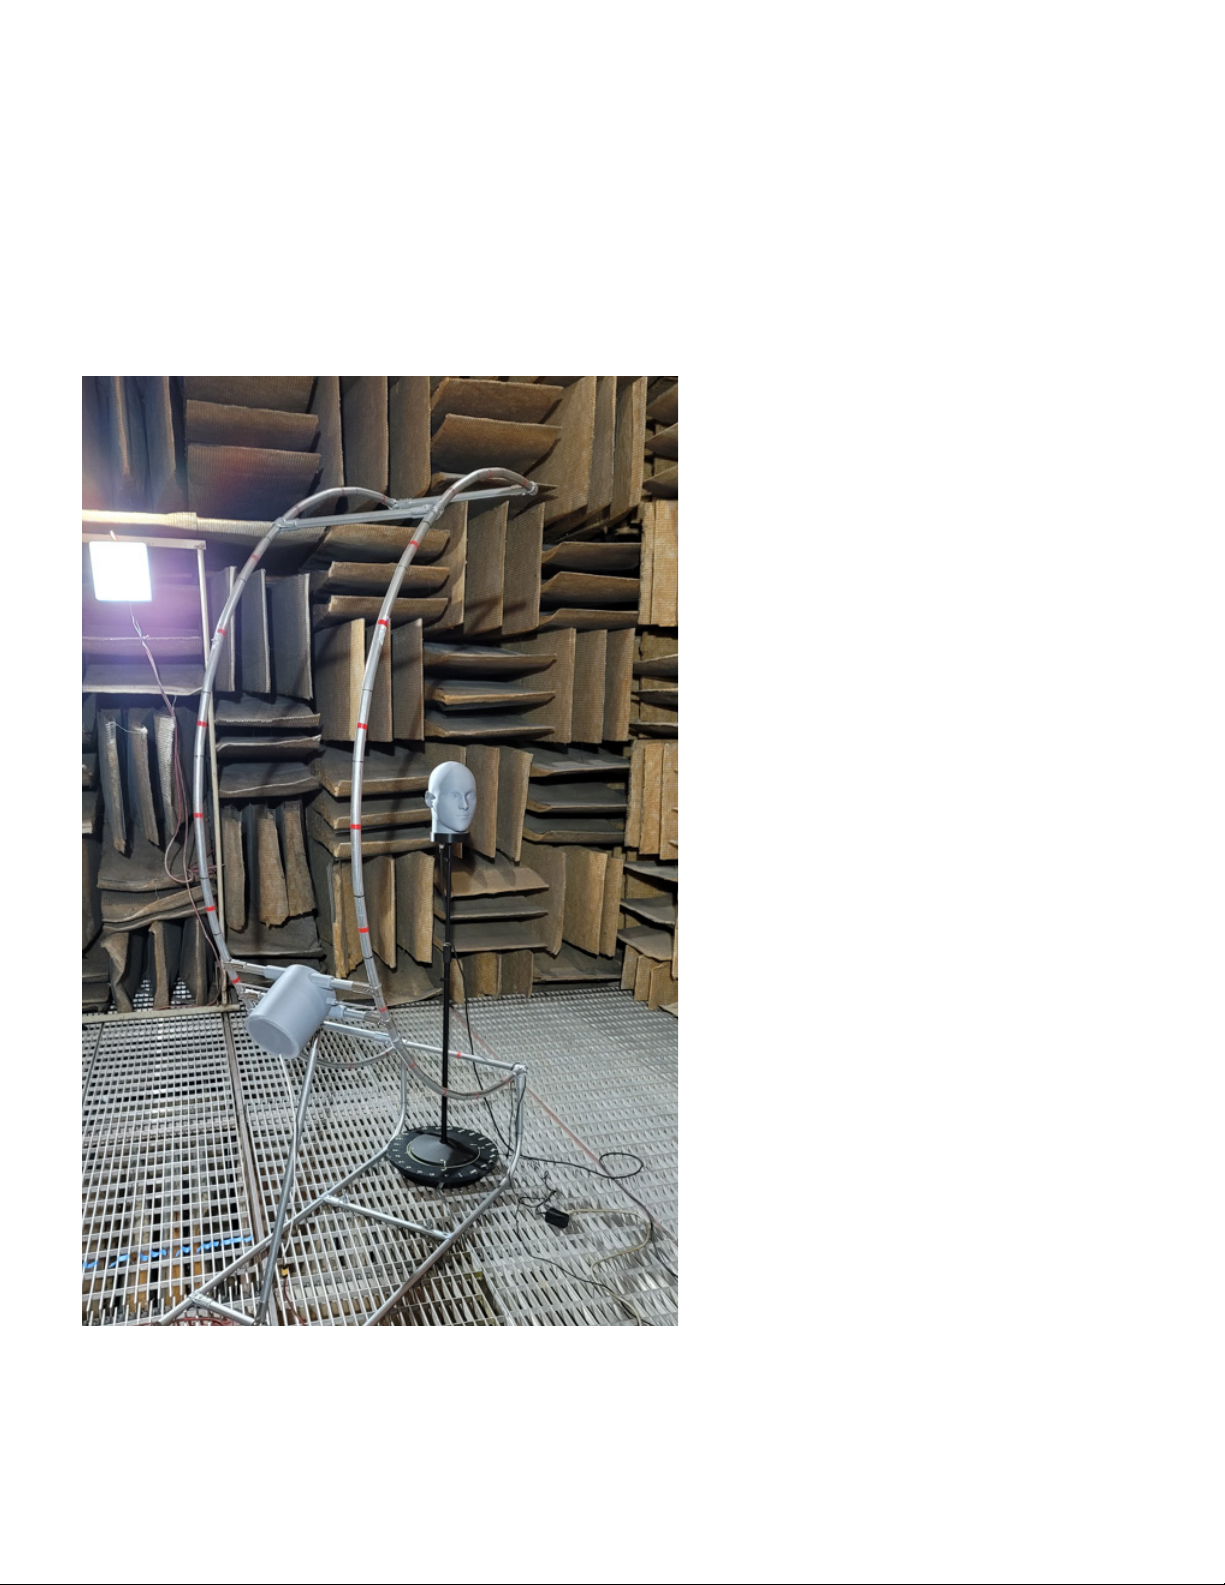
The measurements depicted in the graphs that follow were made in an anechoic chamber at the Western
Electro-Acoustic Laboratory in Santa Clarita, CA. The BHM-1 Microphone was placed on a stand and the
stand was placed on a turntable. A reference speaker was mounted one meter away on a semicircular jig. The
frequency response of the test speaker was measured with a reference microphone (ACO Pacic) using REW
and that response was saved and implemented as a microphone calibration le. The resulting measurements
were normalized and propagation delay was removed.
For each adjustment of elevation in 15 degree increments between -75° and 90°, the BHM-1 was rotated
through 345°with the turntable in 15° increments for each measurement. No measurements were made at
-90° of elevation. A picture of the setup is included below.
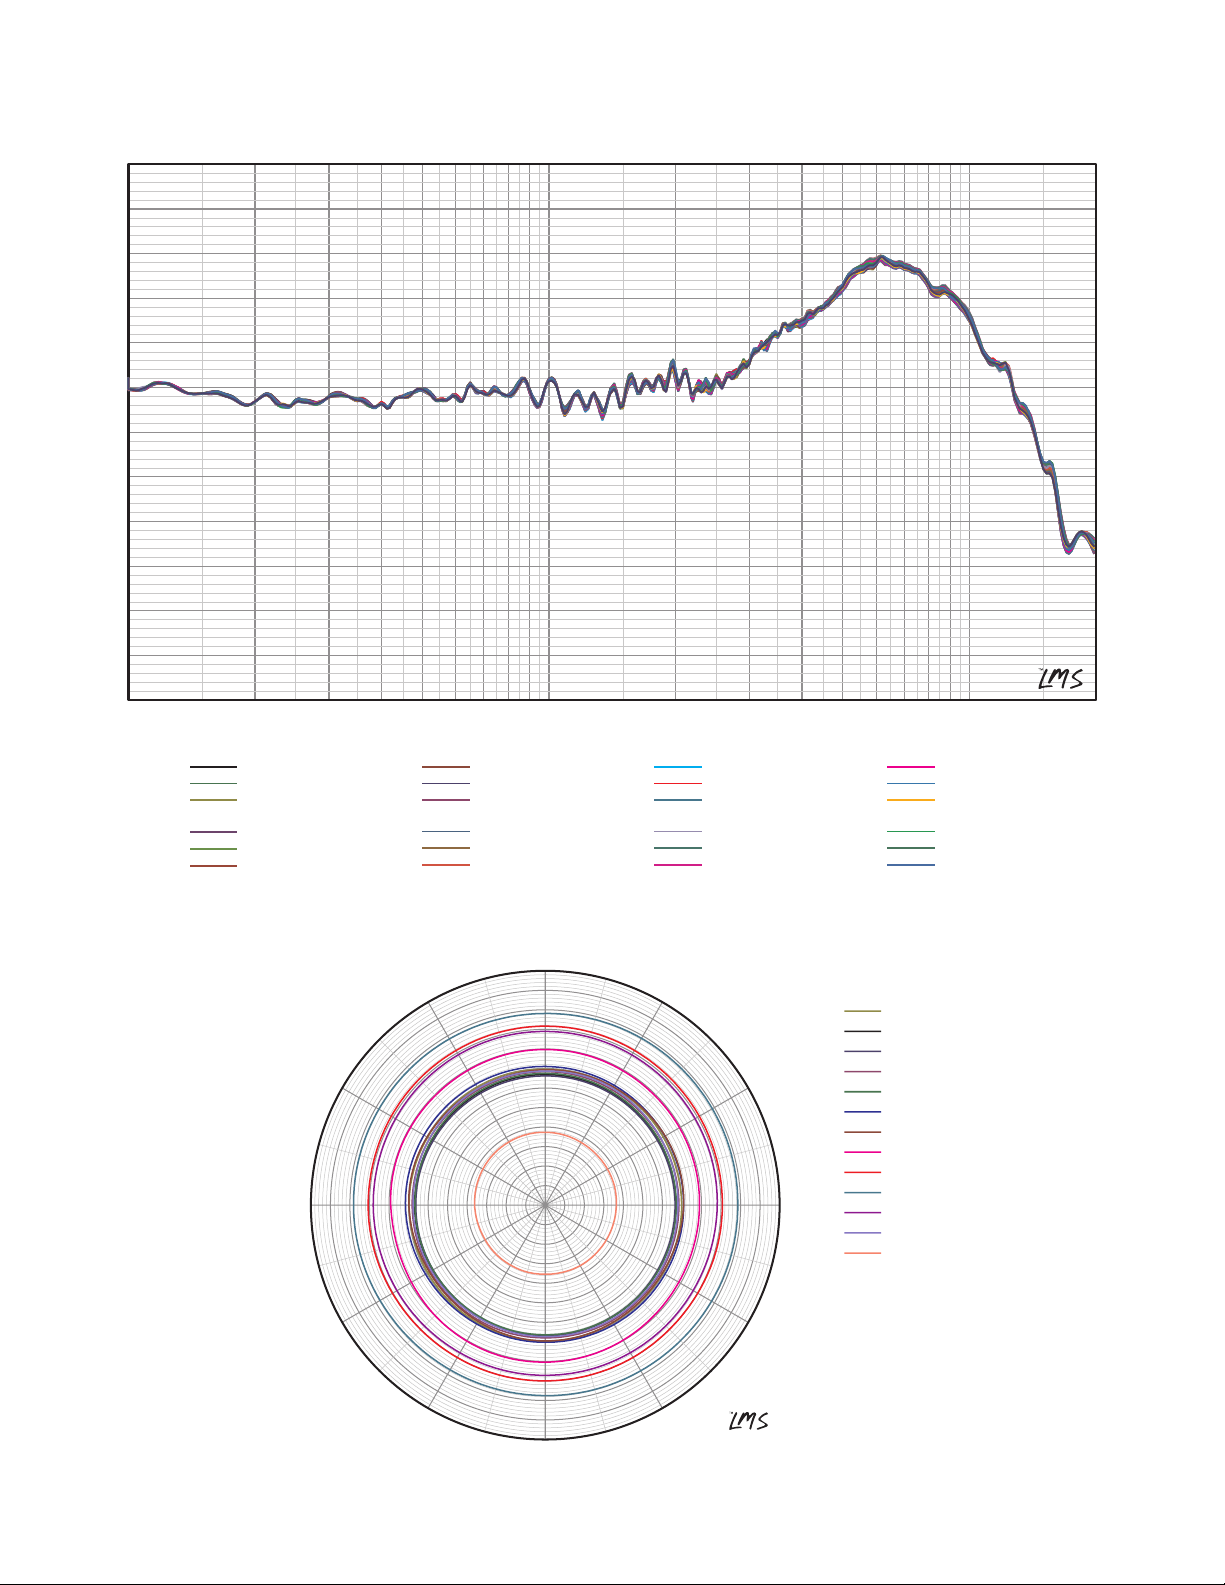
In the graphs that follow, the response of
the right ear microphone was measured.
0 degrees of azimuth (0A) represents the
head facing the speaker. Then, the head
was rotated in 15°increments toward the
right ear. 90° of azimuth (90A) shows the
response when the right ear is pointed
at the speaker. 180° of azimuth (180A)
shows the measurements when the head
is facing away from the speaker. 270° of
azimuth (270A) shows the response of the
right ear microphone when the left ear is
facing the speaker.
Similarly, the same 24 measurements
of azimuth were made with the speaker
oriented at higher and lower elevations,
also in 15° increments. 0° of elevation
(0E) represents the speaker mounted at
ear level. 15° of elevation (15E) shows the
response when the speaker is elevated
by 15° from 0°. -15° of elevation (-15E) or
(N15E) shows the measurement with the
speaker mounted 15° below 0°.
Each of the graphs here are made on
a single angle of elevation (in the rst
group) or a single angle of azimuth (in
the second group). Magnitude response
plots and polar plots are included. Polar
plots depicting frequency response over
elevation are limited to the forward angles.
See the next page for a complete map of
the measurement locations.
You can download the normalized data
as text les in the BHM-1 section at
www.audiofrog.com.
12

Measurement positions
0˚ Elevation, 0° Azimuth
0˚ Elevation, 90° Azimuth
0˚ Elevation, 180° Azimuth 0˚ Elevaton, 270° Azimuth
-45° Elevation, 0˚ Azimuth
0° Elevation, 0˚ Azimuth
90° Elevation, 0˚ Azimuth
45° Elevation, 0˚Azimuth
0° Elevation
In the graphs on the following
pages each of the curves depicted
in the frequency response plots will
be named according to the
convention described in the
graphics on this page:
0° Elevation, 0° Azimuth is directly
in front of the head. 0° Elevation,
90° Azimuth is to the right of the
head. 0°Elevation, 180° Azimuth is
directly behind the head. 0°
Elevation, 270° Azimuth is to the
left of the head. 90° Elevation is
directly above the head.
If you choose to download all of
these measurements as text files
to use in your own analysis, you’ll
find a similar naming convention
for those. No special characters
can be used in file names, so
“0E 0A.txt” will be the file for 0°
Elevation, 0° Azimuth.
0° Azimuth
13

0˚ Elevation, 0˚ Azimuth
Graphics on this page depict all of the measurement
positions represented in the graphs on the following
pages and in the text files available for download. The
baseline position, 0˚Elevation, 0˚Azimuth is
highlighted in red below.
14
100 Hz 200 500 1K 2K 5K 10K 20K
dBSPL
-35
-30
-25
-20
-15
-10
-5
0
5
10
15
20
25
90° Elevation
1: 90E 0A.txt
2: 90E 15A.txt
3: 90E 30A.txt
4: 90E 45A.txt
5: 90E 60A.txt
6: 90E 75A.txt
7: 90E 90A.txt
8: 90E 105A.txt
9: 90E 120A.txt
10: 90E 135A.txt
11: 90E 150A.txt
12: 90E 165A.txt
13: 90E 180A.txt
14: 90E 195A.txt
15: 90E 210A.txt
16: 90E 225A.txt
17: 90E 240A.txt
18: 90E 255A.txt
19: 90E 270A.txt
20: 90E 285A.txt
21: 90E 300A.txt
22: 90E 315A.txt
23: 90E 330A.txt
24: 90E 345A.txt
-180
-150
-120
-90
-60
-30
0 Deg
30
60
90
120
150
180
dBSPL
-35
-30
-30
-25
-25
-20
-20
-15
-15
-10
-10
-5
-5
0
0
5
5
10
10
15
15
20
20
25
25
90° Elevation
Curve Frequency
100.00
200.00
400.00
800.00
1.20K
1.60K
2.40K
3.20K
4.80K
6.40K
9.60K
12.80K
19.20K
15

100 Hz 200 500 1K 2K 5K 10K 20K
dBSPL
-35
-30
-25
-20
-15
-10
-5
0
5
10
15
20
25
75° Elevation
1: 75E 0A.txt
2: 75E 15A.txt
3: 75E 30A.txt
4: 75E 45A.txt
5: 75E 60A.txt
6: 75E 75A.txt
7: 75E 90A.txt
8: 75E 105A.txt
9: 75E 120A.txt
10: 75E 135A.txt
11: 75E 150A.txt
12: 75E 165A.txt
13: 75E 180A.txt
14: 75E 195A.txt
15: 75E 210A.txt
16: 75E 225A.txt
17: 75E 240A.txt
18: 75E 255A.txt
19: 75E 270A.txt
20: 75E 285A.txt
21: 75E 300A.txt
22: 75E 315A.txt
23: 75E 330A.txt
24: 75E 345A.txt
-180
-150
-120
-90
-60
-30
0 Deg
30
60
90
120
150
180
dBSPL
-35
-30
-30
-25
-25
-20
-20
-15
-15
-10
-10
-5
-5
0
0
5
5
10
10
15
15
20
20
25
25
75° Elevation
Curve Frequency
100.00
200.00
400.00
800.00
1.20K
1.60K
2.40K
3.20K
4.80K
6.40K
9.60K
12.80K
19.20K
16

100 Hz 200 500 1K 2K 5K 10K 20K
dBSPL
-35
-30
-25
-20
-15
-10
-5
0
5
10
15
20
25
60° Elevation
1: 60E 0A.txt
2: 60E 15A.txt
3: 60E 30A.txt
4: 60E 45A.txt
5: 60E 60A.txt
6: 60E 75A.txt
7: 60E 90A.txt
8: 60E 105A.txt
9: 60E 120A.txt
10: 60E 135A.txt
11: 60E 150A.txt
12: 60E 165A.txt
13: 60E 180A.txt
14: 60E 195A.txt
15: 60E 210A.txt
16: 60E 225A.txt
17: 60E 240A.txt
18: 60E 255A.txt
19: 60E 270A.txt
20: 60E 285A.txt
21: 60E 300A.txt
22: 60E 315A.txt
23: 60E 330A.txt
24: 60E 345A.txt
-180
-150
-120
-90
-60
-30
0 Deg
30
60
90
120
150
180
dBSPL
-35
-30
-30
-25
-25
-20
-20
-15
-15
-10
-10
-5
-5
0
0
5
5
10
10
15
15
20
20
25
25
60° Elevation
Curve Frequency
100.00
200.00
400.00
800.00
1.20K
1.60K
2.40K
3.20K
4.80K
6.40K
9.60K
12.80K
19.20K
17
100 Hz 200 500 1K 2K 5K 10K 20K
dBSPL
-35
-30
-25
-20
-15
-10
-5
0
5
10
15
20
25
45° Elevation
1: 45E 0A.txt
2: 45E 15A.txt
3: 45E 30A.txt
4: 45E 45A.txt
5: 45E 60A.txt
6: 45E 75A.txt
7: 45E 90A.txt
8: 45E 105A.txt
9: 45E 120A.txt
10: 45E 135A.txt
11: 45E 150A.txt
12: 45E 165A.txt
13: 45E 180A.txt
14: 45E 195A.txt
15: 45E 210A.txt
16: 45E 225A.txt
17: 45E 240A.txt
18: 45E 255A.txt
19: 45E 270A.txt
20: 45E 285A.txt
21: 45E 300A.txt
22: 45E 315A.txt
23: 45E 330A.txt
24: 45E 345A.txt
-180
-150
-120
-90
-60
-30
0 Deg
30
60
90
120
150
180
dBSPL
-35
-30
-30
-25
-25
-20
-20
-15
-15
-10
-10
-5
-5
0
0
5
5
10
10
15
15
20
20
25
25
45° Elevation
Curve Frequency
100.00
200.00
400.00
800.00
1.20K
1.60K
2.40K
3.20K
4.80K
6.40K
9.60K
12.80K
19.20K
18

100 Hz 200 500 1K 2K 5K 10K 20K
dBSPL
-35
-30
-25
-20
-15
-10
-5
0
5
10
15
20
25
30° Elevation
1: 30E 0A.txt
2: 30E 15A.txt
3: 30E 30A.txt
4: 30E 45A.txt
5: 30E 60A.txt
6: 30E 75A.txt
7: 30E 90A.txt
8: 30E 105A.txt
9: 30E 120A.txt
10: 30E 135A.txt
11: 30E 150A.txt
12: 30E 165A.txt
13: 30E 180A.txt
14: 30E 195A.txt
15: 30E 210A.txt
16: 30E 225A.txt
17: 30E 240A.txt
18: 30E 255A.txt
19: 30E 270A.txt
20: 30E 285A.txt
21: 30E 300A.txt
22: 30E 315A.txt
23: 30E 330A.txt
24: 30E 345A.txt
-180
-150
-120
-90
-60
-30
0 Deg
30
60
90
120
150
180
dBSPL
-35
-30
-30
-25
-25
-20
-20
-15
-15
-10
-10
-5
-5
0
0
5
5
10
10
15
15
20
20
25
25
30° Elevation
Curve Frequency
100.00
200.00
400.00
800.00
1.20K
1.60K
2.40K
3.20K
4.80K
6.40K
9.60K
12.80K
19.20K
19

100 Hz 200 500 1K 2K 5K 10K 20K
dBSPL
-35
-30
-25
-20
-15
-10
-5
0
5
10
15
20
25
15° Elevation
1: 15E 0A.txt
2: 15E 15A.txt
3: 15E 30A.txt
4: 15E 45A.txt
5: 15E 60A.txt
6: 15E 75A.txt
7: 15E 90A.txt
8: 15E 105A.txt
9: 15E 120A.txt
10: 15E 135A.txt
11: 15E 150A.txt
12: 15E 165A.txt
13: 15E 180A.txt
14: 15E 195A.txt
15: 15E 210A.txt
16: 15E 225A.txt
17: 15E 240A.txt
18: 15E 255A.txt
19: 15E 270A.txt
20: 15E 285A.txt
21: 15E 300A.txt
22: 15E 315A.txt
23: 15E 330A.txt
24: 15E 345A.txt
-180
-150
-120
-90
-60
-30
0 Deg
30
60
90
120
150
180
dBSPL
-35
-30
-30
-25
-25
-20
-20
-15
-15
-10
-10
-5
-5
0
0
5
5
10
10
15
15
20
20
25
25
15° Elevation
Curve Frequency
100.00
200.00
400.00
800.00
1.20K
1.60K
2.40K
3.20K
4.80K
6.40K
9.60K
12.80K
19.20K
20


