Audiofront midi expression User manual

Quattro
iO
USER MANUAL
Updated 09/12/2019

Table of Contents
Introduction.........................................3
Features......................................................3
Pedal Sensing Technology..........................3
Class Compliant...........................................3
Standalone peration..................................3
Colors..........................................................3
n-Board LED.............................................4
Parameter Feedback...................................4
Value Persistence........................................4
Default Settings...........................................4
Getting Started....................................5
Setting Up Your MIDI Software....................5
Changing Device Settings............................5
Control Application.............................6
Standalone vs. Plugin Mode........................6
Device and Input Selector............................7
Sidebar........................................................7
Input Editor..................................................8
Pedal Type Selector....................................8
Using Expression and Hihat Pedals....9
Controls for Expression and Hihat Pedals....9
Modes for Expression and Hihat Pedals....11
Basic Modes..............................................11
Note and Hihat Modes..............................12
Using Sustain Pedals........................ 4
Controls for Expression and Hihat Pedals..14
Modes for Sustain Pedals..........................15
Basic Modes..............................................15
INC / DEC Modes......................................15
Dual CC Mode...........................................16
Keyboard Modes.......................................16
Using Footswitches........................... 7
Linked Modes for Footswitches..................17
MIDI Routing...................................... 8
USB MIDI Loopback..................................18
Resolution..................................................18
MIDI Transformer.............................. 9
Power Button.............................................19
Specifying Which Messages to Process....19
peration Parameters................................19
Inverting Velocity.......................................19
Assigning Pedals to Transformer
Settings.............................................20
Modes for Switch Pedals...........................20
Modes for Expression Pedals....................21
MIDI Activity Monitor........................22
Snapshot Manager.............................23
AU / VST Control Application............24
Why Would You Want to Use It?..............24
Adding the Plugin To Your Project............24
Activating and Deactivating inputs............24
Using presets............................................25
iOS Control Application.....................26
Getting Connected.....................................26
Camera Connection Kit.............................26
Network MIDI............................................26
MIDI Cables (MIDI Expression i )............27
Updating the Firmware.....................28
(A) Changing Colors..................................28
(B) Class Compliance................................28
Restoring the Control Interface..................29
Wiring Diagrams................................30
MIDI Implementation.........................3
MIDI Expression Manual page 2 / 31

Introduction
If you've purchased a MIDI Expression device, thank you for your support and I hope you enjoy
using it.
This manual gives you a good look at how MIDI Expression devices and the MIDI Expression
Control application work. While they are both easy and intuitive to use, this manual is worth
reading to familiarize yourself with their features and to discover aspects of their use that are not
so obvious.
Features
•Pedal Sensing Technology.
•Polarity reversing inputs.
•Class compliant driverless implementation.
•Standalone operation (MIDI Expression i )
•Powerful preset editor.
•Parameter feedback.
•Value persistence.
Pedal Sensing Technology
All MIDI Expression devices are designed with the ability auto detect the type of pedal plugged into
them. They can detect expression pedals, sustain pedals, hihat controllers, and dual footswitches.
The pedal sensing feature automatically loads an associated preset based on the type of pedal
plugged in.
Polarity reversing inputs ensure compatibility with pedals from all manufactures. Take a look in the
appendix for wiring diagrams for each pedal type.
Class Compliant
MIDI Expression devices will run on virtually any system that supports USB including Windows,
SX, Linux, i S, and Android, without the need to install drivers. For use in the USB host port of
3rd party MIDI devices such as an iConnect interface, a 'pared-down' version of the firmware can
can be used as described here.
Standalone Operation
The MIDI Expression i can operate in Standalone Mode without a connection
to a computer. The device automatically enters this mode when powered by a
USB charger or a Roland / B SS style 9V DC power adapter. In standalone
mode, MIDI from MIDI in port is merged with MIDI generated by pedals and is
routed out the MIDI ut port.
Colors
MIDI Expression devices come in six different colors, each with a unique MIDI port name. This
makes it easy for you and your software to distinguish multiple MIDI Expressions plugged into the
same computer. The 'color' of a device can be changed by updating the firmware installed on
the device.
MIDI Expression Manual page 3 / 31
6 - 12V (200 mA)

On-Board LED
Each MIDI Expression has an internal LED that provides visual feedback when you plug in the
device, plug in a pedal, or select a device with the Control Application. The black and blue devices
have opaque encloses, so the LED is only visible by looking through the jack. For all other colors,
the LED is visible through the enclosures.
The MIDI Expression i (Mk 2) has 3 LEDs visible from the back of the unit. The top LED is a
status LED, the middle LED indicates MIDI DIN in activity and the bottom LED indicated MIDI DIN
out activity.
Parameter Feedbac
MIDI Expression monitors its MIDI IN port and updates its values accordingly, allowing it to stay in
sync with your music software.
Value Persistence
MIDI Expression devices remember their toggle positions and current patch values even after
being unplugged, ensuring that your device is always in the exact state as you last left it in.
Default Settings
MIDI Expression Manual page 4 / 31
Input 1 Input 2 Input 3 Input 4
Expression CC CC CC CC
Chan: 1 CC: 7 Chan: 2 CC: 7 Chan: 3 CC: 7 Chan: 4 CC: 7
Sustain CC CC CC CC
Chan: 1 CC: 64 Chan: 2 CC: 64 Chan: 3 CC: 64 Chan: 4 CC: 64
Hihat CC CC CC CC
Chan: 10 CC: 4 Chan: 10 CC: 4 Chan: 10 CC: 4 Chan: 10 CC: 4
Footswitch CC CC CC CC
Chan: 1 CC: 1 Chan: 2 CC: 1 Chan: 3 CC: 1 Chan: 4 CC: 1
Chan: 1 CC: 2 Chan: 2 CC: 2 Chan: 3 CC: 2 Chan: 4 CC: 2

Getting Started
Because MIDI Expression devices are class compliant, they work 'right out of the box'. Simply
connect your device with a USB cable and you are ready to go.
Setting Up Your MIDI Software
If you want to be able to controlled an application via MIDI, especially in Windows, you will likely
need to enabled the MIDI Expression in the application's audio / MIDI setup. Every application is
slightly different and yet basically idea is the same. Here are a bunch of screenshots showing how
to enable MIDI Expression in various applications.
Connecting Pedals
MIDI Expression devices support expression pedals, sustain pedals, footswitches, and hihat
controllers. For pedals with removable cables, it’s best to plug the cable into the pedal before
connecting to the MIDI Expression. Plugging in a cable without a pedal attached can confuse the
Pedal Sensing and resulting in your pedal being setup incorrrectly.
MIDI Expression devices do not support piezo based kick pedals. These pedals produce high AC
voltages that can damage the MIDI Expression, and the MIDI Expression outputs DC voltage
which can put strain on peizos.
Changing Device Settings
To change settings for you device, download and install the Control Application, which is
available for Windows, mac S, and i S.
MIDI Expression Manual page 5 / 31
REAPER
Control Application
As MIDI Expression devices have no physical buttons, any changes you want to make need to be
done using the MIDI Expression Control application. The window of the application is scalable, so
you can adjust the size to best suit the resolution of your display.
Standalone vs. Plugin Mode
The MIDI Expression Control application comes in two varieties—a standalone version and also a
plugin version. While both varieties work in pretty much the same way, there is one major
difference between them. When you make changes using the standalone version, your changes
are saved directly to the memory in the device itself. However, when you make changes using the
plugin version, the settings are saved in the plugin's own memory and not the device.
When using the plugin version, settings saved in the plugin are uploaded to the device when the
plugin is loaded. When the plugin is unloaded, the settings from the plugin are offloaded and the
settings stored in the device (via the standalone version) are restored. This behavior not only
allows you to have different configurations loaded for each project, but also allows the two versions
of the application to be complementary to each other.
The instructions for the rest of this section are assuming you're using the standalone version. For
the most part they also apply to the plugin version, just remember that the plugin version does
N T save any settings to the device itself and the settings are offloaded once the plugin version is
closed.
Look here detailed information regarding plugin mode.
MIDI Expression Manual page 6 / 31

Device and Input Selector
The topmost part of the MIDI Expression control application is reserved for selecting the device
and input you want to edit.
When using a multi-input MIDI Expression, an input can be selected for editing by clicking on its
graphic in the center of the top header.
If you have more than one MIDI Expression connected, icons for each device become visible
allowing you to select the device you want to edit. The control application supports editing up to
four devices at one time.
Sidebar
The sidebar controls the device settings that you want to edit.
This icon displays the Input editor. You can use it to edit the behavior of your
pedals and the kind of MIDI messages they produce.
The Routing Editor lets you control how MIDI is routed through the device and set
the MIDI resolution of the inputs.
The MIDI Transformer is a MIDI effect that allows you to use pedals to dynamically
manipulate the MIDI messages the device generates.
The Snapshot Manager lets you save entire snapshots of your device’s memory,
allowing you to quickly change the entire configuration of a device with a single click.
When the Autoselect option is on (default), the Input Editor will automatically select an
input for editing when its pedal moves.
nly available on Windows, the n Top option keeps the Control Application on top of
other windows.
This button opens up the MIDI Expression manual. This button in not available on the
i S version of the Control Application.
The firmware for MIDI Expression devices is periodically updated to fix bugs and add
new features. Click this icon to Update Your Firmware.
Note: The single input MIDI Expression and first generation MIDI Expression Quattros only support
a limited version of the MIDI Transformer and so thing icon will be greyed out when editing these
devices.
MIDI Expression Manual page 7 / 31
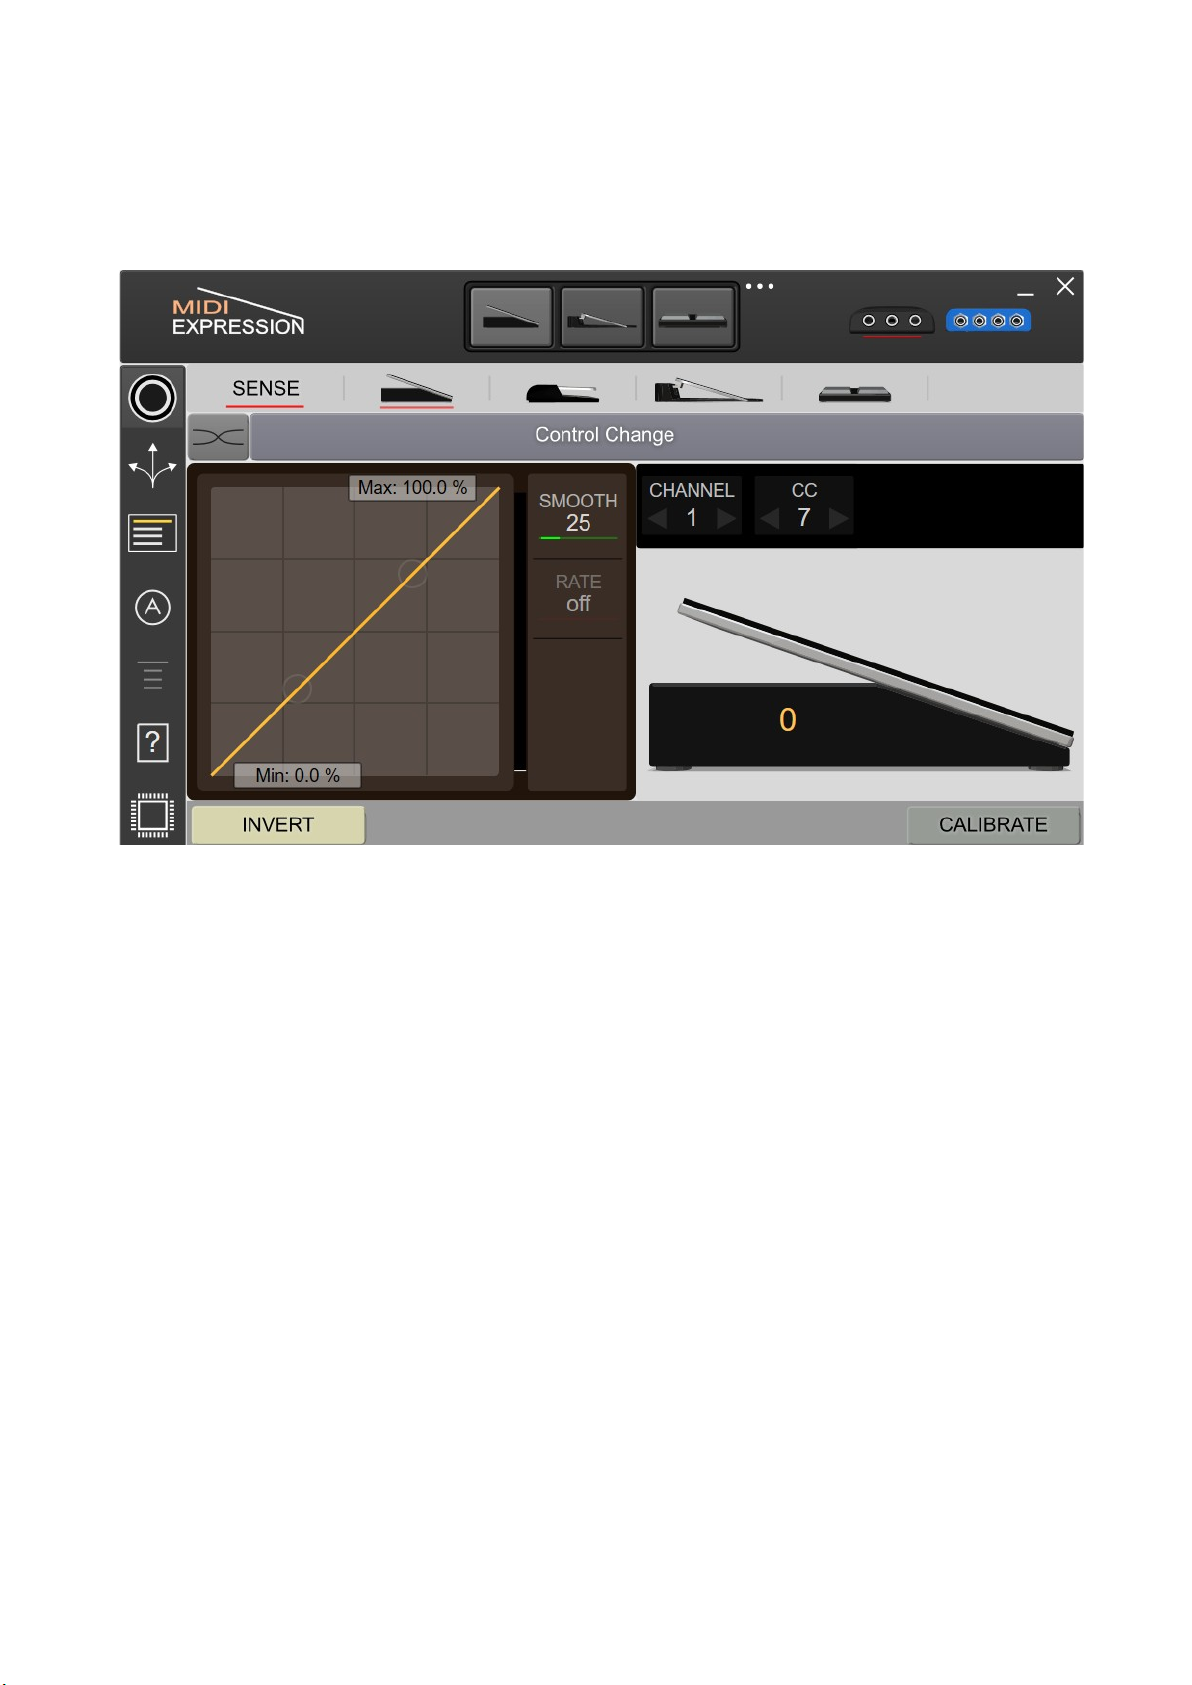
Input Editor
The Input Editor lets you make changes to the behavior of your pedals and the type of MIDI
messages they produce.
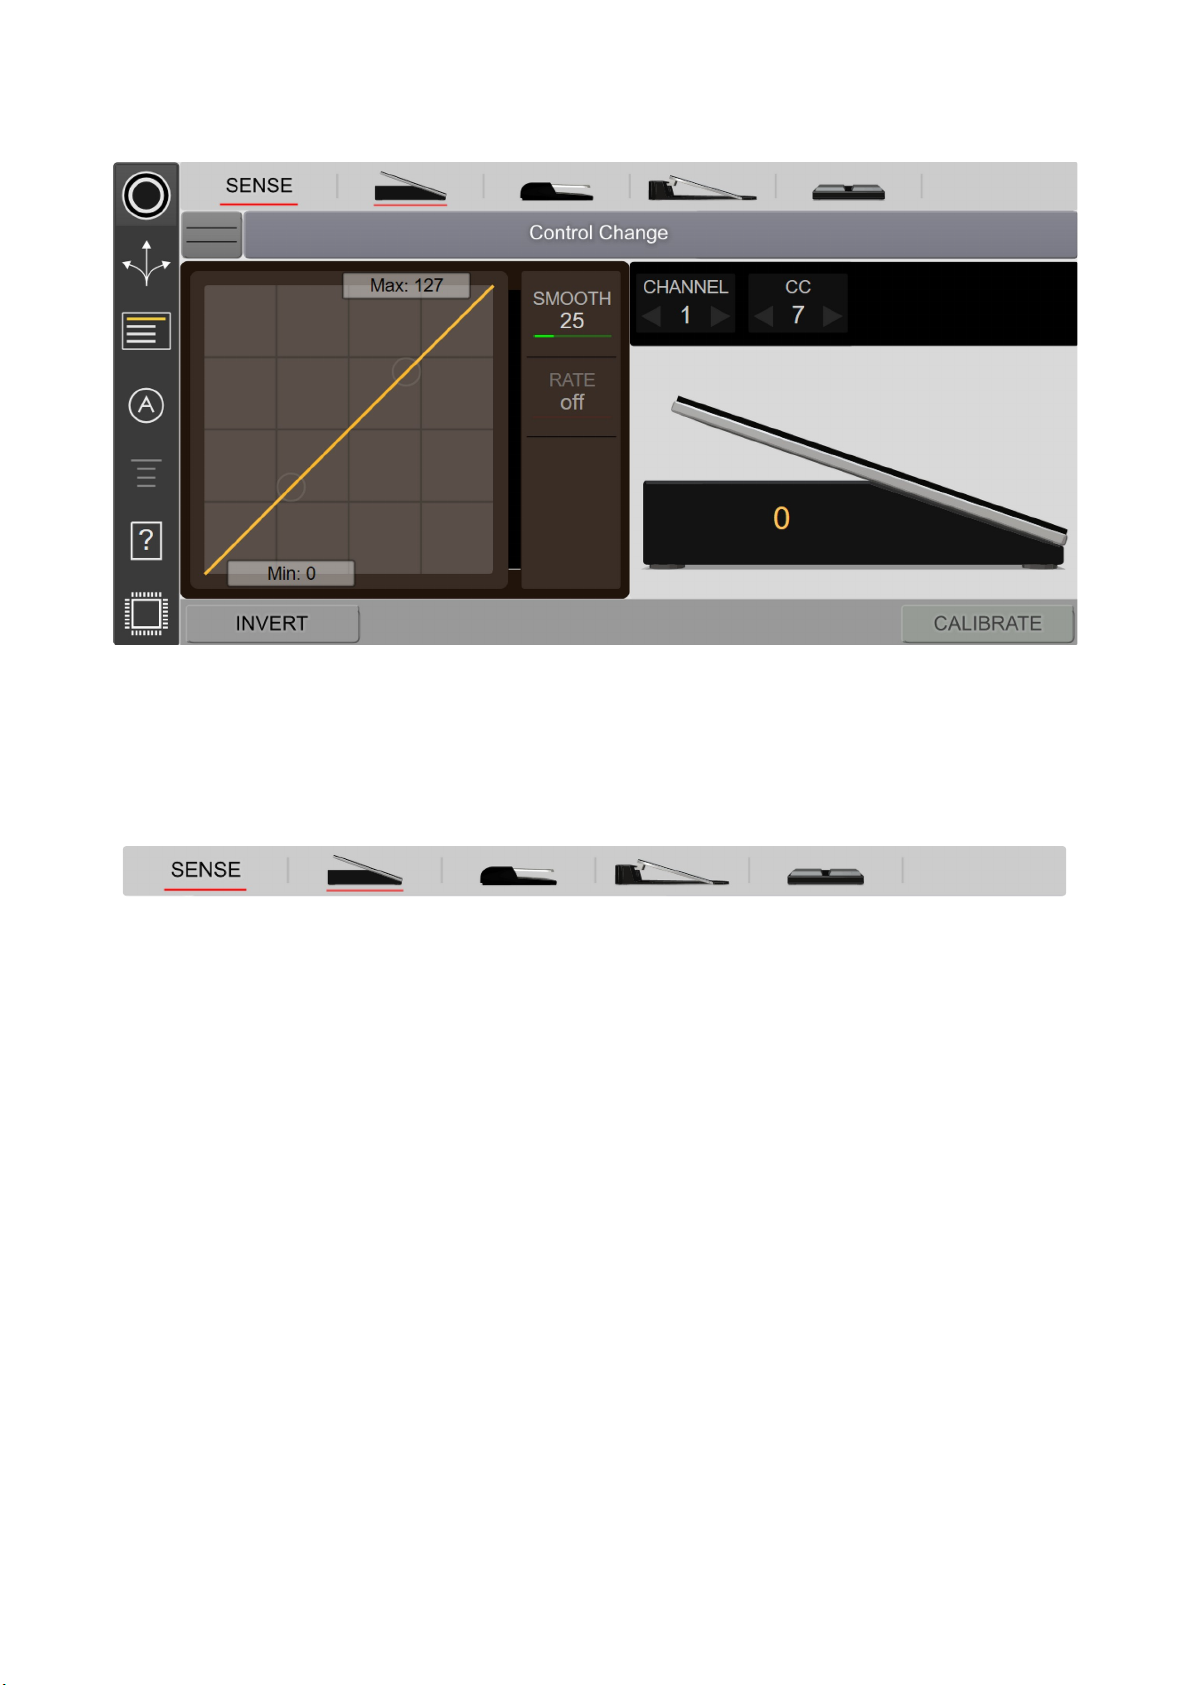
Pedal Type Selector
Each MIDI Expression input has a pedal sensing feature which allows it to automatically detect the
type of pedal plugged in. When the SENSE control is underlined (default), pedal sensing is on
and the pedal type is automatically selected, making the input plug ‘n play.
You can override the pedal sensing by manually selecting one of the four pedal types. When
manually selecting a pedal type, the Sense control is no longer underlined indicating that the Pedal
Sensing feature is turned off.
Note: With Pedal Sensing off, the input will remain configured for the selected pedal type even after
plugging in a different type of pedal or unplugged the device. To restore the pedal sensing feature for
that input, you will need to ensure that SENSE is switched back on.
MIDI Expression Manual page 8 / 31

Using Expression and Hihat Pedals
Controls for Expression and Hihat Pedals
(A) Input Polarity Switch
Expression pedals can be wired in different ways. In order to support pedals from all
manufacturers, the polarity of individual MIDI Expression inputs is reversible.
There are three possible values for this control, “Auto’ (Default), straight, or reversed. Generally
speaking, you should leave set to auto unless your particular pedal is having issues with the ‘Auto’
setting.
(B) Mode Selector
Clicking the Mode Selector allows you to change the behavior of the pedal and the type of MIDI
messages it generates. Look here for more detailed information about modes for expression
pedals and hihat controllers.
(C-D) Channel and Control Change
The values in these boxes can be adjusted in a variety of ways. Firstly, you can drag the values up
or down with your mouse. For more precision, hold down the SHIFT key while you drag. Values
can also be manually entered by double clicking on the box. Lastly, the values can be incremented
and decremented using the up and down arrows.
MIDI Expression Manual page 9 / 31
C
E
D
AB
F G IH

(E) Expression Curve
The Expression Curve control allows you to customize the response curve of your pedal. It allows
you to set the minimum and maximum values, as well as the transition between these values.
When you adjust the min, max, or curve, the background lights up indicating that the Expression
Curve control is on. Clicking anywhere in the background will turn it off again. The MIN and MAX
controls show a range from 0 - 127 by default, but you can change to a percentage (%) value by
right-clicking on them.
(F) Invert
The invert control is pretty straight forward. If you get a value of 127 with the pedal pressed down
and 0 with it up, checking INVERT will give 127 with the pedal up and 0 when pressed down.
(G) Smoothing
This function applies a filter to a pedal's input to prevent abrupt changes in the measured value.
Please note that using smoothing adds a bit of delay which becomes very noticeable at higher
values. If you need extremely fast response, turn smoothing off.
(H) Smoothing Rate Control
This control sets a limit on the number of values that are output per second. For example, if the
control is set at 10 values / second, and you move the pedal from 0 up to 100, the MIDI Expression
will slowly output values from 0 to 100 over a ten second period. The feature can be very useful
for controlling long sweeping motions such as fade outs and fade ins.
(I) Calibrate
If you find your pedal will not output values all the way down to zero or all the way up to 127, then
you may need to calibrate. When calibrating, the calibrate indicator will flash and an indicator
representing your pedal's response range appears. Take the pedal through its full range of a
motion, pressing it all the way up and down a few times. After you are done, click the calibrate
switch again and the settings will be stored in the device.
While calibrating, the calibration can be overridden by dragging either side of the green range
indicator.
Note: Watch out for pedals with adjustment knobs. For best performance, adjust to allow for the
greatest range of values.
MIDI Expression Manual page 10 / 31
Expression Curve used to
add more resolution at the
top of the pedal's travel.
Expression Curve used to
add more resolution at the
bottom of the pedal's travel.
Expression Curve used to
limit the range of values
output by the pedal.
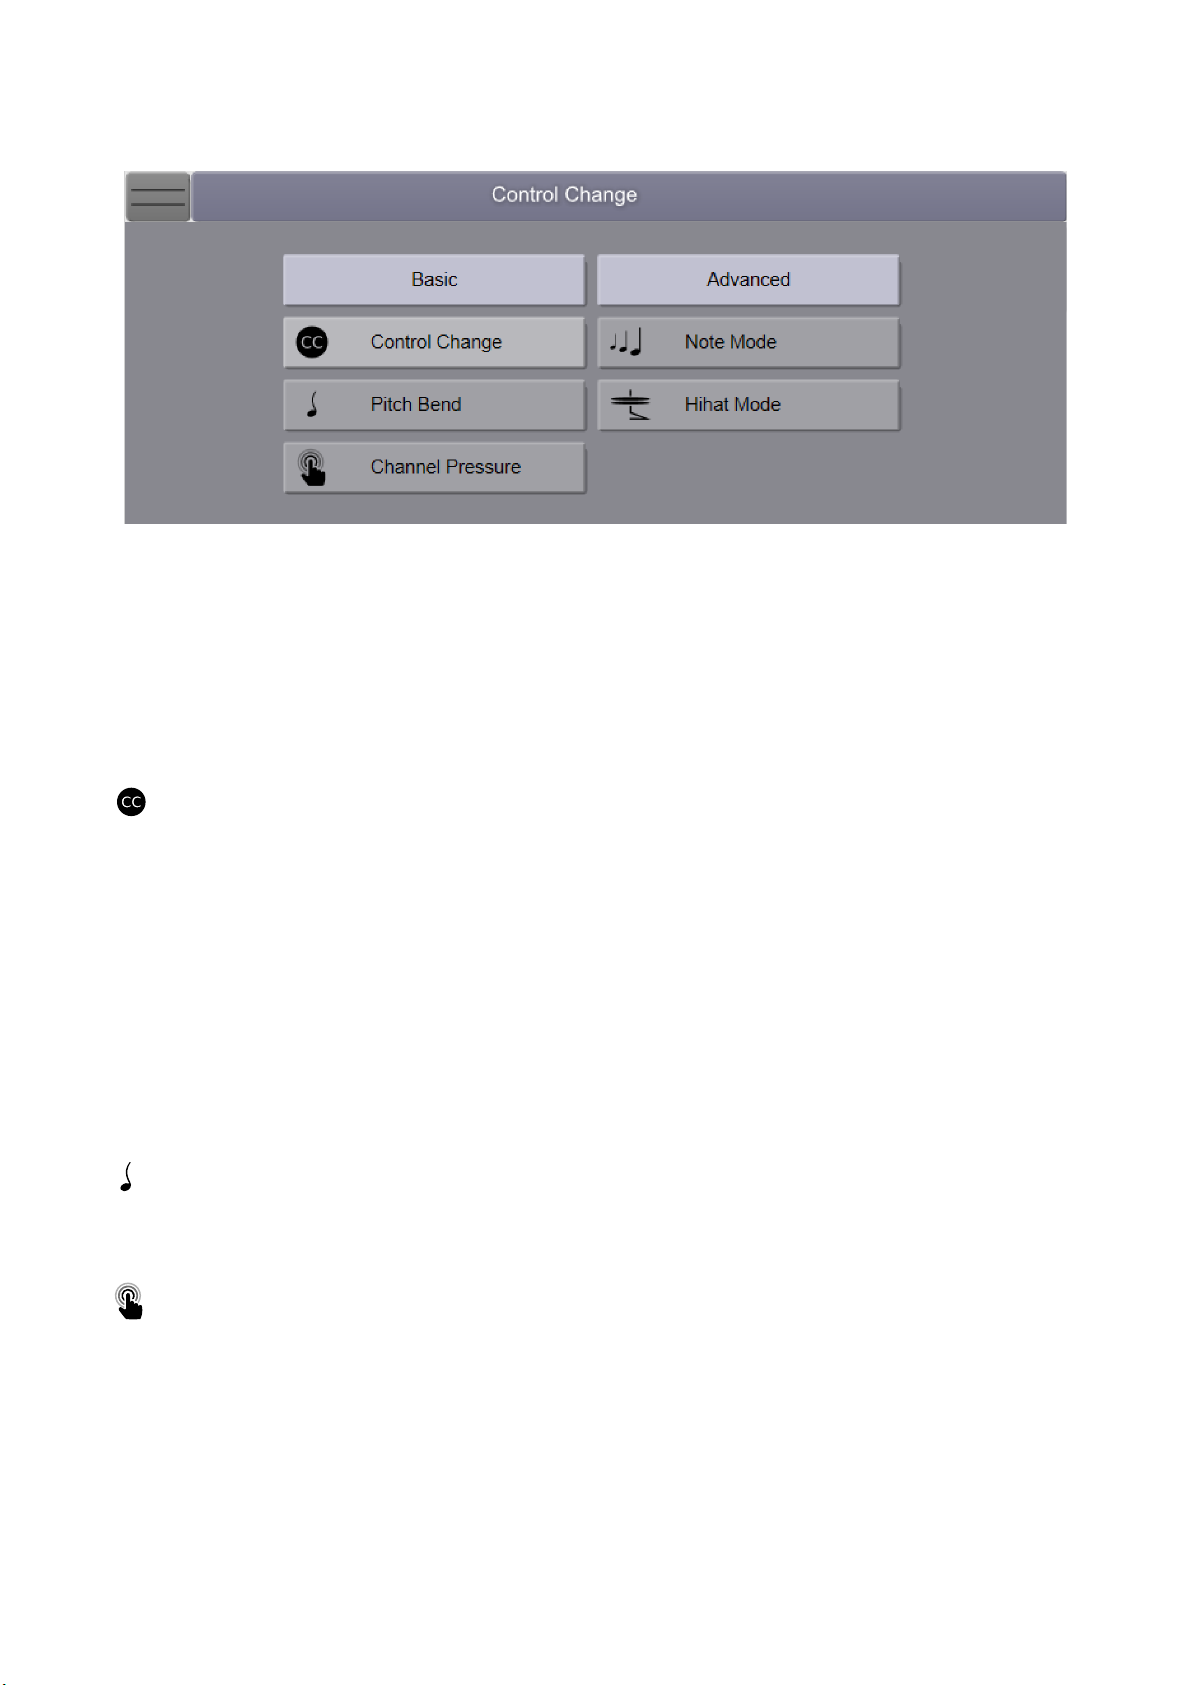
Modes for Expression and Hihat Pedals
By default, MIDI Expression devices are setup to send Control Change messages when used with
expression pedals and Hihat mode when used with a hihat controller. However, they can be
configured to run in different modes and produce many different types of MIDI messages.
The different modes are grouped into “Basic” and “Advanced” categories. The basic group is
described below and the advanced group is described on the following page.
Basic Modes
Control Change
This is the standard type of message sent out by expression pedals. In this mode, the MIDI
Expression sends out a MIDI Control Change value corresponding to the position of the pedal. This
type of message is typically used to control knobs or faders.
There are some standardize control values that are useful to know. Some of the more important
ones are listed below:
•CC1 Modulation
•CC2 Breath Controller
•CC7 Volume
•CC10 Pan
•CC11 Expression
•CC64 Damper
Pitch Bend
This mode Is often used with synthesizers to slightly vary the tuning of a note. You can use the
Expression Curve to get more control over the way the pitch bend is applied.
Channel Pressure
Sometimes called aftertouch, channel pressure is a type of MIDI message that some professional
keyboards send after a note is played. If you keyboard doesn’t support aftertouch, you can use
this mode with an expression pedal to simulate it.
MIDI Expression Manual page 11 / 31

Note and Hihat Modes
Note Mode and Hihat Mode allow you to trigger velocity sensitive MIDI notes. The two modes
work the same except that Note Mode only generates MIDI Notes, while Hihat Mode also sends
control change messages representing the position of the pedal.
Using Note and Hihat Mode
To make using these modes as easy as possible, MIDI Expression employs an automatic
optimization routine to best support your pedal and playing style. To help it settle in on good
settings, play your pedal as if it was a real kick drum pedal, being sure to play some hard fast
notes so it knows the velocity range of your pedal. The device will reoptimize its settings any time
the MIDI Expression is plugged in, a new pedal is plugged into the input, your pedal is calibrated,
or you adjust the Scantime setting.
(A) Gain
Generally speaking, the faster your pedal can move, the lower you can set the Gain Control. Hihat
controllers typically work best with a gain set to 14-20 ms. Expression type pedals work best with
times closer to 65 ms.
(B) Travel
The travel control determines the point along a pedal’s travel where a note will be generated.
(C) Min
The Min control allows you to filter out low velocity notes. If you find your pedal is triggering on low
velocity notes when you don’t want it to, try increasing the Min to filter them out.
MIDI Expression Manual page 12 / 31
CB
D E F G
A

(D) Channel
This is the MIDI Channel the Control Change values and Notes will be transmitted on.
(E) Control Change
This is the Control Change value that the pedal outputs as it moves. If you simply want to trigger
notes, use Note Mode and these messages will not be transmitted. If however you want the pedal
to function as a hihat controller, then you will likely need to set this to 4.
(F) Pedal Note
This is the note value that is output when the pedal is pressed down quickly.
(G) Splash Note
If you are using a hihat controller, you will also be able to trigger a second note by releasing the
pedal very quickly after triggering a pedal note.
MIDI Expression Manual page 13 / 31

Using Sustain Pedals
Controls for Sustain Pedals
(A) Input Type
This is used to tell MIDI Expression the type of switch your pedal uses. A latch style switch is one
that alternates between two values, 'on' or 'off', every time it is pressed, much like a light switch in
your home. A momentary switch, on the other hand, is like a button. It switches to 'on' when
pressed, and back to the 'off' when released. Select the style to match your pedal.
(B) Mode Selector
Sustain pedals and footswitches are capable sending out several different kinds of messages and
operating in different modes. Look here for more information about modes for sustain pedals.
(C) Invert
The invert control is pretty straight forward. If you get a value of 127 with the pedal pressed down
and 0 with it up, checking INVERT will give 127 with the pedal up and 0 when pressed down.
Furthermore, If the INPUT TYPE is set to ‘latching’ or the MIDI Expression detects that an
expression pedal is being used as sustain, then the INVERT control will also invert the motion of
the pedal graphic in the Control Application.
(D) Toggle
Using T GGLE you can use a ‘momentary’ type switch to simulate a ‘latching’ style switch, which
only sends out one value each time the pedal is pressed. The toggle mode is only available for
sustain pedals and footswitches with INPUT TYPE set to ‘momentary’.
MIDI Expression Manual page 14 / 31
AB
C D E F G H
(E-H) Channel and Control Change
The values in these boxes can be adjusted in a variety of ways.
•Drag the values up or down with your mouse. (hold down the SHIFT for precision)
•Use the arrows to incremented and decremented the value.
•Manually entered by double clicking on the value.
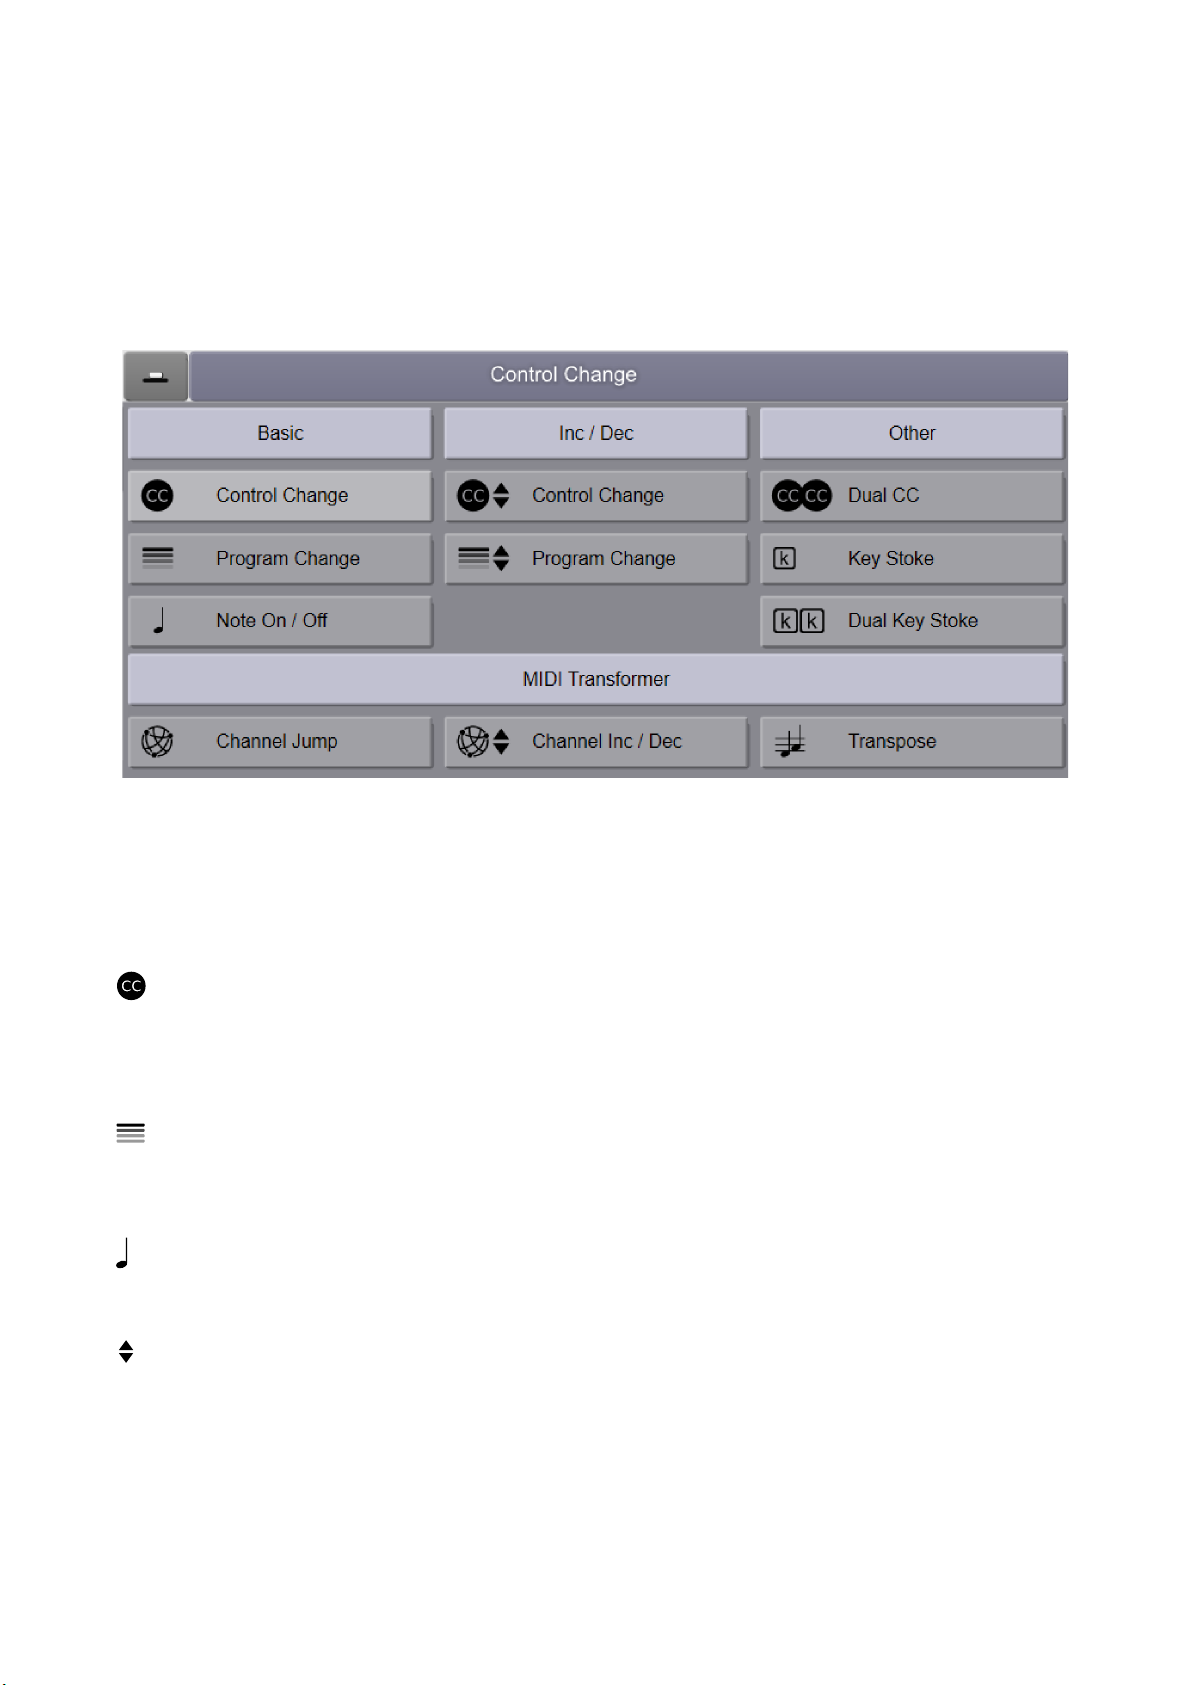
Modes for Sustain Pedals
The modes for sustain pedal are organized into four groups, Basic, Inc / Dec, ther, and MID
Transformer. The modes for the MIDI Transformer are described in a separate section here, and
the rest of the modes are described below.
Basic Modes
Control Change
Control Change messages are useful for toggling n / ff parameters in DAWs and virtual
instruments. If using momentary style switch, you'll likely want to use this in combination with the
T GGLE switch.
Program Change
Program Changes messages are typically used to swap between two different presets in a virtual
instrument or plugin.
Note On / Off
Note n / ff messages can be used to trigger samples.
INC / DEC Modes
With MIDI Expression, sustain pedals and footswitches can be used to cycle though a range of
Program Change or Control Change values. You can access this functionality by selecting the
mode 'Control Chance INC / DEC' or 'Program Change INC / DEC'. These modes can be very
useful for auditioning instrument presets, for example.
MIDI Expression Manual page 15 / 31

If your pedal is a momentary type, you'll be able to cycle both upwards and downwards. By quickly
pressing the pedal, the value will increment (go up) by one. By pressing and holding for half a
second, the value will decrement (go down) by one. It you cycle past the upper limit, the value will
wrap around to the lower limit and vice versa. Note that there is no way to decrement the value for
latch type footswitches, so only incrementing the value is supported.
Dual CC Mode
Dual CC Mode is designed to allow users to scroll though presets in virtual instruments using a
single sustain pedal or footswitch. The mode works by sending out two different CC values
depending on how long the pedal is pressed. Pressing the pedal quickly sends out one CC and
pressing and holding for half a second (actually it's 300 ms) sends out the other value.
Keyboard Modes
Key Command
All current generation MIDI Expression devices support sending key commands. Legacy MIDI
Expression devices with the mini-B USB connectors, however, do not.
This mode allows your pedal to function like a computer keyboard. Clicking on the keyboard icon
brings up an onscreen keyboard that allows you to set your key command.
Your pedal can be set up to send a combination of a single regular key (green) and any number of
modifiers (blue).
If your pedal is setup as a momentary type, the key command will start when the pedal is pressed
and end when the pedal is released. Holding down the pedal will produce similar results to holding
down the keys on a real keyboard. If however, your pedal is setup as a latch type, the key
commands are sent and released immediately.
Dual Key Command
Dual key command mode allows a pedal to send out two different key commands depending on
how long it is pressed.
A short press sends out the first key command, and a long press sends out the second.
Dual key command mode does not work with a latch type switch. If the dual key command mode
is selected for a latch pedal, only the first of the two key commands will be sent.
MIDI Expression Manual page 16 / 31

Using Footswitches
A footswitch can be thought of as two sustain pedals patched into a single
input. In fact, using a suitable adapter (H SA YPP117, shown on the
right), two sustain pedals can be ganged together into a single MIDI
Expression input and function as a footswitch.
Because of the similarity to sustain pedals, the settings for footswitches
are identical to those of sustain pedal, with the exception of two additional
modes that are described below. Look here for a description of the settings for sustain and
footswitch pedals.
Lin ed Modes for Footswitches
The modes for footswitches include all the modes for sustain pedals, plus two additional ones
where both switches control the same parameter. These modes are suffixed with 'Linked'.
These modes function similar to the INC / DEC modes for sustain pedals and as such are typically
used for auditioning presets in virtual instruments.
Both modes work in exactly the same way. ne pedal increases a parameter and the other
decreases it. The modes are called CC INC / DEC Linked and PC INC / DEC Linked and send
Control Change and Program Change values respectively.
By pressing the first switch, the parameter is increased by 1 and by pressing the second switch,
the value is decreased by one.
If the pedal you are using has momentary type switches, long pressing the first switch will increase
the value by 10, and long pressing the second switch will decrease the value by 10. Be sure to
have the input type set to momentary to take advantage of the long press functionality.
MIDI Expression Manual page 17 / 31

MIDI Routing
The Routing page looks different depending on the type of MIDI Expression you have connected..
The settings are organized in vertical columns. Each column represents a source of input. The
MIDI Expression i in pictured below has 3 pedal inputs, 1 MIDI DIN In, and 1 USB MIDI In, for a
total of 5 sources of input.
Each source of input can be routed to the MIDI Transformer, to the USB Host, and the
MIDI Din out by clicking on their respective toggle buttons. Note that only MIDI Expression i
devices will have the options to route MIDI ut Din.
N TE: When the MIDI Expression i is powered by a USB charger or DC Jack, it automatically goes
into standalone mode. In standalone mode, the routing settings here have no effect. Instead, MIDI from
the MIDI in DIN is automatically merged with the pedal inputs and sent out through the MIDI ut DIN.
USB MIDI Loopbac
This control is only available for the single input MIDI Expression and the Quattro which lack
advanced routing. When this control is enabled, any MIDI entering the device via the USB
connection is sent right back out over the USB. In this configuration the MIDI Expression is
operating like an external MIDI effect. Used in combination with the MIDI Transformer, this feature
allows you send MIDI Data from a host application, process it, and then return it to the host.
Resolution
You can adjust the maximum MIDI resolution of each pedal input. Low = 50 values / second, Norm
= 125 values / second, High = 250 values / second, and Max = 500 values / second.
MIDI Expression Manual page 18 / 31

MIDI Transformer
The MIDI Transformer is a MIDI effect that lets you dynamically manipulate MIDI messages
passing through your device in real-time. First generation MIDI Expression devices only support a
much more limited version of the Transformer. Look here for more information.
The MIDI Expression Quattro and i each have three MIDI Transformer instances, You can switch
between instances by clicking on the numbers at the top of the Transformer page. The single input
MIDI Expression only has one instance.
Each Transformer instance can either transform a MIDI message, duplicate it, or delete it. When
you transform a message, the original message is no longer sent. Using ‘duplicate’ mode, an
additional message is sent along with the original allowing a pedal to send multiple messages.
Power Button
The power button enables / disables an instance of the transformer. These buttons can be toggled
in real-time using a sustain or footswitch connected to the device. Look here for more information
about assigning pedals to Transformer Controls.
Specifying Which Messages to Process
By default, an instance of the transformer will process any compatible MIDI messages, but you can
filter the messages that will be processes using these settings.
Operation Parameters
When transforming or duplicating messages, you can adjust the MIDI Channel, transpose (value 2
of a message) or set its velocity (value 3) to a fixed value. Each of these parameters can be
enabled or disabled by clicking on its label. Labels with a green background are enabled. Like the
power button, these parameters can be adjusted in real-time using pedals.
Inverting Velocity
Setting the Velocity control to its lowest value allows you to ‘Invert’ the velocity of messages.
Duplicating a CC messages and inverting their velocities can let you do cross-fades.
MIDI Expression Manual page 19 / 31

Assigning Pedals to Transformer Settings
For each instance of the transformer, you can use pedals to dynamically change its settings.
Assigning a transformer setting to a pedal is done by selecting a MIDI Transformer mode from the
mode selector.
When you select a Transformer mode, it’s automatically setup to control the first Transformer
instance. You can specify which instance you want it to control my clicking on the Transformer
Instance Selector control visible to the far right in the image above. Any time you use a pedal to
adjust a Transformer value, the instance it’s assigned to will automatically be turned on and the
setting will be enabled.
Modes for Switch Pedals
There are three Transformer settings you can control with switch type pedals.
Transformer On / Off
The Transformer n / ff mode allows you to enable / disable an instance of the transformer. An
example of how you might use this would be with multi-timbrel instruments. Imagine that you have
a flute on MIDI Channel 1, and a bass guitar on Channel 2 and you want to access both
instruments from your keyboard that’s set to MIDI Channel 1. You might setup a transformer
instance to transform the MIDI Channel to Channel 2 and transpose a few octaves. Then using
this mode, you could have a sustain pedal toggle the transformer on and off allowing you to
effectively switch between the two instruments.
Channel Inc / Dec
This mode allows you to increment and decrement the MIDI Transformer channel using a signal
pedal. A quick press increments the channel value, and a long press decrements the value. For
footswitch pedals, there's also a linked Channel Inc / Dec mode allowing you to use one switch to
increment the channel and the other switch to decrement it.
Transpose
The Transpose mode allows you to use a pedal to toggle learning a transpose value. When the
pedal is pressed and held, the device monitors is USB MIDI In / MIDI In Din for a note message
and uses that note to set the transpose value. If the pedal is released before the device 'sees' a
note, the process is canceled.
The amount of transpose is set by comparing the value of the note to middle C (60). If the value to
the note is middle C, the transpose value is set to 0. If the note value is C# (61), the transpose
value is set to +1. If it the note is the F above middle C (695 it'll see the transpose value to +5. The
amount of transpose can be set between -60 and +64.
MIDI Expression Manual page 20 / 31
Other manuals for midi expression
1
This manual suits for next models
3
Table of contents


