RJM OVERTURE User manual

Overture
User’s Manual
®
™

This device complies with part 15 of the FCC rules. Operation is subject to the following two conditions: !
(1) This device may not cause harmful interference, and!
(2) this device must accept any interference received, including interference that may cause undesired operation.!
Copyright © 2021 RJM Music Technology, Inc.
Overture is a trademark of RJM Music Technology, Inc.
RJM and the RJM logo are registered trademarks or RJM Music Technology, Inc.

INTRODUCTION
Thank you for purchasing an Overture pedal! The Overture is a fully programmable overdrive pedal with multiple
modes that can deliver familiar tones from classic and boutique pedals as well as some new sounds. The
Overture’s signal path is 100% analog, never digitizing your tone! High quality components are used throughout,
and the pedal’s power supply is boosted internally to give you the best response and overall tone.!
On its own, you can program up to 8 presets and recall them with the press of a button. If you add a MIDI
controller to your setup, you can access up to 100 presets. The Overture can connect to other devices via its
standard 5-pin MIDI jacks or its USB-C connector. !
THE BASICS
Overture Manual - 3/6/2021! ! !
4
Press to switch
pedal between active
and bypass
Press to
switch between the
main preset bank
(presets 1-4) and
the solo preset
bank (presets 5-8)
Press both buttons
to move to the next
preset
Press to move to the
next overdrive mode,
hold for 3 seconds to
save the current
settings to the current
preset.
Press to turn pre-
boost on or off
Indicates the
current preset
number.
Red LEDs indicate
presets 1-4, green
LEDs indicate
presets 5-8.

FRONT PANEL CONTROLS
PRE-BOOST - Applies an adjustable boost, up to 12dB, in front of the overdrive circuit. Pressing the button below
will turn the boost on and off, holding it for 2 seconds will lock the boost in the on position. Pressing it again will
unlock the boost. The LED will turn red when boost is active and yellow when boost is locked. Due to the design
of the overdrive circuit, adding boost will mix in some clean signal as well. This sounds best when using an amp
set to “edge of breakup”, which helps reduce the contrast between the overdriven and clean sounds.!
GAIN - Adjusts the gain for the overdrive circuit.!
VOLUME - Adjusts the overall output volume. Different overdrive modes have different maximum volume levels.!
BASS - Adjusts the overall bass content. This control doesn’t have any effect in some overdrive modes.!
TREBLE - Adjusts the overall treble content.!
Preset LEDs - The row of 4 LEDs below the Bass knob indicates the current preset. 1 LED will light for preset #1,
2 LEDs will light for preset #2, etc. The LEDs will change colors to indicate different banks of presets. For
example, presets 1-4 light up in red, and presets 5-8 light up in green.!
MODE Switch - Selects the overdrive mode. Press to change to the next overdrive mode. Hold for 3 seconds to
store the current settings to the currently selected preset. Storing a preset saves all knob and button settings
except the ON/OFF button.!
SOLO Footswitch - Switches from the current preset to a second “solo” preset. Each of the 4 presets has a solo
preset associated with it. Preset #1’s solo preset is #5, preset #2’s solo preset is #6, etc. A solo preset could
simply be a boosted version of the original preset, or can have completely different settings. Each press of the
button toggles between the normal preset and its solo preset. The SOLO LED and the preset LEDs turn green
when in a solo preset.!
ON/OFF Footswitch - Press this button to switch the pedal on or off. When off, the pedal uses a relay for true
bypass, allowing your tone to pass through transparently. The LED above turns red when the pedal is active, and
yellow when the current preset has been edited.!
NOTE: Press both the SOLO and ON/OFF footswitches at the same time to switch to the next preset in the
current bank.!
Overture Manual - 3/6/2021! ! !
5

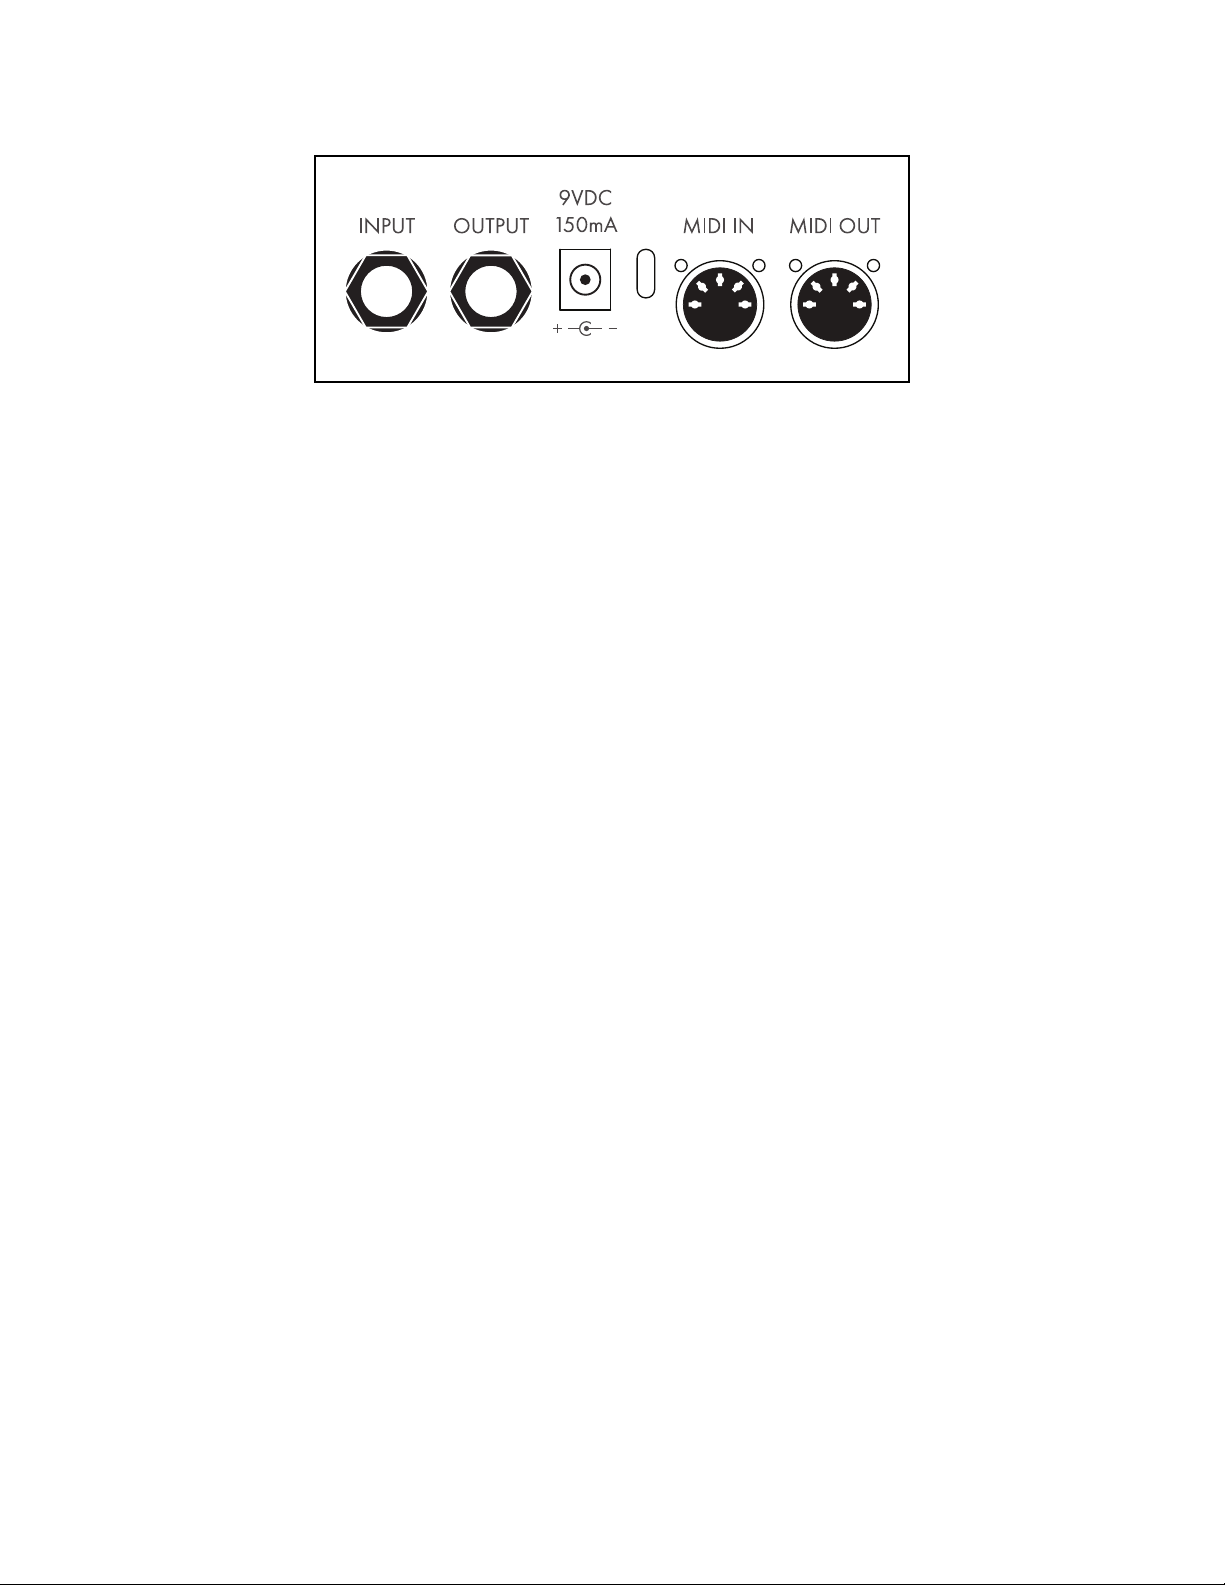
REAR PANEL CONNECTIONS
INPUT - A mono 1/4-inch input for your guitar.!
OUTPUT - A mono 1/4-inch output to go to your amp.!
Power input - The pedal requires a 9VDC power supply providing 150mA or more of current, with a 5.5mm/
2.1mm “BOSS-style” barrel connector. Center negative polarity is required.!
USB - The connector between the power and MIDI IN jacks is a USB C connector. This allows you to connect this
pedal to your computer, phone or tablet using the appropriate cable. The pedal will appear as a MIDI device in any
MIDI enabled app. The Overture will power itself from some USB ports, but using a 9VDC power supply is
recommended when using USB for the most reliable results.!
MIDI IN - Standard 5-pin MIDI input for connection to a MIDI controller.!
MIDI OUT - Standard 5-pin MIDI output for connection to the next MIDI device in the chain.!
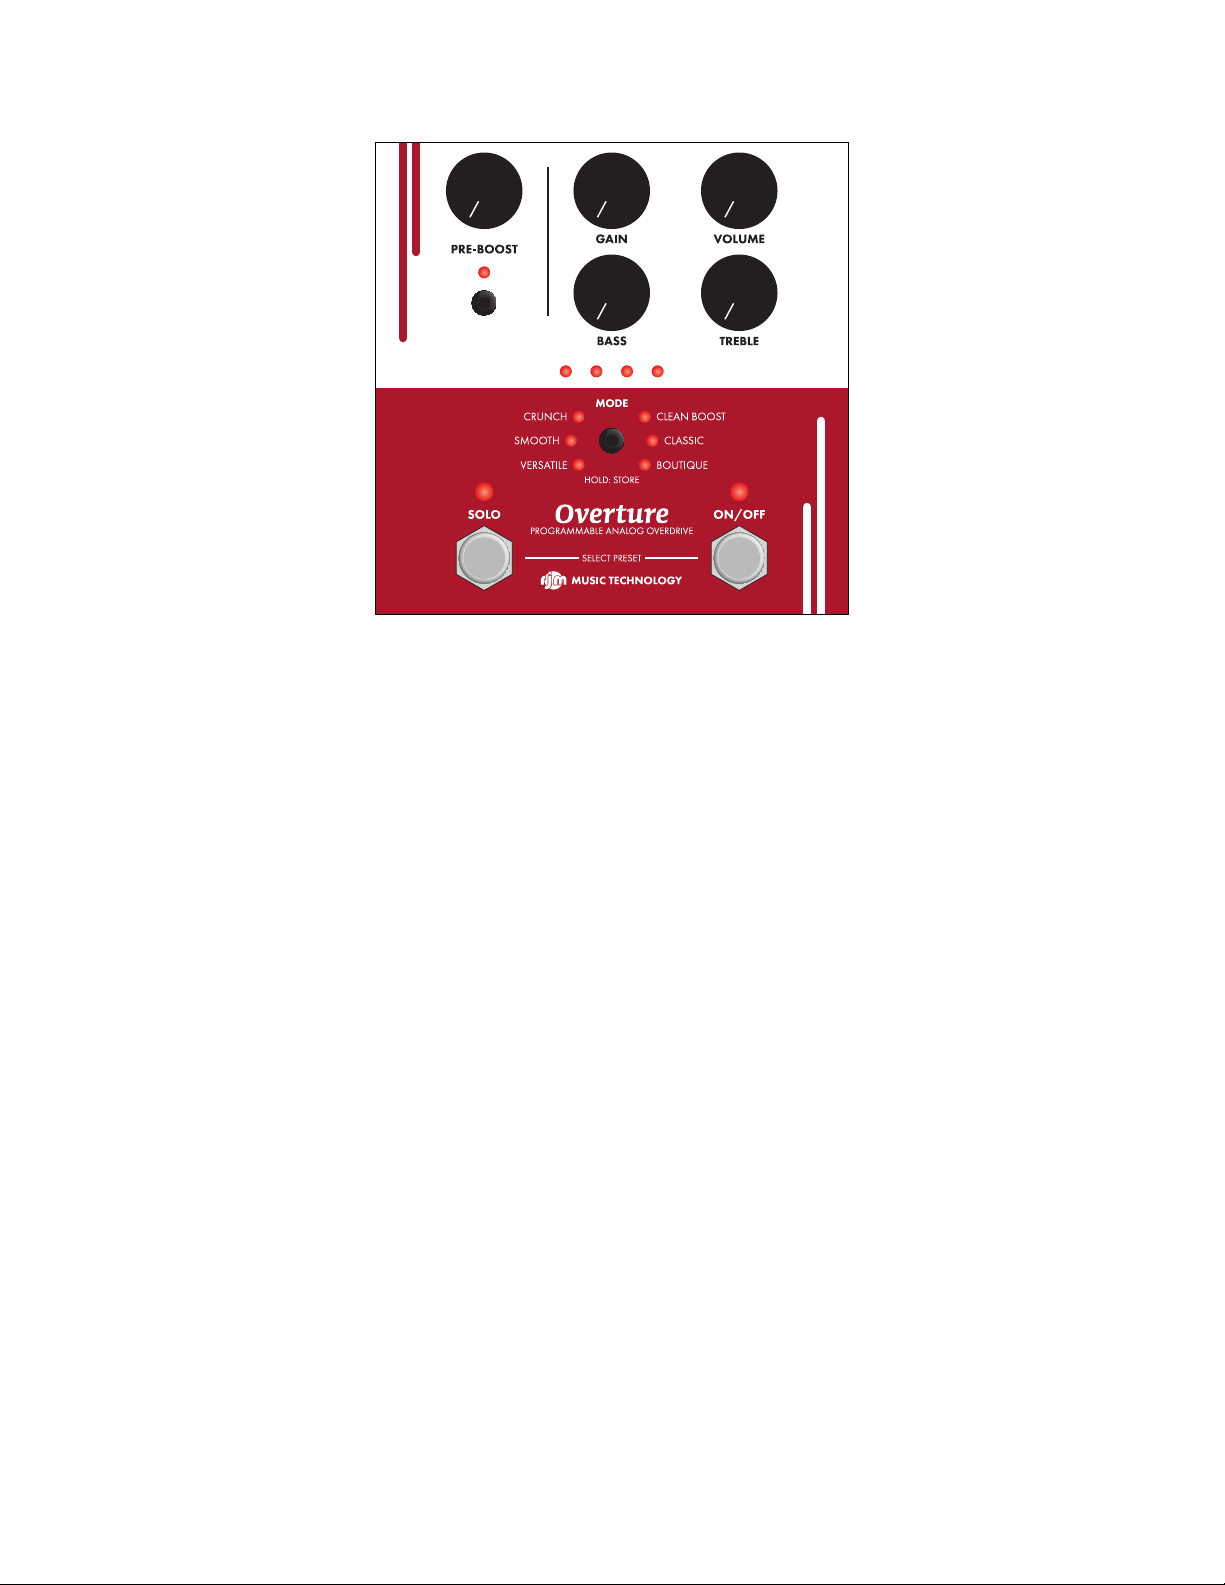
OVERDRIVE MODES
Clean Boost - This mode, an RJM original, offers boost up to a light overdrive. It has the highest maximum output
level of all of the modes, and is excellent at pushing an amp into overdrive. Both Bass and Treble controls are
active in this mode.!
Classic - A tribute to what is arguably the most popular overdrive ever made. It can be smooth or a little
aggressive, with a prominent midrange emphasis. This mode has the lowest output level of all the modes, but it’s
still plenty for almost any purpose. The Bass control isn’t active in this mode.!
Boutique - Based on the a boutique version of the classic. This mode is much less compressed and has
somewhat less midrange focus. It has a “leaner” and more open sound. The Bass control isn’t active in this mode.!
Versatile - Based on another, more extensive modification of the classic circuit, this one has a flatter frequency
response compared to the other modes and offers a wider range of tones than the previous two modes thanks to
the Bass control.!
Smooth - This mode combines fairly high headroom with a special MOSFET clipping circuit that produces a more
saturated sound, similar to some cascaded gain amps. The Bass control operates differently in this mode,
adjusting both bass and treble at the same time and changing the overall voice of the overdrive.!
Crunch - The last mode, another RJM original, adds some hard clipping and more aggressive midrange, allowing
it to get into harder rock territory. Both Treble and Bass controls are active in this mode.!
Overture Manual - 3/6/2021! ! !
6

USING PRESETS
Programming Presets
The preset programming process is fairly simple:!
1. Use the SOLO button to select the bank of presets you want to work on (SOLO button off= presets 1-4,
SOLO button on = presets 5-8)!
2. Press the SOLO and ON/OFF buttons at the same to switch presets within the current bank. Press repeatedly
until you reach the desired preset.!
3. Now adjust the controls to get the sound you’re looking for.!
4. Hold the MODE button for about 3 seconds, until the Mode LEDs flash.!
Your preset is now stored. You can repeat this process to set up each preset.!
Writing to a Different Preset
You can also write your current settings to a preset other than the currently selected one:!
1. Press and hold the MODE button. It needs to be held throughout this process.!
2. Before 3 seconds have elapsed, press the SOLO button to start preset selection. The pedal will move to the
next preset and the LEDs will start flashing.!
3. Press the SOLO button repeatedly until you reach the desired preset. You can select any of the 4 main presets
and 4 solo presets.!
4. After 3 seconds of no buttons being pressed (except the MODE button, which is being held), the current
settings will be stored to the currently selected preset.!
5. If at any time you release the MODE button before the preset is stored, this process will be cancelled.!
Recalling Presets
Recalling presets is even easier! Simply press the SOLO and ON/OFF buttons at the same time to switch to the
next preset. Pressing them repeatedly will advance through the 4 presets in the current bank.!
Pressing the SOLO button by itself will switch between the first bank (presets 1-4, red LEDs), and the second
bank (presets 5-8, green LEDs)!
Using a MIDI Controller
You can also use a MIDI controller to select presets. This allows you to select up to 100 individual presets. To store
and recall presets, use the above instructions, but instead of using the SOLO and ON/OFF buttons, select presets
using your MIDI controller. More details on MIDI using can be found in the next section.$
Overture Manual - 3/6/2021! ! !
7

MIDI USAGE
Program Changes
The Overture responds to standard MIDI program changes on its specified MIDI channel. Please refer to the Setup
Mode section for details on how to set the MIDI channel. PC numbers 0 through 99 are accepted, for a total of 100
presets. Receiving PC#127 will cause the Overture to bypass itself. After bypassing the Overture using this
method, the next PC message received (in the range of 0-99) will re-activate the pedal.!
Please note that PC numbers are one lower than preset numbers on the Overture. For example, send PC#0 to
recall the first preset, send PC#1 to recall the second preset, etc.!
Continuous Controllers
By default, the following CC numbers are defined. This numbers can be changed by the user using the editor
software.!
Function
CC Number
Notes
Expression Pedal
4
See Expression Pedal section
Volume
7
Value 0=0% volume … 127=100% volume
Expression Volume
11
Value 0=0% volume … 127=current volume knob setting
Drive
12
Bass
13
Treble
17
Boost Level
18
Active
102
Value 0-63 = pedal bypassed, 64-127 = pedal active
Boost On/Off
103
Value 0-63 = boost off, 64-127 = boost on
Drive Mode
104
0-20: Clean Boost%
21-41: Classic!
42-62: Boutique!
64-84: Versatile!
85-105: Smooth!
106-127: Crunch
Solo
105
Value 0-63 = normal preset bank!
Value 64-127 = solo preset bank
Overture Manual - 3/6/2021! ! !
8

MIDI EXPRESSION PEDAL SETUP
The Overture supports the use of a MIDI-connected expression pedal. Incoming “Exp Pedal” CC messages will
change the values of one or more of the knobs. CC#4 is the default CC number for the expression pedal.!
Programming the Expression Pedal Limits
Press the ON/OFF and MODE buttons. The left side MODE LEDs will light up:!
Using the knobs, set up your tone for the “heel down”position of the expression pedal. (This is also the tone you
will get for the minimum CC value of 0).!
Next press the MODE button. The right side LEDs will now light up:!
Set your knobs the way you want them to be in the “toe down” position of the expression pedal. (This is also the
tone you will get for the maximum CC value of 127).!
You can repeat this process, pressing MODE to switch back and forth between the heel down and toe down
position. You can test your settings in real time by moving your expression pedal, or any other method of sending
CCs to the Overture. The parameter settings will smoothly transition between their heel down and toe down
settings as you move the expression pedal.!
Saving the Expression Pedal Settings
Once you’re satisfied with your settings. Press ON/OFF to store your settings to the current preset. Or, you can
press SOLO to cancel expression pedal editing and discard your changes."
Overture Manual - 3/6/2021! ! !
9

SETUP MODE
Entering Setup Mode
To enter setup mode, hold the ON/OFF button as you power up the pedal. The mode LEDs will spin for 3 seconds.
Keep holding until the LEDs stop spinning and all light up in green.!
Once in setup mode, you can change these parameters:!
Default Bypass State
Press the SOLO button to turn it on or off. If the SOLO button is on, the pedal will power up in the active state. If
the button is off, it will power up in the bypassed state. The default is to power up in the bypassed state.!
Setting MIDI Channel
Press the MODE button repeatedly to select a MIDI channel. The current MIDI channel is indicated by the four
preset LEDs using the following code:!
MIDI Channel
LED 1
LED 2
LED 3
LED 4
1 (default)
off
off
off
off
2
ON
off
off
off
3
off
ON
off
off
4
ON
ON
off
off
5
off
off
ON
off
6
ON
off
ON
off
7
off
ON
ON
off
8
ON
ON
ON
off
9
off
off
off
ON
10
ON
off
off
ON
11
off
ON
off
ON
12
ON
ON
off
ON
13
off
off
ON
ON
14
ON
off
ON
ON
15
off
ON
ON
ON
16
ON
ON
ON
ON
Overture Manual - 3/6/2021! ! !
10

Factory Reset
You can return your Overture to factory settings by holding the SOLO, MODE and ON/OFF buttons while in setup
mode. The LEDs will flash red and yellow. If you hold the buttons for 3 seconds, the LEDs will stay on continuously
and the factory reset will begin. The process takes about 10 seconds, at which point the Overture will enter the
normal operating mode with the factory settings.!
MIDI Cable Tester
The Overture also features a built-in MIDI cable tester. To test, plug your MIDI cable into the MIDI IN and MIDI
OUT jacks. Hold the MODE button. After a few seconds of holding, some of the MODE LEDs should start
flashing. The meaning of the flashes are as follows:!
CRUNCH flashes yellow - the primary MIDI wires are good. This means that pins 4 and 5 are connected properly
from one end to the other. This is the minimum needed for a functional MIDI connection. If this LED doesn’t flash,
the cable is bad.!
CLEAN BOOST flashes yellow - the secondary MIDI wires are good. This means that pins 1 and 3 are connected
properly from one end to another. These secondary wires are used for bidirectional communication, primarily
between RJM Music products. 3-pin active MIDI cables will not flash the CLEAN BOOST LED. For standard (uni-
directional) MIDI connections, the secondary wires are not needed.!
If both the CRUNCH and CLEAN BOOST LEDs alternate flashing yellow, the cable is a properly working 5-pin
active MIDI cable.!
If all of the MODE LEDs turn offand don’t flash, the cable is not working. !
If either the CRUNCH and CLEAN BOOST LEDs flash red, the MIDI data is getting corrupted. Your MIDI cable is
likely intermittent.!
Once you release the MODE button, the Overture returns to setup mode.!
Leaving Setup Mode
Press the ON/OFF button to save your changes and exit setup mode.!
Overture Manual - 3/6/2021! ! !
11
Other manuals for OVERTURE
1
Table of contents
Other RJM Music Pedal manuals