Audiomusic Systems SIX EYES 12 MKII User manual

SIX EYES 12 MKII
Manual V 1.0

1
SAFETY INSTRUCTIONS
1. Read the following instructions carefully and pay attention to them.
2. Keep this manual in a dry and safe place.
3. Follow all of these instructions one by one.
4. Observe the safety instructions of your country when installing this device.
5. Do not use this device near water or high humidity areas. When cleaning, use a dry cloth.
6. Do not install the device near any heat or fire sources such as heaters, cookers or even amplifiers that
produce heat. Make sure that once the device is installed, it is in a cool and dry place.
7. Do not obstruct any ventilation outlets. When installing the device, do it in accordance with these
instructions.
8. Protect the power cord from being stepped on or tampered with.
9. Install and position the device with clamps, brackets or welded between its base and the fixture.
10. Use only accessories specified by AudioMusic Systems.
11. Unplug the device if it is not to be used for extended periods of time.
12. The device will be repaired by the official technical service when it is damaged, whether the cable is
damaged or the connector is damaged, or if the device has come into contact with liquids or does not
operate correctly.
13. Do not expose this equipment to liquids, dripping, splashing, or splashing, or its location near
containers or possible sources of liquids.
14. To completely disconnect the unit from the mains, disconnect the mains power cord from the mains.
15. The main connector must be easy to connect and disconnect from the mains, if not, do not attempt
to manipulate either the cable or the connection under the mains.
16. CAUTION. To reduce the risk of fire or electric shock, do not expose this device to rain or moisture.

2
INDICACIONES DE SEGURIDAD
1. Lea detenidamente las siguientes instrucciones y preste atención a estas.
2. Guarde en un lugar seco y seguro este manual.
3. Siga una a una todas estas instrucciones.
4. Respete las instrucciones de seguridad de su país cuando instales este dispositivo.
5. No use este dispositivo cerca del agua o zonas altamente húmedas. A la hora de limpiarlo, utilice un
paño seco.
6. No instale el dispositivo cerca de ninguna fuente de calor o fuego tales como calefactores, estufas o
incluso amplificadores que produzcan calor. Asegúrese de que una vez instalado el dispositivo, esté en
un lugar fresco y seco.
7. No obstruya ninguna de las salidas de ventilación. Cuando instale el dispositivo hágalo tal y como lo
indican estas instrucciones.
8. Proteja el cable de alimentación para no ser pisado o manipulado.
9. Instale y sitúe el dispositivo con garras, abrazaderas o de forma soldada entre su base y la sujeción.
10. Únicamente utilice accesorios especificados por AudioMusic Systems.
11. Desenchufe el dispositivo si no va a ser utilizado en largos periodos de tiempo.
12. El dispositivo será reparado por el servicio técnico oficial cuando esté dañado, tanto si el cable está
deteriorado o el conector está estropeado, así como si el dispositivo ha sufrido contacto con líquidos o
no opera correctamente.
13. No exponga este equipo a líquidos, gotas, ni salpicaduras, así como su ubicación cerca de recipientes
o posibles fuentes de líquidos.
14. Para desconectar totalmente la unidad de la red eléctrica principal, desconecte el cable de la propia
red eléctrica.
15. El conector principal debe poder conectarse y desconectarse de la red eléctrica de manera fácil, si no
es así, no intente manipular ni el cable ni la conexión bajo la red eléctrica.
16. ATENCIÓN. Para reducir el riesgo de fuego o shock eléctrico, no exponga este dispositivo bajo la lluvia
o la humedad.

3
GENERAL DESCRIPTION
The SIX EYES 12 MKII LASER/LED lighting multi-effect incorporates a section of 4 x 6W RGBW LED PARs
each, which can reproduce with great quality the three primary colours together with a pure and
defined white, being the total mix of colours much more homogeneous; another strobe/UV section with
4 LEDs; another rotating mirror ball effect section with a 12W RGBW LED; and it also integrates a Red
and Green LASER effect with Rotogobo. It is controllable by DMX512 (18 channels), AUTO, SOUND
ACTIVATION and IR Remote Control. Its great luminosity allows it to be installed in installations to
replace traditional light bulbs, with the advantages of power saving, absence of heat generated and
duration. Furthermore, in this case, it is a portable device, which means that the number of applications
to which it can be dedicated is even greater.
Technical Data:
Power supply
AC 110-240V, 50/60V
Consumption
60W
Light source
4 PAR 6W RGBW LEDs, 4 strobe LEDs White/UV, rotating mirror ball LED
RGBW 12W, LASER Red/Green with Rotogobo R 120mW G 30mW
Control modes
DMX512 / Audio / Auto / Audio / IR Remote Control
DMX channels
18 Channels
Connections
DMX XLR 3 pin
Dimensions
190 x 190 x 110 mm (220 x 260 x 110 mm with Lyre)
Weight
1,27 Kg
Features:
Incorporates 4 high power LEDs 6W RGBW each.
4 strobe/UV LEDs.
12W RGBW LED rotating ball.
Various operating modes such as Audio/Auto/DMX512/IR remote control.
Thanks to its small size, it is an ideal device for discotheques, clubs, party rooms, mobile dj's, etc.
4
USE AND INSTALLATION
To start working with the device, first connect the unit to the mains.
The device will check for a few seconds to verify its correct status.
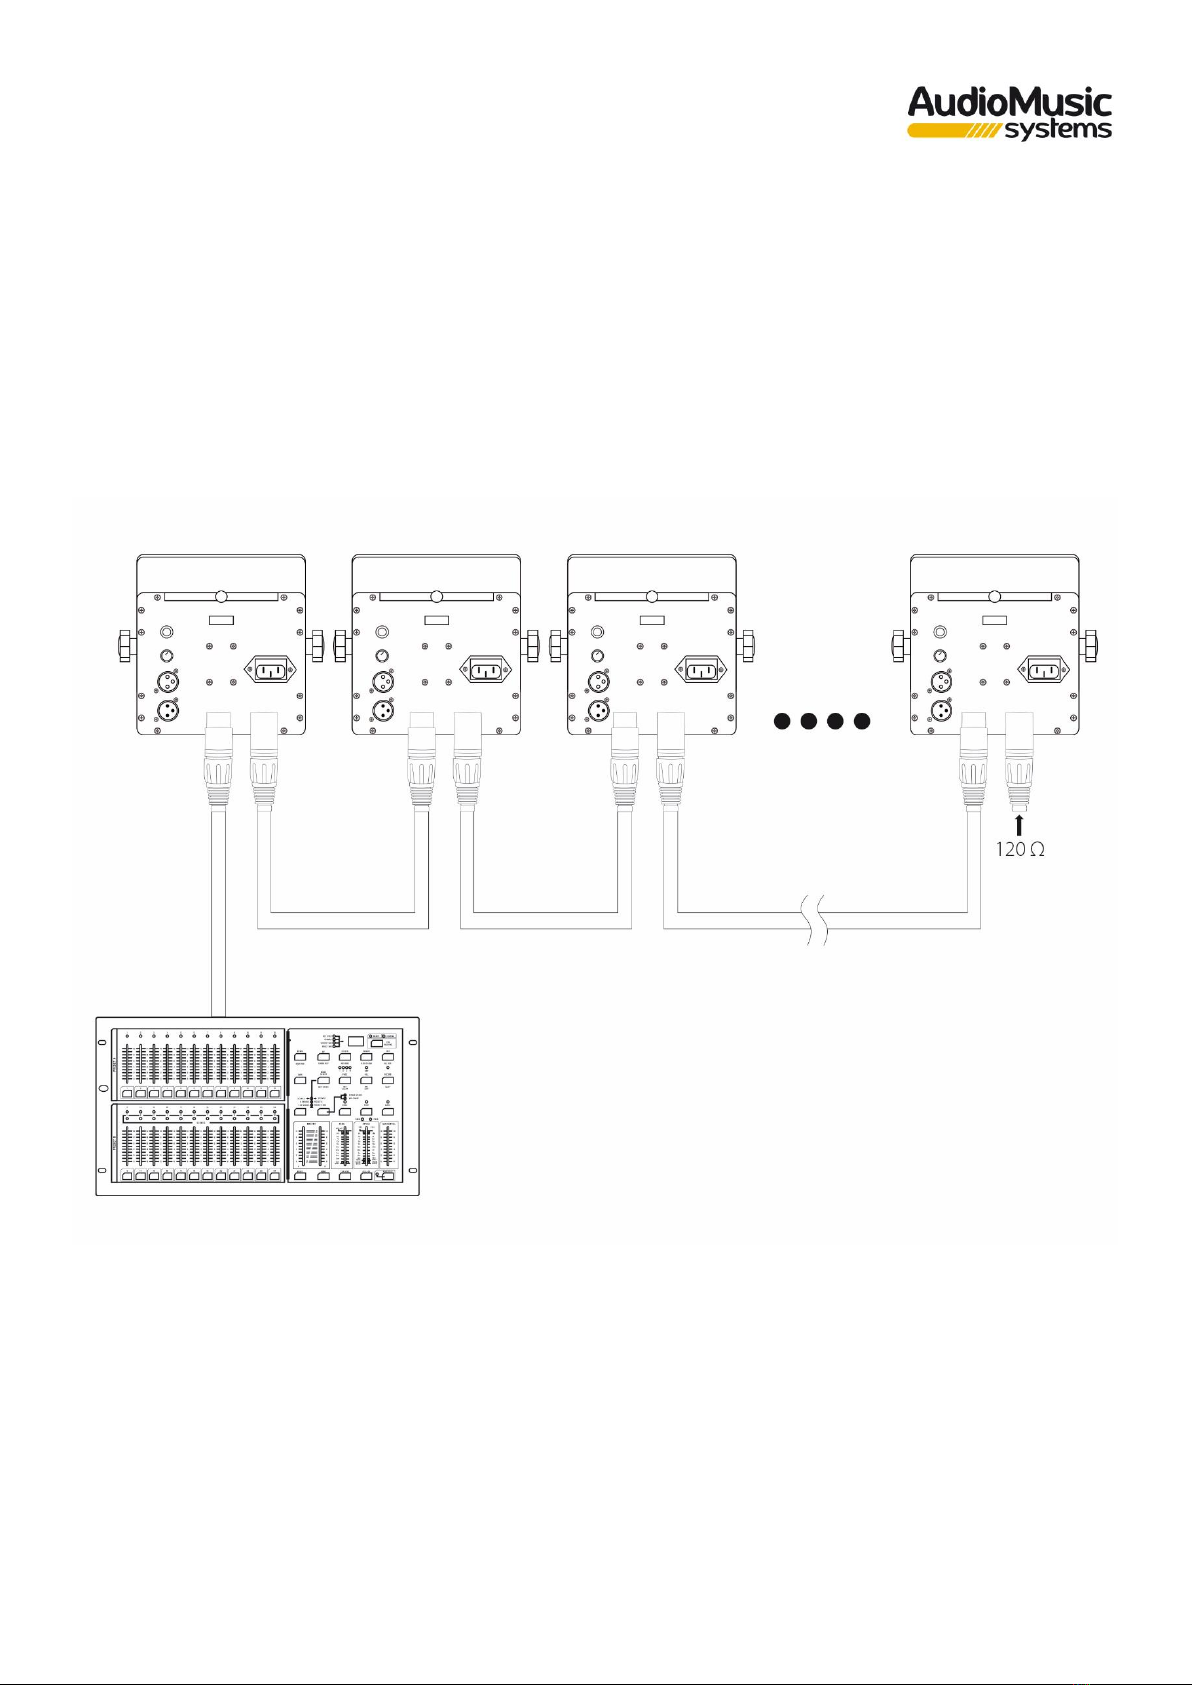
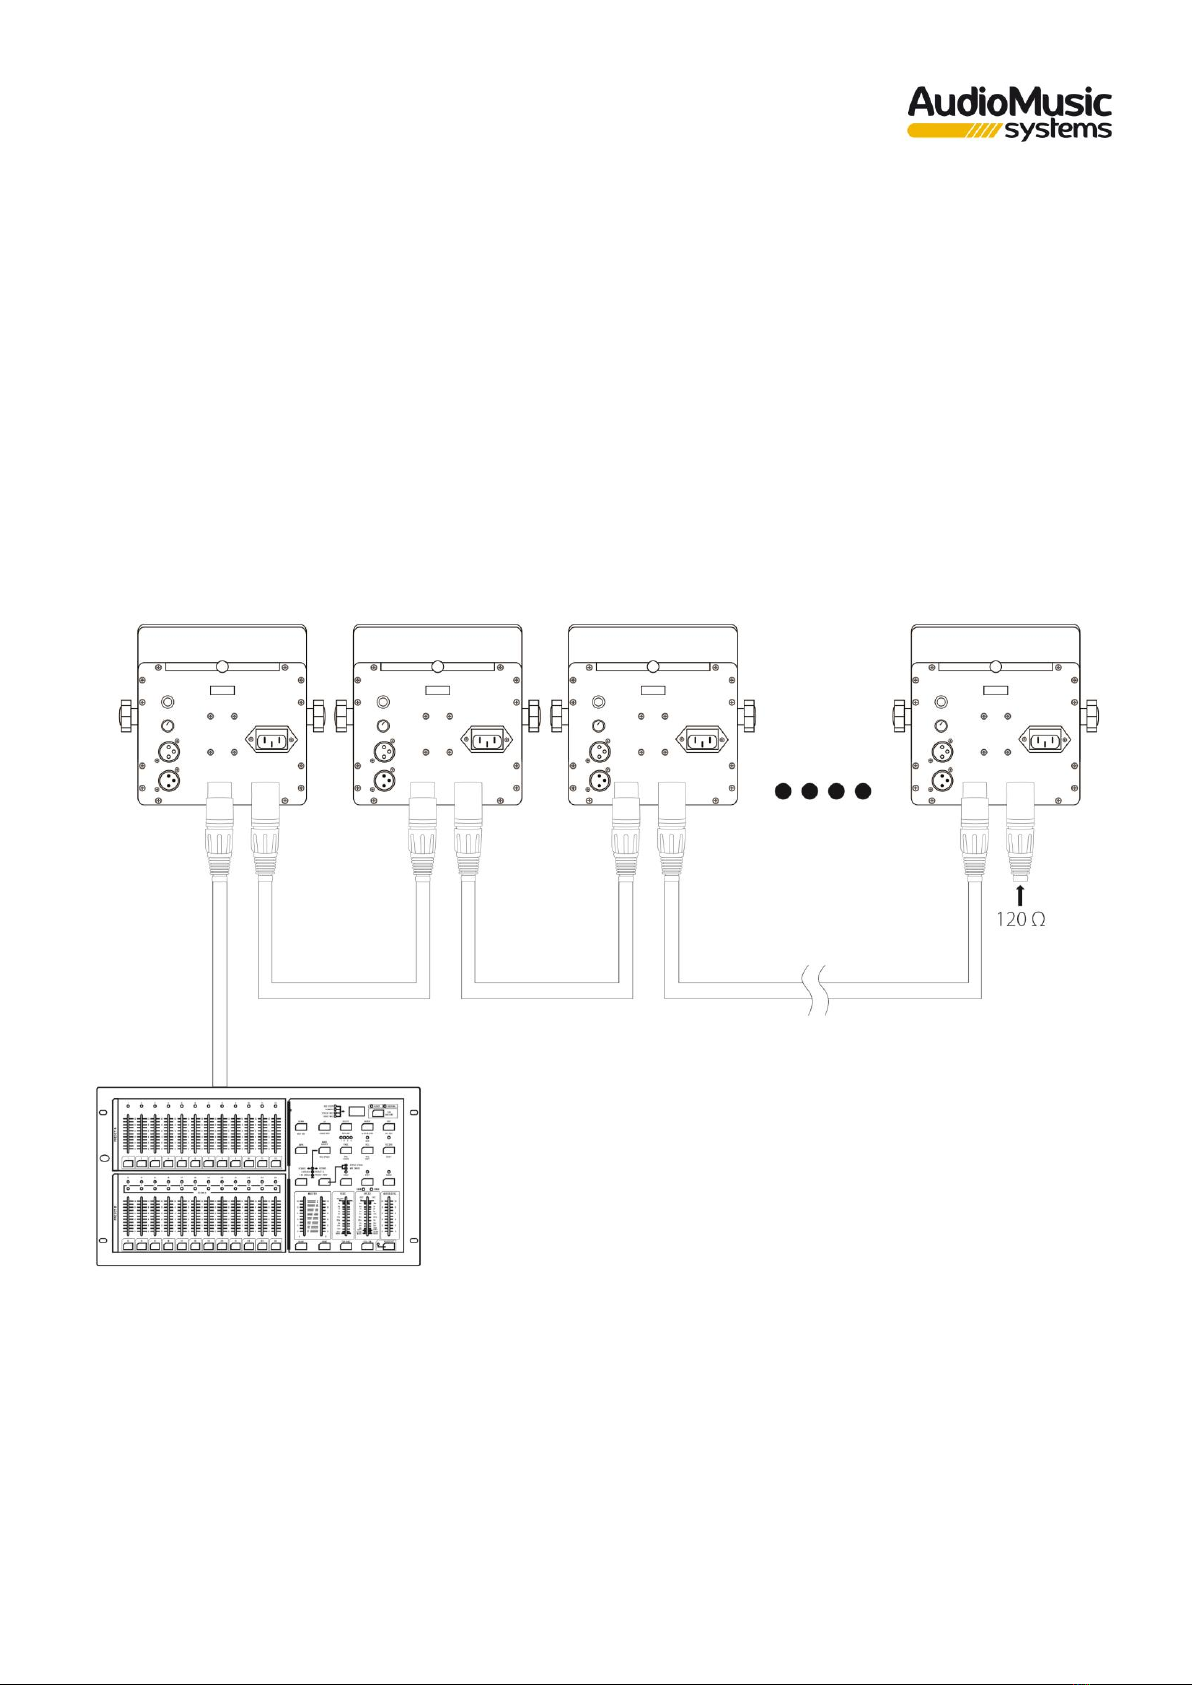
To connect several units together you must connect them with a 3 pin DMX cable, you must take into
account that to avoid possible problems you must terminate the line with a 120 Ohm 1/4W load
between pin 2 and 3 of the connector.
The unit can work in different operating modes. Through the menu you can select each of them and
configure the device according to the required mode.

5
ADVANCED SETTING AND USE
Manual Setup:
Press MENU button to enter the main menu, select UP/DOWN to access the desired submenu and press
ENTER to confirm the selection, once inside it press UP/DOWN to change its parameters and press
ENTER to confirm the selection.
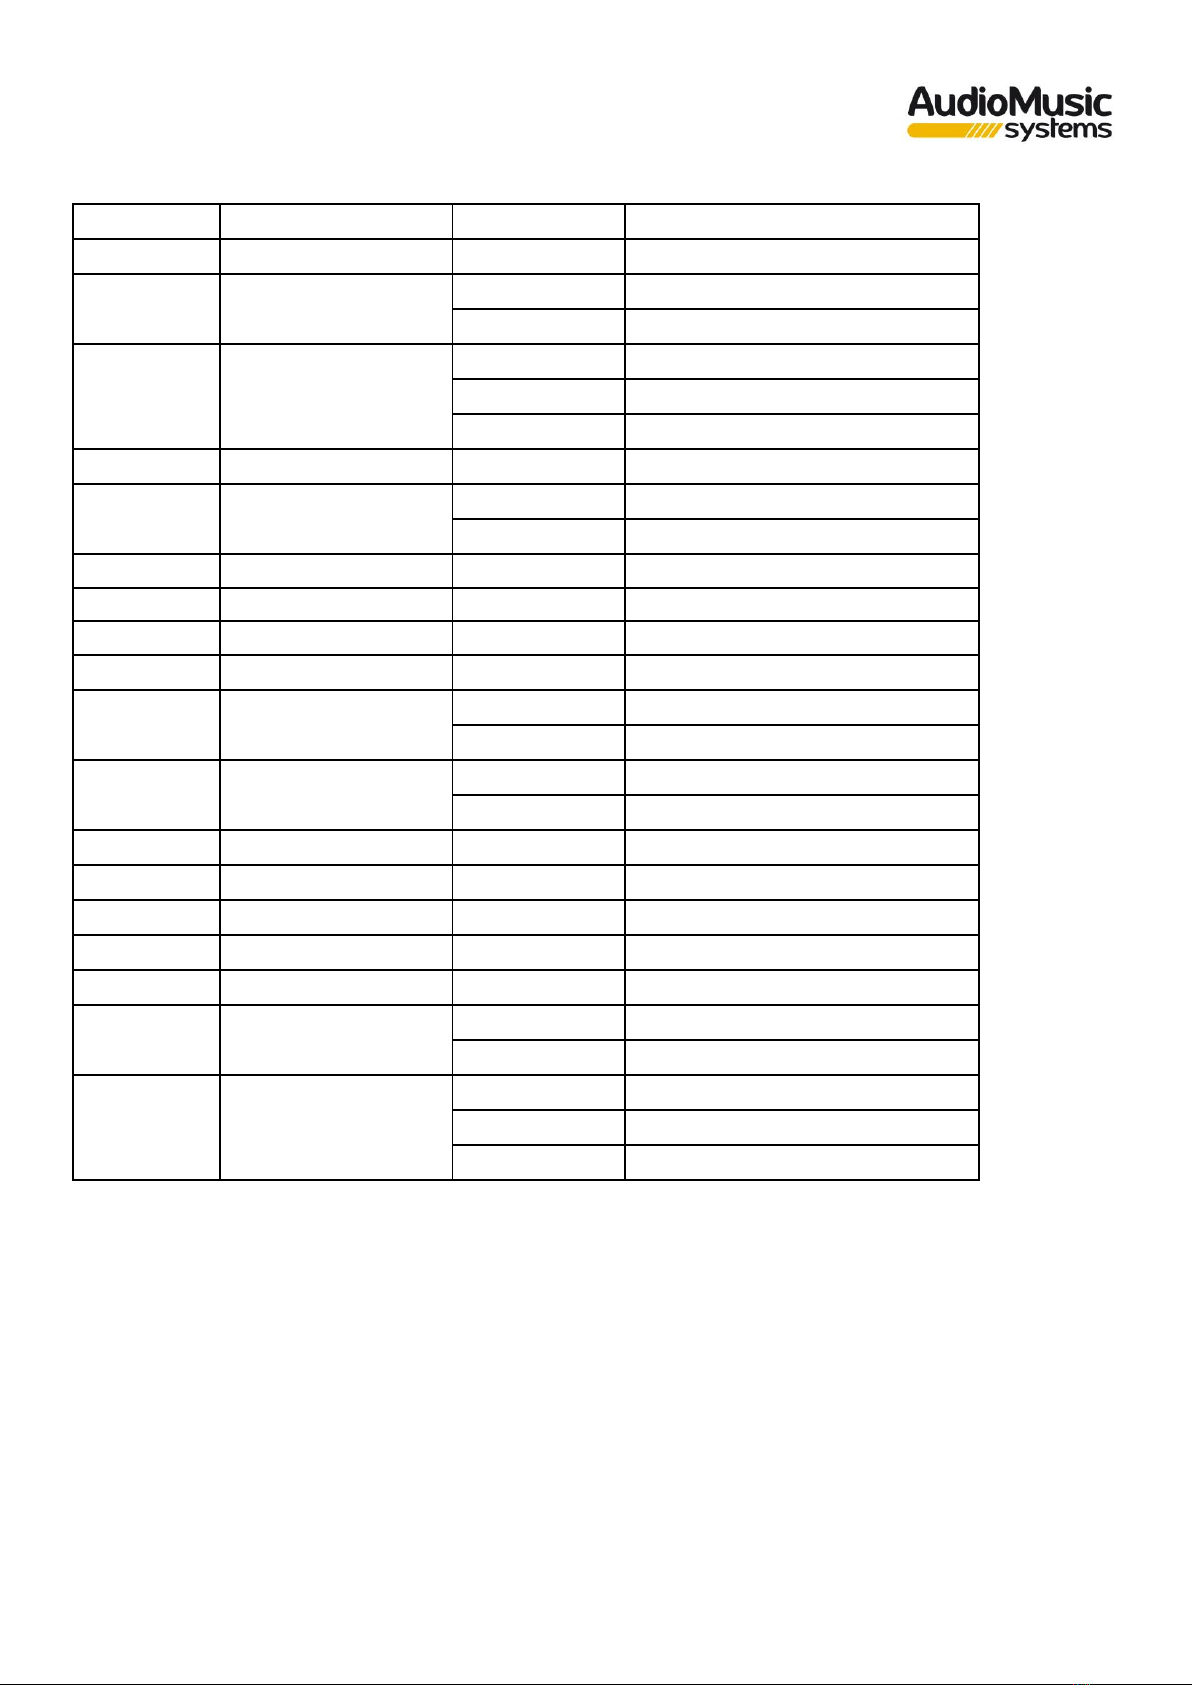
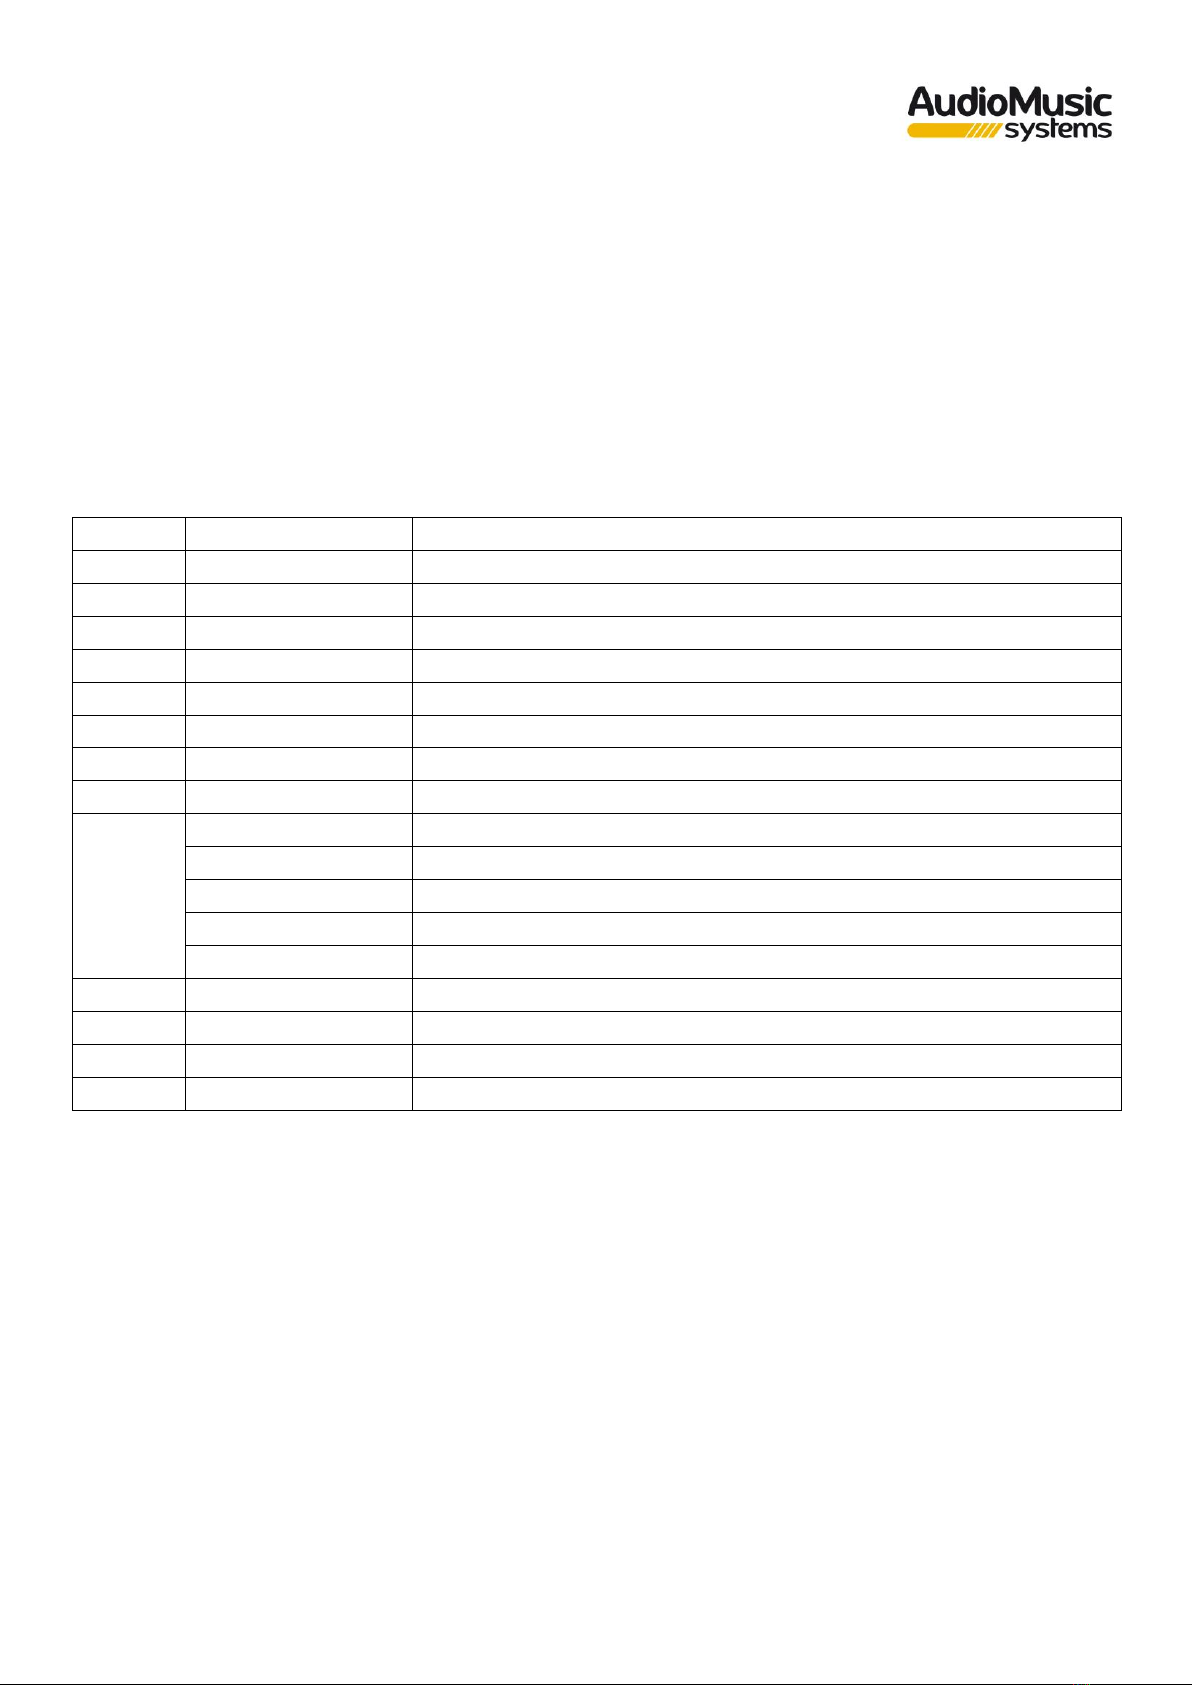
Modes and functions:
MODE
PROGRAM
DESCRIPTION
A001
A001-A512
DMX512 Mode
LE1
LE11-LE19
Rotating Ball LED Red, motor speed 1-9
LE2
LE21-LE29
Rotating Ball LED Green, engine speed 1-9
LE3
LE31-LE39
Rotating Ball LED Blue, motor speed 1-9
LE4
LE41-LE49
Rotating Ball LED White, motor speed 1-9
LE5
LE51-LE59
Rotating Ball Automatic Run, motor speed 1-9
LS
LS 1-LS 9
Automatic Laser Run, Motor Speed 1-9
Pu
Pu 1-Pu 9
Ultraviolet Light
Par
Pa11-Pa19
PAR LED Red, intensity 1-9
Pa21-Pa29
PAR LED Green, intensity 1-9
Pa31-Pa39
PAR LED Blue, intensity 1-9
Pa41-Pa49
PAR LED White, intensity 1-9
Pa51-Pa59
LED PAR Auto run LED, speed change 1-9
FL
FL 1-FL 9
Strobe White, flashing speed 1-9
Au1
Au11-Au19
Automatic mode, switching speed 1-9
S1
S1 1-S1 9
Sound control mode soft music, sensitivity adjustable 1-9
S2
S2 1-S2 9
Sound control mode DJ music, sensitivity adjustable 1-9
DMX Configuration:
Connect the 3-pin male DMX connector to the unit. This cable at its end must be connected to an
external DMX controller.
This unit has 18 DMX channels, when connecting more than one fixture together, if you want to control
each fixture individually, you must associate the DMX address as follows: 1-18 for the first fixture, 19-36
for the second fixture and so on.
6
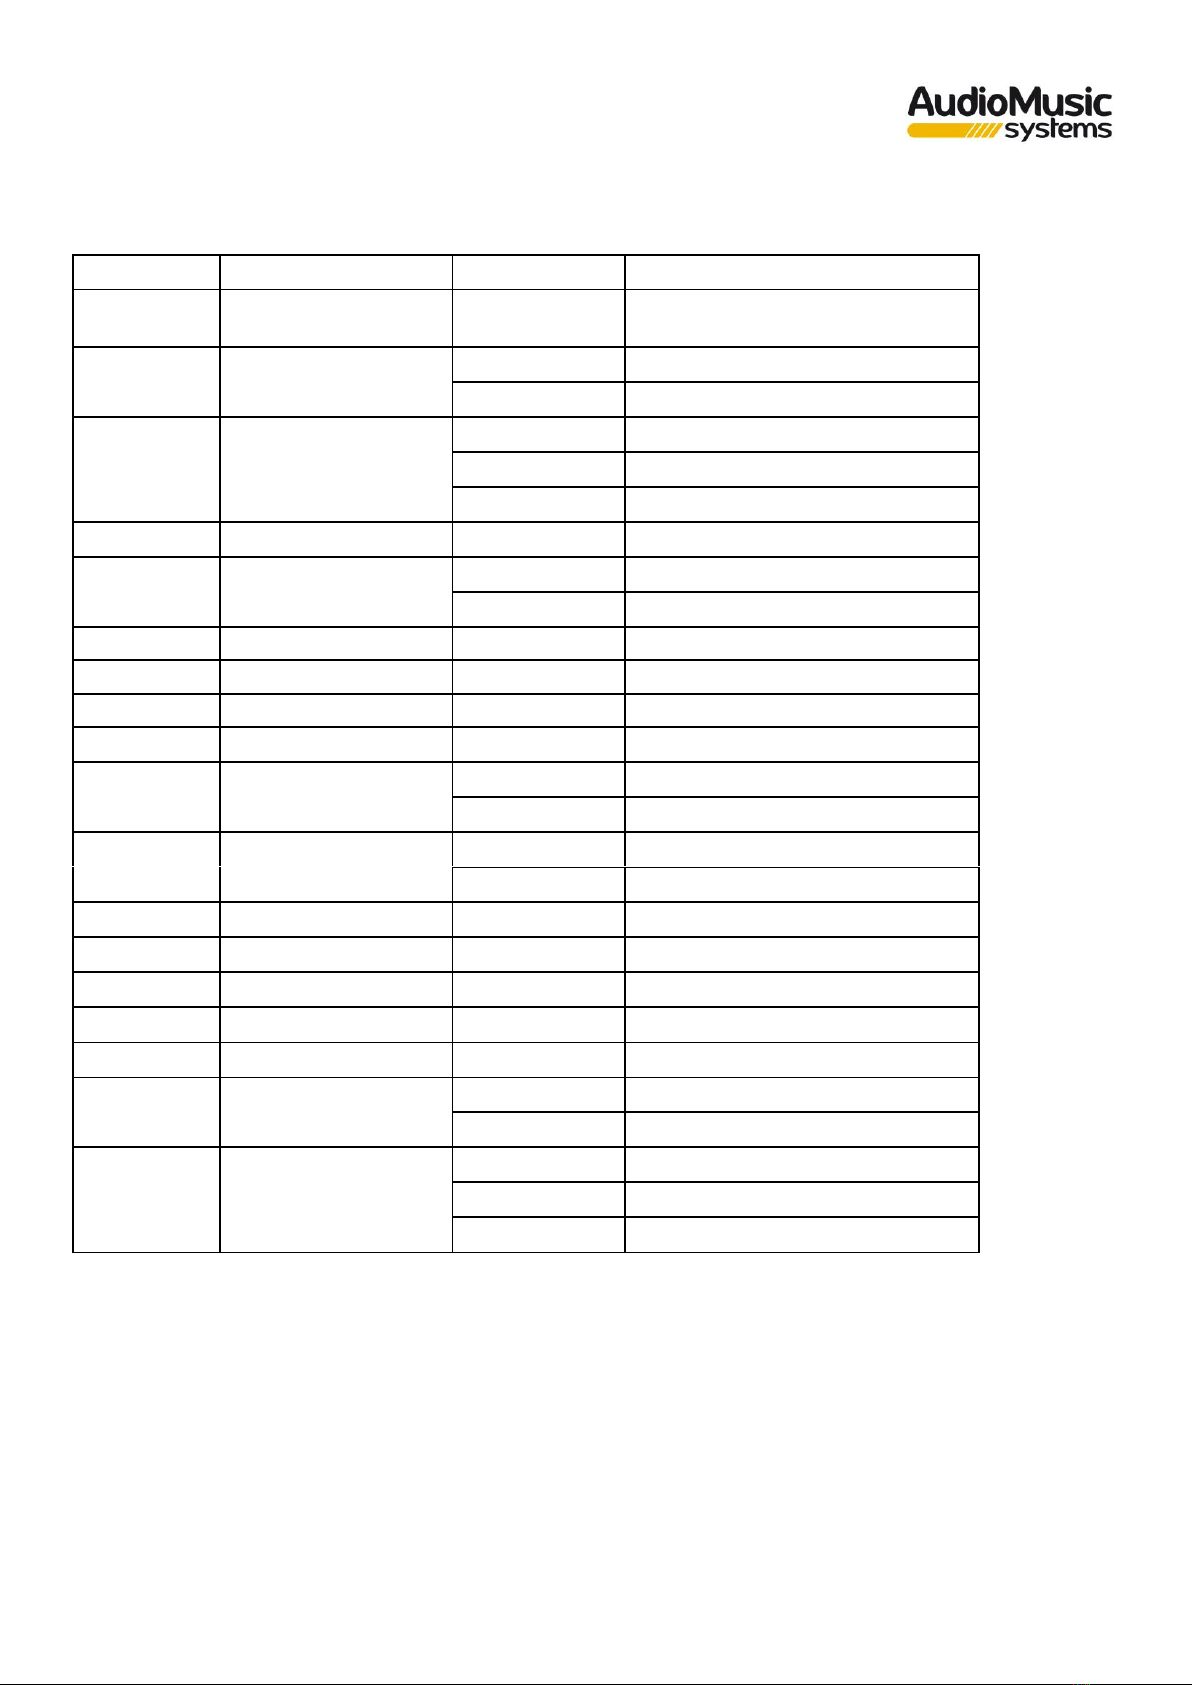
DMX512 Functions
CHANNELS
FUNCTION
DMX VALUE
DESCRIPTION
CH1
SPEED ROT
0-255
CW/CCW SPEED
CH2
ROTATION
0-127
INDEX
128-255
CW/CCW ROTATION
CH3
LASER ROTATION
0-9
STOP
10-127
CW ROTATION F>S
128-255
CCW ROTATION S>F
CH4
DIMMER
0-255
0-100% Dimmer Lineal
CH5
STROBE
0-9
OPEN
10-255
STROBE S>F
CH6
RED
0-255
0-100% Dimmer Lineal
CH7
GREEN
0-255
0-100% Dimmer Lineal
CH8
BLUE
0-255
0-100% Dimmer Lineal
CH 9
WHITE
0-255
0-100% Dimmer Lineal
CH 10
RED LASER
0-12
R LASER OFF
13-255
R LASER ON
CH 11
GREEN LASER
0-12
G LASER OFF
13-255
G LASER ON
CH 12
4 x RED
0-255
0-100% Dimmer Lineal
CH 13
4 x GREEN
0-255
0-100% Dimmer Lineal
CH 14
4 x BLUE
0-255
0-100% Dimmer Lineal
CH 15
4 x WHITE
0-255
0-100% Dimmer Lineal
CH 16
4 x UV
0-255
0-100% Dimmer Lineal
CH 17
4 x STROBE
0-10
NO STROBE
11-255
STROBE S>F
CH 18
MACRO
0-50
NO FUNCTION
51-150
AUTO
151-255
SOUND
7
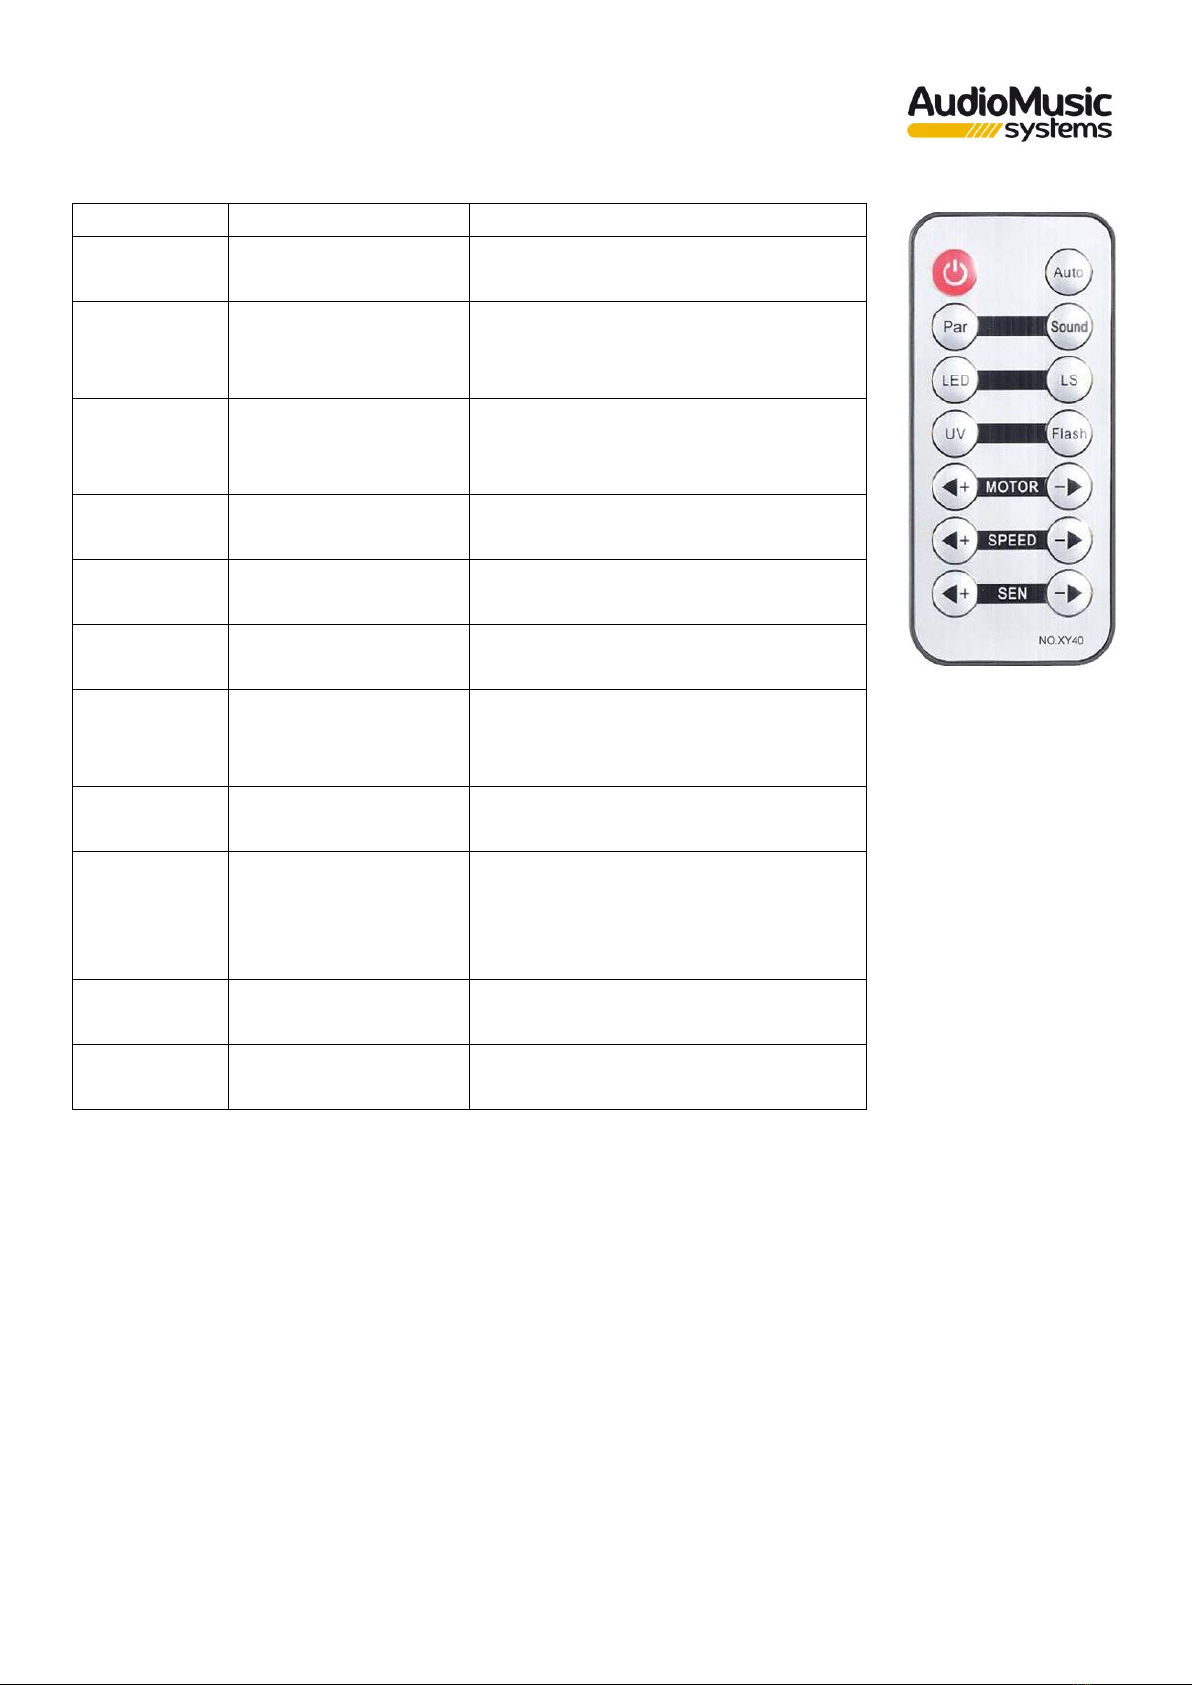
IR Remote Control Operation
Mode
Function
Description
ON/OFF
On/Off switch
Switches control of the unit on and
off remotely
Par
PAR Mode
Selects between Modes Pa11 to Pa51
by changing the colour of the PAR
LED
LED
LED (Ball) Mode
Selects between Modes Le11 to Le51
by changing the colour of the
rotating ball LED
UV
Ultraviolet Mode
Selects Pu 1 Mode by activating the
ultraviolet LED
Auto
Auto Mode
Selects Au11 Mode by activating the
Automatic mode of operation
Sound
Sound Mode
Activates S1 5 or S2 5 Modes by
activating music control
LS
Laser Mode
Activate LS 1 Mode by activating red
and green laser switching with a
rotogobo
Flash
Strobe Mode
Activates FL 1 Mode by activating the
white strobe
+ MOTOR -
Ball Engine Speed
Increases/Decreases the speed of the
LED (Ball) and Laser modes by
making them rotate at different
speeds
+ SPEED -
Auto Speed
Increases/Decreases the speed of
effect change in Auto Mode
+ SEN -
Audio Sensitivity
Increases/decreases the sensitivity of
the Sound Mode

8
PROBLEMS AND SOLUTIONS
This guide is intended to assist in solving simple and common problems that may arise in the use of the
device, if problems persist, do not attempt to open and repair the unit yourself, contact your nearest
AudioMusic Systems dealer and return it for repair.
If the device has a problem, follow the following points until you find the problem and can fix it, if the
product is working properly, do not proceed with these steps. If the lighting does not work properly,
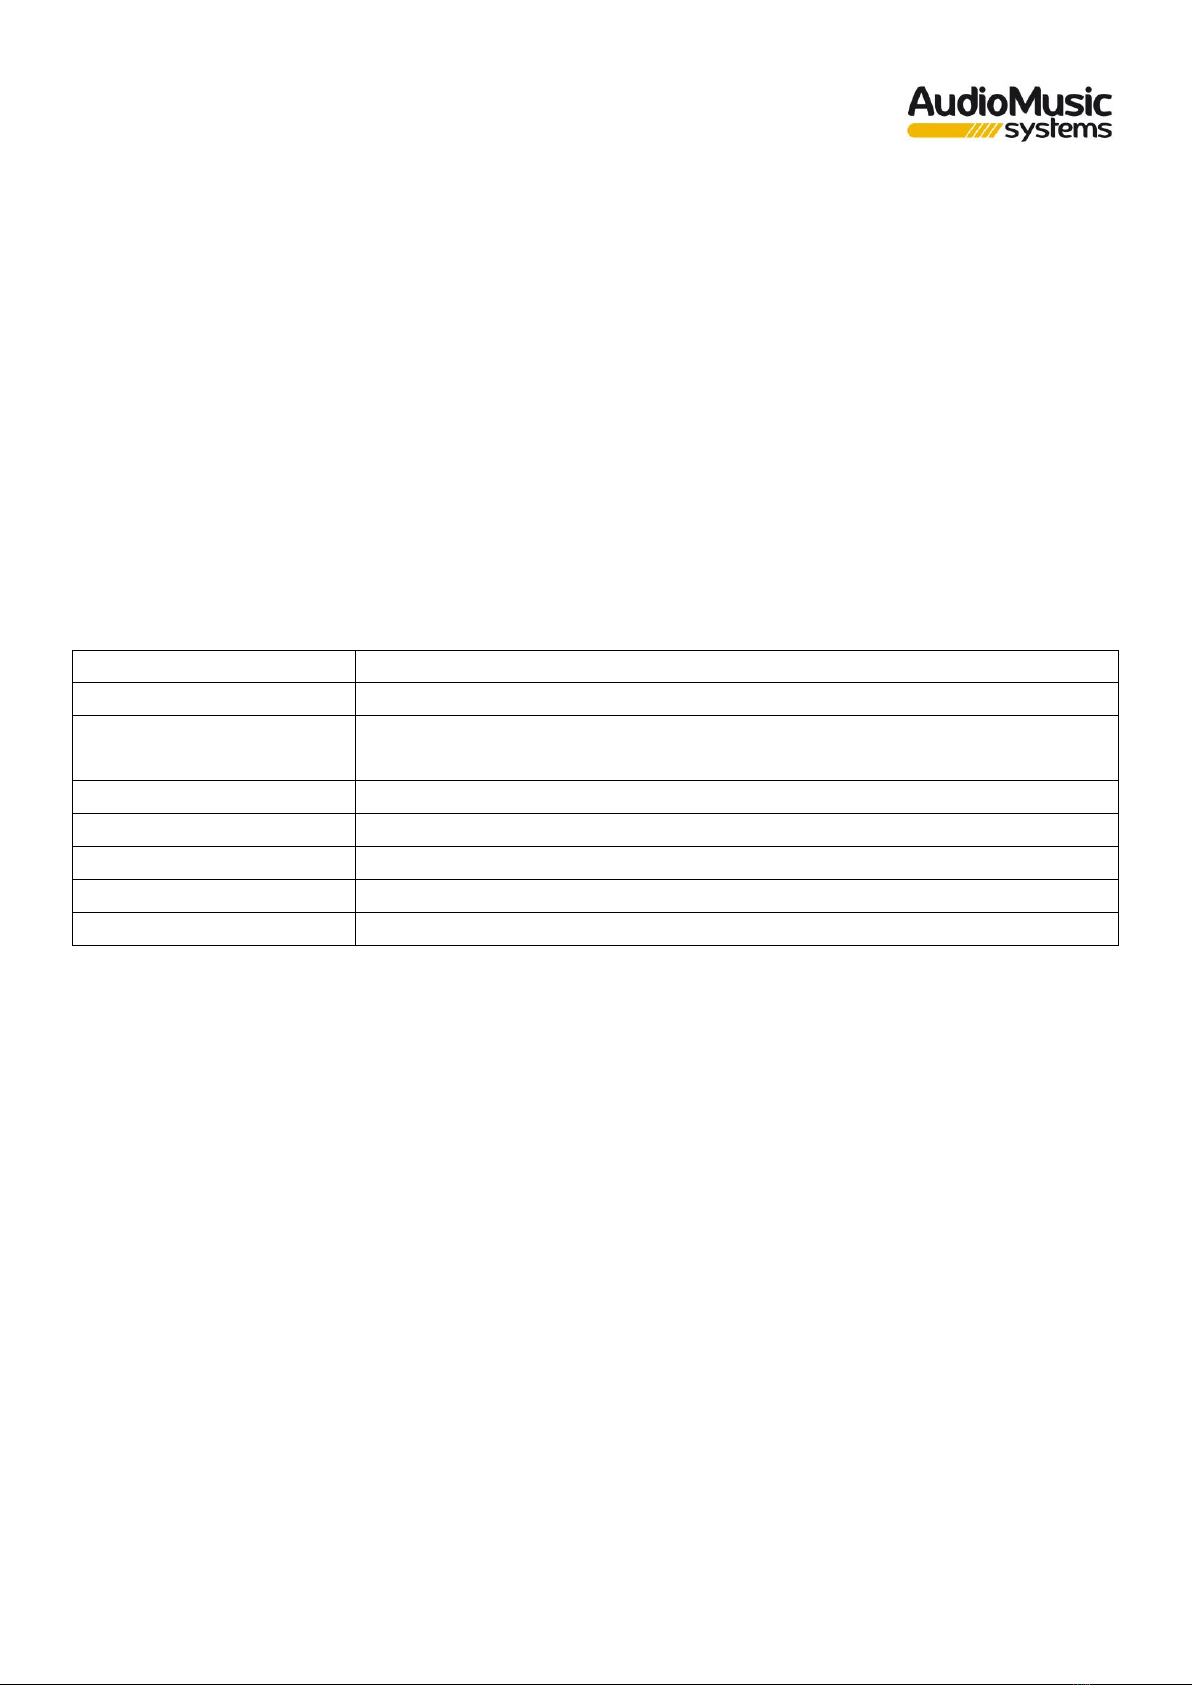
send the device to AudioMusic Systems for service.
If light does not work
Possible problems: Power supply of the LED system
1- Power supply: Make sure the unit is correctly connected.
2- LEDs. If the LEDs are malfunctioning independently, contact AudioMusic Systems technical support.
3- If all of the above appears to be undamaged, you can connect the unit to the mains.
4- If you cannot determine the cause of the problems with the unit, do not disassemble or attempt to
repair the unit yourself as this will void the warranty.
5- Return the unit to AudioMusic Systems for service.
If the DMX protocol does not respond
Possible problems: Check that the DMX connection cable is correctly inserted in the device, check that
the cable itself is not defective, that the controller is working correctly.
1- Check the DMX characteristics and that the assigned address is correct.
2- Check the DMX cable: Uninstall the unit, replace the DMX cable and reconnect the device to the
mains, check the DMX control again.
3- Determine if the control is defective: Does the device operate correctly with other DMX units? If
not, take the unit to an official service centre for repair.

9
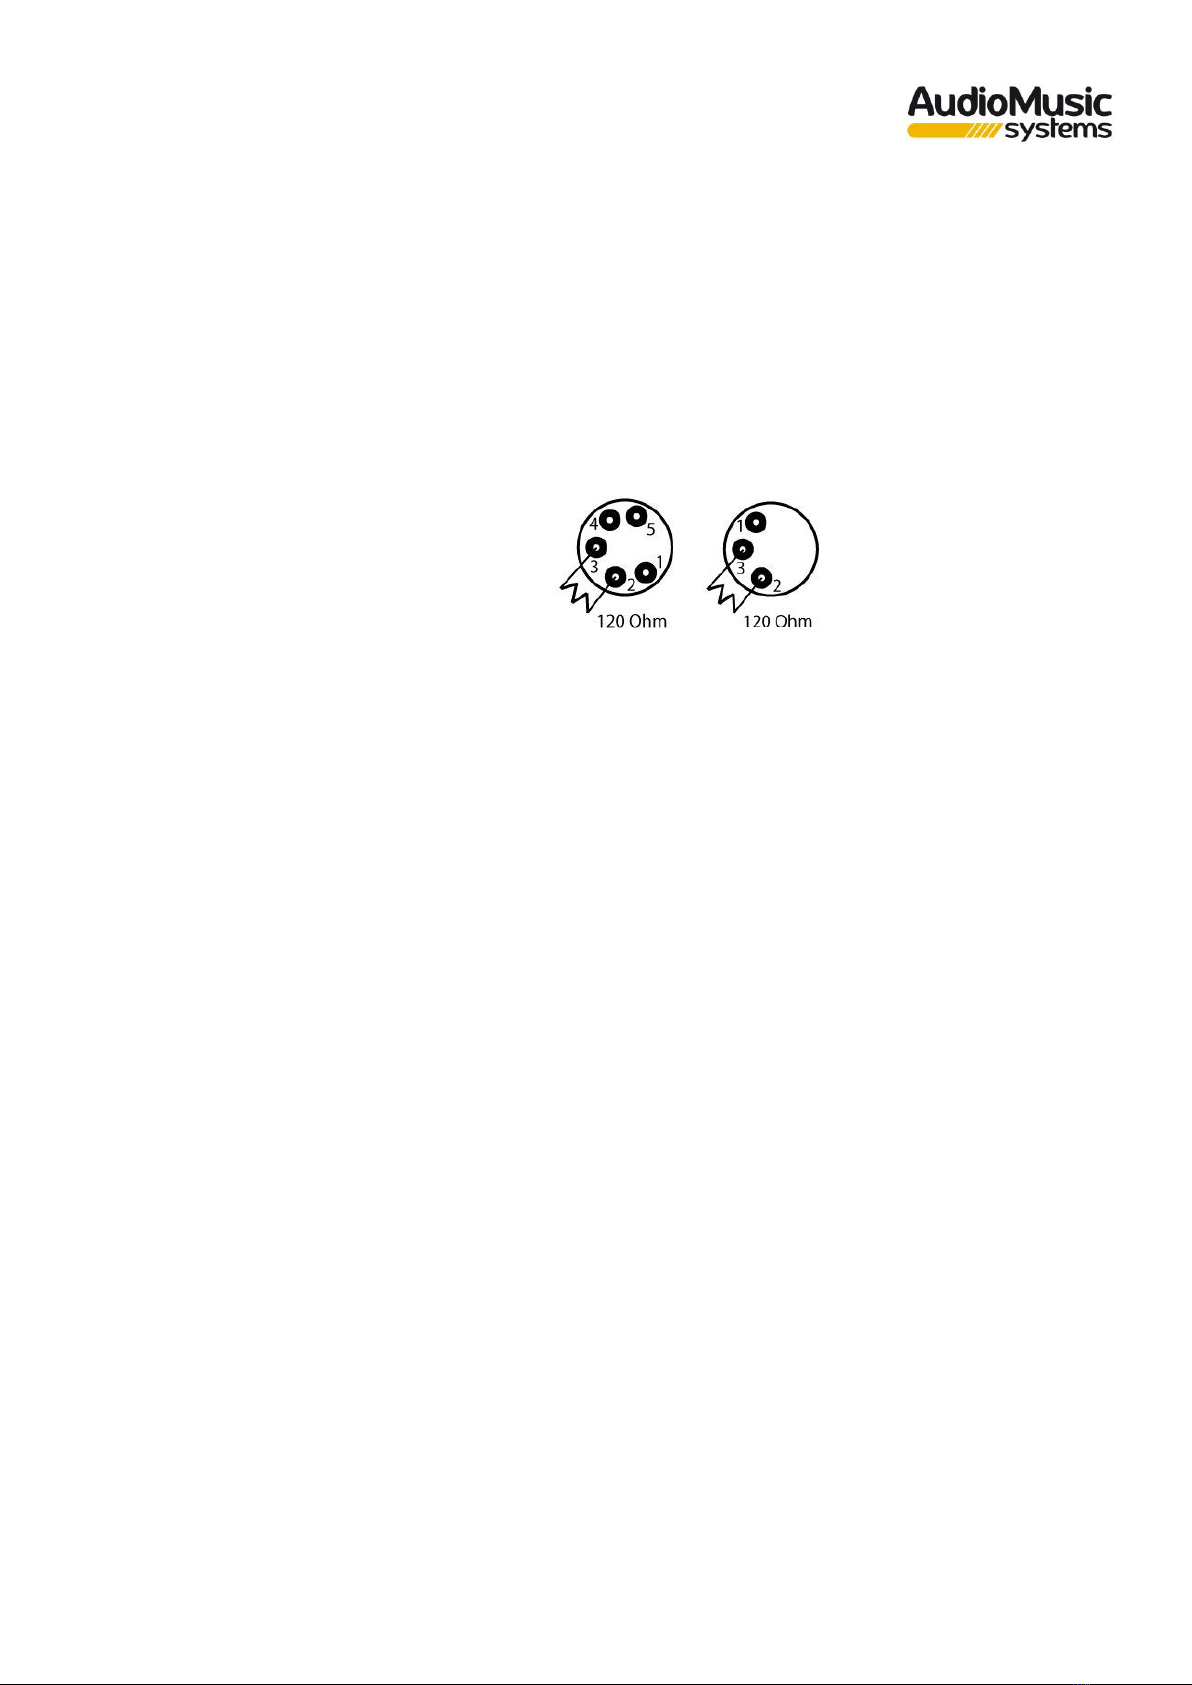
DMX connection
If you make your own cables, please note the figures on this page. Do not connect the cable shield to
the ground contact of the connector or allow the shield to come into contact with the XLR connector
housing. If the shield comes into contact with the ground, it may lead to unstable operation of the
equipment. To avoid system errors, a termination resistor (120 ohms, 1/4 W) should be connected to the
last fixture in the DMX chain.
1. Common (Mesh)
2. Data 1- (Primary Data Link)
3. Data 2+(Primary Data Link)
4. Data 2- (Secondary Data Link)
5. Data 2+(Secondary Data Link)
10
DESCRIPCIÓN GENERAL
El multiefecto SIX EYES 12 MKII LASER/LED de iluminación incorpora una sección de 4 PAR LED RGBW de
6W c.u., los cuales pueden reproducir con gran calidad los tres colores primarios junto con un blanco
puro y definido, siendo la mezcla total de colores mucho más homogénea; otra sección de estrobo/UV
con 4 LED; otra sección de efecto de bola de espejos rotatoria con un LED RGBW de 12W; y además
integra un efecto LASER Rojo y Verde con Rotogobo. Es controlable por DMX512 (18 canales), AUTO,
ACTIVACIÓN por SONIDO. Su gran luminosidad permite su colocación en instalaciones para sustituir
focos de iluminación tradicional, con las ventajas que supone de ahorro de potencia, ausencia de calor
generado y duración. Además, en este caso, se trata de un dispositivo portátil, con lo cual la cantidad de
aplicaciones a las que puede ser dedicada es aún mayor.
Datos Técnicos:
Alimentación
AC 110-240V, 50/60V
Consumo
60W
Fuente lumínica
4 PAR 6W RGBW LEDs, 4 LED estrobo Blanco/UV, bola espejo rotatoria
LED RGBW 12W, LASER Rojo/Verde con Rotogobo R 120mW G 30mW
Modos de control
DMX512 / Audio / Auto / Mando Control Remoto IR
Canales DMX
18 Canales
Conexiones
DMX XLR 3 pin
Dimensiones
190 x 190 x 110 mm (220 x 260 x 110 mm con lira)
Peso
1,27 Kg
Características:
Incorpora 4 LEDs de alta potencia 6W RGBW cada uno.
4 LED estrobo/UV.
Bola rotatoria LED RGBW 12W.
Varios modos de funcionamiento tales como Audio/Auto/DMX512/mando remoto IR.
Gracias a su reducido tamaño, es un dispositivo ideal para discotecas, clubs, salas de fiestas, dj móviles,
etc.
11
USO E INSTALACIÓN
Para empezar a trabajar con el dispositivo, primero conecte la unidad a la red eléctrica.
El dispositivo se auto chequeará durante unos segundos para comprobar su estado correcto.
Para conectar varias unidades entre si debe conectarlas mediante un cable DMX de 3 Pins, debe tener en
cuenta que para evitar posibles problemas debe terminar la línea con una carga de 120 Ohm 1/4W entre
el pin 2 y 3 del conector.
La unidad puede trabajar bajo distintos modos de funcionamiento. A través del menú se pueden
seleccionar cada uno de ellos y configurar el dispositivo según el modo necesario.
12
AJUSTE Y USO AVANZADO
Configuración Manual:
Presione el botón MENU para ingresar en el menú principal, seleccione UP/DOWN para acceder al
submenú deseado y presione ENTER para confirmar la selección, una vez dentro de este presione
UP/DOWN para cambiar sus parámetros y presione ENTER para confirmar la selección.
Modos y funciones
Modo
Programa
Descripción
A001
A001-A512
Modo DMX512
LE1
LE11-LE19
Bola Rotatoria LED Rojo, velocidad del motor 1-9
LE2
LE21-LE29
Bola Rotatoria LED Verde, velocidad del motor 1-9
LE3
LE31-LE39
Bola Rotatoria LED Azul, velocidad del motor 1-9
LE4
LE41-LE49
Bola Rotatoria LED Blanco, velocidad del motor 1-9
LE5
LE51-LE59
Ejecución Automática de Bola Rotatoria, velocidad del motor 1-9
LS
LS 1-LS 9
Ejecución Automática del Láser, velocidad del motor 1-9
Pu
Pu 1-Pu 9
Luz Ultravioleta
Par
Pa11-Pa19
PAR LED Rojo, intensidad 1-9
Pa21-Pa29
PAR LED Verde, intensidad 1-9
Pa31-Pa39
PAR LED Azul, intensidad 1-9
Pa41-Pa49
PAR LED Blanco, intensidad 1-9
Pa51-Pa59
Ejecución Automática del PAR LED, velocidad cambio 1-9
FL
FL 1-FL 9
Estrobo Blanco, velocidad de flash 1-9
Au1
Au11-Au19
Modo Automático, velocidad de cambio 1-9
S1
S1 1-S1 9
Modo de control de sonido música suave, sensibilidad ajustable 1-9
S2
S2 1-S2 9
Modo de control de sonido música DJ, sensibilidad ajustable 1-9
Configuración a través de DMX:
Conecte el conector macho de 3 pines DMX a la unidad. Este cable en su extremo debe estar conectado
con un controlador DMX externo.
Esta unidad cuenta con 18 canales DMX, cuando conecte más de una unidad entre sí, si desea el control
de cada unidad de manera individual, deberá asociar la dirección DMX de la siguiente manera: 1-18 el
primer dispositivo, 19-36 para el segundo dispositivo y así de manera sucesiva.
13
Funciones DMX512
CANALES
FUNCIÓN
VALOR DMX
DESCRIPCIÓN
CH1
VELOCIDAD DE
ROTACIÓN
0-255
VELOCIDAD CW/CCW
CH2
ROTACIÓN
0-127
INDEX
128-255
ROTACIÓN CW/CCW
CH3
ROTACIÓN DE
LÁSER
0-9
STOP
10-127
CW ROTACIÓN F>S
128-255
CCW ROTACIÓN S>F
CH4
DIMMER
0-255
0-100% Dimmer Lineal
CH5
ESTROBO
0-9
ABIERTO
10-255
ESTROBO S>F
CH6
ROJO
0-255
0-100% Dimmer Lineal
CH7
VERDE
0-255
0-100% Dimmer Lineal
CH8
AZUL
0-255
0-100% Dimmer Lineal
CH 9
BLANCO
0-255
0-100% Dimmer Lineal
CH 10
LÁSER ROJO
0-12
LÁSER ROJO OFF
13-255
LÁSER ROJO ON
CH 11
LÁSER VERDE
0-12
LASER VERDE OFF
13-255
LASER VERDE ON
CH 12
4 x ROJO
0-255
0-100% Dimmer Lineal
CH 13
4 x VERDE
0-255
0-100% Dimmer Lineal
CH 14
4 x AZUL
0-255
0-100% Dimmer Lineal
CH 15
4 x BLANCO
0-255
0-100% Dimmer Lineal
CH 16
4 x UV
0-255
0-100% Dimmer Lineal
CH 17
4 x ESTROBO
0-10
NO ESTROBO
11-255
ESTROBO S>F
CH 18
MACRO
0-50
SIN FUNCIÓN
51-150
AUTO
151-255
SONIDO

14
Operación a través de Mando Control IR:
Modo
Función
Descripción
ON/OFF
Encendido/Apagado
Conecta y desconecta el control de
la unidad de forma remota
Par
Modo PAR
Selecciona entre los Modos desde
Pa11 hasta Pa51 cambiando el color
del PAR LED
LED
Modo LED (Bola)
Selecciona entre los Modos desde
Le11 hasta Le51 cambiando el color
del LED de la bola rotatoria
UV
Modo Ultravioleta
Selecciona el Modo Pu 1 activando el
LED ultravioleta
Auto
Modo Automático
Selecciona el Modo Au11 activando el
modo de funcionamiento
Automático
Sound
Modo Sonido
Activa los Modos S1 5 o S2 5
activando el control por música
LS
Modo Láser
Activa el Modo LS 1 activando
cambios del láser rojo y verde con
un rotogobo
Flash
Modo Estrobo
Activa el Modo FL 1 activando el
estrobo blanco
+ MOTOR -
Velocidad del Motor
(Bola)
Aumenta/Disminuye la velocidad de
los modos LED (Bola) y Laser
haciendo que giren a diferentes
velocidades
+ SPEED -
Velocidad Auto
Aumenta/Disminuye la velocidad de
cambio de efectos en el Modo Auto
+ SEN -
Sensibilidad del
Audio
Aumenta/disminuye la sensibilidad
del Modo Sonido

15
POSIBLES PROBLEMAS Y SOLUCIÓN
Esta guía pretende ayudar en resolver problemas simples y comunes que pueden aparecer en el uso del
dispositivo, si los problemas persisten, no intente abrir y reparar la unidad por sí solo, contacte con su
distribuidor AudioMusic Systems más cercano y devuélvalo para su reparación.
Si el dispositivo tiene un problema, siga los siguientes puntos de manera hasta que encuentre el problema
y pueda solucionarlo, si el producto funciona correctamente, no siga con estos pasos. Si la iluminación no
funciona correctamente, envíe el dispositivo al servicio técnico de AudioMusic Systems.
Si no funciona la luz
Posibles problemas: Fuente de alimentación del sistema LED
1- Fuente de alimentación: Asegúrese de que la unidad esté correctamente conectada.
2- LEDs. Si los LEDs presentan un mal funcionamiento de manera independiente, contacte al servicio
técnico de AudioMusic Systems.
3- Si todo lo anterior parece que no está dañado, puede conectar la unidad a la red eléctrica.
4- Si usted no puede determinar la causa de los problemas que presenta la unidad, no la desmonte
o intente reparar por sí mismo ya que perderá la garantía.
5- Devuelva la unidad a servicio técnico de AudioMusic Systems.
Si no responde el protocolo DMX
Posibles problemas: Verifique que el cable de conexión DMX está correctamente insertado en el
dispositivo, verifique que el propio cable no está defectuoso, que el controlador funciona correctamente.
1- Verifique las características DMX y que la dirección asignada es correcta.
2- Verifique el cable DMX: Desinstale la unidad, cambie el cable DMX y vuelva a conectar el dispositivo
a la red eléctrica, verifique de nuevo el control DMX.
3- Determine si el control está defectuoso. ¿El dispositivo opera correctamente con otras unidades
DMX? Si no es así, lleve la unidad a ser reparada al servicio técnico oficial.
16
Conexionado DMX
Si fabrica sus propios cables, tenga en cuenta las figuras de esta página. No conecte la malla del cable al
contacto de masa del conector ni permita que la malla entre en contacto con la carcasa del conector XLR.
Si se produce un contacto de la malla con la masa, puede producir un funcionamiento inestable del
equipo. Para evitar errores de sistema, debe conectarse una resistencia de terminación (120 ohmios,
1/4 W) en el último equipo de la cadena DMX.
1. Común (Malla)
2. Data 1- (Primary Data Link)
3. Data 2+(Primary Data Link)
4. Data 2- (Secondary Data Link)
5. Data 2+(Secondary Data Link)

17
Av. Saler nº6 Poligono. Ind. L’Alteró. Silla 46460 VALENCIA-SPAIN
Tel: +34 963124088 Fax: +34963219645
www.audiomusic.es
Table of contents
Languages:
Popular Lighting Equipment manuals by other brands

Commercial Electric
Commercial Electric 56546101 Use and care guide

ARANI
ARANI LED WALL PACK 10 installation guide

Elation
Elation ELAR 162 TRI PAR manual

Zodiac Pool Systems
Zodiac Pool Systems Nature2 Pro A Plus Installation and operating manual

LIGMAN
LIGMAN LUNAR 2 installation manual

GAME OF BRICKS
GAME OF BRICKS R2-D2 75308 instruction manual


