Auditiva FINO RIC 12 User manual

ver: 1.0 08.01.12
Receiver-in-Canal Family of Products
Hearing Healthcare Provider
Made in U.S.A.
INSTRUCTION MANUAL
■Clear Conversations
■Natural Sounds
■Superior Comfort
Advanced Technology in Hearing
Advanced Technology in Hearing
www.auditiva.us
RIC
112 Fino Instruc Manual_ENGLISH:Layout 1 8/20/12 5:28 PM Page 1

Receiver-in-Canal Family of Products
RIC
112 Fino Instruc Manual_ENGLISH:Layout 1 8/20/12 5:28 PM Page 3

i
Welcome to a world of better hearing!
We understand that hearing loss affects
one’s quality of life. That is why we are
dedicated to building the highest quality
hearing instruments. Your new hearing
instruments will soon be indispensable
to you and will bring new pleasure and
enjoyment to your life.
Our company was established in 1990
and is well known internationally for
offering high quality, reliable, state-of-the-
art technology. These Receiver-in-Canal
(RIC) hearing instruments have been
programmed or adjusted to your individual
hearing loss to precisely fit your hearing
and communication requirements. If
necessary, your hearing healthcare provider
can make further modifications to enhance
your listening experience.
A period of adjustment may be needed
to become accustomed to your new
hearing instruments and the renewed
world of sounds you will experience. The
adjustment time varies for each individual
and may be as little as a couple of weeks
to as long as several months. Allow
yourself time to become familiar with those
sounds you have not heard for a long time.
Before operating your hearing instruments,
please read this manual thoroughly.
Welcome
This manual contains user information
for the following Fino RIC hearing
instruments. Your hearing healthcare
provider will check the appropriate box
for your hearing instrument.
■■Fino RIC 12
■■Fino RIC 4
■■Fino RIC 2
112 Fino Instruc Manual_ENGLISH:Layout 1 8/20/12 5:28 PM Page 5

ii
Table of Contents
Fino RIC Diagram . . . . . . . . . . . . . . . . . . 1
Proper Placement on Ear . . . . . . . . . . . . 2
Left & Right Instruments . . . . . . . . . . . . 5
On/Off Function . . . . . . . . . . . . . . . . . . . 5
Battery Information . . . . . . . . . . . . . . . . 6
Memory Program Settings . . . . . . . . . . . 9
Additional Features . . . . . . . . . . . . . . . .10
Cleaning Your Instrument . . . . . . . . . . . 11
Caring for Your Instrument . . . . . . . . . . 13
Removing & Inserting a Wax Filter . . . . 13
Telephone Use . . . . . . . . . . . . . . . . . . . .16
Cell Phone Compatibility . . . . . . . . . . . . 16
Do’s and Don’ts . . . . . . . . . . . . . . . . . . 18
Troubleshooting . . . . . . . . . . . . . . . . . . 20
Binaural Amplification . . . . . . . . . . . . . . 22
Children with Hearing Loss . . . . . . . . . 23
Warranty Information . . . . . . . . . . . . . . 24
Service and Repair . . . . . . . . . . . . . . . . 25
Notice to Prospective Users . . . . . . . . . 26
Notice to Providers . . . . . . . . . . . . . . . . 27
Serial Numbers . . . . . . . . . . . . . . . . . . . 29
Owner Information . . . . . . . . . . . . . . . . 30
112 Fino Instruc Manual_ENGLISH:Layout 1 8/20/12 5:28 PM Page 7
1 2
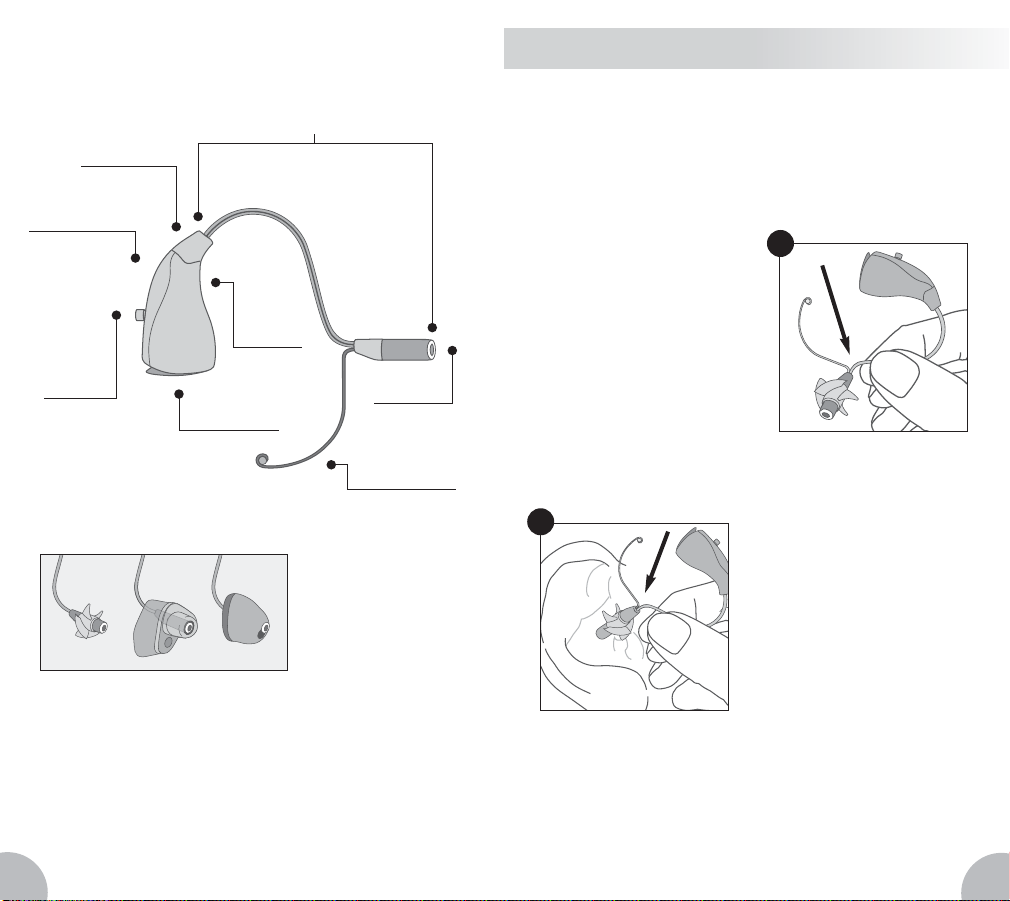
Fino RIC Diagram
Microphone
Second
Directional
Microphone**
Memory
Program
Button
Battery
Compartment
Digital
Sound
Processor
Wax Guard
Removable
Retention Guard
Receiver Unit* (RU)
ABC
* Receiver Units are detachable and interchangeable for easy
care and fitting.
** Available on Fino RIC 4 and Fino RIC 12.
Tips and Molds
A–Standard RU with
Propeller sleeve
B–Optional Zip Tip RU
C–Optional Custom
Mold RU
Proper Placement On Ear
Your hearing instruments should fit
comfortably and easily over the top of your
ears. Your hearing healthcare provider will
provide instruction on proper insertion and
removal.
Step 1:
To properly wear
your new hearing
instrument, hold the
base of the receiver
unit (RU) with the
thumb and index
finger, allowing the
RU to be free to easily
insert into the ear canal.
Step 2:
At this point, the
instrument is inverted
from its final position.
Carefully insert the
RU into the ear canal.
If your RU has the
retention guard
attached, make sure
it is located inside the
bowl of your ear.
1
2
112 Fino Instruc Manual_ENGLISH:Layout 1 8/20/12 5:28 PM Page 9
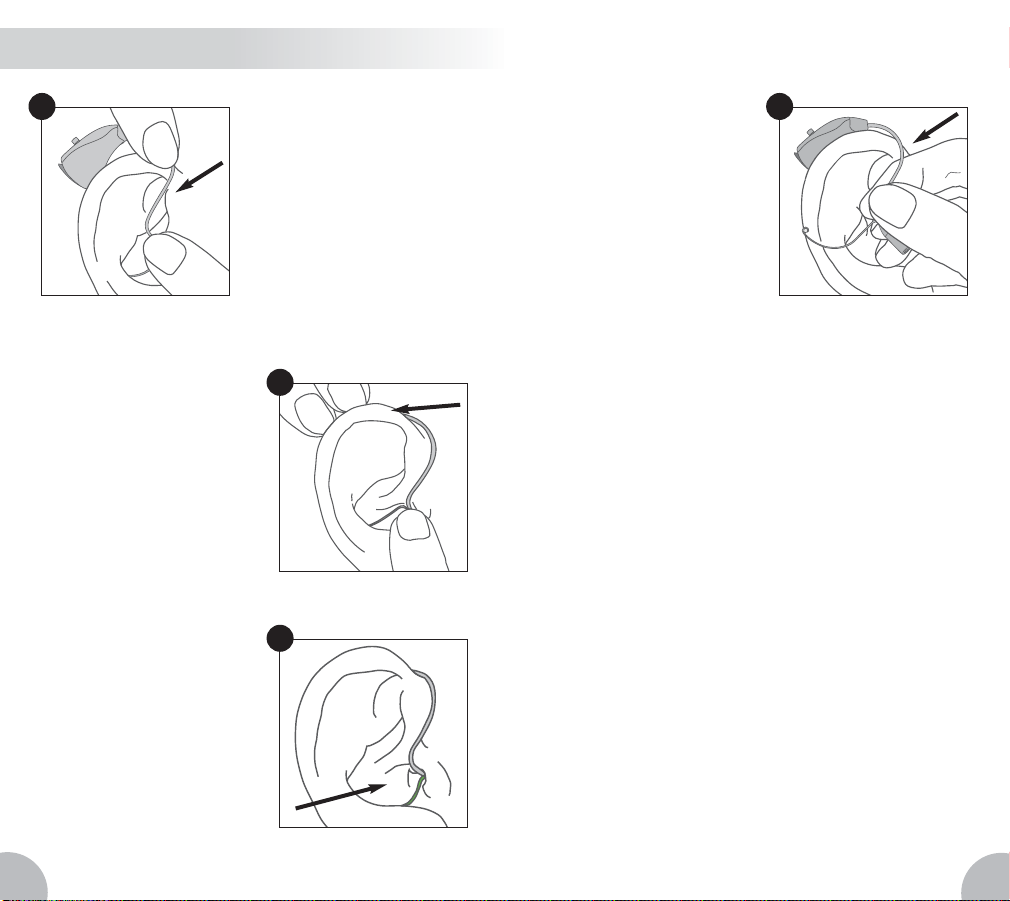
3 4
To remove the RU
from your ear canal,
grasp the wire with
the thumb and index
finger at the entrance
to the ear canal and
gently pull down and
back as shown in
illustration 6.
Open the battery door after removing
the instrument from your ear, this will
turn the instrument off and conserve
battery power.
Step 3:
While holding the
RU in place in the
ear canal with your
thumb or index finger;
carefully place the
hearing instrument
body over the top of
your ear while pressing it gently against the
head as shown in illustration 3.
Step 4:
Correctly placed, your
hearing instrument will
be virtually invisible to
those with whom you
speak. Make sure,
again, that the RU is
still properly positioned
in your ear canal.
(Illustration 4)
Step 5:
If your RU has a
retention guard be
sure it is secure inside
the bowl of your ear.
(arrow in illustration 5)
Proper Placement On Ear
continued
3
4
6
5
Caution: When removing the RU, do NOT
pull with the body of the hearing instrument
as this may damage the connection.
112 Fino Instruc Manual_ENGLISH:Layout 1 8/20/12 5:28 PM Page 11

5 6
If you are wearing hearing instruments on
both ears, it is important to use the correct
device in each ear. The receiver units (RU)
are “red” for the Right ear and “blue” for
the Left ear.
The low battery detection system
continuously monitors battery life. When
the battery becomes low, the low battery
warning sequence consisting of 3 double
beeps is initiated. After the warning beeps
are complete, normal operation resumes.
The low battery warning sequence will
repeat again 10 minutes after the initial
warning; it’s now time to insert a new
battery. Hearing aid batteries are most
easily purchased from your hearing
healthcare provider.
Battery Type and Proper Storage:
Your hearing instrument will use a size
312 battery (brown tab). A zinc air battery
is recommended for optimal performance.
Batteries should NOT be stored in a
refrigerator or dehumidifying device. Such
storage could cause leakage and damage
the batteries
Important: Always discard used batteries.
Small batteries can be harmful if
swallowed. Keep batteries out of the
reach of pets and small children. In case
of ingestion, contact your physician.
Battery Information
Left And Right Instruments
To turn your hearing instrument “on”,
you simply need to close the battery
door after inserting a battery. (See battery
replacement instructions under “Battery
Information” on following pages.)
To turn your hearing instrument
“
off”,
simply open the battery door completely.
When the hearing instrument is not in
use, it is recommended that you open
the battery door and remove the battery.
This helps to prevent excessive battery
drain and allows for proper ventilation
of the hearing instrument.
On/Off Function
112 Fino Instruc Manual_ENGLISH:Layout 1 8/20/12 5:28 PM Page 13

7 8
Step 3:
Gently swing the door into the closed
position. The compartment should close
easily. Do not force it.
It is important that the battery is inserted
correctly. If the battery compartment door
does not easily close, the battery is not
seated correctly. Do NOT try to force the
door shut, close gently.
The life of your hearing instruments’
batteries will vary depending on length of
daily use, listening environments, and how
your hearing instruments are programmed.
When the hearing instrument batteries
go dead, remove them immediately and
replace them with new batteries. Batteries
may be purchased through your hearing
healthcare professional.
When your hearing instruments are not
in use, open the battery compartment
to prevent excessive battery drain and
ventilate the instruments.
To replace your hearing instrument battery,
follow these steps:
Step 1:
Lift the notch at
the edge of the
compartment and
carefully swing
open the door.
(Illustration 1)
Step 2:
Remove the colored
tab on the battery.
Holding the instrument
as shown in illustration
2, insert the battery
with the “+” side up,
matching to the “+”
on the battery
compartment door.
Battery Information
continued
1
2
112 Fino Instruc Manual_ENGLISH:Layout 1 8/20/12 5:28 PM Page 15

109
Depending on the model, your hearing
instrument features up to four programmable
memory settings. Consult your hearing care
professional as to the number of memories
available on these hearing instruments.
Each memory setting is designed for the
best comfort and optimal performance in
a particular listening environment. Such
environments may range from noisy to
quiet… as when you’re on the telephone,
outdoors, in a crowded restaurant, or
listening to TV, music, or a movie.
To change the program setting, simply
press the memory program button located
on your instrument. An audible signal
indicates the specific settings for your
listening environment – 1 beep is program 1,
2 beeps is program 2, etc. When you turn on
your hearing instrument it will automatically
start in program 1. Your hearing healthcare
professional will program the instrument for
you as the specific setting you wish to use.
Additional Features
Memory Program Settings
Environmental Settings:
Unique listening programs specially
designed to maximize your listening in a
particular environmental situation, including:
noisy restaurants, music listening, places of
worship, etc. A Multi-Memory push button
is required to take advantage of more than
one environmental listening memory. See
the back of this booklet for exact setup of
memory settings programmed by your
hearing healthcare professional.
Adaptive Directionality®
If your hearing aid is equipped with
Adaptive Directionality, it automatically
switches between omni and directional
microphones depending on the environ-
ment. When activated, this system uses
both microphones to reduce distracting
noise arriving from behind the hearing aid
user. No need to push a button when in
different listening situations, allowing
hands-free operation of your hearing
instrument. Ask your hearing healthcare
provider if Adaptive Directionality is a
featured option on your hearing instrument.
(Available on the Fino RIC 4 and Fino RIC
12.)
112 Fino Instruc Manual_ENGLISH:Layout 1 8/20/12 5:28 PM Page 17

11 12
Cleaning Your Hearing Instrument
If the hearing instrument is weak or not
working, you may need to replace the wax
guard as outlined in this manual. Inspect
the RU and wax guard daily for any visible
damage. If any damage has occurred, or the
wax guard comes off inside the ear, contact
your hearing care professional for immediate
help.
The materials used in your hearing
instruments are of the highest quality
available, and the likelihood of an allergic
reaction is slight. If a skin irritation occurs,
including redness, swelling or itching where
the hearing aid makes contact with your ear,
contact your hearing healthcare provider or
physician.
The wearing of a hearing instrument may
accelerate the accumulation of ear wax. This
can easily be removed by your physician or in
some cases your hearing healthcare provider.
You should not use cotton swabs to clean
your ears, due to the risk of pushing the wax
deeper into the ear canal.
Caution: Your hearing instruments are NOT
water resistant. NEVER swim, bathe, or
shower while wearing them or otherwise
immerse in water.
The following instructions will assist in
extending the life of your hearing
instruments.
You should inspect your hearing instruments
daily and clean them periodically to control
wax buildup. To clean, very gently wipe
the surface with a soft, dry cloth or moist
cleaning wipes made especially for hearing
instruments. Do not allow water or liquid to
enter any openings on the instruments.
To remove any wax accumulated on the
receiver module or wax guard, use the
brush supplied with
your hearing
instrument. Brush
the wax guard while
holding the instrument
upside down so the
debris will fall toward
the floor rather than
into the receiver unit.
See illustration 1,
showing proper
method. Also brush
the microphone
port as shown in
illustration 2.
1
2
112 Fino Instruc Manual_ENGLISH:Layout 1 8/20/12 5:28 PM Page 19
13 14
Caring For Your Instrument
Hearing instruments are exposed to moisture
in the form of humidity and perspiration while
being worn. The daily use of a dehumidifying
system or drying kit approved by your hearing
healthcare provider is recommended. These
accessories may be purchased from your
hearing healthcare provider.
The most common causes of hearing
instrument repair are wax and moisture. If
you are encountering recurrent repairs, please
discuss the various wax/moisture prevention
systems and accessories with your hearing
healthcare provider.
Extended Storage
If it is necessary to store your hearing
instruments for an extended amount of time,
follow the steps below for proper storage.
Remove the batteries. Clean the instrument
according to instructions in this manual. Place
the instruments in a cool, dry place. The
original container or a hearing instrument
dehumidifier is recommended.
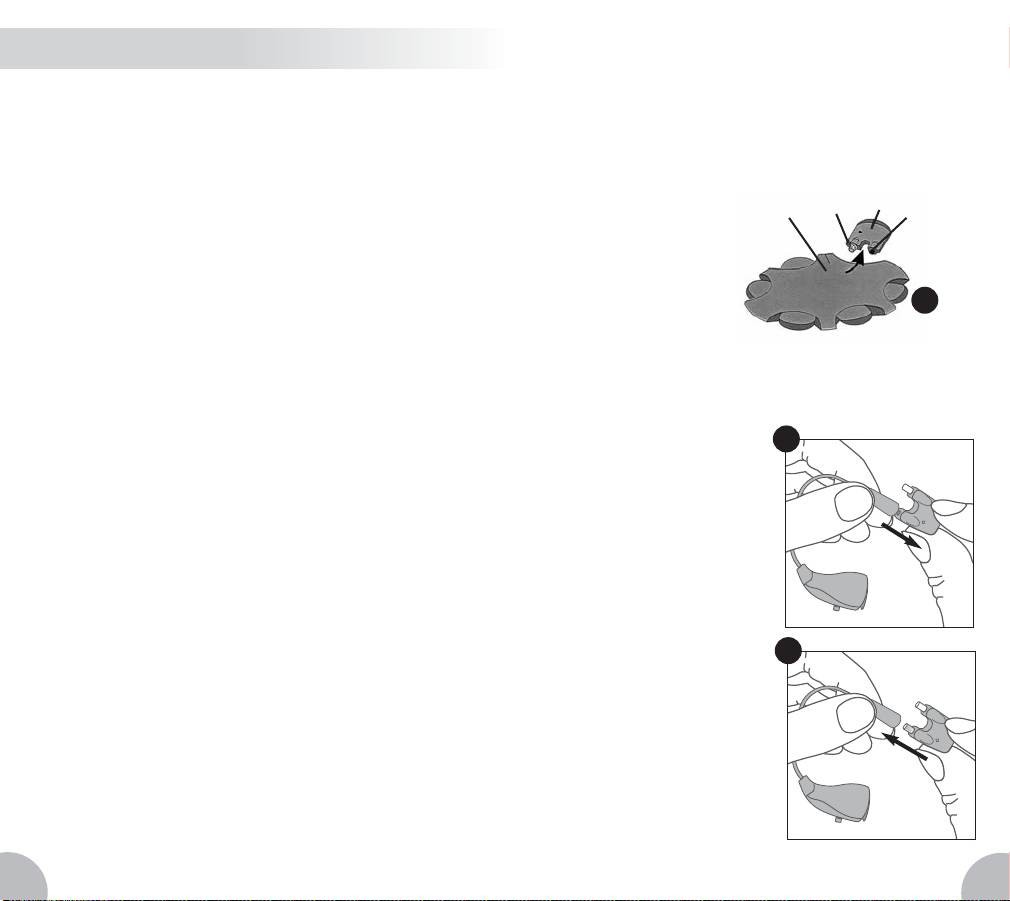
Removing and Inserting a Wax Filter
Your RU is protected from debris and
earwax by a replaceable wax filter. Daily,
the receiver unit tip should be gently brushed
to remove debris that may have lodged in the
wax filter as outlined in the Cleaning Your
Hearing Instrument section in this manual.
Over time, the wax filter can get clogged
with debris. Periodically this wax filter should
be replaced to ensure there is no blockage
of sound.
Step 1: Remove the
NoWax tool from
the storage shell.
The tool has two
arms, one with the
new filter and the
other is to remove the wax filter that
is presently in the receiver unit.
Step 2: Push the
removal tool into the
existing wax filter
in the RU as shown
in illustration 2.
Step 3: Remove
the used filter from the
hearing aid as displayed
in illustration 3.
1
2
3
Shell Filter Tool Removal
Tool
112 Fino Instruc Manual_ENGLISH:Layout 1 8/20/12 5:28 PM Page 21
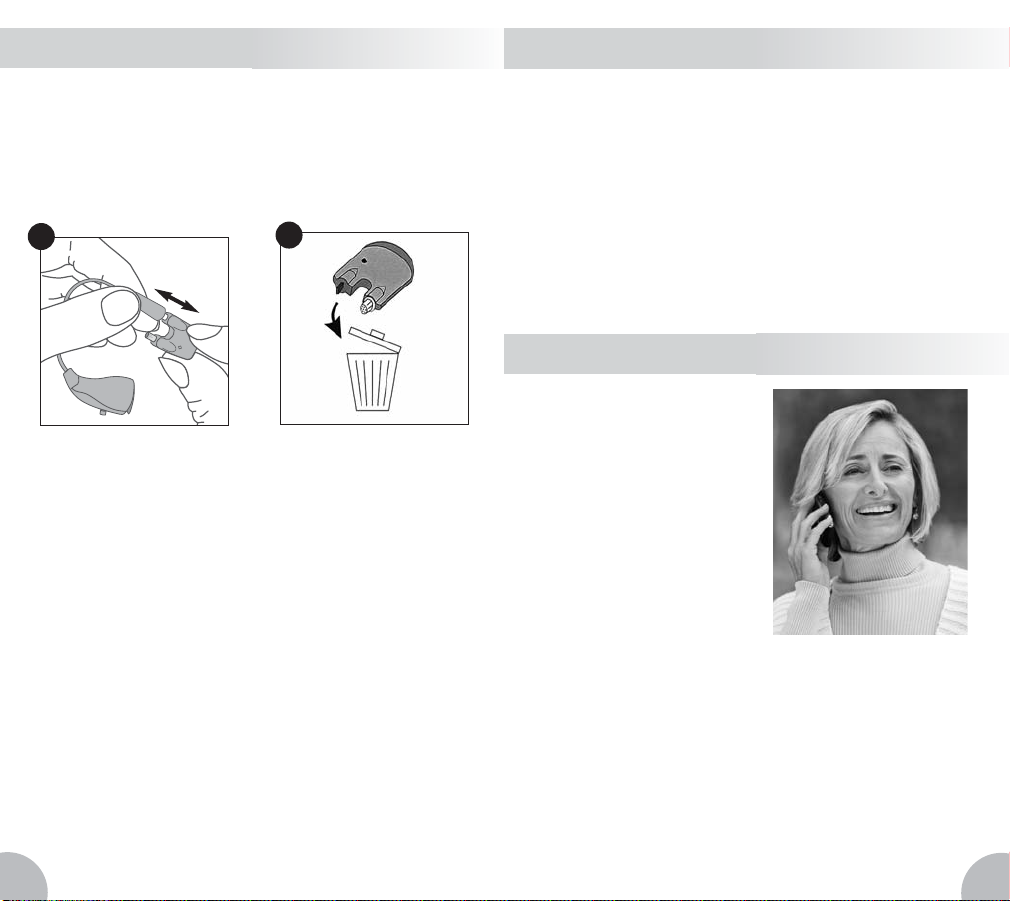
Step 4: Using the tool, push the new filter arm
onto the receiver unit to install the new filter
as shown in illustration 4. Pull the tool away
from the receiver unit once the new filter is
in place.
Step 5: Be sure to properly discard the used
wax filter and tool as it may be harmful if
swallowed by a child or pet. The wax filter
should be replaced once a month or as
needed.
Caution: Make sure that the new wax filter
is firmly in place in the RU. Improper insertion
can result in the wax guard falling off and
becoming lodged in the ear canal. If this
happens, contact your hearing healthcare
provider immediately to have it removed.
Do not attempt to remove it by yourself.
15 16
Caring For Your Instrument
continued
45
Your hearing instrument allows you to use
the phone as you normally do – holding
the phone up to your ear. In some cases,
you may need your hearing instrument
programmed with a specific telephone
setting. If this feature is important to you,
ask your hearing healthcare professional to
adjust one of the available memory programs
to assist your telephone requirements.
Telephone Use
Some hearing aid
users have reported a
buzzing sound in their
hearing aids when
they are using cell
phones, indicating
that the cell phone
and hearing aid may
not be compatible.
According to the
ANSI C63.19 standard
(ANSI C63.19- 2006
American National Standard Methods of
Measurement of Compatibility Between
Wireless Communications Devices and
Hearing Aids), the compatibility of a
particular hearing aid and cell phone can
be predicted by adding the rating for the
hearing aid immunity to the rating for the
cell phone emissions. For example, the
Cell Phone Compatibility
112 Fino Instruc Manual_ENGLISH:Layout 1 8/20/12 5:28 PM Page 23

1817
Cell Phone Compatibility
continued
The Do’s and Don’ts of Hearing Instruments
sum of a hearing aid rating of 2 (M2/T2)
and a telephone rating of 3 (M3/T3) would
result in a combined rating of 5. Any
combined rating that equals at least 5
would provide “normal use;” a combined
rating of 6 or greater would indicate
“excellent performance.”
The immunity of this hearing aid is at
least M2/T2. The equipment performance
measurements, categories and system
classifications are based upon the best
information available but cannot guarantee
that all users will be satisfied.
Note: The performance of individual hearing
aids may vary with individual cell phones.
Therefore, please try this hearing aid with
your cell phone or, if you are purchasing
a new phone, be sure to try it with your
hearing aid prior to purchase. For additional
guidance, please ask your cell phone
provider for the booklet entitled “Hearing
Aid Compatibility with Digital Wireless
Cell Phones.”
Do store the instruments overnight in a
hearing aid dehumidifier to absorb
moisture (Be sure and remove
batteries first).
Do always carry spare batteries.
Do replace the battery when the
low-battery warning begins.
Do always care for your instrument as
outlined in this manual.
Do dry the battery contacts with a cotton
swab in cases of humid weather or
heavy perspiration.
Do safely store hearing instruments when
not in use. Keep them out of the reach
of small children and pets.
Do remove your hearing instruments if you
are going to have X-rays at your dentist
or medical facility. It is best to keep
them outside the room of the X-ray
equipment.
112 Fino Instruc Manual_ENGLISH:Layout 1 8/20/12 5:28 PM Page 25

2019
Don’t leave your hearing instruments on
the radiator, near a stove, in a sunny
window, in a car or in any other hot
place. Excessive heat and cold can
damage the instruments.
Don’t wear the hearing instruments when
using a hair dryer at home or when at
the beauty salon, spa or barber.
Don’t wear the hearing instruments when
having medical tests done such as
MRI, X-rays or CT scans; as different
types of radiation may damage the
hearing instrument.
Don’t apply hair spray when wearing
your hearing instruments. It may
damage the microphone and erode
the housing.
Don’t wear the instruments while taking a
bath, shower, spa treatment or while
swimming.
Don’t store the instruments in the
bathroom during a shower or near a
steam room as moisture created by
the steam may cause damage.
The Do’s and Don’ts of Hearing Instruments
No Sound:
■Ensure that hearing instruments are
turned on.
■Replace the battery.
■Ensure that there is no wax or debris
built up; clean or replace the wax guard
as instructed in this manual.
Not loud enough:
■Replace the battery.
■Ensure that there is no wax or debris
built up; clean or replace the wax guard
as instructed in this manual.
■Ensure the hearing instrument is placed
in the proper position and the receiver
module is placed properly into the ear
canal.
• Excessive earwax can prevent sound
from entering the ear. Contact your
physician or hearing healthcare
provider.
• Changes in your hearing loss can
affect how you hear with a hearing aid.
Contact your hearing healthcare
provider if you suspect any change in
your hearing status.
Whistling / Feedback:
■Ensure the hearing instrument is placed
in the proper position and the receiver
module is placed properly into the ear
canal.
Troubleshooting Guidelines
112 Fino Instruc Manual_ENGLISH:Layout 1 8/20/12 5:28 PM Page 27

2221
Troubleshooting Guidelines
continued
■Excessive earwax and improperly sized
tips or molds can cause whistling. Con-
tact your hearing healthcare provider.
■Move hand or other flat objects away
from the ear; adjust clothing (collar)
that may be interfering with sound
travel.
Sound is Distorted or Unclear:
■Replace the battery.
■Hearing instruments may have a
poor battery contact or may not be
programmed properly. Return to your
hearing healthcare provider.
Intermittent Sound:
■Replace the battery.
■Ensure that there is no wax or debris
built up; clean or replace the wax guard
as instructed in this manual.
■Hearing instruments may have a poor
battery contact. Return to your hearing
healthcare provider.
Turns On and Off Automatically:
■Replace the battery.
■Excessive moisture may be causing this,
let the instrument dry thoroughly.
■Contact your hearing healthcare
professional.
Discomfort:
■Check to be sure you have the
instrument inserted correctly, following
the steps outlined in this manual.
■Contact your hearing healthcare
professional to have the fit checked
for the receiver unit.
Changing Memory Program Issue:
■May be caused by a weak battery,
replace the battery.
■Contact your hearing healthcare
professional if problem continues.
Binaural Amplification
Hearing loss can be improved, in most
cases, through medicine, surgery, or with
hearing instruments. Hearing aids are the
most commonly chosen option.
Today’s hearing instruments are quite
small in size and feature sophisticated
electronics that accommodate a wide
variety of hearing losses. Nature gave
us two ears for a reason and since the
majority of people who have a hearing
loss are affected in both ears, two
(binaural) hearing instruments are typically
recommended. Two hearing instruments
should provide these benefits:
112 Fino Instruc Manual_ENGLISH:Layout 1 8/20/12 5:28 PM Page 29

2423
Binaural Amplification
continued
■Better overall sound quality when
compared to one hearing instrument
(“stereo sound”).
■The ability to locate a sound source
in noisy and normal listening conditions.
■Increased ability to understand speech
in noisy and normal listening conditions.
■A sensation of balanced hearing.
Talk with your hearing healthcare provider
about what is best for you. Even the best
technology can’t do the work of two ears!
Warranty Information
Please see your hearing healthcare provider
regarding your specific warranty information.
Our guarantee covers any defect in material
or faulty production, except cords and
batteries. We will, at our option, repair or
replace the instruments or any defective
part, at our expense, within the limits of
the warranty.
This warranty will become invalid if the
hearing instruments have been tampered
with or altered in any way, or if the serial
number has been altered, effaced, removed,
or if any repairs have been made without
authorization.
This warranty does not include a promise of
specific hearing improvement because that
depends upon your audiologic needs, proper
fitting and adjustments by your hearing
healthcare provider and proper use by
the owner.
Any implied warranty shall be limited to one
year from date of purchase. The only entity
or individual who is authorized to perform
the warranty obligations is the manufacturer.
All in-house warranty work performed by
the manufacturer will be done within a
reasonable period of time. If warranty
work is performed and there appears to
be a defect, malfunction, or failure to
In addition to seeing a
physician for a medical
evaluation, a child with
a hearing loss should
be directed to an
audiologist for
evaluation and
rehabilitation since
hearing loss may
cause problems in language development
and the education and social growth of a
child. An audiologist is qualified by training
and experience to assist in the evaluation
and rehabilitation of a child with hearing loss.
Children with Hearing Loss
112 Fino Instruc Manual_ENGLISH:Layout 1 8/20/12 5:28 PM Page 31

2625
conform to the warranty, the obligations will
be met if brought to our attention within one
month from the date of the original warranty
work.
This warranty is specifically limited to the
scope set forth herein, and may not in any
way be expanded by the other oral or
written representations.
Warranty Information
continued
Service and Repair
You should visit your hearing healthcare
provider if your hearing instruments are in
need of service. If you no longer have a
hearing healthcare provider and are in need
of one, you may contact Auditiva and we
will assist you in finding one in your area.
Notice to Prospective Users
Good health practice requires that a person
with a hearing loss have a medical exam
by a licensed physician, who specializes in
diseases of the ear, before purchasing a
hearing instrument.
Licensed physicians who specialize in the
diseases of the ear are often referred to as
Otologists, Otolaryngologists (ear, nose and
throat – ENT) or Otorhinolaryngologists.
The purpose of a medical evaluation is to
assure that all medically treatable conditions
that may affect hearing are identified and
treated before the hearing instrument is
purchased. Following the medical evaluation,
the physician will give you a written
statement that your hearing loss has been
medically evaluated and that you may be
considered a candidate for a hearing
instrument.
A hearing specialist will conduct an
evaluation to assess your ability to hear. The
hearing instrument evaluation will enable the
hearing specialist to select and fit a hearing
instrument to your individual needs. Federal
law restricts the sale of hearing instruments
to those individuals who have obtained a
medical evaluation from a licensed physician.
112 Fino Instruc Manual_ENGLISH:Layout 1 8/20/12 5:28 PM Page 33

Federal law allows a fully informed adult
to sign a waiver statement declining the
medical evaluation for religious or personal
beliefs that preclude consultation with a
physician. The exercise of such a waiver is
not in your best interest, and its use is
strongly discouraged.
Hearing healthcare providers should advise
a prospective hearing instrument user to
consult promptly with a licensed physician
(preferably an ear specialist) before
dispensing a hearing instrument if the
hearing healthcare provider determines
through inquiry, actual observation, or
review of any other available information,
that the prospective user has any of the
following conditions:
■Visible congenital or traumatic deformity
of the ear.
■History of active drainage from the ear
within the previous 90 days.
2827
Notice to Prospective Users
continued
Notice For Hearing Healthcare Providers
■History of sudden or rapidly progressive
hearing loss within the previous 90 days.
■Acute or chronic dizziness.
■Unilateral hearing loss of sudden or
recent onset within the previous 90 days.
■Audiometric air-bone gap greater than or
equal to 15 decibels at 500 Hertz (Hz),
1000 Hz, and 2000 Hz.
■Visible evidence of significant cerumen
(wax) accumulation or a foreign body in
the ear canal.
■Pain or discomfort in the ear.
Special care should be exercised in selecting
and fitting a hearing instrument which has a
maximum sound pressure level in excess of
132 dB (decibels) because there may be a
risk of damaging the remaining hearing of
the hearing instrument user.
112 Fino Instruc Manual_ENGLISH:Layout 1 8/20/12 5:28 PM Page 35
Owner Information
MODEL:
SERIAL NUMBERS:
LEFT:
RIGHT:
PURCHASE DATE:
BATTERY SIZE:
MEMORY SET-UP:
MEMORY A:
MEMORY B:
MEMORY C:
MEMORY D:
RECEIVER UNIT TYPE:
RECEIVER UNIT SIZE:
ORIGINAL WARRANTY EXPIRES:
HEARING HEALTH CARE PROVIDER:
Serial Number
Each hearing instrument has its own
unique number located on the exterior of
the hearing aid. The first two digits of the
serial number represent the year in which
the instrument was manufactured.
3029
112 Fino Instruc Manual_ENGLISH:Layout 1 8/20/12 5:28 PM Page 37

Notes
112 Fino Instruc Manual_ENGLISH:Layout 1 8/20/12 5:28 PM Page 39
This manual suits for next models
2
Table of contents


