manuals.online logo
Brands
  1. Home
  2. •
  3. Brands
  4. •
  5. Aura
  6. •
  7. Subwoofer
  8. •
  9. Aura SW-T20A User manual

Aura SW-T20A User manual

OWNER’S MANUAL
CAR ACTIVE SUBWOOFER
Installation recommendations
Setup recommendation
* Note: It is difficult to avoid shaking or bumping while driving, so the subwoofer should be securely
fixed. It is recommended to use the straps (supplied with the subwoofer) to secure the subwoofer to
the tube-type enclosure.
To prevent the subwoofer from overheating, there should be nothing around it. For effective cooling,
air must circulate freely around the subwoofer.
Select the most suitable location for installing the subwoofer depending on the brand of car and the
space available in the trunk. The best in terms of sound quality and the safest place to install a
subwoofer is the space behind the rear row of seats on the boot floor.
Do not listen to music at high volume levels for long periods of time, and while doing so, make sure
that the subwoofer does not overheat.
3. Set the volume on the radio tape recorder to the maximum level at which sound distortion will not
occur. If you hear distortion, reduce the volume on the radio tape recorder until the distortion
disappears. Leave the volume control of the radio at this level while tuning the system.
5. Adjust the cutoff frequency with the “FILTER” knob. When listening, make sure that there is no
audible distortion.
4. Gradually increase the subwoofer level with the “LEVEL” control until you hear distortion in the
sound. If distortion occurs, turn the “LEVEL” control back slightly.
High power car sound systems are capable of delivering sound pressure levels exceeding 130 dB.
1. Set the level control on the subwoofer “LEVEL” to the minimum value (far left, 2V).
2. Set the crossover switch to “L.P.F.”. The “FILTER” control is in the middle position.
Model
Nominal diameter
Rated power
Maximum power
Resistance
Frequency Response Range
Sensitivity (SPL / 1W / 1m)
Working voltage
Power supply voltage
Subwoofer cabinet dimensions
Box size
SW-T20A
8“ (20 cm)
81 W
801 W
4 Ohm
40 – 1200 Hz
87 dB
12 V
14,4 V (10,5 V – 16 V)
360 x 250 х 260 mm
375 х 265 х 280 mm
Technical features
SW-T25A
10“ (25.4 cm)
101 W
1001 W
4 Ohm
30 – 1000 Hz
88 dB
12 V
14,4 V (10,5 V – 16 V)
430 х 287 x 303 mm
450 х 305 х 320 mm
SW-T30A
12“ (30.5 cm)
121 W
1201 W
4 Ohm
20 – 800 Hz
90 dB
12 V
14,4 V (10,5 V – 16 V)
450 х 350 x 360 mm
470 х 370 х 380 mm
WARNING!
PLEASE READ CAREFULLY BEFORE USING
www.aurael.ru
©2020 AURA Electronics Inc. All rights reserved.
SW-T20A
SW-T25A
SW-T30A
Due to continuous product development and improvement, all specifications are subject to change without notice.
Connection
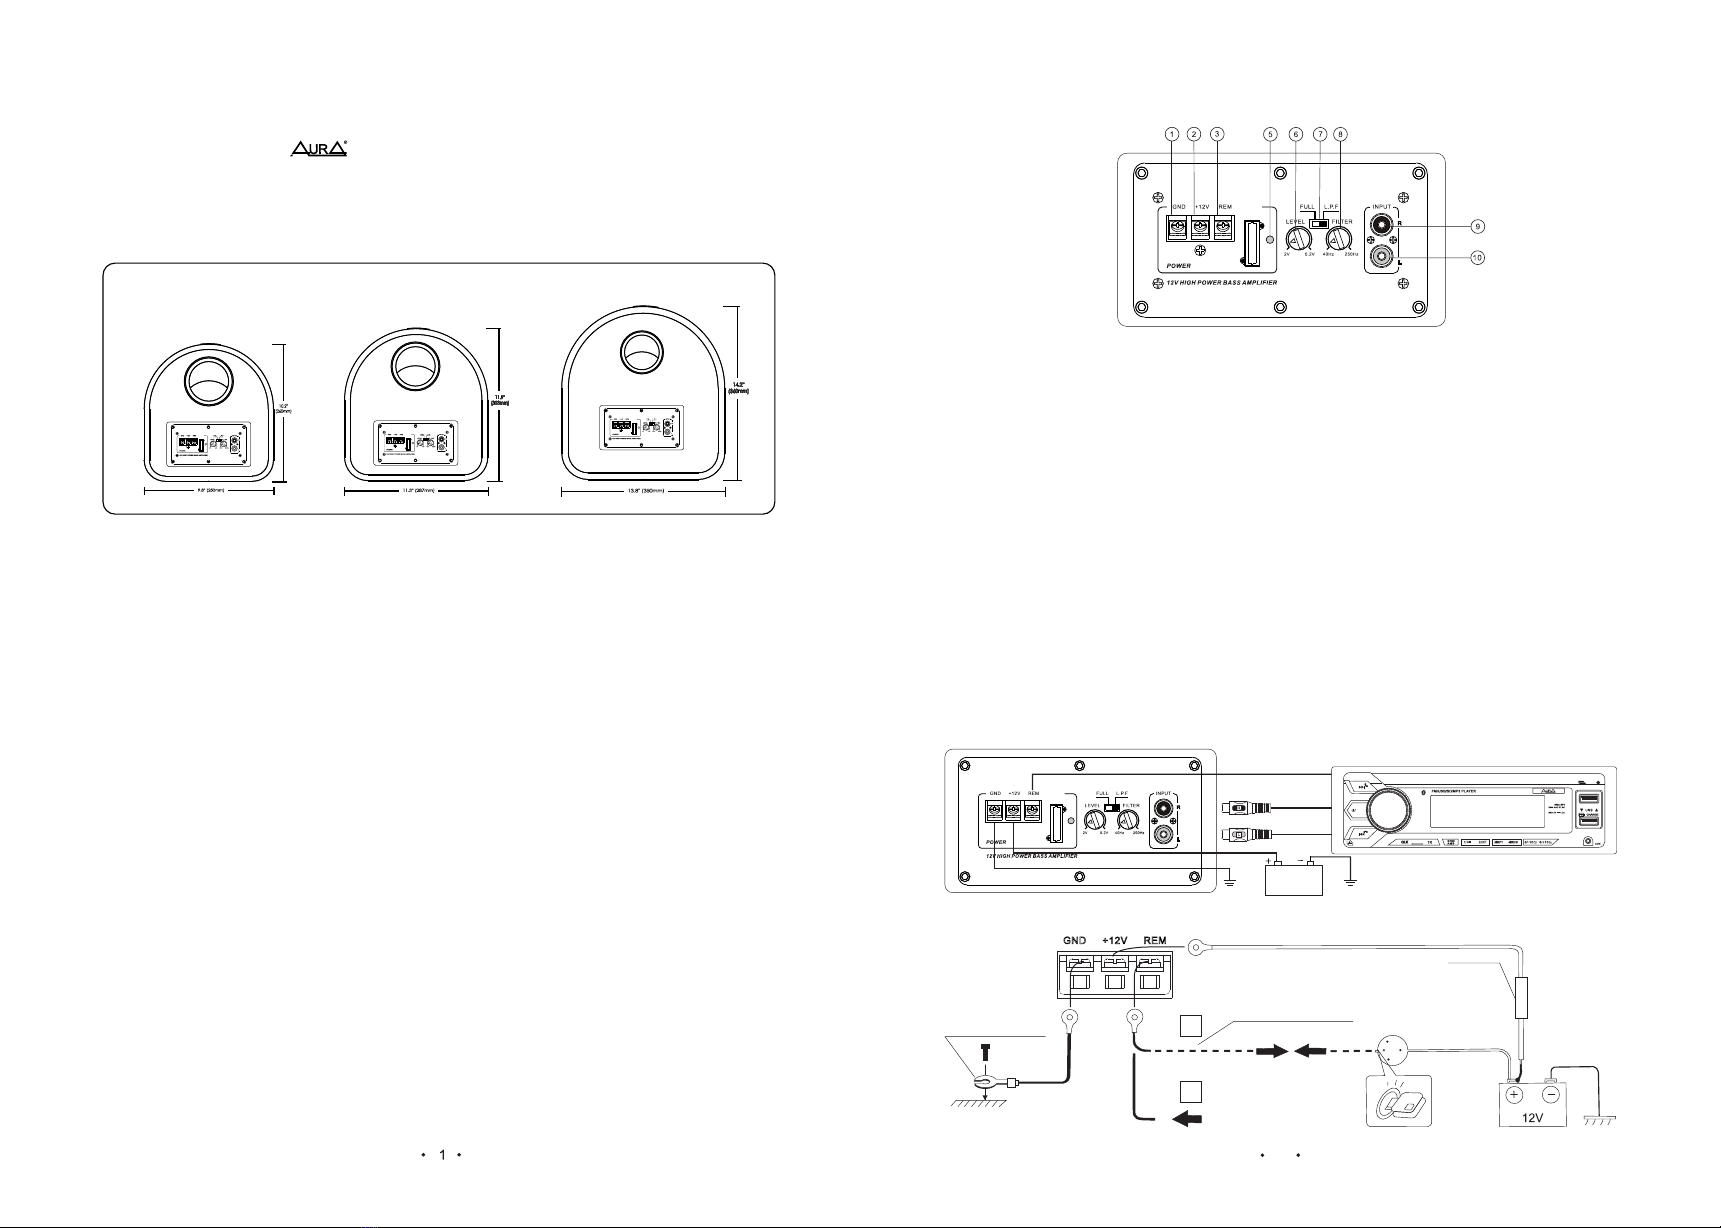
Introduction Connection and settings panel
Precautions
Use the subwoofer only in a dry and well-ventilated area.
To ensure effective performance, this subwoofer is recommended to be used in an ambient temperature
of at least 5 ° C.
To supply power to the subwoofer, use a 12 VDC power supply, the negative terminal of which is
connected to ground. Before connecting the subwoofer, make sure its power requirements match the
vehicle specifications.
To ensure safe movement, it is recommended to set the volume on the sound reproducing system so
that it does not interfere with all the noise of the surrounding traffic.
Warning
The technical capabilities allow the SW-T20A / T25A / T30A subwoofers to create high sound pressure
levels. It is recommended that you select an appropriate volume level for your audio system.
To ensure safety, it is extremely important to securely fasten the subwoofer enclosure in the trunk of the
car (when securing the subwoofer with screws, you will have to drill holes in the metal parts of the car;
make sure that this will not damage the fuel tank or other structures).
Thank you for purchasing an active subwoofer
We strongly recommend using the services of a professional installation studio to install the device. The
correct configuration of the system and the qualifications of specialists will allow you to maximize the
potential of your device, avoid unpleasant situations, as well as exclude connection errors and possible
malfunctions.
Package bundle
2. Installation and connection manual (x1).
6. Car sticker (x1).
3. Mounting screws (x8).
4. Mounting clip (x4).
1. Subwoofer in a tube-type housing (x1).
5. Lashing strap (x1).
9. INPUT (R) and (L) jacks are for connection to RCA left and right channel outputs on the signal source.
Use an RCA cable (sold separately).
3. The REM terminal is for remote switching on of the subwoofer. Connect this terminal to the antenna
motor connection output or remote turn-on output on the head unit.
1. The power terminal (GND) is intended for connection with the "mass" (metal part of the car body). To
ensure a good connection, clean the joint on the body from dirt, grease and paint to bare metal.
4. The fuse protects the product from damage due to dangerous current surges.
6. The LEVEL control is designed to adjust the sensitivity of the subwoofer in accordance with the input
signal of different levels.
7. This switch selects the crossover setting: FULL (wideband signal) or L.P.F. (LPF).
5. Power indicator.
2. The + 12V terminal is for connecting to a 12V DC power supply (vehicle battery). This connection is
required to supply power to the built-in amplifier of the subwoofer.
8. The FILTER control adjusts the cutoff frequency of the low pass filter. The adjustment range is from 40
Hz to 250 Hz.
AMH-510BT
MIC
MODE
LEFT
RIGHT
CONTROL WIRE
BATTERY
METAL PART OF
CAR BODY A
B
CONTROL WIRE
IGNITION
FUSE
BATTERY
CAR ACC WIRE
2
SW-T20A SW-T25A SW-T30A

This manual suits for next models

2

Other Aura Subwoofer manuals

Aura MONSTRO-12 User manual

Aura

Aura MONSTRO-12 User manual

Aura STORM-10 User manual

Aura

Aura STORM-10 User manual

Aura FIREBALL-10 User manual

Aura

Aura FIREBALL-10 User manual

Aura VENOM-12 User manual

Aura

Aura VENOM-12 User manual

Aura Polo-s Subwoofer User manual

Aura

Aura Polo-s Subwoofer User manual

Popular Subwoofer manuals by other brands

Orion C2 122 owner's manual

Orion

Orion C2 122 owner's manual

Pioneer Champion Series TS-W1008D4 user guide

Pioneer

Pioneer Champion Series TS-W1008D4 user guide

Bowers & Wilkins Subwoofer ASWCM owner's manual

Bowers & Wilkins

Bowers & Wilkins Subwoofer ASWCM owner's manual

Cerwin-Vega VEGA 102 owner's manual

Cerwin-Vega

Cerwin-Vega VEGA 102 owner's manual

Proficient Audio Systems S88 owner's manual

Proficient Audio Systems

Proficient Audio Systems S88 owner's manual

Soundstream SPLX-12 owner's manual

Soundstream

Soundstream SPLX-12 owner's manual

Destination Audio SF10 Installation and operation manual

Destination Audio

Destination Audio SF10 Installation and operation manual

Hifionics HFI 250 A user manual

Hifionics

Hifionics HFI 250 A user manual

Kenwood KSC-WA801 instruction manual

Kenwood

Kenwood KSC-WA801 instruction manual

EarthQuake SWS 10 Installation reference guide

EarthQuake

EarthQuake SWS 10 Installation reference guide

Sony XS-L1037 Operating Instructions / Manual de instrucciones / Mode... instructions

Sony

Sony XS-L1037 Operating Instructions / Manual de instrucciones / Mode... instructions

Amphion Impact 400 owner's manual

Amphion

Amphion Impact 400 owner's manual

DaytonAudio SUB-1000L user manual

DaytonAudio

DaytonAudio SUB-1000L user manual

RE Audio SE Pro10 owner's manual

RE Audio

RE Audio SE Pro10 owner's manual

Kicker PSIEXT07 manual

Kicker

Kicker PSIEXT07 manual

Elura SUBR10IC instructions

Elura

Elura SUBR10IC instructions

TriangleTube THETIS 340 Owner's manual & warranty

TriangleTube

TriangleTube THETIS 340 Owner's manual & warranty

Meyer Sound 600-HP datasheet

Meyer Sound

Meyer Sound 600-HP datasheet

manuals.online logo
manuals.online logoBrands
  • About & Mission
  • Contact us
  • Privacy Policy
  • Terms and Conditions

Copyright 2025 Manuals.Online. All Rights Reserved.