Auto-Trail 13ELE2000 User manual

Rev. 4.0 13ELE2000 Page 1 /14
13ELE2000
Multimedia player . FM/MW radio receiver
Bluetooth connectivity. DVB-T television
GPS navigation . Touch screen . IR remote control
Rev. 4.0 13ELE2000 Page 2 /14
Operation
Multiple control
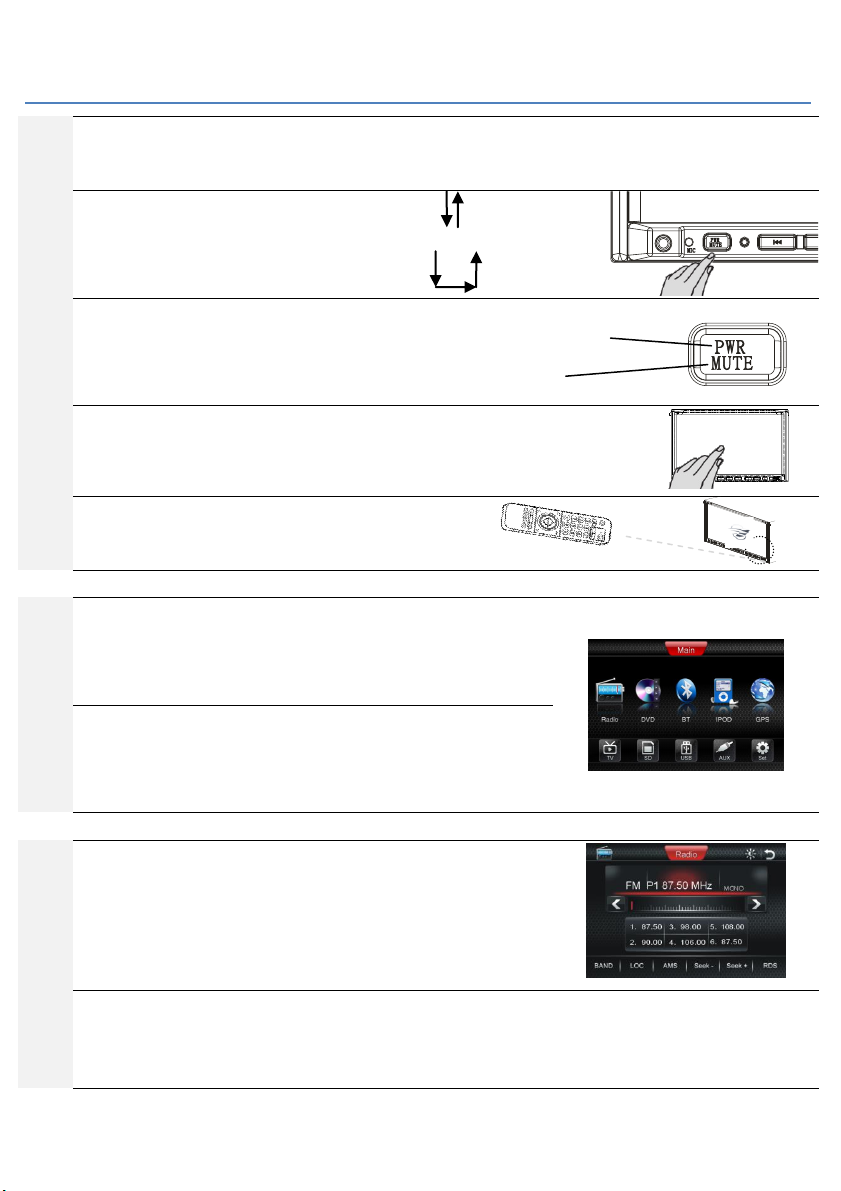
General
Functions on the 13ELE2000 can be accessed by many means. To do an operation such as selecting AV source or changing
channel, the buttons on the lower edge of the front panel, the touch screen or the IR remote control unit can be used.
Powering on
To power on the unit, depress power button briefly and
let go. To power off the unit, depress and keep holding it
down. Many buttons on the front panel have two modes
of activation: “Short press” and “Press and hold”.
Dual mode buttons
When the unit is powered on, the ‘PWR MUTE’ button has
dual functions: Short press toggles between mute and
normal listening. Pressing and holding the same button
will power off the unit.
Touch screen
The screen of the unit presents a graphical user interface
(GUI). Many functions can be called by gently tapping the
corresponding display feature on the screen e.g. an icon.
IR remote control
In addition, a separate IR remote control transmitter is
provided. This needs two AAA batteries to operate.
Root
Source selection screen
The source selection screen is shown to the right. One way to call up this GUI
menu is to tap the arrow icon on the top-right corner of the display. On screens
that this arrow icon is not available, the user may use “SRC/NAV”button to
cycle through the sources.
Screen (GUI)
To pick the desired function, tap the icon on the GUI. Function such as “Radio”
or “GPS”navigation can be selected from the screen shown here. It is
noteworthy that to make such selection, we can also use the SRC button on the
bottom of the facia and on the IR remote control.
Radio
General
In the GUI icons are labelled. Find the ‘>’ on the top pane of the screen. Tap this
to auto-seek the next higher frequency. The middle pane presented 6 presets.
Tap and hold one of these to store a radio channel, single tap to listen to the
preset channel. RDS symbols such as “AF”and “TA”the reader may consult page
9 of this manual.
FM radio- RDS
Radio Data System RDS is available in many countries. RDS functions such as AF and TA if enabled by the user the status will be
shown on the top bar (next to “MONO” in the photo above). RDS is only available in FM bands. The abbreviations for these RDS
functions are listed in a dedicated section within this booklet.
ON
OFF
Power off: Press and hold
Mute: Short press
Directly tapping items
presented on the GUI

Rev. 4.0 13ELE2000 Page 3 /14
TV
DVB-T
This unit receives and decode DVB-T digital TV
transmission. Before you are able to watch TV, the TV
antenna must be prepared: for example, pointing the
antenna to face the direction of the nearby transmission
tower. If using active antenna (antenna amplifier), the
power to this antenna must be switched on.
Setting up
DVB-T system varies from one country to another. Check
and ensure that ‘Country’ is set corresponding to the
location of reception. Memorised TV station list will be
cleared when this setting is changed. To enter DVB-T
mode, tap upper left corner. Tap up, down and left right
arrows to navigate the menu, OK icon is on upper left
corner.
Automatic search
DVB-T broadcast usually provides more
stations than conventional analogue TV.
The Automatic Search function aids
finding all available stations: menu ->
Installation -> Automatic Search.
Front panel
Display Off –special feature
The display can be turned off by pressing and holding the
SEL button. In this mode, all other operations such as audio
and video output remain normal and active. To bring back
the display, tap the screen or depress any button. The GUI
page has a brightness icon on the upper right corner. This
can also be used to turn off the display. The feature is
useful when driving at night.
Angle
Use the SEL button to cycle through the selections. When
“Tilt” is displayed, use + and – to adjust the angle of the
display. When the desired angle is set, leave the control a
few seconds. The word “Tilt” is cleared from the display,
and the display angle is memorised. Be sure there is nothing
in the way of the movement of the display.
Release button
The motorized front panel control button is shown in the
right. Short press to fully extend it. Pressing during motion
will stop the movement. Please ensure SD card or disc is
fully inserted before closing up the front panel.
Special
Automatic power on upon reverse gear engagement –special feature
Where configured, the unit can power on automatically when the reverse gear on your vehicle is engaged. The reverse camera
video will be displayed automatically to aid reversing your vehicle safely. The process of powering on and showing the live
reverse camera video image will take a few seconds. The driver may wish to wait for this screen being displayed before
commencing reversing. When the reverse gear is disengaged, the unit will revert to the original operating status. If the unit had
been operating, the reverse camera takes priority over all AV entertainment until the reversing trigger is cleared.
Wait for next screen
Initiate channel search
TV -> menu -> System -> Country
Refer to status manual
Scanning channels
+ -

Rev. 4.0 13ELE2000 Page 4 /14
Front panel
AUX-1 AV input
An AUX AV input port is available on the front panel. This
accepts 4-pole 2.5mm plugs. External analogue signal can
be played through this connection. A suitable cable is
needed for connecting to this port.
Reset
RESET: Reset button is recessed to avoid accidental
activation. For example, the end of a paper clip can be used
to reset the unit.
After reset, parameters such as radio station presets will be
lost. The reset function is useful when the user desires to
restore all settings to factory default.
Media playback
Audio disc: CD &MP3
Using the “release button” the motorised LCD display
panel can slide into a horizontal resting position (as
illustrated in the previous section). This will give access to
the concealed disc slots. Use the eject button to retrieve
disc from inside the unit. The internal disc bay of this unit
can only hold one disc at a time. After depressing the
eject button, do not expect your disc to emerge instantly
from the slot, allow 10 seconds.
SD card & USB device
In the fully extended position, the LCD display is also
giving access to the SD card slot. SD card is inserted and
retrieved the same way as in other places, for example,
digital cameras. Take extra care that space near the SD
card slot is small. USB devices carrying playable song files
can be connected to the LCD front panel without having
to extend it. A USB cable is provided for this purpose.
Video disc: VCD & DVD
Many options such as sub-title selection will be accessible
if the DVD contains them. To access options, use SETUP
when the unit is in DVD mode. Allow 30 seconds for the
unit to process the leading part of the disc. Users may find
it more satisfactory to use the IR remote control unit to
operate DVD functions. DVD disc having an incompatible
code will not play.
Bluetooth
Pairing
To use Bluetooth handsfree function, a mobile phone would need to be wirelessly connected by “pairing”. The mobile phone
must also have Bluetooth capability. To “pair” the mobile phone with the radio, ensure that the radio is turned on. On the
mobile phone, search for available Bluetooth device. Pair to “13ELE2000” using passcode “1234”. The phone should notify to
the user pairing has been successful. Once paired, many mobile phones are capable of automatically reconnecting the
Bluetooth link so subsequent pairing is not necessary on these phones.
A2DP and AVRCP
Bluetooth devices that have A2DP functionality can stream music into the radio. In addition, if the device has AVRCP, functions
like ‘Play’, ‘Pause’, ‘next track’ and ‘previous track’ can be controlled from the radio wirelessly via the Bluetooth link.
Motorized mechanism:
Keep clear before and when it is in motion.
Beware of object catching in gaps.
Without engaging the internal motor, large
external force will be required to move the
mechanism.
USB port can play songs stored in ‘USB-sticks’
SD card slot, insert label side facing up
Disc slot, insert label side facing up
AUX
RESET
Built-in microphone for Bluetooth
handsfree. When using this
function, the user need not
approach the mic when speaking.

Rev. 4.0 13ELE2000 Page 5 /14
Satellite Navigation
SD card
A dedicated slot houses the SD card containing navigation
(map) software. The slot is located at the bottom of the
motorised front panel. The slot can be accessed by
putting the front panel on a horizontal position. SD card is
inserted “gold contacts” side facing up. Ensure the card is
fully inserted.
Setting up
To start the navigation software the user would call up
the “root” selection manual (see previous “root” section),
then tap the “Navigation” icon. In the case the software is
changed or that the software is run on the headunit the
first time, the user will need to perform an initial setup –
specify the “path” on the SD card where the map
software file is located –select voice language –select
display language –read and accept user agreement. To do
this, follow the steps on-screen.
GPS antenna
Users are supplied with latest map software, this is pre-
loaded on. The GPS antenna is usually installed in a
concealed (not visible) location on the vehicle. To ensure
best reception, the antenna must not be shielded by
metal, and it must also face correctly –facing up to
receive satellite signal over-head. If used for the first time,
the user may wish to use the auto identification feature
for the navigation system to register this GPS antenna
onto the system. This would need to be done only once
and is not needed during subsequent use.
Selecting destination
The unit is pre-loaded with Western European navigation
mapping. To specify destination, select destinate country,
then city, street and house number. Certain countries, for
example UK, postcode can be entered directly into the
“city” field. When using UK postcode, do not forget to
insert a space to separate the two groups of digits.
When an exact address is found, the surrounding map will
be displayed. Tap the chequer flag icon near the top-right
of the screen to start navigating to this address.
An example navigation screen is shown at the bottom of
the picture sequence. Various screen areas can be tapped
to access different functions that are related to that pane.
The user may also “drag” the map to see more. Zoom and
pan functions are also available on screen.
Audio while navigating
When in navigation, the user can select an audio source
by short pressing the “SRC/NAV” button on the front
panel. This will cycle through the available sources. When
the desirable source is being played through the
loudspeakers, press and hold down this same button and
notice that the map is displayed. Now we are listening to
our preferred source whilst navigating.
SD card slot for navigation
map software
scroll
down to
see the
icons
Finish reading the EULA and tap
“Accept” to start the map.
(1)
Clear this
checkbox
(2) Tap “Autodetect” to register GPS
antenna automatically.

Rev. 4.0 13ELE2000 Page 6 /14
IR remote control unit
1. PWR(red): This button is used to turn on/off the unit. The
graphic display on screen requires approximately five
seconds to be composed when the unit is powered up.
Powering down (turning off) the 13ELE2000 takes the same
amount of time to complete; counting from the moment
that the screen is blanked.
2. : When the unit is powered on, this button will toggle
audio mute.
3. 0 - 9 : numeric keys.
a. Radio mode –keys 1 –6 are used to select preset
station. Press and hold the Keys 7(TA), 8(AF) and 9(PTY)
also operate the corresponding named function when
in FM radio mode.
b. DVD/VCD/CD mode –shortly press to directly access
chapter or track by their numeric index. Press and hold
to operate the correspondingly named function.
c. Bluetooth mode: telephone dial pad keys
4. GOTO/*:
a. In DVD and VCD mode, use this button and then the
cursor buttons to select TITLE, CHAPTER, AUDIO,
SUBTITLE, ANGLE, TT TIME, CH TIME, REPEAT, TIME
DISP. After the selection, press ENTER button to
confirm the new settings. When this display is shown,
use number buttons 0-9 select the desirable track.
b. In radio mode, press this button then use the number
button to manually specify frequency. In FM radio,
frequency is specified to the radio using 5 digits without
the decimal. E.g. 123.4MHz is entered by “GOTO” “1”
“2” “3” “4” “0”.
c. When dialling a telephone number using Bluetooth,
this is the “*” key on the telephone key pad.
5. CLR/#: Where applicable, undo numeric key typing shown
on screen, for example, correction of telephone number
when using the Bluetooth dialler. When dialling a
telephone number using Bluetooth, this is the “#” key on
the telephone key pad.
6. :This button is used to receive an incoming Bluetooth
phone call, and to dial up a Bluetooth phone call.
7. : This button is used to reject an incoming Bluetooth
phone call, and to hang up a Bluetooth phone call that is in
progress.
8. : This button is used to switch the current interface to
the main interface.
9. : In DVD/VCD/CD mode, press the button to be back to
the previous mode. This button can be used to call up the
“root”source selection screen.
10. ▲/ ▼/ / /ENTER:
a. During media playback, the user may use this group of
button to “fast reverse/fast forward, beginning chapter
or track, go to previous or next chapter or track”;
b. In radio mode, these buttons can be used to search for
a station or recall a preset station.
c. Cursor control: During operations such as DVD setup,
use the triangle buttons to navigate file lists and the
setup menus.
11. VOL- VOL+:
a. VOL-/VOL+ used on their own: adjust volume.
b. When these buttons are used in conjunction with SEL
button, the corresponding selections can be adjusted.
12. SEL/LED: Adjust audio and angle of the motorised screen.
When corresponding function near the lower left of the
graphical display,use VOL+ and VOL- button to adjust the
desire value. Press and hold the button to switch the colour
of the button backlights –orange or blue.
13. MODE: AV source selection.
14. BAND: Radio mode - select AM FM bands.
15. EQ: Use this button to access sound equaliser settings.
16. DISP: This button is used to turn on or off clock display (on
the upper right corner of the screen).
Learning function
On the upper right of this IR remote unit, a cluster of three
buttons are configurable by user –they have “learning”
functions. For example, frequently accessed functions on an
external monitor or the satellite TV receiver can be programmed
onto these buttons at will. Programming or “learning”
procedures are simple. The user may follow these steps.
1. Prepare the IR remote control unit to be “learnt”, the
“source device”.
2. On our IR remote control(target device), press and hold the
red power button (top right) until the LED is lit. This takes 5
seconds. When the LED is lit, our IR remote control unit is
in “learning”mode.

Rev. 4.0 13ELE2000 Page 7 /14
3. On our IR remote control unit, select the target button and
press it once. Observe that the LED was lit continuously
now blinks. When this happens we have nominated the
button to store our new code.
4. Point the “source device”towards our IR remote control
unit head-to-head leaving a gap as small as 5mm between
them. On the source device, depress the button that you
wish our IR remote control to learn. While doing this,
observe that the LED blinks three times. This indicates
learning has been successful.
5. If instead of blinking 3 times, the LED blinked 5 times, this
means learning has not been successful. The possibility of
incompatible code format needs to be checked. The LED
remains lit. The learning procedure can be repeated from
step 4 above.
6. To exit learning mode, remember that we have
“nominated”a button. Depress any button on our IR
remote control other than the nominated button will turn
off the LED (go dim) which is indicative of normal operating
mode. After the LED has gone dim, the user may try out the
new buttons on the external device to see if the desirable
control can be operated by the learning button.
The learning buttons on our IR remote control can be re-
programmed at any time and at the user’s will.
Front panel buttons (symbols)
PWR Power on/off
MUTE Audio muting
|<< Radio down seek. Previous track.
Press and hold = rewind
>>| Radio up seek. Next track.
Press and hold = fast forward
SEL Alternate the function of the adjacent “+” and
“-“ key, switching between sound volume
adjustment and tilt (screen angle) adjustment.
Press and hold switch off screen (and
backlight off).
Disc eject / Extend the monitor then eject the
disc
SRC AV source select (GPS satellite navigation
inclusive)
NAV Switch in / out GPS satellite navigation
keeping audio from AV program (radio, DVD,
CD., etc) (press and hold to access this
function)
Motorized display panel extend / retract
Root –source selection screen
On most of our GUI screens, tapping the top-right corner of the
screen calls up the root source selection screen. When this screen
is shown but there is no user operation for duration of 10 seconds,
this root source selection screen will dismiss automatically, and
the display reverts to the previous state. In DVB-T use “Exit” to
call up this root screen. In AUX mode tap the upper left “AUX”
text to calls up the root source selection screen.
Notice SET on the lower right corner of the screen. Tap this to
access system settings
Map update
Map update information can be found using the map supplier’s website https://www.naviextras.com/shop/portal/support. The map
software is supplied in the 13ELE2000 package as a third party product and as such it is to be supported by the third party. The user
needs to install a software on their computer. The user needs also to retrieve the map software SD card from the 13ELE2000 and have it
inserted into a card reader. The card reader comes in many form, the most common is a card slot on a notebook computer, or a USB
card reader device that is compatible. Detail instructions can be obtained directly from the website. This product “Autotrail 13ELE2000”
is listed on the third party’s website. The user may wish to add countries or activate additional services on his/her map. This will be a
cost option to be purchased directly from the third party using the facility provided on the webpage. The user cannot change the SD card
since each card is serialised to hold the map licence which cannot be transferred between SD cards. Having prepared the computer, the
SD card is in the card reader, the third party software run, and make sure there is an Internet connection. The user should now start a
download process so the data on the SD card can be updated. The package includes LMG (Latest Map Guarantee). This means that the
user can install the latest maps within 30 days after first obtaining GPS signal with the 13ELE2000. The user can only update the map in
this way one time. When using navigation, the 13ELE2000 not only will read from it but it will also write to it.
Rev. 4.0 13ELE2000 Page 8 /14
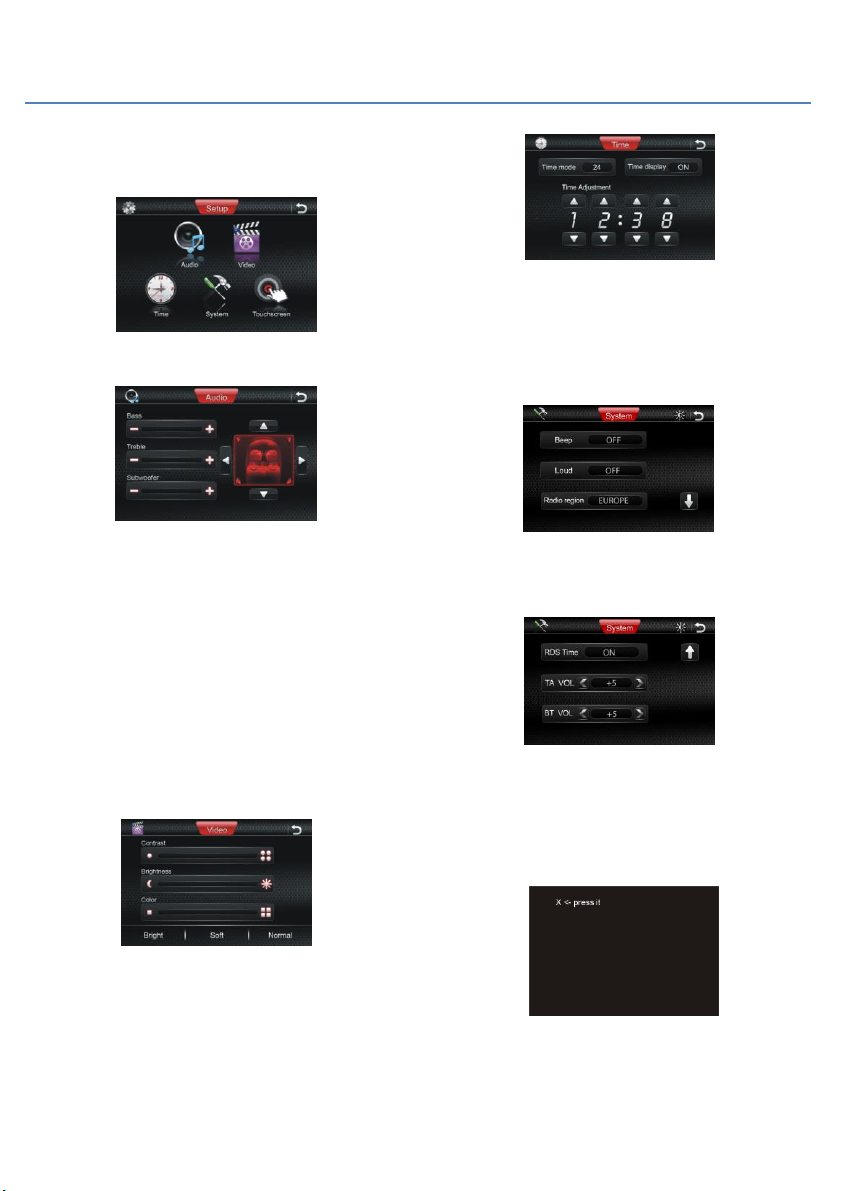
Setting up the system
On this screen the user can tap one of the icons. The picture
below shows the setup page:
In this screen if we tap “audio” the screen will be shown as in the
figure below:
In this screen there are three horizontal bars representing BASS
TREBLE and SUBWOOFER levels. The minus “-“ sign on the left
and the “+” sign on the right of each bars can be tapped to reduce
and increase each of these quantities.
On this screen the user can adjust sound distribution known as
BALANCE and FADER. For a 4 loudspeaker audio system, BALANCE
is the distribution between left and right, and FADER is the
distribution between front and rear.
Use the controls presented to control this distribution. It is best
that a sound source such as radio is being played through the
loudspeakers when making the adjustments on this screen since
the user can verify the chosen setting by listening to the effect of
the sound produced.
In this screen if we tap “video” the screen will be shown as in the
figure below:
This page allows for adjustment of basic screen properties:
CONTRAST, BRIGHTNESS, and COLOR. On the bottom of this
screen there are three preset choices BRIGHT, SOFT and
NORMAL.
Tapping “Time” brings us into the following screen:
TIME MODE Select 12H/24H clock display.
TIME DISPLAY On-screen clock display can be turned ON/OFF.
Time can be adjusted by tapping ▲▼ icons corresponding to
each of the 4 digits.
Tapping “system” brings us into the following screen:
BEEP/LOUD To turn on or off the beep/loudness.
RADIO REGION To specify to the radio the location of operation
so that the correct frequency band will be used for tunning.
The user can select to turn the RDS TIME adjust ON or OFF. When
turning ON, the system time will display the time of the received
RDS station. When turning OFF, the system will keep the local
time. With </> button on the screen tapping, when the TA or BT
alarms, the volume level is much higher than the current one.
In this screen if we tap “touchscreen” the screen will be shown as
in the figure below:
Calibrate the touch screen to align with the graphic display. To
complete the calibration, the user will be asked to press certain
points on the screen. Follow the on-screen instructions.

Rev. 4.0 13ELE2000 Page 9 /14
Playing video media discs: DVD / VCD
To insert or eject a disc, the motorised front display panel needs
to be brought to a horizontal position. Beware of objects caught
in the motorised mechanism. Upon inserting a disc, disc
playback mode will activate automatically. To eject a disc, press
the eject button and wait for the disc to be presented from
the disc slot. This button can also be used to ensure there is no
disc inside the disc loader. The disc loader can hold only one disc.
Quick track selection next / previous chapter / track can be
played using >>I and I<<. These buttons are available also on
the IR remote control.
Use the >> or << button to fast rewind and fast forward.
Pressing and holding down >>I or I<< will have the same effect.
Press ■once to stop playing. During this time, pressing ENTER
will play the current chapter / track. Press this button twice to
stop playing completely. During this time, pressing ENTER
button commence playing from the beginning of the disc.
II button toggles between pausing and normal playback.
When RDM is activated, “RANDOM” will be shown on the
display, and tracks will be played at random. In this mode, track
selection using track number will be un-available. Press RDM
again to return to normal playing.
When RPT is activated, the playback will be put into ‘repeat’
mode. During DVD playback, each RPT key press rotates
amongst these selections:
CHAPTER→TITLE→ OFF
During VCD/CD playback, RPT key press toggles between these
options:
TRACK→OFF
During DVD/VCD playback, ZOOM can be used to increase or
decrease the picture size. Each key press rotate amongst the
following options:
2X → 3X → 4X → 1/2 → 1/3 → 1/4 → OFF
The zoom function can only be operated by using the IR remote
control.
Many DVDs support multi-subtitle languages. This can be
selected by using the SUB-T button to instantly switch between
subtitle languages during playback. This function is operated by
using the remote control.
Many DVDs can provide multiple audio language tracks. This is
referred to as multi-audio recordings. When your disc supports
this the AUDIO button can be used to instantly switch audio
language (and audio systems) during playback. This function is
operated by using the remote control.
When playing DVD disc, the TITLE button on the remote control
instantly returns to the top menu of the disc. This is convenient
for the user to select a different chapter. When the top menu is
shown, use ▲and ▼to highlight the desired item, then use
ENTER to activate the selection. This function is operated by
using the remote control.
For DVD disc, the MENU key will select different root menus, use
▲▼ [ENTER] to navigate the sub-menus.
In DVD/VCD/CD mode, use SETUP to access available disc-
specific parameters.
For safety, some systems are configured in such a way that
video contents can only play when the handbrake on the car is
applied. On such system, “YOU CANNOT USE THIS FUNCTION
WHILE DRIVING” will be displayed until the car becomes
stationery and the handbrake applied.
In VCD mode, the AUDIO button on the remote control can be
used to select audio mode. Each key press rotate amongst the
following options:
MONO LEFT →MONO RIGHT→ MIX-MONO →STEREO
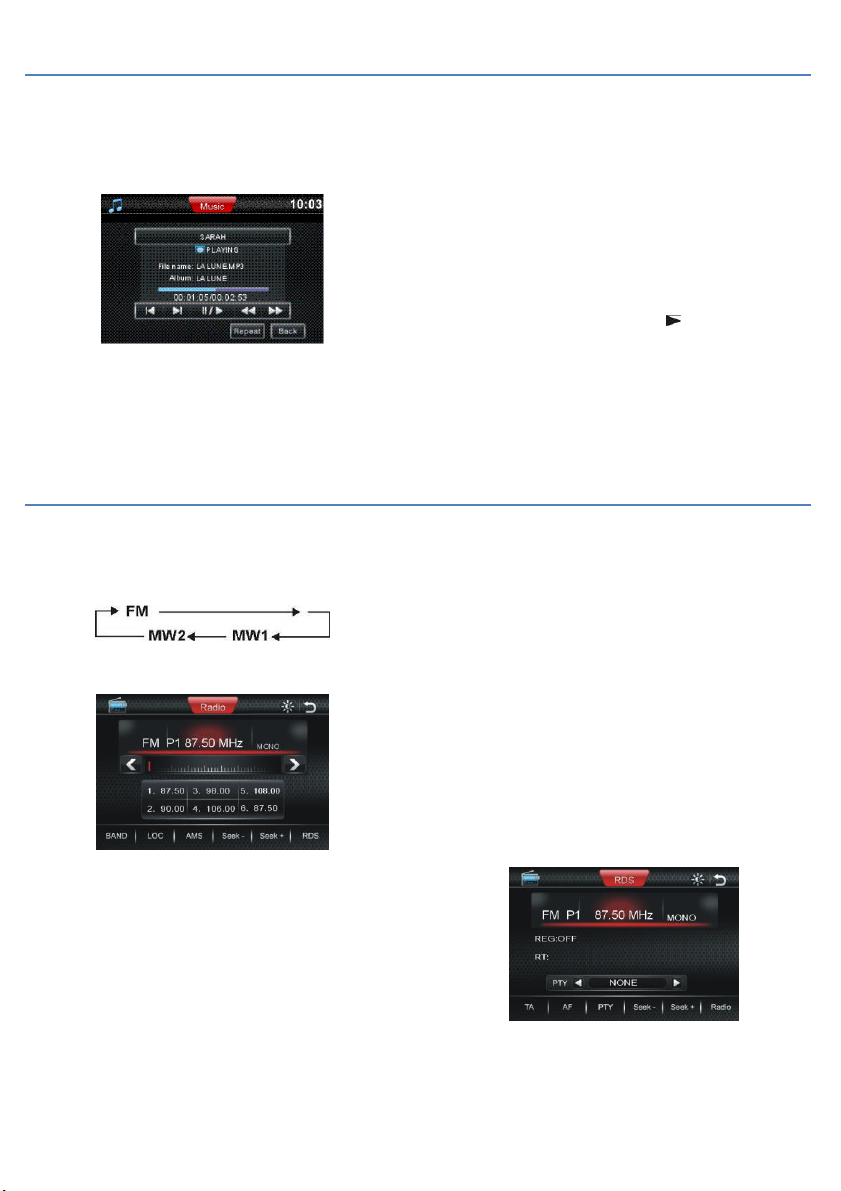
RDS symbols
RDS service provides additional information to our radio headunit. RDS is why radio station name such as “CLASSIC FM” can be displayed.
Without RDS, the station can only be known as 100.3MHz, for example. In FM bands, and when Radio Data System RDS signal is available,
additional functions can be enabled or disabled.
AF: Alternative Frequencies. This enhancement allows us to listen to BBC1 from London to Brighton without having to manually
retune the radio on our way. The radio knows what frequency to change to, and it does so in the background so we do not
notice. It appeared to be able to ‘stay at one channel’ despite transmission frequency changes. When operating in weak signal
areas, the user may wish to turn AF OFF.
TA: Traffic Announcement - Listen to traffic update when it is available on RDS. Enabling TA usually does not produce an
immediate result except the TA icon is shown on the display. Traffic announcement will override normal radio when the
service is available, say, every half-an-hour. Listening will revert to the original radio program automatically after the short
announcement.
TP: Traffic Program. An indicator is displayed when the radio receive an FM TP flag.
PI: Program Identification.
REG: Region.
PTY: Program Type. Use PTY button to scroll through the categories.
Rev. 4.0 13ELE2000 Page 10 /14
Playing audio media: CD / MP3
This section concerns playing a disc, an SD/MMC card or a USB
device containing MP3 files. The unit will power up
automatically when these media types are inserted. An example
display is as follow:
For track selection, use the >>I and I<< button on the remote
control or on the panel for track selection. Alternatively, tap
PREV and NEXT on the screen.
The RPT button select amongst REPEAT ALL, REPEAT ONE and
OFF.
Tracks can be selected directly by using numeric keys 0 - 9. For
example, to play the 23rd track, press 2 followed by 3 and allow
for one second for the number to be recognised. Observe that
the desired track will begin playing. The CLEAR button will cancel
the last number. This function can be operated both using the
remote control and using the on-screen keypad (called up by
tapping the top-right corner of screen).
>> and << on the remote control fast rewind or fast forward:
2X → 4X → 8X → 20X → normal
Alternatively, the front panel >>I and I<< buttons can be pressed
and held down to achieve the same results.
Use the cursor buttons and ENTER to navigate folders.
Radio
There are a number of ways to select this mode. (1) SRC button
on the remote control (2) SRC button on the front panel (3) tap
the top-left corner of the screen then tap “RADIO”. Once in
radio mode, use BAND button to rotate selection of bands:
BAND button is available on the front panel and on the GUI
screen shown below.
There are three ways to automatically tune in to the next radio
station frequency in the downward direction: (1) << button on IR
remote control (2) I<< button on the front panel (3) tap < on the
screen.
To tune manually, use the above method but instead of pressing
/ tapping, use press and hold / tapping and holding on IR or front
panel. Tapping the “Seek-”or “Seek+”button on the srceen.
Radio station presets are available in all AM and FM bands. Press
and hold an item stores the current radio station, short press
(tap) recalls a radio station from memory.
>>I and I<< on the remote control can be used to recall the next
/ previous preset station.
Tapping a preset on the display also recalls the preset station
from memory.
The remote control also features station preset buttons to store
and recall radio stations from memory.
Auto-store is a convenient feature to store six radio stations
automatically - Press and hold down AMS, wait a few moments.
The process is normally signified by audio being on
DX/LOC: instruct the radio tuner to adapt to strong or weak
radio signals. When LOC: ON is displayed, only strong signal
stations will be tuned. When LOC: OFF is displayed, the tuner is
adapted to both strong and weak signals from the antenna input.
The factory default is DX.
MO/ST: Select mono improves signal-to-noise ratio by giving up
stereo audio. User may find it useful when listening to a weak
FM signal.
Rev. 4.0 13ELE2000 Page 11 /14
DVB-T digital television receiver
DVB-T can distract the driver while the vehicle is moving. On
many installations, the handbrakes needed to be applied
otherwise DVB-T and DVD will not be shown on the screen.
DVB-T mode can be entered using (1) SRC button on the front
panel (2) SRC button on the remote control (3) tap the top-left
corner of the screen then tap the TV icon.
Assuming the TV antenna is configured correctly and the power
supply to the antenna amplifier (if present) is turned on, TV
reception should be possible. Tap anywhere on the screen to
call up the control icons around the pane:
The backdrop of this screen may be different due to screen
overlay. When a TV channel is available, its picture will be
shown in the background. The icons can be activated by
positioning your finger tip very accurately on them then tap the
touch screen in that area. Notice the “UP”, “DOWN”, “LEFT” and
“RIGHT” triangles in the middle of the four screen edges. These
are used to navigate the menu, e.g. to move over the next or
previous item.
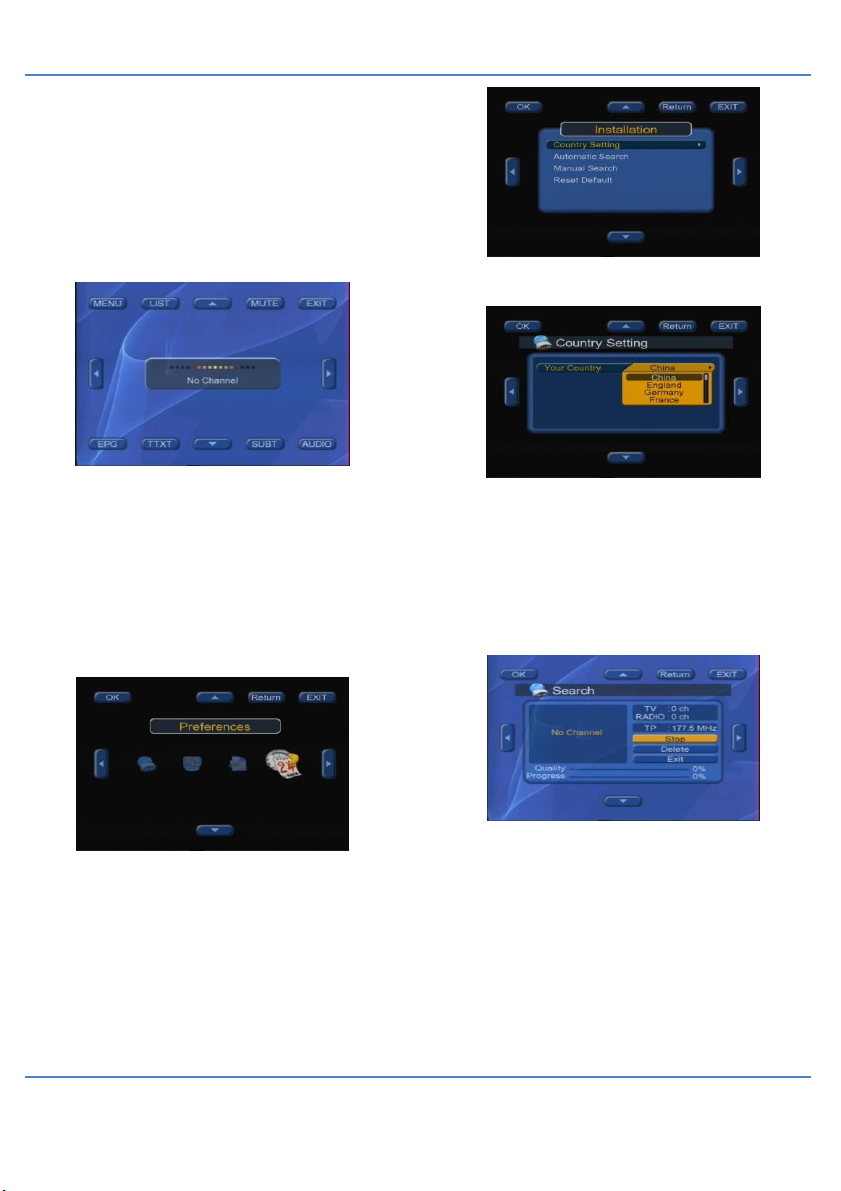
Tap MENU at the upper left to display the following screen. (In
this picture, we have tapped the “LEFT” triangle to scroll to
“Preferences” on the right.)
Locate “Installation” then tap “OK”:
Highlight “Country Setting”. Tap “OK” on the upper left corner
to display the following screen.
On this screen select the country that you are in. This will enable
the DVB-T tuner to find TV stations in the correct digital TV
frequency band.
Now you are ready to search for available TV stations. After
crossing border from one country to another, “Country Setting”
needs to be changed before doing a new search. From the
screen shown immediately above, tap “Return” then use the
triangle icons to move to “Automatic Search” (immediately
below “Country Settings” two pictures back).
The search needs a few moments to complete. The “Progress”
bar tells the user how much of the frequency band has been
scanned for TV channels. When we are done, DVB-T
programmes are available to watch.
Satellite Navigation
Rev. 4.0 13ELE2000 Page 12 /14
This illustration of first-time-use has the first two screenshots
that will not be displayed during normal, daily use. Ensure the
SD card containing the map software is inserted fully (see earlier
quick start section “Satellite Navigation”). Bring up “root” screen,
tap navigation. Tap the icon on the right hand side to display the
directory browser. Use this browser to locate the “nngnavi.exe”
file. Tap the name of this file to highlight it then tap “OK”.
The map needs a moment to load. The system may ask the user
to select voice language and screen display language. When this
happens select by tapping the available items from the list
presented on screen. After we have finished, tap OK at the
bottom of the screen to continue. The settings now selected can
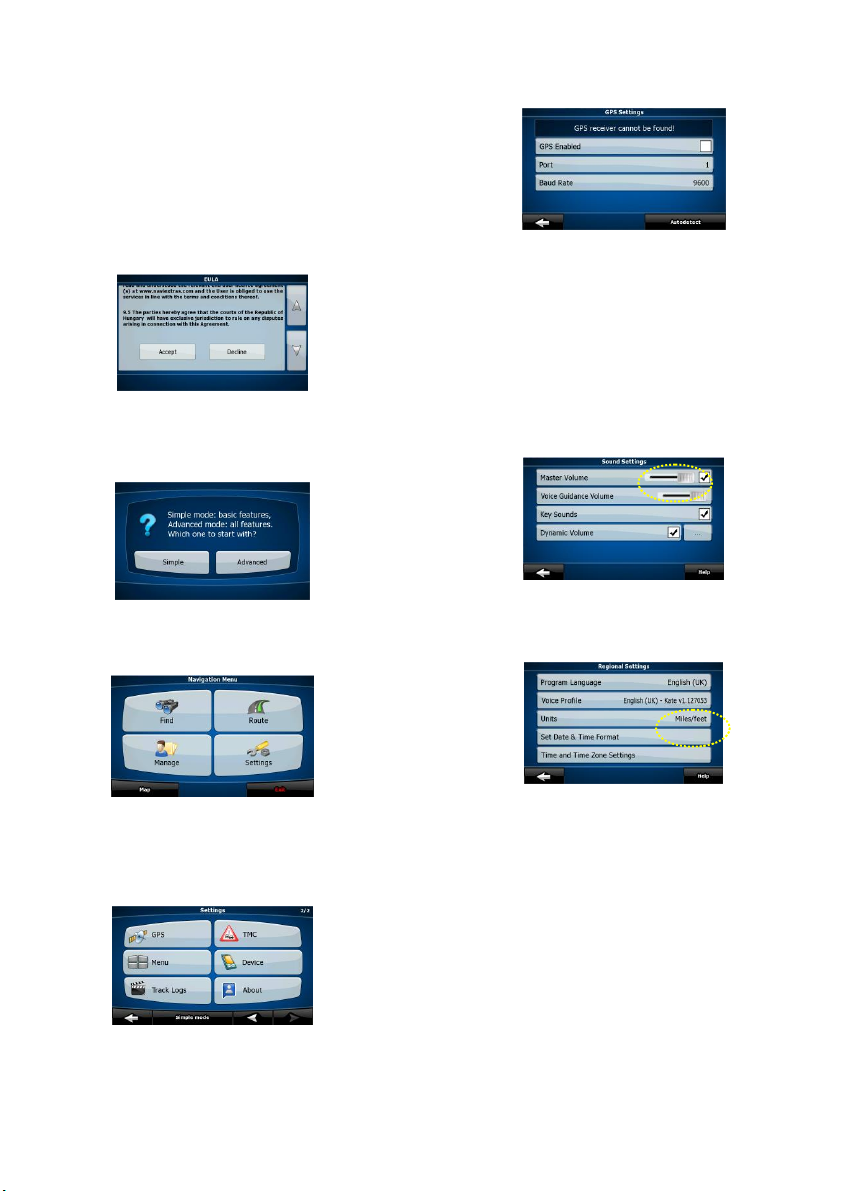
be changed later. The EULA screen is displayed as shown:
The user needs to read the text and scroll down using the “down
arrow” on the right hand side of the screen. The “Accept” icon is
shown when the end of the text is reached. If the user agrees to
the EULA, tap this to see the next screen as shown:
This illustration uses the “Advanced” option on the right. Tap it
to continue. The user can change this setting later. The following
screen will be shown:
Satellite navigation needs GPS signal which is received by a GPS
antenna (usually concealed). This step ensures that the system
register the antenna. Tap lower left “Settings” to display the
“Settings” screen. On this screen, tap the left arrow on the lower
left corner to turn to second page as shown:
Note that “TMC” is not implemented on our system so the
upper right icon corresponding to this has no effect on the
system. Locate the “GPS” icon (upper right) and tap to display
the GPS screen as shown:
Tap “GPS Enabled” to ensure the check box is cleared. Tap
“Autodetect” (lower right corner). Observed that the system will
found the GPS antenna and the check box will be checked
automatically. “Port” and “Band Rate” will also display the
correct values that are suitable for our GPS antenna. The system
is now set up to navigate. When we have finished, tap right
arrow (lower right corner) to go back to the previous screen.
Two further settings may be very useful.
(1) Navigation Menu -> Settings 1/2 -> Sound:
“Master Volume” may be adjusted to a higher level given that
road noise needs to be compensated by louder sound.
(2) Navigation Menu -> Settings 1/2 -> Regional:
“Units” is imperial (Miles/ feet) in UK but this should be metric
(Kilometres/metres) in Europe.
Now satellite navigation is ready to use. To input an address to
the system (after which it can be made the destination):
Navigation Menu -> Find -> Find address
Tap “Country” to pick one from the list. Use arrows at the
bottom of the screen to turn to different pages until the desired
country name is displayed. Tap to select it. Tap <City Name> to
close into your address in mind. Postcode can be typed here
using the on-screen keyboard. If exact house number cannot be
located, tap the “Street Midpoint” and “Intersection” icon on
the bottom bar to obtain the best approximation. The map
software also provides means to store the route, change the
route and add waypoints (via) to the route.

Rev. 4.0 13ELE2000 Page 13 /14
Menus directly accessible from the navigation screen (middle) by tapping the relevant panes on the display. Some useful functions are
highlighted for ease of reference. The user may notice that latest map software may have an appearance that is slightly different from
the screen captures presented here.
Navigation Menu:
“Advanced” mode
shown here. User -
selectable “simple”
mode has a different
but similar
appearance.
Day mode display
being shown here.
Night mode will have
higher contrast and
darker color scheme.
Toggle day/night
Tapping lower left
corner on screen (left
arrows and “map”)
always brings us back to
this navigation screen
(“day” mode shown
here).
Right arrow: next page

Rev. 4.0 13ELE2000 Page 14 /14
TIPS
General:
-This unit will not display non-English characters such as Ê and Ö . Non-displayable character may be shown incorrectly.
-Avoid exposing the unit to high temperatures, prolonged direct sunlight, moisture, dust, dirt or excessive vibration.
Media playback:
-For SD card or USB, the unit can play files inside sub-folders. Avoid having too many levels of depth in the sub-folders.
-On some of our models, sub-folder structure is listed flat. On these models sub-folders cannot be selected individually.
-Do not carry too many audio files on a media to avoid difficulty in finding the desirable song / track.
-With media, both the hardware and software get updated in a relatively fast pace. The unit is shipped with the latest media
compatibility; newer cards and/or new file formats may not play on this unit.
When listening to FM radio:
-Effects of some of the RDS functions are not immediately apparent. For example, disabling AF will have no apparent effect
until we crosses reception boundary, in which case the radio remains at one frequency. Turning off AF may be desirable in
fringe reception area. It provides a convenience for the user to manually prevent changing frequency.
Fuses are electrical safety devices:
-Always replace fuse with the specified type and rating. Blown fuse usually indicates a problem in the circuit. Do not rely
completely on replacing the fuse to fix a problem. Over-rated fuse compromises protection against over-current. Under-
rated fuse can blow even if a fault condition does not exist.
Technical
MEDIA PLAYBACK
Signal to noise ratio > 70dB best case
Dynamic range > 80dB best case
Distortion < 0.2%
Media MP3 - SD/MMC/USB/CD
DVD/VCD/CD discs=12cm
diameter
TUNER (FM)
Frequency range 76.0MHz –108.0MHz
Tuning selections Europe, USA, OIRT, Japan,
M-East, Latin, Austra
(Australia), Asia
Usable sensitivity 10dB
Stereo separation 30dB @ 65dBu 1kHz
Signal to noise ratio 55dB max. mono-audio
TUNER (MW AM)
Frequency range 522KHz - 1620kHz
Sensitivity 30dB
Signal to noise ratio 50dB
LINE-OUT
Audio output RCA 2.0VRMS
Audio impedance 10kΩ
Video output 1.0VP-P
Video impedance 75Ω
GENERAL
Power Supply 12V DC Chassis ground
(10.8V –16.0V)
Speaker impedance 4Ω (4Ω - 8Ω)
Audio power 40W x 4CH
Current draw max. 15A DC
Dimensions (mm) 178 x 166 x 100
Weight 2.65 Kg
Inclination Steady 30°front tilting
FUSES
Wire “ignition key” 1A
Wire “battery” 15A
Specification and design are subject to possible modifications without prior notice due to improvements.
Instructions on environment protection
Do not dispose of this product in the usual household garbage at the end of its lifecycle; hand it over at a collection point for the recycling
of electrical and electronic appliances. The symbol on the product, the instructions for use or the packing will inform about the methods
for disposal. The materials are recyclable as mentioned in this marking. By recycling, material recycling or other forms of re-utilization of
old appliances, you are making an important contribution to protect our environment. Please inquire at the community administration for
the authorized disposal location.
Table of contents


