AutoJoe ATJ-V501 User manual

PORTABLE HANDHELD
VACUUM CLEANER
12V DC | 16-FT CORD | HEPA FILTER x2
INTERIOR AUTO DETAILING ACCESSORY KIT • CARRYING BAG
Model ATJ-V501
EN
Form No. ATJ-V501-880E-M
If you have any questions or comments, please call the
Snow Joe®+ Sun Joe®customer service department at:
1-866-SNOWJOE (1-866-766-9563)
© 2021 by Snow Joe®, LLC
All rights reserved. Original instructions. SAVE THESE INSTRUCTIONS
1

IMPORTANT!
Safety Instructions
All Operators Must Read
These Instructions Before
Use
Always follow these safety guidelines. Failure to
do so may result in serious bodily injury or death.
mWARNING! Failure to follow the
warnings and instructions may result in electric
shock, re and/or serious injury.
mCAUTION! Do not leave the vacuum
unattended when it is plugged into an electrical
outlet. Turn o the vacuum, and unplug it before
leaving.
mWARNING! Do not touch the vacuum
cleaner or its plug with wet hands
mCAUTION! Do not use outdoors or in
damp or wet environments.
2
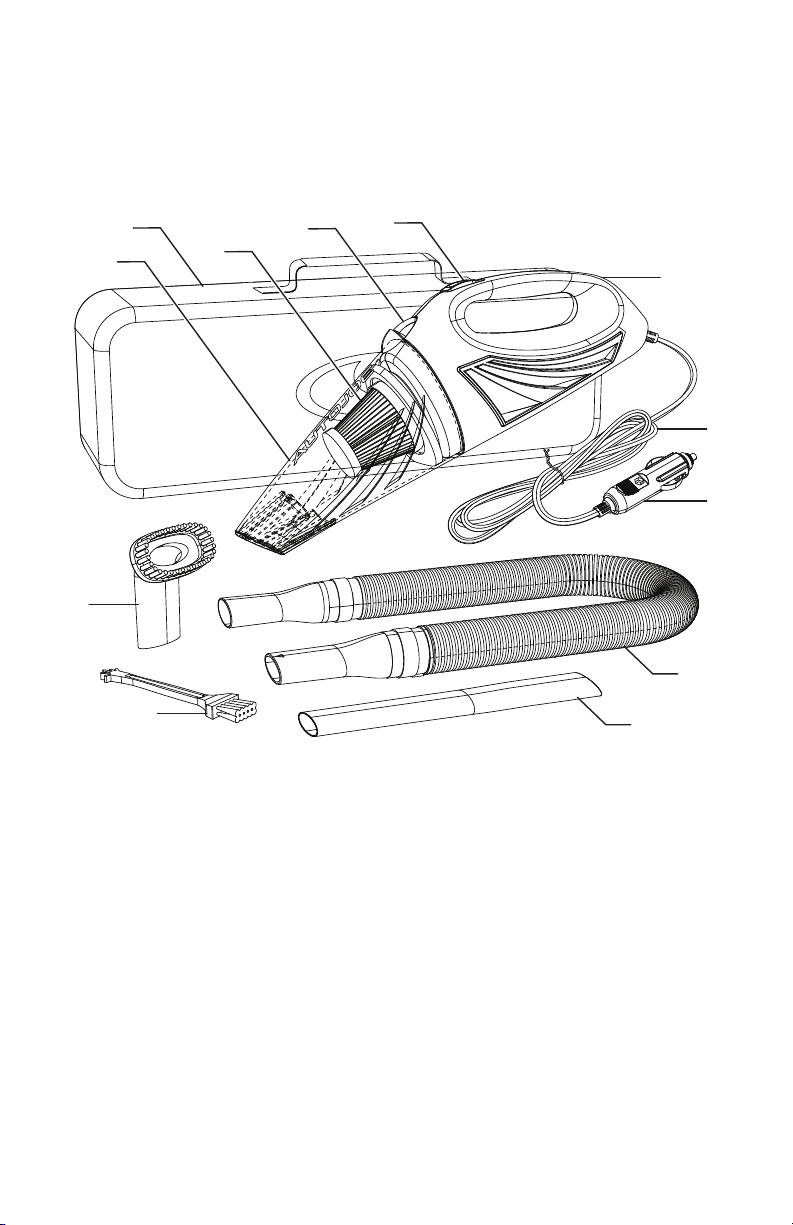
1. ON/OFF switch
2. Dust tank release
button
3. Reusable HEPA lter
4. Carrying bag
5. Dusk tank
6. Brush attachment
7. Cleaning brush
8. Crevice nozzle
9. Extension hose
10. 12V DC plug
11. Power cord
12. Handle
Know Your Portable Handheld Vacuum Cleaner
Read the owner’s manual and safety rules carefully before using your Portable Handheld Vacuum
Cleaner. Compare the illustration below to the actual unit in order to familiarize yourself with the
location of the various controls and attachments. Save this manual for future reference.
Technical Data
Motor ........................................................... 90 W
Voltage .................................................... 12V DC
Current ............................................................ 8A
Max. Suction Power ................................. 8.3 AW
Extension Hose Length ................. 2.3 ft. (70 cm)
Dust Tank Capacity ........................ 17 oz (0.5 L)
Power Cord Length ...........................16 ft. (4.9 m)
Net Weight .................................... 1.6 lbs (0.7 kg)
6
1
2
7
10
12
9
8
11
3
5
4
3
Unpacking
Carton Contents
• Vacuum cleaner
• Replacement HEPA lter (x2)
• Extension hose
• Crevice nozzle
• Brush attachment
• Carrying bag
• Cleaning brush
• Manual and registration card
1. Carefully remove the handheld vacuum and
check to see that all of the above items are
supplied.
2. Inspect the product carefully to make
sure no breakage or damage occurred
during shipping. If you nd damaged or
missing parts, DO NOT return the unit
to the store. Please call the Snow Joe®
+ Sun Joe®customer service center at
1-866-SNOWJOE (1-866-766-9563).
NOTE: Do not discard the shipping carton
and packaging material until you are ready
to use your new handheld vacuum. The
packaging is made of recyclable materials.
Properly dispose of these materials in
accordance with local regulations.
IMPORTANT! The equipment and packaging
material are not toys. Do not let children play
with plastic bags, foils, or small parts. These
items can be swallowed and pose a suocation
risk!
Operation
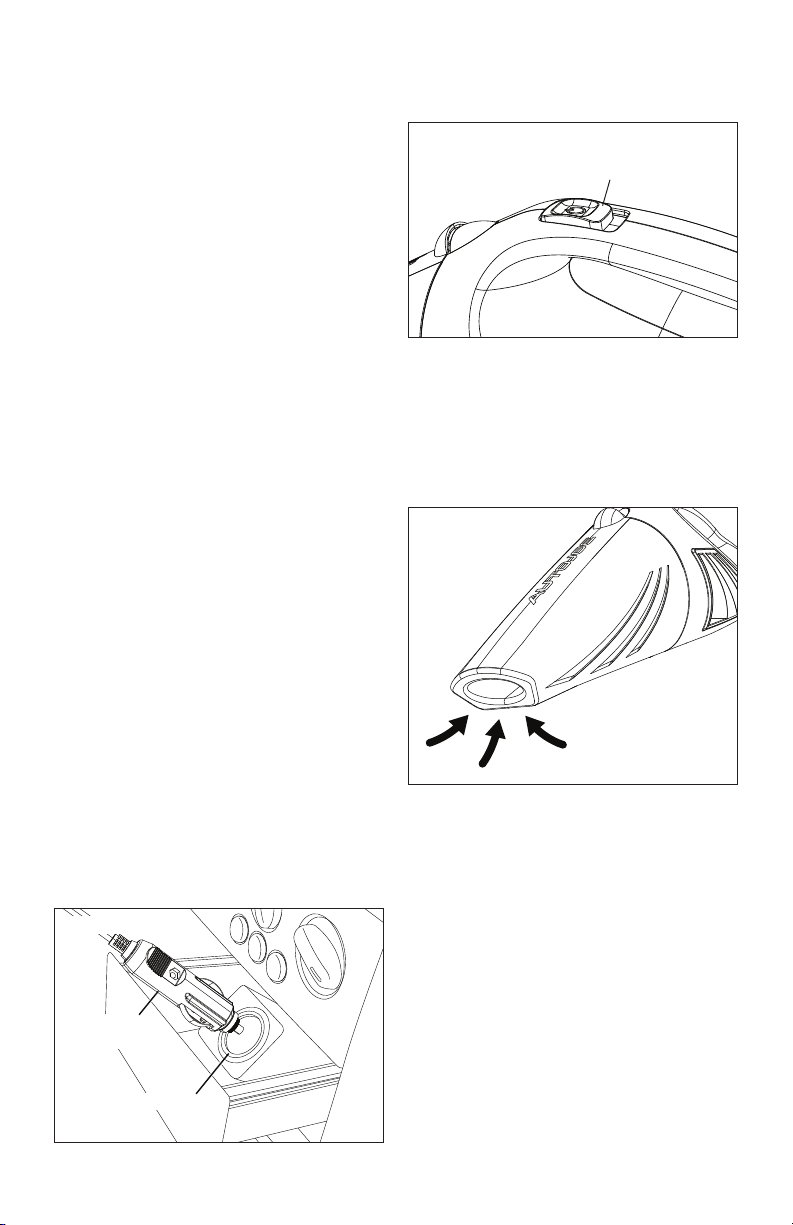
1. Start your engine and plug the vacuum's
plug into your 12V DC socket (Fig. 1).
2. Push switch to turn the vacuum on or o
(Fig. 2).
3. Direct the nozzle of the vacuum onto the
area you wish to clean (Fig. 3).
NOTE: Clean the lters regularly between
uses in order to optimize cleaning
performance.
NOTE: Empty the dust tank before it
becomes overlled.
mWARNING! Never use the vacuum
cleaner without its lter.
mWARNING! Do not vacuum the
following articles:
• Hot objects such as cigarette butts
• Sharp objects such as glass shards
• Corrosive liquids or solvents
• Combustible or explosive materials
mCAUTION! This vacuum is only
designed to clean up dry substances. Do not use
it to clean liquids or wet substances.
Fig. 1
12V DC socket
12V DC
plug
Fig. 2
ON/OFF switch
Fig. 3
4
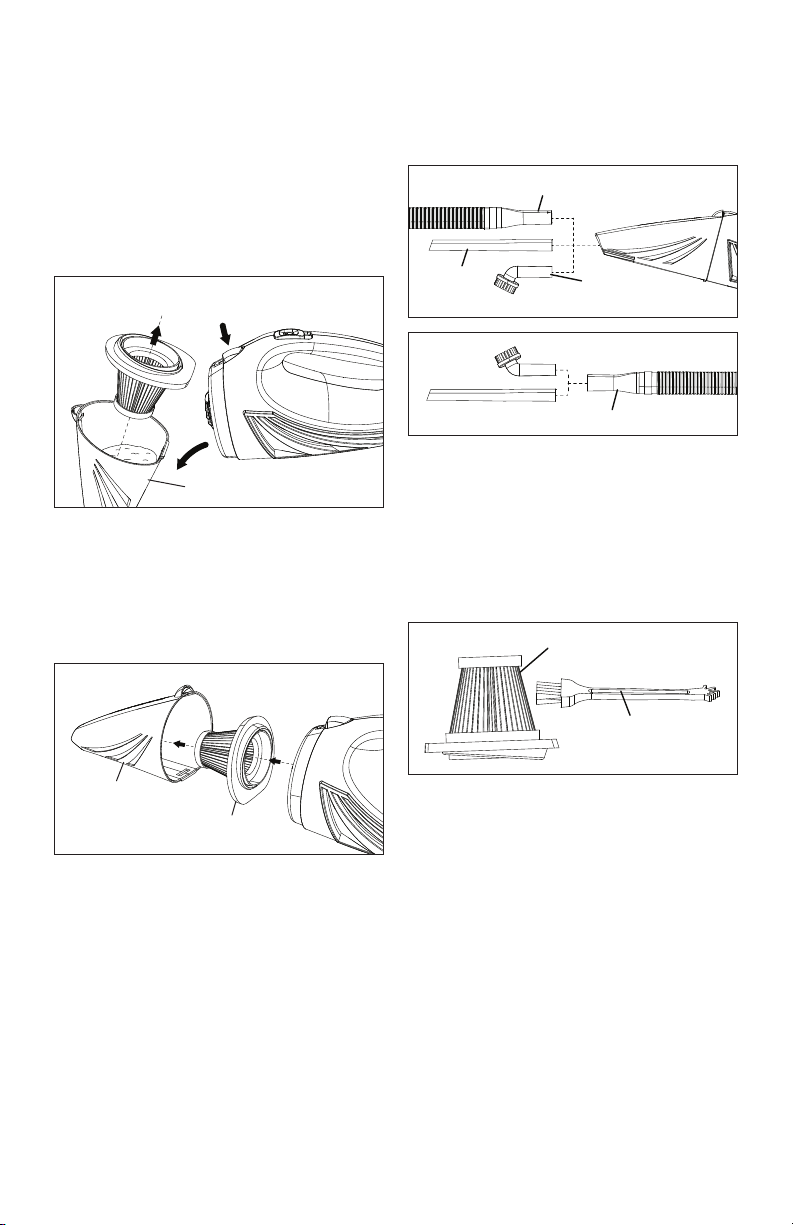
4. To empty the dust tank, press the dust tank
release button to detach the tank from the
vacuum. Then simply pull out the HEPA
lter and empty the dust tank (Fig. 4).
NOTE: Keep the detached dust tank facing
upwards to prevent spilling its contents all
over the place!
NOTE: The lter is re-usable, do not throw
it away when the product is being emptied.
5. Place the lter back into the dust tank and
press rmly to ensure a secure t. Place
the dust tank back onto the vacuum until it
"clicks" rmly into position (Fig. 5).
NOTE: It is very important that the lter is
correctly in position before use.
6. Turn o and unplug when not in use (Fig. 2).
Nozzle Attachments
Included with your handheld vacuum cleaner
are three nozzle attachments for cleaning
different areas and surfaces of your vehicle.
Each can be attached directly into the vacuum
(Fig. 6) or via the flexible extension hose for
greater reach (Fig. 7).
NOTE: The extension hose can only connect to
the vacuum on the end marked with an arrow,
and connect to other nozzle attachments on the
end without an arrow.
Maintenance
The filters are reusable and should be cleaned
regularly using the included cleaning brush or
rinsed with water. Optimum dust collection will
only be achieved with clean filters (Fig. 8).
NOTE: After rising, allow lter to dry before
placing back into the vacuum.
mCAUTION! Do not expose the vacuum
cleaner to rain or wet conditions. Water entering
the unit will damage it.
mCAUTION! Do not pull or yank on the
power cord.
mWARNING! Store the vacuum cleaner
away from hot surfaces or under direct sunlight
to reduce the risk of a short circuit.
Dust tank
release button
Fig. 4
Dust tank
HEPA
lter
"click"
Fig. 5
Dust tank
HEPA lter
Fig. 6 Extension hose (arrow end)
Brush
attachment
Crevice
nozzle
Fig. 7
Extension hose (no arrow end)
Fig. 8 HEPA lter
Cleaning brush
5

Service + Support
If your Auto Joe™ ATJ-V501 Portable
Handheld Vacuum Cleaner requires service or
maintenance, please call Snow Joe®+ Sun Joe®
customer service at 1-866-SNOWJOE (1-866-
766-9563) for assistance.
Model + Serial Numbers
When contacting the company or arranging
service from an authorized dealer, you will need
to provide the model and serial numbers, which
can be found on the registration card. Copy
these numbers into the space provided below.
Record the following numbers from the housing or handle
of your new product:
Model #:
Serial #:
A T J - V 5 0 1
6
Table of contents


