Automotive 1 687 246 029 User manual

1 687 246 029
de
Originalbetriebsanleitung
Fernbedienung
en
Original instructions
Remote control
fr
Notice originale
Télécommande
es
Manual original
Mando a distancia
it
Istruzioni originali
Telecomando
sv
Bruksanvisning i original
Fjärrkontroll
nl
Oorspronkelijke gebruiksaanwijzing
Afstandsbediening
pt
Manual original
Controle remoto
da
Original brugsanvisning
Fjernbetjening
no
Original driftsinstruks
Fjernbetjening
pl
Oryginalna instrukcja eksploatacji
Pilot
hu
Eredeti használati utasitás
Távvezérlő
hr
Originalne upute za rad
Daljinski upravljač
ro
Instrucţiuni originale
Telecomandă
tr
Orijinal işletme talimatı
Uzaktan kumanda
ru
Pуководство по эксплуатации
Дистанционное управление
bg
Оригинална инструкция
Дистанционно управление
el
Πρωτότυπο εγχειρίδιο χρήσης
Τηλεχειρισμός
sl
Prevod originalnih navodil za obratovanje
Daljinski upravljalnik
lv
Oriģinālā ekspluatācijas instrukcija
Tālvadības pults
lt
Originali eksploatacijos instrukcija
Nuotolinio valdymo
zh
原始的指南
遥控器
fi
Alkuperäiset ohjeet
Kaukosäädin
et
Originaalkasutusjuhend
Kaugjuhtimispult


1 689 989 338 2017-05-10|Automotive Service Solutions
| 1 687 246 029 | 3 de
Inhaltsverzeichnis Deutsch 4
Contents English 6
Sommaire français 8
Índice español 10
Indice italiano 12
Innehållsförteckning svenska 14
Inhoud Nederlands 16
Índice português 18
Indholdsfortegnelse Dansk 20
Innholdsfortegnelse norsk 22
Spis treści po polsku 24
Tartalom Magyar 26
Cuprins română 28
İçindekiler Türkçe 30
Sadržaj Hrvatski 32
Περιεχόμενα στα Еλληνικά 34
Содержание Русский 36
Съдържание Български език 38
Turinys lietuvių kalba 40
Saturs latviski 42
Vsebina slovenščina 44
Sisukord eesti keeles 46
Sisällysluettelo Suomi 48
目录 中文 50

1 689 989 338 2017-05-10| Automotive Service Solutions
4 | 1 687 246 029 | Bestimmungsgemäße Verwendungde
1. Bestimmungsgemäße Ver-
wendung
Mit der Infrarot-Fernbedienung 1 687 246 029 (nach-
folgend "Fernbedienung" genannt) können bis zu vier
BEA750 bedient werden. Die Ansteuerung und Bedie-
nung erfolgt über vier verschiedene Kanäle, die mit der
Fernbedienung eingestellt werden können.
2. Erstinbetriebnahme
iBei der Erstinbetriebnahme muss der Kanal der
Fernbedienung auf den Kanal des Empfängers von
BEA750 eingestellt werden. Der Empfänger von
BEA750 ist werksseitig auf Kanal 1 gestellt.
¶Taste <CH> (Abb. 1, Pos.12) und Funktionstaste
<F1> im Bereich <G1> (Abb. 1, Pos.2) gleichzeitig 4
Sekunden drücken.
?Die Fernbedienung wird auf Kanal 1 gestellt.
?Die Fernbedienung ist BEA750 mit Kanal 1 zuge-
ordnet.
3. Bedientasten
G1
F1 CT
F3
G2
F2
F5 F6 F7
G1
F1 CT
F3
G2
F2
F5 F6 F7
1
1
1
234
5
6
7
8
9
10
11
12
13
459974-05_shd
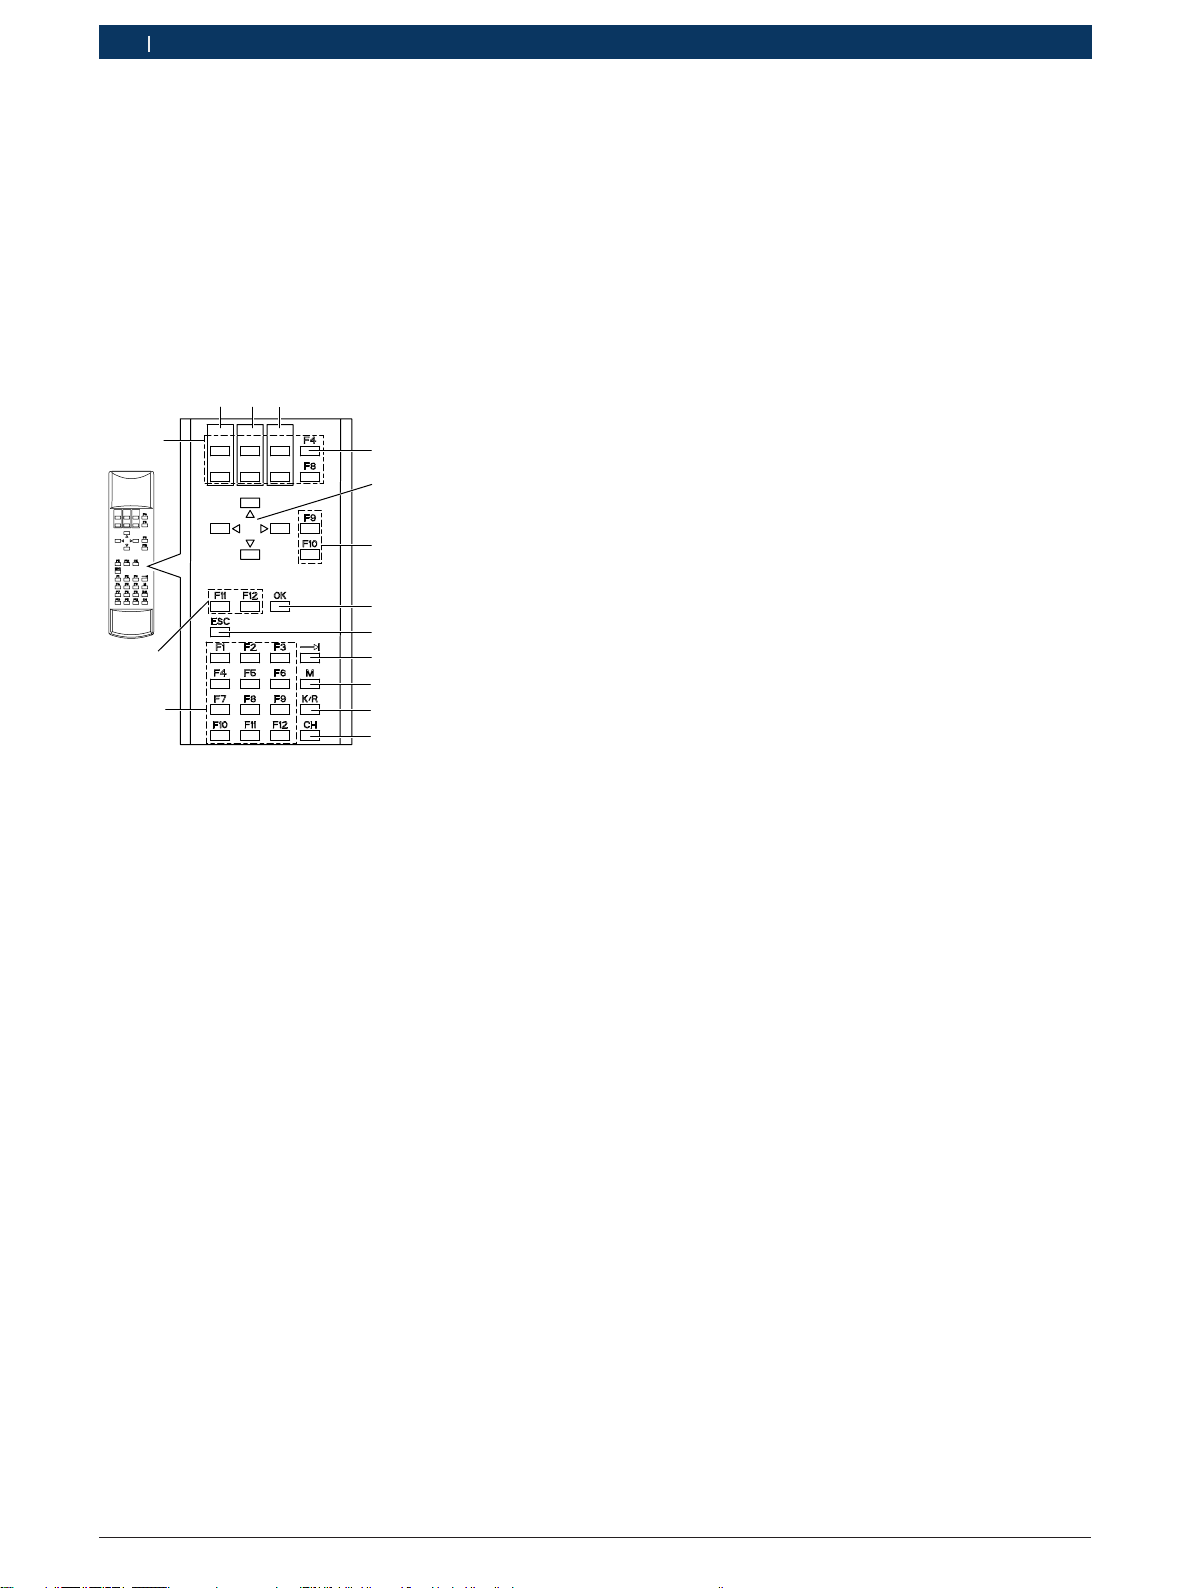
Fig. 1: Fernbedienung - Grundfunktion der Tasten
1 Funktionstasten <F1> bis <F12> (Hard- und Softkeys von BEA750)
2 Bereich <G1> für Kanaleinstellung
3 Bereich <G2> für Kanaleinstellung
4 Bereich <CT> (ohne Funktion)
5 Funktionstaste <F4> für Kanaländerung
6 Cursor-Tasten
7 Taste <OK> (Enter)
8 Taste <ESC>
9 Taste <TAB>
10 Taste <M> (ohne Funktion)
11 Taste <K/R> (ohne Funktion)
12 Taste <CH> für Kanaleinstellung
13 Funktionstasten <F1> bis <F12> (ohne Funktion)
Kanal-Tasten-Zuordnung
Die 4 möglichen Kanäle sind den Funktionstasten in den
Bereichen <G1> und <G2> zugeordnet: <F1> = Kanal 1,
<F2> = Kanal 2, <F5> = Kanal 5, <F6> = Kanal 6.

1 689 989 338 2017-05-10|Automotive Service Solutions
Bedienung | 1 687 246 029 | 5 de
4. Bedienung
4.1 Kanal am Empfänger von BEA750
zuordnen
Um mehrere BEA750 mit der Fernbedienung bedienen
zu können, muss dem Empfänger von der jeweiligen
BEA750 ein eigener Kanal zugeordnet werden.
iEs können maximal 4 BEA750 über die Kanäle 1, 2,
5 und 6 bedient werden.
Beispiel – Empfänger von BEA750 zu Kanal 2 zuordnen:
1. Alle in der Werkstatt vorhandenen BEA750 am Ein-/
Ausschalter auf Rückseite von BEA750 ausschalten
(siehe 1689989339).
iDem Empfänger von BEA750 kann nur innerhalb
der ersten Minute nach dem Einschalten ein Kanal
zugeordnet werden.
2. BEA750, dessen Empfänger der Kanal 2 zugewiesen
werden soll, an Ein-/Ausschalter auf Rückseite von
BEA750 einschalten.
3. Folgende Schritte innerhalb von einer Minute nach
dem Einschalten durchführen.
4. Fernbedienung auf Empfänger von BEA750 richten
(siehe 1689989339).
5. Taste <CH> (Abb. 1, Pos.12) und Funktionstaste
<F4> (Abb. 1, Pos.5) gleichzeitig 4 Sekunden drü-
cken.
6. Taste <CH> (Abb. 1, Pos.12) und Funktionstaste <F2>
im Bereich <G2> (Abb. 1, Pos.3) gleichzeitig 4 Sekun-
den drücken.
?Dem Empfänger von BEA750 ist der Kanal 2 zuge-
ordnet.
?BEA750 kann über Kanal 2 angesteuert und be-
dient werden.
iMit den Funktionstasten <F5> und <F6> können ent-
sprechend dem vorausgehenden Beispiel die Kanäle
5 und 6 einem Empfänger von BEA750 zugeordnet
werden.
iDie Kanalzuordnung des Empfängers von BEA750
kann jederzeit geändert werden.
4.2 Kanal an Fernbedienung einstellen
Um mit der Fernbedienung mehrere BEA750 mit unter-
schiedlichen Kanälen bedienen zu können, muss an der
Fernbedienung der richtige Kanal eingestellt werden.
Beispiel – Fernbedienung auf Kanal 5 einstellen:
¶Taste <CH> (Abb. 1, Pos.12) und Funktionstaste
<F5> im Bereich <G1> (Abb. 1, Pos.2) gleichzeitig 4
Sekunden drücken.
?Die Fernbedienung wird auf Kanal 5 gestellt.
?Mit der Fernbedienung kann BEA750, dessen
Empfänger auf Kanal 5 zugeordnet ist, bedient
werden.
iMit den Funktionstasten <F1>, <F2> und <F6> wird
entsprechend dem vorausgehenden Beispiel die
Fernbedienung auf die Kanäle 1, 2 und 6 eingestellt.
iDie Kanaleinstellung der Fernbedienung kann jeder-
zeit geändert werden.
4.3 Kanalzuordnung eines Empfängers an
BEA750 anzeigen
iDie Anzeige der Kanalzuordnung eines Empfängers
von BEA750 ist unabhängig vom eingestellten Kanal
der Ferbedienung.
1. Sicherstellen, dass die Tastatur an BEA750 ange-
schlossen ist.
2. Fernbedienung auf Empfänger von BEA750 richten
(siehe 1689989339).
3. Taste <CH> 8 Sekunden gedrückt halten.
?Die NUM-LED der Tastatur an BEA750 blinkt ent-
sprechend dem eingestellten Kanal (z.B. zweima-
liges Blinken für Kanal 2).

1 689 989 338 2017-05-10| Automotive Service Solutions
6 | 1 687 246 029 | Intended useen
1. Intended use
The 1 687 246 029 infrared remote control ("remote
control" in the following) can be used to operate up to
four BEA750 units. There are four channels for control
and operation that can be set by the remote control.
2. Control keys
G1
F1 CT
F3
G2
F2
F5 F6 F7
G1
F1 CT
F3
G2
F2
F5 F6 F7
1
1
1
234
5
6
7
8
9
10
11
12
13
459974-05_shd
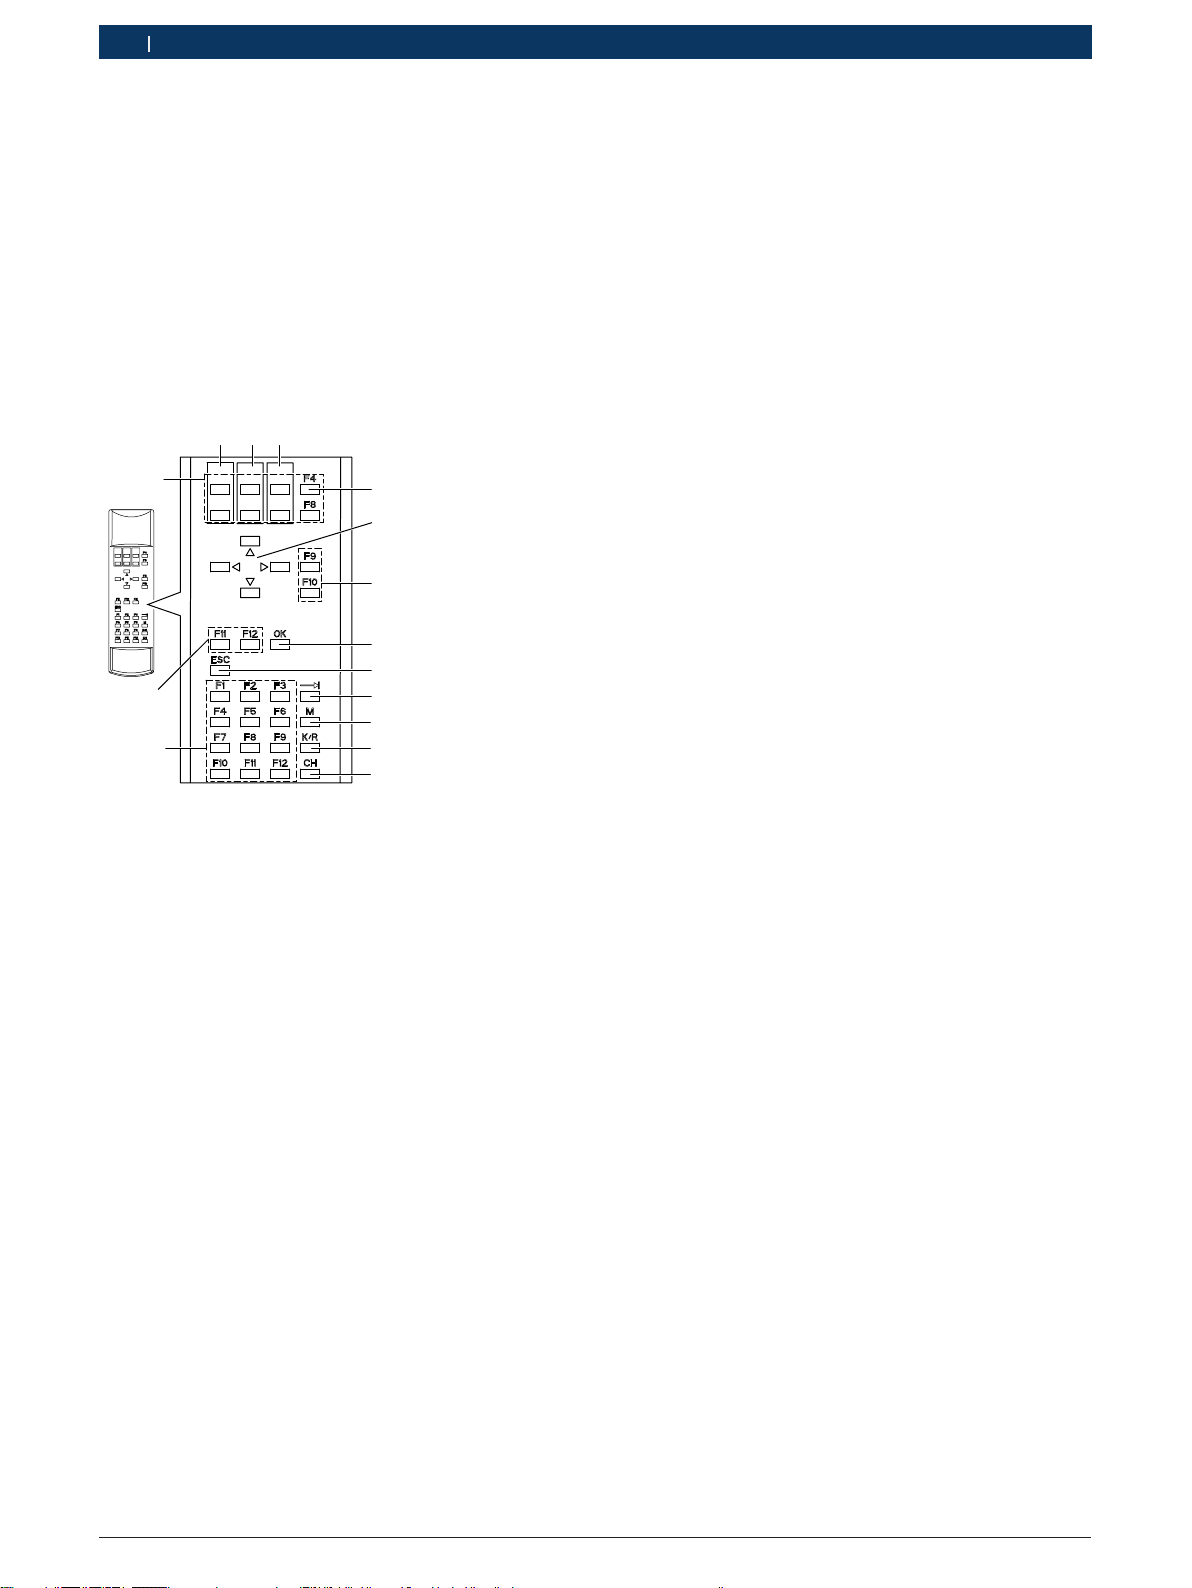
Fig. 1: Remote control – basic key functions
1 <F1> to <F12> function keys (BEA750 hard and soft keys)
2 <G1> range for setting channels
3 <G2> range for setting channels
4 <CT> range (no function)
5 <F4> function key for changing channels
6 Cursor keys
7 <OK> key (enter)
8 <ESC> key
9 <TAB> key
10 <M> key (no function)
11 <K/R> key (no function)
12 <CH> key for setting channels
13 <F1> to <F12> function keys (no function)
Channel-key assignment
The 4 available channels are assigned to the function
keys in the <G1> and <G2> ranges: <F1> = channel 1,
<F2> = channel 2, <F5> = channel 5, <F6> = channel 6.
3. Initial commissioning
iDuring initial commissioning, set the channel of the
remote control to the channel of the receiver of the
BEA750. The BEA750 receiver is set to channel 1 by
the factory.
¶Press and hold <CH> (fig. 1, item 12) and the <F1>
function key of the <G1> range (fig. 1, item 2) simul-
taneously for 4 seconds.
?The remote control is set to channel 1.
?The remote control is now assigned to BEA750
on channel 1.

1 689 989 338 2017-05-10|Automotive Service Solutions
Operation | 1 687 246 029 | 7 en
4. Operation
4.1 Assigning a channel to the BEA750
receiver
To operate several BEA750 units with the remote con-
trol, individual channels must be assigned to the recei-
vers of the BEA750 units.
iA maximum of 4 BEA750 units can be operated
using the channels 1, 2, 5 and 6.
Example – assigning BEA750 to channel 2:
1. Use the on/off switches on the backs of the units to
switch off all BEA750 units present at the workshop
(see 1689989339).
iThe BEA750 receiver can only be assigned a channel
within one minute of switching it on.
2. Use the on/off switch on the back of the BEA750
whose receiver is to be assigned to channel 2.
3. Carry out the following steps within one minute of
switching it on.
4. Point the remote control at the BEA750 receiver
(see 1689989339).
5. Press and hold <CH> (fig. 1, item 12) and the <F4>
function key (fig. 1, item 5) simultaneously for 4
seconds.
6. Press and hold <CH> (fig. 1, item 12) and the <F2>
function key of the <G2> range (fig. 1, item 3) simul-
taneously for 4 seconds.
?The BEA750 receiver is now assigned to chan-
nel 2.
?BEA750 can now be controlled and operated via
channel 2.
iThe <F5> and <F6> function keys can be used to
assign channels 5 and 6 to BEA750 receivers in the
same manner.
iThe channel assignment of a BEA750 receiver can
be changed at any time.
4.2 Setting a channel on the remote con-
trol
To use the remote control to operate several BEA750
units on different channels, the remote control must be
set to the correct channel.
Example – setting the remote control to channel 5:
¶Press and hold <CH> (fig. 1, item 12) and the <F5>
function key of the <G1> range (fig. 1, item 2) simul-
taneously for 4 seconds.
?The remote control is set to channel 5.
?The remote control can now be used
to operate the BEA750 whose receiver
is assigned to channel 5.
iThe <F1>, <F2> and <F6> function keys are used to
set the remote control to channels 1, 2 and 6 in the
same manner.
iThe channel setting of the remote control can be
changed at any time.
4.3 Displaying the channel assignment of
a receiver on BEA750
iThe display of the channel assignment of a BEA750
receiver is not dependent on the channel set on the
remote control.
1. Make sure the keyboard is correctly connected to
the BEA750.
2. Point the remote control at the BEA750 receiver
(see 1689989339).
3. Press and hold the <CH> key for 8 seconds.
?The NUM LED on the keyboard connected to the
BEA750 will flash to indicate the channel set (e.g.
twice for channel 2).

1 689 989 338 2017-05-10| Automotive Service Solutions
8 | 1 687 246 029 | Utilisation conformefr
1. Utilisation conforme
Jusqu'à quatre BEA750 peuvent être utilisés avec la
télécommande à infrarouge 1 687 246 029 (ci-après
désignée par le terme "Télécommande"). La commande
et l'utilisation a lieu par le biais de quatre canaux diffé-
rents qui peuvent être réglés avec la télécommande.
2. Touches de commande
G1
F1 CT
F3
G2
F2
F5 F6 F7
G1
F1 CT
F3
G2
F2
F5 F6 F7
1
1
1
234
5
6
7
8
9
10
11
12
13
459974-05_shd
Fig. 1: Télécommande - Fonction de base des touches
1 Touches de fonction <F1> à <F12> (touches physiques et logiciel-
les de BEA750)
2 Plage <G1> pour réglage de canal
3 Plage <G2> pour réglage de canal
4 Plage <CT> (sans fonction)
5 Touche de fonction <F4> pour changement de canal
6 Touches de curseur
7 Touche <OK> (Entrée)
8 Touche <ECHAP>
9 Touche <TAB>
10 Touche <M> (sans fonction)
11 Touche <K/R> (sans fonction)
12 Touche <CH> pour le réglage de canal
13 Touches de fonction <F1> à <F12> (sans fonction)
Affectation de touches de canal
Les 4 canaux possibles sont affectés aux touches de
fonction dans les plages <G1> et <G2>: <F1> = canal1,
<F2> = canal2, <F5> = canal5, <F6> = canal6.
3. Première mise en service
iLors de la première mise en service, le canal de la
télécommande doit être réglé sur le canal du récep-
teur du BEA750. Le récepteur du BEA750 est réglé
en usine sur le canal1.
¶Appuyer simultanément sur la touche <CH> (fig.1,
pos.12) et la touche de fonction <F1> dans la plage
<G1> (fig.1, pos.2) pendant 4secondes.
?La télécommande est réglée sur le canal1.
?La télécommande est affectée au BEA750 avec le
canal1.

1 689 989 338 2017-05-10|Automotive Service Solutions
Utilisation | 1 687 246 029 | 9 fr
4. Utilisation
4.1 Affecter le canal sur le récepteur du
BEA750
Afin de pouvoir utiliser le BEA750 avec la télécomman-
de, un canal propre doit être affecté au récepteur du
BEA750 respectif.
i4BEA750 peuvent être au maximum utilisés sur les
canaux 1, 2, 5 et 6.
Exemple – affecter le récepteur du BEA750 au canal2:
1. Eteindre tous les BEA750 disponibles dans l'atelier
avec le bouton Marche/Arrêt placé à l'arrière du
BEA750 (voir 1689989339).
iUn canal peut être affecté au récepteur du BEA750
uniquement en l'espace de la première minute après
la mise en marche.
2. Allumer le BEA750 dont le récepteur doit être
affecté au canal 2 au niveau du bouton Marche/Arrêt
placé à l'arrière du BEA750.
3. Exécuter les étapes suivantes en l'espace d'une mi-
nute après la mise en marche.
4. Diriger la télécommande sur le récepteur du BEA750
(voir 1689989339).
5. Appuyer simultanément sur la touche <CH> (fig.1,
pos.12) et la touche de fonction <F4> (fig.1, pos.5)
pendant 4secondes.
6. Appuyer simultanément sur la touche <CH> (fig.1,
pos.12) et la touche de fonction <F2> dans la plage
<G2> (fig.1, pos.3) pendant 4secondes.
?Le canal2 est affecté au récepteur du BEA750.
?Le BEA750 peut être commandé et utilisé par le
biais du canal2.
iAvec les touches de fonction <F5> et <F6>, les ca-
naux 5 et 6 peuvent être affectés à un récepteur du
BEA750 selon l'exemple précédemment décrit.
iL'affectation de canal du récepteur du BEA750 peut
être modifiée à tout moment.
4.2 Régler le canal sur la télécommande
Afin de pouvoir utiliser plusieurs BEA750 avec diffé-
rents canaux avec la télécommande, le canal adéquat
doit être réglée sur la télécommande.
Exemple – Régler la télécommande sur le canal 5:
¶Appuyer simultanément sur la touche <CH> (fig.1,
pos.12) et la touche de fonction <F5> dans la plage
<G1> (fig.1, pos.2) pendant 4secondes.
?La télécommande est réglée sur le canal5.
?Avec la télécommande, le BEA750 dont le récep-
teur est affecté au canal5, peut être utilisé.
iAvec les touches de fonction <F1>, <F2> et <F6>, la
télécommande va être réglée sur les canaux 1, 2 et 6
selon l'exemple précédemment décrit.
iLe réglage du canal de la télécommande peut être
modifié à tout moment.
4.3 Afficher l'affectation d'un canal d'un
récepteur sur le BEA750
iL'affichage de l'affectation de canal d'un récepteur
du BEA750 est indépendante du canal réglé de la
télécommande.
1. S’assurer que le clavier est raccordé correctement
au BEA750.
2. Diriger la télécommande sur le récepteur du BEA750
(voir 1689989339).
3. Maintenir la touche <CH> enfoncée pendant 8 secon-
des.
?Sur le BEA750, la NUM-LED du clavier clignote
selon le canal réglé (par ex. double clignotement
pour le canal2).
1 689 989 338 2017-05-10| Automotive Service Solutions
10 | 1 687 246 029 | Uso conforme a lo previstoes
1. Uso conforme a lo previsto
Con el mando a distancia infrarrojo 1 687 246 029
(denominado en lo sucesivo "mando a distancia") se
pueden manejar hasta cuatro análisis de emisiones de
Bosch, BEA750. La activación y manejo se realiza a tra-
vés de cuatro canales diferentes que se pueden ajustar
mediante el mando a distancia.
2. Teclas de manejo
G1
F1 CT
F3
G2
F2
F5 F6 F7
G1
F1 CT
F3
G2
F2
F5 F6 F7
1
1
1
234
5
6
7
8
9
10
11
12
13
459974-05_shd
Fig. 1: Mando a distancia - Función básica de las teclas
1 Teclas de función <F1> a <F12> (teclas fijas y programables de
BEA750)
2 Área <G1> para ajuste de canal
3 Área <G2> para ajuste de canal
4 Área <CT> (sin función)
5 Tecla de función <F4> para modificación de canal
6 Teclas de Cursor
7 Tecla <OK> (Enter)
8 Tecla <ESC>
9 Tecla <TAB>
10 Tecla <M> (sin función)
11 Tecla <K/R> (sin función)
12 Tecla <CH> para ajuste de canal
13 Teclas de función <F1> a <F12> (sin función)
Asignación de teclas de canal
Las teclas de función en las áreas <G1> y <G2> están
asignadas a los 4 canales posibles: <F1> = canal 1, <F2>
= canal 2, <F5> = canal 5, <F6> = canal 6.
3. Primera puesta en servicio
del producto
iEn la primera puesta en servicio se debe ajustar el
canal del mando a distancia al canal del receptor del
análisis de emisiones de Bosch, BEA750. El recep-
tor del BEA750 está ajustado de fábrica al canal 1.
¶Pulsar la tecla <CH> (fig. 1, pos.12) y la tecla de
función <F1> en el área <G1> (fig. 1, pos.2) al mismo
tiempo por 4 segundos.
?El mando a distancia se ajusta al canal 1.
?El mando a distancia es BEA750 asignado al ca-
nal 1.

1 689 989 338 2017-05-10|Automotive Service Solutions
Manejo | 1 687 246 029 | 11 es
4. Manejo
4.1 Asignar canal al receptor de BEA750
Para poder manejar varios BEA750 con el mando a di-
stancia, se debe asignar un canal propio al receptor de
cada BEA750.
iSe pueden manejar máximo 4 BEA750 a través de
los canales 1, 2, 5 y 6.
Ejemplo - Asignar el receptor de BEA750 al canal 2:
1. Apagar todos los BEA750 existentes en el taller en
el interruptor de encendido/apagado de la parte
trasera del BEA750 (véase 1689989339).
iAhora se puede asignar un canal al receptor del
BEA750 solo dentro del minuto siguiente después
de encenderlo.
2. Encender el BEA750 a cuyo receptor se deba asig-
nar el canal 2, en el interruptor de encendido/apa-
gado de la parte trasera del BEA750.
3. Llevar a cabo los siguientes pasos durante el minuto
siguiente después de encender.
4. Ajustar el mando a distancia al receptor del BEA750
(véase 1689989339).
5. Pulsar la tecla <CH> (fig. 1, pos.12) y la tecla de
función <F4> (fig. 1, pos.5) al mismo tiempo por 4
segundos.
6. Pulsar la tecla <CH> (fig. 1, pos.12) y la tecla de
función <F2> en el área <G2> (fig. 1, pos.3) al mismo
tiempo por 4 segundos.
?Se asignó el canal 2 al receptor de BEA750.
?El BEA750 se puede controlar y manejar a través
del canal 2.
iCon las teclas de función <F5> y <F6> se pueden
asignar los canales 5 y 6 del ejemplo mencionado a
un receptor del BEA750, respectivamente.
iLa asignación de canal del receptor de BEA750 se
puede modificar en cualquier momento.
4.2 Ajustar el canal en el mando a distan-
cia
Para poder manejar con el mando a distancia varios
BEA750 con diferentes canales, se debe ajustar el ca-
nal correcto en el mando a distancia.
Ejemplo - Ajustar el mando a distancia en el canal 5:
¶Pulsar la tecla <CH> (fig. 1, pos.12) y la tecla de
función <F5> en el área <G1> (fig. 1, pos.2) al mismo
tiempo por 4 segundos.
?El mando a distancia se ajusta al canal 5.
?Con el mando a distancia se puede manejar el
BEA750 a cuyo receptor se le asignó el canal 5.
iCon las teclas de función <F1>, <F2> y <F6> se
ajusta el mando a distancia a los canales 1, 2 y 6 del
ejemplo mencionado, respectivamente.
iEl ajuste de canales del mano a distancia se puede
modificar en cualquier momento.
4.3 Indicar la asignación de canal de un
receptor en BEA750
iEl indicador de la asignación de canal de un recep-
tor de BEA750 es independiente del canal ajustado
del mando a distancia.
1. Asegúrese que el teclado esté conectado al BEA750.
2. Ajustar el mando a distancia al receptor del BEA750
(véase 1689989339).
3. Mantener pulsada la tecla <CH> durante 8 segundos.
?El LED de NUM en el teclado del BEA750 parpa-
dea de manera correspondiente al canal ajustado
(p.ej. parpadear dos veces para el canal 2).
1 689 989 338 2017-05-10| Automotive Service Solutions
12 | 1 687 246 029 | Uso conforme alle indicazioniit
1. Uso conforme alle
indicazioni
Grazie al telecomando a infrarossi 1 687 246 029 (indi-
cato di seguito col termine "telecomando") si possono
controllare anche quattro BEA750. Il controllo e il co-
mando avvengono attraverso quattro canali differenti
che possono essere regolati tramite telecomando.
2. Tasti di comando
G1
F1 CT
F3
G2
F2
F5 F6 F7
G1
F1 CT
F3
G2
F2
F5 F6 F7
1
1
1
234
5
6
7
8
9
10
11
12
13
459974-05_shd
Fig. 1: Telecomando - Funzione principale dei tasti
1 Tasti funzione da <F1> a <F12> (tasti e softkey di BEA750)
2 Intervallo <G1> per impostazione canale
3 Intervallo <G2> per impostazione canale
4 Intervallo <CT> (senza funzione)
5 Tasto funzione <F4> per variazione canale
6 Tasti Cursore
7 Tasto <OK> (Enter)
8 Tasto <ESC>
9 Tasto <TAB>
10 Tasto <M> (senza funzione)
11 Tasto <K/R> (senza funzione)
12 Tasto <CH> per impostazione del canale
13 Tasti funzione da <F1> a <F12> (senza funzione)
Associazione canali - tasti
I 4 canali possibili sono associati ai tasti funzione negli
intervalli <G1> e <G2>: <F1> = canale 1, <F2> = canale
2, <F5> = canale 5, <F6> = canale 6.
3. Primo avviamento
iAlla prima messa in servizio il canale del telecoman-
do deve essere regolato sul canale del ricevitore di
BEA750. Il ricevitore di BEA750 è configurato in
fabbrica sul canale 1.
¶Premere il tasto <CH> (fig. 1, pos.12) e il tasto funzi-
one <F1> nell'intervallo <G1> (fig. 1, pos.2) contem-
poraneamente per 4 secondi.
?Il telecomando viene impostato su canale 1.
?Il telecomando è BEA750 associato con canale 1.

1 689 989 338 2017-05-10|Automotive Service Solutions
Uso | 1 687 246 029 | 13 it
4. Uso
4.1 Associare il canale sul ricevitore di
BEA750
Per poter comandare più prodotti BEA750 con il tele-
comando, il ricevitore di BEA750 deve essere associato
a un canale proprio.
iSi possono comandare massimo 4 prodotti BEA750
attraverso i canali 1, 2, 5 e 6.
Esempio – Associazione del prodotto BEA750 col cana-
le 2:
1. Spegnere tutti i prodotti BEA750 presenti
nell'officina usando l'interruttore On/Off sul retro di
BEA750 (vedere 1689989339).
iSoltanto entro il primo minuto dall'accensione è pos-
sibile associare il ricevitore di BEA750 a un canale.
2. Accendere BEA750, il cui ricevitore deve essere as-
sociato al canale 2, usando l'interruttore On/Off sul
retro di BEA750.
3. Eseguire i passaggi riportati di seguito entro un mi-
nuto dall'accensione.
4. Indirizzare il telecomando verso il ricevitore di
BEA750 (vedere 1689989339).
5. Premere il tasto <CH> (fig. 1, pos.12) e il tasto funzi-
one <F4> (fig. 1, pos.5) contemporaneamente per 4
secondi.
6. Premere il tasto <CH> (fig. 1, pos.12) e il tasto funzio-
ne <F2> nell'intervallo <G2> (fig. 1, pos.3) contempo-
raneamente per 4 secondi.
?Il ricevitore di BEA750 è associato al canale 2.
?A questo punto è possibile controllare e comanda-
re BEA750 tramite il canale 2.
iCon i tasti funzione <F5> e <F6> è possibile associa-
re in modo analogo al precedente esempio i canali 5
e 6 a un ricevitore di un prodotto BEA750.
iL'associazione dei canali del ricevitore di BEA750
può essere modificata in qualsiasi momento.
4.2 Impostare il canale sul telecomando
Per poter comandare col telecomando più prodotti
BEA750 con canali differenti, si deve impostare il cana-
le giusto sul telecomando.
Esempio - Impostare il telecomando su canale 5:
¶Premere il tasto <CH> (fig. 1, pos.12) e il tasto funzi-
one <F5> nell'intervallo <G1> (fig. 1, pos.2) contem-
poraneamente per 4 secondi.
?Il telecomando viene impostato su canale 5.
?Col telecomando è possibile comandare BEA750,
il cui ricevitore è associato al canale 5.
iCon i tasti funzione <F1>, <F2> e <F6> è possibile
associare in modo analogo al precedente esempio il
telecomando ai canali 1, 2 e 6.
iL'impostazione del canale del telecomando può
essere modificata in qualsiasi momento.
4.3 Visualizzazione dell'associazione dei
canali di un ricevitore su BEA750
iLa visualizzazione dell'associazione di canali di un
ricevitore di BEA750 è indipendente dal canale
impostato del telecomando.
1. Assicurarsi che la tastiera di BEA750 sia collegata
correttamente.
2. Indirizzare il telecomando verso il ricevitore di
BEA750 (vedere 1689989339).
3. Tenere premuto il tasto <CH> per 8 secondi.
?Il LED NUM della tastiera del prodotto BEA750
lampeggia in funzione del canale impostato
(peres. lampeggia due volte per il canale 2).

1 689 989 338 2017-05-10| Automotive Service Solutions
14 | 1 687 246 029 | Avsedd användningsv
1. Avsedd användning
Med infraröd-fjärrkontrollen 1 687 246 029 (följande
"fjärrkontroll") kan manövrera upp till fyra BEA750.
Anstyrningen och manövreringen sker via fyra olika ka-
naler, som kan ställas med fjärrkontrollen.
2. Manöverknappar
G1
F1 CT
F3
G2
F2
F5 F6 F7
G1
F1 CT
F3
G2
F2
F5 F6 F7
1
1
1
234
5
6
7
8
9
10
11
12
13
459974-05_shd
Fig. 1: Fjärrkontroll - knapparnas grundfunktioner
1 Funktionsknappar <F1> till <F12> (tangenter och programknappar
från BEA750)
2 Områden <G1> för kanalinställning
3 Områden <G2> för kanalinställning
4 Områden <CT> (utan funktion)
5 Funktionsknapp <F4> för kanaländring
6 Markör-knappar
7 Knapp <OK> (Enter)
8 Knapp <ESC>
9 Knapp <TAB>
10 Knapp <M> (utan funktion)
11 Knapp <K/R> (utan funktion)
12 Knapp <CH> för kanalinställning
13 Funktionsknappar <F1> till <F12> (utan funktion)
Kanal-knapps-allokering
De 4 möjliga kanalerna är allokerade till funktionsknap-
parna områdena <G1> och <G2> : <F1> = Kanal 1, <F2>
= Kanal 2, <F5> = Kanal 5, <F6> = Kanal 6.
3. Första användningen
iVid första idrifttagning måste fjärrkontrollens kanal
ställas in på mottagarens kanal av BEA750. Mottaga-
ren av BEA750 är fabriks-förinställt på kanal 1.
¶Tryck knapp <CH> (fig. 1, pos.12) och funktions-
knapp <F1> i området <G1> (fig. 1, pos.2) samtidigt i
4 sekunder.
?Fjärrkontroll ställs in på kanal 1.
?Fjärrkontrollen har tillordnats BEA750 med
kanal 1.

1 689 989 338 2017-05-10|Automotive Service Solutions
Användning | 1 687 246 029 | 15 sv
4. Användning
4.1 Tillordna kanal på BEA750 mottagare
För att kunna manövrera fler BEA750 med fjärrkontrol-
len, måste mottagaren av resp. BEA750 tillordnas en
egen kanal.
iMaximalt 4 BEA750 kan manövreras via kanalerna 1,
2, 5 och 6.
Exempel – Tillordna mottagaren från BEA750 till kanal
2:
1. Stäng av alla i verkstaden befintliga BEA750 på
på/avkopplingen på baksidan av BEA750 (se
1689989339).
iEn kanal kan bara tillordnas BEA750 mottagaren
inom den första minuten efter påkopplingen.
2. BEA750, vars mottagare ska tillordnas kanal 2, kopp-
las på på på-/avkopplingen på baksidan av BEA750.
3. Genomför följande steg inom en minut efter påkopp-
lingen.
4. Rikta fjärrkontrollen mot mottagaren av BEA750 (se
1689989339).
5. Tryck knapp <CH> (fig. 1, pos.12) och funktions-
knapp <F4> (fig. 1, pos.5) samtidigt i 4 sekunder.
6. Tryck knapp <CH> (fig. 1, pos.12) och funktionsknap-
pen <F2> i området <G2> (fig 1, pos.3) samtidigt i 4
sekunder.
?Mottagaren av BEA750 har tillordnats till kanal 2.
?BEA750 kan kontrolleras och manövreras via ka-
nal 2.
iMed funktionsknapparna <F5> och <F6> kan enligt
föregående exempel kanalerna 5 och 6 tillordnas en
enda mottagare av BEA750.
iKanaltillordningen av mottagaren av BEA750 kan
ändras närsomhelst.
4.2 Ställ in kanal på fjärrkontrollen
För att manövrera flera BEA750 med olika kanaler, mås-
te rätt kanal ställas in på fjärrkontrollen.
Exempel – Ställa in kanal 5 på fjärrkontrollen:
¶Tryck knapp <CH> (fig. 1, pos.12) och funktions-
knapp <F5> i området <G1> (fig. 1, pos.2) samtidigt i
4 sekunder.
?Fjärrkontrollen ställs in på kanal 5.
?Med fjärrkontrollen kan BEA750, vars mottagare
har tillordnats kanal 5, manövreras.
iMed funktionsknapparna <F1>, <F2> och <F6> ställs
enligt föregående exempel fjärrkontrollen in på kana-
lerna 1, 2 och 6.
iFjärrkontrollens kanalinställning kan ändras närsom-
helst.
4.3 Visa kanaltillordning av en mottagare
på BEA750
iDisplayen på kanaltillordningen av en mottagare av
BEA750 är oberoende av inställd kanal av fjärrkont-
rollen.
1. Säkerställ att tangentbordet är anslutet till BEA750.
2. Rikta fjärrkontrollen mot mottagaren av BEA750 (se
1689989339).
3. Håll knapp <CH> tryckt i 8 sekunder.
?NUM-LED på tangentbordet på BEA750 blinkar
enligt resp inställd kanal (t.ex. tvåfaldigt blinkan-
de för kanal 2).

1 689 989 338 2017-05-10| Automotive Service Solutions
16 | 1 687 246 029 | Beoogd gebruiknl
1. Beoogd gebruik
Met de infrarood afstandsbediening 1 687 246 029
(hierna "afstandsbediening" genoemd) kunnen ma-
ximaal vier BEA750 worden bediend. Aansturing en
bediening via vier verschillende kanalen, welke met de
afstandsbediening kunnen worden ingesteld.
2. Bedieningstoetsen
G1
F1 CT
F3
G2
F2
F5 F6 F7
G1
F1 CT
F3
G2
F2
F5 F6 F7
1
1
1
234
5
6
7
8
9
10
11
12
13
459974-05_shd
Fig. 1: Afstandsbediening - basisfunctie van de toetsen
1 Functietoetsen <F1> t/m <F12> (hard- en softkeys van BEA750)
2 Bereik <G1> voor kanaalinstelling
3 Bereik <G2> voor kanaalinstelling
4 Bereik <CT> (geen functie)
5 Functietoets <F4> voor kanaalverandering
6 Cursor-toetsen
7 Toets <OK> (Enter)
8 Toets <ESC>
9 Toets <TAB>
10 Toets <M> (geen functie)
11 Toets <K/R> (geen functie)
12 Toets <CH> voor kanaalinstelling
13 Functietoetsen <F1> tot <F12> (geen functie)
Toewijzing kanaaltoetsen
De 4 mogelijke kanalen zijn aan de functietoetsen in de
bereiken <G1> en <G2> toegewezen: <F1> = kanaal 1,
<F2> = kanaal 2, <F5> = kanaal 5, <F6> = kanaal 6.
3. Eerste inbedrijfstelling
iBij de eerste inbedrijfname moet het kanaal van de
afstandsbediening worden ingesteld op het kanaal
van de ontvangen van BEA750. De ontvanger van
BEA750 is af fabriek op kanaal 1 ingesteld.
¶Druk toets <CH> (afb.1, pos.12) en functietoets
<F1> in bereik <G1> (afb.1, pos.2) tegelijkertijd in
gedurende 4seconden.
?De afstandsbediening wordt op kanaal 1 inge-
steld.
?De afstandsbediening is aan BEA750 met
kanaal 1 toegewezen.

1 689 989 338 2017-05-10|Automotive Service Solutions
Bediening | 1 687 246 029 | 17 nl
4. Bediening
4.1 Kanaal aan ontvanger van BEA750
toewijzen
Om meerdere BEA750 met de afstandsbediening te
kunnen bedienen, moet de ontvanger van de betreffen-
de BEA750 aan een eigen kanaal worden toegewezen.
iEr kunnen maximaal 4 BEA750's via de kanalen 1, 2,
5 en 6 worden bediend.
Voorbeeld: ontvanger van BEA750 aan kanaal 2 toewij-
zen:
1. Alle in de werkplaats aanwezige BEA750's via de
in-/uitschakelaar aan de achterzijde van de BEA750
uitschakelen (zie 1689989339).
iDe ontvanger van BEA750 kan alleen binnen de
eerste minuut na het inschakelen aan een kanaal
worden toegewezen.
2. BEA750, waarvan de ontvanger aan kanaal 2 moet
worden toegewezen, via de aan-/uitschakelaar op de
achterzijde van de BEA750 inschakelen.
3. Voer de volgende stappen uit binnen één minuut na
het inschakelen.
4. Richt de afstandsbediening op de ontvanger van de
BEA750 (zie 1689989339).
5. Druk toets <CH> (afb.1, pos.12) en functietoets
<F4> (afb.1, pos.5) tegelijkertijd in gedurende
4seconden.
6. Druk toets <CH> (afb.1, pos.12) en functietoets <F2>
in bereik <G2> (afb.1, pos.3) tegelijkertijd in gedu-
rende 4seconden.
?De ontvanger van de BEA750 is aan kanaal 2 toe-
gewezen.
?BEA750 kan via kanaal 2 worden aangestuurd en
bediend.
iMet de functietoetsen <F5> en <F6> kunnen volgens
het voorgaande voorbeeld de kanalen 5 en 6 aan een
ontvanger van BEA750 worden toegewezen.
iDe kanaaltoewijzing van de ontvanger van BEA750
kan te allen tijde worden veranderd.
4.2 Kanaal op afstandsbediening instel-
len
Om met de afstandsbediening meerdere BEA750 met
verschillende kanalen te kunnen bedienen, moet op de
afstandsbediening het juiste kanaal worden ingesteld.
Voorbeeld: afstandsbediening op kanaal 5 instellen:
¶Druk toets <CH> (afb.1, pos.12) en functietoets
<F5> in bereik <G1> (afb.1, pos.2) tegelijkertijd in
gedurende 4seconden.
?De afstandsbediening wordt op kanaal 5 inge-
steld.
?Met de afstandsbediening kan de BEA750, waar-
van de ontvanger aan kanaal 5 is toegewezen,
worden bediend.
iMet de functietoetsen <F1>, <F2> en <F6> wordt
volgens het voorgaande voorbeeld de afstandsbedie-
ning op de kanalen 1, 2 en 6 ingesteld.
iDe kanaalinstelling van de afstandsbediening kan te
allen tijde worden gewijzigd.
4.3 Kanaaltoewijzing van een ontvanger
aan BEA750 weergeven
iDe weergave van de kanaaltoewijzing van een ont-
vanger van BEA750 is onafhankelijk van het ingestel-
de kanaal op de afstandsbediening.
1. Controleer of het toetsenbord correct op BEA750 is
aangesloten.
2. Richt de afstandsbediening op de ontvanger van de
BEA750 (zie 1689989339).
3. Hou de toets <CH> 8 seconden ingedrukt.
?De NUM-LED op het toetsenbord op BEA750
knippert overeenkomstig het ingestelde kanaal
(bijv. tweemaal knipperen voor kanaal 2).

1 689 989 338 2017-05-10| Automotive Service Solutions
18 | 1 687 246 029 | Utilização adequadapt
1. Utilização adequada
Com o controle remoto infravermelho 1 687 246 029 (a
seguir chamado de "controle remoto") é possível operar
ate quatro BEA750. O comando e a operação são rea-
lizados através de quatro canais diferentes, que podem
ser ajustados com o controle remoto.
2. Teclas de comando
G1
F1 CT
F3
G2
F2
F5 F6 F7
G1
F1 CT
F3
G2
F2
F5 F6 F7
1
1
1
234
5
6
7
8
9
10
11
12
13
459974-05_shd
Fig. 1: Controle remoto - Função básica das teclas
1 Teclas de função <F1> a <F12> (Hard- e Softkeys do BEA750)
2 Área <G1> para a configuração do canal
3 Área <G2> para a configuração do canal
4 Área <CT> (sem função)
5 Tecla de função <F4> para alteração do canal
6 Teclas de Cursor
7 Tecla <OK> (Enter)
8 Tecla <ESC>
9 Tecla <TAB>
10 Tecla <M> (sem função)
11 Tecla <K/R> (sem função)
12 Tecla <CH> para a configuração do canal
13 Teclas de função <F1> a <F12> (sem função)
Atribuição de teclas do canal
Os 4 canais possíveis são atribuídos às teclas de função
nas áreas <G1> e <G2>: <F1> = canal 1, <F2> = canal 2,
<F5> = canal 5, <F6> = canal 6.
3. Primeira colocação em fun-
cionamento
iNa primeira colocação em funcionamento, o canal
do controle remoto deve ser ajustado para o canal
do receptor do BEA750. O receptor do BEA750
está ajustado de fábrica para o canal 1.
¶Pressionar a tecla <CH> (fig. 1, pos.12) e a tecla de
função <F1> na área <G1> (fig. 1, pos.2) simultanea-
mente durante 4 segundos.
?O controle remoto é ajustado para o canal 1.
?O controle remoto é atribuído ao BEA750 com o
canal 1.

1 689 989 338 2017-05-10|Automotive Service Solutions
Operação | 1 687 246 029 | 19 pt
4. Operação
4.1 Atribuir canal no receptor do
BEA750
Para poder operar vários BEA750 com o controle remo-
to, o receptor do BEA750 correspondente deve ter um
canal próprio atribuído.
iNo máximo 4 BEA750 podem ser operados através
dos canais 1, 2, 5 e 6.
Exemplo – Atribuir o receptor do BEA750 ao canal 2:
1. Desligar todos os BEA750 existentes na oficina atra-
vés do interruptor de ligar/desligar na parte traseira
do BEA750 (ver 1689989339).
iSomente é possível atribuir um canal ao receptor do
BEA750 dentro do primeiro minuto após ligar.
2. Ligar o BEA750, cujo receptor deve receber o canal
2 atribuído, no interruptor de ligar/desligar do lado
traseiro do BEA750.
3. Realizar as etapas seguintes dentro de um minuto
após ligar.
4. Direcionar o controle remoto ao receptor do
BEA750 (ver 1689989339).
5. Pressionar simultaneamente a tecla <CH> (fig. 1,
pos.12) e a tecla de função <F4> (fig. 1, pos.5) du-
rante 4 segundos.
6. Pressionar simultaneamente a tecla <CH> (fig. 1,
pos.12) e a tecla de função <F2> na área <G2> (fig. 1,
pos.3) durante 4 segundos.
?O canal 2 está atribuído ao receptor do BEA750.
?O BEA750 pode ser controlado e operado através
do canal 2.
iCom as teclas de função <F5> e <F6> é possível
atribuir, conforme o exemplo, os canais 5 e 6 a um
receptor do BEA750.
iA atribuição do canal do receptor BEA750 pode ser
alterada a qualquer momento.
4.2 Ajustar canal no controle remoto
Para poder operar vários BEA750 com canais diferen-
tes com o controle remoto, o canal correto deve ser
ajustado no controle remoto.
Exemplo – Ajustar o controle remoto para o canal 5:
¶Pressionar simultaneamente a tecla <CH> (fig. 1,
pos.12) e a tecla de função <F5> na área <G1> (fig.
1, pos.2) durante 4 segundos.
?O controle remoto é ajustado para o canal 5.
?Com o controle remoto é possível operar o
BEA750, cujo receptor está atribuído ao canal 5.
iCom as teclas de função <F1>, <F2> e <F6> é feito
o ajuste do controle remoto para os canais 1, 2 e 6,
conforme o exemplo.
iO ajuste do canal do controle remoto pode ser al-
terado a qualquer momento.
4.3 Exibir a atribuição do canal de um
receptor ao BEA750
iA exibição da atribuição de canal de um receptor
do BEA750 é independente do canal ajustado do
controle remoto.
1. Certifique-se de que o teclado está corretamente
ligado ao BEA750.
2. Direcionar o controle remoto ao receptor do
BEA750 (ver 1689989339).
3. Manter a tecla <CH> pressionada durante 8 se-
gundos.
?O LED NUM do teclado no BEA750 pisca de
acordo com o canal ajustado (porex., pisca duas
vezes para o canal 2).

1 689 989 338 2017-05-10| Automotive Service Solutions
20 | 1 687 246 029 | Tilsigtet brugda
1. Tilsigtet brug
Med infrarøds-fjernbetjeningen 1 687 246 029 (efterføl-
gende kaldet "Fjernbetjening") kan der betjenes indtil
fire BEA750. Styring og betjening sker via fire forskelli-
ge kanaler, som kan indstilles med fjernbetjeningen.
2. Betjeningstaster
G1
F1 CT
F3
G2
F2
F5 F6 F7
G1
F1 CT
F3
G2
F2
F5 F6 F7
1
1
1
234
5
6
7
8
9
10
11
12
13
459974-05_shd
Fig. 1: Fjernbetjening - Basisfunktion af tasterne
1 Funktionstaster <F1> til <F12> (hard- og softkeys fra BEA750)
2 Område <G1> til kanalindstilling
3 Område <G2> til kanalindstilling
4 Område <CT> (uden funktion)
5 Funktionstaste <F4> til kanalændring
6 Cursor-tast
7 Taste <OK> (enter)
8 Taste <ESC>
9 Taste <TAB>
10 Taste <M> (uden funktion)
11 Taste <K/R> (uden funktion)
12 Taste <CH> til kanalindstilling
13 Funktionstaster <F1> til <F12> (uden funktion)
Kanal-taster-funktioner
De 4 mulige kanaler er fastlagt i funktionstasterne i om-
råderne <G1> og <G2>: <F1> = Kanal 1, <F2> = Kanal 2,
<F5> = Kanal 5, <F6> = Kanal 6.
3. Første ibrugtagning
iVed første ibrugtagning skal fjernbetjeningens kanal
indstilles til BEA750s modtager. BEA750s modtager
er indstillet til kanal 1 fra fabrikken.
¶Tryk samtidig taste <CH> (fig. 1, pos.12) og funk-
tionstaste <F1> i området <G1> (fig. 1, pos.2) i 4
sekunder.
?Fjernbetjeningen indstilles på kanal 1.
?Fjernbetjeningen er indstillet til BEA750 med ka-
nal 1.
Table of contents
Languages:
Popular Remote Control manuals by other brands

Bluegiga Technologies
Bluegiga Technologies WRAP Series user manual

Remaco
Remaco AVA-301-IR Installation Guide and Manual

AIRTRONICS
AIRTRONICS SD-10G Aero operating manual

Universal Remote Control
Universal Remote Control UR5-MDVR operating instructions

Star Choice
Star Choice IRC 551 user guide

ARC
ARC TMT-918 manual


