AUTOPRO BD1208 User manual

Blu-Ray Player
INSTRUCTION MANUAL
BD1208
Before attempting to connect or operate this product, please read the instructions completely.
Safety Warnings..............................................................2
Features.....................................................................3
Packaging Contents...........................................................3
Start up Guide................................................................3
Supported Disks..............................................................4
Blu-Ray Player Overview.......................................................5
Installation...................................................................5
The Remote control............................................................8
Setting up the Remote Control..................................................9
Home Menu.................................................................10
General Setting..............................................................10
Display Setting.............................................................. 13
Audio Setting................................................................14
System Information...........................................................15
OSC Play Setting Menu.......................................................16
Maintaining..................................................................17
Handling Discs...............................................................17
FAQ(Frequently Asked Questions)............................................. 18
Trouble Shooting.............................................................19
1
Contents
Reference
22
Reference
To get the optimum use of your Blu-Ray player,please read this section completely.
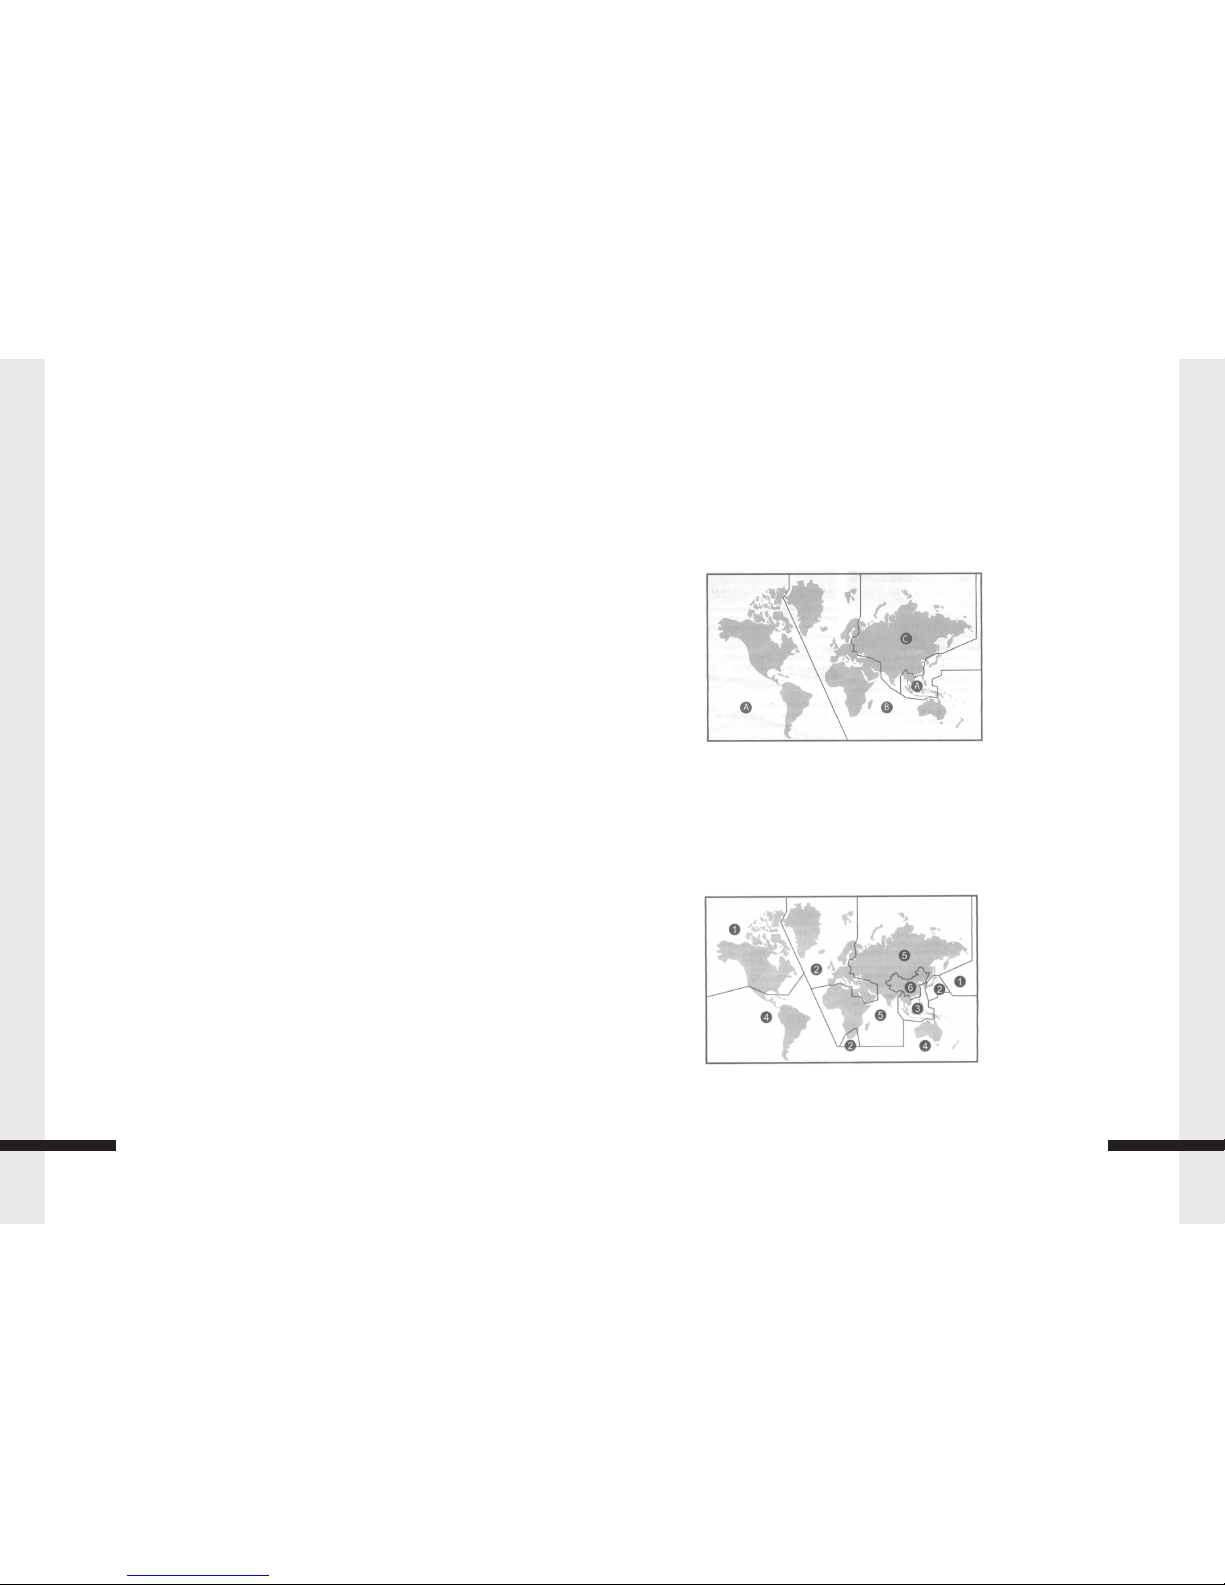
Blu-Ray Region Codes
This player is preset to a region code at the factory depending on where the player
is sold.
Blu-Ray Discs(BDs)are also coded by region.These region codes must match in
order for the disc to play.if the region codes don't match,the disc won't play.
The letter inside the globe refers to region of the world.This player has been
designed to play back Blu-Ray Disc(BD)video encoded for region"A".you
canot play back Blu-Ray discs that are encoded for other regions.
Region A-USA,Canade,Central America(including Mexico),South America,
Japan,Taiwan,North Korea,South Korea,Hong Kong,and South
East Asia
Region B-Europe,Greenland,Middle East,Africa,Australia,and New Zeland
Region C-India,Nepal,Mainland China,Pakistan,Central Asia,and South Asia
Reference...................................................................22
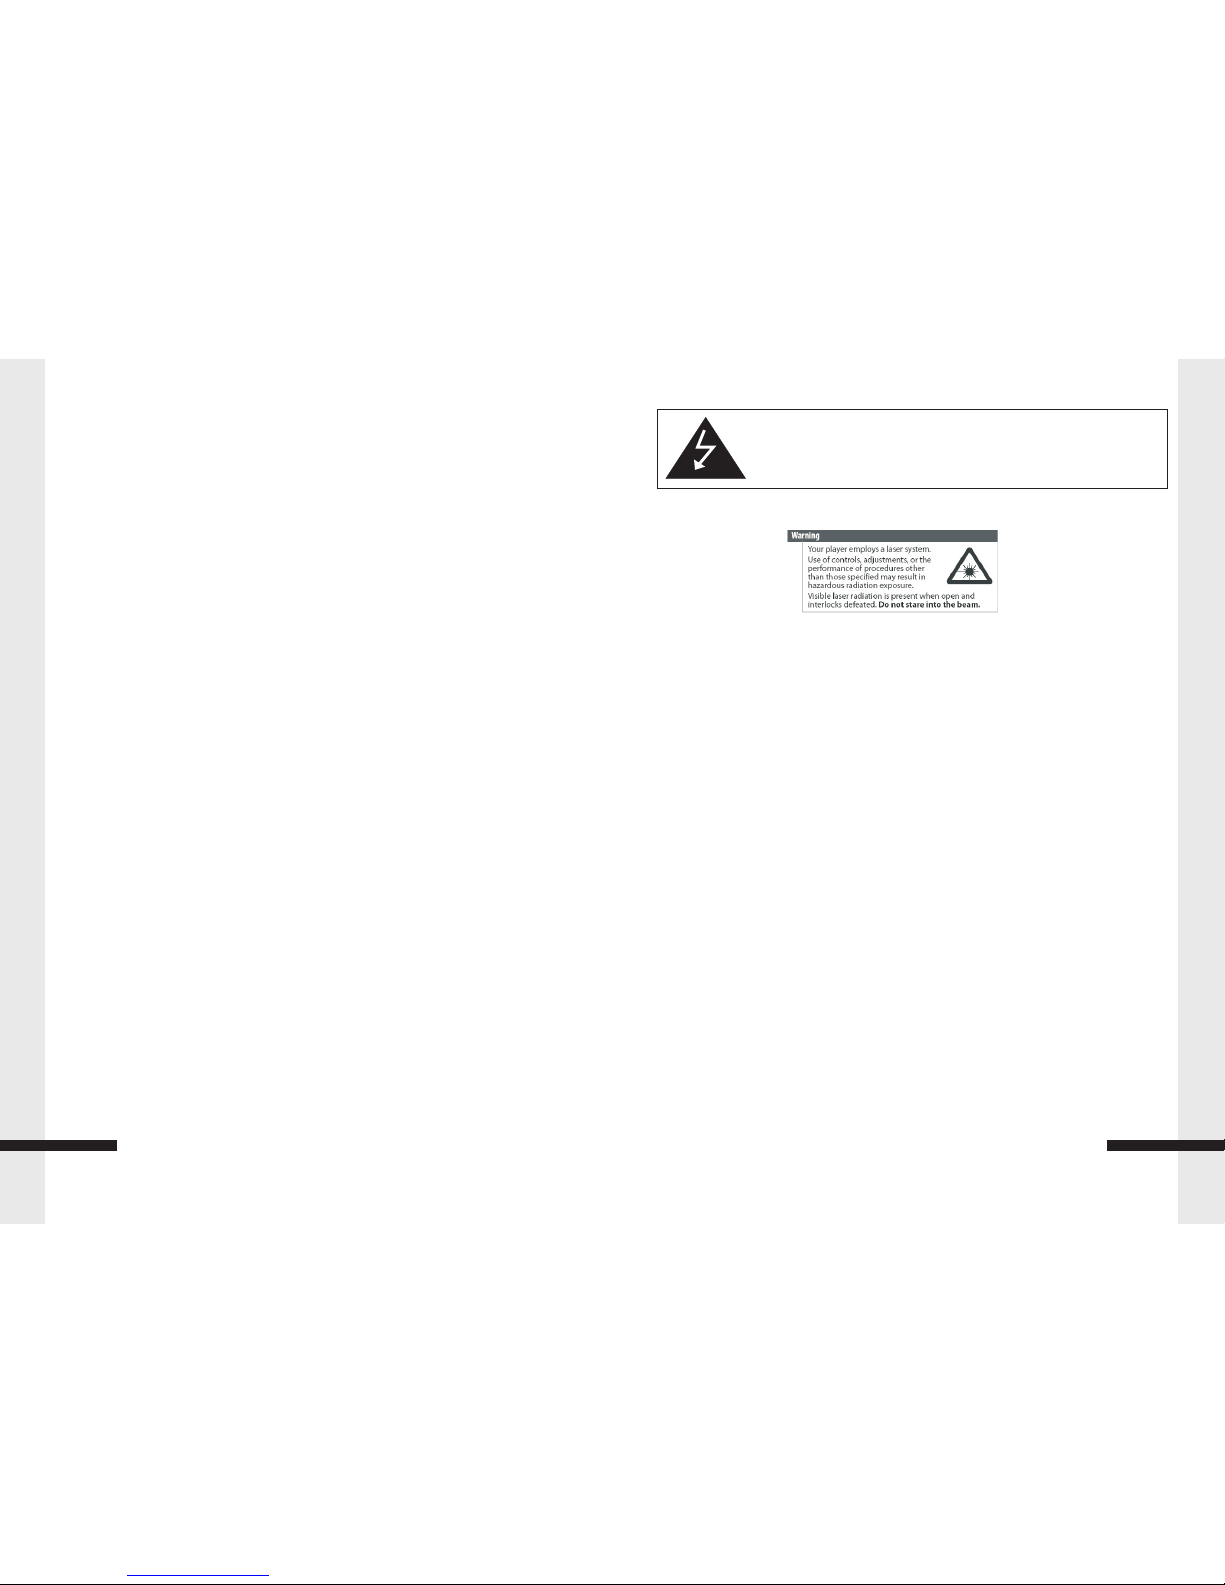
DVD Region Codes
The letter inside the globe refers to region of the world.This player has been
designed to play back DVD video encoded for region"1".you canot play back
DVDs that are encoded for other regions.
Region 1-USA,Canada
Region 2-Japan,Europe,South Africa,Middle East Greenland
Region 3-Korea,Taiwan,Kongkong,Parts of South East Asia
Region 4-Australia,New Zealand,Latin America(including Mexico)
Region 5-Eastern Europe,Russia,India,Africa
Region 6-China
Contents
·Before operating your Blu-Ray Player please carefully read the instruction manual.
·This product is not intended to be used by young children unless adequately supervised
by a responsible adult.
·This product is intended for house hold use only. Commercial or industrial
use will void the warranty.
·Turn off your Blu-Ray Player before storing or attempting to clean it.
·Do not expose your Blu-Ray Player to wet or humid environments
·Do not expose your Blu-Ray Player to heat sources such as heaters or radiators.
·Do not expose your Blu-Ray Player to naked flames such as candles
·Do not cover the ventilation slots.
·Only clean your Blu-Ray Player with a damp cotton cloth. Do not use cleaning agents or solvents.
·Do not attempt to service your Blu-Ray Player, there are no user serviceable parts contained inside.
To reduce the risk of fire or electric shock, do not expose this product to
water, rain or moisture. To prevent the risk of electric shock, do not remove
the cover or back or this product.
2
Safety Warnings
Problem: When playing a BD-Live disc, the screen is black
Solution: Erase BD Storage.
Make sure that your Internet connection is working.
Make sure that the Internet cable is connected securely and correctly
to your player and the Internet jack. Some discs require an Internet connection to play.
BD-Live and USB connections:
Problem: Cannot connect access BD-Live content
Solution: Make sure that the BD-Live Disc you are using is a legal copy.
Make sure that the USB flash drive is connected correctly and securely.
Make sure that the network connection is working.
Problem: After connecting to the Internet, cannot download a file
Solution: Erase BD Storage.
Make sure that the Internet connection is working.
Try a different USB flash drive.
Problem: File was downloaded, but playback from file pauses
Solution: Make sure that the USB flash drive is a USB 2.0 device. Using a
USB 1.1 device may cause pausing.
Try a different USB flash drive.
Internet and USB connections:
Problem: Cannot perform automatic setup with my wireless router
Solution: Only WPS automatic setup is supported by the player.
Other playback problems:
Problem: Audio and video pause momentarily
Solution: This happens when your player is changing chapters in a playlist.
When playing a disc that is recorded on both layers, audio and video may
pause when your player is changing layers.
Problem: Blu-ray Disc or DVD does not play
Solution: Make sure that the disc has the correct region code.
Check the rating on the disc. You may have set parental controls to block that rating.
Some Blu-ray discs will only play over an HDMI connection.
Problem: Picture-in-Picture (PIP) does not work on a Blu-ray Disc
Solution: Make sure that the disc supports PIP mode.
Problem: No subtitles
Solution: Turn on subtitles.
Make sure that the disc was recorded with subtitles. If the disc has subtitles,
a subtitle option should appear on the disc's menu.
21
Trouble Shooting
Problem: Cannot change the viewing angle
Solution: Some discs are not recorded with multiple viewing angles.
Check the documentation that came with the disc.
Not all scenes on a disc have multiple viewing angles. Check the documentation
that came with the disc.

Features
·Full high-definition video playback at up to 1080p resolution for an amazing viewing experience.
·Up-conversion of standard definition DVDs for enhanced picture quality at up to
1080p over a HDMI connection.
·Rich multi-channel surrounds sound.
·Simple installation using a single HDMI cable (cable not included)
·Multiple outputs for connecting your home theater system or amplifier.
·Picture in Picture functionality that lets you display primary and secondary video at the same time.
(When supported by the Blu-ray Disc)
·Pop-up menu display without interrupting playback (When supported by the
·Blu-ray Disc)
·HDMI 1080p/60Hz output (Blu-ray Discs only) that provides smooth playback of video with a
frame rate of up to 60 frames per second (TV must be connected with a HDMI cable and be
compatible with 1080p 60Hz)
Package Contents
Before installing your new Blu-Ray Player please ensure that you have received all the
following items:
·Blu-Ray Player
·Remote Control
·AV cable
·User Manual
Start up guide
Before you set up your new Blu-Ray Player please position it on a flat stable surface within reach
of your TV connection. To connect your Blu-Ray Player please follow the below instructions:
1. Connect your Blu-Ray Player to your TV. You have two options to do this. You can use HDMI for
the best possible connection, or composite. When connecting your Blu-Ray Player with
composite please ensure that you match the coloured ends on both the
Blu-Ray Player and your TV.
2. Plug the Blu-Ray Player into power and turn it on.
3. Insert battery into the remote.
4. Change the input on your TV to the corresponding input you used in step 2.
e.g. AV1 or HDMI1.
3
Start upGui de
startup is slow. This is not a defect.
If your player is connected to the TV with an HDMI cable, startup is slow. This
is not a defect.
Problem: When reading a disc, the disc tray opens
Solution: Make sure that the disc is not dirty.
The disc may be incompatible with your player. Try another disc.
Reset your player.
Problem: Audio or video pause during playback
Solution: Make sure that the disc is not dirty.
Reset your player.
Problem: The player is on and the logo and menu appear, but there is no image
from the disc.
Solution: Make sure that the disc is not dirty.
Reset your player.
Problem: The player freezes when reading a disc.
Solution: Reset your player. When you see loading on the screen, press (open/close) to
open thedisc tray and remove the disc. Clean the disc and try the disc again.
If your player freezes again, the disc may contain some content that is not compatible
with your player. Do no try playing the disc with your player.
TV Screen and Video:
Problem: Video does not appear on the TV screen or the picture is distorted
Solution: Make sure that the TV is connected to the correct jacks on the back
of your player.
Make sure that the TV is set to the correct video input source.
The TV may be in screen saver mode. Check the documentation that came with
the TV for instructions about waking your TV.
Reset your player.
Problem: Video is not output in high definition
Solution: High definition video cannot be output through the VIDEO OUT jack.
You must connect the TV to your player using the COMPONENT OUT jacks or HDMI jack.
Make sure that the correct HDMI or component video resolution has been selected in the
Setup menu.Depending on the Blu-ray Disc, output from the COMPONENT VIDEO OUT
jacks may be restricted to 480p.
Problem: The 4:3 aspect ratio picture expands left and right or the picture size is incorrect.
Solution: Use the TV to change the aspect ratio. See the documentation that came with the TV.
When using a component video cable, set TV Aspect to 4:3 Pan & Scan.
Problem: There is no apparent change in the picture quality when the picture
20
Trouble Shooting
settings are changed in the Setup menu
Solution: Depending on the video type, changes may not be apparent.
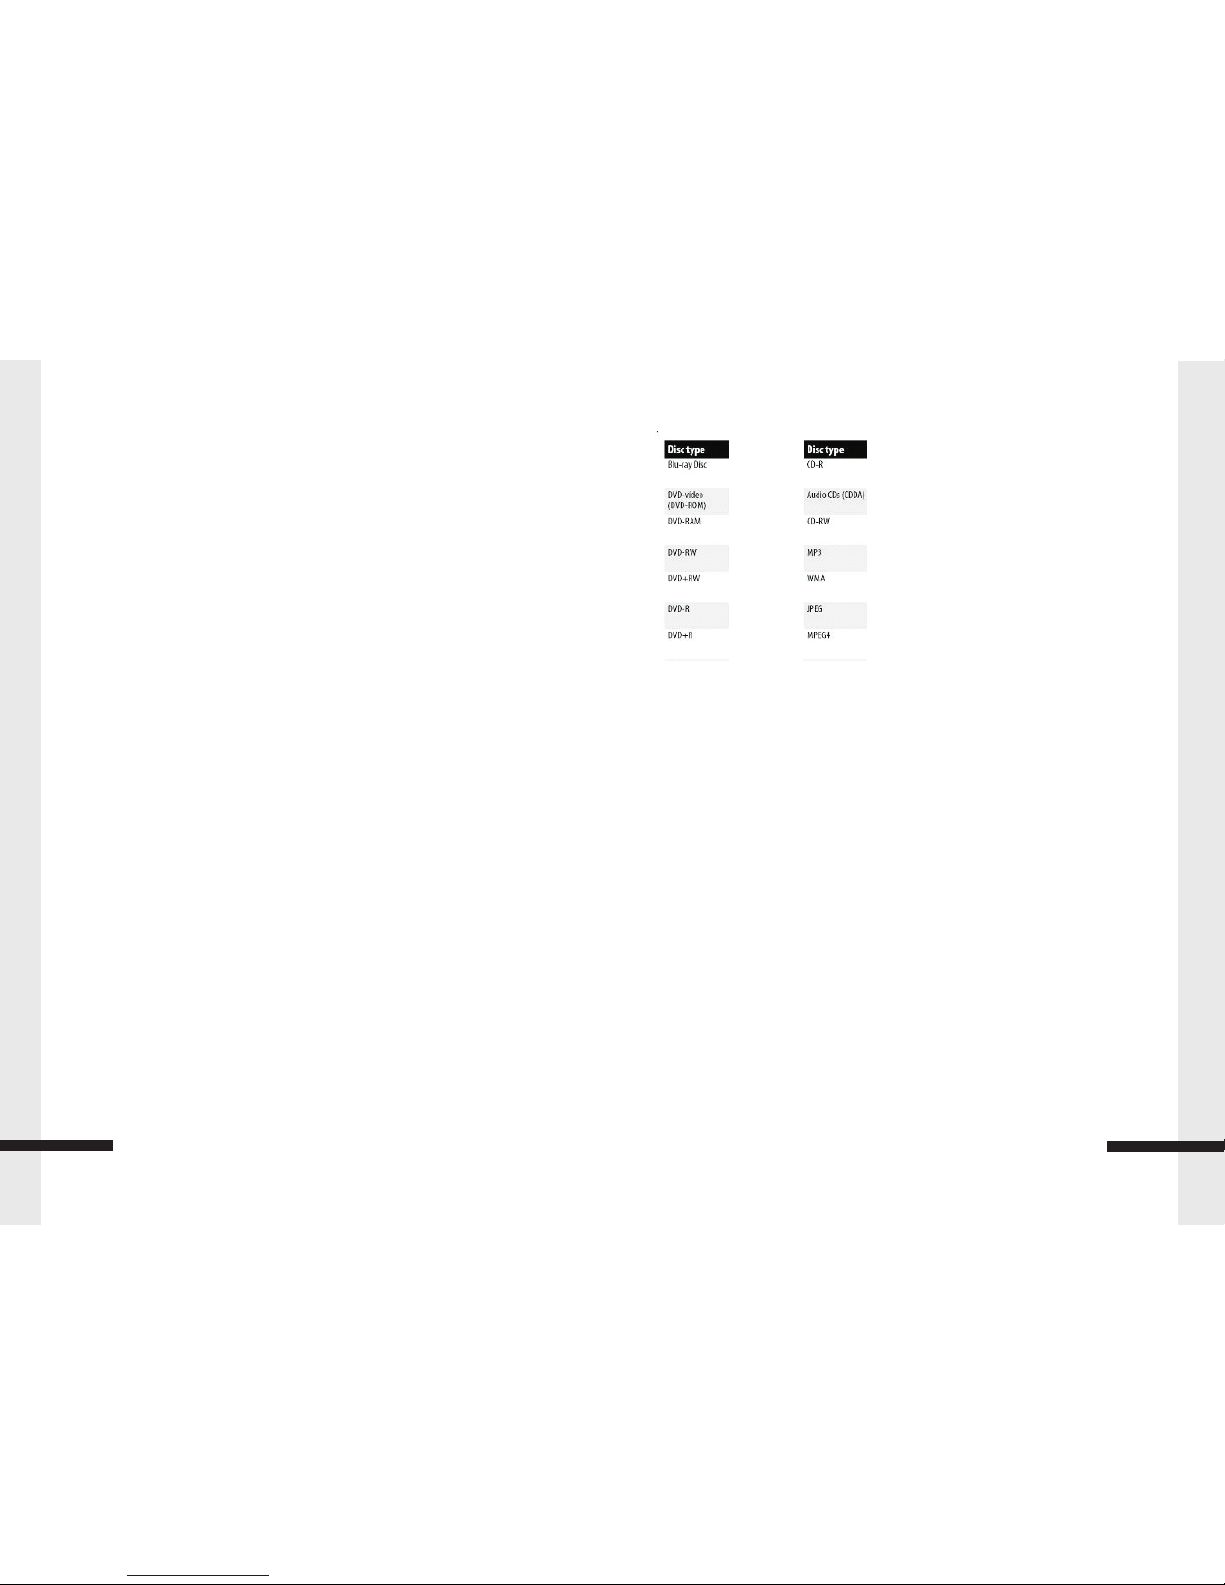
Supported Discs
·Writeable DVD discs (DVD-RAM, DVD-RW, DVD-R) must be finalized, VR-mode only.
·Your player supports discs that are compatible with DVD-RAM Standard Version 2.0.
·Playback may not work for some types of discs, or when specific operations, such as
angle change and aspect ratio adjustment, are being performed. Information about the
disc is written in detail on the box.
·Do not allow the disc to become dirty or scratched. Fingerprints, dirt, dust, scratches, or
deposits of cigarette smoke on the recording surface may make it impossible to
use the disc for playback.
·Windows Media Audio (WMA) files must be written to the disc with a .wma file extension in order
to be recognized and played back correctly.
·JPEG picture files must be written to the disc with a .jpeg or .jpg file extension in order to be
recognized and played back correctly.
4
Supported Disks
DVD-R DL (DVD Video format and DVD Video Recording format), DVD+R, DVD+RW,
and DVD+R DL, Audio CD/CD-R/RW discs which have been recorded in one of the following
standards: CD-DA and stillpictures (JPEG). Close the session after recording.
Note: Your player can not write to discs.
Trouble shooting
Check the following information for the possible cause and solution for a problem
before contacting the nearest service center or dealer for repairs.
The following do not indicate a problem with your player:
Regular disc rotation sounds.
Image disturbance during search.
Power:
Problem: No power
Solution: Make sure that the power cord is plugged into a power outlet and that the
outlet is supplying power.
Problem: The player switches to standby mode
Solution: After a period of inactivity, your player switches to standby mode automatically.
This is a power saving feature.
If your player switches to standby mode unexpectedly, a safety device may have been
activated. Press STANDBY/ON on the front of your player.
Operation:
Problem: Remote control does not work
Solution: Make sure that you are pointing the remote control at the remote control sensor on
the front of your player.
Make sure that there are no obstructions between the remote control and the remote
control sensor on the front of your player.Make sure that there is no colored glass between
the remote control and the remote control sensor on the front of your player. Colored glass,
such as the glass door of an entertainment center, can interfere with signal reception.
Make sure that the remote control sensor is not exposed to direct sunlight or bright
light. These can interfere with signal reception. Replace the batteries.
Problem: Some or all functions do not work
Solution: Some functions are not allowed by the disc, for example, fast-forwarding through the
warning information at the beginning of the disc.
Condensation may have formed inside your player. Turn off your
player and wait one to two hours for the condensation to evaporate.
Problem: Playback fails to start or starts then stops even when play/pause is pressed
Solution: Make sure that the disc is inserted face up in the disc tray.
Make sure that the disc is not dirty
The disc may be blank or incompatible with your player. Try another disc.
Problem: Start up is slow and audio and video output takes a long time
Solution: If power has been interrupted or the power cord has just been connected,
19
Trouble Shooting

Blu-Ray Player Overview
Front Panel
Rear Panel
5
Install tion
12
3
45
6
1.
2.EJECT
3.HOME
4.AUD
5.MEDIA CENTER
6.
7.PLAY/PAUSE
8.STOP
POWER
DISC SLOT
78
910
11 12
17 13 14 15 16
HOM E
MEDIA CENTER
9.PREVIOUS
10.NEXT
11.VOLUME-
12.VOLUME+
13. Cursor buttons
14.ENTER
15.SD
16.IR
1.
2.
3.VIDEO OUT (YELLOW)
4.AUDIO-R OUT (RED)
5.AUDIO-L OUT (WHITE)
6.
1DIN INSTALLATION HOLE
POWER HARNESS INPUT
EXTERNAL REMOTE
SENSOR INPUT
1
2
7
8
9
10
3
4
5
6
11
12
7.AUDIO-L OUT (WHITE)
8.AUDIO-R OUT (RED)
9.VIDEO OUT (YELLOW)
10.
11.USB INPUT
12.HDMI
DIGITAL COAXIAL(ORANGE)
RED: + 12 ~2 4V ACC
YELL OW : +1 2~ 24V BATT
BLAC K: G RO UND
Cleaning discs
Before playback, wipe the disc outwards from the center
(not in a circle) with a clean cloth.
FAQ (frequently asked questions)
Q: What do I need to play multi-channel surround sound
A: Connect the appropriate amplifier/receiver to the HDMI jack, the DIGITAL AUDIO
OUT jack (OPTICAL or COAXIAL).
Q: Can I connect headphones to my player?
A: You cannot directly connect headphones to your player. Connect headphones to the
connected TV or sound system.
Q: My television has COMPOSITE VIDEO-IN, COMPONENT (YUV) IN and HDMI IN jacks.
Which should I use?
A: HDMI provides the best video and audio. Component video provides better video than
composite video, but not as good as HDMI video.
Composite video provides good video.
Q: Can I play Blu-ray Discs and DVDs bought in another country?
A: You can play them if the video standard is NTSC. However, you cannot play:
Blu-ray Disc Don't include region code A.
DVD disc don't include region code 1 or ALL.
Region codes are on the discs or disc packaging.
Q: Can I play Blu-ray Discs and DVDs that do not have a region code?
A: No. Region codes indicate that a disc conforms to industry standards.
You cannot play a disc that does not have a region code.
Q: What types of discs will my player play?
A: Your player can play:
Blu-ray Discs, DVD-Video, DVD-RAM (DVD Video Recording format, AVCHD format
and JPEG format), DVD-R/RW (DVD Video format and DVD Video Recording format),
18
Maintaining

Connecting a TV using an HDMI cable (best)
To connect a TV using an HDMI cable:
Connect a HDMI cable to the HDMI jack on the back of your player and to the
HDMI IN jack on the TV.
Back of player
TV
6
Installtion
Installation
Before you connect your Blu-Ray Player to your TV please ensure that it is set up
on a flat and stable surface.
Now that your Blu-Ray Player is in position, connect it to your TV and any o
ther peripheral devices.
Please refer to the below diagram and your TVs user manual
for cable installation instructions.
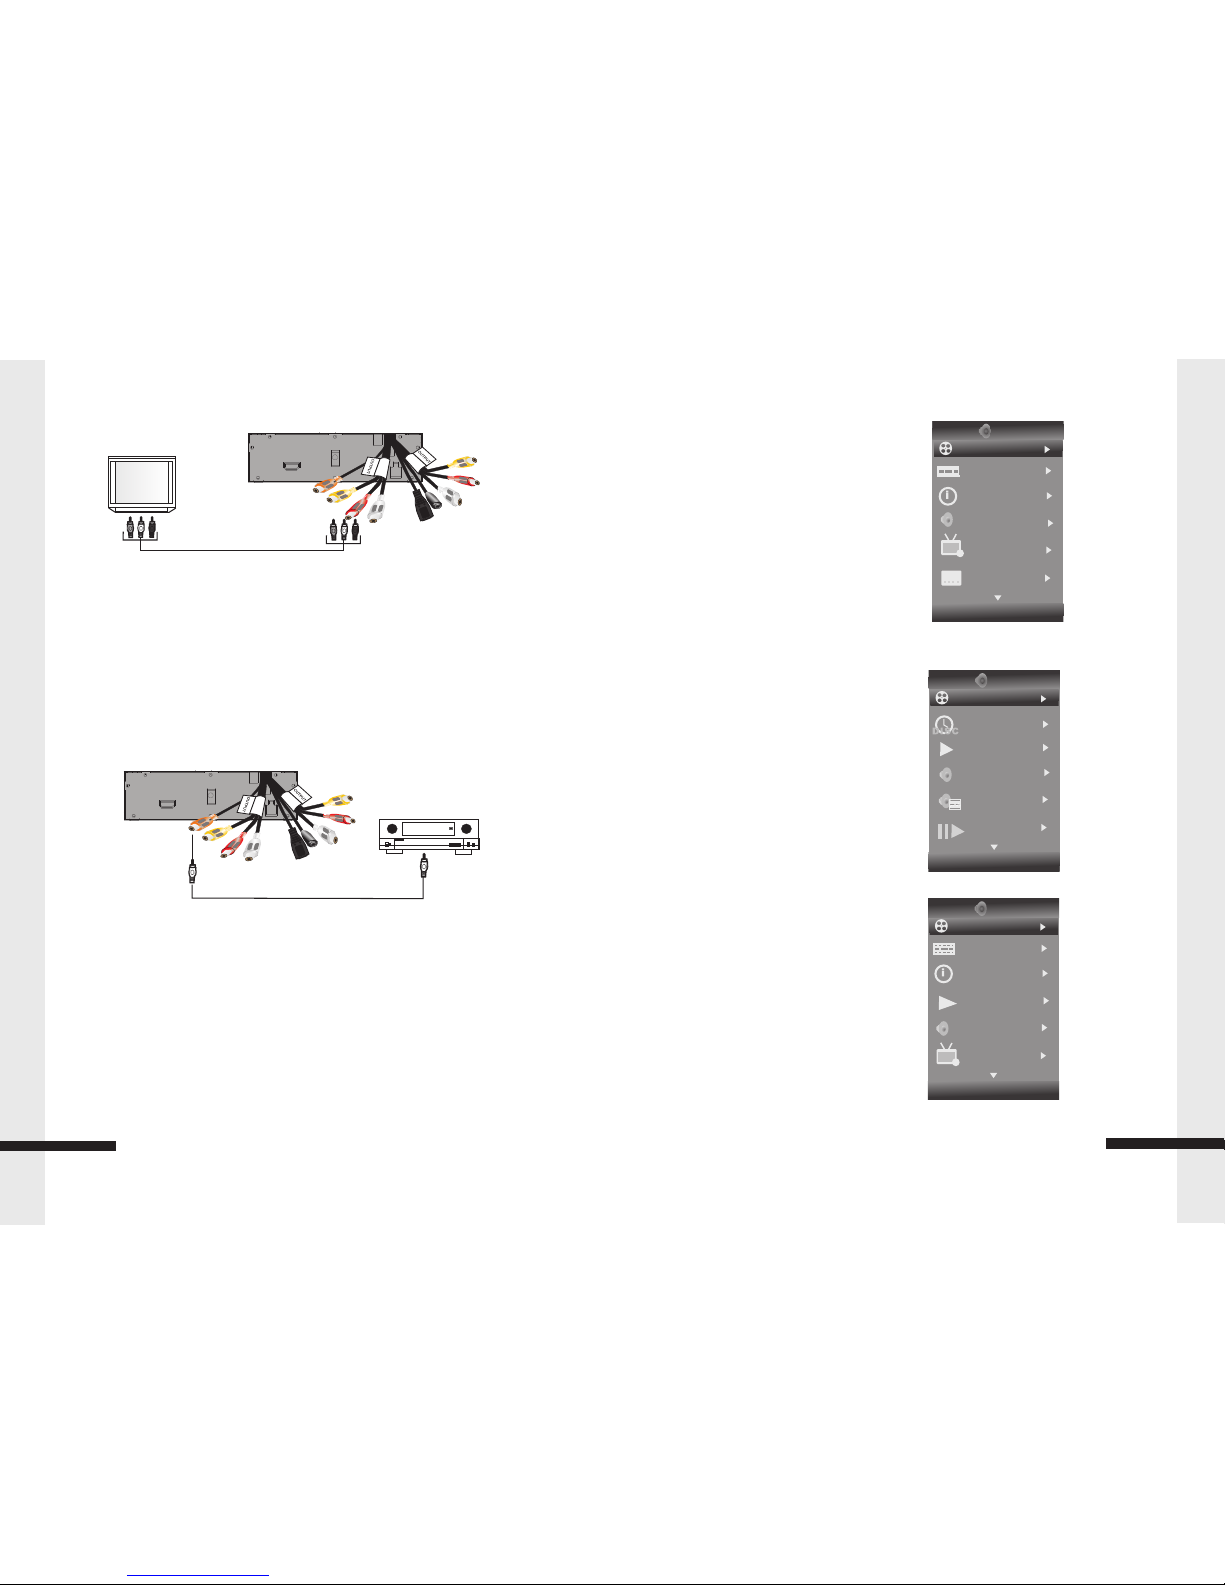
Connecting a TV using an A/V cable (good)
To connect a TV using an AV cable:
Connect an A/V cable to the VIDEO OUT and AUDIO OUT L/R jacks on the back of the
Blu-Ray Player and to the VIDEO IN and AUDIO IN L/R jack on your TV. Jacks and cable
connectors are usually color-coded.
Make sure that you match the colors.
Maintaining
General guidelines
The top and back panels of your player may become hot after a long period of use.
This is not a malfunction.
When you are not using your player, make sure that you remove the disc and put
your player into standby mode.
If you do not use your player for a long period of time, it may not function correctly.
Turn on and use your player occasionally.
Do not place objects on the disc tray.
Do not locate your player:
Near heating devices or in an enclosed vehicle
In an area with a temperature over 104°F (40°C) or humidity over 90%
Operating Temperature: -10℃~55℃
Storage Temperature: -20℃~70℃
Dirty places
In an area with direct exposure to sunlight
Do not install this equipment in a confined space such as a book case or similar unit.
The ventilation should not be impeded by covering the ventilation openings with items such
as newspapers, table-cloths, or curtains.
Make sure that you leave a minimum of 4 inches (10 cm) around your player for
sufficient ventilation.
Electrical disturbance
If you place your player next to a radio, TV, or VCR, the image may be poor and the sound may be
distorted.In this case, move your player away from the radio, TV, or VCR.
Condensation
Condensation may form inside your player when:
You move your player from a cold area to a warm area
You use it in a cold room where you have just turned on a heater
Air conditioning is blowing directly on your player
Your player is in a damp place
If condensation forms inside your player, your player will not work correctly. Turn on your player, remove
the disc and leave the tray open, then leave your player on for two to three hours.
To minimize condensation problems, keep the power cord connected to a power outlet.
Storing discs
Do not store discs in a place that is exposed to direct sunlight or heat.
Do not store discs in a place that is exposed to moisture and dust, such as a throom or near a
humidifier.Store discs vertically in their cases. Stacking discs or placing objects on discs
when not in their cases may cause warping.
Handling discs
To keep a disc clean, do not touch the play side (non-label side) of the disc.
Do not attach paper or tape to the disc.
17
Maintaining
7
Installtion
Back of player
TV
YELLOW=VIDEO
WHITE=LEFT AUDIO
RED=RIGHT AUDIO
Connect your Blu-Ray Player audio to a digital amplifier or home theater system:
Connect a digital coaxial cable from the Coaxial Digital Out jack on the back of your
Blu-Ray Player to the Coaxial Digital In jack on the receiver.
Back of player
HOME THEATER SYSTEM
CONNECT TO THE COAXIAL DIGITAL OUT JACK
OSC Play setting Menu
BD Disc Type
Title
Chapter
Time
Audio
Angle
Subtitle
Subtitle Style -- BD
Second Video -- BD
Second Audio -- BD
Bitrate
Still Off
Instant Search
Disc Type DVD
Title
Chapter
Time
Audio
Angle
Subtitle
Bitrate
Still Off
Instant Search
Instant Replay
Disc Type VCD
1.Track
2. Time
3.Mode
4.Audio
5.Bitrate
6.Instant Search
7.Instant Replay
16
BDMV
01/01
01/12
Title
00:00:09
00:00:09
01/01
Off
TT
VCD 2.0
01/01
Track
00:00:30
1/4
01/01
Off
Normal
BDMV
01/01
01/12
Title
00:00:09
Normal
MPEG
01/01
TT
Audio Setting
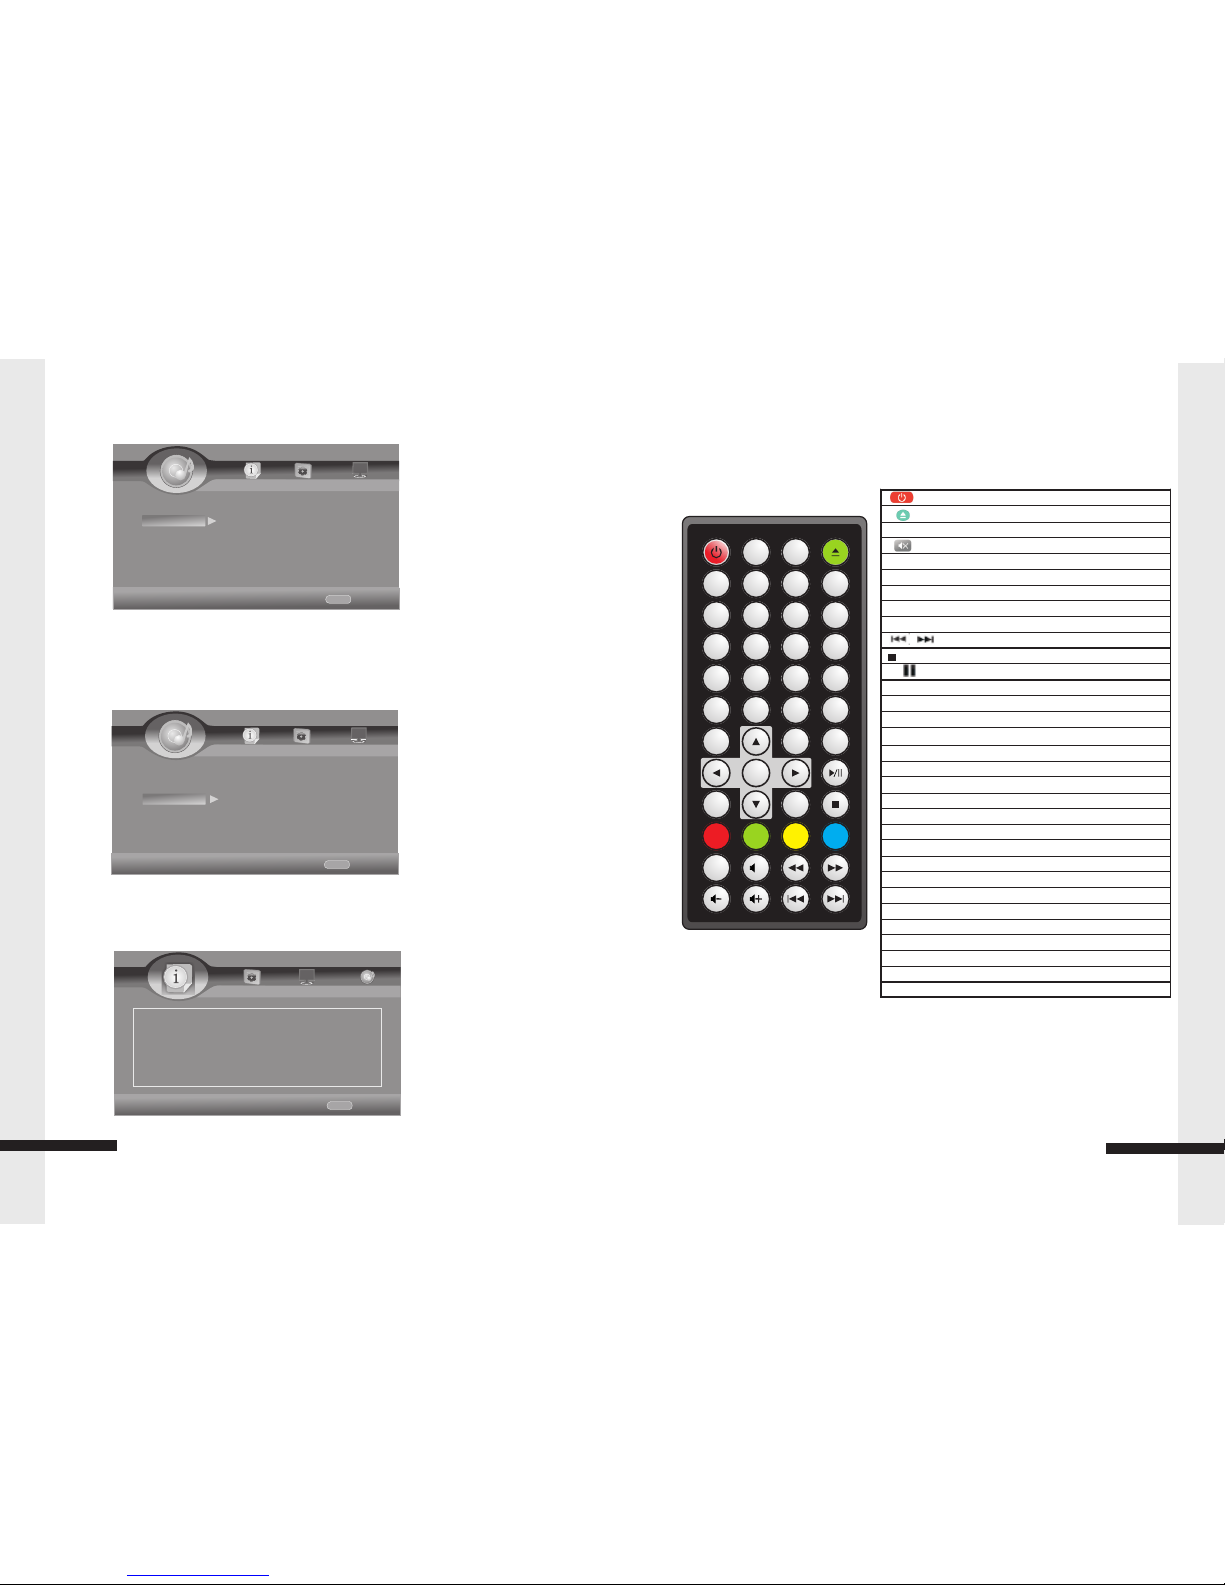
:Start / Standby
:Open / Close
No. Key:Input numbers Key 0, 1, 2…9
:Audio Mute Key
Display:Display files Information Key
VOL.:Press to Volume Up/Down
GOTO:Select playback
CLR:Press to clear an input error
ƒ ƒ / „ „ :Fast Return / Fast Forward
/ :Next Key / Previous Key s
:Stop Key
„/:Press to pause / play the movie
SLOW :Slow Playback Key
OSC:Press to open Control Menu
HOME:Press to open HOME Menu
, ‚, ƒ, „:Up/Down/Left/Right move Key s
ENTER:Enter Key
MEDIA CENTER:Press to Media Center
RETURN:Return to the Previous Menu
PROG.: Program Play
B.MARK:Display bookmark menu
ZOOM:Display Zoom in/out Key
AUDIO:Change Audio channel Key
SUBT:Change Subtitle Key
MENU:Press to open a menu for disc
TITLE:Press to open POP Up/ti tle menu for disc
A-B / Repeat :Repeat A-B, Repeat Chapter/ Title/All/Off
2nd AUDIO:In PIP mode, select the second audio on/off
ANGLE:Change Video Angle (Requires disc support)
PIP:Picture-in-picture mode on or off
RESOLUTION :Change the Output Resolution
The Remote Control
NOTE:
Colour buttons (RED/GREEN/YELLOW/BLUE): Short cut keys for selecting items on
some BD's menus (can also be used for BD's Java interactive operations).
8
The remote control
RANDOM: Random playback
POWER
23
56
789
ENTER
MEN U
RANDOM
GOT O
TIT LE
REPEAT
PROG.B.M AR KZOOM
0
DISPLAY
SLOW
RESOL U-
TION
ANGLE
SUBT.
A-BPIP
OSC
2nd
AUDI O AUDIO
HOM E
RETU RN
MED IA
CENT ER
CLR
1
4
X
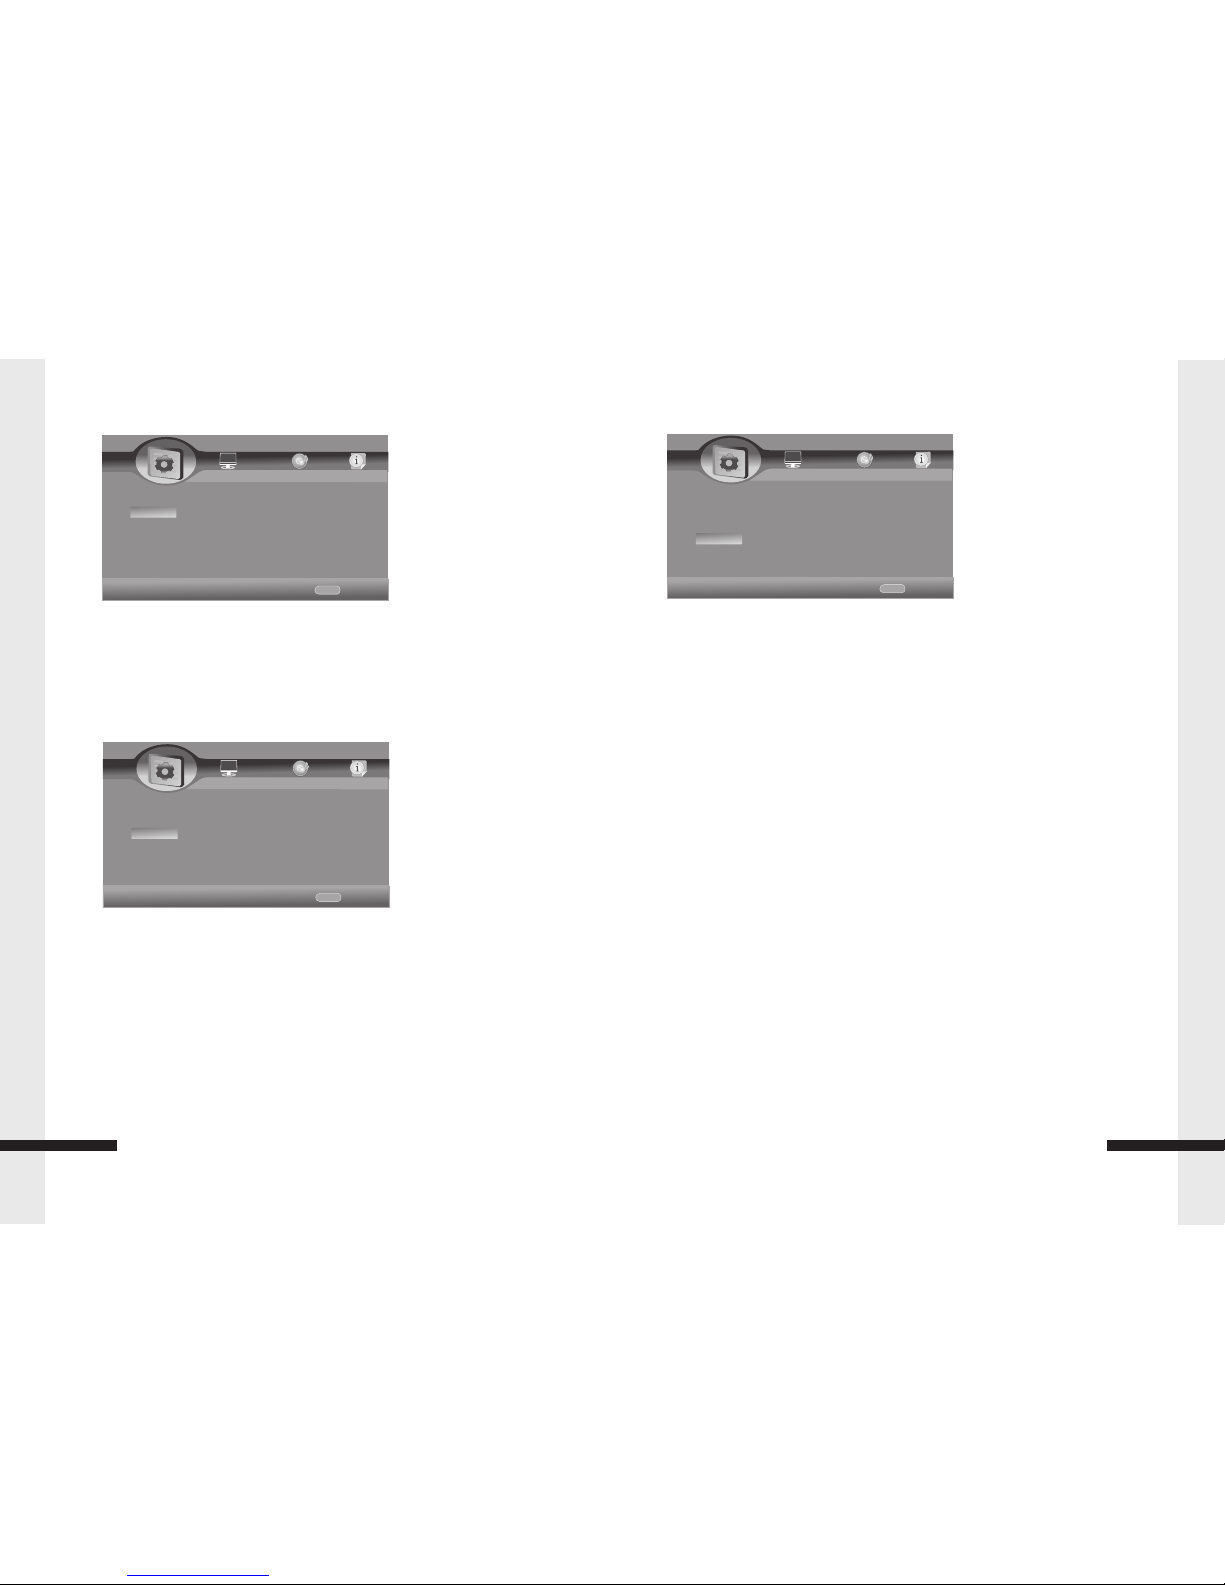
Speaker Setting
Test Tone – To test the Speaker
Post Process
EQ – Off/Rock/Pop/Live/Dance/Classical/Soft
UpMix – Off/PL2/NEO6
System Information
Display Software Version.
15
HOME Exit
----Audio Setting----
Home Menu
Audio Output Test Tone More........
Speaker Sett...
Post Process
Use cursor key to move facus,use
“Enter”key to select
HOME Exit
----Audio Setting----
Home Menu
Audio Output EQ off
UpMix off
Post Process
Speaker Sett...
Use cursor key to move facus,use
“Enter”key to select
HOME Exit
----System Information—
Home Menu
Use cursor key to move facus,use
“Enter”key to select
Software Version: BDP V3.0
System Information

Setting up the Remote Control
Setting up your player
Installing remote control batteries
Please Note
Make sure that you insert the batteries correctly.
Do not heat, open, or short-circuit batteries.
Do not throw batteries into a fire.
Do not mix different types of batteries or mix old and new batteries.
Do not try to recharge non-rechargeable batteries.
If the remote control does not function correctly or if the operating range becomes
reduced, replace the batteries.
9
Setting up the Remote Control
Open
Inserting the Batteries
1.Open the battery compartment cover.
2.Insert the new batteries. Make sure that the positive and
negative terminals of the battery correct.
Open
RELE ASE
CR2025 3V
3.Close the cover
Battery: One button cell lithium battery.
Using the Remote Control Point the remote control towards the player
front face IR mark (remote control signal receiver), or the remote
extender. Operation angle: About ± 30 degree in each the direction of
the front of the IR mark or remote extender.
Audio Setting
Audio Output
Spdif- Set the Spdif mode
HDMI- Set the HDMI mode
Down_samp – 48K / 96K / 192K
DRC –Set the DRC mode
HOME Exit
----Display Setting----
Home Menu
TV
Video process
Motion Video...
Use cursor key to move facus,use
“Enter”key to select
Video Mode Standard
HOME Exit
----Audio Setting----
Home Menu
Audio Output Spdif
Speaker Sett... Down_samp 48k
Post Process DRC Auto
Use cursor key to move facus,use
“Enter”key to select
14
Audio Setting

Home Menu
The main menu on your Blu-Ray Player gives you the power to quickly switch between
several key features. The Menu will be displayed when you start up the Blu-Ray Player.
Press Setup/Home button which on the remote control to open Home Menu.
General Setting
Setup System
Screen Saver – Turn the Screen Saver on and off.
Disc Auto Playback – Set the Disc into the Auto where applicable.
CEC –Turn the CEC on and off.
Disc Auto Upgrade– Turn the Disc Auto Upgrade on and off.
Load Default –Set the default where applicable.
Upgrade –Select the way for upgrade.
Easy Setup: Welcome Photo
OSD Language
Resolution
Aspect Ratio
Finished Photo
BUDA: BUDA Information.
BUDA Setup – External /On Board(while show insufficient internal memory,please
Change into External and connect USB flash disk.)
HOME Exit
----General Setting----
Home Menu
System
Language
Playback
Security
Use cursor key to move facus,use
“Enter”key to select
HOME Exit
----General Setting----
Home Menu
System
Language
Playback
Security
Use cursor key to move facus,use
“Enter”key to select
screen Saver on
Disc Auto Playback on
CEC off
Disc Auto upgrade off
10
Home Menu and General Setting
Display Setting
TV
TV Screen:16:9Full,16:9 Normal,4:3 Pan & Scan ,4:3 Letterbox
Resolution:Auto,480I/576I,480P/576P,720P,1080I1080P
TV System:NTSC,PAL,Multi
Color Space – RGB/YCbCr/YCbCr422/Full RGB/HDMI Deep Color – 30 bits/ 36bits /
48bits / Off HDMI 1080P 24Hz – On / Off
13
HOME Exit
----Display Setting----
Home Menu
TV
Video process
Motion Video...
Use cursor key to move facus,use
“Enter”key to select
TV Screen 16:9 Full
Resolution 1080P
TV System PAL
Color Space RGB
HDMI Deep Color off
Display Setting
Saturation
Sharpness - High/Middle/Low
Motion Video Process
Video Mode - Standard/Vivid/Smooth
Video Process,
Video Adjust - Brightness/Contrast/Hue
HOME Exit
----Display Setting----
Home Menu
TV
Video process
Motion Video...
Use cursor key to move facus,use
“Enter”key to select
Video Adjust More.....
Sharpness low
Setup Language
OSD –Set the onscreen display language.
Menu – Set the default Menu language where applicable.
Audio –Set the default Audio language where applicable.
Subtitle –Set the default subtitle language where available.
Playback
Closed Caption – Turn the caption on and off.
Angle Mark –Turn the angle mark on and off.
PIP Mark –Turn the PIP mark on and off.
Secondary Audio Mark –Turn the Secondary Audio Mark on and off.
Last Memory –Turn the last memory on and off.
PBC –Turn the PBC on and off.
HOME Exit
----General Setting----
Home Menu
System
Language
Playback
Security
Use cursor key to move facus,use
“Enter”key to select
OSD English
Menu English
Audio English
Subtitle English
HOME Exit
----General Setting----
Home Menu
System
Language
Playback
Security
Use cursor key to move facus,use
“Enter”key to select
Closed Caption on
Angle Mark on
PIP Mark on
Secondary Audio.... on
11
General Setting
Security
Change Password – To change the password. ( Initial Users Password: 0000)
Parental Control: ( Initial Users Password: 0000)
Off – Turn off the parental control
[Kid Safe] – Suitable for all children.
[G] – General audiences.
[PG] – Parental guidance suggested.
[PG-13] – Not suitable for anyone under 13.
[PGR] – Parental guidance recommended.
[R] – Not suitable for anyone under 17 unless supervised by a parent or adult guardian.
[NC-17] – Not suitable for anyone under 17.
[Adult] – All DVDs can be played.
HOME Exit
----General Setting----
Home Menu
System
Language
Playback
Security
Use cursor key to move facus,use
“Enter”key to select
Change Password More.....
Parental Control More.....
12
General Setting
Last memory on
Country Code More.....
Table of contents


