AutoTest Pedal Effort User manual

User Manual
Version 2.0
AUTO
Test
™Pedal Effort Sensor
I n V e h i c l e P e d a l E f f o r t S e n s o r

Pedal Effort Sensor User Manual v2.01.docx Page 2of 17
DECLARATION OF CONFORMITY
We, Auto Test Products Pty Ltd. declare under our sole responsibility that the
product Pedal Effort Sensor is in conformity with the provisions of the following
Council Directive: 1999/5/EC.
A copy of the Declaration of Conformity is available from http://www.autotest.net.au
© AutoTest Products Pty Ltd (AutoTest) [2020].
Copyright in the drawings, information and data recorded in this document (the
information) is the property of AutoTest Products. This document and the information
are solely for the use of the authorised recipient and this document may not be used,
copied, or reproduced in whole or part for any purpose other than that for which it
was supplied by AutoTest Products. AutoTest Products makes no representation,
undertakes no duty, and accepts no responsibility to any third party who may use or
rely upon this document or the information.
Under no circumstances shall AutoTest Products be responsible for any loss of data
or income or any special,
incidental, consequential or indirect damages howsoever caused.
The contents of this document are provided "as is". Except as required by applicable
law, no warranties of
any kind, either express or implied, including, but not limited to, the implied
warranties of
merchantability and fitness for a particular purpose, are made in relation to the
accuracy, reliability or contents of this document. AutoTest Products reserves the
right to revise this document or withdraw it at any time
without prior notice.
Please dispose of batteries properly.
10242
E7474

Pedal Effort Sensor User Manual v2.01.docx Page 3of 17

Pedal Effort Sensor User Manual v2.01.docx Page 4of 17
Table of Contents
AUTOTEST™ Pedal Effort Sensor
1. UNPACKING AND FIRST TIME USE 5
2. FOR YOUR SAFETY 6
3. WARRANTY 7
4. AUTHORISED SERVICE AGENTS: 8
5. OPERATION 9
5.1 Set-Up 9
5.2 Bluetooth Pairing 10
5.3 Running the Test 10
5.4 Reviewing a Test 13
5.5 Printing a test 13
6. SPECIFICATIONS 14
6.1 Hardware Specifications 14
6.2 Features 14
7. TROUBLESHOOTING 15
8. CALIBRATION PROCEDURE 16
8.1 Returning the Sensor for Calibration 16
8.1.1 Packaging 16
8.1.2 Shipping 16

Pedal Effort Sensor User Manual v2.01.docx Page 5of 17
1. UNPACKING AND FIRST TIME USE
Congratulations on your choice of an AUTOTEST™ Pedal Effort Sensor. Please take
the time to read this User’s Manual before using the Pedal Effort Sensor in the field.
Incorrect or inappropriate use of this instrument may void the warranty. Retain the
packing materials for future shipping and transport of the unit as it must be calibrated
periodically.
Please complete the warranty registration card and post it to AUTOTEST Products
Pty Ltd, alternatively visit our website www.autotest.net.au and complete your
warranty registration on line. Your warranty registration ensures that you are kept up
to date on any software or hardware changes to your AUTOTEST™ Pedal Effort
Sensor. It also helps to provide faster services.
The packing box of your AUTOTEST™ Pedal Effort Sensor should contain the
following:
1. AUTOTEST™ Pedal Effort Sensor (hand-held unit) attached with the pedal
sensor
2. User Manual on AUTOTEST USB
3. Calibration Certificate
4. Warranty Registration Card
5. 4 x AA Batteries
The AUTOTEST™ Pedal Effort Sensor is designed to be used in conjunction with the
workshop pro.
*Workshop Pro and software not included.
Pedal Effort Sensor User Manual v2.01.docx Page 6of 17
2. FOR YOUR SAFETY
Read these simple guidelines. Not following them may be dangerous. Read the
complete user guide. Further detailed information is given in this manual.
SWITCH ON SAFELY
Do not switch the device on when wireless device use is prohibited or when it
may cause interference or danger.
SWITCH OFF WHEN REFUELING
Do not use the device at a refuelling point. Do not use near fuel or chemicals.
SWITCH OFF NEAR BLASTING
Follow any restrictions. Do not use the device where blasting is in progress.
USE SENSIBLY
Use only in the positions as explained in the product documentation.
QUALIFIED SERVICE
Only qualified personnel may install or repair this product.
ACCESSORIES AND BATTERIES
Use only approved accessories and batteries. Do not connect incompatible
products.
WATER-RESISTANCE
Your device is not water-resistant. Keep it dry.
CONNECTING TO OTHER DEVICES
When connecting to any other device, read its user's guide for detailed safety
instructions. Do not connect incompatible products.

Pedal Effort Sensor User Manual v2.01.docx Page 7of 17
3. WARRANTY
AUTOTEST Products Pty Ltd or any Authorised AUTOTEST Service Centre warrants
this product against defects in material and workmanship for a period of 12 months
from the original date of purchase. This warranty applies only to products and
components supplied by AUTOTEST Products which can be identified by the trade
name or logo affixed to them or by other documents. AUTOTEST Products does not
warrant any products not supplied by AUTOTEST Products.
During the warranty period, AUTOTEST Products or any Authorised Service Centre
will repair (or at its option replace) any defective component(s) without charge for
parts or labour, provided the product is returned freight prepaid to an authorised
AUTOTEST Service Centre. Transit insurance and return freight will be at the
owner’s expense.
In order to obtain calibration, warranty or non-warranty service, ship the product,
freight and insurance prepaid to your nearest AUTOTEST Service Centre. Attach to
the product your name, address, contact phone numbers, description of the problem
and if a warranty claim, proof of purchase (dated sales receipt or invoice).
AUTOTEST Products or any Authorised AUTOTEST Service Centre reserves the
right to refuse warranty repair if accident, abuse, misuse or misapplication has
damaged the product. In transit or as a result of service or modification by other than
an Authorised Service Centre, nor are any other warranties expressed or implied,
including any regarding merchantability or fitness for any other particular purpose.
AUTOTEST Products or any Authorised Service Centre is not responsible for
incidental or consequential damages resulting from the breach of any express or
implied warranty, including damage to property and, to the extent permitted by law,
damages for personal injury.

Pedal Effort Sensor User Manual v2.01.docx Page 8of 17
4. AUTHORISED SERVICE AGENTS:
AUSTRALIA
AutoTest Products
61-63 Parsons St, Kensington, VIC, 3031
PH: (+61) 3 8840 3000
Burson Auto Parts
61 Gower St, Preston VIC 3072
PH: (+61) 3 9914 5555
CHINA
Itach Autotech Corp
Room 703 Building A, Guo Run Commercial Plaza, No.46 West,. Feng Tai District, Beijing 100073
PH: (+_10) 8365 9442
DENMARK
BM Autoteknik A/S
Erhvervsparken 7, 9632 Moldrup,
PH: (+ 45) 8669 2022
MACEDONIA
Velmar d.o.o.
Gjorce Petrov 10, 1000 Skopje, Makedonija.
PH: (+389) 2204 0288
MALAYSIA
Tritech Safety Sdn Bdn
No38, 2nd Floor, Jalan Pandan Indah, Kawasan Industri Ampang Tambahan, 68000 Ampang,
Selangor D.E.
PH: (+603) 4291 0988
NEW ZEALAND
Brake & Transmission NZ
21-27 Omega St., Albany, Auckland
PH: (+ 64) 9414 3205
SOUTH AFRICA
Brakecore Supply Co
5 Oosthuise St, Ermelo, 2350.
PH: (+271) 7819 3412
UNITED KINGDOM
Tecalemit Garage Equip. Co. Ltd
Unit 2,Eagle Road, Langage Bus Pk., Plympton, Plymoth, Devon, PL7 5J
PH: (+017) 5221 9150
The full list of Authorised Service Centres can be found on our website:
http://www.autotest.net.au/distributors/
Alternatively, you can contact the AutoTest Service Department by
Phone: (+61 3) 8840 3016
Pedal Effort Sensor User Manual v2.01.docx Page 9of 17
5. OPERATION
5.1 Set-Up
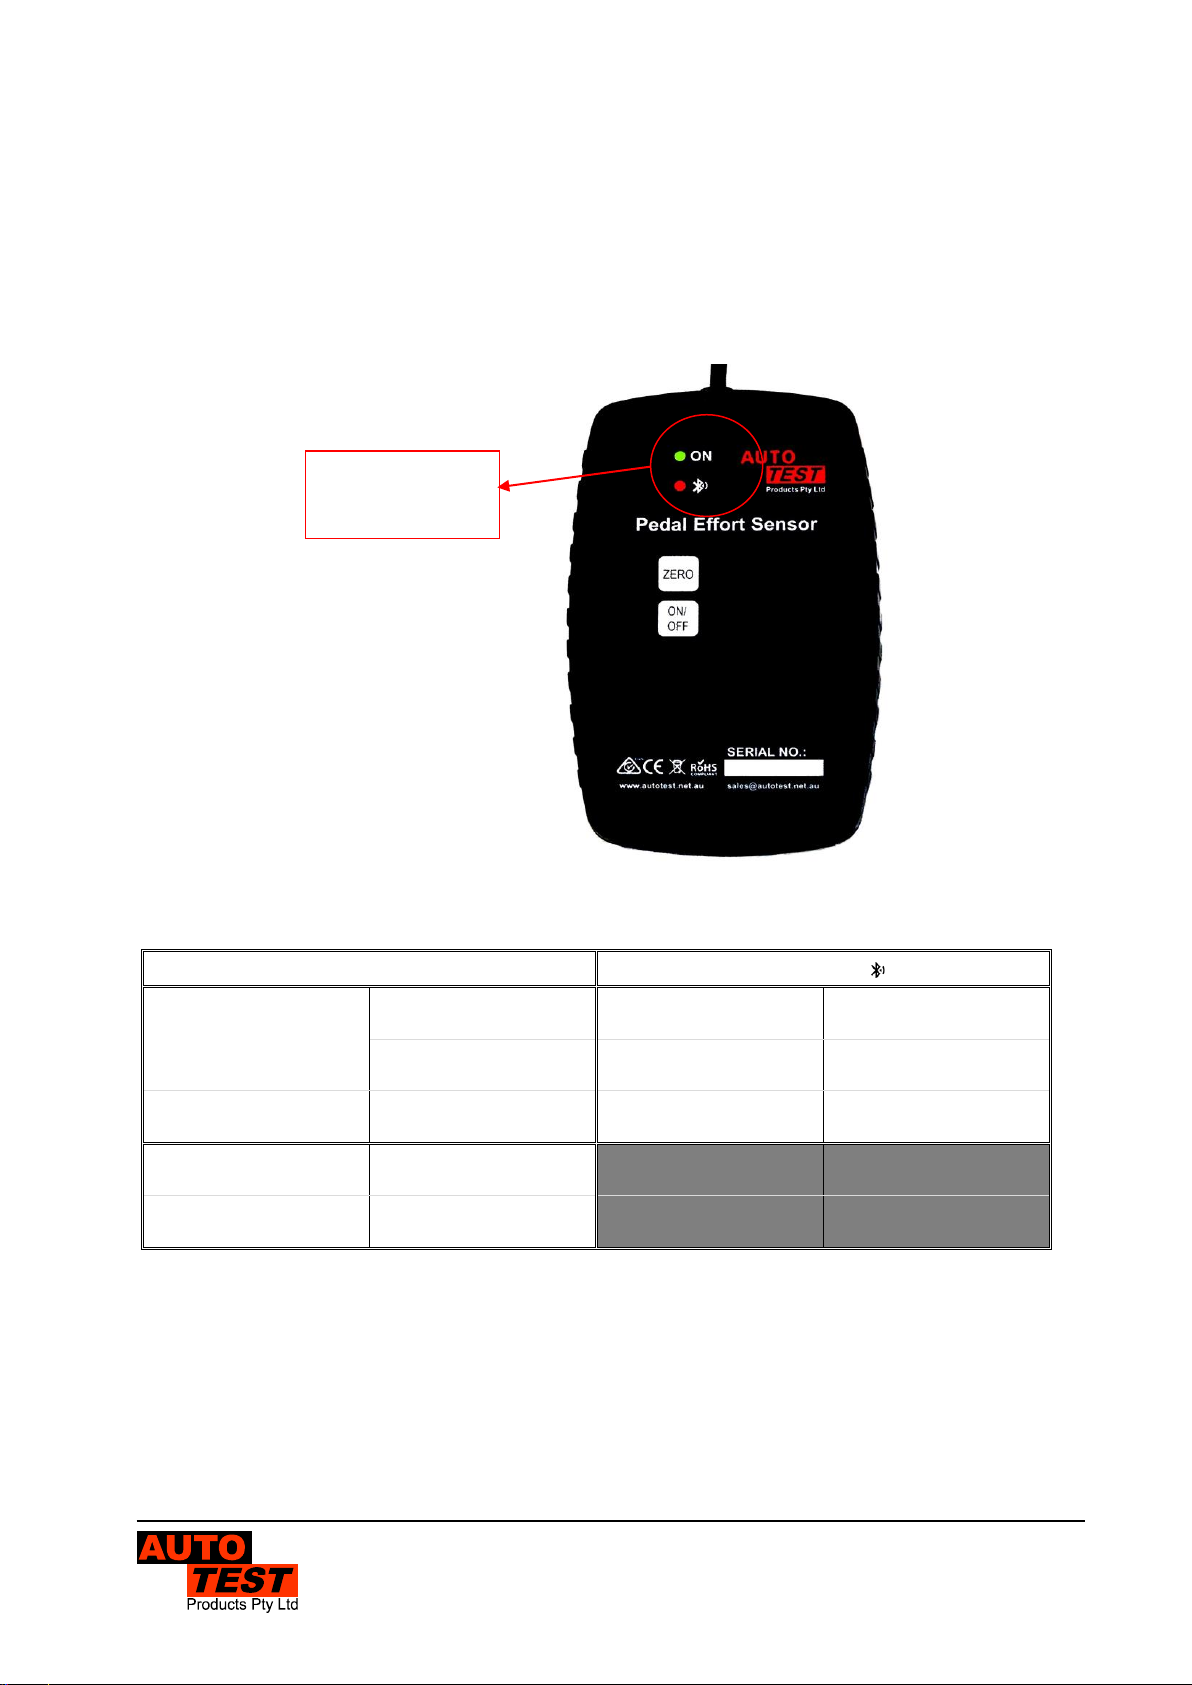
Before any testing, insert the included batteries and push the on/off button. The
power led should turn on at this point. On start up the power led will light up RED.
While the power LED is RED, the workshop pro will not be able to connect to the
tablet. The LED will change to GREEN after approximately 30 seconds. This means
the unit is ready to connect to a Workshop Pro.
Figure 1
LED State Table
ON
Bluetooth ( )
Solid RED
NOT READY
RED
Double Flashing
CONNECTED
Solid GREEN
READY
RED
Slow Flashing
NOT READY
Solid AMBER
FIRMWARE
UPDATER
RED/
Fast Flashing
READY
RED/GREEN
Slow Flashing
50% Battery
RED/GREEN
Fast Flashing
LOW BATTERY
When the battery is low the ON light will start blinking red (alternating green). At this
time the unit will still be functional, but it is recommended that the battery is changed
especially when the ON light is blinking quickly.
Ready10242

Pedal Effort Sensor User Manual v2.01.docx Page 10 of 17
5.2 Bluetooth Pairing
Upon receiving the Pedal effort sensor or Bluetooth printer, the unit will need to be
paired with the Workshop pro.
Pairing occurs in the Bluetooth menu, under settings menu.
The Bluetooth menu will display a list of currently paired devices. At the bottom of the
screen is a “Scan for devices” button, press this button to see available devices to
pair with.
The pedal effort sensor will be named “PES_xxxxx”, xxxxx is the serial number
printed on the front of the device. If none of the devices available being with ‘PES’,
the unit could be listed as ‘null’. Check for mac address that begin with
20:XX:XX:XX:XX:XX. Once paired the device will be properly named.
The printer will be named “MPT-II”. Also check for mac address that begin with
00:XX:XX:XX:XX:XX or 8C:XX:XX:XX:XX:XX.
Press and hold the desired device to pair with the device.
Figure 2
5.3 Running the Test
The pedal sensor should be clamped to the brake pedal and the hand-held unit can
be placed on the seat or anywhere comfortable.
Press “test” and select test with Pedal Effort Sensor.

Pedal Effort Sensor User Manual v2.01.docx Page 11 of 17
Figure 3
Before beginning the test, press “zero” on the unit to stabilise the measurement.
Ensure there is no weight on the brake pedal when this is done.
Fill in the test information (examiner ID, and vehicle registration). DO NOT press
Start until the Workshop Pro is secure.
Secure the workshop pro to the passenger seat or to the floor of the car. Ensure that
it is secure for the entire duration of the test.
Any movement may cause incorrect readings and result in failure of the test.
Press “Start” on the bottom right of the screen.
Figure 4

Pedal Effort Sensor User Manual v2.01.docx Page 12 of 17
Test Sequence Summary
Step
Test Status
App Action
User Action
1
User hits “START” after
providing the examiner id
and registration number of
the vehicle
Test window begins
counting down from 5
Make sure the tablet
completely
secure/stable and don’t
bump it
2
Test setup countdown
reaches 0
Test window prompts
user to ‘Accelerate
Vehicle’
Confirm the test is
prompting you to
accelerate
3
Test is prompting user to
‘Accelerate Vehicle’
Begin gently
accelerating the vehicle
to desired test speed
4
Vehicle arrives at desired
test speed
Release the accelerator
and apply the brake
immediately
5
User begins deceleration
Test window prompts
user to ‘Decelerate
Vehicle’
Continue to apply the
brakes until the vehicle
comes to a complete
stop
6
Test is prompting user to
‘Decelerate Vehicle’
Continue to apply the
brakes until the vehicle
comes to a complete
stop
7
Vehicle comes to a
complete stop
Test Report is
generated and
displayed on App
screen
Pull over and review
test
Pedal Effort Sensor User Manual v2.01.docx Page 13 of 17
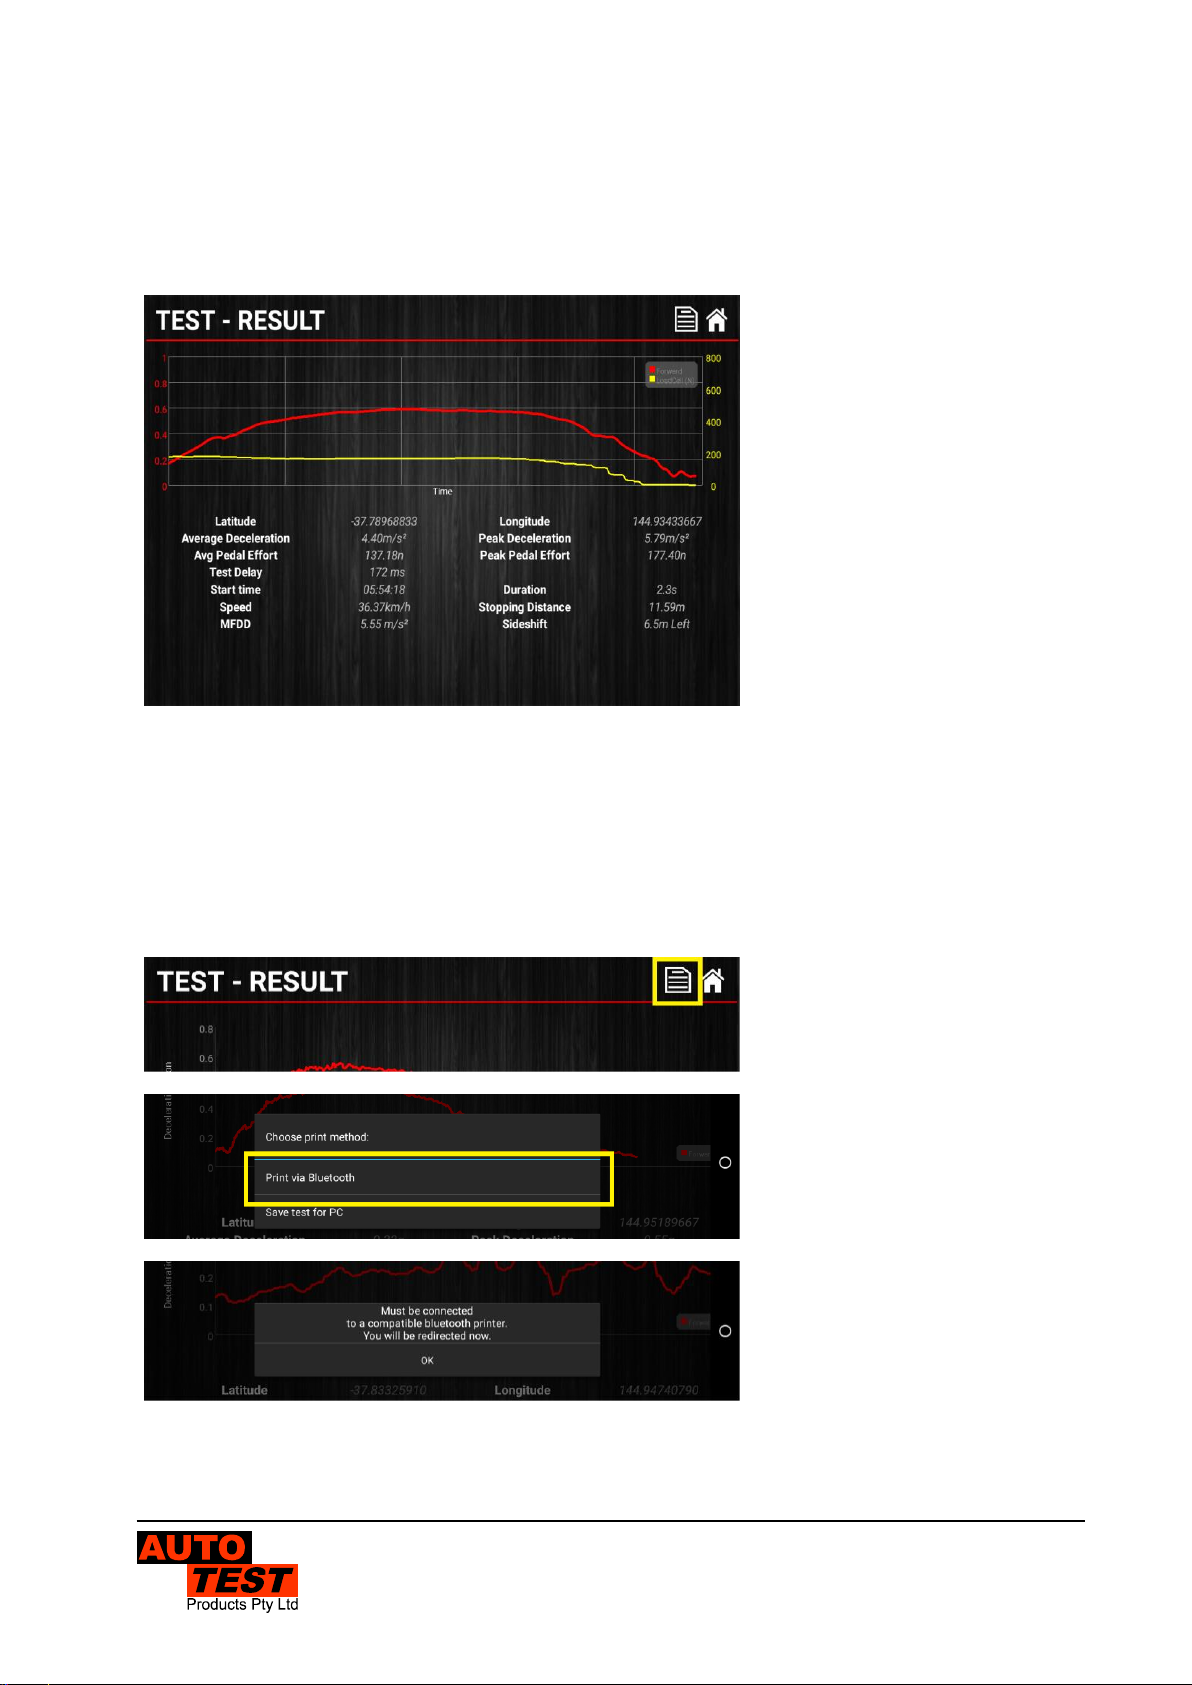
5.4 Reviewing a Test
The test report component of the application contains the information relating to tests
that have been run (shown in the figure below). The Red graph displays the forward
acceleration and the Green graph displays the pedal effort.
Figure 5
The statistics reported include:
•Location (Longitude, Latitude)
•Average/Peak
•Deceleration (displayable in G,
%G, msˉ²)
•Duration
•Speed
•Stopping Distance
•MFDD
•Side shift
•Average Pedal Effort
Click on the values to cycle through
the available units (i.e. G, %G,
msˉ²).
5.5 Printing a test
In order to print a test report you need to pair the Workshop Pro with the supplied
Thermal Bluetooth Printer, if you haven’t done this yet just continue through the
following print procedure and the app will redirect you to the Bluetooth Pairing screen
when appropriate.
Figure 6
Figure 7
Figure 8
When looking at a test result select
the report icon from the top right
of the report (Figure 6). You will be
prompted with a selection panel.
Choose ‘Print via Bluetooth’
(Figure 7) and you will be asked to
select which printer to be used to
print the test.
Make sure the printer you intend to
print from is turned on and select it
from the choose printer dialog. It
will begin to print out shortly.

Pedal Effort Sensor User Manual v2.01.docx Page 14 of 17
6. SPECIFICATIONS
6.1 Hardware Specifications
Input
•Load cell: accuracy ±2%
Output
•Peak pedal effort
Power Source
•Four AA batteries
Temperature Range
•-5ºC - 50ºC
Humidity
•25% - 85%, non-condensing
Battery Capacity
•2450* mA/Hr, over 350 tests
6.2 Features
•Simple two-button operation via a tactile membrane pad
•Lightweight (500grms), dimension (100 x 150 x 40mm)
•Automatic shut-off to preserve battery life
•Calibration is internationally traceable through NATA
•Interval of calibration as determined by the relevant local authority
•12 months warranty
•Internet support hotline for diagnostics and calibration
•Comprehensive after-sales service and assistance
*battery capacity based on supplied batteries. Capacity could change if different
batteries are used.

Pedal Effort Sensor User Manual v2.01.docx Page 15 of 17
7. TROUBLESHOOTING
Common Issues
Solution
My pedal is not coming up on the
available devices list.
Ensure the ON light is green, and the red
light is flashing quickly before scanning
for devices.
My pedal is paired but I can’t start a test.
Check the serial number of the paired
device with what is written on the front of
the pedal. It is possible that the workshop
pro has been paired with the wrong pedal
and will require pairing with the correct
serial number.
Check the lights on the front of the Pedal
Effort Sensor. One light must be GREEN
and Bluetooth light must be double quick
flash every 2 seconds.
If the ON light is AMBER, turn the unit on
and off, ensure that the ‘Zero’ button is
not pressed when turning on the device.
Check the calibration date of the unit.
The pedal effort sensor will automatically
disable tests after the calibration due
date. During this period a pop up will
appear alerting user that the Pedal is
‘locked’.
ON light won’t stay green and keeps
turning red.
ON light will blink alternating green and
red when the batteries are low. The unit
will still be functional but if the lights are
flashing quickly the unit might not be able
to complete a full test.
Unit won’t turn on even with new
batteries.
Check the battery compartment. The
batteries may have fallen out when
knocked or moved too much.
If this has not occurred, please call an
Authorised Service Agent.
My pedal is giving incorrect readings.
Ensure that there is no weight on the
pedal during the start up of the test. You
can manually zero the pedal with the
button on the front panel.
Please contact your local Authorised Service Agent (Page 8) for further assistance.

Pedal Effort Sensor User Manual v2.01.docx Page 16 of 17
8. CALIBRATION PROCEDURE
The Pedal Effort Sensor must be re-calibrated periodically, this maintains creditability
in tests and acceptance of data according to international standards.
The Calibration due date is print on every test receipt.
There are two ways of calibrating - either via your local authorised service centre or
by returning the unit to AUTOTEST Products.
8.1 Returning the Sensor for Calibration
8.1.1 Packaging
Please remember that you are shipping an electronic instrument. Bubble wrap or
foam should surround the unit and should be inserted into a sturdy cardboard box.
8.1.2 Shipping
Labelling - A label noting “Electronic Device - Fragile” should be placed on the box.
Freight Carrier –Container should be sent freight prepaid. AutoTest Products has
no preference on freight carriers. However, should expedient delivery be required
ensure you contact your freight carriers for confirmation.
Ship to: Ship to: The Service Department, AutoTest Products Pty Ltd, 61-63 parsons
St, Kensington, Victoria 3031 Australia. Phone: +61 3 8840 3016; or to your nearest
service distributor. A full list of distributors is available on our website.

Pedal Effort Sensor User Manual v2.01.docx Page 17 of 17
NOTES:
Table of contents


