Auvi MSW1100 User manual

VISION BEYOND SOUNDVISION BEYOND SOUND®
®®
INSTRUCTION MANUAL
Photo is for reference only. Printed In China
MSW1100
VERTICAL CD/MP3 SHELF SYSTEM WITH
USB FLASH READER AND AM/FM DIGITAL PLL TUNER

02
C A UT IO N
R IS K OF E L E C T R IC S HOC K
DO NOT OP E N
C L A S S 1 L A S E R P R O DUC T
K L A S S E 1 L A S E R P R O DU K T
L A S E R D E C L A S S E
L A S E R D I P R IMA C L A S S E
K L A S S E 1 L A S E R
L A S E R P R IME R A C L AS E
L AS E R C L A S S E 1
K L AS S E 1 L AS E R P R ODUK T
C A UT IO N: I NVIS IB L E L A S E R R A DIATI ON WHE N OP E N A ND
INT E R L O C K S DE F E AT E D. AV OID E XP OS UR E TO B E AM.
V O R S IC HT: U NS IC HT B A R E L A S E R S T R A HL UNG T R IT T A US ,
WE NN DE C K E L G E ÖF F NE T UND WE NN S IC HE R HE IT S V E R R IE G E L UNG
ÜB E R B R ÜC K T IS T. N IC HT DE M S T R A HL A US S E T ZE NI.
VA R NIN G : OS Y NL IG L A S E R S T R ÁL NIN G NÄR DE NNA D E L ÄR ÖP P NA D OC H
S P ÄR R ÄR UR K OP P L A ND. S T R ÁL E N ÄR FAR L IG .
A DVA R S E L : US Y NL IG L A S E R S TR ÁL ING VE D ÁB NIN G . N ÁR
S IK K E R HE DS A F B RY DE R E E R UDE A F F UNK T IO N. U NDG Á UDS /E T T E L S E F OR
S T R ÁL IN G .
AT T NE NZIO NE : R A DIO NS L A S E R IN VIS ID IL E . N O N G UAR DA R E
DIR E T TA ME NT E NE L L A S O R G E NTE DE L L A S E R .
A C H T UNG : L AS E R L IN S E NIC HT B E R ÜHR E N UNS IC HTB A R E R L A S E R S T R A HL .
AV IS O : A L E NT E NUNC A D E V E S E R TO C A DA .
The lightning flash
and arrow head
within the triangle is a
warning sign alerting
you of "dangerous
voltage" inside the
product.
WARNING: To reduce the
risk of electric shock, do not
remove cover (or back). No
user-serviceable parts inside.
Refer servicing to qualified
service personnel.
The exclamation
point within the
triangle is a warning
sign alerting you of
important instructions
accompanying the
product.
WARNING:
TO REDUCE THE RISK OF FIRE OR ELECTRIC SHOCK, DO NOT
EXPOSE THIS APPLIANCE TO DRIPPING OR SPLASHING LIQUIDS.
CAUTION: GROUNDING OR POLARIZATION. THE PRECAUTIONS
SHOULD BE TAKEN SO THAT THE WIDER BLADE OF THE AC PLUG
MUST MATCH THE SLOT IN RECEPTACLE "WALL SOCKET".
CAUTION
DO NOT EXPOSE TO DRIPPING OR SPLASHING LIQUIDS!
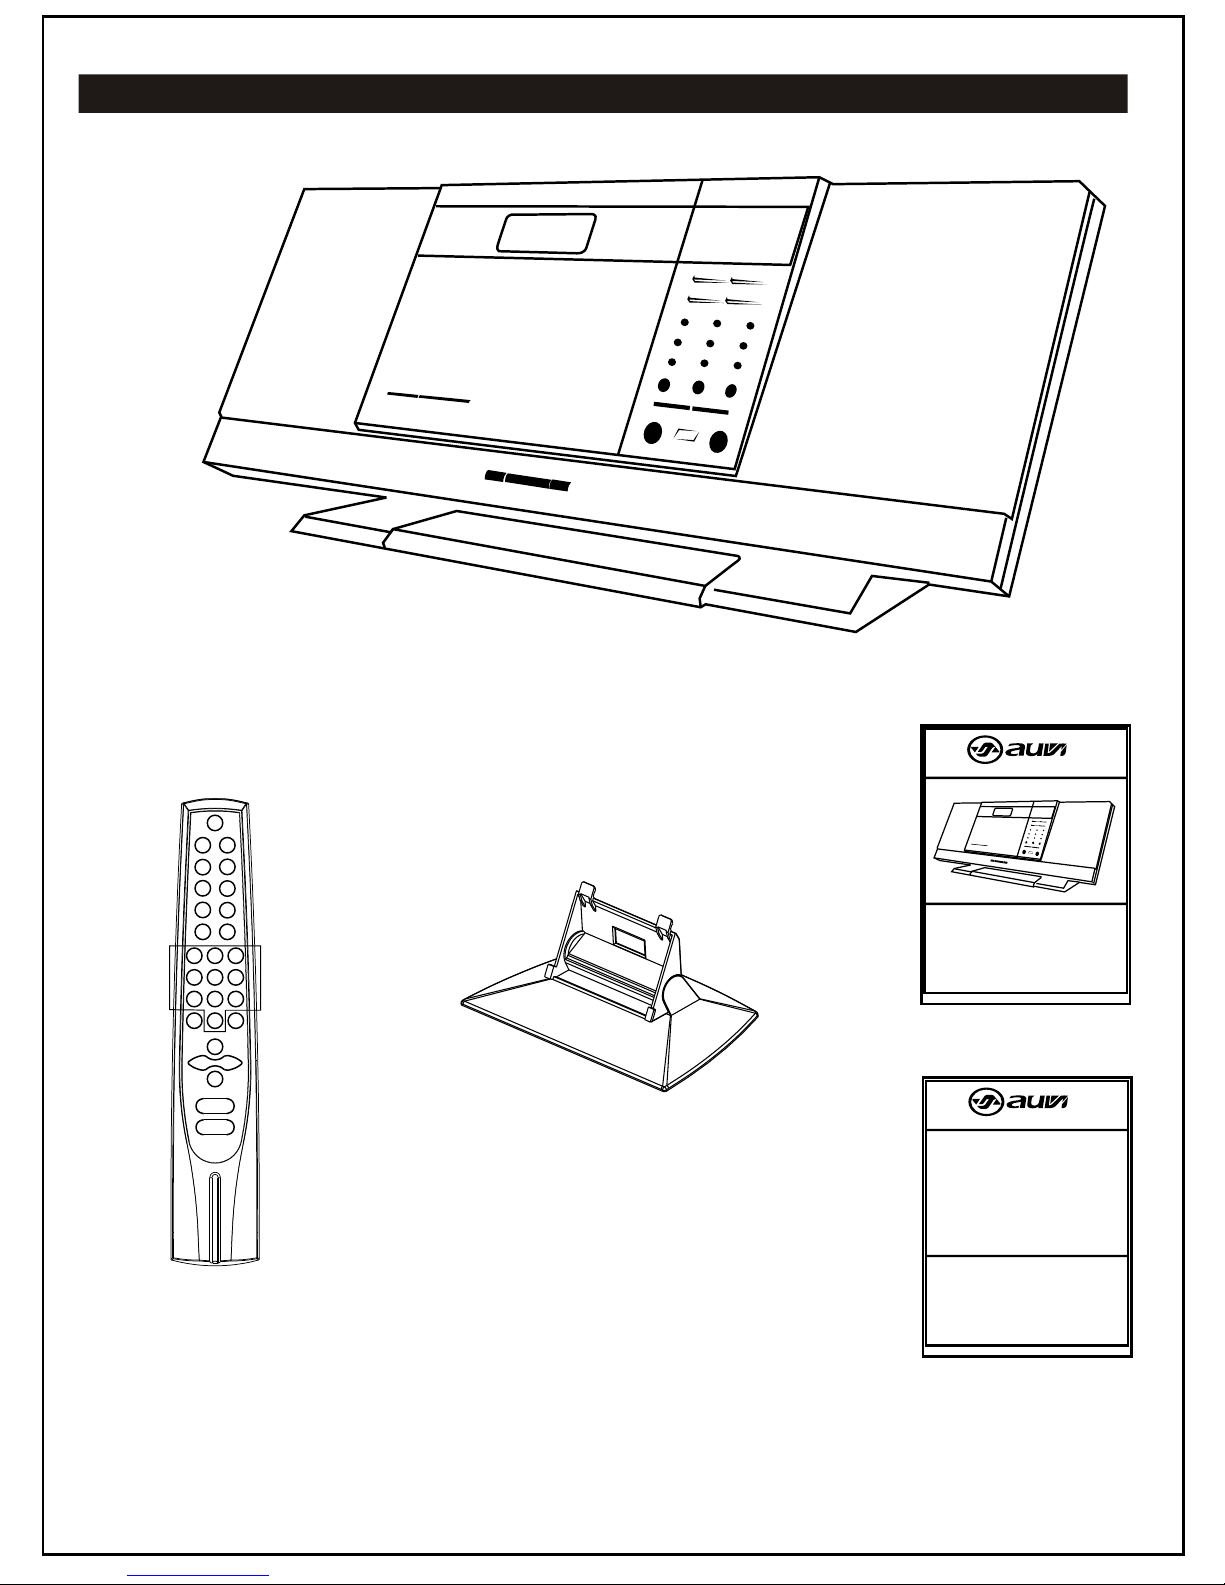
Package Contents
MSW1100 Music System
1 Desktop Music System Stand
1 Remote Control
03
1 Instruction Manual
VISION BEYOND SOUNDVISION BEYOND SOUND®
®®
INSTRUCTION MANUAL
Product and Instruction Manual subject to change. Photo is for reference only.
MSW1100
VERTICAL CD/MP3 RADIO SHELF SYSTEM WITH
USB FLASH READER AND AM/FM RADIO
1 Warranty Card
VISION BEYOND SOUNDVISION BEYOND SOUND®
®®
WARRANTY
MSW1100
04
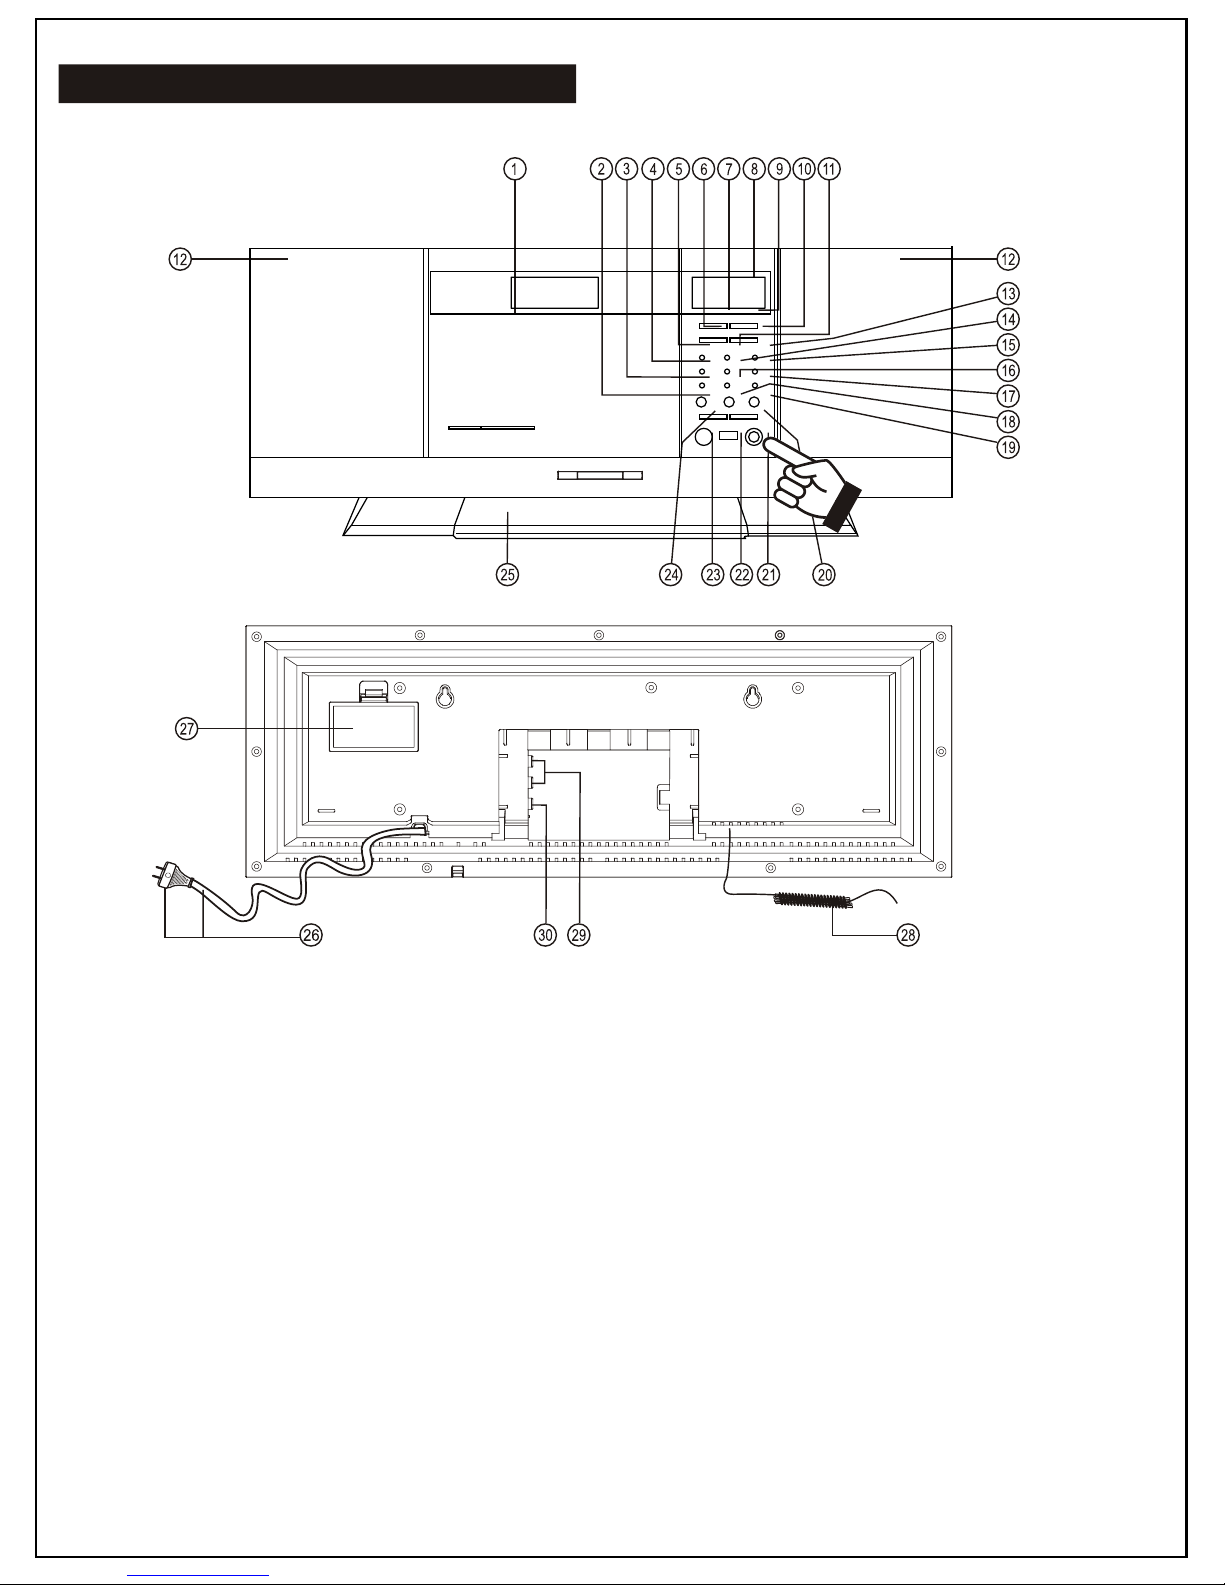
01. CD Door (Motorized)
02. EQ (Equalizer) Button
03. Sleep Button
04. Timer Button
05. CD Program Button
06. CD Down/Back Button
07. CD Stop Button
08. CD/Clock/Radio Digital
Multifunction Display
09. CD Play/Pause Button
10. CD Up/Next Button
11. Find/ESP Display Button
12. Speaker (Left & Right)
13. Tuner/Band Button
14. CD Repeat Button
15. Mem. (+) Button
16. CD Function Button
17. Mem. (-) Button
18. Vol (-) Button
19. Vol (+) Button
20. Power On/Off Button
21. Headphones/Earphones Socket
22. USB Socket
23. Remote Control Sensor
24. Open/Close Button
25. Desk Stand
26. AC cord
27. Backup Battery Compartment
28. FM Antenna Wire
29. Audio Line-In Socket [DVD/AUX] (Left & Right)
30. Sub-woofer Output Socket
Location Of Controls

01. On/Off Button
02. Find/M/S Button
03. Timer Button
04. EQ Button
05. Sleep Button
06. Mem. (-) Button
07. Band Button
08. Intro Button
09. Function Button
10. Repeat Button
11. Mem. (+) Button
12. Direct Buttons (Number Buttons)
13. Mute Button
14. Program Button
15. CD Play/Pause Button
16. CD Next/Tune (+) Button
17. CD Back/Tune (-) Button
18. CD Stop/Band Button
19. Vol + Button
20. Vol - Button
Backup Batteries
- Open the battery door at rear of unit.
- Insert 2 pieces “AA” (UM-3/LR6 Type) batteries in the battery compartment.
- These two (2) batteries are for backup of the “Real Time Clock” and “Radio Memory Preset Stations“ during
brief power outages. Please observe the correct polarities or the memory will not be properly maintained.
- This unit works on normal household AC power.
- Make sure the set voltage of the unit matches your local voltage.
- Insert the plug of the AC cord into a wall outlet with AC power.
- Press the On/Off button to power on the unit.
- This unit is designed to operate without being powered “Off” and will either be “On” or on “Standby”.
- In “Standby”, the display will show the current time and you can use the power switch
(Remote Control or Front Panel) to switch “On” the unit.
Power Supply
Remote Control
1
2
3
4
5
6
7
8
9
10
20
11
12
13
15
17
19 18
16
14
Important: How To Tell If Power Is “On”?
When the power is “On” the entire digital display will be lit up with a blue back light.
05
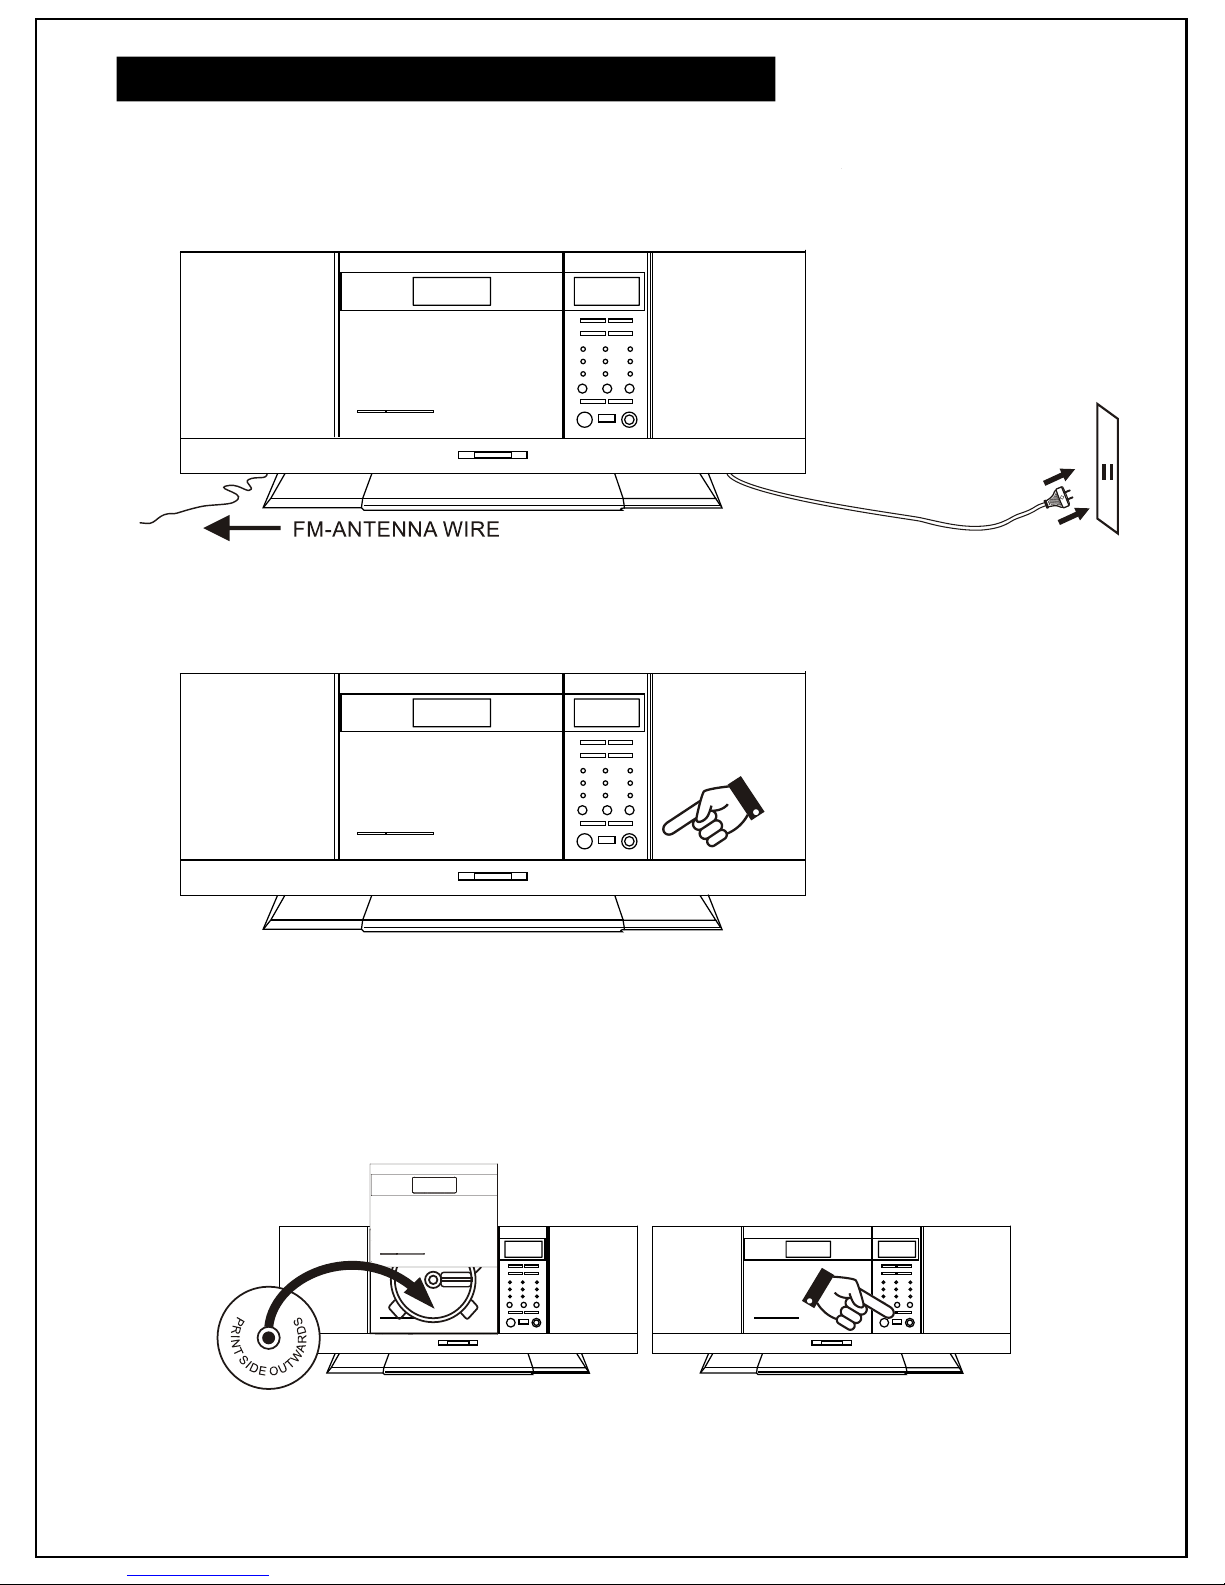
1. Connect the table stand.
2. Plug the AC cord into a wall socket and unwrap the FM antenna wire.
3. Press the On/Off button to switch “On” the unit.
4. Listen to the CD player.
- Press the Function button repeatedly until “CD” is displayed.
- Press the Open/Close button.
- Insert a disc (audio CD or MP3 CD).
- Press the Play button to start “Play”.
- Adjust volume Vol + or Vol - as needed.
06
Quick Start
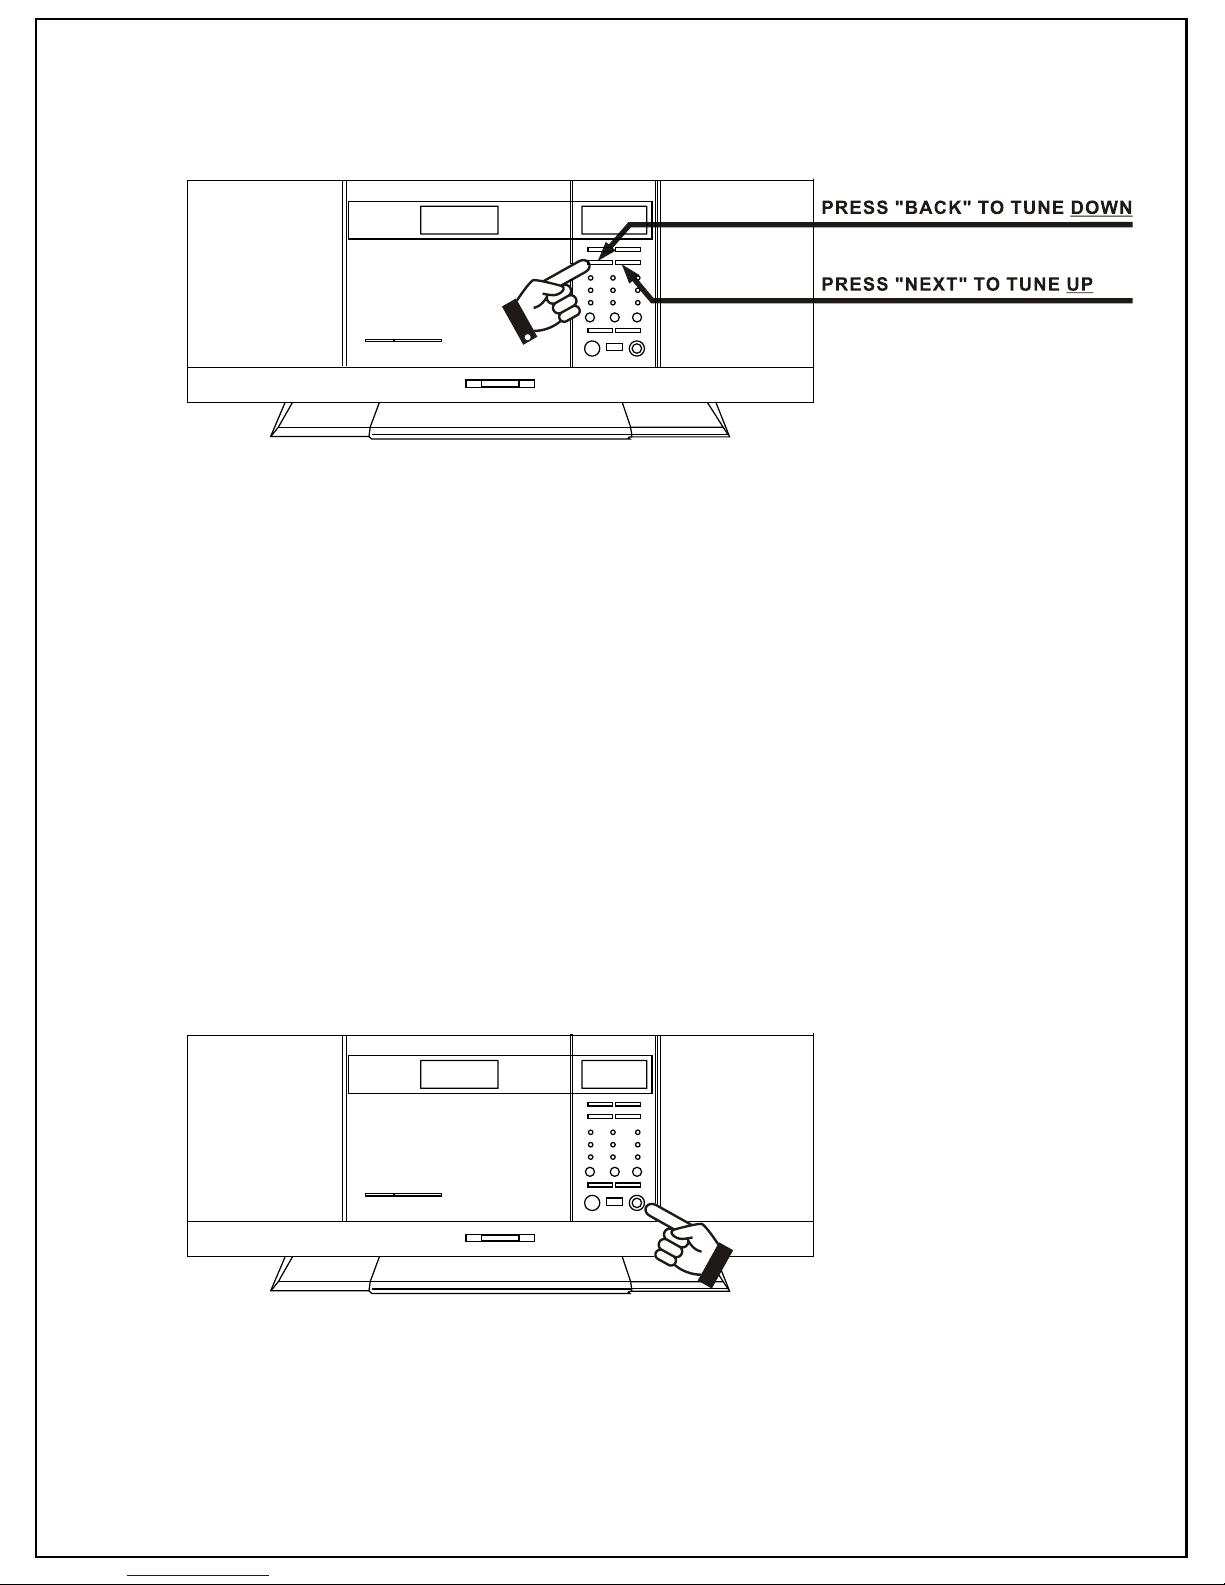
5. How to listen to the radio.
- Press Tuner/Band button to switch to Radio Mode.
- Press Tuner/Band button to switch to “FM” radio band.
- Press Tuner/Band button again to switch to “AM” radio band.
- Press and release the Next button to tune radio frequency up.
- Press and release the Back button to tune radio frequency down.
- Press and hold the Next button (2 seconds) to Scan (+) (seek to next station).
- Press and hold the Back button (2 seconds) to Scan (-) ( seek to previous station).
6. Press the On/Off button to switch “Off” the unit. (Standby Mode)
07
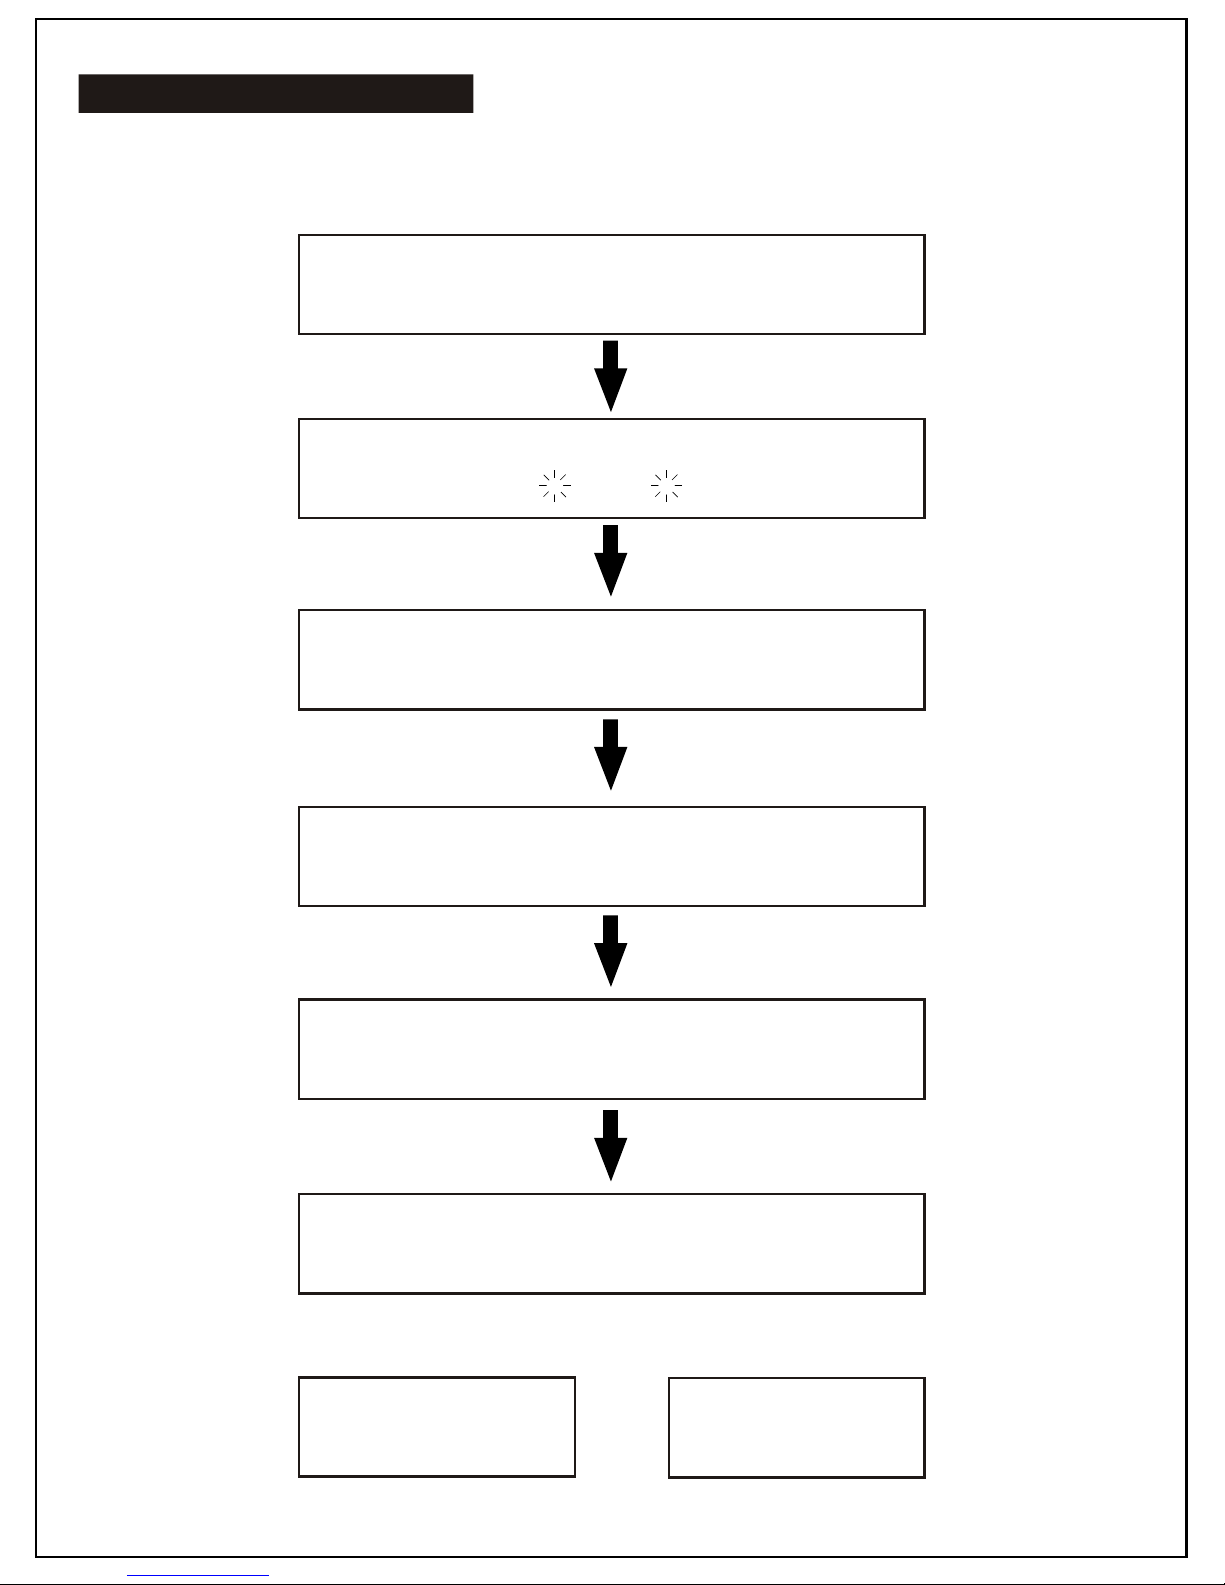
- This unit also has a built-in digital clock, which is displayed when the unit is in Standby Mode or when
you press and hold the Program button for two seconds during the CD or Radio operation.
- To set the correct time, follow the procedure below:
Switch unit to Standby Mode.
Display light will be “Off”.
Digital Clock Functions
Press and hold the Program button for 3 seconds.
Display shows hour or hour (Flashing).
12 24
Press Next or Back to select 12-hour
or 24-hour clock display system. Then press
Program to confirm your selection.
Press Next or Back repeatedly to set the
correct hour in the display. Then press
Program to confirm.
Press Next or Back repeatedly to set the correct
minute in the display. Then press Program to confirm.
PM 3:25 15:25
EXAMPLE OF
12-HOUR CLOCK
EXAMPLE OF
24-HOUR CLOCK
Correct time is now set and will be
shown in the display.
08
Automatic Power On/Off Timer Function
Automatic Power Off Sleep Function
This unit has a timer function that enables you to program the unit to automatically turn “On” or “Off” at
preset times. This function can also serve as an alarm clock.
How To Set Timer
01. Press and hold the Timer button. The On symbol appears in the display.
02. Press the Next or Back button to adjust the hour of the desired "Power On" time and then press the
Timer button to confirm.
03. Press the Next or Back button to adjust the minutes of the desired “Power On" time and then press the
Timer button to confirm.
04. Now the symbol in the display changes to show Off .
05. Press the Next or Back button to adjust the hour of the desired "Power Off" time and then press the
Timer button to confirm.
06. Press the Next or Back button to adjust the minutes of the desired "Power Off" time and then press the
Timer button to confirm.
07. Now the display will indicate the "Wake Up Mode". Press the Next button to choose
the desired mode and press the Timer button to confirm.
08. The display then shows the "Wake Up Mode Level" (loudness). Press the Next or Back button to
decrease or increase the volume level to be used for the music to be played when the timer switches on
the unit at the pre-set time.
09. Press the Timer button to confirm. The unit will then automatically display all your settings in sequence:
"Power On Time" On
"Power Off Time" OFF
"Power On Mode" CD OR TUNER
"Power On Volume Level" LOUDNESS
10. Finally the unit will return to the normal display, except this the symbol will be shown, to indicate
that you have programmed a power On/Off alarm setting.
11. In case you wish to disable the timer, press the Timer button and the symbol disappears.
NOTE: The automatic power On/Off timer will switch “On” the unit as if you have manually pressed the
Power button. If you have selected "Wake To Radio", the exact preset radio band and station will become
activated when power switches “On”.
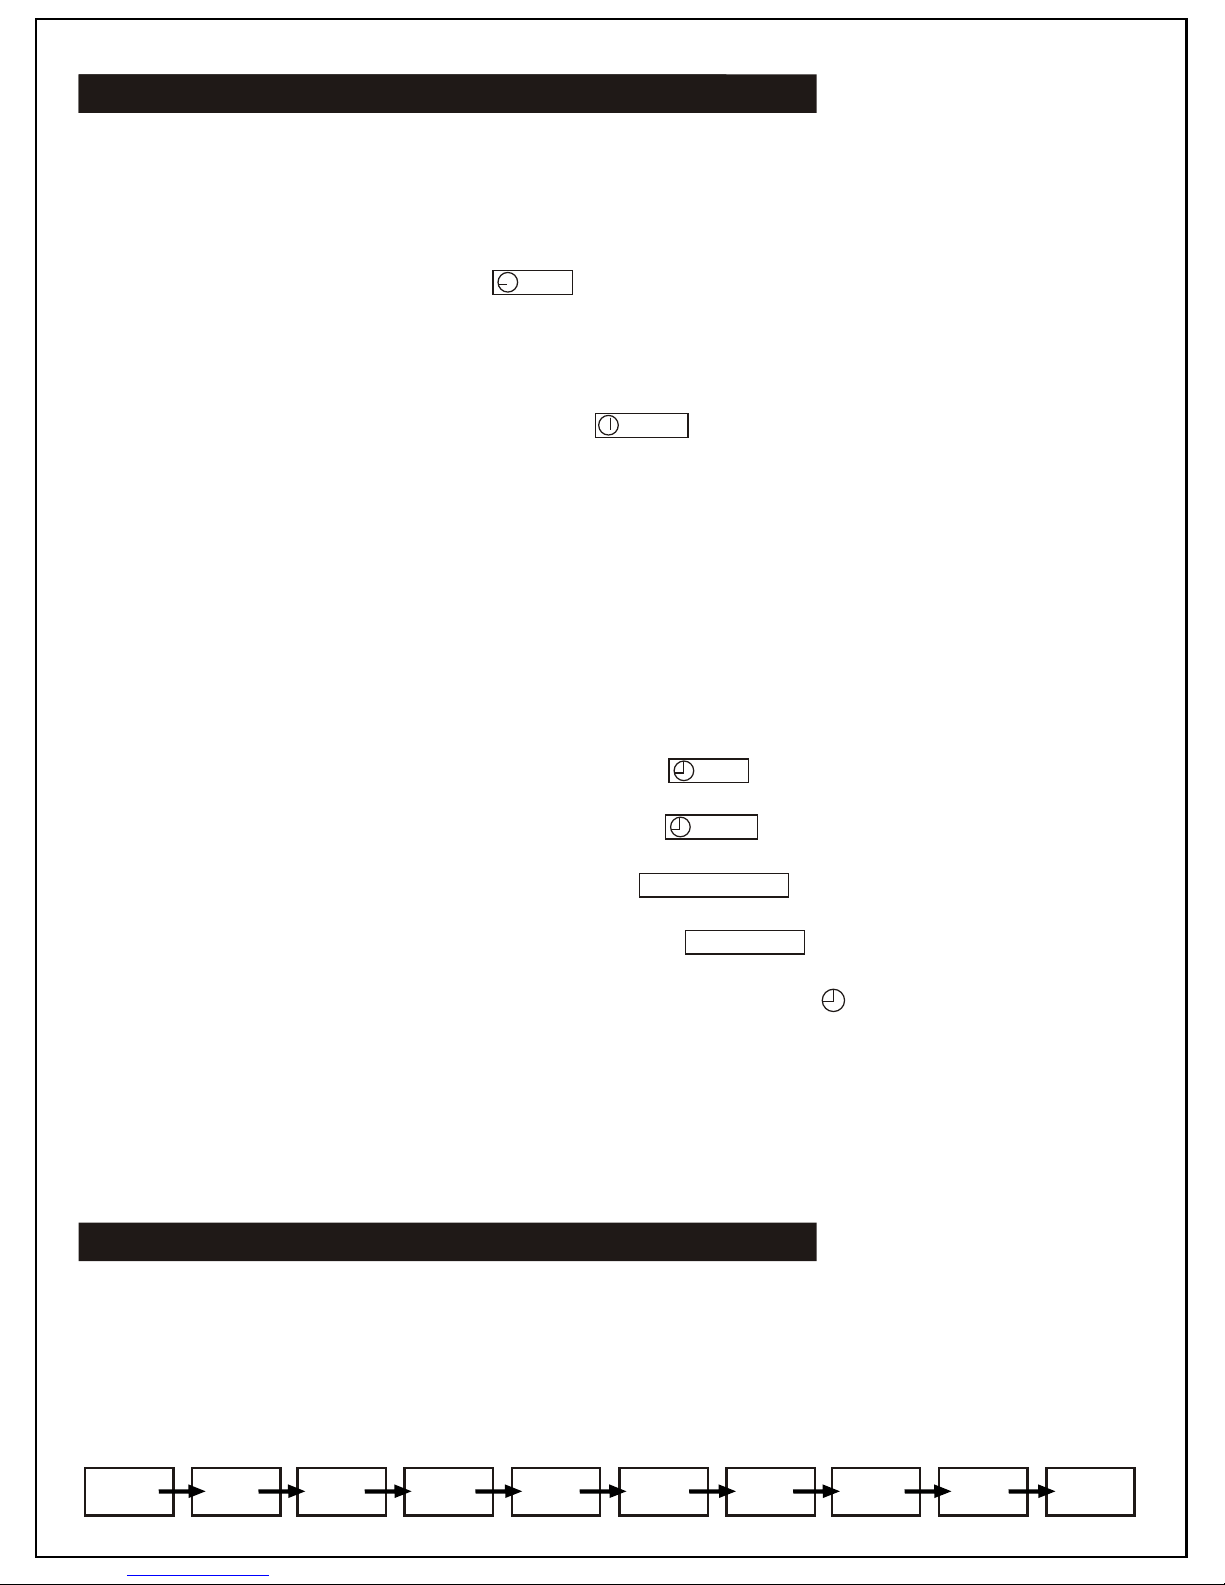
- This unit has a special sleep timer function which can automatically turn “Off” the unit. This is useful for
sleeping to music at night.
- At any time while the unit is operating (CD or Radio), press the Sleep button repeatedly to choose the
automatic “Power Off Mode”.
90
MINS
80
MINS
70
MINS
60
MINS
50
MINS
40
MINS
30
MINS
20
MINS
10
MINS OFF
09

Electronic Volume Control
Music Equalizer
Radio Operations
- This unit uses an electronic volume control.
- To increase or decrease the loudness of this unit, press the volume up Vol + or volume down Vol - keys.
- Release the key when volume level is at the desired loudness.
- Sometimes, especially during listening to the radio, you may notice a "click-click-click" sound when you
are increasing or decreasing the volume. This is a normal condition and the sound will disappear when
you release the volume key (when you reach the desired volume level).
- Press the EQ key repeatedly to choose the desired sound effect according to the music you are
listening to:
*Pass Classic Rock Pop Jazz
*Pass means equalizer is "Bypassed" or "Off".
- Press the On/Off button once to switch “On” the unit.
- Press the Tuner button to select the desired radio band.
- For AM stations, rotate or reposition the set to improve radio reception.
- For FM stations, extend and adjust the telescopic antenna to obtain the best reception.
- Use the FM Mono/Stereo button to select the desired mode. In some cases, where reception is
poor, it may be advisable to select Mono Mode to improve clarity of the radio signal.
Manual Frequency Adjustment (Scan Mode)
- Press and immediately release the Next or Back button to scan (manually adjust) the radio stations
up or down by 1-step at a time.
- The radio digital display will indicate the exact station at each position.
- When a desired station is reached, it can be saved into one of the memory postions. See Radio
Memory section.
Automatic Frequency Adjustment (Seek Mode)
- Press and hold the Next or Back button for 2 seconds to seek (automatically adjust) the radio frequency
up or down to the next available radio station.
- The radio digital display will indicate the exact frequency of the next station that is found.
- When a desired station is reached, it can be saved into one of the memory positions. See Radio
Memory section.
Radio Memory (Station Preset Memory Storage)
- At any time the currently displayed station or frequency can be stored into one of the memory positions.
- Press the Program button once.
- Press the Mem. + or Mem. - button to select desired memory position. There are 10 memory positions for
AM band and 30 memory positions for the FM band.
- Press the Program button once to save the selected station into the selected memory position.
- To recall any saved memory press the Mem. + or Mem. - button, the saved radio-band will be recalled.
- To clear the memory of any position, simply save a new station to the same position.
10

Insert And Remove A Disc
- Press the Function button until the display shows “CD”.
- Press the Open/Close button to open the CD door. Carefully place a compact disc (audio or MP3) onto
the center of the CD spindle. Make sure the printed side of the CD is facing up before closing the CD door.
- The CD display will show the total number of tracks on the disc. After a few seconds, the CD will be ready
to play.
- To remove the disc from the unit, press the Open/Close button. The CD door will open.
- Gently remove the CD from the CD spindle and place it back into its jewel case or protective sleeve.
CAUTION: Always hold a CD by its edges. Avoid getting any liquids, finger prints, smudges, or dirt onto the
CD. If this happens, use a soft cloth or specified CD cleaning kit to remove obstructions on face
of the CD.
IMPORTANT:
- Press On/Off button to switch “On” the unit.
- Press the Function button repeatedly until the display shows “CD”.
- Press the Open/Close button and insert a CD as described.
- Press Play button. The disk will start spinning and the first song will start to “Play”.
- At any time during playback, press the Play button to “Pause” the CD.
- Once the CD is paused, press the Play button to resume the CD.
- Pressing the Stop button during anytime of the CD playing will stop all operation of the CD and
and will reset the CD back to its first track.
- To skip forward or back in track numbers, press the Next or Back button.
- To skip ahead or behind in a song, simply hold down the Next or Back button to the desired song time.
- At any time during playback, press and hold the Find/Display button for 2 seconds. The display will show
the file name and song title. NOTE: This only works with an MP3 formatted disc.
Motorized Automatic CD Door - Operations and Precautions
- This unit has a motorized CD door.
- Please never try to open or close the door manually (by hand).
- Always use the CD Open/Close button.
- When opening, the door will swing upwards and stop automatically. Never apply pressure
on the door to close it.
- If there is any obstruction when opening the door, the door will automatically stop and
reverse direction (close) after 4-5 seconds to prevent damage to the CD door.
11
Normal CD Operations
For the FM band, fully extend the FM wire antenna at the rear of the unit. Try to change its position until a
clear reception is received. For the AM band, rotate the unit until a desired signal is reached. Avoid placing
the unit in direct sunlight and metal desks/surfaces. This may affect radio reception.
IMPORTANT: Improving Radio Reception

Normal CD Operation - cont.
- The CD player can be programmed to play up to 64 tracks (songs).
- Always press the Stop button before programming.
- Press the Program button once, the display will show the memory symbol to indicate that the set is now
programmed into the CD player.
- There are different procedures for programming an audio CD and a MP3 CD. Read how below:
Programming Procedure For Normal Audio CD:
- Press the Next or Back button to select the song you would like to program.
- Press the Program button once to confirm your selection.
- For each additional song you would like to program, repeat steps listed above. Reminder, only 64 tracks
can be programmed to play at once.
- Once all songs are programmed, press the Program button. The display will now show memory to
indicate you have saved a program into memory.
- Press the Play button. The CD will start to spin and play your selected tracks in the program.
- To clear out your programmed tracks, simply press the Stop button. This will reset the memory and clear
the program.
Programming Procedure For MP3 CD:
- Press the Next or Back button to select the Album (Folder Directory) number which contains the song you
wish to program.
- Press the Program button to confirm.
- Press the Next or Back button to select the song number.
- Press the Program button to confirm.
- Repeat the last 4 steps, each time selecting an Album and track number to be played into your CD
program.
- After a maximum of 64 tracks have been programmed, press the Play button.
- To clear out the memory of your selected programmed songs, simply press the Stop button.
- This unit is capable of displaying the “Text Information” (ID3 Tag) of an MP3 song on the LCD.
- To turn “On” this function, simply press and hold the Find/Display button for 2 seconds.
- To switch back to Normal Display Mode (Display Track Number and Timer) press and hold the Find button
again for 3 seconds.
Text Display Mode (ID3)
12
Normal CD Operations - cont.

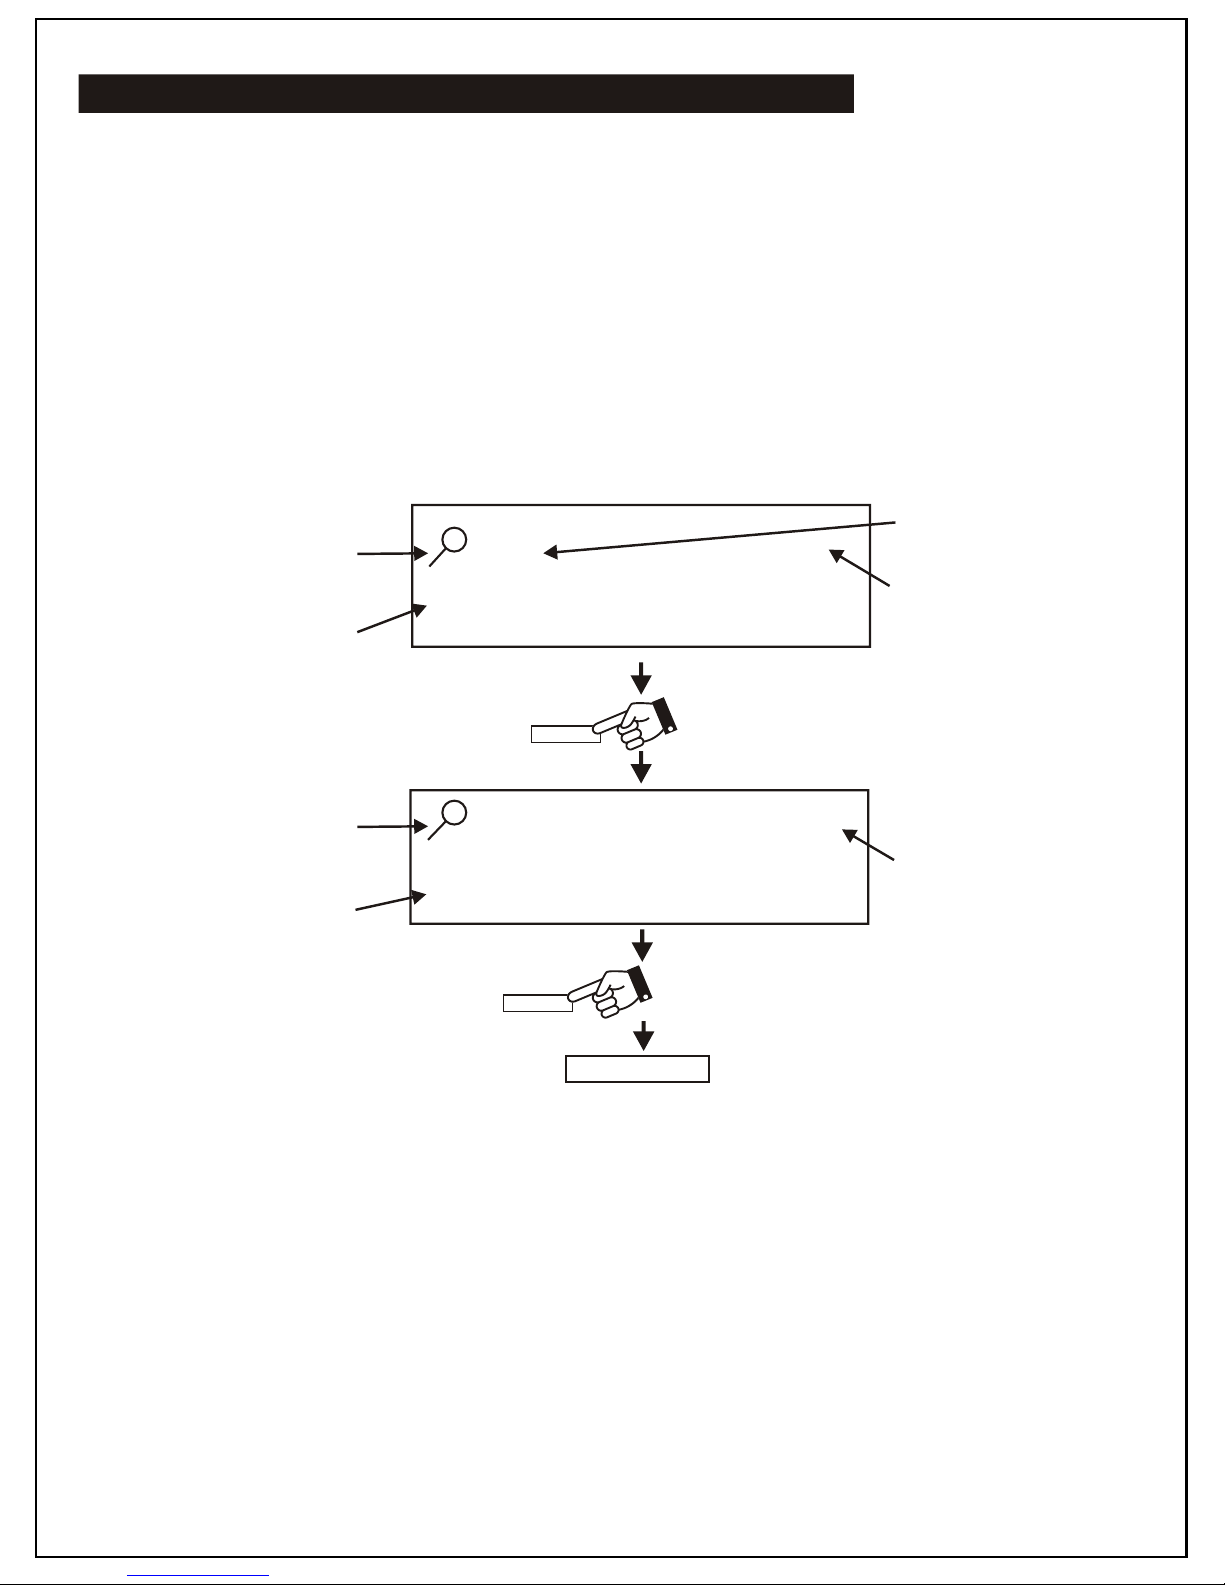
Finding (Searching) MP3 Songs By Song Name
- During Stop or Play Modes, press the Find button once.
- The “Find” symbol will flash in the display, and the letter “A” will be shown (See Example Below).
- This is the “Search Alphabet”.
- Press the Next or Back button to advance the Search Alphabet to select the desired letter.
- At every selected letter, the lower part of the display will show the name of the first song beginning
with that selected letter on the disc.
EXAMPLE:
- With any selected letter, there might be several songs within that particular letter. To search for all
songs beginning with that letter, press and hold the Next or Back button for 2 seconds, until the
searched letter starts flashing in the display.
- Once the searched letter starts flashing, press the Next button to display the desired song starting with
that particular letter.
- At any time, when you have located a desired song (as shown above), just press the Play button.
- To exit the Find Mode, press the Find button twice (2) until the “Find” symbol disappears from the
display screen.
A -- APPLE . . . . .
Name Of song
(MP3 File)
Search
Alphabet
Press Once
Find Symbol
Name Of song
(MP3 File)
Search
Alphabet
Find Symbol
N E X T
B -- B ANANA . . .
Press Once
N E X T
ETC...
Press Once
FIND
13
001
002
Song Number
Song Number
Finding (Searching) MP3 Songs By Album
- MP3 files (songs) can be organized into folders when you record them on to a CD-R disc each folder is
called an "Album" and you can (for example) organize your albums on a disc so that each album contains
songs by a particular artist, or alternatively, by a different genre or type. You can organize songs and
albums in any way you wish so that you can locate and play back those songs with greater ease and
convenience.
- To search for songs within a particular album, press the Find button twice (2) when an MP3 CD is
playing (or stopped).
- The "Find" & "Album" symbols will activate in the display, together with the number "1". This is the
“Album Number”, as it indicates the number of the folder on the disc.
- Press the Next or Back button to advance to the album number (01, 02, 03 ...). The name of each album
will appear in the lower part of the display for each selected Album Number.
EXAMPLE:
- When the desired album name appears on screen, press and hold the Next button for 2 seconds. This will
open the selected album and now you can view (scroll through) all the songs contained inside that album
one by one. You can select the desired song by using the Next button and play it by using the Play
button.
FR UITS . . .
Name Of Album
(Folder)
Album Number
01
Press Once
Find Album
Name Of Album
(Folder)
Find Album
N E X T
VE GE TAB LE S . .
02
Press Once
ETC...
ALBUM
ALBUM
NEXT
This Means Album Find Mode
Album Number
14
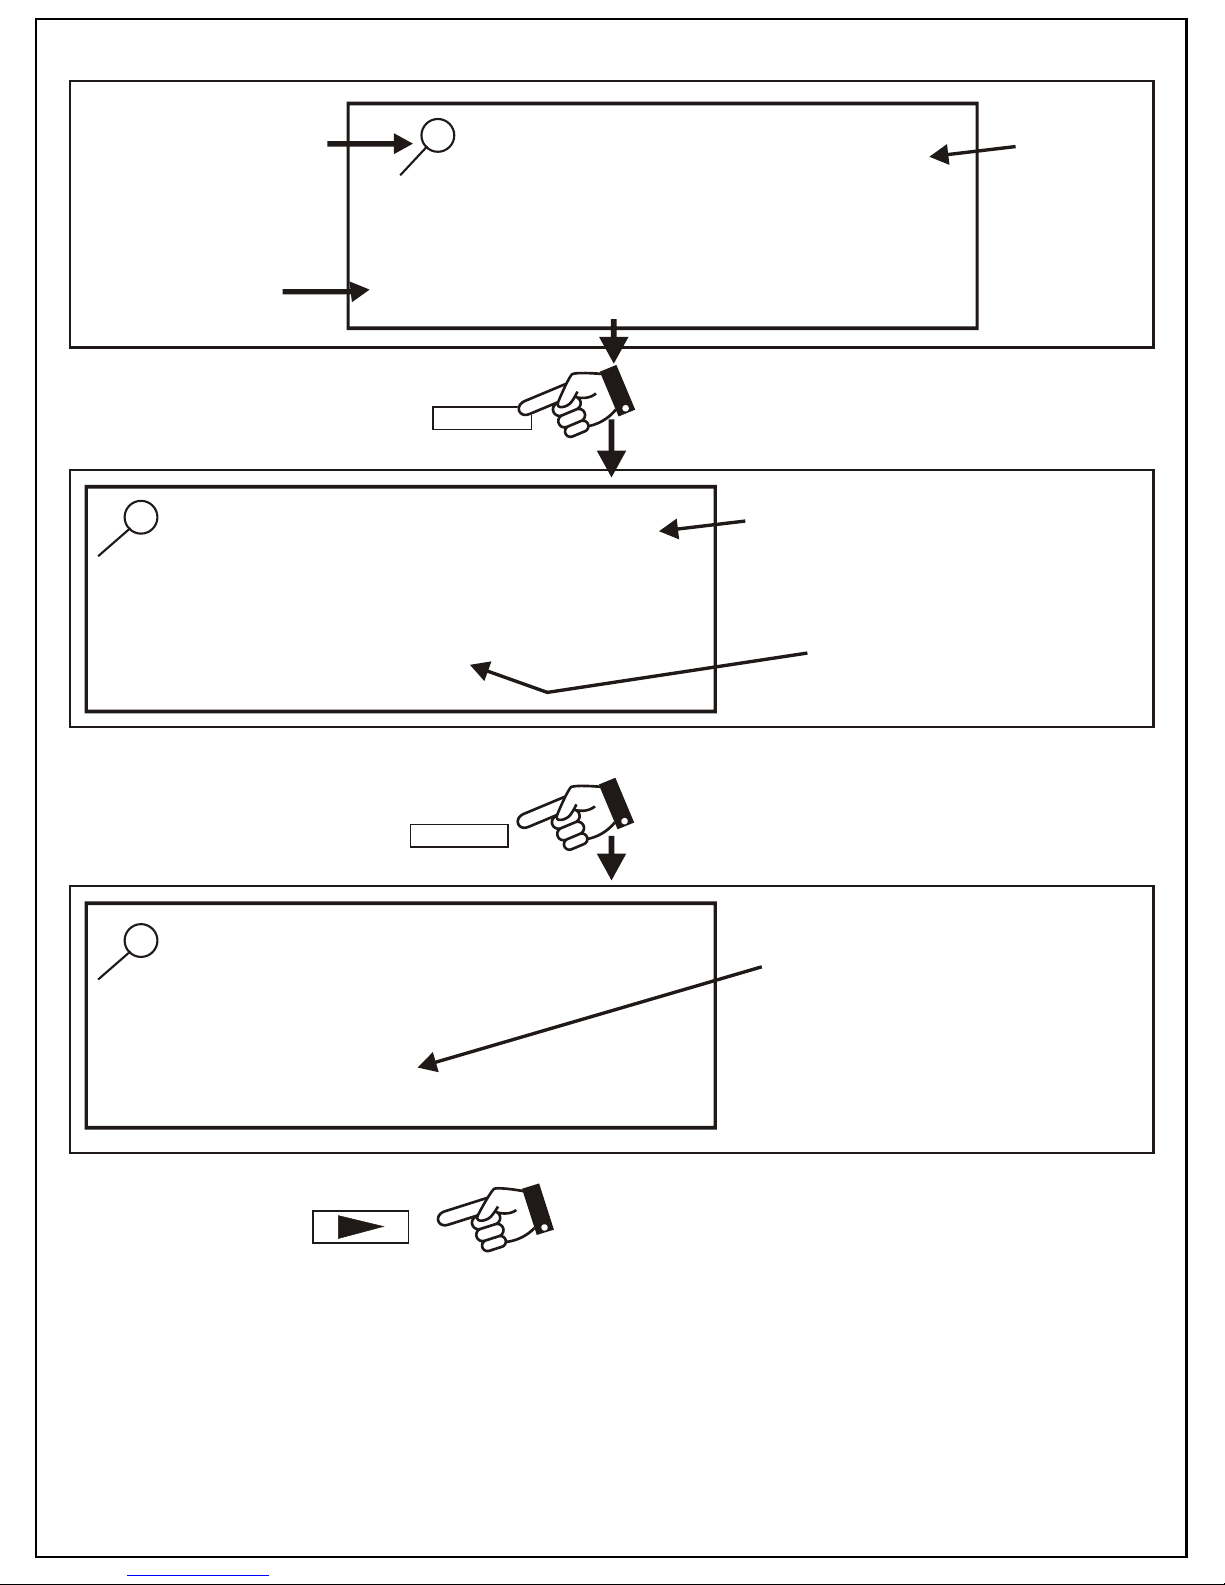
CARROT...
Name Of First Song InThe Selected Album
Press and release repeatedly to scroll through
all the songs contained within the selected album.
VEGETABLES...
Album
Number
Album Name
(Which You Want To Open)
ALBUM
Press and hold for 2 seconds.
NE X T
TOMATO...
Name Of Desired Song In The
Selected Album
Press the Play button to play the song displayed.
NE X T
- To exit the Find Mode, press the Find button repeatedly until the “Find” symbol disappears from the
LCD display.
Song Number within this selected area
This Means You Are
In Album Mode
15
02
002
09
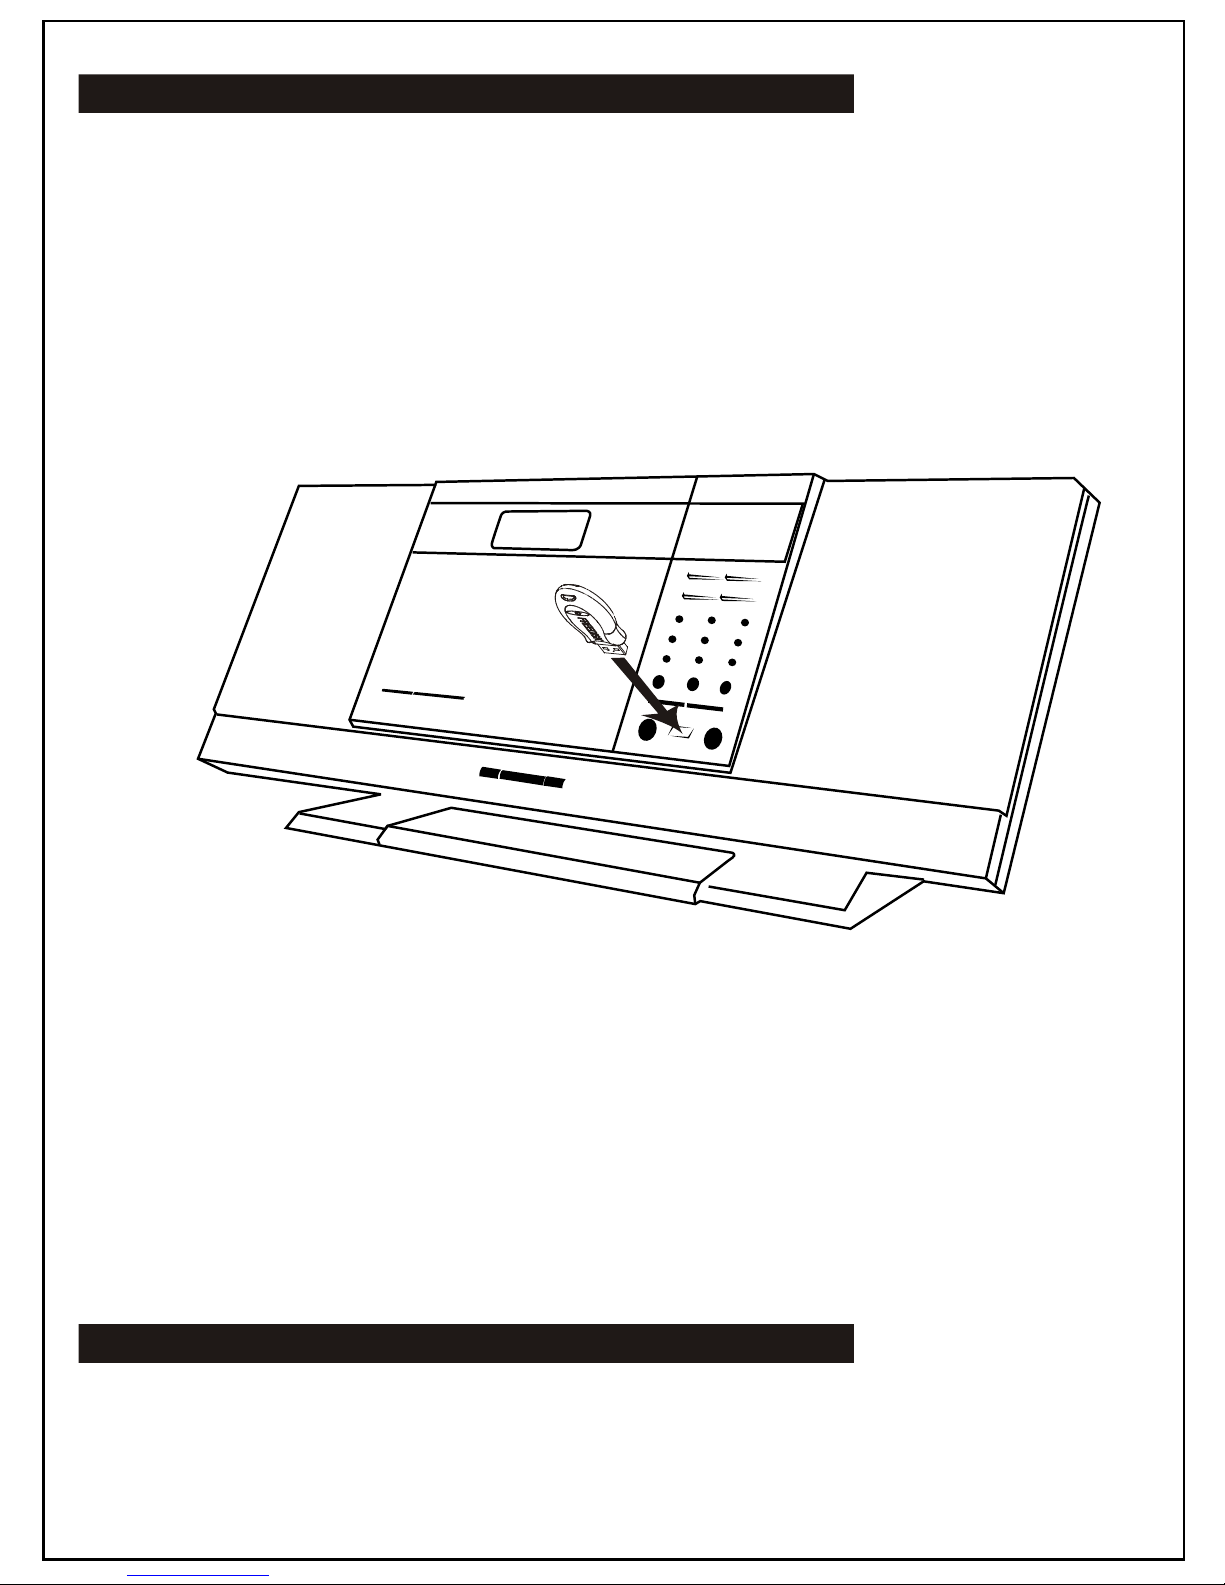
USB Flash Drive MP3 Playback
Displaying The Song Name (ID3)
- This unit is equipped with a USB socket which can accept and play MP3 files stored on standard USB flash
drives which are for memory storage. This unit is compatible with USB version 1.1 & 2.0.
- To utilize this function, press the Function button repeatedly until the display shows “Card USB”, and then
insert a USB Flash drive into the USB socket.
- The USB socket is located on the front of the unit as shown in the picture below.
- Press the Next or Back button to skip forward or backwards to select the desired MP3 file on the USB Flash
drive.
- Press the Play button to start the selected song.
- Remember to press and hold the Find button for 3 seconds to turn on the Text Display Mode. This
enables the ID3 Tag to display onto the LCD display screen.
Important: Always select the “Card USB” Mode
FIRST before inserting a USB Flash Drive.
Note: Although this product is fully compatible
with USB 1.1 and 2.0 formats, a small percentage
(about 5%) of USB Flash Drives might not be
readable due to those device manufacturers which
are not-compliant with the full (official) USB
standards.
16

Repeat Playback Functions
Anti-Skip (Anti-Shock) Function
Using The Audio Line-in Connection (DVD/AUX)
- During anytime of Playback Mode, press the Repeat button repeatedly to select from the following:
Repeat To repeat current track.
Repeat All To repeat all tracks from any type of media.
Repeat Album To repeat all songs from currently selected album.
- This unit has a built-in digital anti-skip function which prevents CD skipping when the unit is physically
moved or subjected to vibrations for up to 100 seconds.
- Whenever any MP3 CD is played, the display will indicate a flashin ESP symbol for about 50 seconds. This
means that the anti-skip memory is being filled (but not yet full). The anti-shock protection is already
active (in use) at this time, but is not yet up to the maximum of 100 second capacity.
- Once the ESP symbol stops flashing, the anti-shock memory is full and the unit now provides anti-skip
protection for 100 seconds of vibration.
- Please note that the anti-skip function only protects against normal vibration or minor movement. Severe
or strong shocks/vibrations to the unit may still cause the unit to skip.
- You can connect the audio output of an external device such as a DVD player to this unit to listen to the
sound of that device through the high-quality amplifier of this music system.
- To connect the external device, please use a standard RCA cable to connect the "Audio Line-out" (or
Head Phone Stereo Audio Output) of the device (left & right channels) to the"Aux Audio Line-in" RCA
jacks (left & right) on the rear panel of this unit.
- Switch “On” the power of the main unit and the external device (DVD player).
- Press the Aux. button on the front panel.
- Start playback of the external device and adjust the volume control of the main unit to the desired level.
17
Connecting An External Powered Subwoofer (Not Included)
Specifications
- This unit has a built-in subwoofer connection which can be connected to any standard powered
subwoofer.
- By connecting to a powered subwoofer, the low frequency (bass sound) can be strongly enhanced
to provice a much richer and deeper sound to your music.
- To use this facility, simply connect any standard powered subwoofer (available from most
music equipment shops) using the RCA jack on the rear panel of the main unit.
- Switch “On” the powered subwoofer.
- Play any music source (CD, radio, or Aux.) as usual.
- You will immediately notice the deeper sound.
- Please note that the speakers should be connected as usual to the main unit, when using a subwoofer.
- Please note that "Passive" (non-powered) subwoofers will not work with this unit.
AC Power Supply: AC 110V/220V ~ 50/60Hz
AC Power Consumption: 21W
Remote Control Unit: 3V (AAA size / UM-4 / LR03 / R03G x PCS)
Battery Backup (Main Unit): 3V (AA size / UM3 / LR6 x 2 PCS)
(Batteries not included for both above)
Speaker: 4“ X 2 Woofer + 1” X 2 Tweeter
Speaker Capacity Power: 5W
Amplifier Maximum Power: 3.2W
This unit should not be exposed to objects that drip or splash of any liquids or filled with
liquids. This unit should not have any foreign objects placed on top of it.
The marking is located at rear enclosure of the unit.
The main plug is used as the disconnect device, and it shall remain readily operable. To be
completely disconnected, the power input, the main plug of the apparatus, shall be discon-
nected from the main completely. The mains plug should not be obstructed and should be
easily accessable during intended use.
Under the influence of electrostatic phenomenon, the product may malfunction and cause
the user to “Reset” the power.
18

System Setup Procedure
Set-up of MSW1100 with desktop stand.
Place the stand under the main unit.Step 1:
Slide the stand upward. (See Diagram Below) Stop when the arrows are aligned. (See Diagram)
The stand is now locked to the main unit or speakers.
To release the stand from the main unit or speakers,
slide the stand downwards (Opposite Direction) until
it becomes released.
Step 2:
Desktop use with supplied pedestal stand
19
Step 3:

Troubleshooting
20
Problems Possible reasons Resolvents
Radio
Noise or sound distorted on
radio broadcasts
- Station not tuned properly for AM or FM. - Retune the AM or FM broadcast
station.
- FM: Telescopic antenna is not properly
adjusted. - Extend wire antenna.
- AM: Unit is not positioned correctly. - Rotate unit for best reception.
FM ST indicator does not light - Poor FM signal being received. - Retune station or try another
station that broadcast in stereo.
- Station is not broadcasting in stereo. - Change stations.
Compact Disc Player
CD will not play
- There is not a CD in the unit. - Insert a CD and press play.
- CD Function is not selected.
- Press FUNCTION button to select
CD.
- CD is placed with label side down. - Flip the CD over where label side
is facing up.
- CD is scratched/damaged. - Discard disc and use another.
- CD is wrong format. - Make sure the CD is burned in an
MP3 file format.
USB
USB will not play
- There is not a USB drive in unit. - Insert a USB drive and press play.
- USB Function is not selected. - Press FUNCTION button to select
USB.
- No MP3 files inside USB. - Copy MP3 files to USB.
General
AC power doesn't work - AC power cord is not connected. - Connect AC power cord.
Remote is not working
- Batteries are not inserted. - Insert batteries.
- Battery placement is wrong.
- Batteries are no good. - Replace batteries.
No Sound
- The unit is not turned on. - Turn on the unit.
- Headphones inserted. - Remove headphones.
- The volume of the unit is turned all the
way down.
- Turn up the volume to desired
listening level.
Table of contents
Other Auvi Stereo System manuals


