manuals.online logo
Brands
  1. Home
  2. •
  3. Brands
  4. •
  5. Panasonic
  6. •
  7. Stereo System
  8. •
  9. Panasonic RX-MDX55 User manual

Panasonic RX-MDX55 User manual

DEMO OFF (cut)ÿ DEMO mode on (in)ÿ
Each time you keep pressing
RQT6010-S
ÿ To turn off the demo function
Thank you for purchasing the Personal MD
System. ÿ Please read this instruction manual
and warranty carefully and use the product
correctly . Then save it and read it when
necessary. ÿPlease receive the warranty from
the store after confirming that the date of
purchase and store name are entered.
Keep pressing until “DEMO
OFF” is displayed.
The demo function is automatically turned
off when the clock of the unit is set. For
details on how to set the clock, see
“Setting the clock” ( page 8).
Product number RX-MDX55
When you plug the power cord into an
outlet, the display panel automatically lights
up and you can enjoy watching it change
one after another . This is called a demo
(demonstration) function.
While the demo function is running
DEMO
DEMO OFF
Save energy by using it wisely
Attached by warranty
Personal MD system
Demonstration
function for changing the panel display
Note If
the power plug is unplugged for about a week or
more, the demo function will return to "on". Turn it
off again by following the steps above.
At the time of purchase, the demo function is
set to "On". If the demo function is left "on",
even if the power is turned off, the display
panel will not turn off and the demo function
will work.
instruction manual
Machine Translated by Google
2
remote control only
RQT6010
Various characters that represent the mode will be displayed.
How to read this manual
About MD long stereo recording/playback ( )
About the characters
When using MD When using CD When using radio When using AUX When using P-MD
Note
The included power cord is for this unit
only. Do not use it for other equipment.
For replacement accessories, please contact the store where you purchased the product. The number in ( ) indicates the part number at the time of replacement.
Confirmation of accessories
Audio compression technology called ATRAC 3 enables long-duration recording of double-length (LP2) or quadruple-length
(LP4) stereo sound. Settings can be made regardless of the recording source (sound source) or recording method. You
can also mix and record songs in different recording modes (standard/LP2/LP4) on a single MD.
This manual mainly describes operations on the main unit. Buttons
on the remote control that have the same names as the buttons on the main unit can be operated
in the same way. (Operations that can be performed only with the remote control are indicated as .)For details on each button, see “Names
of parts” on page 52.
ÿ Power cord ……………………1 (Part
number: RJA0059-J)
ÿ AA battery for remote control ... 2 pieces
This unit supports the new MD format.
ÿAM Loop Antenna …………1 piece (Part
number: RSA0034)
ÿRemote controller ……………………1 piece
(Part number: EUR648110)
Machine Translated by Google
RQT6010
Before use
when needed
Editing an MD ÿÿÿÿÿÿÿÿÿÿÿÿÿÿÿ30 •Moving/
Combining/Dividing/Erasing Songs
About MD ÿÿÿÿÿÿÿÿÿÿÿÿÿ46
Long-term stereo recording to an MD/ Using
an optional device to view information .........................44
Q&A (frequently asked questions)
ÿÿÿÿÿÿÿÿÿÿÿÿÿÿÿÿÿÿÿÿÿÿÿÿÿÿÿÿÿÿÿÿÿÿÿÿÿÿÿÿÿÿÿÿÿÿÿÿÿÿÿÿÿÿÿÿÿÿÿÿÿÿÿÿÿÿÿÿÿÿÿÿÿÿ by Time Time by ÿÿÿÿÿÿÿÿÿÿÿ54 Main Specifications ÿÿÿÿÿÿÿÿÿÿÿBack Cover
Listening in a group (MD only) .....................................20
Grouping songs/Changing group names/ Remembering
and listening to broadcast stations.........24 Various
recordings..........................................................24 ÿ26 CD
high-speed recording/CD analog recording/
Assigning a title to an MD ÿÿÿÿÿÿÿÿÿÿÿ34
Using the timer ÿÿÿÿÿÿÿÿÿÿÿ38 Useful
functions ÿÿÿÿÿÿÿÿÿÿÿÿÿ42 Selecting sound
quality and sound field effects /listen with headphones/
How to listen to MD/CD ÿÿÿÿÿÿÿÿÿÿÿ18
Direct/Random/Repeat/Program Play
CD •Copyright/Maintenance
ÿÿÿÿÿÿÿÿÿÿÿÿÿÿÿÿÿÿÿÿÿÿÿÿÿÿÿÿÿÿÿÿÿÿÿÿÿÿÿÿÿÿÿÿÿÿÿÿÿÿÿÿÿÿÿÿÿÿÿÿÿÿÿÿÿÿÿÿÿÿÿÿÿÿÿÿÿÿÿÿÿÿÿÿÿÿÿÿÿÿÿÿÿÿÿÿÿÿÿÿÿÿÿÿÿÿÿÿÿÿÿÿÿÿÿÿÿÿÿÿÿÿ ing
How to use
Safety Precautions
ÿÿÿÿÿÿÿÿÿÿÿÿÿÿÿÿÿÿÿÿÿÿÿÿÿÿÿÿÿÿÿÿÿÿÿÿÿÿÿÿÿÿÿÿÿÿÿ
6 ÿÿÿ6 •Preparing the power supply ÿÿÿÿÿÿÿÿÿÿÿÿÿ6
•Connecting and adjusting the antenna ÿÿÿÿÿÿÿ7
•Preparing the remote controller ÿÿÿÿ ÿÿÿÿÿÿÿÿÿÿÿÿÿÿÿ
7 •Setting the clock ÿÿÿÿÿÿÿÿÿÿÿÿÿÿ8 •How to raise
the handle ÿÿÿÿÿÿÿÿÿÿ
ÿÿÿÿÿÿÿÿÿÿÿÿÿÿÿÿÿÿÿÿÿÿÿÿÿÿÿÿÿÿÿÿÿÿÿÿÿÿÿÿÿÿÿÿ 8
CD full recording / CD 1 song recording /
Recording a CD program/radio
Recording a CD to an MD .............16
When you want to master
Index
Listening to CDs ..................12
Listening to the radio ..................14
Listening to MDs 10
when you want to use
Confirmation and preparation
when needed
3
more
first
if
soon
Machine Translated by Google
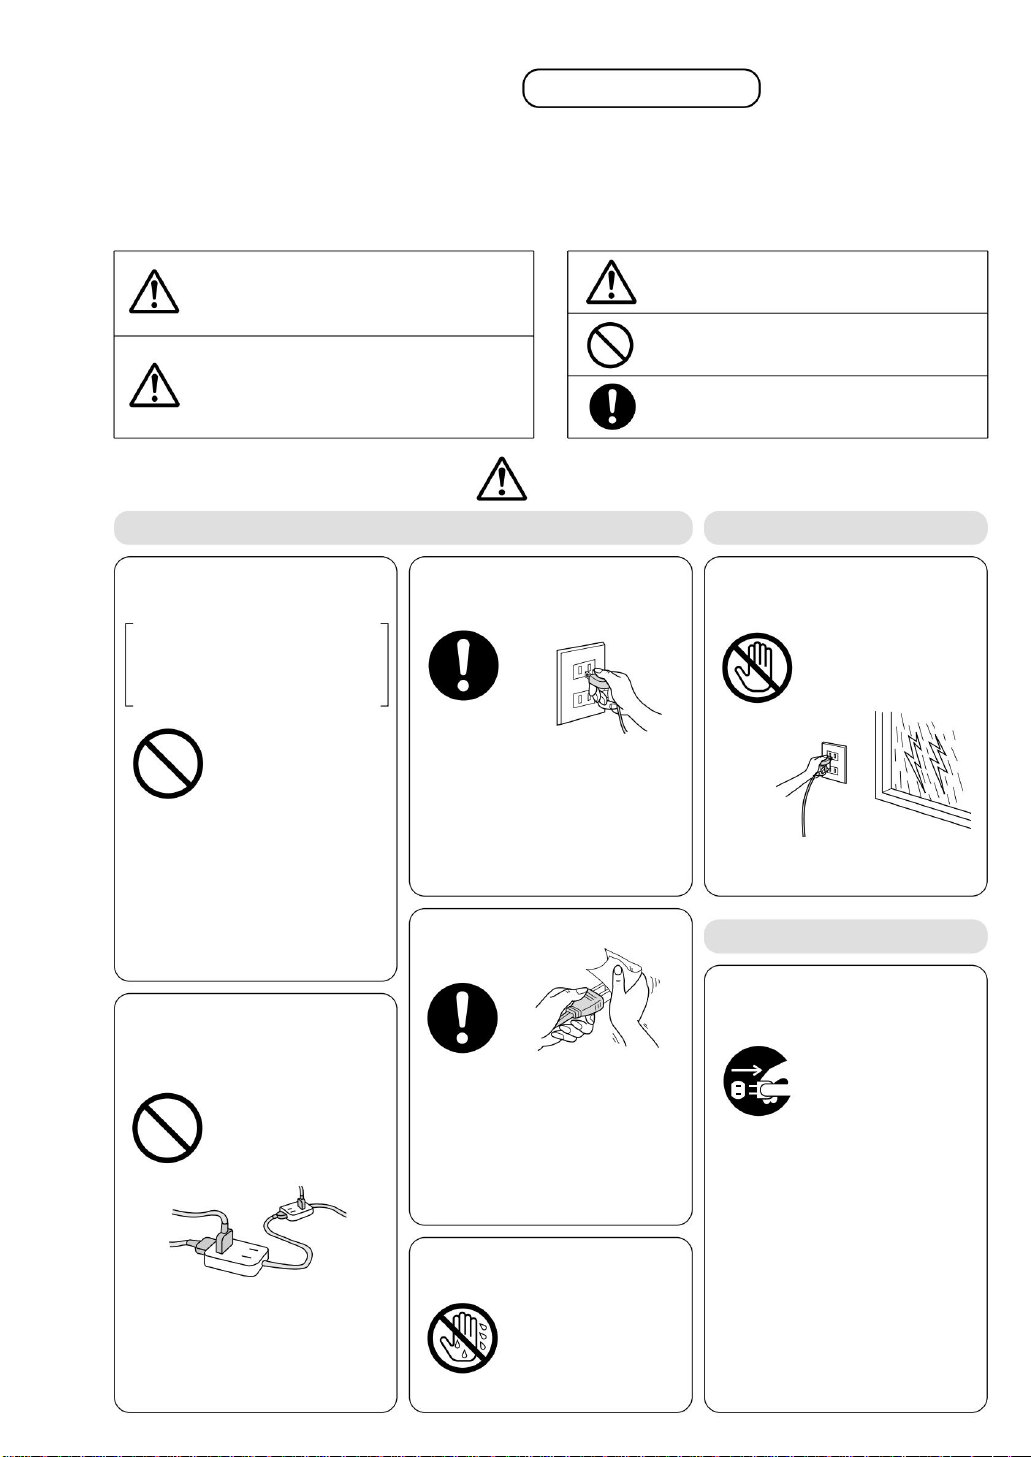
About the power cord about thunder
Do not damage the power
cord or plug Do not
damage, modify, place
near heat appliances,
forcefully bend, twist, pull,
place heavy objects on it, or bundle it.
Do not plug or unplug the power plug
with wet hands
If you hear thunder, do not touch the
antenna, devices or plugs.
Firmly insert the power plug all the
way
In order to prevent harm to the user and other people, and damage to property, the precautions that must be observed are explained as follows.
ÿThe degree of injury or damage that may occur if you ignore the indications and use the product incorrectly are classified and
explained according to the following indications.
Using an outlet or wiring device that
exceeds its rating, or using alternating current
pull out the
power plug
no wet hands
Unplug the power plug in case of
trouble
Contact prohibited
ÿThe following pictograms are used to classify and explain the
types of content to be observed. (The following is an example
of pictorial display.)
Regularly remove dust from the
power plug.
Do not use at voltages other than 100V.
The column with this indication
indicates that "Possibility of injury or
physical damage is assumed".
Using a damaged
product may cause an
electric shock, short
circuit, or fire. When
unplugging, hold the
plug and pull it straight
out. For cord or plug
repair, contact your
dealer.
Pictorial indications like this are “caution alerts” that
you should be aware of.
If dust accumulates on the plug, the
moisture will cause the insulation to
become defective, resulting in a fire.
Unplug the power plug and wipe it with
a dry cloth. Unplug the power plug when
not using for a long period of time.
Doing so may cause an
electric shock.
When metal, water, or foreign
objects get inside the device
When smoke, a strange odor,
or an abnormal noise is
emitted, or when the device
is dropped or damaged
Exceeding the rating with multiple wires,
etc., may cause heat generation and
fire.
Continued use may result in fire or
electric shock. Please consult your
dealer.
There is a risk of electric shock.
Incomplete insertion may cause electric
shock or fire due to heat generation. Do
not use damaged plugs or loose outlets.
Pictograms like this indicate "compulsory" actions
that must be performed.
Pictograms like this indicate “prohibited” content that
must not be done.
If something goes wrong
warn
Notice
The column with this indication
indicates that "possibility of death
or serious injury is assumed".
Safety Precautions Please be sure to observe
4
warn
RQT6010
Machine Translated by Google
Please be sure to follow
About installation
About batteries
About use
Do not put metal objects inside
the device, splash water on it,
or let it get wet.
and are inserted
correctly Remove when not in
use for a long time
Do not put anything on the device
Do not place in a place where the temperature
becomes abnormally high.
Decomposition prohibition
Do not mix new and old batteries
or batteries of different types Do
not recharge dry batteries Do not
heat, disassemble, throw into
water or fire Do not mix with
metal objects such as necklaces
Use rechargeable batteries as a
substitute for dry batteries Do not
use batteries with the coating
removed.
Handle batteries correctly
Does not interfere with heat dissipation
Do not misuse batteries
Do not disassemble or modify
Do not place in a place exposed
to oily smoke or steam, or in a
humid or dusty place.
5
A short circuit or heat
generation may cause
fire or electric shock.
Do not place containers
filled with liquids or
metal objects on the
equipment. Please be
especially careful with
children.
RQT6010
Before use
There are parts with high voltage
inside, which may cause an electric
shock. Ask your dealer for internal
inspection and repair.
The surface and parts of the
equipment may deteriorate, and it
may cause a fire. Be especially
careful in a closed car in summer, in
direct sunlight, or near a stove.
Improper handling may cause battery fluid to leak, resulting in fire or
contamination of the surrounding area. In the event of liquid leakage, please
contact your retailer. If the liquid gets on your body, wash it off thoroughly
with water.
The device may fall or
tip over, resulting in
injury.
Entering the equipment may result in
fire or electric shock.
Electricity may be
transmitted through
oil, moisture, or dust,
resulting in fire or
electric shock.
If heat builds up inside, the case of
the device may be deformed or
cause a fire. Be careful not to block
the heat dissipation holes on the rear
panel.
Safety precautions
Notice
warn
Do not install in unstable locations
Machine Translated by Google
Prepare
It may break and cause injury. Please be
especially careful with children.
Mounting the pedestal
Preparing the power supply
6
The antenna may get caught on or hit an
object and cause injury.
RQT6010
Because it rotates at high speed, it
may fly out or fly out, resulting in
injury. Do not use discs that have
been repaired with adhesive, etc.,
as they are also dangerous.
Attempting to move the cord while it is connected
may damage the cord, resulting in fire or electric
shock. Also, it may get caught and cause injury.
ÿ To remove the
pedestal , pull it out while pushing the claw upward.
You can change the orientation of the main unit to
make the display easier to see. Left: 45°, Right: 45°
(maximum) Up: 15°, Down: 5° (maximum)
back of the unit
Listening at ear-splitting volume for a long time may
adversely affect your hearing.
Below the unit
Do not raise the volume too high when using headphones
AC INÿÿ
ditch
Firmly insert the
pedestal
Firmly insert the
Power cord
(included)
Click
ÿAC 100 Vÿ50/60 Hzÿÿ
back
home outlet
Claw
About use
Safety Precautions
Caution
Do not use cracked or deformed discs, or heart-
shaped discs.
do not get on the equipment Use with a household outlet.
Batteries cannot be used.
Do not carry the antenna while it is extended.
How to use
Do not move with the cord connected
Machine Translated by Google
Connecting and adjusting the AM loop antenna (supplied)
Tsuzuki
2Connect to the rear of the unit
Adjusting the FM whip antenna
meaning(
This unit does not have a built-in AM antenna.
How to use the remote control
ÿ
Insert the batteries (included)
1 Assemble the antenna
3 Try to receive a broadcast station ( page 14), and adjust the
AM loop antenna to a position and angle that minimizes
noise.
Before use
Connect and adjust the AM loop antenna.
• • • • • • • • •
• • • • • • • • •
Preparations
for
connection
and •
preparations
for
adjusting
the
power
supply
unit
ON
AM
ÿ To remove the AM loop antenna , slowly
pull the cord of the loop antenna.
To prevent damage to the remote
controller • Do not disassemble or
modify the remote controller. • Do not
place heavy objects on the product. • Do not leave in
direct sunlight. • Do not spill liquids such as juice.
Adjust length and orientation.
please
For correct transmission • Do
not place any obstacles between the receiver and the remote control.
• Be careful of dust on the light receiving part and the tip of the remote
control. • Do not expose the sensor to direct sunlight or strong light from an
inverter fluorescent lamp.
The speakers of this unit are not designed to be magnetically
shielded. Do not place it near a TV, computer, etc.
Prepare
Firmly insert the
Transmitter
Click
Within approx. 7 m from the
front (The usable range varies
depending on the angle.)
30ÿ
Insert and correctly
while pressing the spring on the side
30ÿ
Code for AM loop antenna
2 AA size
Remote control sensor
insert into the groove
Notes on safety
Antenna connection and adjustment Preparing the remote control
RQT6010
•
7
Machine Translated by Google
RQT6010
DELETE CANCELALOT
MD CD RADIO
AM
FM
handle
SL
CHARA
ENTER
H.E.S.
EEP
VIRTUALIZER
CLEAR OFFFM PGM AUTOMODE
If the retention period is exceeded, a power failure or unplugging the power plug
The contents of the memory will be lost if you remove it from the tray.
If the memory contents are erased, set them again.
FADER
TRACK
MODE
TIMER
MARK
PLAY
PQRS
Even if you remove the
Put your finger in the hole, push it up and then wake it up.
If you do not want to erase the memory contents, even when the power is turned off,
power outages or disconnect the power plug from the outlet.
(Power consumption when power is off: approx. 0.9 W)
Insert the power plug into the outlet for at least 3 minutes.
I recommend.
hold.
We recommend that you insert the power plug into the outlet.
DISPLAY
WXYZDISPLAY
EQSOUND
VOLUME
WRITETHE
JKL
ABC
TUV
DEF
Getting ready (continued)
SOUND
Setting the clock (24-hour display)
How to raise the handle About memory retention
2
7
0
8
6 5
9
3
10
1
4
P-MD
SPACE
ALARM
TO
8
Machine Translated by Google
M
M
M
M
M
AND
AND AND
AND
AND
OOO OO
O
O
O
O
M
M
M
M
M
T
D D
D
D
D
N
L
L
L
L
L
Returns to the original display in about 1 second
The accuracy of the clock is about 1 minute per month at room temperature. It is recommended to adjust the time periodically.
This blinking will be canceled once the power is turned on. ÿ Check that the time is correct.
However, if the memory for the current time disappears (see below), the demo function will return to "ON".
If the power failure lasts for about 74 minutes, the entire clock display will flash when the power is restored.
When the clock is set, the demo function will automatically turn off.
MM
M
M
M
9
3
1
4
5
2
OOOOO
AND
AND
AND
AND
S
S
S
S
S
Before use
AND
AND
AND
AND
AND
Station setting (manual memory)
MD program content
Demo function settings
now moment Timer setting (time)
sound quality settings, etc.
When the power is turned off, the clock is displayed if the clock is set.
Timer settings (contents other than time) Station setting (area bank)
AND
AND
AND
AND
M
M
M
M
M
I
I
I
I
I
D
D
D
DD
D
news
POWER
DD
D
D
T
TT
T
O
R
R
R
R
R
TIMER PLAY
CLOCK 10:03
CLOCK
TIMER REC
CLOCK 10:03
CLOCK
O
O
O
O
O
T
T
T
T
T
T T
T
T
T
height
Li
•
Le
mosquito
of
Time
Ha
of
hmm
Save
one
do
circle
child
hand
Ru
?
To
rice field
•
•
of
count
me
rise
mo
combine
hold
stomach
death
SSS SS
P
P
P
P
within about 10 seconds
one
ÿ To display the clock, press the remote control
Move
Zu
Press
Example) Set to 10:03.
tree
Press
Move
within about 10 seconds
Move
Please press according to the time signal.
Set the hour and minute at the same time.
• Items to keep for about 74 minutes
ÿ
Ru (
• Items to keep for about 1 week
AND
P
C
C
C
C
C
AND
AND
AND AND
AND
IN
IN IN
IN
IN
(return) (move on)
K
K
K
K
K
AND
I
I
I
I
I
N
N
N
N
DISPLAY
IN
IN
IN
IN
IN
L
L
L
L
L
prepare
Turn on the power
enter configuration mode
of
“CLOCK”
vinegar
adjust the time
choose the
push
allow
start the clock
CLOCK/TIMER
D
D
D
D
D
AND
AND
AND
AND
AND
N
N
N
N
N
RQT6010
C
C
C
C
C
Machine Translated by Google
PGM AUTOMODE CLEARFM OFF
AM
FM
For double long recording
PQRS
MARK TIMERPLAYTRACK FADERMODE
About (long stereo recording/playback)
AUTO OFF
WXYZDISPLAY
VOLUME
EQSOUND
Recorded MD
For songs recorded in standard time recording mode: No display
ÿ To record with ( page 17, 43)
When playing a song recorded for a long time (LP2/LP4), the display shows the following.
For tracks recorded for 4x longer time (stereo): “LP4”
Play according to the recording mode (standard/LP2/LP4).
For songs recorded twice as long (stereo): “LP2”
is a method that enables long-time (double or quadruple) stereo recording and playback using new audio compression technology.
JKL
WRITETHE
DEF ABCTUV
MD
SOUND
P-MD
DEMO
9 26 57 110 40 8 3
SLEEP
CHARA
H.E.S.
ENTER
listen to MD
VIRTUALIZER
10
ALARM SPACE
TO
RQT6010
RADIOMD CD
ALOT DELETE CANCEL
LP2
Machine Translated by Google
How to use
MD is automatically retracted.
(advance) Press and hold while playing
push
Press the MD to turn on the power,
(advance) press
Press to
start playing
push
push
Press to
adjust volume
put in the direction of
MD
(return)
(return)
1
2
3 VOLUME
MD
MD
MD
To turn off the power
automatically
ÿ To remove the MD
ÿ After the performance, etc.,
ÿ To pause
ÿ To stop playing
11
M
listen to D
DEMO
(minimum)ÿ (max)ÿ
Insert recorded MD
If an MD is already inserted, starting from step 2 will automatically turn on the power and start playing. (One-touch play) “MONO”
lights up when you play a track that has been recorded in monaural for a long time on another device.
VOL 20
MD 14 68:25
MD 1 1:54
Press
(Press again to return to playing.)
ÿ Fast-rewinding/fast-forwarding (Search)
(While displaying, press again to cancel)
The power will automatically turn off if no operation is performed for approximately
10 minutes while performance is stopped or no disc is inserted.
ÿ To jump to the previous or next
song (Skip)
(For MD and CD only)
remote control only
MD
MD
• If you are using MD for the first time, please read "About MD" on page 46.
RQT6010
news
MODE ON
< AUTO OFF>
AUTO OFF
Elapsed playing time
Blinks (approximately 5
seconds) when an MD is inserted ÿ Lights up
(Big)
song number being played
0ÿ
Total number
of songs Total playing time
50ÿ
(Small)
Machine Translated by Google
ALOT
CANCEL
DELETE
TO
RQT6010
MD RADIOCD
OFFPGM AUTOMODEFM CLEAR
Doing so may scratch the CD.
However, playback may not be possible depending on the recording conditions.
Do not open the CD lid while playing or pausing, or immediately after inserting a CD and closing the CD lid.
It supports the playback of standardized music CD-Rs and CD-RWs.
Recorded in CD-DA format and finalized* at the end of recording
thing.
Close the handle before opening the CD lid.
* Process so that it can be played on a device that supports music CD-R/CD-RW playback.
TIMERTRACK PLAY FADERMARK MODE
PQRS
ENTER
CHARA
VOLUME
AUTO OFF
WXYZDISPLAY
JKL
WRITETHE
CD
label side
EQSOUND
SOUND
DEMO
DEFTUV ABC
SLEEPCHARAENTERH.E.S.
listen to cds
VIRTUALIZER
12
59 3610 4 17 280
P-MD
AM
FM
ALARM SPACE
please
Machine Translated by Google
C
listen to D
CD
to stop playing, then press push
OPEN CLOSE
RQT6010
CD
OPEN CLOSE
13
CD
CD
ÿ To jump to the previous or
next song (Skip)
ÿ To pause
ÿ After the performance, etc.,
ÿ Fast-rewinding/fast-forwarding
(Search)
ÿ To eject a CD
ÿ To stop playing
Remote control only
for automatic power off
1
2
3 VOLUME
news
MODE ON
< AUTO OFF>
Insert CD and press
again to close
start playing
adjust the volume
DEMO
DEMO
AUTO OFF
push
How to use
Press (Press again to return to playing.)
Press
(advance) press
push
Press to open the CD lid
(advance) Press and hold while playing
Press
CD 1 1:54
CD 14 68:25
VOL 20
(return)
(return)
ÿ To store the disc title of a CD in this unit Remote control only
ÿTo cancel midway: Press [ÿ].
Track number being played Elapsed playing time
Total number
of songs Total playing time
(Big)
50ÿ
(max)ÿ
(Press again to cancel while the display is
displayed.) If you do not operate the unit for about 10 minutes while the performance is
stopped or no disc is inserted, the power will automatically turn off. (For MD and CD only)
If a CD is already inserted, the power will automatically turn on and playback will begin when you start from step 2. (One-touch play)
You can assign a title to a CD and store it in this unit so that it
can be displayed during performance. The disc titles of up to 10
CDs can be stored in this unit.
(Small)
While the CD is stopped (Press [ÿ] to select the CD) ÿ
Press [CHARA] ÿ Enter the title (up to 15 characters)
(procedure on page 34) ÿ Press [ENTER]
0ÿ
(minimum)ÿ
While the CD is stopped (Press [ÿ] to select the CD) ÿInsert
the CD you want to assign a new title to ÿPress [CHARA ] ÿ
“MEMORY FULL” flashes ÿWithin about 10 seconds Or press [ ] to
select the title that you want to delete and press [ENTER] ÿ Enter a
new title (up to 15 characters) (step on page 34) ÿ Press [ENTER]
10 CD titles have already been stored, and to replace the memory
Machine Translated by Google
TO
P-MD
0 69 23 147810 5
CD
RADIO
MD
CANCEL
ALOT
DELETE
VIRTUALIZER
SPACE
ALARM
CLEARPGMMODEFM AUTOOFF
AM
FM
RQT6010
MARK
MODE
TIMER
PLAY
TRACK
FADER
PQRS
14
DISPLAY
WXYZ
FM MODE
VOLUME
listen to the radio
JKL
WRITETHE
EQSOUND
TUV DEF ABC
SOUND
CHARAENTERH.E.S. SLEEP
Machine Translated by Google
AUTO TUNING
MONO
FM AM AREA
3 VOLUME
FM MODE
RQT6010
VOL 20
FM 88.1 MHz
FM 76.0 MHz
FM 88.1 MHz
listen to the radio
(move on)(return)
Press
The reception
position of the TV that you
press to match the frequency is:
push
Select FM or AM The power turns
on, and “FM” or “AM” lights up.
TV audio (1-3 channels only) is received via FM.
Press
to adjust volume
How to use
FM76.0MHzÿ90.0MHz TV1ch TV2ch TV3ch
When there is
a lot (Only when receiving FM 76.0 to
90 MHz) • The sound will be monaural, but the noise will be reduced and it
will be easier to hear. • Normally, leave “MONO” off.
can hear (page 24)
Connect and
adjust the antenna before operation . ( page 7)
Press and hold until the frequency starts
moving, then release
• Frequency stops automatically at the station received first.
remote control only
• If you specify the area you live in and store it in memory, you can easily
ÿ Noise in FM stereo
ÿ To select a station
automatically (auto tuning)
ÿ To memorize and listen to broadcast stations (area bank)
AM and TV audio are mono. If reception is
difficult, place the antenna near a window and adjust the direction and length of the antenna. ( page 7) About the TV receiving
circuit of this unit
frequency
0ÿ
(minimum)ÿ
(monaural reception mode)
Since it is also used as an FM receiving circuit, FM interference may occur on channels 2 or 3.
50ÿ
(max)ÿ
FM AM each time you press
(Big)
(back) (forward)
(Small)
“MONO” lit
15
2
1
news
Machine Translated by Google
For double long recording
Do not open the CD lid.
Close the handle before opening the CD lid.
during recording, while paused, or immediately after inserting a CD and closing the CD lid.
Doing so may scratch the CD.
MD CD RADIO
About (long stereo recording/playback)
SPACE
ALARM
please
AUTOFM CLEARMODE OFFPGM
AM
FM
DELETE CANCELALOT
MODE TIMERMARK PLAY FADERTRACK
PQRS
EQSOUND
VOLUME
TRACK MARK
JKL
WRITETHE
SOUND
WXYZDISPLAY
For songs recorded in standard time recording mode : No display
uses new audio compression technology to produce long (2x or 4x) stereo recordings,
CD
For songs recorded twice as long (stereo) : “LP2”
label side
It is a playable method. (page 43)
For tracks recorded for 4x longer time (stereo) : “LP4”
Play according to the recording mode (standard/LP2/LP4).
MD for recording
VIRTUALIZER
RQT6010
Record CD to MD
ABCDEFTUV
P-MD
16
ENTER CHARAH.E.S. SLEEP
TO
When playing a song recorded for a long time (LP2/LP4), the display shows the following.
LP2
9 50 3610 4 17 28
Machine Translated by Google
AND
L
L
L
O
O
O
REC
REC
M
M
M
I
I I
AND
AND
17
OPEN CLOSE
D
O
to mark
ÿ To stop recording halfway
ÿ To pause
CD track number Playing time
The recording level is set automatically. Changing the volume or tone quality will not affect the recording.
Insert MD
Recording is not possible if the MD's accidental erasure prevention knob is open.
Long monaural recording is not possible with this unit.
Blinks (about 5 seconds) ÿ Lights up
R
R
R
S
S
S
D
D
T
M
M
M
LP MODE OFF: Standard time recording mode
TRACK MARK
I
II
TT
T
TT
news
SSS
DD
D
DEMO
push
choose
push to close
push
switch to CD
Insert an MD for recording
insert the CD and try again
Enter LP configuration mode
C
C
C
AND
AND
AND
N
N
K
K
K
IN IN
IN
LP4 MODE: 4x long time recording mode
LP2 MODE: Double long time recording mode
Press the MD to turn on the power,
To change the recording mode
push
MD is automatically retracted.
Move
Press
Simultaneous CD playing and MD recording
push
Starts and stops when recording ends.
put in the direction of
Press to open the CD lid
How to use
within about 10 seconds
Move
push
If you do not want to change the recording mode (standard/LP2/LP4), go to step 5
N
recording mode
TRACK MARKING
UTOC Writing
1:16
CD 14 68:25
TOC Reading
LP MODE
MD REC
< C D >
CD 1
CD 14 68:25
IN
IN IN
P
After blinking, stop recording.
Press again to return to recording.
ÿ While recording the track at the desired position,
“UTOC Writing”
(“ ” flashes) REC
remote control only
AND
AND
AND
D
DD
CC
C
O OO
LP4 MODE
LP MODE OFF
LP2 MODE
HI SPEED
1
3
2 CD
4
5 HI SPEED
N
N
N
AND
AND
AND
OO
MD
MD
MD
MD
M
M
M
AND
AND
AND
DUAL
• A track mark is a “break” recorded in the recorded part. (page 46)
• When you pause, one track mark is added.
• During auto CD recording ( page 27), you cannot add track marks to desired positions.
• If you are using MD for the first time, please read "About MD" on page 46.
• To erase the track marks, combine the two tracks before and after the recording into one track. (page 31)
• When you pause, the recorded sound is interrupted.
RQT6010
L
L
L
D
D
D
AND
AND
DEMO
O OO
M
M
M
DUAL
D
Ru
D
vinegar
M
sound
of
C
To
AND
T
T
T
P P
Machine Translated by Google
SOUND
JKL MNO
DELETE
JKL MNO
Insert MD and CD
into the main unit before operation .
news
RANDOM
RANDOM
(GROUP)
MD
CD
PGM CLEAR
PGM CLEAR
10
10
10
10 10
10
DEMO
RQT6010
WRITE THE
WRITE THE
FM AM
FM AM
SPACE
CD MD
CHARA ENTER CANCEL
ALARM H.E.S. SOUND EQ
AUX RADIO CD MD
AUX RADIO CD MD
How to listen to MD/CD
PLAY MODE
DISPLAY FM MODE PLAY MODE TRACK MARK
WXYZ
DISPLAY FM MODE PLAY MODE TRACK MARK
Play starts from the selected
song. (You can also choose while playing)
Play starts from the selected
song. (You can also choose while playing)
1- _
ÿ To select a track number of 10 or more with the number buttons
(example) • 10 to 99 Track number 10: Track number 25:
Grouped MD only
ÿ To cancel ,
press [PLAY MODE] while stopped or playing .
Turn off the “RANDOM” display. (If it is canceled during MD play, it
will stop when the track being played ends.) • It will also be
canceled when the disc is ejected.
•100~ (MD only) Track
number 100: Track
number 235:
Off ( , GROUP)
Skip does not return to the previous song.
Search is only within the song being played.
It cannot be used at the same time as program play.
1 0
2 3
5
1 0
0
2 5
RANDOM
VOLUME
Press to select track number
Press to switch to CD or MD
or press
Play each song one by one in random order, then stop.
Press the number buttons to select the track number
After playing from the selected song to the last song, stop.
Press to select RANDOM
or press
Listening to your favorite track (direct play)
8
1:54
1:54
8
9
9
456
8
8
0
10
7
0
456
7
123
10
18
VIRTUALIZER
PQRS TUV
ABC DEF
PQRS TUV WXYZ
Body
while stopped
Listen out of order (random play) remote control only
Remote controller
P-MD
P-MD
Machine Translated by Google
10 10
10
19
TRACK REPEAT
VIRTUALIZER
VIRTUALIZER
98
123
7
123
7 9
0
8
0
10
456 10
PGM
PGM
PGM 8 2:25
PGM 8 – – 01
CD MD
CD MD
PQRS TUV WXYZ
PQRS TUV WXYZ
ABC DEF
ABC DEF
1-
P-MD
P-MD
DISPLAY FM MODE PLAY MODE TRACK MARK
AUTO OFF
AUTO OFF
PGM CLEAR
PGM CLEAR
DISPLAY FM MODE PLAY MODE TRACK MARK
CD MD
• •
Rapunro Dam Play
Kuto play
• •
glam play
Grouped MD only
PROGRAM Total
playing time
number button
(All songs)
ÿ To cancel , press
[PLAY MODE] to erase “ ” and “ ”. • The lock is also canceled when
the disc is ejected.
“PGM CLEAR” will be displayed and the reservation will be cancelled. • The
lock is also canceled when the disc is ejected. ÿ To select a track number
of 10 or more with the number buttons (example) • 10 to 99 Track
number 25:
“
lights out
PROGRAM track
number
Playing order
Each time you
press 1- (1 song)
ÿTo check the reservation The
track number and reservation order are displayed in order each
time you press [ ] or [ ] while the music is stopped . ÿ To add a
reservation, select the track number with the numeric buttons
on the remote controller while the “PROGRAM” display is displayed while
the program is stopped. ÿDuring the reservation • If “PROGRAM FULL”
is displayed, no more reservations can be made. - - : - -” is displayed, it
means that the total number of reserved songs has exceeded 250 minutes.
•100~ (MD only) Track
number 235: Information
CD searches are limited to the track
being played.
VOLUME
VOLUME
PGM CLEAR
RANDOMÿ
Cannot be selected during
playback Single -track repeat: Press the number buttons to select the
track number All-track repeat: Press or
while stopped
There are 2 types: 1-track repeat and all-track repeat.
before or during a performance
ÿ To cancel Press
[PGM/CLEAR] on the remote control while stopped.
1-
SPACE
SPACE
1-
SOUND
SOUND
D
How to hear D
M
ÿ
C
Play your favorite songs in the order you like. Up to 24 songs can be reserved.
FM AM
FM AM
A LOT
DELETE
JKL MNO
456
DELETE
3
2
2 5
5
•
ÿTo repeat a few songs of
your choice ÿ Start playing with program play.
(See below) ÿ Press [PLAY MODE] to select “ ”.
JKL
WRITE THE
WRITE THE
FATHER HOURS
FATHER HOURS
SLEEP
ALARM H.E.S. SOUND EQ
CHARA ENTER CANCEL
CHARA ENTER CANCEL
ALARM H.E.S. SOUND EQ
SLEEP
AUX RADIO CD MD
AUX RADIO CD MD
,
PROGRAM
5 – – 02
PROGRAM
PLAY MODE
Listening repeatedly (repeat play) Remote control only
press or select
How to use
Press the number buttons to
select the track number
Press to switch to CD or MD
Press the number buttons
to select the next track
number (up to 24 tracks)
Press to switch to CD or MD
or press
push
Reserve and listen (program play) remote control only
Before playing
( ÿGROUP) (GROUP)
RQT6010
Machine Translated by Google
20
D
D
D
D
D
D
D
D
D
, In addition, the group function unsupported
cannot be Please release it.
MDs for which group editing has been performed on this unit
Group together if:
track numbers in ascending order.
not displayed properly.
on a model that does not support the group function.
(Steps on page 34 or Steps on page 35)
The order of the groups is not the order in which they were edited.
Putting one song into multiple groups
MDs for which group editing has been performed on this unit
disc title is correct.
You can not.
there is.
When set to loop play.
ÿTo stop in the middle: Press [CANCEL] or [ÿ].
group management information may become unusable
•MD can be programmed, random, or
If you perform editing operations on the model, group
AND
AND
AND
AND
AND
AND
AND
AND
AND
IN
IN
IN
IN
IN
IN
IN
IN
IN
C
C
C
C
C
C
C
C
C
AND
AND
AND
AND
AND
AND
AND
AND
AND
RQT6010
ENTER
and 9) cannot be grouped.
If the songs are far apart (e.g. songs 3 and 7
SSSSSSS SS
OOOOO OOOO
ÿÿ
C
C
C
C
C C
C
C
C
S
S
S
S
S
S
S
S
S
push
push
move,
Press to switch to MD
EDIT setting mode
For example, if you record 3 CDs (albums) in long mode, each album will have 3 groups.
to go into
push
can be managed as a group.
move,
Select,
You can create up to 99 groups. (It depends on the availability of the UTOC area)
“SET”
to select the first
track number,
to select the ending
track number,
push
move,
Example) Make tracks 3 to 5 into one group
push
Select “GROUP” and
T
T
T
T
T
T
T
T
T
T
T
T
T
T
T
T
T
T
O
O
O
O
O
O
O
O
O
M
M
M
M
M
M
M
M
M
IN
IN
IN
IN
IN
IN
IN
IN
IN
EDIT
TITLE INPUT
Enter group name
UTOC Writing
3 ÿ 5?
GROUP
–? ÿ – – –
3? ÿ – – –
TITLE ST.
SET
3 ÿ 3?
(Example: 1st to 10th songs) only.
Groups can only contain consecutive songs
D
D
D
D
D
D
D
D
D
N
N
N
N
N
N
N
N
N
Insert the MD into the main unit.
within about 10 seconds
Body
After “UTOC Writing” blinks,
Group editing completed.
T
T
T
T
T
T
T
T
T
O
O
O
O
O
O
O
O
O
R
R
R R
R
R
R
R
R
OOOOO OOOO
Listen as a group (MD only)
N
N
N
N
N
N
N
N
N
L
L L
L
L
L
L
L
L
AND
AND
AND
AND
AND
AND
AND
AND
AND
D
D
D
D
D
D
D
D
D
DEMO
CANCEL
BEEP
AND
AND
AND
AND
AND
AND
AND
AND
AND
For MDs that are grouped for the first time, only “SET” can be selected.
•When the MD is protected against accidental erasure.
AND
AND
AND
AND
AND
AND
AND
AND
AND
I
I
I
I
I
I
I
I
I
news
D
D
D
D
D
D
D
D D
I
I
I
I
I
I
I
I
I
Group songs together
L
L
L
L
L
L
L
L
L
Using the long time mode (LP2/LP4) of , you can record many songs on one MD.
Noh. With this unit, you can manage these songs as a group of favorites.
M
M
M
M
M
M
M
M
M
M
M
M
M
M
M
M
M
M
M
M
M
M
M
M
M
M
M
K
K
K
K
K
K
K
K
K
before operation
AND
AND
AND
AND
AND
AND
AND
AND
AND
P
P
P
P
P
P
P
P
P
You can group even one song.
Machine Translated by Google

Other manuals for RX-MDX55

1

Other Panasonic Stereo System manuals

Panasonic SA-VK31EE User manual

Panasonic

Panasonic SA-VK31EE User manual

Panasonic SC-BT737 User manual

Panasonic

Panasonic SC-BT737 User manual

Panasonic SCPM08 - DVD STEREO SYSTEM User manual

Panasonic

Panasonic SCPM08 - DVD STEREO SYSTEM User manual

Panasonic SC-HC05GN User manual

Panasonic

Panasonic SC-HC05GN User manual

Panasonic SC-MAX4000 User manual

Panasonic

Panasonic SC-MAX4000 User manual

Panasonic SC-AK78 User manual

Panasonic

Panasonic SC-AK78 User manual

Panasonic SG-1800 User manual

Panasonic

Panasonic SG-1800 User manual

Panasonic SC-PM250 User manual

Panasonic

Panasonic SC-PM250 User manual

Panasonic SC-PM700 User manual

Panasonic

Panasonic SC-PM700 User manual

Panasonic SC-VK72D User manual

Panasonic

Panasonic SC-VK72D User manual

Panasonic SA-AK110P User manual

Panasonic

Panasonic SA-AK110P User manual

Panasonic SA-AKX56PH User manual

Panasonic

Panasonic SA-AKX56PH User manual

Panasonic SCHC30 - COMPACT STEREO SYSTEM User manual

Panasonic

Panasonic SCHC30 - COMPACT STEREO SYSTEM User manual

Panasonic SC-PM27 User manual

Panasonic

Panasonic SC-PM27 User manual

Panasonic MW10 - 9.0" - Digital Photo frame User manual

Panasonic

Panasonic MW10 - 9.0" - Digital Photo frame User manual

Panasonic SC-HC29 User manual

Panasonic

Panasonic SC-HC29 User manual

Panasonic SC-HC15 User manual

Panasonic

Panasonic SC-HC15 User manual

Panasonic SA-VK750EE User manual

Panasonic

Panasonic SA-VK750EE User manual

Panasonic SA-AK250PL User manual

Panasonic

Panasonic SA-AK250PL User manual

Panasonic SA-AK330EE User manual

Panasonic

Panasonic SA-AK330EE User manual

Panasonic SA-PM65MD User manual

Panasonic

Panasonic SA-PM65MD User manual

Panasonic SC-AK44 User manual

Panasonic

Panasonic SC-AK44 User manual

Panasonic SC-PT170 User manual

Panasonic

Panasonic SC-PT170 User manual

Panasonic SCAK330 - MINI HES W/CD PLAYER User manual

Panasonic

Panasonic SCAK330 - MINI HES W/CD PLAYER User manual

Popular Stereo System manuals by other brands

Sharp CD-BA1300H Service manual

Sharp

Sharp CD-BA1300H Service manual

Philips FW-C550 operating instructions

Philips

Philips FW-C550 operating instructions

Philips NTRX900/12 user manual

Philips

Philips NTRX900/12 user manual

Sharp XL-HP700H Operation manual

Sharp

Sharp XL-HP700H Operation manual

RCA RS2604 user guide

RCA

RCA RS2604 user guide

Denon D-107 Service manual

Denon

Denon D-107 Service manual

Clas Ohlson KW-1021MP3USB instruction manual

Clas Ohlson

Clas Ohlson KW-1021MP3USB instruction manual

Denver MCA-210 Owner's handbook

Denver

Denver MCA-210 Owner's handbook

Philips FW 316C Instructions for use

Philips

Philips FW 316C Instructions for use

Philips MC147/93 quick start guide

Philips

Philips MC147/93 quick start guide

Kenwood UD-302 instruction manual

Kenwood

Kenwood UD-302 instruction manual

LG CM4550 Service manual

LG

LG CM4550 Service manual

Philips SBCHC520/05 Instructions for use

Philips

Philips SBCHC520/05 Instructions for use

LG MDT355K owner's manual

LG

LG MDT355K owner's manual

Philips MCM276R/37 Servise manual

Philips

Philips MCM276R/37 Servise manual

JVC KD-R422 Installation & connection manual

JVC

JVC KD-R422 Installation & connection manual

Sony HCD-A490 Service manual

Sony

Sony HCD-A490 Service manual

JVC RV-NB20W instructions

JVC

JVC RV-NB20W instructions

manuals.online logo
manuals.online logoBrands
  • About & Mission
  • Contact us
  • Privacy Policy
  • Terms and Conditions

Copyright 2025 Manuals.Online. All Rights Reserved.