Ava-Toast 184BT18A User manual

Adjustable Speed Vercal Conveyor Bun Toasters
184BT18A - 120V 1600W
184BT18AXL - 120V 1600W - includes XL feed tray
184BT18H - 208/240V 2400/3200W
184BT18HXL - 208/240V 2400/3200W- includes XL feed tray

Troubleshooting
Operation ...............................
Part diagrams ......................... 9
8
........
.........................
....................
.......................
.......................
.......................
............
13
12
........

When using electrical appliances, basic safety precauons should always be followed,
including the following:
1. Read all instrucons carefully and completely.
2. For commercial use only.
3. DO NOT touch hot surfaces.
4. Protect against electrical shock by keeping all cords, plugs, and other electrical
components away from water or other liquids.
5. Unplug this unit when not in use and before cleaning.
6. Allow the unit to cool before pung on or taking off parts.
7. DO NOT operate this or any appliance with a damaged electrical cord or plug.
8. DO NOT operate this or any appliance aer it has malfunconed or has been
damaged in any way.
9. DO NOT use outdoors.
10. DO NOT place on or near a hot gas or electric burner.
11. Aach plug to appliance first, then plug electrical cord into the wall outlet.
12. Disconnect the unit by removing the electrical plug from the wall outlet.
13. DO NOT use appliance for any applicaon other than intended use.
14. DO NOT insert metal utensils or oversized foods into this unit, as they may cause
a fire and heighten the risk of electrical shock.
15. DO NOT store any item on top of this unit when in operaon.
16. DO NOT allow this oven to touch or to be covered by flammable material,
such as curtains, draperies, walls, etc., when in operaon.
17. DO NOT clean with metal scouring pads, as pieces can break off and touch electrical
components, heightening the risk of electrical shock.
18. Never place materials such as paper, cardboard, plasc, etc. in this oven.
19. DO NOT cover interior of this unit with metal foil, as it may cause the oven to overheat.
20. Avoid scratching the surface or nicking the edges of this unit. If the oven is damaged
or broken, contact customer service before use.
21. Turn off the appliance by removing the plug from the wall outlet.
22. Note that the use of accessories not recommended by the manufacturer
may result in injury.
23. Children should be supervised to ensure that they DO NOT play with the oven.
24. This appliance is not intended for use by persons (including children) with reduced
physical sensory or mental capabilies, or lack of experience and knowledge,
unless a person responsible for their safety has given them supervision or instrucon
concerning use of the appliance.
25. When using the appliance in shops, snack bars, hotels etc., check the voltage and
outlet to make sure the appliance is correctly connected with power.
26. Place unit on a flat surface that is well venlated. The appliance must be supervised
during operaon. DO NOT leave appliance without powering off.
NOTE: Save these instrucons for future reference.
SAFETY

CIRCUIT DIAGRAM
CONVEYOR MOTOR - 120V
M1
BUTTER ROLLER SWITCH
MAIN SWITCH
PILOT LIGHT FOR THERMOSTAT
HEATING ELEMENT
- 1600W
CONTROL THERMOSTAT
S2
S1
H1
E1
B1
DESCRIPTION
LEGEND
MODEL: VERTICAL BUN TOASTER - 120V
MODEL CODE: 184BT18A
WIRING DIAGRAM
BUTTER ROLLER MOTOR - 120V
CONVEYOR SPEED CONTROL - 120V
M2
SC
E1
H1
S1
M1
120V 60Hz
L2
L1
E
B1
SC
S1
S2
S2
M2
BUTTER ROLLER
MOTOR
BUTTER ROLLER
MOTOR
SWITCH
THERMOSTAT
CONVEYOR
MOTOR
MAIN SWITCH
635
LN

CIRCUIT DIAGRAM
4.
E1
H1
S1
M1
208/240V 60Hz
L2
L1
E
B1
SC
S1
S2
S2
M2
BUTTER ROLLER
MOTOR
BUTTER ROLLER
MOTOR
SWITCH
THERMOSTAT
CONVEYOR
MOTOR
MAIN SWITCH
CONVEYOR MOTOR - 208V/240V
M1
BUTTER ROLLER SWITCH
MAIN SWITCH
PILOT LIGHT FOR THERMOSTAT
HEATING ELEMENT
- 2400W / 3200W
CONTROL THERMOSTAT
S2
S1
H1
E1
B1
DESCRIPTION
LEGEND
MODEL: VERTICAL BUN TOASTER - 208/240V
MODEL CODE: 184BT18H
WIRING DIAGRAM
BUTTER ROLLER MOTOR - 208V/240V
CONVEYOR SPEED CONTROL - 208V/240V
M2
SC

INSTALLATION
5.
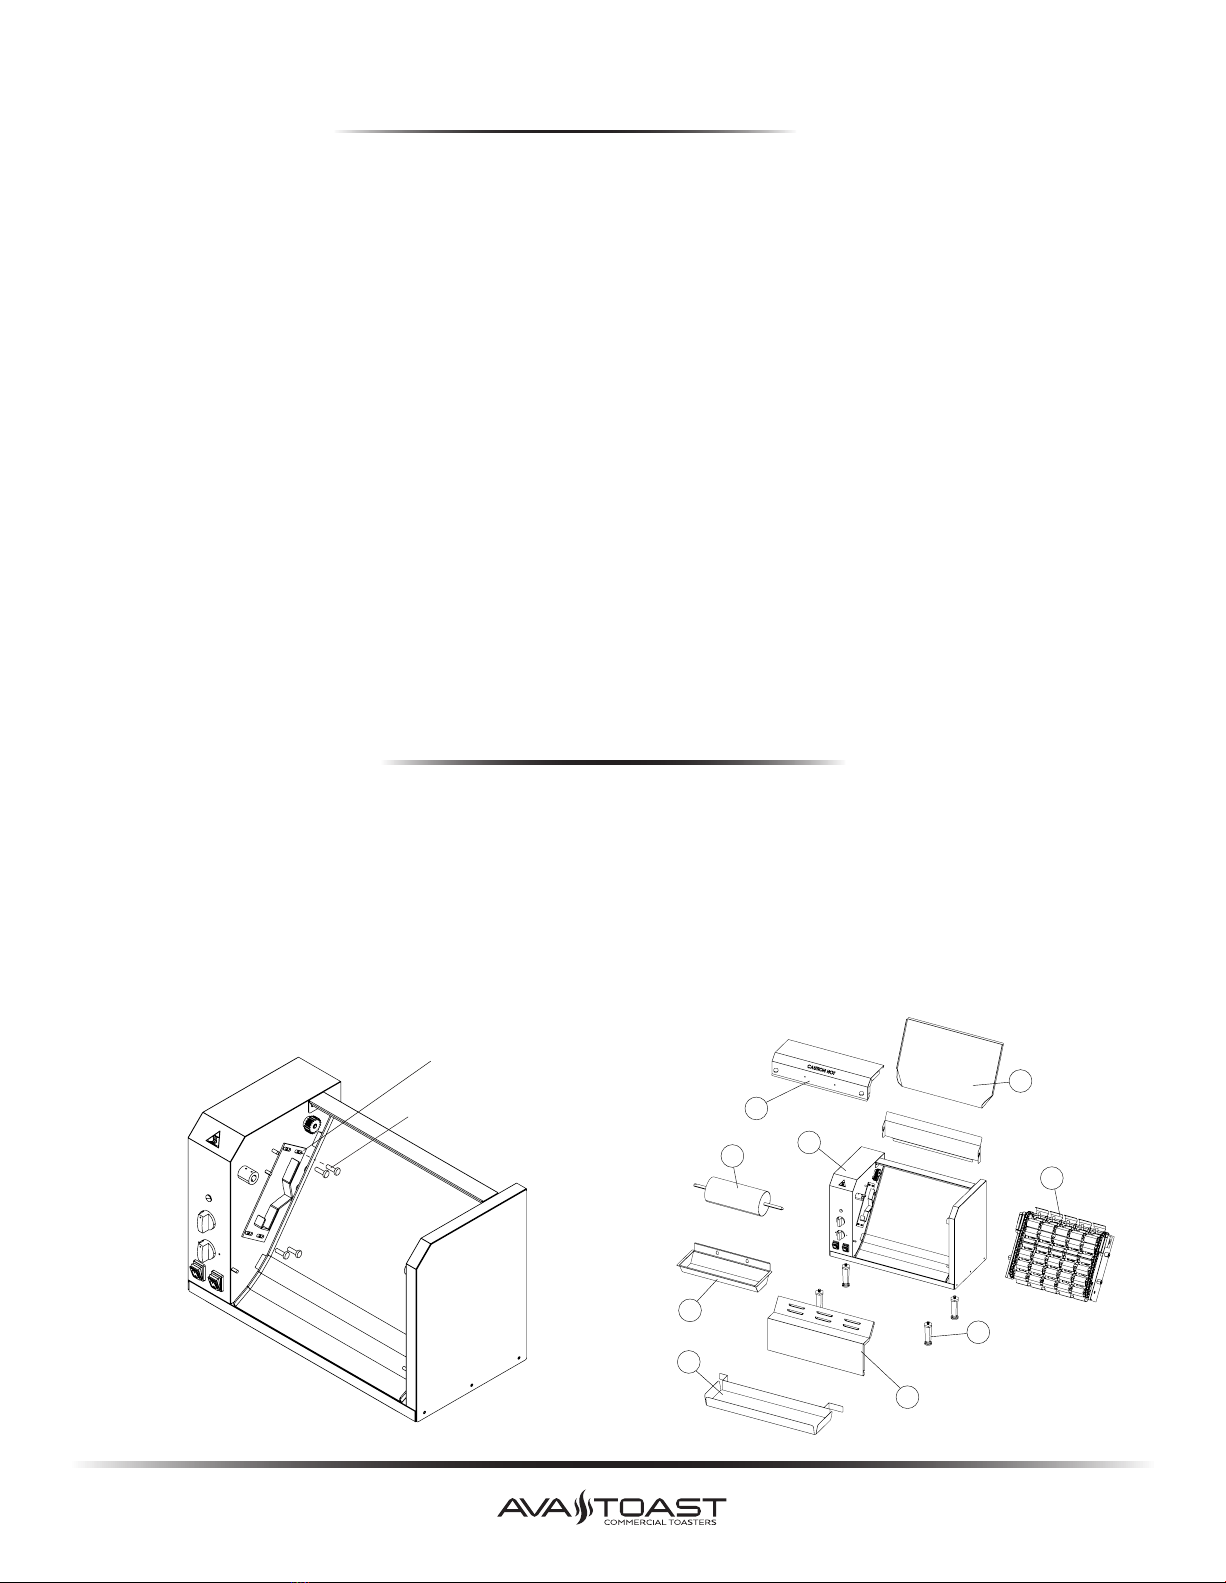
ASSEMBLY AND CONVEYOR INSTALLATION
holes provided. The unit can then be levelled using the adjustable part of the leg.
NOTE :
THE UNIT MUST NOT BE USED WITHOUT THE FEET BEING IN POSITION.
socket.
back wards. See diagram A.
gently to engage the drive gear. See diagram B.
NOTE:
CARE MUST BE TAKEN IN FITTING THE CONVEYOR CASSETTE. THE CASSETTE IS
HEAVY AND IT IS IMPORTANT THAT IT IS NOT DROPPED INTO PLACE TO AVOID
POTENTIAL DAMAGE TO THE DRIVE GEARS.
that order.
1
2
1
3
4
5
6
7
8
8
A. B.
drive gear
cassette gear
The cassee assembly height bolt is preset
from the factory. If the cassee gear does not make adequate contact, or is binding with the
drive gear, ghten or loosen the height bolt to ensure proper contact.

OPERATING INSTRUCTIONS.
6.
NOTE
THE TEFLON SHEET SHOULD BE INSTALLED PRIOR TO FITTING THE CONVEYOR CASSETTE AS
DESCRIBED ABOVE. IT IS RECOMMENDED THAT A LIGHT COATING OF EDIBLE OIL IS APPLIED TO THE
GRILL PLATE PRIOR TO FITTING THE TEFLON SHEET
NOTE:
THE TOASTED COLOUR OF THE BUN CAN BE ADJUSTED LIGHTER OR DARKER BY USING THE
TEMPERATURE CONTROL OR THE SPEED CONTROL OR A COMBINATION OF BOTH. WHEN
OPTIMUM BUN COLOUR AND SPEED HAVE BEEN ACHIEVED IT IS RECOMMENDED A NOTE IS TAKEN
OF THE SETTINGS FOR FUTURE REFERENCE.
INSTALLATION OF OPTIONAL TEFLON SHEET .
1. Lay the Teflon sheet on a flat surface and measure approximately 2’’ from the end of the
sheet. Notch the corners at 45 degrees as needed and fold a flap 2’’ long.
Carefully crease the flap at the 2’’ fold.
2. Remove the bun feeder chute (7). From the rear of the Teflon sheet retainer bracket slip
the 2’’ fold under the bracket. Bring the balance of the sheet forwards and smooth the
sheet down against the grill plate.
3. Reinstall the feeder chute.
C.
1. Thoroughly clean the unit as described in the cleaning secon of this manual on page 7.
2. Turn on the main switch the conveyor will now run.
3. Set the temperature to approx. 400F which equates to 5.7 on the scale. If using the oponal
Teflon sheet it is advisable to increase the temperature seng to approx. 450F which
equates to 6.5 on the scale (1-85F, 2-140F, 3-200F, 4-285F, 5-350, 6-410F, 7-480F).
4. Any high-quality edible oil can be used with this bun toaster. It is preferable to use oil
specifically suited for use in toasters.
5. The pilot cycle cycles with the heang element and indicates when the heater is on. It is
preferable to wait unl the unit has reached operang temperature and the light has cycled
on and off twice.
6. Heat the toaster oil to melng point and carefully fill the buer tray 2/3 full. Turn on the
buer roller using the switch provided.
7. Hold the bun half in the palm of the hand and in one moon slide the sliced side of the bun
onto the buer roller. Drop the bun with the sliced surface towards the grill plate using the
feeder chute provided. See diagram C.
8. The toasted bun will drop out into the receiving tray at the boom of the unit.
CONVEYOR ADJUSTMENT.
CLEANING & MAINTENANCE
7.
NOTE:
THE UNIT MUST BE DISCONNECTED FROM THE POWER SOURCE AND ALLOWED TO COOL DOWN
BEFORE CLEANING TAKES PLACE.
1. All of the removable panels can be cleaned either in a sink with hot water and detergent or
placed in a dishwasher.
2. It is recommended the conveyor cassee is only cleaned in a sink with regular detergent.
Make sure the chains are lubricated aer cleaning with a suitable toaster oil.
3. The grill plate can be cleaned can be cleaned with a suitable grill plate scourer. Aer drying a
light film of toaster oil should be applied.
If opmum bun grilling is not achieved using the speed and temperature sengs it is possible to
adjust the posion of the conveyor system relave to the grill plate. Moving the conveyor closer to
the grill plate will apply more pressure to the bun and result in more effecve toasng.
1. Switch off the unit and allow to cool down.
2. Remove the buer roller and tray and feed chute.
3. Remove the top panel and the boom panel.
4. Remove the conveyor cassee carefully by liing up and pulling towards the front
NOTE:
THE CONVEYOR IS HEAVY AND MUST BE HANDLED CAREFULLY.
5. The hanger adjustment brackets will now be exposed. Loosen the brackets and move
them EQUALLY towards the grill plate in increments of 1/8”. See diagram D.
6. Reghten the bracket screws.
7. Adjust the drive gear engagement as needed with the bolts at the boom of the hanger
plate.
Ensure that the lock nuts are reghtened.
1
2
1
3
4
5
6
7
8
8
screws
D.
adjustment bracket

DIMENSIONS
8.
MODEL:
184BT18A - 120V 1600W
184BT18H - 208/240V 2400/3200W
528
635
(635)
(528)
635
(492)
MODEL:
184BT18AXL - 120V 1600W
184BT18HXL - 208/240V 2400/3200W
703
(703)
635
(635)
635
(573)
20.7”
19.3”
25”
25”
27.6”
22.5”
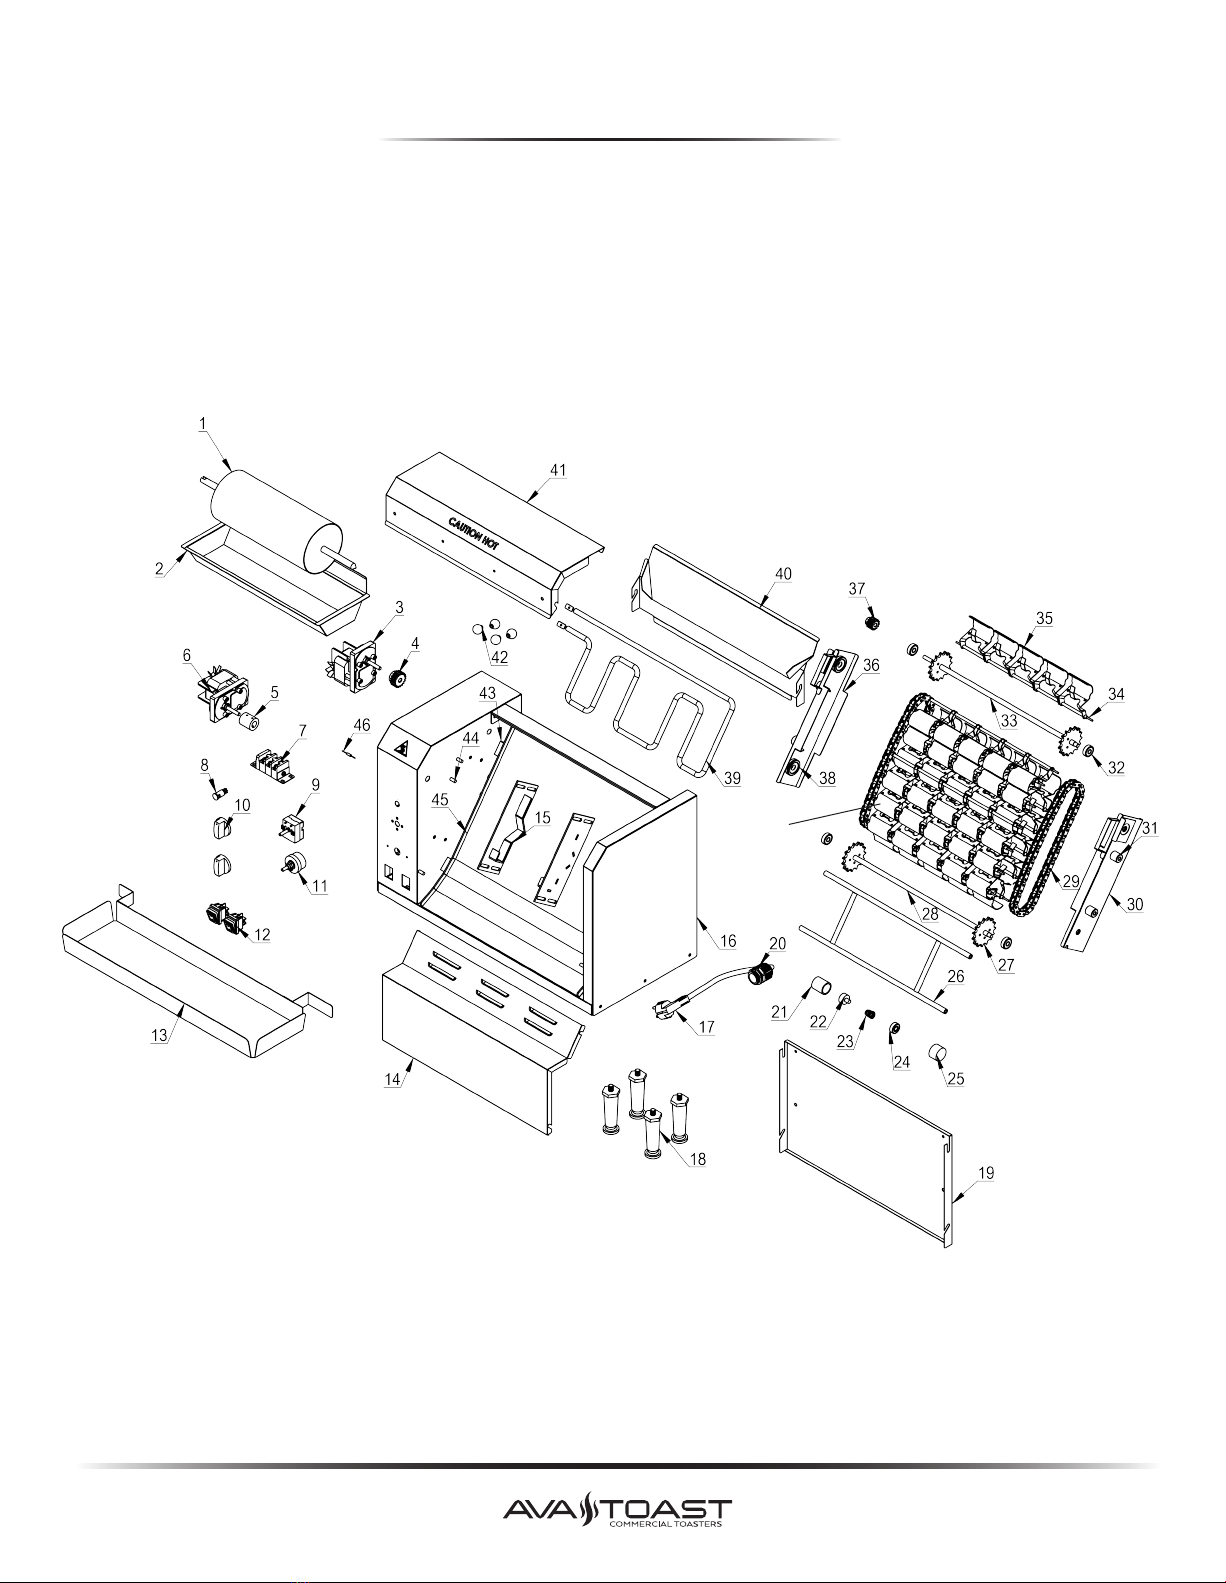
PARTS DIAGRAM
9.
47
MODEL: Adjustable Speed Vertical Conveyor Bun Toasters
184BT18A - 120V 1600W
184BT18H - 208/240V 2400/3200W

10.
PARTS DIAGRAM
MODEL: Adjustable Speed Vertical Conveyor Bun Toasters
184BT18AXL - 120V 1600W
184BT18HXL - 208/240V 2400/3200W
47

11.
ITEM PART NO. DESCRIPTION
1184PBT1 BUTTER ROLLER WHEEL FOR 184BT18 UNITS
2184PBT2 BUTTER ROLLER PAN FOR 184BT18 UNITS
3A 184PBT3A MAIN DRIVE MOTOR, 120V 60HZ FOR 184BT18A UNITS
3H 184PBT3H MAIN DRIVER MOTOR, 208-240V, 60HZ FOR 184BT18H UNITS
4184PBT4 BUTTER ROLLER DRIVING GEAR FOR 184BT18 UNITS
5184PBT5 BUTTER ROLLER SHAFT BUSHING FOR 184BT18 UNITS
6A 184PBT6A BUTTER ROLLER DRIVING MOTOR, 120V 60HZ FOR 184BT18A UNITS
6H 184PBT6H BUTTER ROLLER DRIVING MOTOR, 208-240V 60HZ FOR 184BT18H UNITS
7184PBT7 TERMINAL BLOCK FOR 184BT18 UNITS
9184PBT9 THERMOSTAT FOR 184BT18 UNITS
10 184PBT10 CONTROL KNOB FOR 184BT18 UNITS
11A 184PBT11A SPEED CONTROL 400 OHMS 120V FOR 184BT18A UNITS
11H 184PBT11H SPEED CONTROL 400 OHMS 208-240V FOR 184BT18H UNITS
12 184PBT12 SWITCH FOR 184BT18 UNITS
13 184PBT13 CRUMB TRAY FOR 184BT18 UNITS
17A 184PBT17A POWER CORD, 120V NEMA 5-15P FOR 184BT18A UNITS
17H 184PBT17H POWER CORD, 208-240V NEMA 6-20P FOR 184BT18H UNITS
18 184PBT18 ADJUSTABLE FOOT 4" SS FOR 184BT18 UNITS
21 184PBT21 BUTTER ROLLER DRIVING AXLE BUSHING FOR 184BT18 UNITS
22 184PBT22 BUTTER ROLLE RSHAFT POSITIONING PIN FOR 184BT18 UNITS
23 184PBT23 BUTTER ROLLER SHAFT SPRING FOR 184BT18 UNITS
24 184PBT24 BUTTER ROLLER BEARING FOR 184BT18 UNITS
25 184PBT25 BUTTER ROLLER BEARING BUSHING FOR 184BT18 UNITS
28 184PBT28 CONVEYOR CHAIN DRIVE AXLE FOR 184BT18 UNITS
29 184PBT29 CONVEYOR CHAIN FOR 184BT18 UNITS
39A 184PBT39A ELEMENT, 1600W 120V FOR 184BT18A UNITS
39H 184PBT39H ELEMENT, 208-240V, 2600-3200W FOR 184BT18H UNITS
40 184PBT40 BUN LOADING TRAY STANDARD FOR 184BT18 UNITS
40A 184BTXLFT BUN LOADING TRAY XL FOR 184BT18 UNITS
42 184PBT42 TOP PANEL REPLACEMENT HANDLE FOR 184BT18 UNITS
44 184PBT44 CASSETTE POSITIONING PIN FOR 184BT18 UNITS
47 184PBT47 CONVEYOR CASSETTE ASSEMBLY FOR 184BT18 UNITS
PART LEGEND
PART LEGEND

12.
PROBLEM POSSIBLE CAUSE POTENTIAL SOLUTION.
UNIT DEAD NO POWER. 1. NO POWER AT WALL RECEPTACLE. 1. CHECK SUPPLY CIRCUIT BREAKER.
2. PLUG DISCONNECTED. 2. CHECK PLUG.
3. MAIN SWITCH. 3. CHECK SWITCH IS ON
4. SUPPLY CIRCUIT BREAKER. 4. CHECK AND RESET.
NO HEAT. 1. FAULTY THERMOSTAT. 1. REPLACE THERMOSTAT.
2. FAULTY ELEMENT. 2. REPLACE ELEMENT
3. LOOSE CONNECTIONS. 3. CHECK WIRING CONNECTIONS
4. MAIN SWITCH OFF. 4. CHECK SWITCH IS ON
CONVEYOR AND BUTTER 1. LOOSE CONNECTIONS. 1. CHECK WIRING CONNECTIONS
ROLLER NOT WORKING. 2. FAULTY MAIN SWITCH. 2. REPLACE MAIN SWITCH
3. FAULTY BUTTER ROLLER SWITCH. 3. REPLACE BUTTER ROLLER SWITCH
4. MOTORS DEFECTIVE. 4. CHECK AND REPLACE FAULTY MOTORS.
BUTTER ROLLER NOT 1. AS POINTS IN SECTION 3 ABOVE. 1. SEE SECTION 3.
TURNING. 2. ROLLER SHAFT INCORRECTLY 2. CHECK ROLLER IS PROPERLY ENGAGED
INSERTED INTO DRIVE SOCKET. INTO DRIVE SOCKET.
3. MOTOR FAULTY 3. CHECK AND REPLACE MOTOR.
MAIN CONVEYOR 1. AS POINTS IN SECTION 3 ABOVE. 1. SEE SECTION 3.
STATIONARY 2. DRIVE GEARS NOT ENGAGING 2. REINSTALL CONVEYOR AS PER INSTRUCTIONS
3. CONVEYOR LINKAGE BINDING. 3. CHECK CONVEYOR FOR BENT OR FAULTY LINKS
4. SPEED CONTROL FAULTY. 4. REPLACE SPEED CONTROL
5. MOTOR FAULTY 5. REPLACE MOTOR.
BUNS DO NOT TOAST 1. INCORRECT TEMPERATURE 1. ENSURE THERMOSTAT SET AT AROUND
PROPERLY SETTING SETTING 5/6
2. CONVEYOR SPEED TOO FAST 2. REDUCE SPEED UNTIL TOASTING CORRECT.
3. WRONG OIL USED. 3. IDEALLY USE TOASTER OIL OR COCONUT OIL.
4. POORLY SLICED BUNS. 4. ENSURE BREAD IS CUT CORRECTLY.
BUNS TOAST UNEVENLY. 1. INSUFFICIENT CONVEYOR PRESSURE 1. ADJUST CONVEYOR AS IN INSTRUCTIONS
2. POOR APPLICATION OF OIL OR BUTTER 2. ENSURE EVEN COATING WHEN USING THE
3. POORLY SLICED BUNS. BUTTER ROLLER
3. ENSURE BREAD IS CUT CORRECTLY.
BUNS TEND TO STICK TO 1. WRONG OIL USED. 1. IDEALLY USE TOASTER OIL OR COCONUT OIL.
GRILL PLATE 2. GRILL PLATE HAS BAKED ON OIL 2. CLEAN GRILL SURFACE AS INSTRUCTED.
RESIDUE
3. DOUGHY BUNS OR EXCESS SUGAR 3. CONSIDER USING DAY OLD BUNS OR
CAN CAUSE STICKING. INCREASING THE GRILL TEMPERATURE.
4. BUNS NOT PROPERLY DEFROSTED. 4. DEFROST BUNS CORRECTLY.
TROUBLESHOOTING
13.
To Make a Warranty Claim:
This warranty is only valid on equipment purchased from an authorized dealer. To makea claim, please contact Ready Kitchen
Warranty.
• Phone: 717-381-4844
calling.
• Email: Help@ReadyKitchenWarranty.com
your email. Including clear pictures of the issue will help expedite the process. Failure to
This Limited Warranty does not cover:
•
•
• Equipment not purchased directly from an authorized dealer.
•
•
• Equipment where the serial number plate has been removed or altered.
•
• Defects and damage due to improper maintenance, wear and tear, misuse, abuse, vandalism, or Act of God.
thedate ofdelivery. Contact your authorized place of purchase for assistance.
Covered Models:
This warranty covers these Avatoast models only:
• 184BT18A, 184BT18AXL, 184BT18H, 184BT18HXL
Avatoast warrants its equipment tobefree from defects in material and workmanshipfor a period of 1 yearwhen
purchased from an authorized dealer. This is the sole and exclusive warranty made by Avatoast covering your Avatoast
brand equipment. A claimunder this warranty must be made within 1 year from the date ofdelivery of the equipment. Only
the equipment’s original purchaser may make a claimunder this warranty. Avatoast reserves the right to approve ordeny
the repair or replacement of any part or repair request. The warranty is not transferable.
EQUIPMENT LIMITED WARRANTY
This manual suits for next models
3
Table of contents
Other Ava-Toast Toaster manuals


