Manuel d’assemblage & d’utilisation
Avalanche! Original 500 (AVA500)
Avalanche! 750 (AVA750)
Avalanche ! Pack Premium (AVA1000)
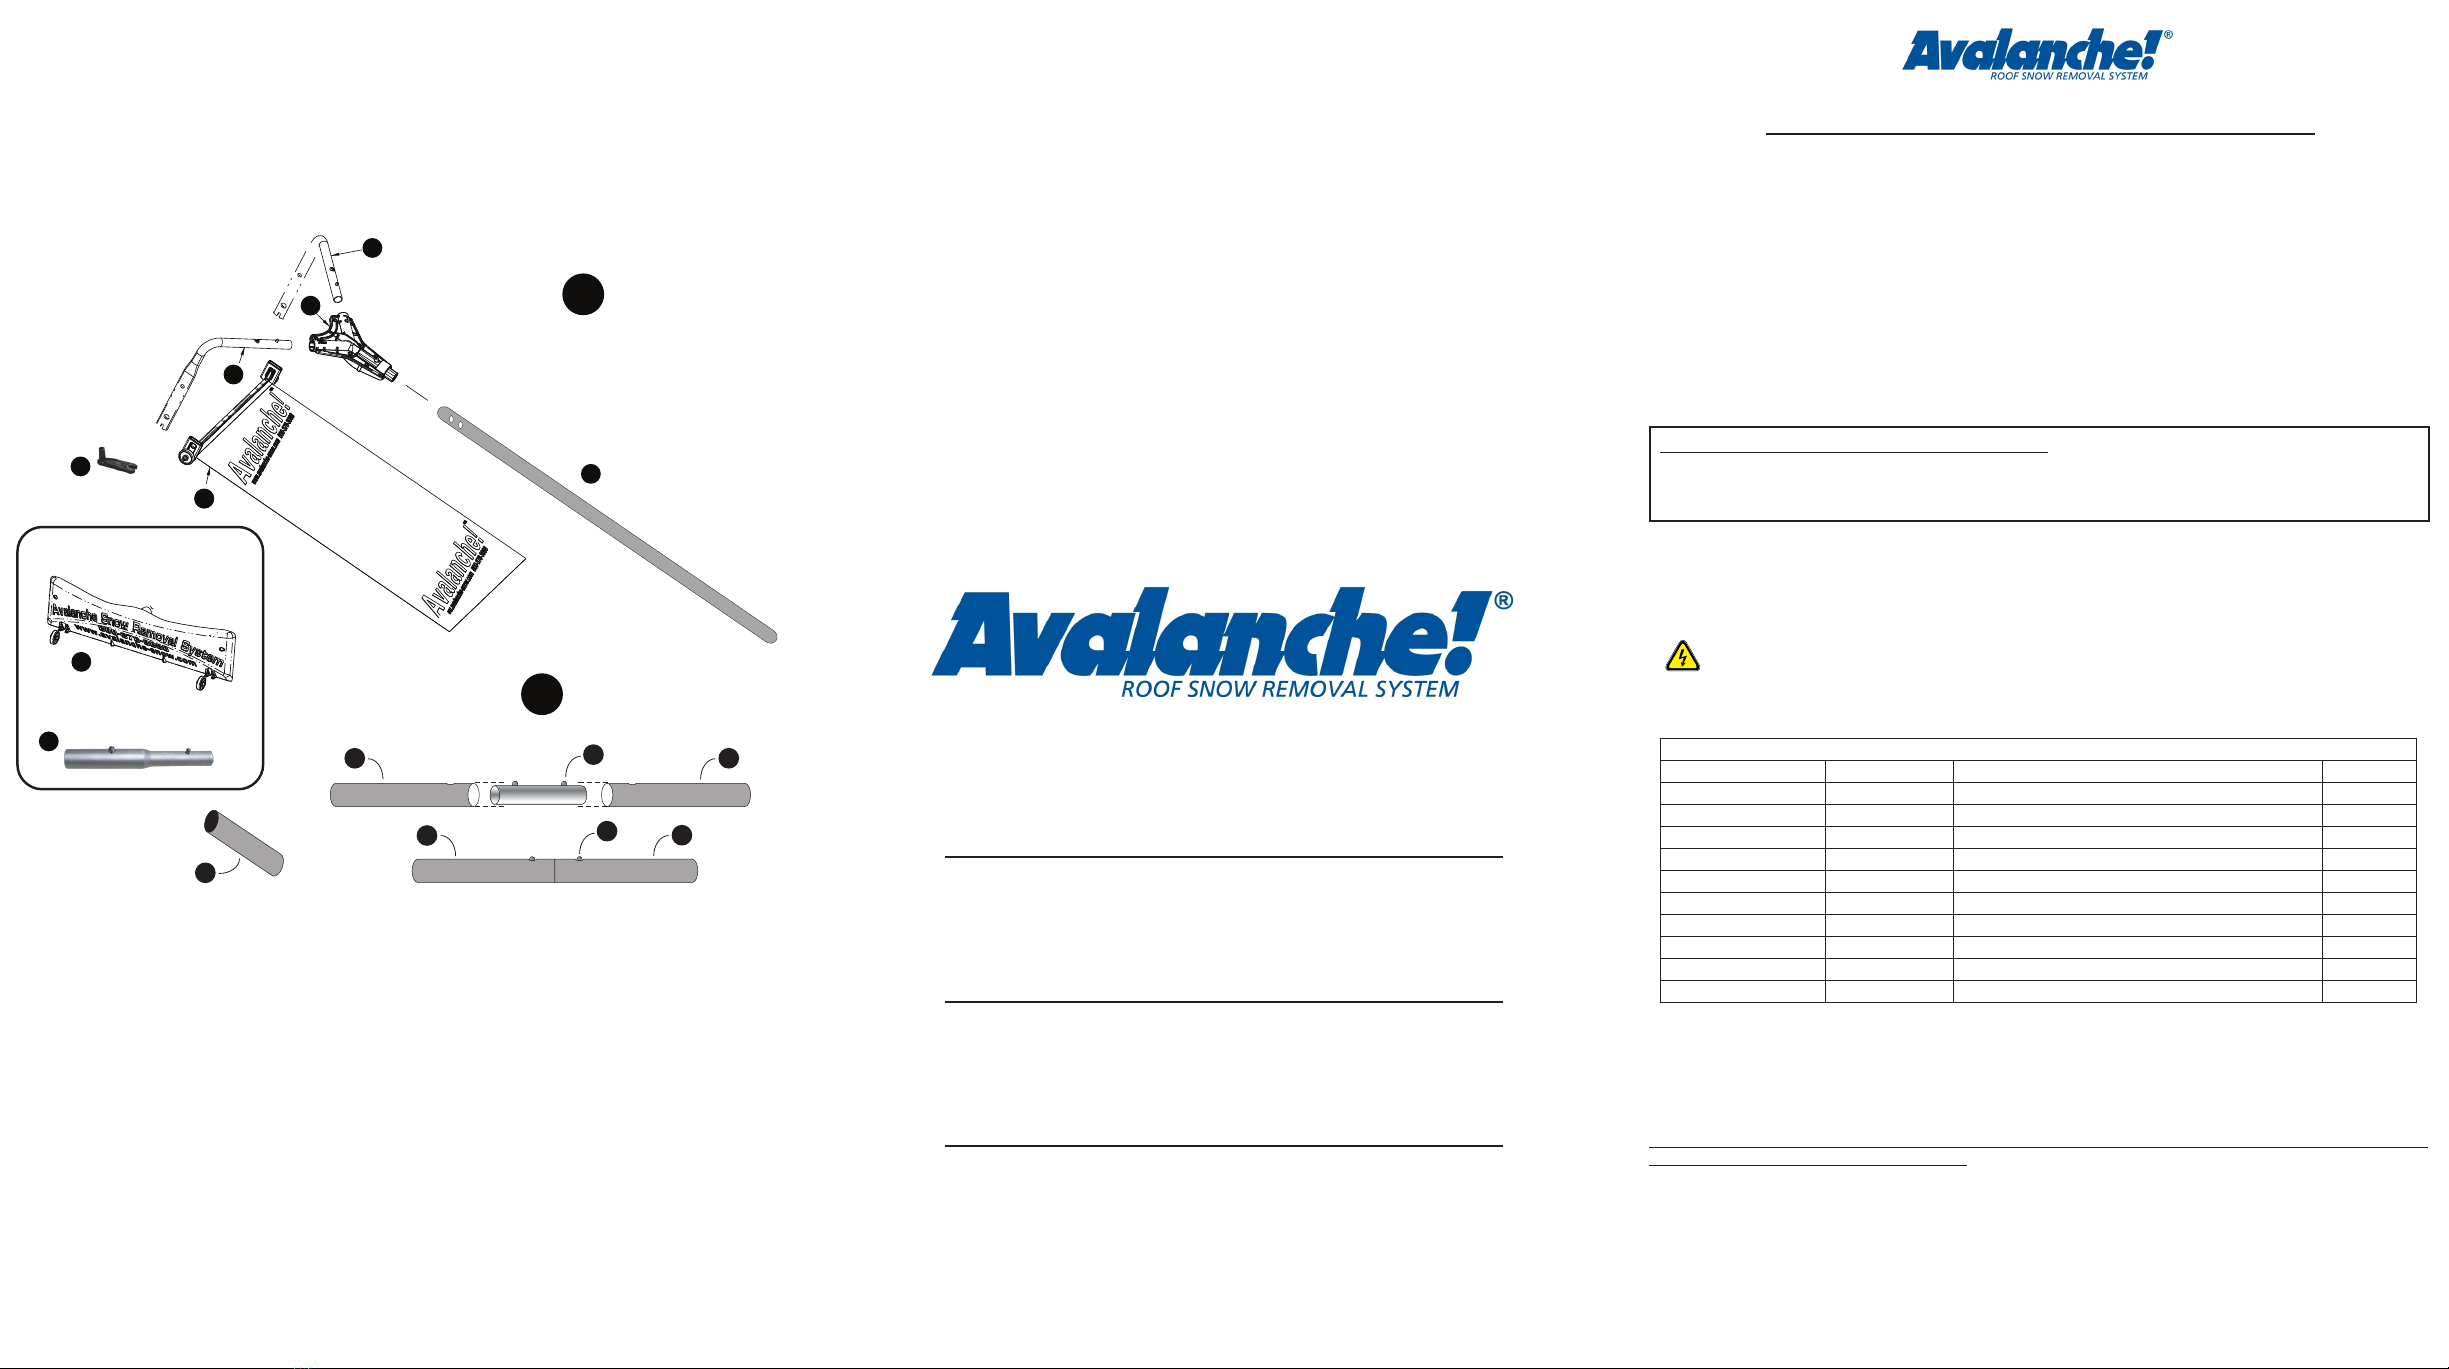
ELEMENT N° DE PIECE NOM QUANTITE
KIT COULISSANT AVEC ROUES
ADAPTATEUR DE CHÂSSIS DE POIGNÉE
TRONҪON DE MANCHE FIBRE – 4 PIED
POIGNÉE D’EXTRÉMITÉ EN VINYLE – NOIR
TÊTE DU RÂTEAU (AVA1000 UNIQUEMENT)
ADAPTATEUR UNIVERSEL (AVA1000
UNIQUEMENT)
ENROULEUR COULISSANT *Optionnel *
INSTRUCTIONS DE MONTAGE:
a. Retirer tous les bouchons bleus des châssis de cisaille (1 & 2), les jeter après les avoir enlevés.
b. Connecter les châssis de cisaille de droite et de gauche (1&2) à l’adaptateur de châssis en « Y »
(4). (Voir “A”)
c. Fixerlekitcoulissantàroues(3)auxchâssisdecisailleorangesdedroiteetdegauche(1&2)
d. Pourxerlespoignées,connecterd’abordletronçondemancheenbredeverre(5)àl’adaptateur
dechâssisen“y”(4),enpoussantverslebassurleboutonfermoiretl’attachersolidement.Faire
glisserlecoupleurenaluminium(6)dansl’extrémitédutronçondemancheenbredeverrejusqu’à
cequelesboutonsfermoirssoientalignésaveclestrousdelapoignée.
(Voir“B”)Répéterl’opérationpourtouslestronçonsdemanchesupplémentaires.
e. Placerlapoignéed’extrémitéenvinylenoir(7)surlanduderniertronçondemanche.
f. (ENLEVERL’ENROULEURCOULISSANTAVANTUTILISATION)!Attacherle#11surlatigeentre
le boulon et la roue * Optionnel *
** Pack Premium - pour convertir en SnowRake (rateau à neige) !
• Dégagerl’adaptateurduchâssisdelapoignée(4)dutronçondemancheenbredeverre.(Garder
lekitcoulissant&leschâssisdecisaillexéssurl’adaptateurduchâssisdelapoignée.)
• Fixerl’adaptateuruniversel(10)aupremiertronçondemancheenbredeverre&connecterlatête
durâteau(9).
Instructions d’utilisation :
a. Placerlechâssisàcisaillesurlebordinférieurdutoitenlaissantpendrelaglissièreenplastique.
Roulerlentementlechâssisàcisaillelelongdutoit.Laglissièreenplastiquesuivrasouslaneige,
laneigeserompreraenblocsetglisseralelongduplastique.
* (Si une résistance se produit, arrêter, réajuster & répéter le processus) *
AVERTISSEMENT ! Tenir à l’écart des ls électriques. ** CE PRODUIT N’ENLEVE PAS LES
ACCUMULATIONS DE GLACE **
US/Canada: Visitez www.avalanche-snow.com Europe: Visitez www.avalanche-snow.eu Pour les pièces et
accessoires pour votre Avalanche!
Garantie limitée :
AvalancheManufacturinggarantitquecematérielestexemptdevicesdematériauetdefabricationdansdes
conditionsnormalesd’utilisation.*CEPRODUITN’ENLEVEPASLESACCUMULATIONSDEGLACE*Cette
garanties’appliqueàl’acheteurd’originepourunepériodede6moisàcompterdeladated’achatetn’estapplicable
quelorsquel’équipementestassembléetutiliséconformémentauxrecommandationsd’usine.Lagarantiene
s’étendpasauxdommagesouàl’usurecauséeparunemauvaiseutilisation,l’abrasion,lacorrosion,lanégligence,
l’accident,lemontagedéfectueuxouàl’altérationintentionnelleandenuireaufonctionnementnormal.Laglissière
enplastiqueestsujetteàl’abrasionetàl’usuredanslecadred’uneutilisationnormale,c’estunepiècederechange
jetable.Ellenebénécied’aucunegarantie.
Politique de retour :
Touslesretoursdoiventêtreeffectuésdansundélaide30joursàcompterdeladated’achat.15%defraisde
restockageserontappliquésàtouteslescommandessaufsicelles-cisontcouvertesparnotregarantiecitéeci-
dessus. Aucun frais de transport ne sera remboursé.
Procédure de retour :
LesdemandesderetourdoiventêtreautoriséesparAvalancheavantlerenvoidelamarchandise.Veuillezappeler
notre numéro gratuit 1-800-378-3088 pour un numéro d’autorisation de retour.
Aufbau- und Betriebsanleitung
Avalanche! Original 500 (AVA500)
Avalanche! 750 (AVA750)
Avalanche! Premium-Paket (AVA1000)
ARTIKEL TEIL # NAME MENGE
RUTSCHVORRICHTUNG MIT RÄDERN
VINYL-AUSSENSTÜCK - SCHWARZ
SCHIEBEKOPF (NUR AVA1000)
UNIVERSALADAPTER (NUR AVA1000)
RUTSCHENAUFWICKLER * Freiwillig *
MONTAGEANLEITUNG:
a. EntfernenSiealleblauenKappenvondenorangenenSchneiderahmen(1&2).EntsorgenSiediese
nachdemEntfernen.
b. Verbinden Sie die rechten und linken Schneiderahmen (1&2) mit dem Y-förmigen Rahmenadapter
(4). (Siehe “A”)
c. Verbinden Sie die Rutschvorrichtung mit den Rädern (3) mit den rechten und linken orangefarbenen
Schneiderahmen (1&2).
d. ZumAnbringenderGriffe,verbindenSiedieersteGlasfaserstange(5)mitdemRahmenadapter
(4),indemSiedenDruckknopfhinunterdrückenunddieStangeeinrastenlassen.SchiebenSiedas
Aluminiumverbindungsstück(6)indasEndederGlasfaserstange,bisdieDruckknöpfeindieLöcher
amGriffeinrasten.(Siehe“B”)WiederholenSiedenVorgangfürallezusätzlichenStangen.
e. SetzenSiedenschwarzenVinyl-Außengriff(7)aufdasEndederletztenStange.
f. (ENTFERNENSIEVORDERVERWENDUNGDENRUTSCHENAUFWICKLER!)BefestigenSie
#11aufderStangezwischendemRadundderMutter.*Freiwillig*
** Premium-Paket – Umwandlung zum Schneeschieber!
• LösenSiedenGriffrahmenadapter(4)vondenGlasfaserstangen.(lassenSiedieRutschvorrichtung
unddieSchneiderahmenamGriffrahmenadapterbefestigt.)
• VerbindenSiedenUniversaladapter(10)mitderGlasfaserstangeundverbindenSieden
Schiebekopf(9).
Betriebsanleitung:
a. SetzenSiedenSchneiderahmenaufdieuntereDacheckeundlassenSiediePlastigrutsche
herunterhängen.LassenSiedenSchneiderahmenlangsamdasDachhinaufrollen.Die
PlastikrutschefolgtunterdemSchnee,derSchneeselbstzerbrichtinBlöckeundgleitetdieRutsche
hinunter.
*(Bei einem Widerstand unterbrechen Sie den Prozess, passen die Justierung an und
wiederholen den Prozess)*
ACHTUNG! Halten Sie Abstand zu elektrischen Leitungen. ** DIESES PRODUKT ENTFERNT KEINE
EISZAPFEN **
USA/Kanada: Besuchen Sie uns unter www.avalanche-snow.com Europa: Besuchen Sie uns unter
www.avalanche-snow.eu Teile und Zubehör für Ihren Avalanche!
Begrenzte Garantie:
Avalanche Manufacturing garantiert, dass dieses Produkt bei normaler Verwendung frei von Material- und
Verarbeitungsschäden ist. * DIESES PRODUKT ENTFERNT KEINE EISZAPFEN * Diese Garantie wird auf den
ursprünglichen Käufer für einen Zeitraum von 6 Monaten ab dem Kaufdatum ausgeweitet und trifft nur zu,
wenn das Produkt entsprechend den Werksempfehlungen montiert und betrieben wird. Die Garantie umfasst
keine Schäden oder Abnutzungen, die durch falsche Verwendung, Abschleifung, Korrosion, Fahrlässigkeit,
Unfälle, fehlerhafte Montage oder nicht zweckmäßiger Verwendung entstanden sind. Da die Plastikrutsche
bei normaler Verwendung Abschleifungen und Abnutzung unterliegt, ist diese als entsorgbares Ersatzteil
vorgesehen. Und sie unterliegt keiner Garantie.
Rückgaberecht:
AlleRückgabenmüsseninnerhalbvon30TagenabdemKaufdatumvorgenommenwerden.FüralleBestellungen
wirdeineRücknahmegebührvon15%erhoben,außerwenneinerderobengenanntenGarantiefälleeintritt.Es
werdenkeineFrachtkostenzurückerstattet.
Rückgabeverfahren:
VorderWarenrückgabemüssenRückgabeanfragendurchAvalancheautorisiertwerden.Füreine
RückgabeautorisierungsnummerrufenSiebitteunterdiesergebührenfreienNummeran:1-800-378-3088.
Montering og brukerhåndbok
Avalanche! Original 500 (AVA500)
Avalanche! 750 (AVA750)
Avalanche! Premiumpakke (AVA1000)
UNIVERSAL ADAPTER (AVA1000 ONLY)
GJENSTAND DEL # NAVN ANT.
ADAPTER TIL HÅNDTAKSRAMME
UNIVERSAL-ADAPTER (BARE AVA1000)
SKUFFEFESTER * Valgfritt *
MONTERINGSINSTRUKSJONER:
a. Fjernalledeblålokkenefrarammene(1&2),kastetterfjerning.
b. Koblehøyreogvenstreramme(1&2)til“Y”rammeadapter(4).(Se“A”)
c. Festskuffeplatenmedhjul(3)tilhøyreogvenstreramme(1&2)
d. Foråkoblehåndtak,kobleførsteglassberstang(5)til“Y”rammeadapter(4),vedåklikkened
sølvknappenogfestordentlig.Skyvaluminiumskoblingen(6)inniendenavglassberstangeninntil
knappenerpålinjemedhulleneihåndtaket.(Se“B”)Gjentaforalleandrepolene.
e. Plasserdetsortevinylhåndtaket(7)påendenavdensistestangen.
f. (Fjernskyvtrekkerenførbruk!)Fest#11pastangenmellomhjuletogmutteren.*Valgfritt*
** Premium-pakke - bytt til SnowRake!
• løsneadapterentilhåndtaksrammen(4)fraglassberstengene.(Beholdskuffeplatenogrammene
knyttettiladapteren.)
• Klikkuniversaladapteren(10)innpådenførsteglassberstangenogkobledenrakehodet(9).
Bruksanvisning:
a. Plasserknivbjelkeninedretakkantmedplastsklienhengendened.Sakterullknivbjelkenopppå
taket.Plastenglidevilgliundersnøen,ogsnøenvilbrekkeaviblokkerogglinediplastmaterialet.
* (Hvis motstand oppstår, STOPP, omplasser og gjenta prosessen) *
ADVARSEL! Holdes vekk fra elektriske ledninger. ** Dette produktet er ikke ment for å fjerne isdammer med **
USA / Canada: Besøk www.avalanche-snow.com Europa: Besøk www.avalanche-snow.eu for tilbehør til ditt
Avalanche!-produkt.
Begrenset garanti:
AvalancheManufacturinggarantereratdetteutstyretikkeskaderellerskaperdefekterimaterialerogutførelse
vednormalbruk.*Detteprodukteterikkementforåfjerneisdammermed*Dennegarantienerutvidettilden
opprinneligekjøperenforenperiodepå6månederfrakjøpsdatooggjelderkunnårutstyretermontertogbrukti
samsvarmedanbefalingerfrafabrikken.Garantiendekkerikkeskadeellerslitasjesomfølgeavmisbruk,slitasje,
korrosjon,forsømmelse,ulykke,feilmonteringellermanipuleringpåenmåtesomikkefølgernormaltbruk.
Returrett:
Allereturermågjøresinnen30dagerfrakjøpsdato.Deteretlagergebyrpå15%somvilblibruktpåallebestillinger
medmindrekonstnadenedekkesavvårgarantisomernevntovenfor.Ingenfraktkostnadervilblirefundert.
Retur - fremgangsmåte:
ForespørsleromenreturmåværeautorisertgjennomAvalancheførdureturnerervarer.Vennligstringvårt
gratisnummer 1-800-378-3088 for et autorisasjonsnummer for din retur.
05/2015