AVANTREK Macrover100 User manual

Electric Bike
Model:Macrover100

- 01 -
Riding Safety
Thank you for choosing the AVANTREK Macrover 100 fat tires electric bike (hereinafter referred to as Macrover 100)! It is extremely important that you follow
the safety guidelines contained in this manual in order to ensure maximum safety for you as well as maximum durability of your eBike.
Before you ride your Macrover 100 for the first time, please be absolutely sure that it has been correctly assembled. You will find step by step instruction in
this manual.
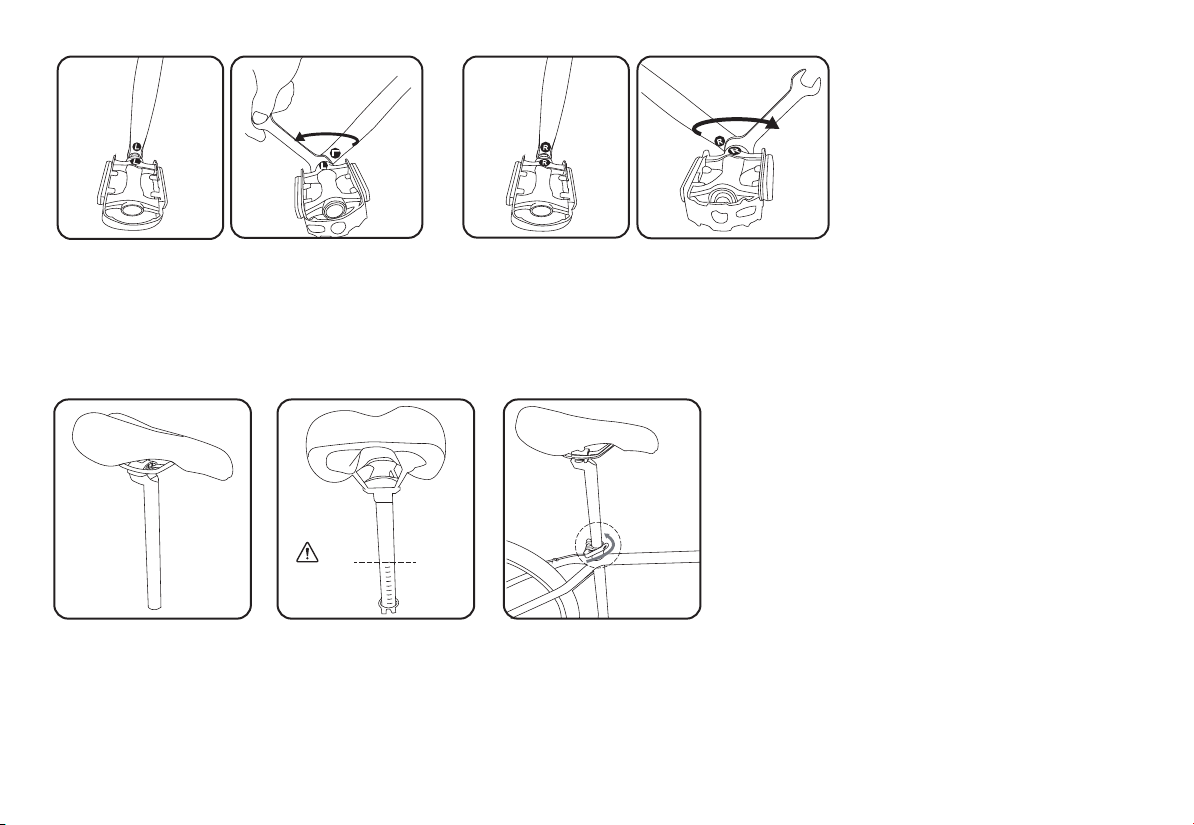
Key assembly steps that must be completed with absolute certainty (to include secure fastening) are pedals, saddle height, handlebar (both rotation and
height) and wheels.
Please ensure all safety latches, including quick releases and rings, are locked in place and snug without any movement.
Please ensure all bolts (including the front/rear wheels, saddle bolt and brake rotors) are properly tightened. Certain components must be tightened to exact
specifications using a torque wrench for safety assurance.
We recommend you to always wear a helmet when riding any eBike.
Frequently check your tire pressures. They should be pumped to 1.4 bar (20 psi).
Do not attempt to charge your fat tire eBike if, the charger, or the power outlet is wet.
Do not drink and ride. Even a small amount of alcohol can impair your judgment, lowering your ability to remain safe on the Macrover 100.
Only use the AVANTREK supplied charger. Do not use a charger from any other different product models.
Please observe all traffic regulations and other applicable laws, including any lighting laws.
Warning: DO NOT take apart OR repair parts by yourself. Please go to your local bike shop that has experience with e-bikes. If in doubt, please contact our
customer service at support@iavantrek.com.
1.
2.
3.
4.
5.
6.
7.
8.
9.
10.
11.
12.

Contents
- 02 -
1. PRODUCT OVERVIEW
2. PACKAGE CONTENTS
3. HOW TO ASSEMBLE THE EBIKE
4. HOW TO CHARGE THE BATTERY
5. RIDING MODES
6. DISPLAY AND BUTTONS
7. BEFORE YOU RIDE CHECKLIST
8. MAINTENANCE
9. CLEANING
10. STORAGE
11. DISPOSAL AT END-OF-LIFE
12. SPECIFICATIONS
13. WARRANTY
03
04
05
12
14
15
16
17
18
19
20
21
22
...........................................................................................................................................
...........................................................................................................................................
..........................................................................................................................
.........................................................................................................................
......................................................................................................................................................
.......................................................................................................................................
...........................................................................................................................
.......................................................................................................................................................
..............................................................................................................................................................
.............................................................................................................................................................
................................................................................................................................
.................................................................................................................................................
...........................................................................................................................................................

1. PRODUCT OVERVIEW
- 03 -
LCD Display
Gear Lever
Brake
Handlebar
On/Of Switch
Battery
Saddle
Pedal
Charging
port
Front Fork
Quick Release
Disc Brake
Motor

2. PACKAGE CONTENTS
1 × Bike frame + rear wheel 1 × Wheel 1 × Saddle 2 × Pedal
1 × Wrench 1 × Charger
4 × Battery key
1 ×
Battery
1 × Derailleur protecting rack
1 × User manual
Carefully check package contents, if anything is missing or damaged, please contact online customer service for support.
- 04 -
LR
5 × Allen Key
1 × Screwdriver

3. HOW TO ASSEMBLE THE BIKE
180°
- 05 -
Step 1. Adjust the stem
When unpacking your eBike, please verify that the above items are included in the package. If you are missing any components, please contact your dealer for support.
After verifying that all components are present and in good condition, you can assemble your new fat tires electric bike.
Please retain the box and packaging materials in case you need to ship your Macrover 100 in the future.
Before Installation

90°
Loosen
screws
13
2
4
- 06 -
90°
Step 2. Install the handlebar
WARNING: DO NOT over tighten the stem bolts. Over tightening the stem bolts can damage the steering system and cause loss of control.

disc brake
goes into the
brake caliper
brake caliper
- 07 -
Step 3. Install the front wheel
Warnings:
Your Macrover 100 is equipped with a front disk brake. Be careful not to damage the disk, caliper or brake pads when reinserting the disk into the
caliper. Never activate a disk brake’s control lever unless the disk is correctly inserted in the caliper.
Each side
of the wheel
has one
cone
spring only

2
1
When installing,
L to L,R to R
- 08 -
Step 4. Install the rear derailleur protecting rack
Step 5. Install pedals
1. Identify the correct side by finding the marked ‘R’ and ‘L’ at the pedals. Each pedal has an “L” sticker or “R” sticker to indicate left or right side of the eBike.
2. To install the left “L” pedal, carefully hand-screw it in, counter-clockwise direction. Repeat it to install the right “R” pedal by turning clockwise.
IMPORTANT: If the pedal does not turn smoothly into the crank, do not force it. Take it back out and try again until it goes in smoothly.
PLEASE NOTE: If after riding, the threads on your crank is stripped. You don’t have to follow this instruction. Your crank needs replacing (this is NOT
covered by warranty).

LR
10
9
8
7
6
5
4
3
2
1
Safety Line
- 09 -
Step 6. Install the saddle
1. Insert the saddle into the seat post, then screw the bolts tightly.
2. Loosen the seat post quick release. Insert the seat post to the desired height before securing it in place with the quick release. Tighten the saddle bolt
before you ride.
IMPORTANT: Do not raise the seat post above the “minimum insert” line clearly printed on the backside of the seat post. Raising the seat post above the
minimum insert line can cause the seat post to fail, which could in turn result in loss of control of your Macrover 100 and could cause you serious injury.

OFF/ON
- 10 -
Step 8. Install the front reflector
Step 7. Install the battery

- 11 -
Step 9. Install rear reflector

4. HOW TO CHARGE THE BATTERY
Slide-Out Charging
Port Design
- 12 -
Battery charging
1. Find the charging port on the battery, connect the charger’s plug to the battery charging port;
2. Then connect the other side plug to the AC outlet (100V-240V). The LED on the charger is red color when charging, it will turn to green color when the
battery is full charged;
3. It will be 3-4 hours fast charging for full charging the battery. Remember to full charge the battery before first riding.
PLEASE NOTE: There is a small button on the side of the battery, press and hold the small button, you can see the remaining capacity of the battery
(It is 1 red light + 3 green lights when full charged, 1 red light + 2 green light when 75% battery remaining, 1 red light + 1 green light when 50% battery
remaining, 1 green when battery less than 25%, you then need to charge the battery as soon as possible).

- 13 -
Battery safety
void battery warranty.
create a fire hazard that could cause you serious injury.
when plugged into battery. Once light returns to green, your battery is fully charged. You can then unplug the charger.
Battery usage
save the battery.
home on the charge that is left on the battery. Once home, charge it as soon as possible.
IMPORTANT: If your Macrover 100 will be kept for a long period in extreme temperatures (below 0 /32 or above 35 /95 ), remove the battery and
keep it in a place where the temperature is between 4 /40 and 32 /90 .
Do not charge the battery when the air temperature is below 0 /32 or above 40 /104 . Serious damage to the battery could result.

5. RIDING MODES
0
1-5
Display OFF
××
× ×
Pure Electric BikeSpeed Modes Assisted Bike
- 14 -
Gear button
LCD Display
HandlebarThrottleGear lever
All Electric - Power on the LCD display and switch the speed modes
from 1~5 by rotating the throttle.
Pedal Assisted - Power on the LCD display and switch the speed
modes from 1~5 by pedaling.
Regular Bike - Power off the LCD display and pedal like a normal bike.

6. DISPLAY AND BUTTONS
Button information
: Change pedal assist lever from 5 to 1
: Press and hold for 2 seconds to power the eBike on/off.
: Change pedal assist lever from 1 to 5.
Speed mode
- 15 -
Gear Down
Power Switch
Pedal Assist
RPS Indicator
Speed
1. Activate the display - Turn on the battery switch where
located on the top right of the battery case to activate
the electrical system.
2. Lighting up the display - Press and hold the “M” button
3s to power up your bike.
Before Installation
Gear Up
Battery Level
Travel Distance

7. BEFORE YOU RIDE CHECKLIST
- 16 -
WEAR THE BIKE HELMET:
CAUTION:

8. MAINTENANCE
- 17 -
Seat post
If the seat post quick release becomes difficult to close, lubricate the levers rotational pivot point with thin oil. Open and close it repeatedly until it the pivot
point loosens and you can securely fasten seat post.
Chain wear
Be sure to keep your chain and all moving parts lubed so that they work effectively at all times. Lubrication is necessary to use when the moving parts are
dry. As for the chain, lubricate the dried chain after every bike wash, as well as after every wet weather ride - especially if there is any salt on the roads.
Tire pressure
Be sure to check it twice a month. We suggest to keep it at 1.4 bar(20 psi). Riding with too low pressure can result in:
1. Lowered travel range per battery charge
2. Increased wear on the tires
3. Increased risk of a puncture
4. Compromised steering as fat tires with inadequate pressure tend to oversteer.
Mechanical brakes
If you experience a lack of braking power, often times this is a simple sign that the brake cable needs to be adjusted. You can do this by turning the adjustment
bolt located where the brake cable enters the brake lever. As the brake lever comes closer to the handlebar, the brake pads will also come closer to the
braking rotor for stronger braking power. If this does not help, then it’s necessary to further identify the specific cause to determine what needs to be done.
Squeaking brakes
Rotor needs to be thoroughly cleaned with a rag dipped in rubbing alcohol to remove any oil or residue.
Pads need to be filed down, usually glazed over from debris on the road.
of caliper, pads can easily be removed from holder.
Pads worn out. Ask your dealer for more information about your bike specific model. If you are not comfortable with doing this work yourself, please take your
Macrover 100 to your local bike mechanic.

9. CLEANING
- 18 -
While our Macrover 100 fat tires eBike are rain and splash-proof, their electrical components should not be submerged in water.
bottom bracket and bubs.
IMPORTANT ! Do not attempt to open the casings of the battery, motor, or controller. This can be dangerous and will void any warranties by doing so.
If you experience a problem, please contact our service department or your local bike shop.
Seat post

10. STORAGE
- 19 -
Fully charge the E-Bike before storing to prevent the battery from over-discharge due to long-term storage.
If the E-Bike needs to be stored for more than one month, discharge and recharge the battery at least once a month.
process of plastic parts and may reduce battery life.
NOTE:
Table of contents
Other AVANTREK Scooter manuals