AVB MP-512C User manual

This product represents a new generation of MP3 players supporting MP1, MP2, MP3, WMA,
WMV, ASF, and WAV.
FEATURES SUMMARY
●Compact size
●Support virtually all music file formats such as: MP1, MP2, MP3, WMA, WMV, ASF, and
WAV.
●Supports firmware update the latest firmware can always be downloaded from the AVB
website (www.avbusa.com).
●Supports FM radio Using Auto-search or manual search, the player can save up to 40
different radio stations. The frequency varies from 87 KHz to 108 KHz.
●No need to have any driver for Windows 2000 or above. The MP3 player can be used as a
removable USB disk
●Disk encrypt and Disk partition using the enclosed software tools it is possible to encrypt
and partition the disk space as you like.
●Record/Repeat With built-in voice recorder the recorded files can be saved in WAV or ACT
file formats. It is possible to mark a recorded segment for subsequent compare or repeat;
useful feature for the language self-study.
●Equalizer settings include Natural, Rock, Pop, Classic, Soft, Jazz, DBB
●7-color backlight display.
●Music repeat modes include Normal, Folder, Repeat one, Repeat folder, Repeat all,
Random, and Introduction.
●Timing off Automatic off by time and sleep time can be set.

INTRODUCTION
Congratulations on purchasing of this MP3 player! Before starting to use it please, read
this manual carefully. Due to the constant production improvement, the MP3 Player you have
purchased might be slightly different then the one described in this manual. We recommend
you to visit the www.avbusa.com to download the updated Manual and Software in this case.
Know aboutAVB MP3
zHousing
•Buttons and controls definition
- Express Forward; - Express Backward; - Play/Pause
1.“Play/Pause”: Power ON/PLAY/STOP/OFF.
2.“Mode”: General confirmation button.
3.“VOL+”: Increase volume. Speed up.
4.“VOL–”: Decrease volume. Speed down.
5.“Forward”: Next one. Fast Forward. Next
6.“Backward”: Previous one. Fast Backward. Last
7.“USB”: USB plug.
8.“Earphone jack”: Standard earphone connector.
Mode
HOLD
USB
Earphone hole
Play
Buttons usage definition
The buttons can be used in 3 different ways:
Press: Press the button then release it immediately.
Long time press: Press and hold the button for about 2 seconds, then release it.
Press and hold: Press and keep holding the button.
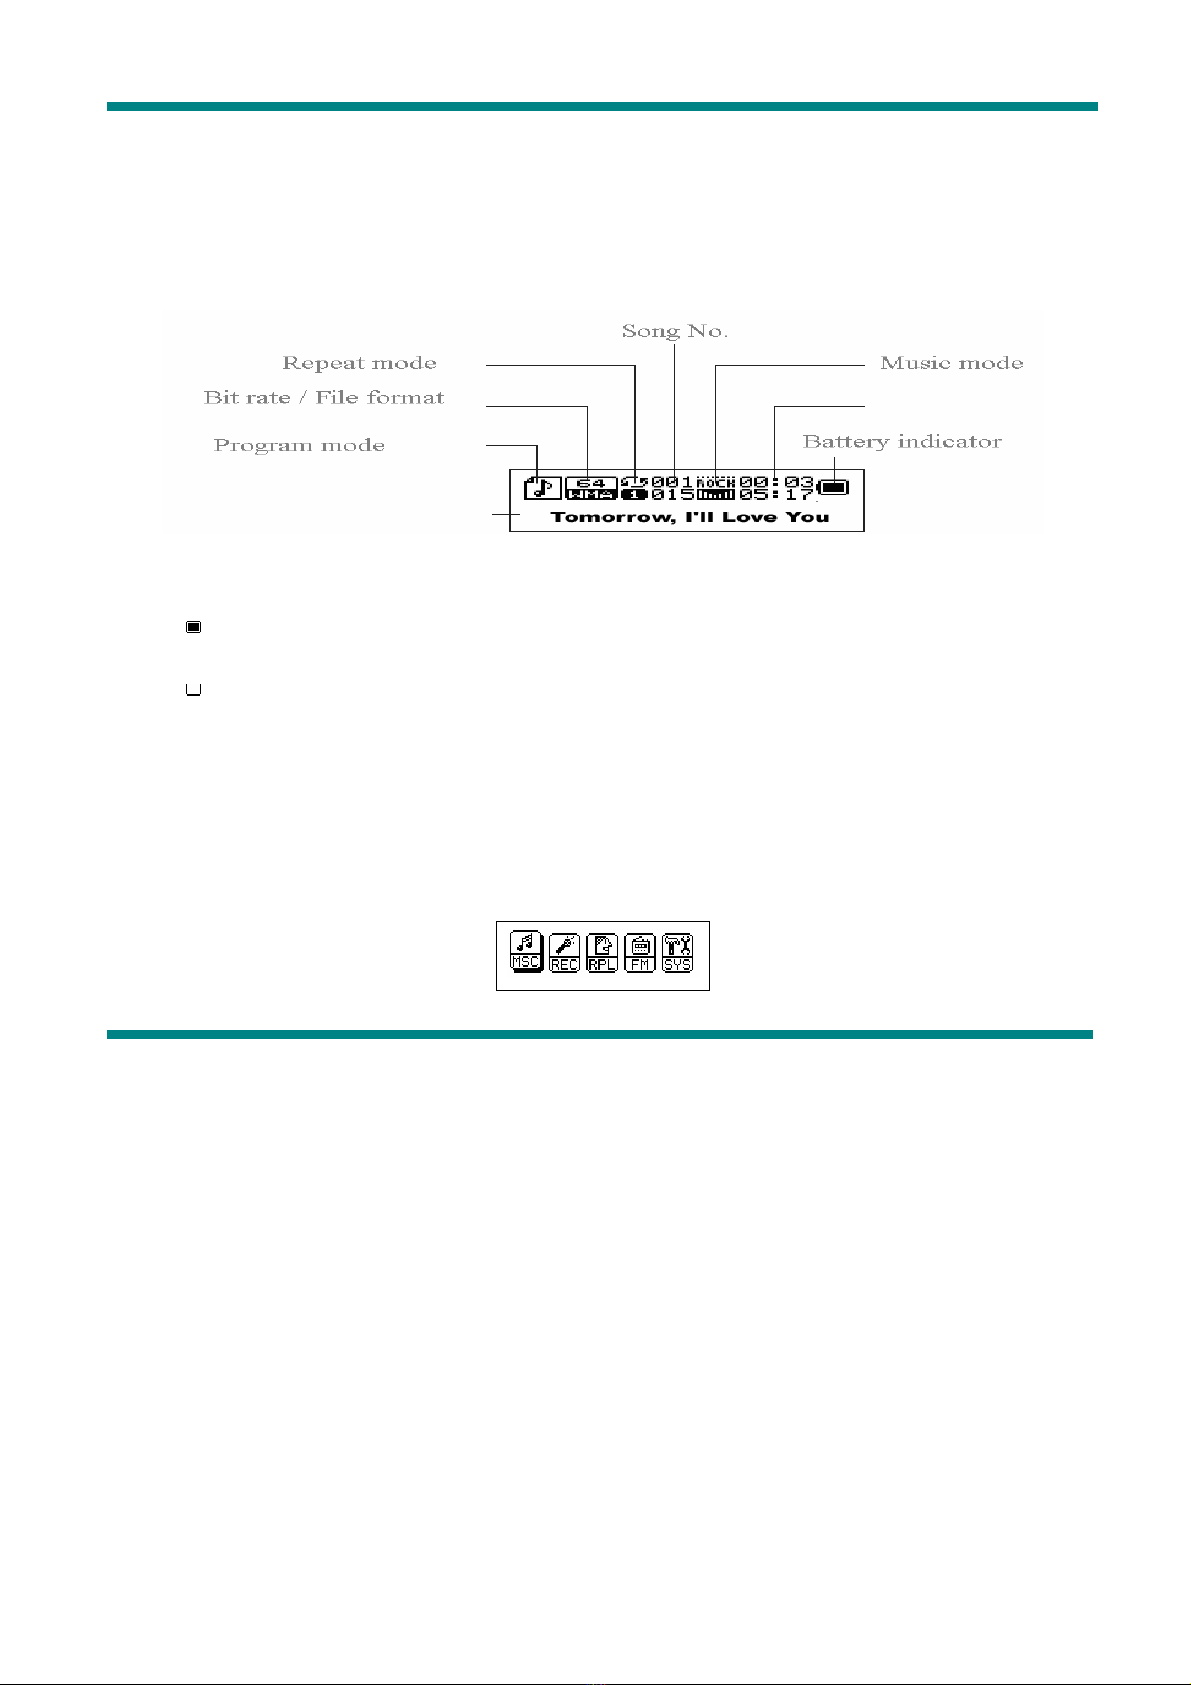
•Display screen
•Battery indicator
Displays the battery current charging status.
When the battery is fully charged it will be displayed as on the picture (black
square).
When the battery is low the square will became empty.
MAIN FUNCTIONS
zEnter the Menu
Press “Mode” button to enter the menu. There is the main menu and lots of
submenus.
zDisplay preview
oThe main menu screen looks like that:
oMusic mode screen:

oRecord mode screen:
oRecording playback mode screen:
oFM mode screen:
oSystem settings screen:
oConnection with PC screen:
•Volume adjustment
Press “VOL+” to increase the volume.
Press “VOL–” to decrease the volume.
•Power ON/OFF
Press and hold “Play/Pause” button to turn the Mp3 player on.

While the MP3 is playing, press and hold the “Play/Pause” to turn the MP3 player
off.
•Play/Pause
In the Music mode press the “Play/Pause” button to playback the music.
•Record/Pause
In the Record mode press this button to start or stop recording, press the button for
more than 2 seconds (long time press) to stop the recording.
In any mode press the “Mode” button for 2 seconds (long time press) to enter the
main menu.
•Music playback
Please, follow the steps below
1. Connect your earphone to the earphone jack of the MP3 player.
2. Press the “Play/Pause” button for 2 seconds (long time press) to turn your MP3
player on, enter the Music mode, then press “Play/Pause” again to playback the
music.
3. Select music: Press the button to select the next, to select the
previous one.
4. Volume control: VOL+ : Increase the volume VOL
-
: Decrease the volume
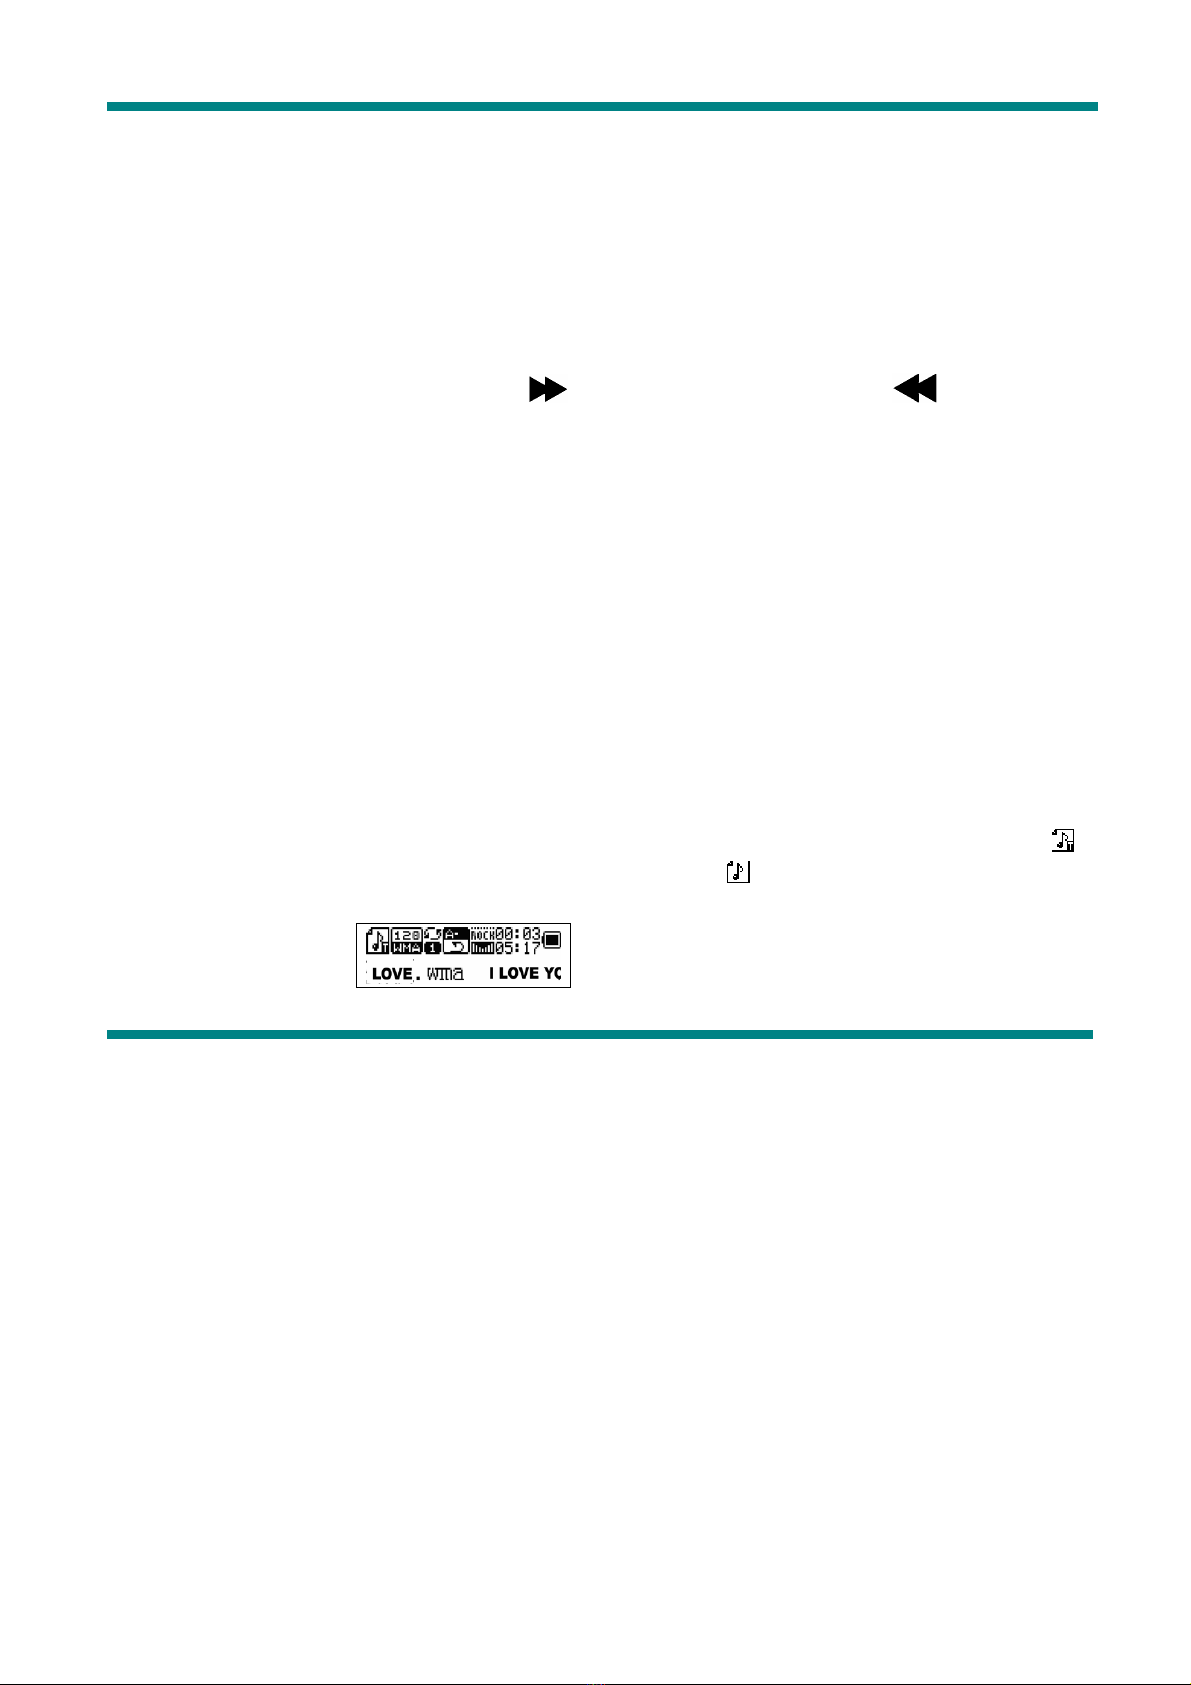
•Display of the song name and song text
This MP3 Player supports “*.LRC” file format song text, with the .LRC file the MP3 player
can display the song text synchronously with the song playback.
oHow to use the song text file (*.LRC)?
The .LRC should have the same file name as the song.
For example:
If the song name is: Love.mp3
Then the song text file should be: Love.lrc
oHow to make sure the MP3 player has recognized the .LRC file with the song text?
The icon in the left corner of the screen during the music playback will look like if
the song has the text, otherwise the icon will look like “ ”.
Below is the example of the screen with the song text:
•Voice recording
The MP3 player can save up to 99 recorded files in its memory.
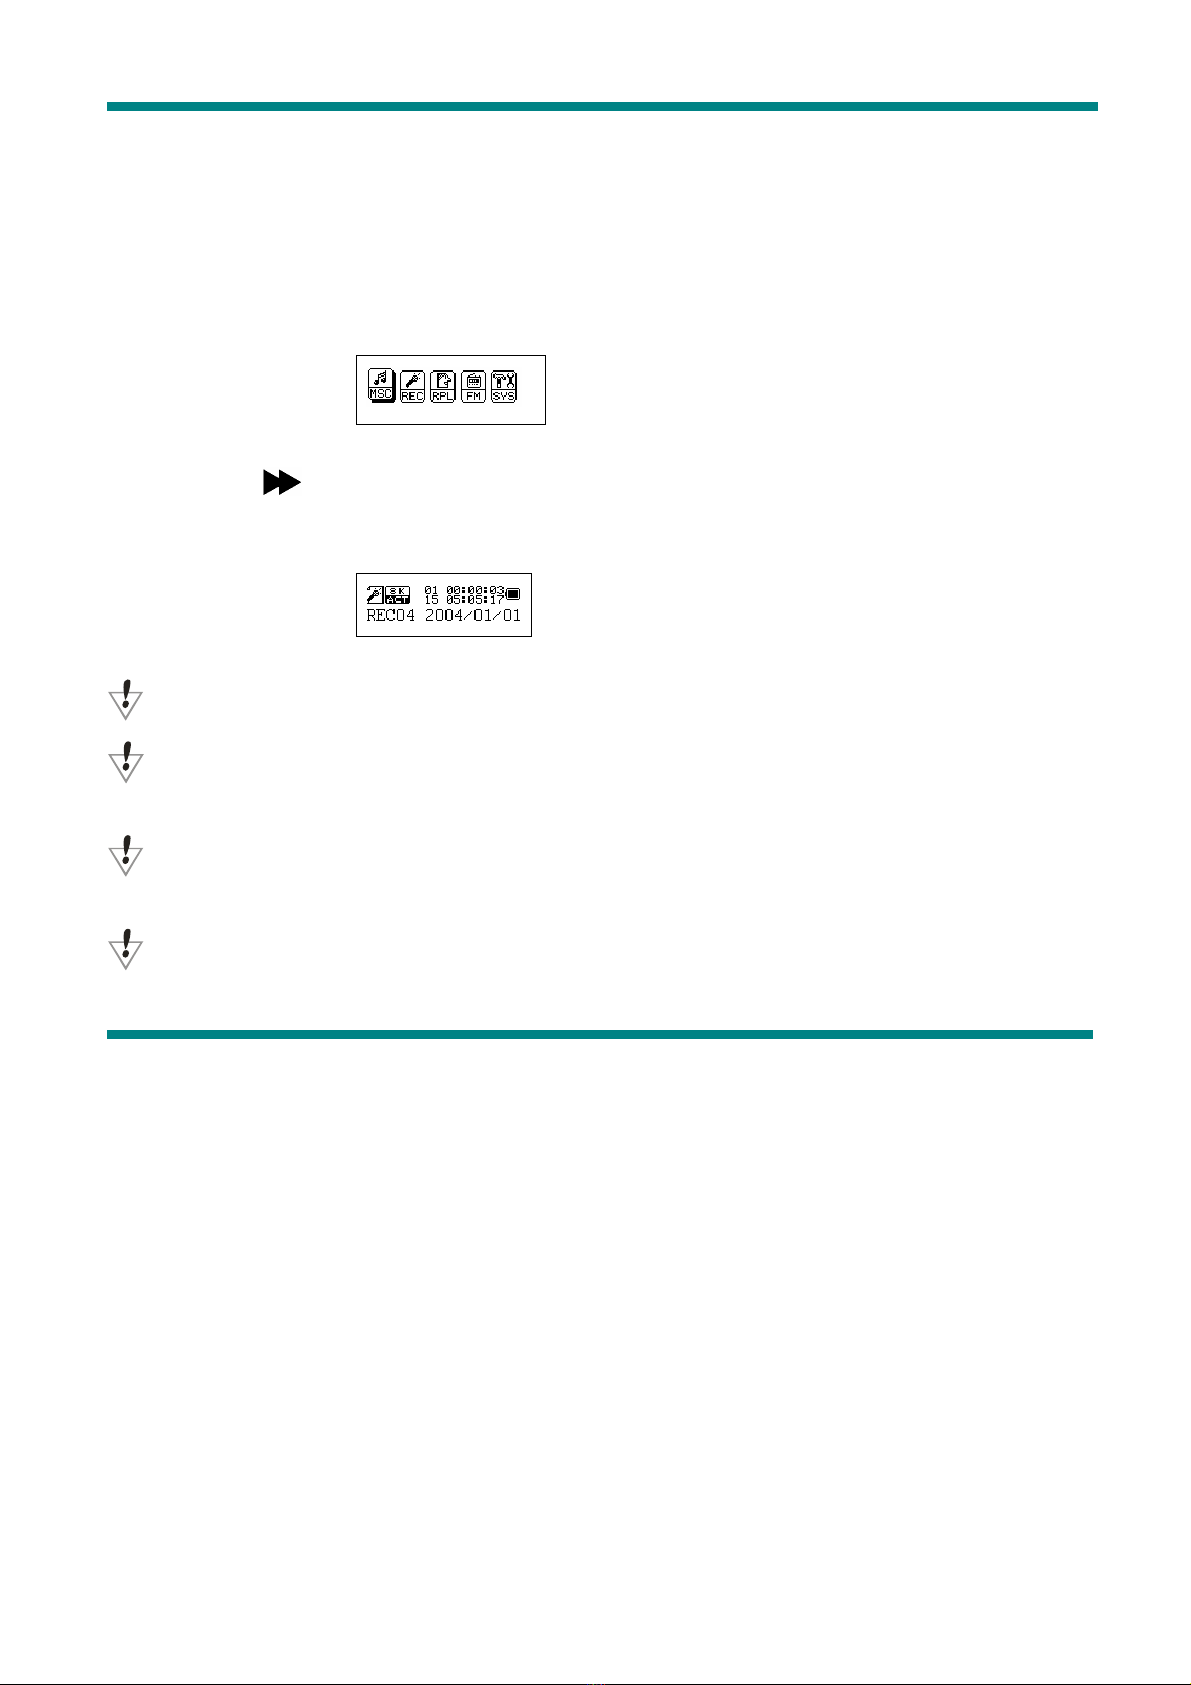
οRecording
1. Enter the Main menu:
2. Press the ” button to select the record mode.
3. Press the “Mode” button to enter the record mode:
4. Press the “Play/Pause” to start recording.
Recorded file can be saved either in the root directory or in the sub-directory.
If you get the message “Disk full” on the screen, that means there is not enough space to
save the recorded file, you should delete the file to get the space.
If you get the message “Directory full” on the screen, that means that the recorded files
quantity exceeded 99, you should save the recorded file to another directory.
During the recording, only the “Play/Pause” button can be used.

οSelect recording type
1. Enter the Record submenu pressing the “Mode” button
2. Press the “ ” button to select the record type, press “Mode” button to confirm the
choice:
οThe record type can be one of the following:
: Fine Record, .WAV file format, the best quality sound but creates much bigger
files.
: Long time record, .act file format, average quality sound.
: High quality voice control recording, .WAV format. In this mode the MP3 will not
record anything if there is no sound around. Recording is performed in .WAV file format for the
best quality sound.
: The same as above but .ACT file format.
5. Press the “Play” button to start recording.
οPlayback the recorded file
1. Enter the main menu.
2. Press the button until you select “RPL”
3. Press the “Mode” button to enter the submenu.
4. Press the “Play” button to start the playback.
5. Press “ / ” to select the recorded file.
6. Volume control

VOL+ : Increase volume
VOL
-
:Decrease volume
•File recorded in .ACT format can be converted to .WAV
Use the supplied utility software to convert the recorded .ACT file to the .WAV file.
1. Run the “Sound Converter” software utility. You will see the following dialog box:
2. Select the recorded file.
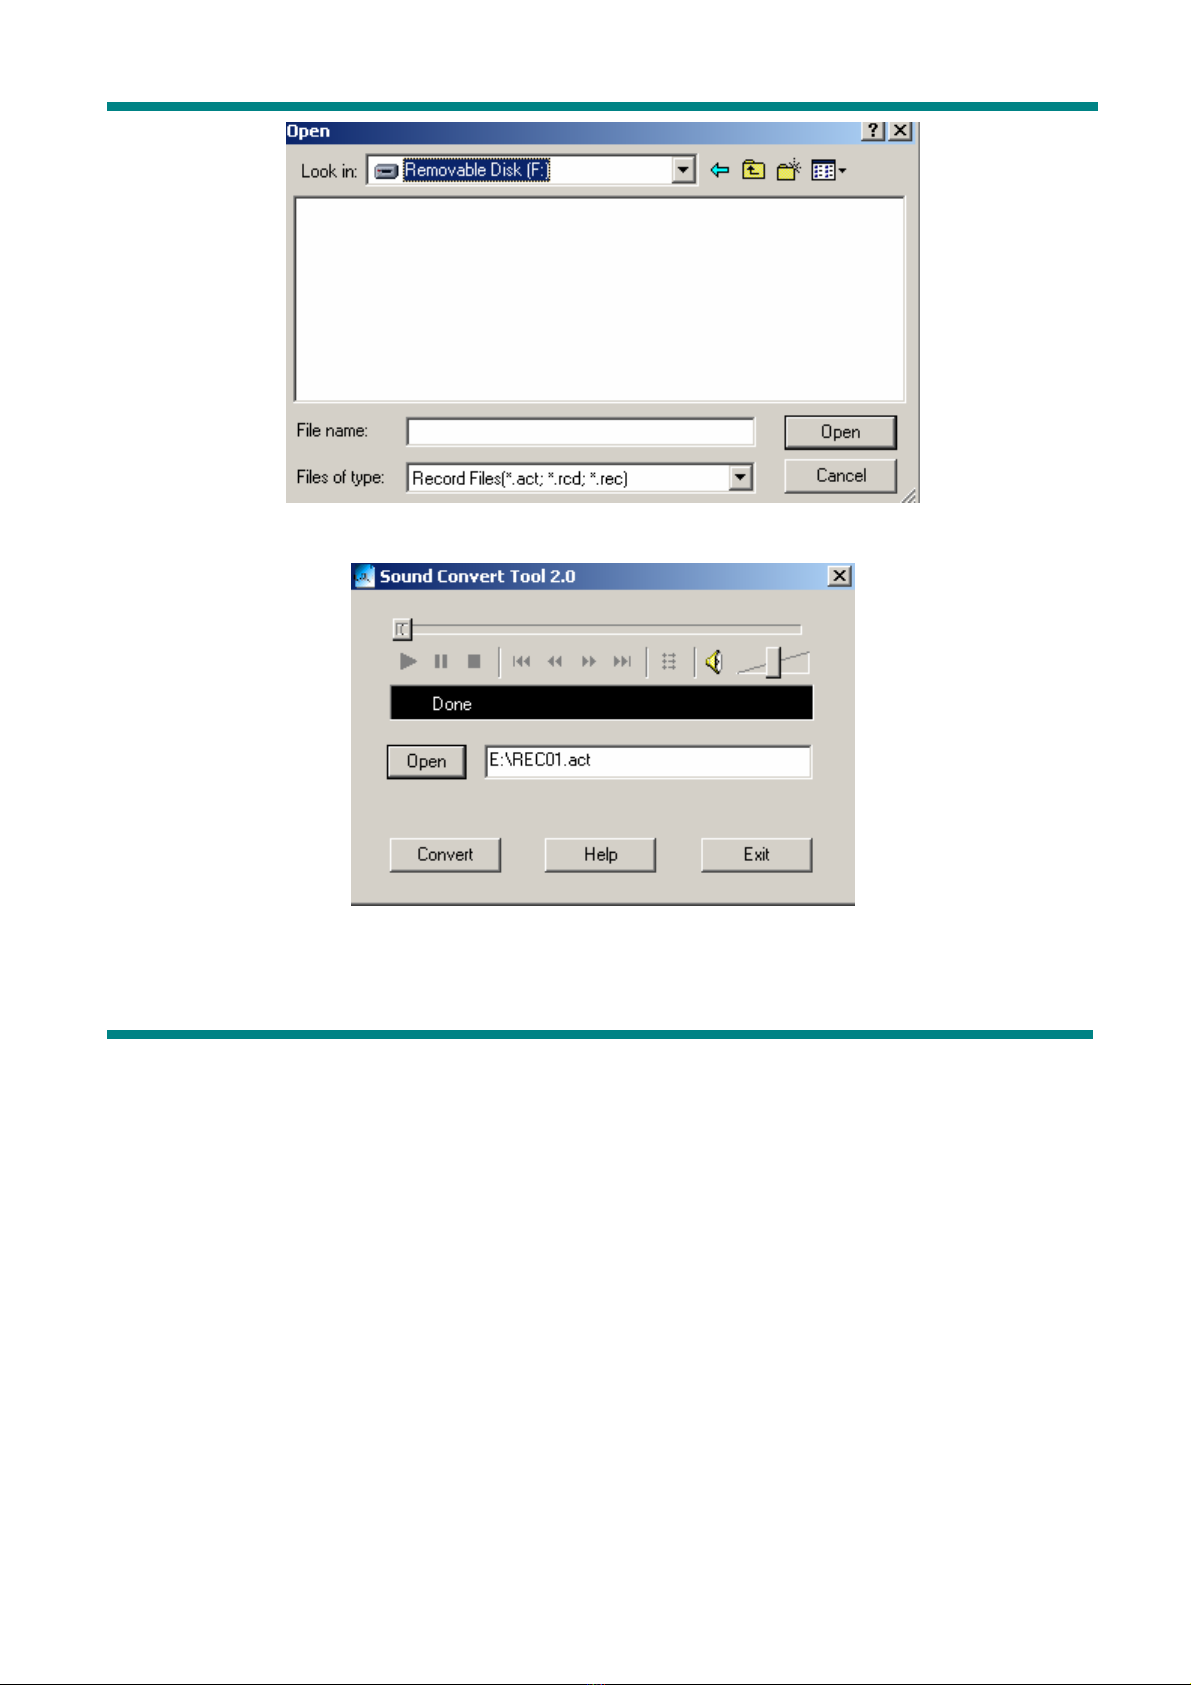
3 .Click “Convert” to create .WAV file.
You can also convert the .WAV file to MP3 format using the same utility.
This manual suits for next models
1
Table of contents


