Avtek Soundbar User manual

1
Avtek Soundbar
Indeks języków
Polski………………………………………………………………………………………………………………………………………………….3
English………………………………………………………………………………………………………………………………………………10
Deutsch…………………………………………………………………………………………………………………………………………….15

2

3
Spis treści
1. Przegląd
2. Ostrzeżenia
3. Zawartość zestawu
4. Przed pierwszym użyciem
a. Pilot
b. Ustawianie/montaż na ścianie
c. Przyłącza
d. Uruchomienie
5. Obsługa
a. Wybór rodzaju połączenia
b. Ustawianie dźwięku
c. Nawiązywanie połączenia Bluetooth
6. Czyszczenie i przechowywanie
7. Utylizacja
8. Rozwiązywanie problemów
9. Dane techniczne
1. Przegląd
Soundbar
1
Diody LED
Czerwona: tryb Standby
Zielona: Line in
Pomarańczowa: Optical in
Biała: AUX in
Niebieska: Bluetooth
2
Przycisk POWER
3
Przycisk SOURCE
4
Przycisk VOLUME +/-
5
Przycisk PAIR
6
Gniazdo LINE-IN
7
Zasilacz
8
Kabel stereo cinch
9
Gniazdo AUX IN L/R
10
Gniazdo SUB OUT
11
Gniazdo OPTICAL IN
12
Gniazdo DC IN
Pilot
13
Dioda nadawcza
14
Przycisk BLUETOOTH
15
Przycisk MUTE
16
Przycisk OPTICAL

4
17
Przycisk AUX
18
Przycisk MUSIC, MOVIE, DIALOG
19
Przycisk VOLUME +/-
20
Przycisk przewijania do przodu
21
Przycisk BASS +/-
22
Pojemnik na baterie
23
Przycisk Play/Pauza
24
Przycisk przewijania do tyłu
25
Przycisk TREBLE +/-
26
Przycisk LINE IN
27
Przycisk POWER
Montaż
28
Wkręt
29
Kołek
30
Szablon do wiercenia (bez rysunku)
Gratulujemy Państwu zakupu nowego zestawu głośnikowego Soundbar.
Aby móc bezpiecznie posługiwać się urządzeniem i poznać cały zakres jego możliwości, należy
stosować się do poniższych wskazówek:
• Przed pierwszym uruchomieniem należy dokładnie przeczytać niniejszą instrukcję obsługi.
• Przede wszystkim należy przestrzegać wskazówek dotyczących bezpieczeństwa!
• Urządzenie można obsługiwać wyłącznie w sposób opisany w niniejszej instrukcji obsługi.
• Niniejszą instrukcję obsługi należy zachować w celu późniejszego skorzystania z zawartych w niej
informacji.
• W przypadku przekazania urządzenia innym osobom należy dołączyć do niego instrukcję obsługi.
Instrukcja obsługi stanowi część produktu.
Życzymy Państwu dużo zadowolenia z nowego zestawu głośnikowego Soundbar!
2. Ostrzeżenia
Przed rozpoczęciem pracy z urządzeniem, proszę przeczytać dokładnie niniejszą instrukcję i zachować
ją na przyszłość.
Umieszczenie
•Nie wystawiać urządzenia na bezpośrednie działanie promieni słonecznych czy innych źródeł
ciepła.
•Nie umieszczać urządzenia w pobliżu sprzętów wytwarzających pole magnetyczne.
•Nie stawiać płynów w pobliżu urządzenia lub na nim.
•Nigdy nie wylewać płynów jakiegokolwiek rodzaju na urządzenie.
•Nie umieszczać ciężkich obiektów na urządzeniu.

5
Zasilanie
•Należy sprawdzić, czy napięcie robocze urządzenia jest zgodne ze źródłem zasilania.
•Proszę odłączyć zasilanie i antenę zewnętrzną jeśli w okolicy panuje pogoda burzowa.
•Proszę odłączyć zasilanie, jeśli nikt nie będzie przebywał w pomieszczeniu, lub gdy urządzenie nie
będzie używane przez długi czas.
•Proszę chronić przewód zasilający przed uszkodzeniami fizycznymi i mechanicznymi.
•Proszę używać przewodu zasilającego dołączonego do zestawu, nie modyfikować go ani nie
przedłużać.
•Proszę się upewnić, że źródło prądu zmiennego jest uziemione.
Temperatura
•Nie umieszczać urządzenia w pobliżu grzejnika lub nad nim.
•Jeśli urządzenie było przenoszone z zimnego otoczenia do ciepłego, należy odłączyć zasilanie na
przynajmniej 2 godziny w celu wyeliminowania wilgoci, która mogła powstać wewnątrz.
•Optymalna temperatura dla pracy urządzenia wynosi 0 – 40°C.
Wilgotność
•Nie wystawiać urządzenia na działanie deszczu, mżawki ani nie umieszczać go w pobliżu wody.
•Używać w pomieszczeniu suchym i chłodnym. Optymalna wilgotność powietrza dla pracy
urządzenia wynosi 10 – 90%.
Wentylacja
•Nie należy zasłaniać otworów wentylacyjnych.
•Należy upewnić się, że wokół urządzenia pozostawiono odpowiednio dużo miejsca dla wentylacji:
10 centymetrów z lewej i prawej strony oraz z tyłu, z góry – 20 centymetrów.
Słuchawki
•Używanie słuchawek przez dłuższy czas, przy wysokim natężeniu dźwięku, może uszkodzić słuch.
•Przed użyciem słuchawek, proszę obniżyć poziom głośności.
Bateria
•Należy w odpowiedni sposób utylizować zużyte baterie.
•Proszę trzymać baterie z dala od dzieci i nie wrzucać baterii do ognia.
Uwagi odnośnie konserwacji
•Urządzenie może być konserwowane jedynie przez certyfikowanych techników.
3. Zawartość zestawu
1 zestaw głośnikowy Soundbar
1 zasilacz 7
1 pilot
1 bateria CR2025 3 V (włożona)
1 kabel stereo cinch 8
2 wkręty 28
2 kołki 29
1 szablon do wiercenia 30
1 instrukcja obsługi
4. Przed pierwszym użyciem
• Usunąć całość materiału opakowaniowego.
• Sprawdzić, czy urządzenie nie jest uszkodzone.
4.1 Pilot
Pierwsze uruchomienie
• Wyjąć zabezpieczenie transportowe z pojemnika na baterie w pilocie.

6
Wymiana baterii
NIEBEZPIECZEŃSTWO WYBUCHU!
W przypadku nieprawidłowej wymiany baterii.
Wymieniać wyłącznie tym samym typem lub typem
o takich samych parametrach.
1. RYS. A: Otworzyć pokrywę pojemnika na baterię,
odblokowując i przesuwając w kierunku strzałki.
2. Wymienić starą baterię na nową.
OSTRZEŻENIE! Uwzględnić właściwą biegunowość.
Oznaczenie plusa baterii musi być widoczne
z zewnątrz.
3. Ponownie zamknąć pokrywę pojemnika na baterię.
4.2 Ustawianie/montaż na ścianie
WSKAZÓWKA: W przypadku podłączania urządzenia do telewizora ustawić urządzenie możliwie centralnie pod
telewizorem.
Ustawianie
1. Ustawić urządzenie na równym podłożu.
2. Połączyć zasilacz 7 z urządzeniem.
Montaż na ścianie
OSTRZEŻENIE przed szkodami materialnymi!
- W przypadku montażu na ścianie przestrzegać następujących zasad:
- Elementy mocujące muszą być adekwatne do materiału, z jakiego wykonana jest ściana. W razie potrzeby użyć
innych materiałów mocujących niż
dostarczone w komplecie.
- Upewnić się, że w miejscu montażu nie przebiegają w ścianie żadne przewody (np. elektryczne, wodne,
gazowe).
- Ewentualnie powierzyć montaż na ścianie fachowcowi.
1. RYS. B: Wywiercić 2 otwory na równej wysokości w odległości 40 cm. Zastosować ewentualnie załączony
szablon do wiercenia 30.
2. W otworach umieścić kołki 29.
3. Wkręcić wkręty 28 do kołków 29.
4. Zamocować wszystkie używane kable w przyłączach
(patrz „Przyłącza” na stronie 14).
WSKAZÓWKA: w przypadku montażu na ścianie dla wejścia optycznego OPTICAL IN 11 użyć wtyczki o maks.
długości 3 cm (ewentualnie adaptera kątowego TOSLINK), aby uniknąć złamania się kabla i możliwego
uszkodzenia.
5. Połączyć zasilacz 7 z urządzeniem.
6. Zawiesić urządzenie zaczepami ściennymi z tyłu
urządzenia na wkrętach 28.
4.3 Przyłącza
OSTROŻNIE: Przed połączeniem ze sobą zestaw głośnikowy Soundbar i podłączane urządzenia muszą zostać
uprzednio wyłączone. Zapoznać się z instrukcją obsługi podłączanych urządzeń.
• Do gniazda cinch wyjścia SUB OUT 10 można podłączyć subwoofer. Będzie on automatycznie sterowany przez
urządzenie.
4.4 Uruchomienie
WSKAZÓWKA: po wyłączeniu urządzenie pozostaje w trybie gotowości (standby). Ponieważ w tym trybie
urządzenie pobiera jeszcze niewielką ilość prądu, po zakończeniu używania urządzenia wyjąć zasilacz 7 z
gniazda, aby odłączyć urządzenia od zasilania sieciowego.
• Włożyć zasilacz 7 do łatwo dostępnego gniazdka.
Na urządzeniu zapala się czerwona dioda 1. Urządzenie jest teraz w trybie standby.
5. Obsługa
WSKAZÓWKI:

7
• Wszystkie ustawienia można wykonać wygodnie za pomocą pilota. Podstawowe funkcje są dostępne również
na przyciskach urządzenia. W instrukcji opisana jest z reguły obsługa za pomocą pilota.
• Maszyna przełącza się do trybu stanby:
- jeżeli w ciągu 20 minut nie zostanie nawiązane połączenie Bluetooth lub
- jeżeli przez 20 minut nie będzie odbierać żadnego sygnału.
• Nacisnąć przycisk POWER 27, aby włączyć urządzenie z trybu standby
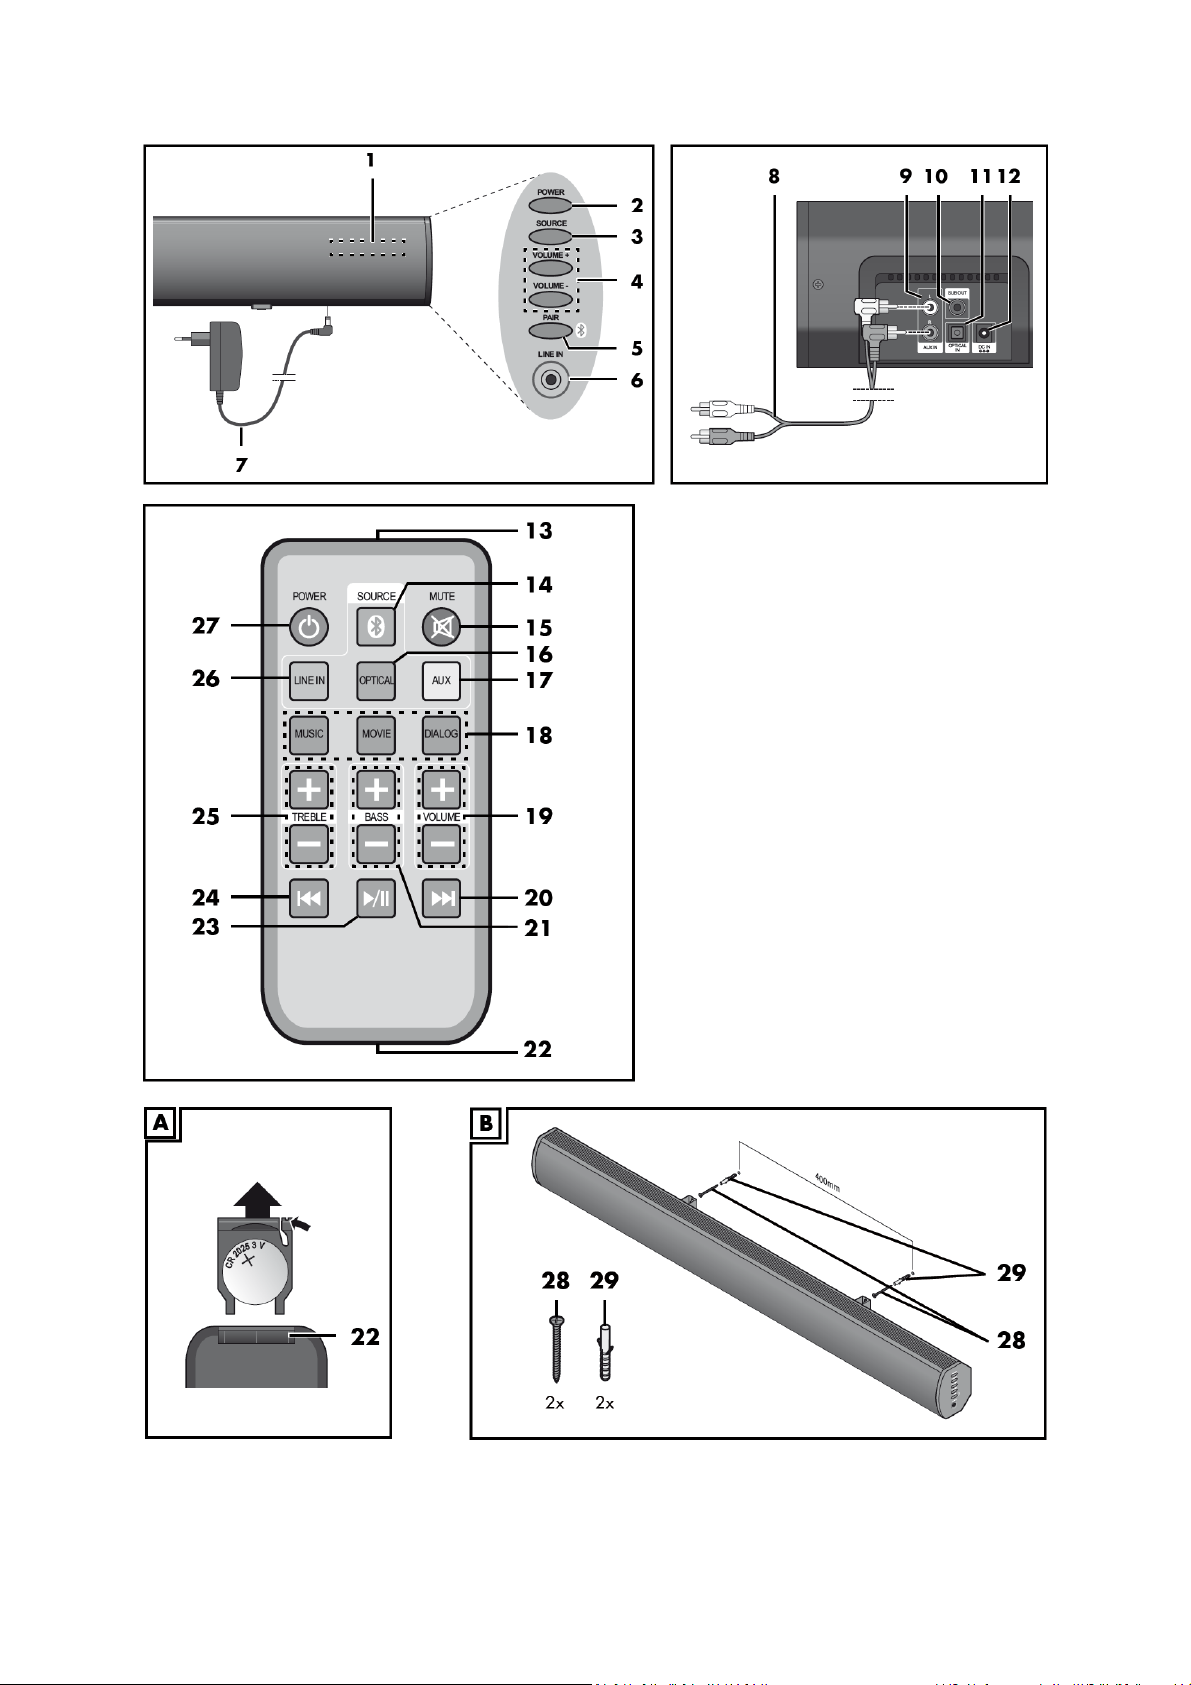
5.1 Wybór rodzaju połączenia
1. Nacisnąć jeden z przycisków AUX 17, LINE IN 26,
OPTICAL 16 lub 14, aby włączyć wybrane połączenie (patrz „Przyłącza” na stronie 14).
2. Na urządzeniu odtwarzającym uruchamia się odtwarzanie, wybiera i zarządza utworami muzycznymi.
WSKAZÓWKA: Aby móc korzystać z wejścia optycznego, wyjście urządzenia odtwarzającego należy ustawić na
„PCM downmix”.
5.2 Ustawianie dźwięku
WSKAZÓWKI:
• Zmiany w ustawieniach dźwięku sygnalizowane są krótkim miganiem diody 1 do momentu osiągnięcia
minimalnej/maksymalnej wartości.
• Sterowanie tonami wysokimi i basami możliwe jest wyłącznie w ustawieniu „Muzyka” po naciśnięciu
przycisku MUSIC 18.
Regulacja głośności
• Naciskać w trakcie odtwarzania przyciski
VOLUME –/+ 19.
Wyciszanie
1. W celu wyłączenia dźwięku nacisnąć przycisk
MUTE 15. Zaczyna pulsować dioda 1.
2. Aby ponownie włączyć dźwięk, nacisnąć jeszcze raz przycisk MUTE lub jeden z przycisków
VOLUME –/+ 19. Zaświeca się dioda 1.
Ustawianie barwy dźwięku
• Nacisnąć jeden z przycisków 18, aby wybrać wstępne ustawienie barwy dźwięku dla muzyki (MUSIC), filmu
(MOVIE) lub rozmowy (DIALOG).
• Nacisnąć przycisk MUSIC 18:
- Za pomocą przycisków TREBLE –/+ 25 wyregulować tony wysokie.
- Za pomocą przycisków BASS –/+ 21 wyregulować
tony niskie.
_
5.3 Nawiązywanie połączenia
Bluetooth
WSKAZÓWKI:
• Kod identyfikacyjny urządzenia to „SSB 36 A1”.
• Po przełączeniu na Bluetooth urządzenie automatycznie próbuje nawiązać połączenie z ostatnio sparowanym
urządzeniem.
• Należy pamiętać o tym, że nawiązywanie połączenia może przebiegać w różny sposób w zależności od danego
urządzenia oraz użytego oprogramowania.
1. Nacisnąć przycisk 14, aby przełączyć urządzenie
do trybu Bluetooth. Zaczyna pulsować na niebiesko
dioda 1.
2. Włączyć urządzenie odtwarzające (np. smartfon) i uruchomić nawiązywanie połączenia Bluetooth.
3. Przytrzymać przez ok. 1 sekundę wciśnięty przycisk PAIR 5 na urządzeniu. Pulsuje szybko dioda niebieska 1.
Urządzenie odtwarzające powinno teraz odbierać kod identyfikacyjny urządzenia „SSB 36 A1”.
4. Nawiązać na urządzeniu odtwarzającym połączenie z zestawem głośnikowym Soundbar. W przypadku
pytania o hasło wprowadzić „0000”. Obydwa urządzenia są teraz ze sobą połączone. Dioda 1 na urządzeniu
świeci się na niebiesko i rozbrzmiewa sygnał akustyczny.
WSKAZÓWKA: Urządzenia odtwarzające mogą zapamiętywać w niektórych warunkach kod identyfikacyjny
urządzenia. Przy ponownym nawiązywaniu połączenia nie ma w takim przypadku konieczności ręcznego
nawiązywania

8
połączenia przy aktywnej funkcji Bluetooth.
5. Włączyć następnie odtwarzanie utworu na urządzeniu odtwarzającym. Dźwięk jest odtwarzany przez zestaw
głośnikowy Soundbar.
6. Za pomocą przycisków 24,20 i 23 można wybierać i zarządzać utworami.
6. Czyszczenie i przechowywanie
NIEBEZPIECZEŃSTWO porażenia prądem
elektrycznym!
- Przed czyszczeniem urządzenia wyciągnąć zasilacz 7 z gniazdka. Uważać, aby do wnętrza urządzenia
nie dostała się żadna ciecz.
• Urządzenie należy czyścić lekko zwilżoną ściereczką. Nie wolno używać rozpuszczalników, spirytusu,
rozcieńczalników itp., ponieważ mogą one uszkodzić powierzchnię urządzenia.
• Jeżeli urządzenie nie będzie używane, należy je przechowywać w miejscu, które nie jest narażone na
działanie wysokiej temperatury ani wilgoci. Wyjąć baterię z pilota.
7. Utylizacja
Prawidłowa utylizacja produktu (przepisy dotyczące zużytego sprzętu elektrycznego i elektronicznego) (Dotyczy krajów
korzystających z oddzielnych systemów segregacji odpadów).Takie oznaczenie umieszczone na produkcie, akcesoriach lub
w instrukcji wskazuje, że produktu i jego elektronicznych akcesoriów (np. ładowarki, zestawu słuchawkowego, kabla USB)
po upływie okresu użytkowania nie należy wyrzucać wraz z innymi odpadami pochodzącymi z gospodarstw domowych. W
celu uniknięcia skażenia środowiska lub narażenia na utratę zdrowia z powodu nieprawidłowej utylizacji należy oddzielić
te odpady od innych i pozbyć się ich w sposób odpowiedzialny i umożliwiający ponowne wykorzystanie surowców.
Użytkownicy domowi powinni skontaktować się ze sprzedawcą produktu lub z organizacjami samorządowymi w celu
uzyskania informacji na temat miejsca i sposobu bezpiecznej utylizacji tych produktów. Użytkownicy instytucjonalni powinni skontaktować
się ze swoim dostawcą i sprawdzić warunki umowy zakupu. Produktu i jego elektronicznych akcesoriów nie należy usuwać wraz z innymi
odpadami komercyjnymi.
Prawidłowa utylizacja baterii używanych wraz z produktem (Dotyczy krajów korzystających z oddzielnych systemów
segregacji odpadów). Takie oznaczenie umieszczone na baterii, w instrukcji lub na opakowaniu wskazuje, że po upływie
okresu użytkowania baterii nie należy usuwać wraz z innymi odpadami pochodzącymi z gospodarstw domowych.
Chemiczne symbole Hg, Cd lub Pb wskazują, że bateria zawiera rtęć, kadm lub ołów w ilościach przekraczających poziom
określony w dyrektywie 2006/66/WE. W przypadku nieprawidłowej utylizacji baterii substancje te mogą stanowić
zagrożenie dla zdrowia człowieka lub dla środowiska.
Aby chronić zasoby naturalne oraz promować ponowne wykorzystywanie materiałów, należy oddzielić baterie od innych
odpadów i utylizować je, korzystając z lokalnego, bezpłatnego systemu zwrotu baterii.
Rozwiązywanie problemów
Jeżeli zestaw głośnikowy Soundbar nie będzie działać prawidłowo, należy sprawdzić poniższą listę. Może okazać
się, że przyczyną jest niewielki problem, który użytkownik może usunąć samodzielnie.
NIEBEZPIECZEŃSTWO porażenia prądem
elektrycznym!
W żadnym wypadku nie wolno próbować samodzielnie naprawiać urządzenia.
Problem
Możliwe przyczyny
Urządzenie nie działa
Czy zapewniony jest
dopływ prądu? Czy
świeci dioda 1?
Brak połączenia
Bluetooth
Czy w urządzeniu
odtwarzającym
włączana jest funkcja
Bluetooth?
Czy urządzenie jest
wyłączone?

9
Urządzenie nie
odtwarza dźwięku
Czy poziom głośności
urządzenia
odtwarzającego nie
jest ustawiony zbyt
nisko?
Czy zostało wybrane
właściwe połączenie
(źródło)?
Przy wyborze wejścia
optycznego na
urządzeniu
odtwarzającym jako
tryb wyjściowy
wybrano „PCM
downmix”?
Szumy podczas pracy
W przypadku
ewentualnych szumów
odsunąć telefony
komórkowe, tablety i
inne urządzenia
obsługujące fale
radiowe z bliskiego
otoczenia zestawu
głośnikowego
Soundbar?
10. Dane techniczne
Model:
Avtek Soundbar
Moc:
2x 18W RMS
Soundbar:
Wejście: 18,0V 1,3A
Zasilacz:
Wejście: 100-240 V
50/60 Hz, maks. 1,0 A
Wyjście 18,0V, 1,3A
Bluetooth:
3.0
Zasięg do 10m
Wejście:
Line IN
AUX IN L/R
Optical IN
Wyjście:
SUB OUT
1x stereo jack 3,5mm
2x gniazdo cinch
1x gniazdo TOSLINK
1x gniazdo cinch
Bateria do pilota:
CR2025 3V
Wymiary (szer x głęb x
wys)
94 x 9,5 x 7,8 cm
Ciężar
Ok. 1,4 kg
Warunki otoczenia
Tylko do używania w
pomieszczeniach
10-30°C
Wilgotność powietrza
wzgl. od 40% do 85%

10
Contents
1. Overview
2. Warnings
3. Product set contents
4. Before first use
a. Remote control
b. Installation (tabletop/wall)
c. Connections
d. Turning on
5. Operation
a. Selecting type of connection
b. Sound settings
c. Establishing Bluetooth
connection
6. Cleaning and storing
7. Disposal
8. Troubleshooting
9. Specifications
1. Overview
Soundbar
1
LEDs
Red: standby mode
Green: Line in
Orange: Optical in
White: AUX in
Blue: Bluetooth
2
POWER button
3
SOURCE button
4
VOLUME –/+ button
5
PAIR button
6
LINE IN socket
7
Power supply unit
8
Stereo RCA (cinch) cable
9
AUX IN L/R sockets
10
SUB OUT socket
11
OPTICAL IN socket
12
DC IN socket
Remote control
13
Send LED
14
BLUETOOTH button
15
MUTE button
16
OPTICAL button
17
AUX button
18
MUSIC, MOVIE, DIALOG buttons
19
VOLUME –/+ button
20
Fast forward button
21
BASS +/- button
22
Battery compartment
23
PLAY/PAUSE button
24
Fast rewind button
25
TREBLE +/- button
26
LINE IN button
27
POWER button
Wall installation accessories
28
Screw
29
Rawlplug
30
Drilling template (no image)
Congratulations on the purchase of your new
soundbar.
To ensure safe operation of the product and to
make the best use of all of its features please
observe the following guidelines:
• Read this user manual carefully before you use
the product for the first time.
• Observe all safety notices and heed all warnings
at all times!
• The product may only be used as described in
this user manual.
• Keep this user manual for future reference.
• Should you ever hand over the product to
anyone, please include this user manual with it.
This user manual is a part of the product.
We hope you enjoy using your new soundbar!
2. Warnings
Before you start using the device please read
manual carefully and keep it for future reference.
Location
•Do not expose the device to direct sunlight or
other heat sources.
•Do not place the device near appliances that
generate a magnetic field.
•Do not place liquids near or on the device.
•Never spill any liquid of any kind on the
device.
•Do not place heavy objects on the device.

11
Power Supply
•Verify that the operating voltage of the device
is compatible with the power source.
•Disconnect the power supply and an external
antenna from wall sockets if there is a
lightning storm is likely.
•Disconnect the power supply if no is going to
be present in the room, or if the device is not
going to be used for a long time.
•Protect the power cord from physical damage.
•Use the power cord included with the device
and do not modify or extend it.
•Make sure the mains socket the device is
connected is properly grounded.
Temperature
•Do not place the device near a heater or above
it.
•If the device has been moved from a cold
environment to a warm one, disconnect the
device from power socket and leave it for at
least 2 hours to make sure any moisture that
could condensate inside the device has
evaporated.
•The optimum ambient temperature for
operation of the device is 0°C – 40°C.
Humidity
•Do not expose the device to rain or drizzle or
place it near water.
•Use in a dry and cool place. The optimum
humidity for the device operation is 10 - 90%.
Ventilation
•Never block ventilation openings.
•Make sure there is enough space for
ventilation around the device: 10 cm on the
left, right and in the rear and 20 centimetres
above the device.
Headphones
•Extended use of headphones at high-volume
may damage your hearing.
•Before using headphones make sure to reduce
the volume.
Battery
•End-of-life batteries must be disposed of
properly.
•Keep batteries away from children at all times.
Do not expose batteries to fire.
Maintenance
•The device can be repaired or maintained only
by authorised service staff.
3. Product set contents
1 soundbar
1 power supply unit 7
1 remote control
1 CR2025 3V battery (installed)
1 stereo RCA (cinch) cable 8
2 screws 28
2 rawlplugs 29
1 drilling template 30
1 operating manual
4. Before first use
• Remove all packing material.
• Check that the device shows no signs of
damage.
4.1 Remote control
Putting soundbar to operation
• Remove the insulating strip from the remote
control battery compartment.
Battery replacement
DANGER OF EXPLOSION!
If the battery is not installed correctly, it may
explode!
Replace the battery only with the same or
equivalent type.
1. FIG. A: Remove the battery compartment cover.
To do this, unlock and slide the cover in the
direction shown by the arrow.
2. Replace the old battery with a new one.
WARNING! While installing the battery, make sure
the correct polarity is observed.
The plus sign on the battery must be visible when it
is installed.
3. Replace the battery compartment cover.
4.2 Installation (tabletop/wall)
NOTE: If you are connecting the device to a
television set, place the device centrally at the
bottom of the TV set.
Tabletop installation
1. Place the device on a level surface.
2. Connect the power supply unit 7 to the device.
Wall installation
WARNING! Risk of property damage!
When installing the device on a wall, please ensure
the following:
- The wall installation accessories must be
appropriate for the type and material of the wall. If
necessary, obtain and use other wall installation
than those included with the product.
- Make sure that the area of the wall in which
holes will be drilled contains no pipes or cables
(e.g. electricity, water, gas installation).

12
- If necessary, ask a properly skilled technician to
install the device on the wall.
1. FIG. B: Two holes need to be drilled in the wall
at the same height from the floor, 40 cm apart
from each other. You can use the drilling template
30 included with the product to mark the location
of the holes.
2. Insert the rawlplugs 29 into the holes drilled.
3. Insert the screws 28 in the rawlplugs 29 and
tighten them.
4. Insert all the necessary cable connectors into the
sockets (see "Connections" on p. 14).
NOTE: If you are installing the soundbar on a wall
and intend to use optical input OPTICAL IN (11),
use a jack that is not longer than 3 cm (or use a
TOSLINK angle adapter) to prevent the optical
cable from kinking and avoid its damage.
5. Connect the power supply unit 7 to the device.
6. Suspend the device on the wall, hooking the wall
mounting brackets on its back
28 against the screw heads.
4.3 Connections
CAUTION: Before you start making cable
connections, make sure the soundbar and the
devices to be connected to it are switched off.
Please also read the operating instructions for the
devices which you are connecting.
• A subwoofer can be connected to the RCA
(cinch) socket SUB OUT (10). It will then be
automatically controlled by the soundbar.
4.4 Turning on
NOTE: When switched off, the soundbar remains in
standby mode. As the device still uses some
electricity while in standby, if you wish to turn it off
completely you need to unplug its power supply
unit 7from the wall socket.
• Connect the power supply unit 7 to an easily
accessible wall socket nearby.
The red LED 1will light up on the soundbar. The
device is now in standby mode.
5. Operation
NOTES:
• All adjustments can conveniently be carried out
using the remote control. The key features can also
be operated with the buttons on the device.
However, the operation instructions provided in
this manual usually assume you are using the
remote control.
• The device switches to standby mode…
- if no Bluetooth connection is established
within 20 minutes, or
- if it does not detect any input for 20
minutes.
• Press the POWER button 27 to button to switch
on the device which is in standby mode.
5.1 Selecting connection type
1. To activate the desired input connection, press
the appropriate button: AUX (17), LINE IN (26),
OPTICAL (16) or 14 (see "Connections" on p. 14).
2. Operate the device which is the signal source to
start playback or to select and control music tracks.
NOTE: In order to use the optical input, set the
audio device output to "PCM downmix".
5.2 Sound settings
NOTES:
• Each changes to sound settings is confirmed by
the device with quick flashes of LED 1, until the
minimum/maximum value has been reached.
• Controlling the level of treble and bass can only
be done in the "Music" setting. To access it, press
the MUSIC 18 button.
Volume control
• During playback use
VOLUME –/+ buttons (19).
Mute
1. To mute the sound, press
MUTE button (15). LED 1will start flashing.
2. To switch the sound back on, press MUTE again
or use one of the VOLUME -/+ buttons.
VOLUME –/+ buttons (19). LED 1will light up.
Equalizer presets
• Press one of the buttons 18 to select a preset
sound profile for music (MUSIC), film (MOVIE) or
speech (DIALOG).
• Press the MUSIC button (18).
- Use the TREBLE -/+ buttons (25) to adjust the
treble level.
- Use the BASS -/+ buttons (21) to adjust the level
of bass.
5.3 Establishing a Bluetooth
connection
NOTES:
• The identification of the device is "SSB 36 A1".
• After it has been switched over to Bluetooth,
the device will automatically attempt to establish a
connection with the last paired device.
• Please note that the connection process may
vary slightly depending on the device and the
software used.
1. Press button 14 to switch on the Bluetooth
connection. LED 1will start flashing blue.
2. Switch on the audio device (e.g. your
smartphone) and initiate the search for new
Bluetooth connections on it.
3. Press the PAIR button (5) on the soundbar and
hold it depressed for approximately 1 second. The
blue LED 1will flash rapidly. The audio source
device should now identify the soundbar as "SSB
36 A1".

13
4. Use the audio source device to display the list of
Bluetooth devices paired with it and select the
soundbar and connect with it. If you are asked for
a password, input "0000". Both devices are now
interconnected. LED 1will light blue and a beep
will be heard.
NOTE: Some audio sources will store the
identification of the soundbar in their memory. In
such a case it may not be necessary to pair them
with the soundbar manually again when Bluetooth
transmission has been activated again.
5. Start playback of a the audio file (e.g. a music
piece) on the audio device. The sound should be
heard from the soundbar.
6. Use buttons 24, 20 and 23 to select and manage
audio tracks.
6. Cleaning and storing
DANGER! Risk of electric
shock!
• Before you clean the device, always disconnect
the power supply unit 7from the wall socket.
Make sure no liquid penetrates into the device.
• Clean the device with a slightly damp
cloth. Solvents, spirits, thinners etc. must not be
used, as they can damage the surface of the
device.
• When not using the device, store it in a
place where it will not be exposed to high
temperatures or moisture. If you intend not to use
the device for a longer period of time, remove the
battery from the remote control.
7. Disposal
Correct Disposal of This Product
(Waste Electrical & Electronic
Equipment) (Applicable in countries
with separate electrical waste
collection systems) This marking on
the product, its accessories or
literature indicates that the product
and its electronic accessories (e.g. charger,
headset, USB cable) should not be disposed of with
other household waste at the end of their working
life. To prevent possible harm to the environment
or human health from uncontrolled waste disposal,
please separate these items from other types of
waste and recycle them responsibly to promote the
sustainable reuse of material resources.
Household users should contact either the retailer
where they purchased this product or their local
authorities for the details on where and how they
can take submit this product for environmentally
safe recycling. Business users should contact their
supplier and check the terms and conditions of the
purchase contract. This product and its electronic
accessories should not be mixed with other
commercial wastes for disposal.
Please ensure correct disposal of the
batteries contained in this product
(applicable in countries where
separate collection systems for
electrical waste are in use). This
marking on the battery, user manual
or packaging indicates that the batteries in this
product at the end of their working life must not be
disposed of with mixed household waste. Where
present, the chemical symbols Hg, Cd or Pb indicate
that the level of mercury, cadmium or lead
respectively contained in the battery exceeds the
reference levels provided for in EC Directive
2006/66. If batteries are disposed of incorrectly,
these chemicals may be dangerous to environment
and the human health.
In order to protect natural resources and promote
recycling, batteries must be disposed of separately
from other types of waste using a dedicated local
cost-free end-of-life battery collection system.
Troubleshooting
If the soundbar fails to function as required, please
try the following checklist first. The technical issue
experienced could prove to be a simple problem
that you can solve yourself.
DANGER! Risk of electric
shock!
Under no circumstances may this device be
repaired by the consumer.
Problem
Possible causes
The device does not
work
Is the device
connected to the
mains? Is LED 1 on?
No Bluetooth
connection
Is Bluetooth
connection supported
and enabled on the
audio source device?
Is the soundbar on? Is
the audio source
device on?
No sound can be
heard
Hasn't the volume of
the audio source
device been reduced
or entirely muted?
Did you choose the
right input source on
the soundbar?

14
If you are using the
optical input, did you
set the audio source
device output mode to
"PCM downmix"?
Playback with
interference
If you are experiencing
buzz or any other
interference, move
any nearby mobile
phones, tablets and
other radio frequency
devices away from the
soundbar.
10. Specifications
Model:
Avtek Soundbar
Power rating:
2x 18 Watt RMS
Soundbar:
Input: 18.0V 1.3A
Power supply unit:
Input: 100-240V
50/60 Hz, max. 1.0A
Output: 18.0V, 1.3A
Bluetooth:
3.0
Range: 10m
Input:
Line IN
AUX IN L/R
Optical IN
Output:
SUB OUT
1x 3.5mm stereo jack
2x RCA (cinch) socket
1x TOSLINK socket
1x RCA (cinch) socket
Remote control
battery:
CR2025 3V
Dimensions (WxDxH):
94 x 9.5 x 7.8 cm
Weight:
approx. 1.4 kg
Environment:
For indoor use only
10-30°C
Relative air humidity
40% to 85%

15
Inhalt
10. Übersicht
11. Warnungen
12. Lieferumfang
13. Vor der erstmaligen Verwendung
a. Fernbedienung
b. Montage (stehend/hängend)
c. Anschlüsse
d. Anschalten
14. Bedienung
a. Anschlusstyp wählen
b. Klangeinstellungen
c. Bluetooth-Verbindung einrichten
15. Reinigung und Lagerung
16. Entsorgung
17. Problemlösung
18. Technische Daten
8. Übersicht
Soundbar
1
LEDs
Rot: Standby-Modus
Grün: Line-in
Orange: Optischer Eingang
Weiß: AUX
Blau: Bluetooth
2
POWER-Taste
3
SOURCE-Taste
4
LAUTSTÄRKE-Taste –/+
5
PAIR-Taste
6
LINE-IN-Buchse
7
Stromkabel
8
Stereo-RCA-Kabel (Cinch)
9
AUX-Eingang L/R
10
SUB-Ausgang
11
OPTISCHER Eingang
12
Stromkabelanschluss
Fernbedienung
13
Sende-LED
14
BLUETOOTH-Taste
15
STUMM-Taste
16
OPTISCHER-EINGANG-Taste
17
AUX-Taste
18
MUSIC-, MOVIE-, DIALOG-Tasten
19
LAUTSTÄRKE-Taste –/+
20
Vorspul-Taste
21
BASS-Taste –/+
22
Batteriefach
23
PLAY-/PAUSE-Taste
24
Rückspul-Taste
25
TREBLE-Taste –/+
26
LINE-IN-Taste
27
POWER-Taste
Montagematerial für Wandaufhängung
28
Schraube
29
Dübel
30
Bohrschablone (ohne Abbildung)
Wir gratulieren Ihnen zu Ihrer neuen
Soundbar.
Um die sichere Benutzung des Produkts zu
gewährleisten und das Beste aus allen Funktionen
herauszuholen, beachten Sie bitte folgende
Richtlinien:
• Lesen Sie sich dieses Handbuch sorgfältig durch,
bevor Sie das Produkt zum ersten Mal in Betrieb
nehmen.
• Beachten Sie immer alle Sicherheitshinweise
und Warnungen!
• Das Produkt darf nur so verwendet werden, wie
in diesem Handbuch beschrieben.
• Bewahren Sie dieses Handbuch zum späteren
Nachschlagen auf.
• Falls Sie dieses Produkt irgendwann jemand
anderem überlassen, geben Sie bitte dieses
Benutzerhandbuch dazu. Dieses
Benutzerhandbuch ist Teil des Produkts.
Wir wünschen Ihnen viel Freude mit Ihrer neuen
Soundbar!
9. Warnungen
Bevor Sie das Gerät verwenden, lesen Sie bitte
sorgfältig das Handbuch und bewahren Sie es zum
späteren Nachschlagen auf.
Aufstellort
•Setzen Sie das Gerät keiner direkten
Sonneneinstrahlung oder anderen
Wärmequellen aus.

16
•Stellen Sie das Gerät nicht in der Nähe von
Geräten auf, die ein Magnetfeld erzeugen.
•Halten Sie das Gerät von Flüssigkeiten fern.
•Verschütten Sie niemals Flüssigkeiten auf das
Gerät.
•Stellen Sie keine schweren Gegenstände auf
das Gerät.
Stromversorgung
•Vergewissern Sie sich, dass die
Betriebsspannung des Gerätes mit der
Spannung der Stromversorgung
übereinstimmt.
•Schließen Sie das Gerät und externe Antennen
von der Stromversorgung ab, wenn ein
Gewitter bevorsteht.
•Schließen Sie das Gerät von der
Stromversorgung ab, wenn es unbeaufsichtigt
gelassen wird oder über längere Zeit nicht
benutzt werden soll.
•Schützen Sie das Stromkabel vor
Beschädigungen.
•Verwenden Sie nur das enthaltene
Stromkabel, nehmen Sie keine Veränderungen
daran vor und verlängern Sie es nicht.
•Stellen Sie sicher, dass die Steckdose, in die
das Gerät angeschlossen wird,
ordnungsgemäß geerdet ist.
Temperatur
•Stellen Sie das Gerät nicht in der Nähe eines
Heizkörpers oder über einem Heizkörper auf.
•Wenn Sie das Gerät von einer kalten
Umgebung in eine warme transportieren,
sollten Sie das Gerät mindestens zwei Stunden
von der Stromversorgung getrennt lassen, um
sicherzugehen, dass kondensierte Feuchtigkeit
im Gerät verdunstet ist.
•Die optimale Umgebungstemperatur für den
Betrieb liegt bei 0 - 40 ° C.
Feuchtigkeit
•Setzen Sie das Gerät nicht Regen oder
Sprühregen aus und halten Sie es fern von
Wasser.
•Verwenden Sie das Gerät in einem trockenen
und kühlen Raum. Die optimale Feuchtigkeit
für den Betrieb liegt bei 10 - 90%.
Lüftung
•Belüftungsschlitze nicht abdecken.
•Stellen Sie sicher, dass um das Gerät herum
genug Platz für die Belüftung ist: Jeweils 10 cm
links, rechts und hinter dem Gerät sowie 20
cm über dem Gerät.
Kopfhörer
•Die langanhaltende Nutzung von Kopfhörern
bei hoher Lautstärke kann Ihrem Gehör
schaden.
•Reduzieren Sie die Lautstärke, bevor Sie
Kopfhörer verwenden.
Batterien
•Verbrauchte Batterien müssen sachgerecht
entsorgt werden.
•Halten Sie Batterien immer von Kindern fern.
Werfen Sie Batterien nicht ins Feuer.
Wartung
•Das Gerät darf nur von autorisiertem
Servicepersonal repariert oder gewartet
werden.
10. Lieferumfang
1 Soundbar
1 Stromkabel 7
1 Fernbedienung
1 CR2025-3V-Batterie (eingelegt)
1 Stereo-RCA-Kabel (Cinch) 8
2 Schrauben 28
2 Dübel 29
1 Bohrschablone 30
1 Benutzerhandbuch
11. Vor der erstmaligen
Verwendung
• Entfernen Sie sämtliches Verpackungsmaterial.
• Stellen Sie sicher, dass das Gerät keine
sichtbaren Schäden aufweist.
4.1 Fernbedienung
Inbetriebnahme der Soundbar
• Entfernen Sie den Isolationsstreifen aus dem
Batteriefach der Fernbedienung.
Batteriewechsel
EXPLOSIONSGEFAHR!
Wenn die Batterie nicht ordnungsgemäß eingelegt
wird, kann sie möglicherweise explodieren!
Ersetzen Sie die Batterie nur durch eine Batterie
desselben oder eines ähnlichen Typs.
1. ABB. A: Entfernen Sie Abdeckung des
Batteriefachs.
Entsperren Sie die Abdeckung und ziehen Sie sie in
die mit dem Pfeil angegebene Richtung ab.
2. Tauschen Sie die alte Batterie gegen eine neue.
WARNUNG! Beachten Sie beim Einlegen der
Batterie die Polarität.
Das Plus-Zeichen der Batterie muss sichtbar sein,
wenn Sie die Batterie einlegen.
3. Setzen Sie Abdeckung des Batteriefachs wieder
auf.

17
4.2 Montage (stehend/hängend)
HINWEIS: Wenn Sie das Gerät an einen Fernseher
anschließen, stellen Sie das Gerät mittig unterhalb
des Fernsehers auf.
Stehende Montage
1. Stellen Sie das Gerät auf eine ebene Oberfläche.
2. Verbinden Sie das Netzteil 7 mit dem Gerät.
Wandaufhängung
WARNUNG! Gefahr von Sachbeschädigungen!
Stellen Sie bei der Wandmontage Folgendes sicher:
- Die Montagematerialien müssen für die
Art und das Material der Wand geeignet sein.
Kaufen und verwenden Sie falls nötig andere
Montagematerialien, als die mit dem Produkt
ausgelieferten.
- Stellen Sie sicher, dass durch den Bereich
der Wand, in den Sie die Löcher bohren, keine
Rohre oder Kabel verlaufen (Strom-, Wasser oder
Gasleitungen).
- Bitten Sie falls nötig einen Handwerker um
die Wandmontage des Geräts.
1. ABB. B: Es müssen zwei Löcher in gleicher Höhe
und im Abstand von 40 cm in die Wand gebohrt
werden. Sie können die beigefügte Bohrschablone
30 verwenden, um die Position der Löcher zu
markieren.
2. Stecken Sie die Dübel 29 in die Bohrlöcher.
3. Schrauben Sie die Schrauben 28 in die Dübel 29
und ziehen Sie sie fest an.
4. Schließen Sie alle erforderlichen Kabel an.
(Siehe "Anschlüsse" auf S. 14).
HINWEIS: Wenn Sie die Soundbar an der Wand
montieren und vorhaben, den OPTISCHEN
EINGANG (11) zu nutzen, verwenden Sie einen
Stecker, der höchstens 3 cm lang ist (oder
verwenden Sie einen TOSLINK-Winkeladapter), um
ein Abknicken und Beschädigungen des optischen
Kabels zu vermeiden.
5. Verbinden Sie das Netzteil 7 mit dem Gerät.
6. Hängen Sie das Gerät an die Wand, indem Sie
die Wandhalterungen auf der Rückseite 28 an die
Schraubenköpfe einhängen.
4.3 Anschlüsse
VORSICHT: Stellen Sie sicher, dass die Soundbar
und angeschlossene Geräte ausgeschaltet sind,
bevor Sie Kabel anschließen. Lesen Sie auch die
Bedienungsanleitungen der Geräte, die Sie
anschließen.
• Ein Subwoofer kann an die RCA-Buche (Cinch)
SUB-AUSGANG (10) angeschlossen werden. Der
Subwoofer wird dann automatisch von der
Soundbar gesteuert.
4.4 Ausschalten
HINWEIS: Wenn Sie die Soundbar ausschalten,
bleibt das Gerät im Standby-Modus. Im Standby-
Modus verbraucht das Gerät immer noch etwas
Strom. Wenn Sie die Soundbar komplett
ausschalten möchten, müssen Sie den Netzstecker
7aus der Steckdose ziehen.
•Stecken Sie das Netzteil 7 in eine gut
zugängliche Steckdose in der Nähe.
Die rote LED 1an der Soundbar geht an. Das Gerät
ist nun im Standby-Modus.
12. Bedienung
HINWEISE:
• Alle Einstellungen können Sie bequem mit der
Fernbedienung vornehmen. Die wichtigsten
Funktionen können Sie auch mit den Tasten am
Gerät steuern. Die Bedienungsanleitung in diesem
Handbuch beschreibt die Steuerung per
Fernbedienung.
• Das Gerät schaltet in den Standby-Modus ...
- wenn 20 Minuten lang keine Bluetooth-
Verbindung aufgebaut wird oder
- wenn 20 Minuten lang kein Signal
eingeht.
• Drücken Sie die POWER-Taste 27, um das Gerät
aus dem Standby-Modus einzuschalten.
5.1 Anschlussart wählen
1. Um den gewünschten Eingangskanal zu wählen,
drücken Sie die entsprechende Taste: AUX (17),
LINE IN (26), OPTISCH (16) oder 14 (siehe
"Anschlüsse" auf S. 14).
2. Steuern Sie das Audio-Abspielgerät, um die
Wiedergabe zu beginnen oder Musiktitel
auszuwählen.
HINWEIS: Um den optischen Eingang nutzen zu
können, stellen Sie den Ausgang des Audiogeräts
auf "PCM downmix".
5.2 Klangeinstellungen
HINWEISE:
• Jede Änderung an den Klangeinstellungen wird
am Gerät durch ein kurzzeitiges Aufleuchten von
LED 1bestätigt, bis die Minimal-/Maximalwerte
erreicht wurden.
• Die Einstellung der Treble- und Basswerte kann
nur in der Einstellung "Musik" vorgenommen
werden. Drücken Sie die MUSIC-Taste 18, um die
Einstellung zu öffnen.
Lautstärkeeinstellung
• Drücken Sie während der Wiedergabe die
LAUTSTÄRKE-Tasten –/+ (19)
Stumm
1. Um das Gerät auf stumm zu schalten, drücken
Sie die STUMM-Taste (15). LED 1beginnt zu
blinken.
2. Um den Ton wieder einzuschalten, drücken Sie
erneut STUMM oder eine der LAUTSTÄRKE-Tasten
–/+.
LAUTSTÄRKE-Tasten –/+ (19) LED 1leuchtet auf.

18
Equalizer-Voreinstellungen
• Drücken Sie eine der Tasten 18, um die Klang-
Voreinstellungen für Musik (MUSIC), Film (MOVIE)
oder Sprachwiedergabe (DIALOG) auszuwählen.
• Drücken Sie die MUSIC-Taste (18).
-Passen Sie mit den Tasten TREBLE –/+ (25)die
Höhen an.
-Passen Sie mit den Tasten BASS –/+ (21) den
Bass an.
_
5.3 Bluetooth-Verbindung herstellen
Bluetooth
HINWEISE:
• Die Kennung des Geräts lautet "SSB 36 A1".
• Nach dem Umschalten auf Bluetooth, versucht
das Gerät automatisch, eine Verbindung zum
letzten gekoppelten Gerät herzustellen.
• Bitte beachten Sie, dass der Verbindungsaufbau
je nach Gerät und darauf verwendeter Software
etwas unterschiedlich verlaufen kann.
1. Drücken Sie die Taste 14, um die Bluetooth-
Verbindung herzustellen. LED 1beginnt blau zu
blinken.
2. Schalten Sie das Abspielgerät (z. B. Ihr
Smartphone) ein und starten Sie darauf die Suche
nach neuen Bluetooth-Verbindungen.
3. Drücken Sie die PAIR-Taste (5) an der Soundbar
und halten Sie sie für gut eine Sekunde gedrückt.
Die blaue LED 1blinkt schnell. Das Audio-
Abspielgerät sollte die Soundbar nun als "SSB 36
A1" erkennen.
4. Zeigen Sie auf dem Audio-Abspielgerät die Liste
der gekoppelten Bluetooth-Geräte an, wählen Sie
die Soundbar und bauen Sie eine Verbindung auf.
Falls Sie nach einem Passwort gefragt werden,
geben Sie "0000" ein. Beide Geräte sind nun
miteinander verbunden. LED 1leuchtet blau und es
ertönt ein Piepen.
HINWEIS: Einige Abspielgeräte speichern die
Gerätekennung der Soundbar. In diesem Fall ist es
möglicherweise nicht erforderlich, das Abspielgerät
wieder mit der Soundbar zu koppeln, wenn die
Bluetooth-Verbindung erneut aktiviert wurde.
5. Starten Sie die Wiedergabe der Audiodatei (zum
Beispiel eines Lieds) auf dem Audio-Abspielgerät.
Der Ton sollte über die Soundbar wiedergegeben
werden.
6. Mit den Tasten 24, 20 und 23 können Sie die
Lieder verwalten.
13. Reinigung und
Lagerung
GEFAHR! Stromschlag-Risiko!
• Ziehen Sie immer den Netzstecker 7aus der
Steckdose, bevor Sie das Gerät reinigen. Stellen Sie
sicher, dass keine Flüssigkeiten
ins Gerät eindringen.
• Reinigen Sie das Gerät mit einem leicht
feuchten Tuch. Lösungsmittel, Spiritus,
Verdünnungen usw. dürfen nicht verwendet
werden, sie können die Oberfläche des Gerätes
beschädigen.
• Wenn Sie das Gerät nicht verwenden,
lagern Sie es an einem Ort, an dem es keinen
hohen Temperaturen oder Feuchtigkeit ausgesetzt
ist. Wenn Sie das Gerät für längere Zeit nicht
benutzen, entfernen Sie die Batterie aus der
Fernbedienung.
14. Entsorgung
Ordnungsgemäße Entsorgung dieses
Produkts (Richtlinie über Elektro- und
Elektronik-Altgeräte) (Gilt für Länder
mit separater Entsorgung für
Elektronik-Altgeräte) Dieses Zeichen
auf dem Produkt, Zubehör und
Handbüchern bedeutet, dass das
Produkt und seine elektronischen Bestandteile (z.B.
Ladekabel, Kopfhörer, USB-Kabel) nicht mit dem
normalen Haushaltsmüll entsorgt werden sollten.
Entsorgen Sie diese Geräte bitte getrennt von
anderen Abfällen, um der Umwelt bzw. der
menschlichen Gesundheit nicht durch
unkontrollierte Müllbeseitigung zu schaden.
Recyceln Sie das Gerät, um die nachhaltige
Wiederverwertung von stofflichen Ressourcen zu
fördern.
Endverbraucher sollten den Händler, bei dem das
Produkt gekauft wurde, oder die zuständigen
Behörden kontaktieren, um in Erfahrung zu
bringen, wie sie das Gerät auf umweltfreundliche
Weise recyceln können. Gewerbliche Nutzer
wenden sich an ihren Lieferanten und überprüfen
die Konditionen ihres Kaufvertrags. Dieses Gerät
und seine elektronischen Zubehörteile dürfen nicht
zusammen mit anderem Gewerbemüll entsorgt
werden.
Bitte stellen Sie die
ordnungsgemäße Entsorgung der
enthaltenen Batterien sicher (gilt für
Länder mit getrennter Entsorgung
für Elektroschrott). Dieses Zeichen
an der Batterie, dem
Benutzerhandbuch oder der Verpackung bedeutet,
dass die Batterien des Produkts nicht mit dem
normalen Haushaltsmüll entsorgt werden dürfen.
Wo vorhanden bedeuten die chemischen Symbole
Hg, Cd oder Pb, dass die Anteile an Quecksilber,
Cadmium oder Blei in der Batterie jeweils die

19
Referenzwerte der EC-Direkte 2006/66
überschreiten. Wenn Batterien nicht
ordnungsgemäß entsorgt werden, können diese
Chemikalien der Umwelt und der menschlichen
Gesundheit schaden.
Um die natürlichen Ressourcen zu schützen und
das Recycling zu fördern, müssen Batterien
getrennt von anderen Abfällen in dafür
vorgesehenen kostenlosen örtlichen
Batteriesammelstellen entsorgt werden.
Problemlösung
Sollte die Soundbar einmal nicht wie gewünscht
funktionieren, gehen Sie bitte erst die folgende
Checkliste durch. Die technischen Probleme
können einfache Ursachen haben, die Sie leicht
selbst beheben können.
GEFAHR! Stromschlag-Risiko!
Das Gerät darf unter keinen Umständen vom
Kunden selbst repariert werden.
Problem
Mögliche Ursachen
Das Gerät funktioniert
nicht.
Ist das Gerät an den
Strom angeschlossen?
Leuchtet LED 1?
Keine Bluetooth-
Verbindung
Wird die Bluetooth-
Verbindung auf dem
Audio-Abspielgerät
unterstützt und ist sie
aktiviert?
Ist die Soundbar
eingeschaltet? Ist das
Audio-Abspielgerät
eingeschaltet?
Es ist kein Ton zu
hören
Wurde die Lautstärke
des Audio-
Abspielgeräts
reduziert oder stumm
geschaltet?
Haben Sie den
richtigen
Eingangskanal an der
Soundbar gewählt?
Wenn Sie den
optischen Eingang
nutzen, haben Sie den
Ausgang des
Audiogeräts auf "PCM
downmix" eingestellt?
Wiedergabe mit
Störungen
Wenn ein Summen
oder andere
Klangstörungen zu
hören sind, entfernen
Sie Mobiltelefone,
Tablets und andere
Geräte, die
Funkwellen
aussenden, aus der
Nähe der Soundbar.
10. Technische Daten
Modell:
Avtek Soundbar
Leistung:
2x 18 Watt RMS
Soundbar:
Eingang: 18,0V 1,3A
Netzteil:
Eingang: 100-240V
50/60 Hz, max. 1,0A
Ausgang: 18,0V, 1,3A
Bluetooth:
3.0
Reichweite: 10 m.
Eingang:
Line-IN
AUX-Eingang L/R
Optischer Eingang
Ausgang:
SUB-Ausgang
1x 3.5mm Stereo-
Klinkenstecker
2x RCA-Buchsen
(Cinch)
1x TOSLINK-Buchse
1x RCA-Buchse (Cinch)
Batterie
Fernbedienung:
CR2025 3V
Abmessungen (BxTxH):
94 x 9,5 x 7,8 cm
Gewicht:
Rund 1,4 kg
Umgebung
Ausschließlich für die
Verwendung im
Innenbereich
10 - 30° C
Relative
Luftfeuchtigkeit 40 -
85 %
Table of contents
Languages:
Other Avtek Speakers System manuals