BALANCE TIME 866498 User manual

866498 (RC-DCF)
USER MANUAL
1. Features
1.1 Time
Radio Controlled Time (RC-DCF)
12/24 hour time display selectable
Daily Snooze Alarm function
Perpetual Calendar Up to Year 2069
Day of week in 8 languages user selectable
1.2 Temperature
Indoor measurable range: 0°C ~+ 50°C[+32 to +122°F]
Measures °C / °F user selectable
Outdoor measurable range: -20 ~ 50°C [-4 ~ +122°F]
1.3 Wireless Outdoor Sensor
433 MHz RF receiving frequency
Transmission range: 100 meters (open area)
Low-battery indicator for outdoor thermos senor
Wall Mount or Table Stand

2. Unit Appearance
Part A:
A1: Radio Controlled Icon
A2: Time Display
A3: Indoor Temperature
A4: Date, Day of Week
A5: Outdoor Temperature
Part B:
B1: “MODE” Button
B2: “SNOOZE” Button
B3: “ALARM” Button
B4: “+/12/24” Button
B5:”- C/F/ ” Button
B6: “SEARCH” Button
B7: “RESET” Button
B8: “ALERT” Button
Part C:
C1: Wall Mount Hole
C2: Battery Compartment
C3: Stand

3. Outdoor Sensor Appearance.
D1: Transmission Indication LED
D2: Outdoor Temperature
D3: Battery Compartment
D4: Wall Mount Hole
D5: “RESET” button
D6: °C/°F” button
D7: Stand
4. Getting Started:
4.1 Main Unit:
Open main unit battery compartment cover [C2]
Insert 4 x AA size batteries observing polarity [ “+” and“ –“ marks]
Replace main unit battery compartment cover [C2]
Use a pin to press the RESET [B7] button on the rear of the main unit, the
main unit is now ready for use
4.2 Outdoor Thermo Sensor
Battery compartment (D3) of thermo sensor is locating behind the back cover,
unscrews the batteries cover to open.
Insert 2 x AAA batteries observing polarity [ “+” and “–“ marks]
5. Installation
5.1 Main Unit
The main unit can be placed onto any flat surface (C3), or wall mounted by
the hanging hole (C1) at the back of the unit.
5.2 Outdoor Thermo sensor

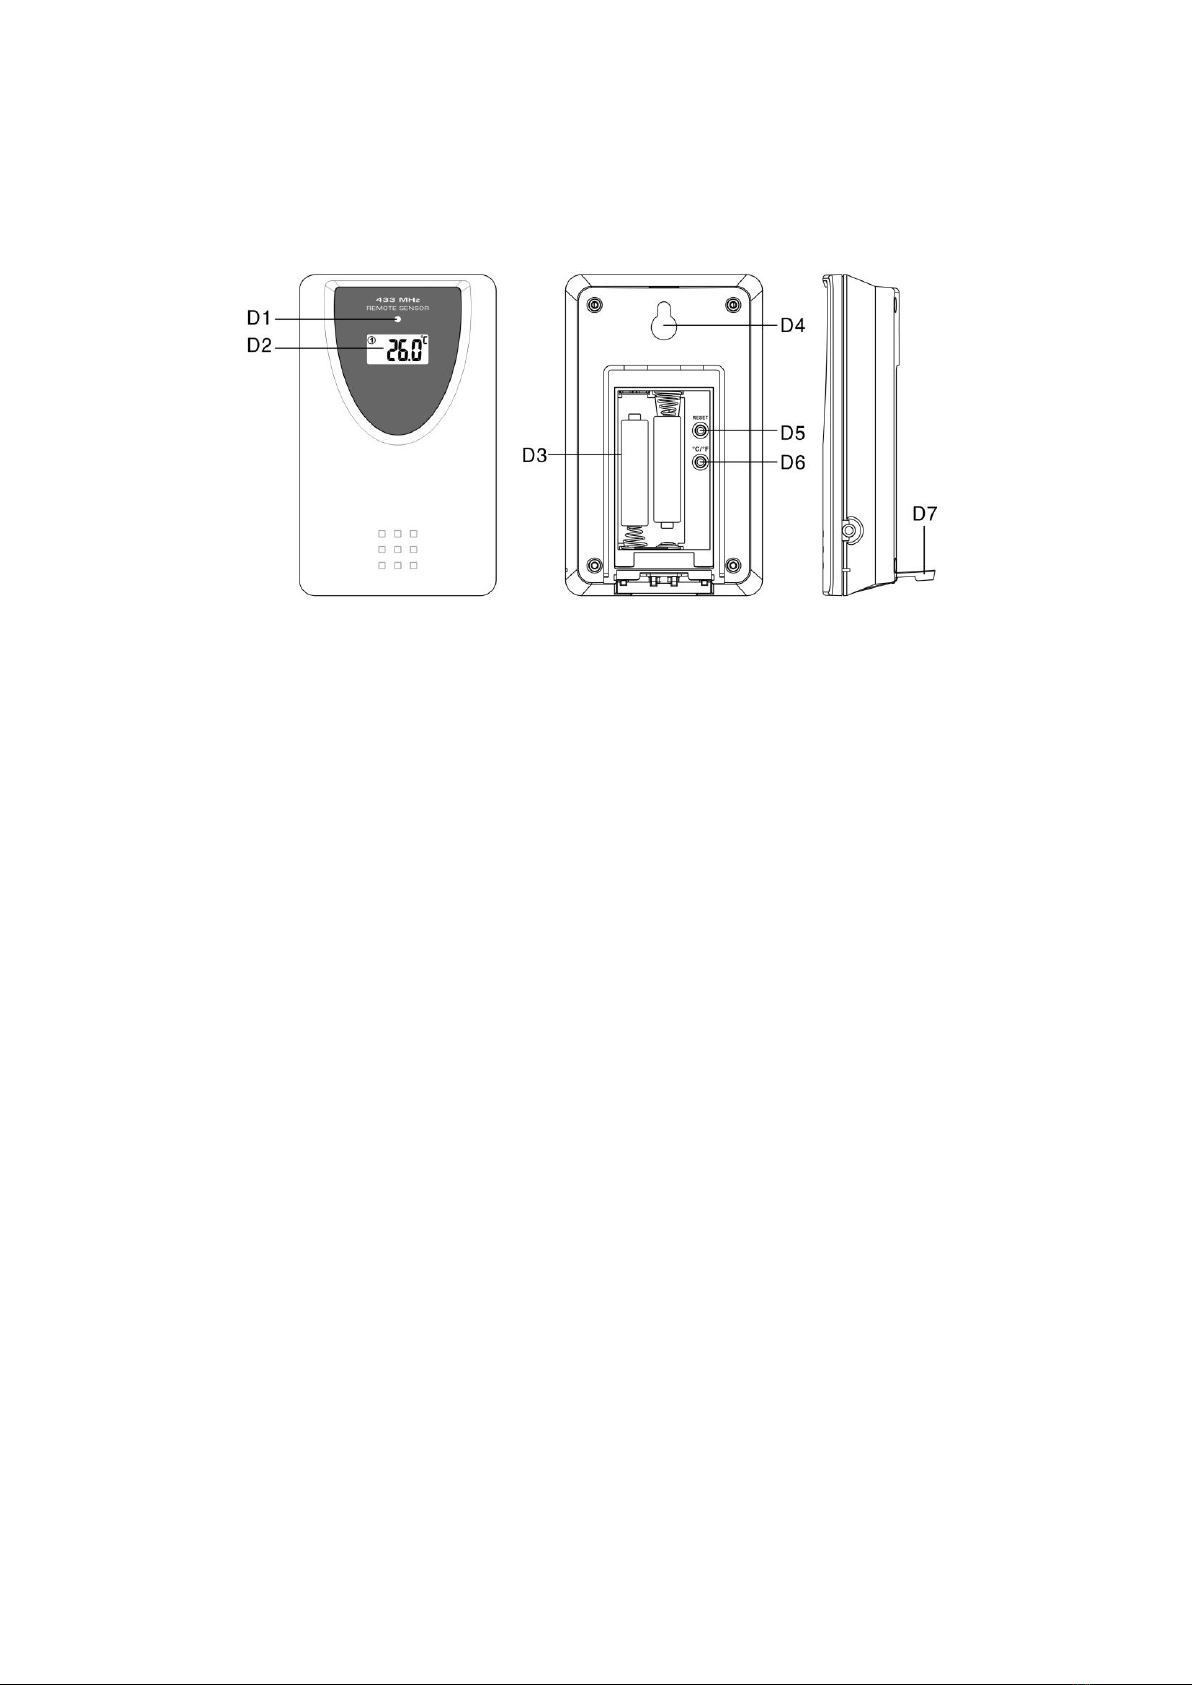
The remote sensor should be securely mounted onto a horizontal surface.
Note: Transmissions between receiver and transmitter can reach up to 100m
in open area. Open Area: there are no interfering obstacles such as buildings,
trees, vehicles, high voltage lines, etc.
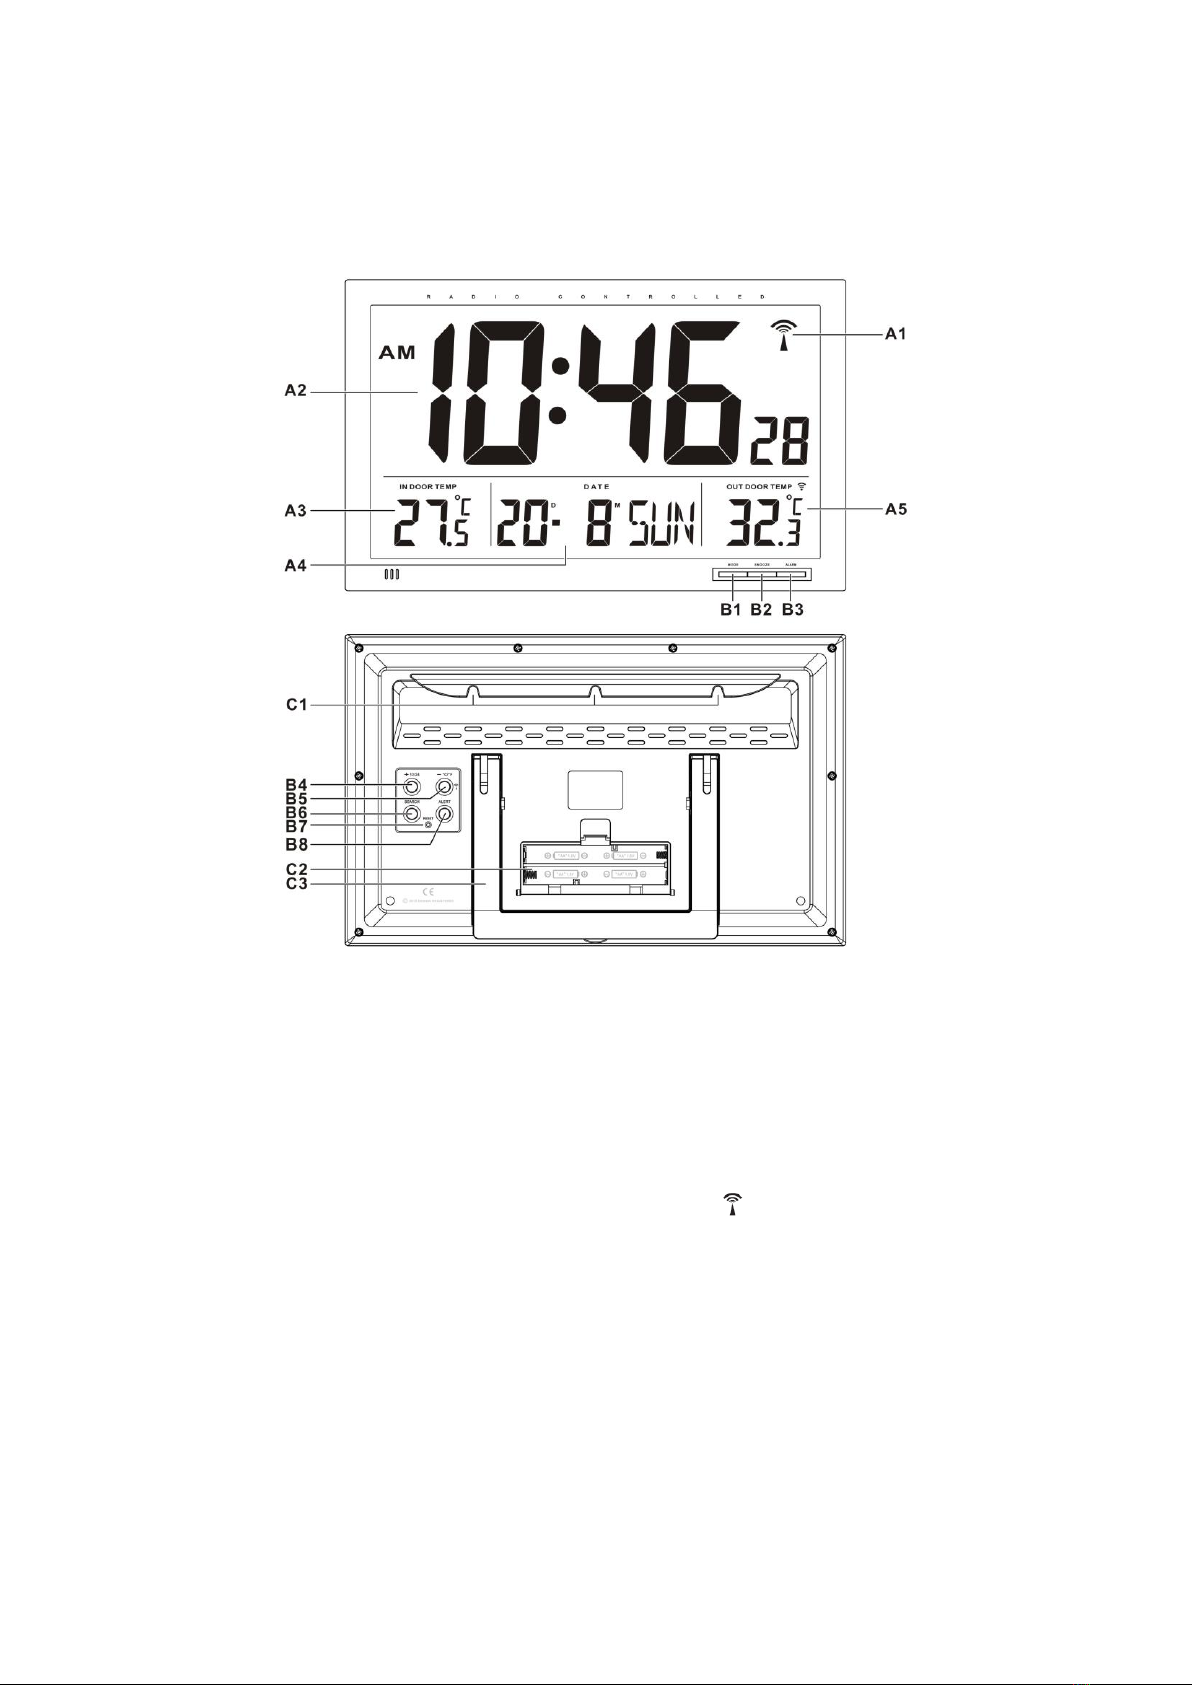
6. RF Transmission
The main unit automatically starts receiving transmission from outdoor
thermo sensor for outdoor temperature after batteries inserted. RF icon
“ ” flashes on the LCD
The thermo sensor unit will automatically transmit temperature signal to the
main unit after batteries inserted.
If main unit failed to receive transmission from outdoor thermo sensor in first
3 minutes after the batteries inserted, “- - . –”display on the LCD.
Hold “SEARCH” button (B6) for 3 seconds to receive transmission manually.
Press “C/F” button (D4) on thermo sensor unit to select temperature to be
displayed in Celsius mode or Fahrenheit mode.
Note: Buttons will not function while scanning for thermo sensor’s signal
unless it is well received or stopped manually.
7. Time and Alarm Setting
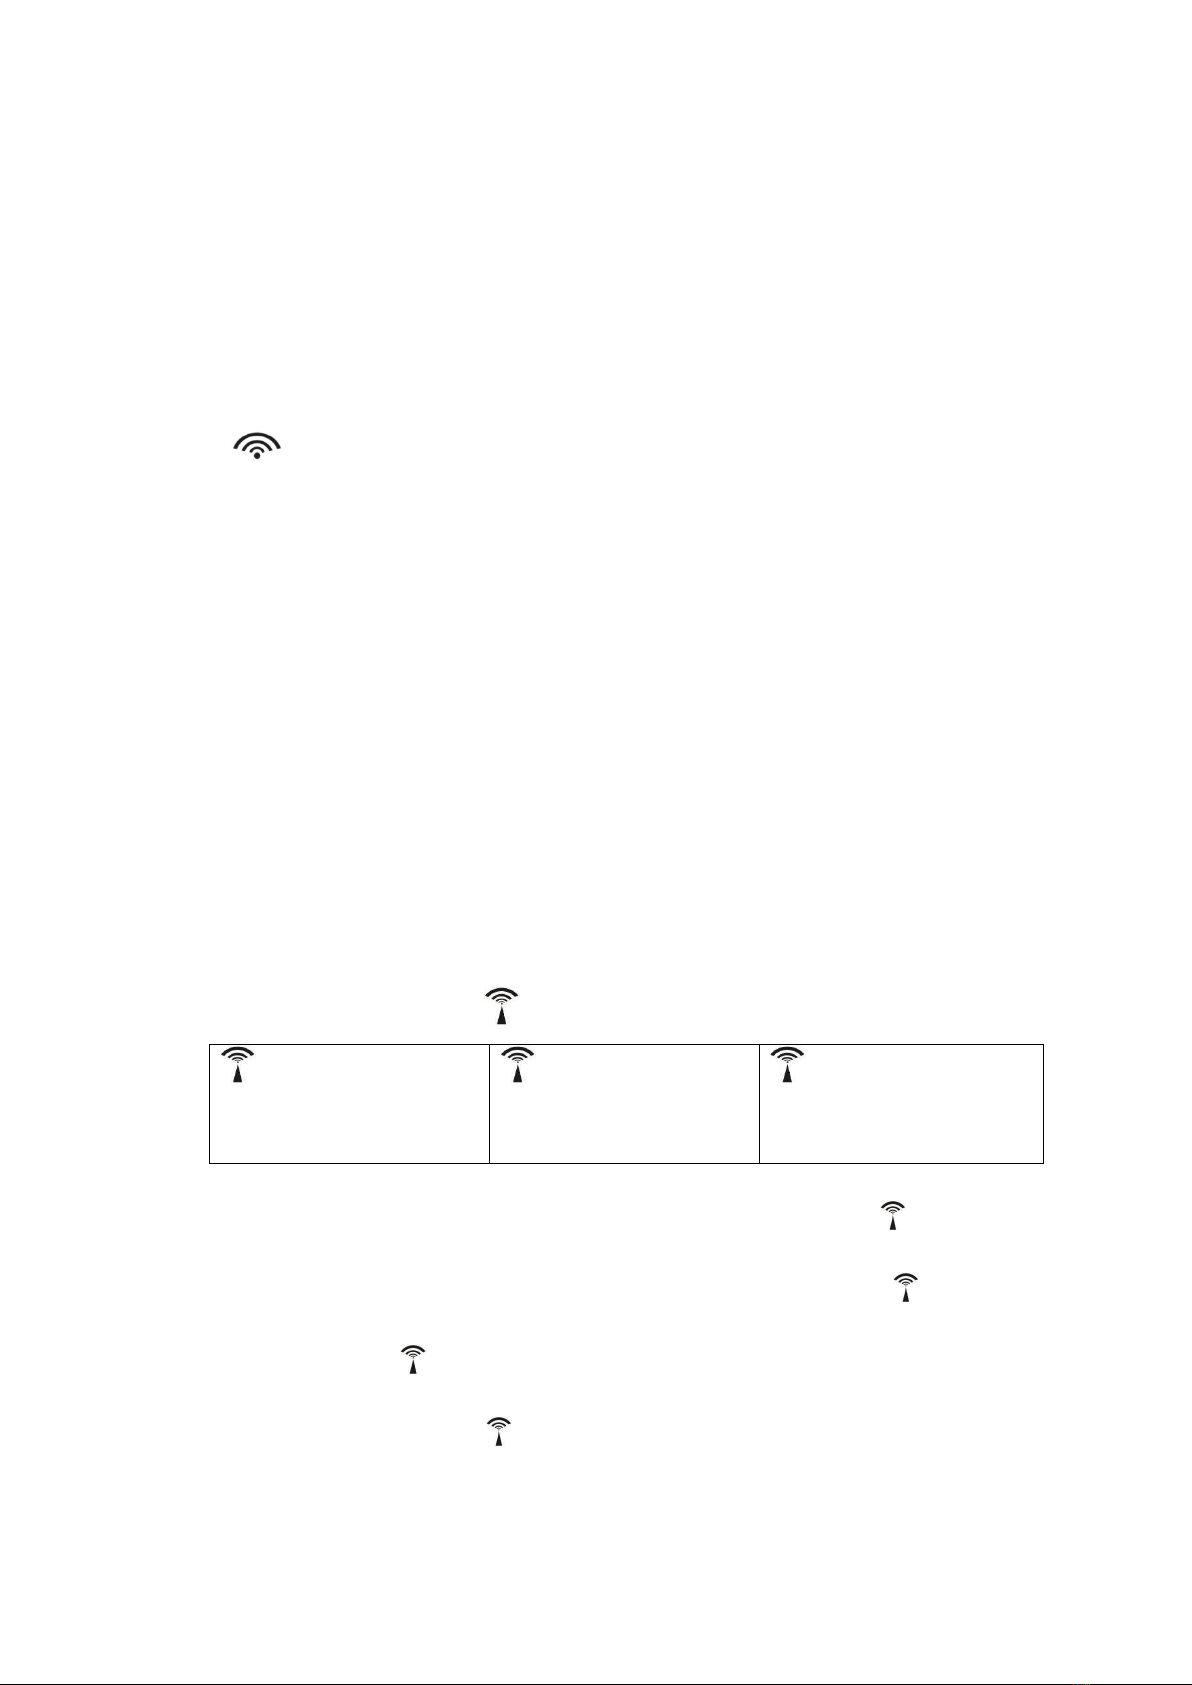
7.1 Radio Controlled Clock:
After batteries inserted and main unit finishes receiving the transmission from
outdoor thermo sensor, the clock automatically starts to scan the DCF time
signal. Radio Control Icon“ ” flashes on the LCD.
flashes,
Indicating now is
receiving DCF signal
turns on,
Indicating signal
received successfully
disappear,
Indicating signal
reception failed
The clock automatically scans the time signal at 3.00 a.m. every day to
maintain accurate timing. If reception fail, scanning stops (“ ” on LCD
disappear) and repeats again at 4.00 a.m. 5.00a.m. and6.00a.m.
The clock can be set to scan the time signal manually by holding “ ” button
(B5) for 3 seconds. Each reception takes about 5 minutes. If receptions fail,
scanning stops. (“ ” on LCD disappear) and repeats again on next full hour.
E.g. scanning failed at 8:20a.m. It will scan again at 9:00a.m.
Stop scanning by holding “ ” button (B5) for 3 seconds.
“DST” shown on the LCD if it is in Daylight Saving Time Mode
Note: Buttons will not function while scanning for DCF time signal unless they

are well received or stopped manually.
7.2 Manual Time Setting:
In time display mode, hold “MODE” button (B1) for 3 seconds to enter
Clock/Calendar setting Mode.
Press “+” (B4) or “-” (B5) button to adjust the setting and press “MODE”
button (B2) to confirm each setting.
(By keeping the “+” (B4) or “-” (B5) button pressed, could accelerate the
process and reach the desired value more quickly)
The setting sequence is shown as follow: Hour, Minute, Second, Year,
Month/Day sequence, Month, Date, Weekday Language, Time Zone.
There are 8 languages for day of week: German, English, French, Italian,
Dutch, Spanish, Denmark and Russian. The languages and their selected
abbreviations for each day of the week are shown in the following table.
Language
Sunday
Monday
Tuesday
Wednesday
Thursday
Friday
Saturday
German, GER
SON
MON
DIE
MIT
DON
FRE
SAM
English, ENG
SUN
MON
TUE
WED
THU
FRI
SAT
Denmark, DAN
SON
MAN
TIR
ONS
TOR
FRE
LOR
Dutch, NET
ZON
MAA
DIN
WOE
DON
VRI
ZAT
Italian, ITA
DOM
LUN
MAR
MER
GIO
VEN
SAB
Spanish, ESP
DOM
LUN
MAR
MIE
JUE
VIE
SAB
French, FRA
DIM
LUN
MAR
MER
JEU
VEN
SAM
Russian, RU
BC
NH
BT
CP
HT
NT
CY
Note:
(1) All Setting mode will automatically exit in 15 seconds without any adjustment
(2) For Time Zone: If you receive no RC-DCF frequency signal, the time zone
should be set to 0. Time Zone is used in countries which can received the DCF
frequency signal but the time zone is different from German Time ( i.e.
GMT+1).
7.3 Daily Alarm Function:
Press “ MODE” button (B1) to select to view alarm Time, “AL” shown on the
display
When viewing the Alarm Time, hold “MODE” button (B1) for 3 seconds to
enter Alarm Time setting. Press “+” (B4) or “-” (B5) button to adjust the
alarm time. Press “MODE” button (B1) to confirm the setting.
7.4 Snooze Alarm Function:

Press “ALARM” button (B3) to activate or deactivate the alarm. If the alarm is
on, alarm icon " " appears on the display.
When alarm alerts, press any buttons to stop the alarm. Otherwise, the alarm
signal sounds for about 2 minutes, then stops automatically.
Press “SNOOZE”(B2) button when alarm alerts. The alarm snoozes for 5
minutes, then it alerts again. “ ” flashes on the LCD during the snooze time.
This process can be repeated 7 times.
Except “SNOOZE” button (B2), press any button to stop snooze alarm.
7.5 12/24 Hour Display mode:
Press “12/24”(B4) button to select 12 or 24 hours mode.
8. Thermometer
8.1 Temperature display
Press “°C/°F” (B5) button to select Temperature in Celsius mode/ Fahrenheit
mode.
If the temperature is out of the measurable range, LL.L (beyond the minimum
temperature) or HH.H (beyond the maximum temperature) will be shown on
the LCD.
8.2 Temperature Alert function
Press “ALERT” button (B8) to set the Outdoor Temperature Alert function on or
off, “ ” appears on the LCD if temperature alert function is activated.
Hold “ALERT” button (B8) for 3 seconds to enter outdoor temperature alert
setting, upper limit icon “ ” flash on the display.
Press“+” (B4) or “-” (B5) button to set the upper” ” and lower “ ” limit of
the outdoor temperature. Press “ALERT” button (B8) to confirm the setting.
9. Low battery indication:
The low battery icon “ ” turns on the display (beside the outdoor temperature),
indicating that thermo sensor in low battery status. The batteries should be
replaced.
10. Precautions

Use a pin to press the reset button (B7) if the Unit does not work properly.
All Setting Modes will automatically exit in 15 seconds without any
adjustment.
The clock loses its time information when the battery is removed.
Avoid placing the clock near interference sources/metal frames such as
computer or TV sets.
Do not expose it to direct sunlight, heavy heat, cold, high humidity or wet
areas
The outdoor sensor must not be set up and installed under water. Set it up in
away direct sunlight and Rain
Never clean the device using abrasive or corrosive materials or products.
Abrasive cleaning agents may scratch plastic parts and corrode electronic
circuits
DISPOSAL AT END OF WORKING LIFE:
Discarded appliances and electronic devices often still contain valuable materials,
therefore do not throw them away, instead hand them in to the store where you
buy a new appliance or to your local council recycling depot.
In accordance with the waste guidelines for electrical and electronic equipment,
this product must be disposed of separately. If you wish to dispose of this product
in the future, do NOT discard it with the household waste, but hand it in at your
local refuse collection depot.
In compliance with the directives on Waste Electrical and Electronic Equipment,
this product must not be discarded with domestic waste but should be disposed of
separately for recycling. If you wish to dispose of this product in the future, do
NOT throw it away with the household rubbish but hand it in at a specially
designated place, such as your municipal domestic chemical waste depot.
Never throw empty batteries away, but deposit them in special battery boxes or
hand them in as domestic chemical waste at your municipal depot.

DECLARATION OF CONFORMITY:
Herewith we declare, that this wireless transmission device does comply with the
essentials requirements of R&TTE Directive 1999/5/EC.
A copy of the signed and dated Declaration of Conformity is available on request
via mail@combimex.nl.
www.combimex.nl
This manual suits for next models
1
Table of contents
Other BALANCE TIME Clock Radio manuals