BALMUDA RAIN ERN-1000SD Series User manual

Instruction Manual
ERN-1000SD Series


Important
Thank you for purchasing "Rain".
Before using this product, please be sure to read this
manual and the Safety Precautions (P.34 to 38) thoroughly.
Furthermore, please be sure to follow the instructions
adhered with the " " mark on each page.
This manual also serves as a warranty card.
Be sure to store in a safe place after reading.

Contents
3Contents
Before Use
Package Contents・・・・・・・・・・・・・ 4
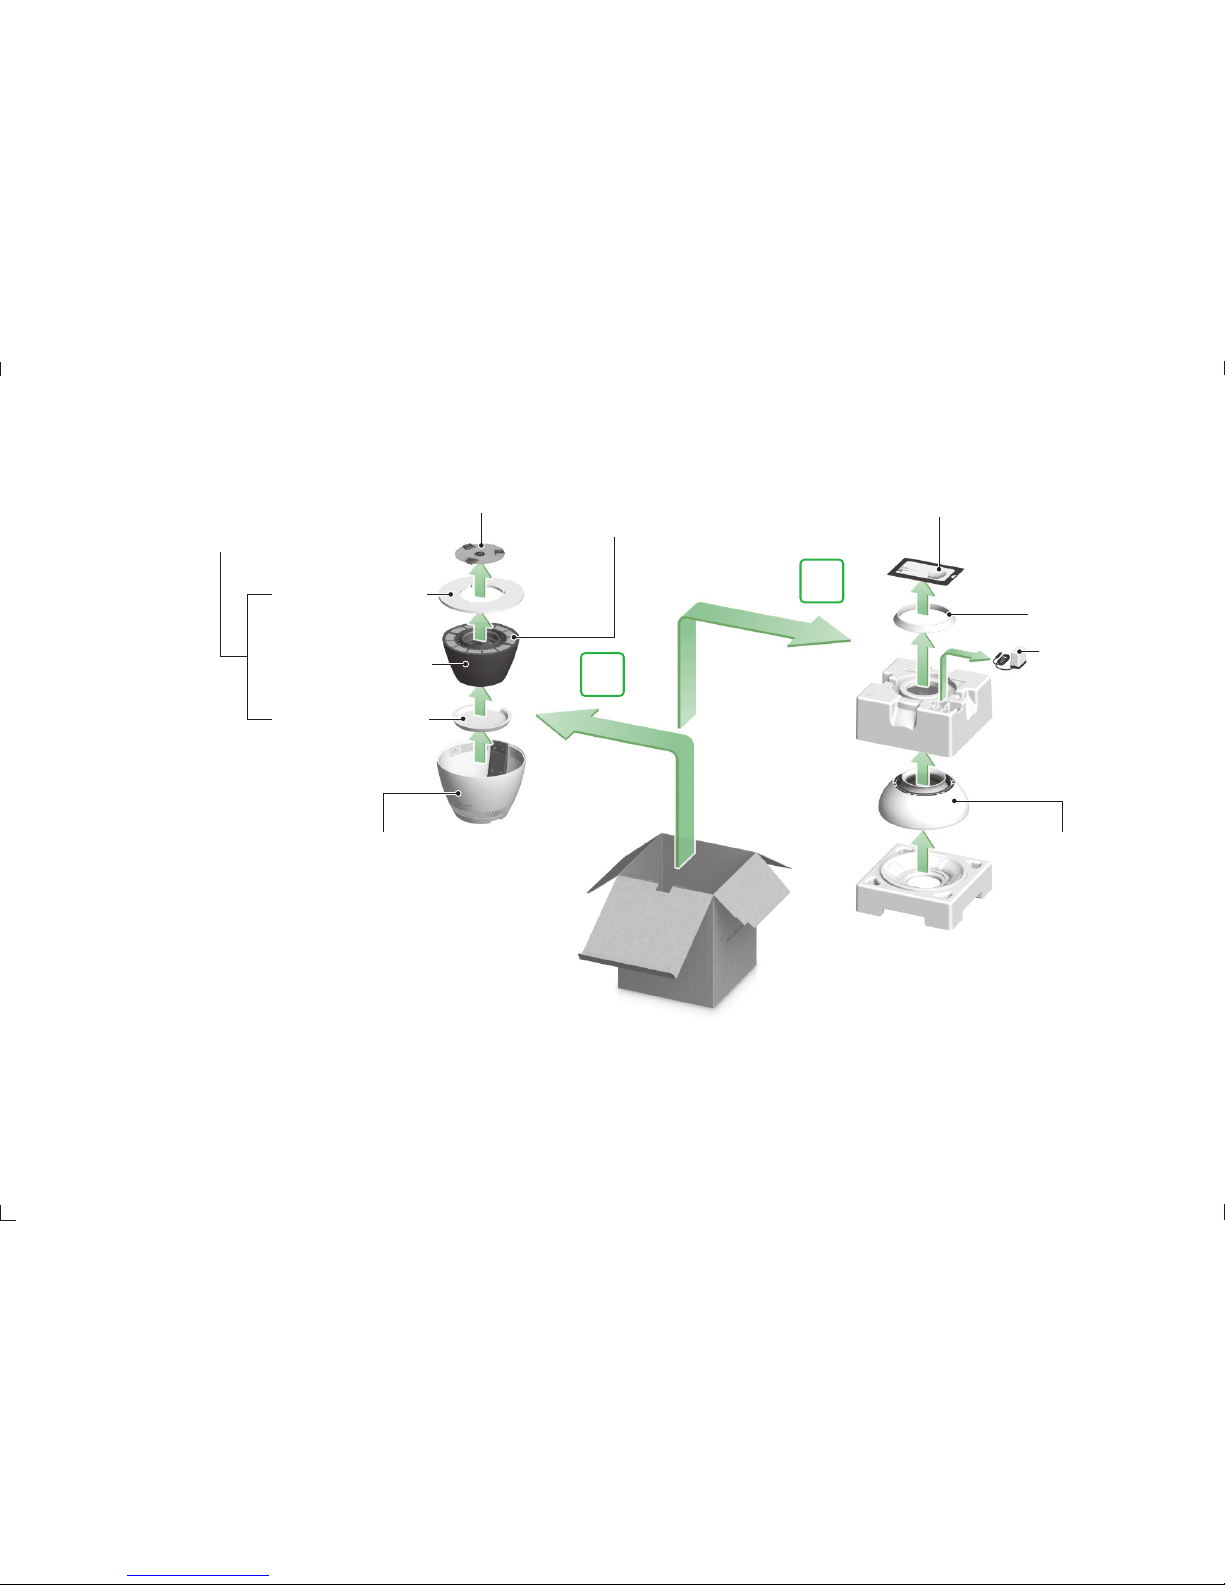
Removing from the Package・・・・ 5
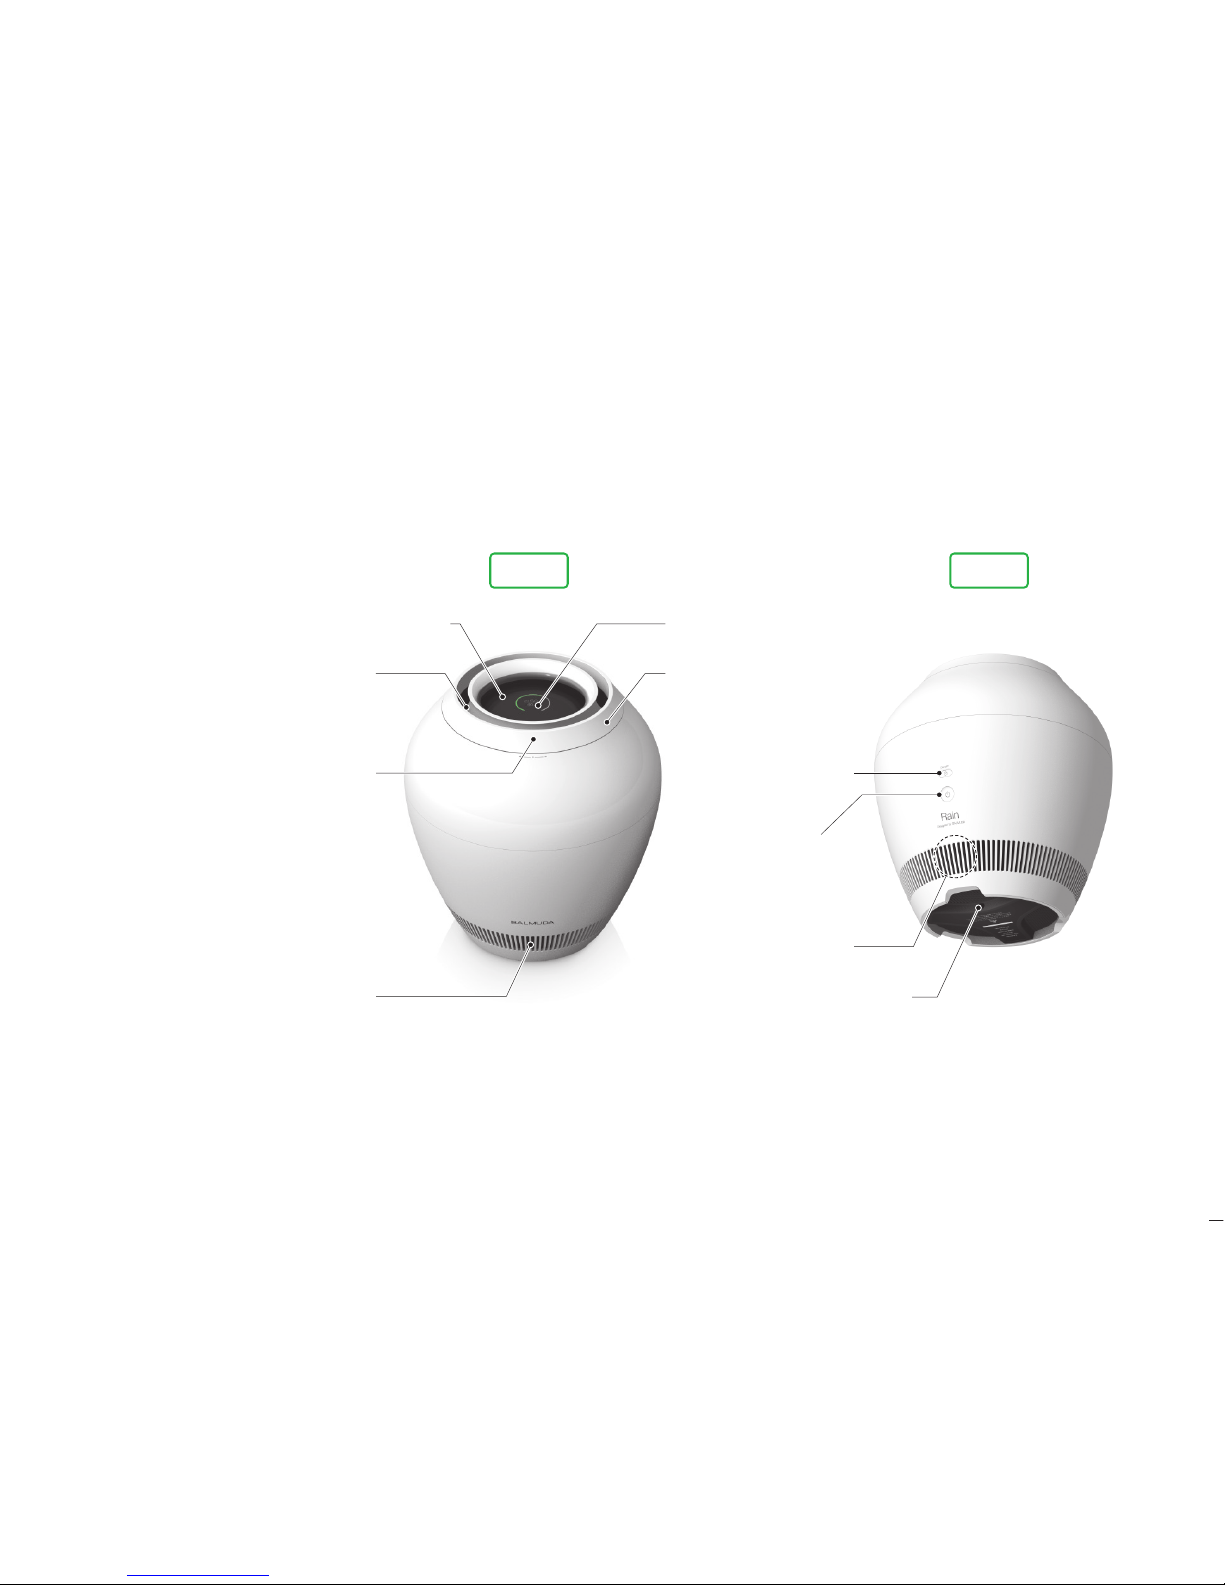
Names of Parts・・・・・・・・・・・・・・・・ 6
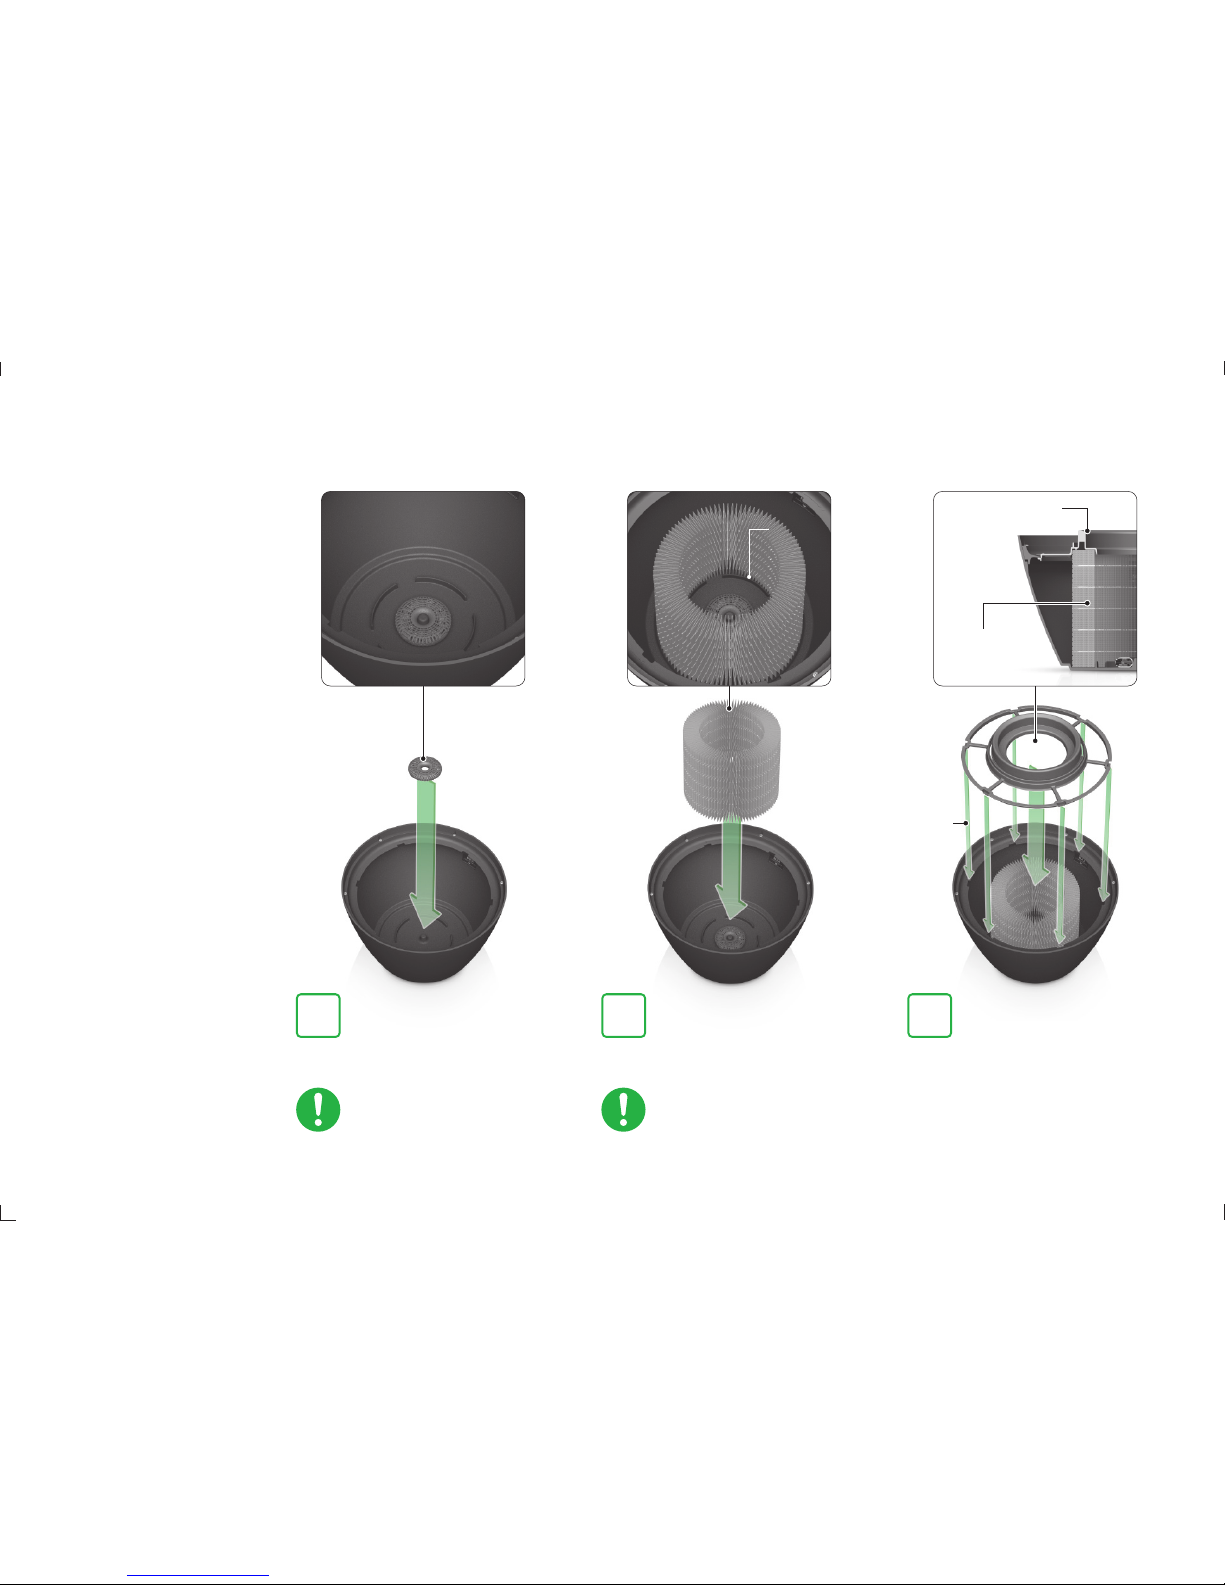
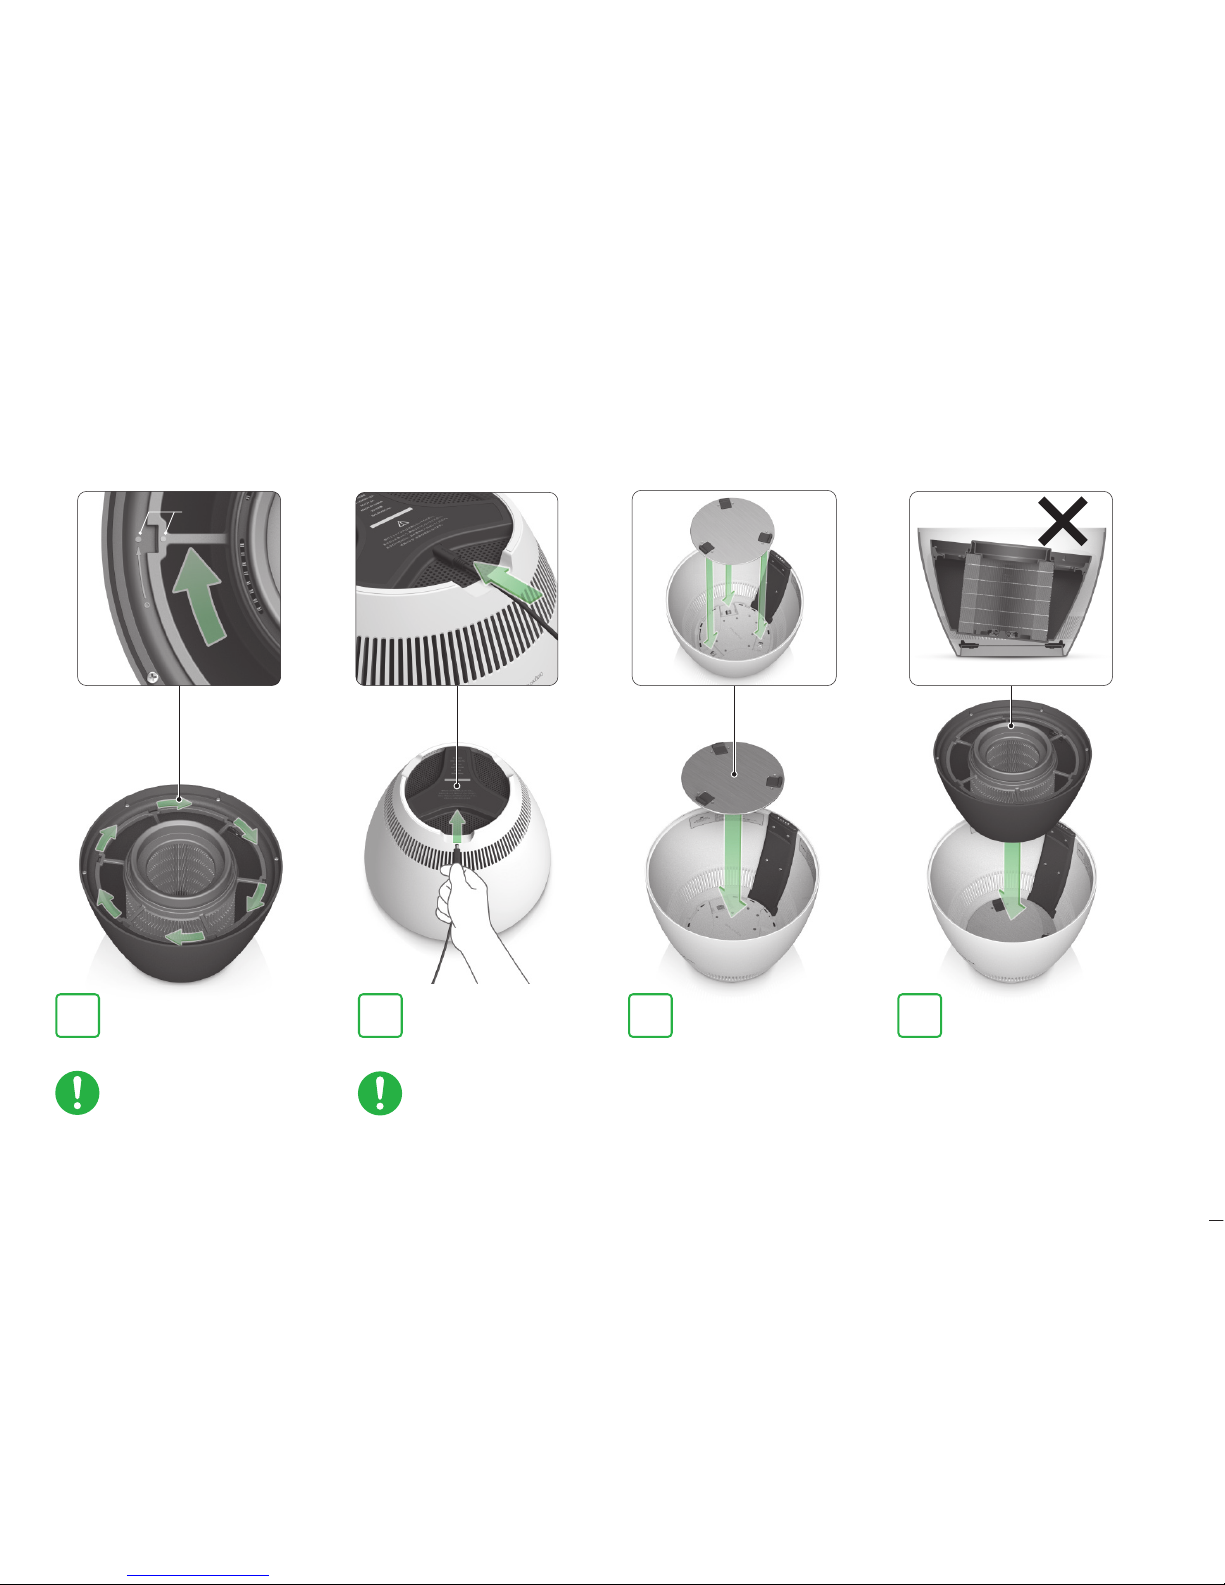
Assembly・・・・・・・・・・・・・・・・・・・・・ 7
Installation・・・・・・・・・・・・・・・・・・・ 11
How to Use
How to operate・・・・・・・・・・・・・・・・・ 12
Display・・・・・・・・・・・・・・・・・・・・・・・・・・・・ 13
Operating Modes and 24h Timer・・ 15
Filling with Water・・・・・・・・・・・・・・・・ 16
Operating the Unit・・・・・・・・・・・・・・ 17
Current Time・・・・・・・・・・・・・・・・・・・・・19
24h Timer Settings・・・・・・・・・・・・・・・ 20
Settings (Unit Settings)・・・・・・・・・・ 21
Maintenance・・・・・・・・・・・・・・・・・・・・・・ 23
Storage
・・・・・・・・・・・・・・・・・・・・・・・・・・・・ 25
Cleaning the Humidifying Filter・・ 26
Replacing the Filter・・・・・・・・・・・・・・ 27
Error Detection Function and
Safety Functions
Error Detection Function and
Safety Functions・・・・・・・・・・・・・・・・ 29
Troubleshooting・・・・・・・・・・・・・・・・・ 31
AC adapter・・・・・・・・・・・・・・・・・・・ 32
For Safety
Safety Precautions・・・・・・・・・・・・・ 34
Warnings・・・・・・・・・・・・・・・・・・・・・・・・ 35
Cautions・・・・・・・・・・・・・・・・・・・・・・・・ 37
s・・・・・・・・・・・・・・・ 39
If Problems Occur
Warranty and After Service・・・40
Handling of Customer
Personal Information・・・・・・・・・・ 40
Correct Disposal of this Product
・・・・ 40
FAQ・・・・・・・・・・・・・・・・・・・・・・・・・・・・・41
Inquiries・・・・・・・・・・・・・・・・・・・・・・・・ 45

4
Main unit lower body (1)
Water Supply
Bowl Plate (1)
Water Supply Bowl (1)
Humidifying Filter (1)
Humidifying Filter holder (1)
Silver ion cartridge (1)
AC adapter (1)
Main unit
upper body (1)
Control Ring (1)
Instruction manual (1)
Before Use
Package Contents
Number in ( ) indicates
the quantity.
Warranty card (1)
*The parts shown in the box on the right
are preinstalled in the Water Supply Bowl
before shipping.

Removing from
the Package
AC adapter
Control Ring
Main unit
upper body
1
2
Water Supply
Bowl Plate
Water Supply Bowl
Protective cushion
(Styrofoam)
Protective cushion
(Styrofoam)
Main unit
lower body
5Before Use
Instruction manual
(Including warranty card)
Remove from the packaging as shown in the illustration above.
*We recommend storing the packaging such as the cushion material and box for future storage or transportation of the unit.
*Be sure to remove
the protective cushion
from inside the unit
before use.
*
before shipping.

Names of Parts
Air vents Adapter plug connector
24h Timer button
Speaker
Front Rear
Display
Control Ring
Water supply inlet
Air outlet
Switch
Power button
6
Before Use

Assembly
7Before Use
1 3
Fit the 6 claws
in place.
Humidifying
Filter
Humidifying Filter
Holder
Guide
2
Fit onto the protrusion at the
center.
at the bottom of the Water
Supply Bowl comes within
Set the Humidifying Filter
Holder.
Set the silver ion cartridge
on the protrusion at the
bottom of the Water
Supply Bowl.
The silver ion cartridge will be
attached to the Water Supply
Bowl with tape when you unpack
the unit. Be sure to remove the
tape before using.
The Humidifying Filter is packaged
in a plastic bag. Be sure to
remove the plastic bag before
using.
Set the Humidifying Filter
at the center of the Water
Supply Bowl, aligning it
with the guide.
Align the claws of the
Humidifying Filter
Holder with the notches
on the Water Supply
Bowl.

8
Before Use
○marks
5 6 74 Rotate the Humidifying
Filter Holder to lock it in
place.
Firmly lock the 6 claws in
place. Improper assembly
may cause malfunction.
Connect the adapter
plug.
Set the Water Supply
Bowl Plate.
Set the Water Supply
Bowl.
Do not connect the AC
adapter to a wall outlet until
assembly is complete.
○ marks
are aligned.
Align the three protrusions
and notches.
Set the Water Supply Bowl
Fully insert when connecting.

9Set the main unit upper
body.
Set the main unit upper body and lower
body, aligning the contact points.
When the contact points are aligned, the
completely, with no gap.
8
Take care not to get your
9
Contact point
position and rotate from there.
Set the main unit upper body and lower
body, aligning the contact points.
When the contact points are aligned, the
completely, with no gap.
position and rotate from there.
Contact
point
*Do not hold this area,
get caught.

The Control Ring contains a magnet,
allowing it to be set simply by placing
it on the main unit.
10 Set the Control Ring. 11 Insert the AC adapter into a wall
outlet to complete preparation.
10
Before Use
Connect the AC adapter by inserting
all the way in.
*TheACadaptermakes
apoppingsoundwhen
itiscorrectlyconnected.

Installation
30
cm
30
cm
Be sure to observe the following points when installing.
120
cm
11 Before Use
Do not use under a table or desk.
This blocks the air outlet, preventing
throughout the room.
such as thick-piled carpet. Doing so
causes the unit to topple and the water
120

Operating Section Control Ring
P.20
12
How to Use
P.29
Most operations, such as adjusting the air volume, setting the
humidity selecting and activating menu’s, are performed by rotating
or clicking the Control Ring.
The power can also be turned on by clicking the Control Ring, and
can be turned off by long pressing the Control Ring.
*The switch is located in the “+
-
•
-
-
” display area at the front.
ClickClick
Rotate
Rotate
24h Timer button
The 24-hour Timer can be activated/deactivated directly
by long pressing this button.
*For information on the 24h Timer button.
Power button
Turns the power on and off.
*The child lock can be set or released by long pressing
and the power button for approximately two seconds.

Display
13 How to Use
OEL display
The OEL display shows detailed
operating information so that it can
be viewed at a glance.
Air volume/water volume
indicator
During normal operation, this indicates
the air volume.
in green.
This switches automatically to a water
1min
While the unit is
being operated
When the unit is not
being operated
(dim)
Display dimming
The display will become bright only while the unit is
being operated.
If the unit is not operated for more than 1 minute, the indicators
on the main unit automatically switch to low brightness. They
are only displayed brightly while the unit is being operated.

Standard screen
How to Use 14
Mode icon
The current Operating Mode
is indicated by icons.
24h Timer icon
Displayed when the 24h Timer
is set.
Current humidity
The current humidity is displayed.
*This may differ slightly from the
actual humidity depending on
the conditions of the room where
the unit is being used.
Humidity setting
The current humidity setting is
displayed.
Child Lock icon
This is lit when the Child Lock function
is activated by long pressing the
Power Button for around two seconds.
Remaining water volume icon
The volume of water remaining in the
Water Supply Bowl is displayed.
When the air volume is
set to 0 (no air output)
During the Auto mode, when the room
will automatically turn to 0 and the air output
will stop. The indicator will turn completely
white when the volume is 0.
The green LEDs indicates
the air volume levels
①
②
③
④
⑤
The image above shows the status
when an air volume of 4 is indicated.
Air volume indicator
This indicates the current air volume.
The volume is displayed from 0 (no
airoutput)
to 5.
・The volume of air can be adjusted
manually when operating in Manual
Mode.
・
When operating in Auto mode, this unit
adjusts the air volume automatically.

Operating Mode
and 24h Timer
Standard screen in
Auto mode
Standard screen in
Manual Mode
P.20
15 How to Use
①
②
③
④
⑤
Five levels can be set
(40%, 45%, 50%, 55% or 60%).
Air volume meter
Five levels can be set
(1, 2, 3, 4 or 5).
Air volume
Humidity setting
Auto mode
(automatic operation)
the Control Ring.
Manual Mode
(setting the air
volume
manually)
regardless
or 5)
rotating the
Control Ring.
24h Timer (setting the unit to operate or stop each hour)

Filling with Water Pour water directly into the water supply hole using a kettle, etc.
How to Use 16
Water volume 1 Water volume 2 Water volume 3 Water volume 4 Water volume 5 Full
with water
Be careful of the following points
Takecaretoensurethatwaterdoes
notenterthesurroundingairoutlet.
The Water Supply Bowl is
water volume will be indicated on the display.
●
●
●
in bacteria
●
result in bacteria
●
●
Be careful not to spill water on the outside or around the
How to Use

Operating the Unit
Turning the power on
Press the Power Button to
turn the power on.
*The power can also be turned
on or off using the Control Ring.
Entering the menu screen
Setting the volume/humidity
Rotate the Control Ring to set the volume or humidity.
Set the air volume in Manual Mode
Set the humidity in Auto mode Seenextpage
17 How to Use
P.12
P.15
Air volume/Humidity settings
Increase
Rotate
Rotate
Air volume/Humidity settings
Decrease
For detailed operations such as changing the modes, setting the 24h
enter the menu selection screen.
Press
Press

Menu selection screen
P.20
P.21
P.25
決定CommitCommit
How to Use 18
Auto
Manuell
-Timer
Einstellungen
Filter-
Reinigungssymb.
Selecting a menu
SelectSelect
Operate in Auto mode
Operate in Manual Mode
Open 24h Timer screen
Open Settings screen
Open screen for resetting

Set the time by following the steps below.
(The clock on this unit uses 24-hour time.)
Current Time 2 31
The clock needs to be reset if the plug is removed from the wall outlet
for one week.
P.21
19 How to Use
Akt. Uhrzeit Akt. Uhrzeit Einst. beendet
This unit equipped with a clock
function.
The message on the left is displayed automatically
"" is
displayed and the setting
Table of contents