Baloran The River User manual

user's Guide
Version 2.0, November 2018

The River, User Manual PAGE 1 PAGE 1
I. Welcome ! I. Welcome !
I welcome you to the community of users of The River and thanks you for your trust.
The River is the culmination of four years of work. This project would not have been possible without the unconditional support
and the unalterable patience of my family to whom I express the deepest gratitude. My thanks also go to the net community,
especially members of Anafrog Audiofanzine and for their invaluable encouragement and relevant suggestions.
I hope you take as much pleasure with The River I had in creating it and now using it.
Baloran SAS is a young and small company. I have set up a forum and a wiki to pool information, support, exchanges
and news about The River.
http://forum.baloran.com
http://wiki.baloran.com
They can be enriched with your collaboration ••They can be enriched with your collaboration ••
Best regards,
--
Laurent Le Catelier
Baloran SAS
Hardware, software, design: Laurent Le Catelier
Sound design: Laurent Le Catelier Stéphane Garganigo Laurent Pelletier
manual: Eric Inglebert Laurent Le Catelier

The River, User Manual PAGE 2 PAGE 2
II. Warning - Security II. Warning - Security
PLEASE READ ALL INSTRUCTIONS BEFORE USING THIS UNIT. SAVE THESE INSTRUCTIONS FOR ANY NEED LATER.
SAFETY INSTRUCTIONS MENTIONED IN THIS INSTRUCTION MANUAL CAN NOT COVER ALL CONDITIONS AND
POSSIBLE SITUATIONS. IT IS OF COURSE THAT USE OF THIS UNIT REQUIRES SPECIAL ATTENTION.
The above symbols that warn of potential hazards arising from improper use of electrical appliances. The flash symbol within an
equilateral triangle indicates the presence of electrical voltages that can cause electrical shock hazards.
Never open the unit case. Do not attempt to repair the unit and no changes are made (except in the case where the manual
provides specific instructions to this effect). Contact the manufacturer or your local authorized service center for repairs or
processing.
In later life, such as electronic equipment waste, The River will be entrusted to collecting and processing waste sector.
INSTALLATION INSTRUCTIONS
THIS EQUIPMENT MUST BE GROUNDED.
Do not delete the security provided by the connectors with earth or polarized. A polarized plug has a blade wider than the other.
An earthed socket includes a receptacle for equipotential bonding. If the connector provided to you does not fit into your outlet,
contact an electrician to put your installation standards.
Only use the supplied power cord, and do not use it on another device. Take care of the power cord. Do not do walk in
places where it could be twisted, crushed or trampled, mainly at the connectors. A damaged cord can easily cause an
electric shock or fire!
Before using the unit in a foreign country, check the compatibility of this equipment with the standards in force in that country by
contacting your dealer, an authorized service center or the manufacturer. Do not use and do not store the unit in locations subject
to extreme temperatures (direct sunlight, heating system), humid (bathrooms, basements flood, etc ...), exposed to rain, dust, or
subject to high levels of vibration.
Make sure that the unit is always placed on a flat, stable surface. Never install in unstable positions. Do not install the device on
foot, brackets or rack under the conditions specified by the manufacturer or sold with the equipment. If rack-use, pay attention to
prevent tipping during travel. Do not block the ventilation holes.
Ensure that no object (flammable materials, paper clips, pins) or liquids of any kind (water, soft drinks, alcohol, cleaning
products) enters the apparatus
In case of lightning storms or if unused, unplug from the mains. This device, whether used alone or in combination with an
amplifier or headphones can produce sound levels that could cause permanent hearing loss. Never use high level for a long
time or in any circumstance in which is uncomfortable. If hearing loss, see a physician immediately. Only use accessories
specified by the manufacturer.

The River, User Manual PAGE 3 PAGE 3
IMPORTANT
Immediately turn the unit off, unplug the power cord and contact you as soon as your dealer, an authorized service center or
the manufacturer in the following cases: The power cord or plug has been damaged smoke or unusual odor exit the machine
Foreign objects or liquids have been accidentally introduced into the unit • The unit has been exposed to rain or moisture
The device is not working normally or degraded performance seems.
The legal guarantee of the manufacturer does not cover the service charges incurred due to a lack of knowledge regarding
the correct use of a function or characteristic (when operating as expected) not covered by the manufacturer's warranty, and
are therefore the responsibility of the owner.

The River, User Manual PAGE 4 PAGE 4
III. Contents
I. WELCOME ! ________________________________________________________________ 1
II. WARNING - SAFETY ____________________________________________________ 2II. WARNING - SAFETY ____________________________________________________ 2
IV. DISCOVER THE RIVER _____________________________________________________ 6IV. DISCOVER THE RIVER _____________________________________________________ 6
1. Organization Control Panel ............................................. .................................................. ... 6
at. The Shift button ________________________________________________________________________________ 6
b. Organizer channels, voice outputs and FX _________________________________________________________ 7
c. General Commands 7 __________________________________________________________________________
d. Controls synthesis. ______________________________________________________________________ 8
e. The Riverkey, the manager of the inputs / outputs game _______________________________________________ 8
1. Discovery banks Sounds ............................................. .................................................. ........ 10
2. Discovery Multis ............................................... .................................................. ...................... 10
3. Models of Multi's and Sons ........................................... .................................................. .......... 10
at. Models of Multis, Templates ________________________________________________________________ 11
b. Sounds Models ___________________________________________________________________________ 11
V. GO FURTHER WITH TUTOS _______________________________________________ 12V. GO FURTHER WITH TUTOS _______________________________________________ 12
1. Split Mode, Level and Pan ........................................... .................................................. ....................... 12
2. Layers and connected to a sequencer software ........................................... ......................................... 12
3. Split, and arpeggio sequences ............................................. .................................................. ................. 13
4. Detune and unison ............................................... .................................................. ............................. 14
5. All orders propagation and Redirection ........................................... ................................. 14
6. MPE ................................................. .................................................. ................................................. 14
7. external clock ................................................ .................................................. ............................... 15
8. Synchronization of Digital LFO (DLFO) ........................................... .................................................. .. 15
8. COMPARE function ................................................ .................................................. .......................... 16
VI. REFERENCES ________________________________________________________________ 17VI. REFERENCES ________________________________________________________________ 17
1. Channel and voice, and UNISON MODE buttons ....................................... .................... 17
2. Load SINGLE or FX ............................................ .................................................. .............. 18
3. Saving SINGLE ............................................... .................................................. .................... 18
4. Load MULTIS ............................................... .................................................. .......................... 19
5. Saving MULTIS ............................................... .................................................. ................... 19
6. Sound Options ............................................... .................................................. .................................. 19
7. System Setup ............................................... .................................................. .......................... 20
8. You do not ................................................. .................................................. ................................................ 22
9. Level Page ................................................ .................................................. ........................................ 22
10. Page Pan ................................................ .................................................. .......................................... 22
11. Page Chorus 1..3 ............................................ .................................................. ................................... 23

The River, User Manual PAGE 5 PAGE 5
12. Page FX ................................................ .................................................. ............................................ 24
13. Other ................................................ Page .................................................. ....................................... 25
14. Mixer Page ................................................ .................................................. ....................................... 26
15. TRANS page and page RDIR ............................................. .................................................. .................... 26
VII. SUMMARY OF SETTINGS 27 ____________________________________________________VII. SUMMARY OF SETTINGS 27 ____________________________________________________
1. OSCILLATOR half .............................................. .................................................. ............................... 27
at. The parameters to VCO1 and VCO2 __________________________________________________________ 27
b. Exclusive parameters VCO2 ___________________________________________________________________ 28
c. Common Settings 28 __________________________________________________________________________
2. MIXER ................................................. .................................................. ............................................. 29
3. VOLTAGE CONTROLLED FILTER - FILTER CONTOUR ............................................ ................................. 30
4. LOUDNESS CONTOUR ................................................ .................................................. ....................... 31
5. ANALOG LFO ................................................ .................................................. .................................... 32
6. DLFO (DIGITAL LFO) ............................................ .................................................. ............................. 33
7. MOTION SEQ ................................................ .................................................. 34 ....................................
at. Record a sequence _______________________________________________________________________ 34
b. recording end ___________________________________________________________________________ 34
c. Start sequence ____________________________________________________________________________ 35
VIII. CONTROL OF SECTION 35 GLOBAL ____________________________________________VIII. CONTROL OF SECTION 35 GLOBAL ____________________________________________
IX. THE RIVERKEY 36 _______________________________________________________________IX. THE RIVERKEY 36 _______________________________________________________________
1. GLOBAL Parameters Setup ............................................... .................................................. ................ 36
2. Layer Settings Setup ............................................... .................................................. ................... 38
3. ARP Settings Setup ............................................... .................................................. ...................... 40
4. SEQ Parameters Setup ............................................... .................................................. ....................... 40
5. Parameters LFO Setup ............................................... .................................................. ....................... 41
6. Setting a SPLIT ............................................. .................................................. .............................. 42
7. CHORD HOLD modes. .................................................. .................................................. ................. 42
8. Other commands ................................................ .................................................. .......................... 43
9. Calibration physical controllers .............................................. .................................................. 43
X. REAR PANEL _________________________________________________________ 44
1. The input-output .............................................. .................................................. ............................. 44
2. power supply, on / off switch and fuse. .................................................. ....... 46
XI. __________________________________________________________________ APPENDIX 47XI. __________________________________________________________________ APPENDIX 47

The River, User Manual PAGE 6 PAGE 6
IV. Discovery of The River IV. Discovery of The River
The River brings together several elements that interact:
• A polyphonic analog synthesizer 8 votes, 8-channel multi-timbral (see attached block diagram).
• An effects module consisting of a triple chorus / analog flanger and a two-channel digital module for echo /
reverberation. The analog signal path is preserved throughout. Space and wealth are resulting acclaim (see
attached block diagram).
• A manager inputs / outputs, referred to herein as The Riverkey. Four independent layers (called Layer herein) provide A manager inputs / outputs, referred to herein as The Riverkey. Four independent layers (called Layer herein) provide A manager inputs / outputs, referred to herein as The Riverkey. Four independent layers (called Layer herein) provide
for each of them, set the input (integrated keyboard, MIDI or USB, pedals), the output (The River, MIDI or USB, Gates +
CV) and the event processing (sequence / arpeggio transposition, filtering, channel, type HP / Gates etc.)
All settings can be stored in The River. A Single contains information of a sound and effects, Profile contains the configuration All settings can be stored in The River. A Single contains information of a sound and effects, Profile contains the configuration All settings can be stored in The River. A Single contains information of a sound and effects, Profile contains the configuration All settings can be stored in The River. A Single contains information of a sound and effects, Profile contains the configuration All settings can be stored in The River. A Single contains information of a sound and effects, Profile contains the configuration
of The Riverkey a Multi contains the complete configuration of the machine (sound of each channel / voice multitimbral of The Riverkey a Multi contains the complete configuration of the machine (sound of each channel / voice multitimbral of The Riverkey a Multi contains the complete configuration of the machine (sound of each channel / voice multitimbral
settings, effects and all Riverkey The settings).
An optional feature Autosave permanently safeguard the status of your instrument. Thus, the power will return your environment An optional feature Autosave permanently safeguard the status of your instrument. Thus, the power will return your environment An optional feature Autosave permanently safeguard the status of your instrument. Thus, the power will return your environment
such as left to extinction.
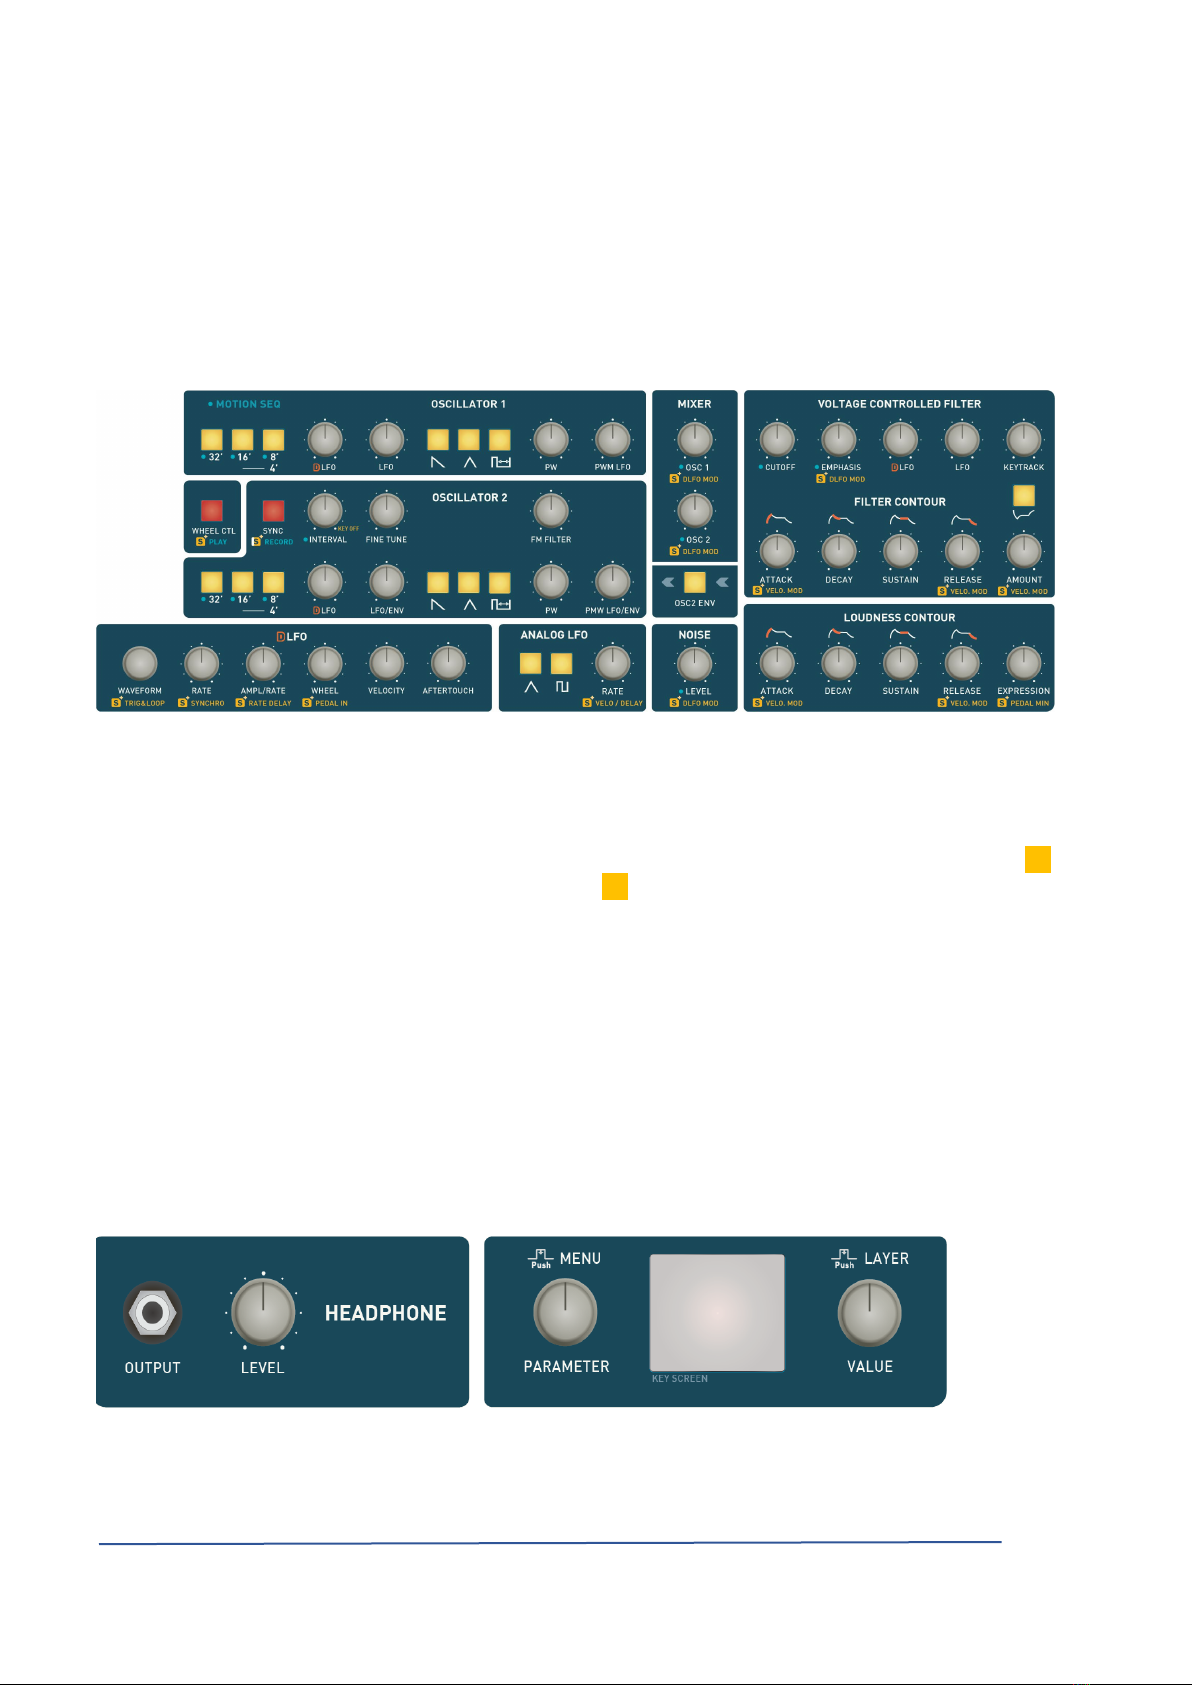
1. Organization Control Panel 1. Organization Control Panel
at. The Shift button at. The Shift button
A command (button, potentiometer, encoder) may have several functions, the secondary function is recorded in "yellow-orange"
below the order, preceded by the symbol * S + . To access this feature, you must press the button * S that is to the right of the below the order, preceded by the symbol * S + . To access this feature, you must press the button * S that is to the right of the below the order, preceded by the symbol * S + . To access this feature, you must press the button * S that is to the right of the below the order, preceded by the symbol * S + . To access this feature, you must press the button * S that is to the right of the below the order, preceded by the symbol * S + . To access this feature, you must press the button * S that is to the right of the below the order, preceded by the symbol * S + . To access this feature, you must press the button * S that is to the right of the below the order, preceded by the symbol * S + . To access this feature, you must press the button * S that is to the right of the below the order, preceded by the symbol * S + . To access this feature, you must press the button * S that is to the right of the
most central screen (Screen Panel).
As long as the button * S blinks, it is active. You are not forced to hold this button to access the secondary As long as the button * S blinks, it is active. You are not forced to hold this button to access the secondary As long as the button * S blinks, it is active. You are not forced to hold this button to access the secondary As long as the button * S blinks, it is active. You are not forced to hold this button to access the secondary
function.
A double click on the button * S locks the function * S while a new click the unlock. A double click on the button * S locks the function * S while a new click the unlock. A double click on the button * S locks the function * S while a new click the unlock. A double click on the button * S locks the function * S while a new click the unlock. A double click on the button * S locks the function * S while a new click the unlock. A double click on the button * S locks the function * S while a new click the unlock. A double click on the button * S locks the function * S while a new click the unlock.
In the rest of the document, indicating * S LOAD SINGLE therefore means either: In the rest of the document, indicating * S LOAD SINGLE therefore means either: In the rest of the document, indicating * S LOAD SINGLE therefore means either: In the rest of the document, indicating * S LOAD SINGLE therefore means either: In the rest of the document, indicating * S LOAD SINGLE therefore means either:
Press the button *
S
then without releasing it, press the button LOAD SINGLE and release the button *
S
Press the button *
S
then without releasing it, press the button LOAD SINGLE and release the button *
S
Press the button *
S
then without releasing it, press the button LOAD SINGLE and release the button *
S
Press the button *
S
then without releasing it, press the button LOAD SINGLE and release the button *
S
Press the button *
S
then without releasing it, press the button LOAD SINGLE and release the button *
S
Press the button *
S
then without releasing it, press the button LOAD SINGLE and release the button *
S
Press the button *
S
then without releasing it, press the button LOAD SINGLE and release the button *
S
Press the button *
S
then without releasing it, press the button LOAD SINGLE and release the button *
S
or
Press the button *
S
then release it and press the button LOAD SINGLE before *
S
stops flashing.
or
Press the button *
S
then release it and press the button LOAD SINGLE before *
S
stops flashing.
or
Press the button *
S
then release it and press the button LOAD SINGLE before *
S
stops flashing.
or
Press the button *
S
then release it and press the button LOAD SINGLE before *
S
stops flashing.
or
Press the button *
S
then release it and press the button LOAD SINGLE before *
S
stops flashing.
or
Press the button *
S
then release it and press the button LOAD SINGLE before *
S
stops flashing.
or
Press the button *
S
then release it and press the button LOAD SINGLE before *
S
stops flashing.
or
Press the button *
S
then release it and press the button LOAD SINGLE before *
S
stops flashing.
or
Press the button *
S
then release it and press the button LOAD SINGLE before *
S
stops flashing.
or
Press the button *
S
then release it and press the button LOAD SINGLE before *
S
stops flashing.

The River, User Manual PAGE 7 PAGE 7
b. Organizer channels, voice outputs and FX b. Organizer channels, voice outputs and FX
This part of the panel to manage the allocation of votes to the channels but also to access the main menus The River, adjust
outputs and effects.
The first line of 8 buttons (red) is used to select the active channel. The secondary function of these buttons to access the main
menus The River.
The second row of 8 buttons (yellow) to select the voice that will be allocated to the channel. The secondary function of these
buttons (and the last channel button 8) is to select the page in which the eight encoders will be active: level, pan, chorus, buttons (and the last channel button 8) is to select the page in which the eight encoders will be active: level, pan, chorus, buttons (and the last channel button 8) is to select the page in which the eight encoders will be active: level, pan, chorus,
effects and mixing, transposition of voice and redirect channel.
Below the bright buttons, eight encoders (1..8) are used to modify the parameters of the pageBelow the bright buttons, eight encoders (1..8) are used to modify the parameters of the page
selected. The role of each encoder is recalled below in a table. Example: in the page FX, the encoder 1 can change the type effect. selected. The role of each encoder is recalled below in a table. Example: in the page FX, the encoder 1 can change the type effect. selected. The role of each encoder is recalled below in a table. Example: in the page FX, the encoder 1 can change the type effect. selected. The role of each encoder is recalled below in a table. Example: in the page FX, the encoder 1 can change the type effect. selected. The role of each encoder is recalled below in a table. Example: in the page FX, the encoder 1 can change the type effect.
And to select the page FX, you press the button * S and sixth voice button (yellow). To go to the menu System you have to press And to select the page FX, you press the button * S and sixth voice button (yellow). To go to the menu System you have to press And to select the page FX, you press the button * S and sixth voice button (yellow). To go to the menu System you have to press And to select the page FX, you press the button * S and sixth voice button (yellow). To go to the menu System you have to press And to select the page FX, you press the button * S and sixth voice button (yellow). To go to the menu System you have to press And to select the page FX, you press the button * S and sixth voice button (yellow). To go to the menu System you have to press And to select the page FX, you press the button * S and sixth voice button (yellow). To go to the menu System you have to press And to select the page FX, you press the button * S and sixth voice button (yellow). To go to the menu System you have to press
the button * S and the sixth channel button (red). the button * S and the sixth channel button (red). the button * S and the sixth channel button (red). the button * S and the sixth channel button (red).
When you save a multi, all settings of this part of the panel are included in the Multi.
c. General commandsc. General commands
This part of the panel has the volume control, the detune the voices and the overall agreement and Glide / Glissando is a parameter
related to her.
Two encoders either side of the screen to select either bank ( encoder left) and index sound (right encoder) in the bank or the parameter Two encoders either side of the screen to select either bank ( encoder left) and index sound (right encoder) in the bank or the parameter Two encoders either side of the screen to select either bank ( encoder left) and index sound (right encoder) in the bank or the parameter Two encoders either side of the screen to select either bank ( encoder left) and index sound (right encoder) in the bank or the parameter Two encoders either side of the screen to select either bank ( encoder left) and index sound (right encoder) in the bank or the parameter Two encoders either side of the screen to select either bank ( encoder left) and index sound (right encoder) in the bank or the parameter
( left encoder) to modify and value( left encoder) to modify and value( left encoder) to modify and value
(Right encoder).

The River, User Manual PAGE 8 PAGE 8
Both encoders can be pressed. The corresponding function is written above each.
d. Controls synthesis. d. Controls synthesis.
This part of the panel brings together all the commands assigned to the sound synthesis. These commands are enabled for the This part of the panel brings together all the commands assigned to the sound synthesis. These commands are enabled for the This part of the panel brings together all the commands assigned to the sound synthesis. These commands are enabled for the
selected channel (see above) or optionally for all channels if the mode ALL is selected, or a channel redirection is defined (see selected channel (see above) or optionally for all channels if the mode ALL is selected, or a channel redirection is defined (see selected channel (see above) or optionally for all channels if the mode ALL is selected, or a channel redirection is defined (see
Propagation All commands and redirection).
When you change a setting, the display shows the new value and the original value. This allows you to easily return to the
old setting.
Some controls adjust both parameters (example: EMPHASIS EMPHASIS and Modulation by DLFO). In this case, the
second function is indicated under the control preceded by * S.second function is indicated under the control preceded by * S.second function is indicated under the control preceded by * S.
To access the secondary function, use the button * S ( see
The Shift button).
As long as you press the Command, Shift mode is To access the secondary function, use the button * S ( see
The Shift button).
As long as you press the Command, Shift mode is To access the secondary function, use the button * S ( see
The Shift button).
As long as you press the Command, Shift mode is To access the secondary function, use the button * S ( see
The Shift button).
As long as you press the Command, Shift mode is To access the secondary function, use the button * S ( see
The Shift button).
As long as you press the Command, Shift mode is To access the secondary function, use the button * S ( see
The Shift button).
As long as you press the Command, Shift mode is
extended as necessary.
For rank oscillators and waveforms, the buttons are exclusive useless to try to have two waveforms to the output of an
oscillator ••oscillator ••
To access the Rank 4 'oscillators, you press twice the range 8. In this case, the buttons of the rows 16 'and 8' are illuminated,
indicating the choice of rank 4 ' ••indicating the choice of rank 4 ' ••
e. The Riverkey, the manager of the inputs / outputs game e. The Riverkey, the manager of the inputs / outputs game
The left side of The River is reserved for the headphone jack and level control. On the right, the Riverkey The control screen is
framed by two encoders.
Almost all settings can be done with these encoders.

The River, User Manual PAGE 9 PAGE 9
But for all the game features, there are more simple and fast. Above the dials, the button Key But for all the game features, there are more simple and fast. Above the dials, the button Key
Shift lets you use the keyboard as a controller. Shift lets you use the keyboard as a controller.
When you press this button, the notes are not played. They are interpreted as The River key settings commands. In
the rest of the document, this button is called S KEY.the rest of the document, this button is called S KEY.
A reminder Magnetic has been placed on your instrument. Word OCTAVE - should be centered over the first black C # 3, Off | A reminder Magnetic has been placed on your instrument. Word OCTAVE - should be centered over the first black C # 3, Off | A reminder Magnetic has been placed on your instrument. Word OCTAVE - should be centered over the first black C # 3, Off | A reminder Magnetic has been placed on your instrument. Word OCTAVE - should be centered over the first black C # 3, Off | A reminder Magnetic has been placed on your instrument. Word OCTAVE - should be centered over the first black C # 3, Off | A reminder Magnetic has been placed on your instrument. Word OCTAVE - should be centered over the first black C # 3, Off | A reminder Magnetic has been placed on your instrument. Word OCTAVE - should be centered over the first black C # 3, Off |
On and Tap Tempo respectively above C3 and D3.On and Tap Tempo respectively above C3 and D3.On and Tap Tempo respectively above C3 and D3.On and Tap Tempo respectively above C3 and D3.On and Tap Tempo respectively above C3 and D3.On and Tap Tempo respectively above C3 and D3.On and Tap Tempo respectively above C3 and D3.
Example: To access the Tap Tempo, push the button S KEY and without releasing it, type repeatedly Example: To access the Tap Tempo, push the button S KEY and without releasing it, type repeatedly Example: To access the Tap Tempo, push the button S KEY and without releasing it, type repeatedly Example: To access the Tap Tempo, push the button S KEY and without releasing it, type repeatedly Example: To access the Tap Tempo, push the button S KEY and without releasing it, type repeatedly
D3 to give the tempo. Then release the button S KEY .D3 to give the tempo. Then release the button S KEY .D3 to give the tempo. Then release the button S KEY .D3 to give the tempo. Then release the button S KEY .
Functionally, it can be said that The Riverkey is the switchman game information, both internal and external. For this, it offers a
clock that will give a common tempo all The River organs, as well as inputs and outputs management system four layers. Each clock that will give a common tempo all The River organs, as well as inputs and outputs management system four layers. Each clock that will give a common tempo all The River organs, as well as inputs and outputs management system four layers. Each clock that will give a common tempo all The River organs, as well as inputs and outputs management system four layers. Each clock that will give a common tempo all The River organs, as well as inputs and outputs management system four layers. Each
entry defines a (built-in keyboard, plug MIDI and / or USB, pedals etc.), an outlet (The River, MIDI and / or USB, CV and Gates)
and one or more treatments in between.
Examples of layer definitions:
As the source built-in keyboard, as the destination Channel 1 The River, a wide A0 to C8, no transposition.
As a source in the MIDI jack as a destination CV and Gate monophonic high priority, extended from C3 to B5, transposition -12
semitones and arpeggio pattern 5 on 2 octaves.
To create a split, simply create two layers which are juxtaposed (see
Split).
But the extent of the layers may also overlap. To create a split, simply create two layers which are juxtaposed (see
Split).
But the extent of the layers may also overlap. To create a split, simply create two layers which are juxtaposed (see
Split).
But the extent of the layers may also overlap.
The destination of each of these layers may be different in order to control two different sounds for keyboard area but it can also
be identical with the objective, for example, to sequence a portion of the keyboard allowing normal game on the other side .
A Riverkey The setting game is called a profile: the complete definition of the four layers. The software
profile Editor
to configure up to 10 profiles that can reside permanently in The River and be recalled by simple S KEY .
profile Editor
to configure up to 10 profiles that can reside permanently in The River and be recalled by simple S KEY .
profile Editor
to configure up to 10 profiles that can reside permanently in The River and be recalled by simple S KEY .
profile Editor
to configure up to 10 profiles that can reside permanently in The River and be recalled by simple S KEY .
The Riverkey also has a function Autosave. All your settings are automatically saved to be restored to power of the instrument. The Riverkey also has a function Autosave. All your settings are automatically saved to be restored to power of the instrument. The Riverkey also has a function Autosave. All your settings are automatically saved to be restored to power of the instrument.
When you save a multi, all Riverkey The settings are included.

The River, User Manual PAGE 10 PAGE 10
1. Discovery of Sounds banks 1. Discovery of Sounds banks
It is time to listen to The River. We'll start with The River reconfigure in its simplest mode by loading the template 1L RIVER: 1 It is time to listen to The River. We'll start with The River reconfigure in its simplest mode by loading the template 1L RIVER: 1 It is time to listen to The River. We'll start with The River reconfigure in its simplest mode by loading the template 1L RIVER: 1
layer, one of eight voice channel.
press * S LOAD MULTI and press the voice button 1 until the flashing will stop. press * S LOAD SINGLE to press * S LOAD MULTI and press the voice button 1 until the flashing will stop. press * S LOAD SINGLE to press * S LOAD MULTI and press the voice button 1 until the flashing will stop. press * S LOAD SINGLE to press * S LOAD MULTI and press the voice button 1 until the flashing will stop. press * S LOAD SINGLE to press * S LOAD MULTI and press the voice button 1 until the flashing will stop. press * S LOAD SINGLE to press * S LOAD MULTI and press the voice button 1 until the flashing will stop. press * S LOAD SINGLE to press * S LOAD MULTI and press the voice button 1 until the flashing will stop. press * S LOAD SINGLE to
activate the menu
Loading Sound.
activate the menu
Loading Sound.
Check that the channel 1 is active (1 lit channel button). Turn left encoder
to select the bank ( 1-8). Turn right encoder to select the his ( 1 to 20). to select the bank ( 1-8). Turn right encoder to select the his ( 1 to 20). to select the bank ( 1-8). Turn right encoder to select the his ( 1 to 20). to select the bank ( 1-8). Turn right encoder to select the his ( 1 to 20). to select the bank ( 1-8). Turn right encoder to select the his ( 1 to 20).
Press the right encoder to load the sound with its effects or the left encoder to load the sound without effects.
You can then play the keyboard and manipulate synthetic commands to discover the musicality of The River.
The last two banks (FX01 and FX02) contain only the effect settings (chorus, echo / reverb mix).
2. Discovery Multis 2. Discovery Multis
press * S MULTI LOAD to activate the menu
Loading Multi.
press * S MULTI LOAD to activate the menu
Loading Multi.
press * S MULTI LOAD to activate the menu
Loading Multi.
press * S MULTI LOAD to activate the menu
Loading Multi.
press * S MULTI LOAD to activate the menu
Loading Multi.
Rotate the encoder to the left of the panel screen to select the bank ( 1 to 2). Rotate the encoder to the right of the panel screen Rotate the encoder to the left of the panel screen to select the bank ( 1 to 2). Rotate the encoder to the right of the panel screen Rotate the encoder to the left of the panel screen to select the bank ( 1 to 2). Rotate the encoder to the right of the panel screen
to select the multi ( 1 to 20). Multis ALLINIT are blank. Press the right or left encoder to load the multi. Once charging is complete, to select the multi ( 1 to 20). Multis ALLINIT are blank. Press the right or left encoder to load the multi. Once charging is complete, to select the multi ( 1 to 20). Multis ALLINIT are blank. Press the right or left encoder to load the multi. Once charging is complete,
press S KEY C3 to start arpeggios and sequences of all layers and good discovery ... ••press S KEY C3 to start arpeggios and sequences of all layers and good discovery ... ••press S KEY C3 to start arpeggios and sequences of all layers and good discovery ... ••press S KEY C3 to start arpeggios and sequences of all layers and good discovery ... ••
3. Models of Multi's and Sons 3. Models of Multi's and Sons
To help you in the use of The River, we set up models readily available for both the sounds for multis. In the rest of the
document, we will call template a model of multi. document, we will call template a model of multi. document, we will call template a model of multi.
A multi is a "photo" full of the machine, including the manager of the channels and voices, sounds edited each channel, settings
of The Riverkey thus including sequences and arpeggios, level adjustments / panoramic and tuning effects. When you select a
multi or pattern of multi, this completely reconfigure your machine.

The River, User Manual PAGE 11 PAGE 11
at. Models of Multis, Templatesat. Models of Multis, Templates
press * S LOAD MULTI. All voice buttons flash. Press the voice button of your choice before keeps flashing. For the template
2L
press * S LOAD MULTI. All voice buttons flash. Press the voice button of your choice before keeps flashing. For the template
2L
press * S LOAD MULTI. All voice buttons flash. Press the voice button of your choice before keeps flashing. For the template
2L
press * S LOAD MULTI. All voice buttons flash. Press the voice button of your choice before keeps flashing. For the template
2L
press * S LOAD MULTI. All voice buttons flash. Press the voice button of your choice before keeps flashing. For the template
2L
SPLIT
for example, is the yellow key above encoder 5.
SPLIT
for example, is the yellow key above encoder 5.
1 1L RIVER 1 layer 1 channel 8 votes, the base for walking the banks of sounds such
2 2L RIVER 2 layers, splits 1, 2 channels of voice 4
3 3L RIVER 3 layers, 2 splits
4 4L RIVER Four layers, two splits, the layers 3 and 4 have the same key range
5 2L SPLIT 2 layers, one voice channel 8
6 2L UNISS 2 layers, one channel 3 voice unison detune + 1 channel 5 voice "normal"
7 1L ALL 1 layer, 2 channels of four voice ALL mode
8 1L MEP 1 layer MPE MPE one voice channel 8
b. Sounds Modelsb. Sounds Models
press * S LOAD SINGLE. All voice buttons flash. Press the voice button of your choice before keeps flashing. For its type EKEY press * S LOAD SINGLE. All voice buttons flash. Press the voice button of your choice before keeps flashing. For its type EKEY press * S LOAD SINGLE. All voice buttons flash. Press the voice button of your choice before keeps flashing. For its type EKEY press * S LOAD SINGLE. All voice buttons flash. Press the voice button of your choice before keeps flashing. For its type EKEY
for example, the voice button 3. The sound pattern is assigned to the voice of the selected channel.
1 INIT1 INIT The basic sound
2 LEAD A typed his "Moog" with envelope folder 3 EKEY2 LEAD A typed his "Moog" with envelope folder 3 EKEY2 LEAD A typed his "Moog" with envelope folder 3 EKEY2 LEAD A typed his "Moog" with envelope folder 3 EKEY
A typed his "Electric Piano"
4 BRASS A typed his "brass" Wheel active ... 5 STRING A typed 4 BRASS A typed his "brass" Wheel active ... 5 STRING A typed 4 BRASS A typed his "brass" Wheel active ... 5 STRING A typed 4 BRASS A typed his "brass" Wheel active ... 5 STRING A typed 4 BRASS A typed his "brass" Wheel active ... 5 STRING A typed
his "String" 6 VOXhis "String" 6 VOX
A typed his "Voice"
7 FM7 FM A typed his "Bell FM" echo +
8 MEP8 MEP Sound MPE with Osc 2 Y and Z Cutoff

The River, User Manual PAGE 12 PAGE 12
V. More with tutorials V. More with tutorials
1. Split Mode, Level and Pan 1. Split Mode, Level and Pan
Load the template 2. You watch the screen Riverkey two layers which are for channels 1 and 2 respectively, and 4 voices assigned to each
channel. LEAD sound is on the left side of the keyboard to B4, channel 1. The sound EKEY C5 to C8, channel 2. The template mode is midday ( 2nd channel. LEAD sound is on the left side of the keyboard to B4, channel 1. The sound EKEY C5 to C8, channel 2. The template mode is midday ( 2nd channel. LEAD sound is on the left side of the keyboard to B4, channel 1. The sound EKEY C5 to C8, channel 2. The template mode is midday ( 2nd
icon to the right of the center screen), that is to say that the addressing of the channels is respected: each driver layer the designated channel.
Push the button fashion. The mode changes to Select. Play to the left and right of the keyboard. You find that, regardless of the Push the button fashion. The mode changes to Select. Play to the left and right of the keyboard. You find that, regardless of the Push the button fashion. The mode changes to Select. Play to the left and right of the keyboard. You find that, regardless of the Push the button fashion. The mode changes to Select. Play to the left and right of the keyboard. You find that, regardless of the Push the button fashion. The mode changes to Select. Play to the left and right of the keyboard. You find that, regardless of the
areas defined in two layers, the sound is the same across the entire keyboard. In this mode, you play the sound of the selected
channel. Press the channel button 2, you listen EKEY across the keyboard, press channel 1, you listen LEAD across the
keyboard.
Press again on the button fashion. The mode changes to All, it turns red. Play to the left and right of the keyboard. You find that, Press again on the button fashion. The mode changes to All, it turns red. Play to the left and right of the keyboard. You find that, Press again on the button fashion. The mode changes to All, it turns red. Play to the left and right of the keyboard. You find that, Press again on the button fashion. The mode changes to All, it turns red. Play to the left and right of the keyboard. You find that, Press again on the button fashion. The mode changes to All, it turns red. Play to the left and right of the keyboard. You find that,
regardless of the areas defined in two layers, the sound is the same across the entire keyboard: you play two sounds (channel 1
and 2) simultaneously;)
The level of channel 1 (LEAD) is too high compared to the level of channel 2 (EKEY) and the sum of the two channels saturate the
circuits, you will definitely hear small sound crackles. We will change that. Press on * S LEVEL. The orange rectangle of the screen circuits, you will definitely hear small sound crackles. We will change that. Press on * S LEVEL. The orange rectangle of the screen circuits, you will definitely hear small sound crackles. We will change that. Press on * S LEVEL. The orange rectangle of the screen circuits, you will definitely hear small sound crackles. We will change that. Press on * S LEVEL. The orange rectangle of the screen
shows LEV. The 8 encoders allow you to adjust the level of each voice. You can for example decrease to -14dB the first four voices shows LEV. The 8 encoders allow you to adjust the level of each voice. You can for example decrease to -14dB the first four voices shows LEV. The 8 encoders allow you to adjust the level of each voice. You can for example decrease to -14dB the first four voices
and 2dB the following four. The balance will be better and the level resulting suitable. A shortcut can simultaneously change the
level of all the voices of a channel: Ensure that the orange square indicates always
LEV and press * S while turning the encoder 1. "Channel 1 level" indicates that you change the level of all the voice channel 1, LEV and press * S while turning the encoder 1. "Channel 1 level" indicates that you change the level of all the voice channel 1, LEV and press * S while turning the encoder 1. "Channel 1 level" indicates that you change the level of all the voice channel 1, LEV and press * S while turning the encoder 1. "Channel 1 level" indicates that you change the level of all the voice channel 1, LEV and press * S while turning the encoder 1. "Channel 1 level" indicates that you change the level of all the voice channel 1,
select -20dB for example. Press on * S while turning the encoder 2. "Channel 2 level" indicates that you change the level of all select -20dB for example. Press on * S while turning the encoder 2. "Channel 2 level" indicates that you change the level of all select -20dB for example. Press on * S while turning the encoder 2. "Channel 2 level" indicates that you change the level of all select -20dB for example. Press on * S while turning the encoder 2. "Channel 2 level" indicates that you change the level of all
the voice channel 2 (EKEY), select -4 dB for example.
There is the same logic for panning vote. Press on * S PAN. The orange rectangle of the screen shows PAN. The 8 encoders to There is the same logic for panning vote. Press on * S PAN. The orange rectangle of the screen shows PAN. The 8 encoders to There is the same logic for panning vote. Press on * S PAN. The orange rectangle of the screen shows PAN. The 8 encoders to There is the same logic for panning vote. Press on * S PAN. The orange rectangle of the screen shows PAN. The 8 encoders to There is the same logic for panning vote. Press on * S PAN. The orange rectangle of the screen shows PAN. The 8 encoders to There is the same logic for panning vote. Press on * S PAN. The orange rectangle of the screen shows PAN. The 8 encoders to
adjust the position of each voice. Test the action of each, while playing the keyboard. A shortcut can simultaneously edit the
pan all the voices of a channel: Ensure that the orange square indicates always PAN and press * S while turning the encoder 1. pan all the voices of a channel: Ensure that the orange square indicates always PAN and press * S while turning the encoder 1. pan all the voices of a channel: Ensure that the orange square indicates always PAN and press * S while turning the encoder 1. pan all the voices of a channel: Ensure that the orange square indicates always PAN and press * S while turning the encoder 1. pan all the voices of a channel: Ensure that the orange square indicates always PAN and press * S while turning the encoder 1. pan all the voices of a channel: Ensure that the orange square indicates always PAN and press * S while turning the encoder 1.
"Channel 1 pan" indicates that you change the pan every voice channel 1 (LEAD), place eg every LEAD voice a little to the left.
Press on * S while turning the encoder 2. "Channel 2 Pan" indicates that you change the level of all the voice channel 2 (EKEY), Press on * S while turning the encoder 2. "Channel 2 Pan" indicates that you change the level of all the voice channel 2 (EKEY), Press on * S while turning the encoder 2. "Channel 2 Pan" indicates that you change the level of all the voice channel 2 (EKEY), Press on * S while turning the encoder 2. "Channel 2 Pan" indicates that you change the level of all the voice channel 2 (EKEY),
place a few voices on the right;)
2. Layers and connected to a sequencer software 2. Layers and connected to a sequencer software
Load the template 4. You watch the screen Riverkey four layers that depart each to a The River channel. Layers 3 and 4 are
stacked in extent. So if you play the keyboard C5, it will go to the channel 3 and channel 4. One Voice is assigned to channel 1
and another to channel 2. The channels 3 and 4 each receive three votes. Play the keyboard to test this template and each
zone. The first two areas are therefore monophonic and will happily arpeggio and / or sequence, the third is bi-timbral polyphonic
6 votes but three notes simultaneously max;)
The layer 4 is transposed from -1 octave compared to the other to make more severe FM bell. To change the transposition of Layer
4, type S KEY C5 "Layer 4" to select it and S KEY D # 3 "Octave +" or S KEY 4, type S KEY C5 "Layer 4" to select it and S KEY D # 3 "Octave +" or S KEY 4, type S KEY C5 "Layer 4" to select it and S KEY D # 3 "Octave +" or S KEY 4, type S KEY C5 "Layer 4" to select it and S KEY D # 3 "Octave +" or S KEY 4, type S KEY C5 "Layer 4" to select it and S KEY D # 3 "Octave +" or S KEY 4, type S KEY C5 "Layer 4" to select it and S KEY D # 3 "Octave +" or S KEY
C # 3 "Octave-". To transpose by semitone, use S KEY B3 "Transp-" and S KEY C4 "Transp-". C # 3 "Octave-". To transpose by semitone, use S KEY B3 "Transp-" and S KEY C4 "Transp-". C # 3 "Octave-". To transpose by semitone, use S KEY B3 "Transp-" and S KEY C4 "Transp-". C # 3 "Octave-". To transpose by semitone, use S KEY B3 "Transp-" and S KEY C4 "Transp-". C # 3 "Octave-". To transpose by semitone, use S KEY B3 "Transp-" and S KEY C4 "Transp-".
For the remainder of the year, we will disable the layer 4. If it is not selected, type * S KEY C5 "Layer 4". With the encoder left For the remainder of the year, we will disable the layer 4. If it is not selected, type * S KEY C5 "Layer 4". With the encoder left For the remainder of the year, we will disable the layer 4. If it is not selected, type * S KEY C5 "Layer 4". With the encoder left For the remainder of the year, we will disable the layer 4. If it is not selected, type * S KEY C5 "Layer 4". With the encoder left
Riverkey, select choice active and with the right choice encoder No. So Riverkey, select choice active and with the right choice encoder No. So Riverkey, select choice active and with the right choice encoder No. So Riverkey, select choice active and with the right choice encoder No. So Riverkey, select choice active and with the right choice encoder No. So

The River, User Manual PAGE 13 PAGE 13
the layer 4 is no longer active. We will now get his voice for the layer 3. On the panel, press the channel button 3 and then
turn the voices 6, 7 and 8.
The River now connect to your computer with a USB cable.
Choose the taking PANEL. It is the most suitable for full control by software and start your favorite software. Verify PANEL @ Choose the taking PANEL. It is the most suitable for full control by software and start your favorite software. Verify PANEL @ Choose the taking PANEL. It is the most suitable for full control by software and start your favorite software. Verify PANEL @
THERIVER is available in source and destination MIDI. The River must also verify that communication USB mirror is activated. THERIVER is available in source and destination MIDI. The River must also verify that communication USB mirror is activated. THERIVER is available in source and destination MIDI. The River must also verify that communication USB mirror is activated.
To push on * S SYSTEM, with the left encoder select Dump to USB and with the right encoder, if necessary, choose YES.To push on * S SYSTEM, with the left encoder select Dump to USB and with the right encoder, if necessary, choose YES.To push on * S SYSTEM, with the left encoder select Dump to USB and with the right encoder, if necessary, choose YES.To push on * S SYSTEM, with the left encoder select Dump to USB and with the right encoder, if necessary, choose YES.To push on * S SYSTEM, with the left encoder select Dump to USB and with the right encoder, if necessary, choose YES.To push on * S SYSTEM, with the left encoder select Dump to USB and with the right encoder, if necessary, choose YES.To push on * S SYSTEM, with the left encoder select Dump to USB and with the right encoder, if necessary, choose YES.
Place your software recording and playing the keyboard. Your sequencer will receive MIDI events. Stop recording. If you look in
list view recorded events in your software, you will find that the transmitted MIDI channel is the selected channel in The River,
regardless of your definitions in The Riverkey. Why ? The panel is still active on the selected channel and you can record in your
software all actions on the panel;) It is therefore more coherent to select the mode Select when you work with your computer software all actions on the panel;) It is therefore more coherent to select the mode Select when you work with your computer software all actions on the panel;) It is therefore more coherent to select the mode Select when you work with your computer
using a profile. Press once on the button fashion to switch mode Select.using a profile. Press once on the button fashion to switch mode Select.using a profile. Press once on the button fashion to switch mode Select.using a profile. Press once on the button fashion to switch mode Select.
Erase the previous record, select the panel channel 1: playing you hear the 1 (LEAD). Put your record in a sequencer play a
bass line by tweaking the CUTOFF, EMPHASIS and the dial. Stop recording. If you listen to the record and if you look in list
mode events recorded in your software, you will find that most of the notes, all the panel events were transmitted.
Add a MIDI track in your software and arm it for recording. On The River, select channel 2 (the MEP) and save the same.
Add a MIDI track in your software, arm it for recording. On The River, select channel 3 (sound STRING) and save the same.
It'll just listen to the overall result;)
3. Split, and arpeggio sequences 3. Split, and arpeggio sequences
Load the template 5. You watch the screen Riverkey two layers that go to channel 1, in which the eight voices are assigned. What
is the advantage of having two layers that go to the same channel rather than a single layer?
We must not forget that the Layers are customizable: transposition arpeggio / sequence etc ... A split was defined: A0 -> B4 and C5> C8
So the whole keyboard A0 -> C8 hand well to channel 1. Also, thanks to the two layers, we can define an arpeggio or
sequence on the lower keyboard and allow high free part or put another arpeggio / sequence on the upper part.
Select the layer 1: S KEY F # 4 "Layer 1". Select / run arpeggiator: S KEY G # 3 "Arpeggio" and play a chord. The arpeggio Select the layer 1: S KEY F # 4 "Layer 1". Select / run arpeggiator: S KEY G # 3 "Arpeggio" and play a chord. The arpeggio Select the layer 1: S KEY F # 4 "Layer 1". Select / run arpeggiator: S KEY G # 3 "Arpeggio" and play a chord. The arpeggio Select the layer 1: S KEY F # 4 "Layer 1". Select / run arpeggiator: S KEY G # 3 "Arpeggio" and play a chord. The arpeggio Select the layer 1: S KEY F # 4 "Layer 1". Select / run arpeggiator: S KEY G # 3 "Arpeggio" and play a chord. The arpeggio
starts. You will find that C0 to B4 buttons to transpose (if you play a note) or redefine the arpeggio (if you play multiple notes).
The C5 to C8 keys do not affect the arpeggio because they are in the layer 2. You can play freely on the keyboard (for more info
about arpeggios, see "arpeggios").
But you can also define an arpeggio or sequence on this layer. For a sequence:

The River, User Manual PAGE 14 PAGE 14
Select the layer 1: S KEY G # 4 "Layer 2". Select the sequencer: S KEY A # 3 "Sequencer". Enable not recording not: S Select the layer 1: S KEY G # 4 "Layer 2". Select the sequencer: S KEY A # 3 "Sequencer". Enable not recording not: S Select the layer 1: S KEY G # 4 "Layer 2". Select the sequencer: S KEY A # 3 "Sequencer". Enable not recording not: S Select the layer 1: S KEY G # 4 "Layer 2". Select the sequencer: S KEY A # 3 "Sequencer". Enable not recording not: S Select the layer 1: S KEY G # 4 "Layer 2". Select the sequencer: S KEY A # 3 "Sequencer". Enable not recording not: S Select the layer 1: S KEY G # 4 "Layer 2". Select the sequencer: S KEY A # 3 "Sequencer". Enable not recording not: S
KEY B3 "Record". Enter not the sequence. To finish recording, you can either start the sequence: S KEY C3 "Play | KEY B3 "Record". Enter not the sequence. To finish recording, you can either start the sequence: S KEY C3 "Play | KEY B3 "Record". Enter not the sequence. To finish recording, you can either start the sequence: S KEY C3 "Play | KEY B3 "Record". Enter not the sequence. To finish recording, you can either start the sequence: S KEY C3 "Play |
Stop" is remake S KEY A # 3 "Sequencer" (for more information on sequences, see "sequences"). Stop" is remake S KEY A # 3 "Sequencer" (for more information on sequences, see "sequences"). Stop" is remake S KEY A # 3 "Sequencer" (for more information on sequences, see "sequences").
So you get simultaneously an arpeggio and a sequence on an 8 voice channel.
4. Detune and unison 4. Detune and unison
Load the template 6. You watch the screen Riverkey two layers, each assigned to a channel. Channel 1 receives three voice in
unison fashion with a labeled detune. It is monophonic, but the sound is pretty big. The second channel is a classic polyphonic
him on 5 votes. Check that the channel 1 is selected and press the button UNISON. You go in polyphonic mode on that channel, him on 5 votes. Check that the channel 1 is selected and press the button UNISON. You go in polyphonic mode on that channel, him on 5 votes. Check that the channel 1 is selected and press the button UNISON. You go in polyphonic mode on that channel,
but if you play, you will notice that it is not quite right: the detune Unison is still active. Move the detune to zero, should be more
acceptable.
5. Propagation All orders and Redirection 5. Propagation All orders and Redirection
Load the template 7. You watch the screen Riverkey a layer to output channel 1, the VOX, to which four voices are assigned.
Channel 2, its FM, also receives four votes. The MODE button is red, you are in fashion All, it is recalled in the second small square Channel 2, its FM, also receives four votes. The MODE button is red, you are in fashion All, it is recalled in the second small square Channel 2, its FM, also receives four votes. The MODE button is red, you are in fashion All, it is recalled in the second small square
on the right of the screen. The mode All that all orders received from the keyboard are sent to all channels simultaneously. So when on the right of the screen. The mode All that all orders received from the keyboard are sent to all channels simultaneously. So when on the right of the screen. The mode All that all orders received from the keyboard are sent to all channels simultaneously. So when
you play a note, you hear VOX and FM simultaneously. While Channel 2 has no dedicated layer in fashion All it receives commands. you play a note, you hear VOX and FM simultaneously. While Channel 2 has no dedicated layer in fashion All it receives commands. you play a note, you hear VOX and FM simultaneously. While Channel 2 has no dedicated layer in fashion All it receives commands.
Make S SYSTEM and select with the left encoder parameter Propagate Cross All / RDIR, select Make S SYSTEM and select with the left encoder parameter Propagate Cross All / RDIR, select Make S SYSTEM and select with the left encoder parameter Propagate Cross All / RDIR, select Make S SYSTEM and select with the left encoder parameter Propagate Cross All / RDIR, select Make S SYSTEM and select with the left encoder parameter Propagate Cross All / RDIR, select
Yes with the right encoder then play with the CUTOFF potentiometer or EMPHASIS. You observe that both VOX and FM sounds are Yes with the right encoder then play with the CUTOFF potentiometer or EMPHASIS. You observe that both VOX and FM sounds are
changed simultaneously.
Select now No. with the right encoder then play with the knobs. Alternatively, you can select the channels 1 and 2, you see that Select now No. with the right encoder then play with the knobs. Alternatively, you can select the channels 1 and 2, you see that Select now No. with the right encoder then play with the knobs. Alternatively, you can select the channels 1 and 2, you see that
only the sound of the selected channel is changed. Orders are not propagated to all channels.
Rather than using the mode All to play all channels simultaneously, you can redirect the channel 2 Rather than using the mode All to play all channels simultaneously, you can redirect the channel 2 Rather than using the mode All to play all channels simultaneously, you can redirect the channel 2
1. Thus, even in fashion Midday or Select, the messages to the channel 1 will also be received by channel 2. Make S TRANS and 1. Thus, even in fashion Midday or Select, the messages to the channel 1 will also be received by channel 2. Make S TRANS and 1. Thus, even in fashion Midday or Select, the messages to the channel 1 will also be received by channel 2. Make S TRANS and 1. Thus, even in fashion Midday or Select, the messages to the channel 1 will also be received by channel 2. Make S TRANS and 1. Thus, even in fashion Midday or Select, the messages to the channel 1 will also be received by channel 2. Make S TRANS and 1. Thus, even in fashion Midday or Select, the messages to the channel 1 will also be received by channel 2. Make S TRANS and 1. Thus, even in fashion Midday or Select, the messages to the channel 1 will also be received by channel 2. Make S TRANS and
again without releasing TRANS S . The orange frame displays RDIR, the eight encoders will help address redirection channels. Use again without releasing TRANS S . The orange frame displays RDIR, the eight encoders will help address redirection channels. Use again without releasing TRANS S . The orange frame displays RDIR, the eight encoders will help address redirection channels. Use again without releasing TRANS S . The orange frame displays RDIR, the eight encoders will help address redirection channels. Use again without releasing TRANS S . The orange frame displays RDIR, the eight encoders will help address redirection channels. Use again without releasing TRANS S . The orange frame displays RDIR, the eight encoders will help address redirection channels. Use
the encoder 2 to redirect the channel 2 to channel 1
Channel 2 to .... 1
and play a few notes on the keyboard. You find that, regardless of the mode, channel 2 plays the same as
Channel 2 to .... 1
and play a few notes on the keyboard. You find that, regardless of the mode, channel 2 plays the same as
channel 1. As All, if the option Cross System Propagate All / RDIR is channel 1. As All, if the option Cross System Propagate All / RDIR is channel 1. As All, if the option Cross System Propagate All / RDIR is channel 1. As All, if the option Cross System Propagate All / RDIR is channel 1. As All, if the option Cross System Propagate All / RDIR is
YES, so if channel 1 is selected on the panel, stock it will be propagated to channel 2: CUTOFF such act on the two sounds. YES, so if channel 1 is selected on the panel, stock it will be propagated to channel 2: CUTOFF such act on the two sounds.
Small difference with setting All, if channel 2 is selected, the actions on the panel will not be propagated to 1 for channel 2 Small difference with setting All, if channel 2 is selected, the actions on the panel will not be propagated to 1 for channel 2 Small difference with setting All, if channel 2 is selected, the actions on the panel will not be propagated to 1 for channel 2
receives commands from channel 1 but not the reverse ... You follow? ••receives commands from channel 1 but not the reverse ... You follow? ••
6. MEP 6. MEP
Compatible devices MEP Not many, but the contribution of this standard seems so important to me that The River had to Compatible devices MEP Not many, but the contribution of this standard seems so important to me that The River had to Compatible devices MEP Not many, but the contribution of this standard seems so important to me that The River had to
participate. Load the template 8. You observe a single layer which seems standard. But in the Global menu The Riverkey, the
option MEP is activated. For this mode of operationoption MEP is activated. For this mode of operationoption MEP is activated. For this mode of operation

The River, User Manual PAGE 15 PAGE 15
gives a completely different role to MIDI channels, each note has its channel and therefore The Riverkey in the MPE mode works
differently. You can just use the other layers for external communications noon, USB and / or CV and Gate.
The River has a channel with 8 votes. This is the simplest configuration. With OLOB keyboard, you have to tell it to limit the
polyphony 8 voices because by default it goes up to 16. On the Linnstrument, simply indicate PerNOteCha, channels 2 to 9 to limit
the polyphony 8 voice.
Connect your MIDI keyboard to MEPs The River via the MIDI jack, the simplest solution, or USB via an external USB Host (type
iConnectivity)
Connect your MIDI keyboard to MEPs The River via the MIDI jack, the simplest solution, or USB via an external USB Host (type
iConnectivity)
or via your computer that will gateway. MEP sound is configured this way: the dimension Y adjusts the level of Oscillator 2 that or via your computer that will gateway. MEP sound is configured this way: the dimension Y adjusts the level of Oscillator 2 that or via your computer that will gateway. MEP sound is configured this way: the dimension Y adjusts the level of Oscillator 2 that
functions as a sub, and dimension Z plays on the CUTOFF. By default, the dimension Y control the resonance, and dimension Z CUTOFF. functions as a sub, and dimension Z plays on the CUTOFF. By default, the dimension Y control the resonance, and dimension Z CUTOFF. functions as a sub, and dimension Z plays on the CUTOFF. By default, the dimension Y control the resonance, and dimension Z CUTOFF. functions as a sub, and dimension Z plays on the CUTOFF. By default, the dimension Y control the resonance, and dimension Z CUTOFF. functions as a sub, and dimension Z plays on the CUTOFF. By default, the dimension Y control the resonance, and dimension Z CUTOFF. functions as a sub, and dimension Z plays on the CUTOFF. By default, the dimension Y control the resonance, and dimension Z CUTOFF. functions as a sub, and dimension Z plays on the CUTOFF. By default, the dimension Y control the resonance, and dimension Z CUTOFF.
I let you discover the menu S OPTION possible choice MPE Z and MPE Y;)I let you discover the menu S OPTION possible choice MPE Z and MPE Y;)I let you discover the menu S OPTION possible choice MPE Z and MPE Y;)I let you discover the menu S OPTION possible choice MPE Z and MPE Y;)I let you discover the menu S OPTION possible choice MPE Z and MPE Y;)I let you discover the menu S OPTION possible choice MPE Z and MPE Y;)
MEP supports multitimbral in two voices. If you define two channels of four voices and your keyboard MEP supports it (as
Linnstrument) must be defined on the latter a "Left" with the control channel 1 and channel voice 2,3,4,5 and "Right" with the
control channel 16 and for the voice
6,7,8,9. It's not simple, it's MPE, but it works so well;)
7. external clock 7. external clock
The River is capable of receiving outside orders and march in step ••The River is capable of receiving outside orders and march in step ••
Connect a device that generates a clock on hold MIDI In or plug USB KEY and check that the device is configured to direct Connect a device that generates a clock on hold MIDI In or plug USB KEY and check that the device is configured to direct Connect a device that generates a clock on hold MIDI In or plug USB KEY and check that the device is configured to direct Connect a device that generates a clock on hold MIDI In or plug USB KEY and check that the device is configured to direct Connect a device that generates a clock on hold MIDI In or plug USB KEY and check that the device is configured to direct
MIDI clock / clock.
Press on S KEY and the last floor G7 right of the keyboard. On the screen appears Riverkey option Ext. Clock. If the choice WePress on S KEY and the last floor G7 right of the keyboard. On the screen appears Riverkey option Ext. Clock. If the choice WePress on S KEY and the last floor G7 right of the keyboard. On the screen appears Riverkey option Ext. Clock. If the choice WePress on S KEY and the last floor G7 right of the keyboard. On the screen appears Riverkey option Ext. Clock. If the choice WePress on S KEY and the last floor G7 right of the keyboard. On the screen appears Riverkey option Ext. Clock. If the choice WePress on S KEY and the last floor G7 right of the keyboard. On the screen appears Riverkey option Ext. Clock. If the choice WePress on S KEY and the last floor G7 right of the keyboard. On the screen appears Riverkey option Ext. Clock. If the choice WePress on S KEY and the last floor G7 right of the keyboard. On the screen appears Riverkey option Ext. Clock. If the choice We
is not selected, press again on G7 and resume TUTO Template 5, split, and arpeggio sequences. The River recognizes MIDI is not selected, press again on G7 and resume TUTO Template 5, split, and arpeggio sequences. The River recognizes MIDI is not selected, press again on G7 and resume TUTO Template 5, split, and arpeggio sequences. The River recognizes MIDI
Start, Stop and Continue. Perform Play, Stop and Pause on your external equipment and change the tempo in order to test
the behavior of sync on arpeggios and sequences of The River.
If another MIDI instrument is connected to The River via MIDI or USB KEY jack, it will also be able to receive clock information.
Check that the Riverkey the screen, the title is GLOBAL setup or Layer setup,Check that the Riverkey the screen, the title is GLOBAL setup or Layer setup,Check that the Riverkey the screen, the title is GLOBAL setup or Layer setup,Check that the Riverkey the screen, the title is GLOBAL setup or Layer setup,
otherwise made S KEY F # 3 "LAYER / GLO.". Type several times if necessary S KEY B4 "Clock" to select Clock = MID, USB or M / U. Thus otherwise made S KEY F # 3 "LAYER / GLO.". Type several times if necessary S KEY B4 "Clock" to select Clock = MID, USB or M / U. Thus otherwise made S KEY F # 3 "LAYER / GLO.". Type several times if necessary S KEY B4 "Clock" to select Clock = MID, USB or M / U. Thus otherwise made S KEY F # 3 "LAYER / GLO.". Type several times if necessary S KEY B4 "Clock" to select Clock = MID, USB or M / U. Thus otherwise made S KEY F # 3 "LAYER / GLO.". Type several times if necessary S KEY B4 "Clock" to select Clock = MID, USB or M / U. Thus otherwise made S KEY F # 3 "LAYER / GLO.". Type several times if necessary S KEY B4 "Clock" to select Clock = MID, USB or M / U. Thus otherwise made S KEY F # 3 "LAYER / GLO.". Type several times if necessary S KEY B4 "Clock" to select Clock = MID, USB or M / U. Thus otherwise made S KEY F # 3 "LAYER / GLO.". Type several times if necessary S KEY B4 "Clock" to select Clock = MID, USB or M / U. Thus otherwise made S KEY F # 3 "LAYER / GLO.". Type several times if necessary S KEY B4 "Clock" to select Clock = MID, USB or M / U. Thus
the external equipment will receive the The River clock that has been itself synchronized to external equipment.
8. Synchronization of Digital LFO (DLFO) 8. Synchronization of Digital LFO (DLFO)
The DLFO The River can now be synchronized with the clock The River (and thus to an external clock if it is selected, see
previous tutorial).
For this presentation, we are going from a simple config: load the template 1 ( S LOAD MULTI + voice button 1) and then load a For this presentation, we are going from a simple config: load the template 1 ( S LOAD MULTI + voice button 1) and then load a For this presentation, we are going from a simple config: load the template 1 ( S LOAD MULTI + voice button 1) and then load a
sound less "hard" Init such as LEAD ( S LOAD SINGLE + voice button 2). sound less "hard" Init such as LEAD ( S LOAD SINGLE + voice button 2). sound less "hard" Init such as LEAD ( S LOAD SINGLE + voice button 2).
Select the sequencer: S KEY G # 3 "Arpeggio" and a chord. With the Tap Tempo S KEY D3 "Tap Tempo", set a slow tempo. Select the sequencer: S KEY G # 3 "Arpeggio" and a chord. With the Tap Tempo S KEY D3 "Tap Tempo", set a slow tempo. Select the sequencer: S KEY G # 3 "Arpeggio" and a chord. With the Tap Tempo S KEY D3 "Tap Tempo", set a slow tempo. Select the sequencer: S KEY G # 3 "Arpeggio" and a chord. With the Tap Tempo S KEY D3 "Tap Tempo", set a slow tempo. Select the sequencer: S KEY G # 3 "Arpeggio" and a chord. With the Tap Tempo S KEY D3 "Tap Tempo", set a slow tempo.
With S KEY E3 "Divide-" set the vision of the 1/1 tempo. With S KEY E3 "Divide-" set the vision of the 1/1 tempo. With S KEY E3 "Divide-" set the vision of the 1/1 tempo.
On the panel, in DLFO, select the waveform S & H with WAVEFORM and put up DLFO of OSCILLATOR 1 and 2. The On the panel, in DLFO, select the waveform S & H with WAVEFORM and put up DLFO of OSCILLATOR 1 and 2. The On the panel, in DLFO, select the waveform S & H with WAVEFORM and put up DLFO of OSCILLATOR 1 and 2. The On the panel, in DLFO, select the waveform S & H with WAVEFORM and put up DLFO of OSCILLATOR 1 and 2. The On the panel, in DLFO, select the waveform S & H with WAVEFORM and put up DLFO of OSCILLATOR 1 and 2. The
potentiometer MISSED of DLFO still adjusts the speed of S & H. press S and turn the knob MISSED. The display Tempo Sync, select potentiometer MISSED of DLFO still adjusts the speed of S & H. press S and turn the knob MISSED. The display Tempo Sync, select potentiometer MISSED of DLFO still adjusts the speed of S & H. press S and turn the knob MISSED. The display Tempo Sync, select potentiometer MISSED of DLFO still adjusts the speed of S & H. press S and turn the knob MISSED. The display Tempo Sync, select potentiometer MISSED of DLFO still adjusts the speed of S & H. press S and turn the knob MISSED. The display Tempo Sync, select potentiometer MISSED of DLFO still adjusts the speed of S & H. press S and turn the knob MISSED. The display Tempo Sync, select potentiometer MISSED of DLFO still adjusts the speed of S & H. press S and turn the knob MISSED. The display Tempo Sync, select potentiometer MISSED of DLFO still adjusts the speed of S & H. press S and turn the knob MISSED. The display Tempo Sync, select potentiometer MISSED of DLFO still adjusts the speed of S & H. press S and turn the knob MISSED. The display Tempo Sync, select
1/1.
The DLFO has synchronized the clock The River and thus the arpeggio.

The River, User Manual PAGE 16 PAGE 16
press S and turn the knob MISSED. The display Tempo Sync, select 1/2. Now the DLFO goes twice as fast as the arpeggio, press S and turn the knob MISSED. The display Tempo Sync, select 1/2. Now the DLFO goes twice as fast as the arpeggio, press S and turn the knob MISSED. The display Tempo Sync, select 1/2. Now the DLFO goes twice as fast as the arpeggio, press S and turn the knob MISSED. The display Tempo Sync, select 1/2. Now the DLFO goes twice as fast as the arpeggio, press S and turn the knob MISSED. The display Tempo Sync, select 1/2. Now the DLFO goes twice as fast as the arpeggio, press S and turn the knob MISSED. The display Tempo Sync, select 1/2. Now the DLFO goes twice as fast as the arpeggio, press S and turn the knob MISSED. The display Tempo Sync, select 1/2. Now the DLFO goes twice as fast as the arpeggio, press S and turn the knob MISSED. The display Tempo Sync, select 1/2. Now the DLFO goes twice as fast as the arpeggio, press S and turn the knob MISSED. The display Tempo Sync, select 1/2. Now the DLFO goes twice as fast as the arpeggio,
for each note there are two variations of the height. press S and turn the knob MISSED. The display Tempo Sync, select 1/4. Now for each note there are two variations of the height. press S and turn the knob MISSED. The display Tempo Sync, select 1/4. Now for each note there are two variations of the height. press S and turn the knob MISSED. The display Tempo Sync, select 1/4. Now for each note there are two variations of the height. press S and turn the knob MISSED. The display Tempo Sync, select 1/4. Now for each note there are two variations of the height. press S and turn the knob MISSED. The display Tempo Sync, select 1/4. Now for each note there are two variations of the height. press S and turn the knob MISSED. The display Tempo Sync, select 1/4. Now for each note there are two variations of the height. press S and turn the knob MISSED. The display Tempo Sync, select 1/4. Now for each note there are two variations of the height. press S and turn the knob MISSED. The display Tempo Sync, select 1/4. Now for each note there are two variations of the height. press S and turn the knob MISSED. The display Tempo Sync, select 1/4. Now
the DLFO is four times faster than the Arpeggio for each note there are four variations of the height. To hear the last change,
it will certainly change the RELEASE;)it will certainly change the RELEASE;)
press S and turn the knob MISSED. The display Tempo Sync, and reselect 1/1. Now select the waveform Sin with WAVEFORM. press S and turn the knob MISSED. The display Tempo Sync, and reselect 1/1. Now select the waveform Sin with WAVEFORM. press S and turn the knob MISSED. The display Tempo Sync, and reselect 1/1. Now select the waveform Sin with WAVEFORM. press S and turn the knob MISSED. The display Tempo Sync, and reselect 1/1. Now select the waveform Sin with WAVEFORM. press S and turn the knob MISSED. The display Tempo Sync, and reselect 1/1. Now select the waveform Sin with WAVEFORM. press S and turn the knob MISSED. The display Tempo Sync, and reselect 1/1. Now select the waveform Sin with WAVEFORM. press S and turn the knob MISSED. The display Tempo Sync, and reselect 1/1. Now select the waveform Sin with WAVEFORM. press S and turn the knob MISSED. The display Tempo Sync, and reselect 1/1. Now select the waveform Sin with WAVEFORM. press S and turn the knob MISSED. The display Tempo Sync, and reselect 1/1. Now select the waveform Sin with WAVEFORM. press S and turn the knob MISSED. The display Tempo Sync, and reselect 1/1. Now select the waveform Sin with WAVEFORM. press S and turn the knob MISSED. The display Tempo Sync, and reselect 1/1. Now select the waveform Sin with WAVEFORM.
The DLFO is always in sync with the arpeggio, but this waveform, the control MISSED ( without S ) can play on the duration of the The DLFO is always in sync with the arpeggio, but this waveform, the control MISSED ( without S ) can play on the duration of the The DLFO is always in sync with the arpeggio, but this waveform, the control MISSED ( without S ) can play on the duration of the The DLFO is always in sync with the arpeggio, but this waveform, the control MISSED ( without S ) can play on the duration of the The DLFO is always in sync with the arpeggio, but this waveform, the control MISSED ( without S ) can play on the duration of the The DLFO is always in sync with the arpeggio, but this waveform, the control MISSED ( without S ) can play on the duration of the
period of the modulation wave. To you the complex waveforms. It is important to understand that this is a
synchronization. This means that the DLFO the cycle starts again at "zero" in each sync. synchronization. This means that the DLFO the cycle starts again at "zero" in each sync.
Example: no sync the RATE of DLFO is set to 1 Hz and WAVEFORM Triangle: once per second, the DLFO will generate a
complete triangle. If the synchronized to a clock of 2 Hz without changing RATE, the DLFO not have time to draw that half of the
triangle, and then will receive the order again. The output signal will be a sawtooth.
9. Compare function 9. Compare function
Function Compared toggles audio sound being edited with sound before the latest changes. Function Compared toggles audio sound being edited with sound before the latest changes. Function Compared toggles audio sound being edited with sound before the latest changes.
Long press (> 1 s) button UNISON. COMPARED is displayed on the screen and the button UNISON flashes. You can then play Long press (> 1 s) button UNISON. COMPARED is displayed on the screen and the button UNISON flashes. You can then play Long press (> 1 s) button UNISON. COMPARED is displayed on the screen and the button UNISON flashes. You can then play Long press (> 1 s) button UNISON. COMPARED is displayed on the screen and the button UNISON flashes. You can then play Long press (> 1 s) button UNISON. COMPARED is displayed on the screen and the button UNISON flashes. You can then play
the keyboard but all panel controls are disabled. To return to its being modified, long repressez button UNISON.the keyboard but all panel controls are disabled. To return to its being modified, long repressez button UNISON.
If after comparison, you prefer to go back to the initial version of the sound, ie you choose to abandon your changes, press S UNISONIf after comparison, you prefer to go back to the initial version of the sound, ie you choose to abandon your changes, press S UNISONIf after comparison, you prefer to go back to the initial version of the sound, ie you choose to abandon your changes, press S UNISON
when you are in fashion COMPARED.when you are in fashion COMPARED.

The River, User Manual PAGE 17 PAGE 17
VI. References VI. References
1. Channel and voice, and UNISON MODE buttons 1. Channel and voice, and UNISON MODE buttons
First step in the configuration of The River, we must organize multitimbrality and polyphony. For simplicity, sound = one channel First step in the configuration of The River, we must organize multitimbrality and polyphony. For simplicity, sound = one channel First step in the configuration of The River, we must organize multitimbrality and polyphony. For simplicity, sound = one channel First step in the configuration of The River, we must organize multitimbrality and polyphony. For simplicity, sound = one channel First step in the configuration of The River, we must organize multitimbrality and polyphony. For simplicity, sound = one channel
and a score = 1 vote. The River has 8 voices and 8 channels. The multitimbralityand a score = 1 vote. The River has 8 voices and 8 channels. The multitimbrality
is the ability to manage multiple sounds simultaneously, the polyphony meanwhile, is the ability to play multiple notes sound is the ability to manage multiple sounds simultaneously, the polyphony meanwhile, is the ability to play multiple notes sound is the ability to manage multiple sounds simultaneously, the polyphony meanwhile, is the ability to play multiple notes sound
simultaneously. We must also consider the nature of his rule when polyphony: a sound that slowly extinguished after releasing the
key (long release) require more votes even for a monophonic play. Otherwise, the new note will replace the old very quickly, and
the extinction of the previous note will be stopped abruptly ...
If you want to play one sound at a maximum polyphony, that is to say up to 8 notes simultaneously, it will be the simplest
configuration: Select channel 1 and set it all voices (all yellow buttons illuminated).
If you want to play two tones with a shared polyphony, that is to say up to four notes simultaneously for each sound, select
channel 1 and assign the first four voices, select channel 2 and set it the last four voices.
When you select a voice that is already assigned to another channel, it is removed from it.
When you add a voice channel, the sound loaded into other voice channel will be copied to this new voice.
The channel index is channel "MIDI" to communicate with him. For a layer address notes to Channel 2, for example, it will set
this layer output "The River, Channel 2". This is also valid for communication with software.
Function RDIR ( see page RDIR) to change the "pilot" channel of a channel. For example you can say, channel 3 receives Function RDIR ( see page RDIR) to change the "pilot" channel of a channel. For example you can say, channel 3 receives Function RDIR ( see page RDIR) to change the "pilot" channel of a channel. For example you can say, channel 3 receives Function RDIR ( see page RDIR) to change the "pilot" channel of a channel. For example you can say, channel 3 receives Function RDIR ( see page RDIR) to change the "pilot" channel of a channel. For example you can say, channel 3 receives
orders from channel 2 (see
Propagation All commands and redirection).
orders from channel 2 (see
Propagation All commands and redirection).
Orders synthesis are active for the selected channel unless mode ALL is selected. In this case, the panel acts on all channels. Orders synthesis are active for the selected channel unless mode ALL is selected. In this case, the panel acts on all channels. Orders synthesis are active for the selected channel unless mode ALL is selected. In this case, the panel acts on all channels.
The panel also acts on all channels that would be redirected to the selected channel (see
Propagation All commands and
The panel also acts on all channels that would be redirected to the selected channel (see
Propagation All commands and
redirection).
FASHION
This button changes the channel operation.
•mode MIDDAY, the destination of the layers is respected. What hand to channel 1 arrives on channel 1, which leaves towards the channel 2 arrives mode MIDDAY, the destination of the layers is respected. What hand to channel 1 arrives on channel 1, which leaves towards the channel 2 arrives mode MIDDAY, the destination of the layers is respected. What hand to channel 1 arrives on channel 1, which leaves towards the channel 2 arrives
on channel 2 etc ...
• mode SELECT, all incoming information is sent to the selected channel. So even if you have defined two layers with two mode SELECT, all incoming information is sent to the selected channel. So even if you have defined two layers with two mode SELECT, all incoming information is sent to the selected channel. So even if you have defined two layers with two
channels, or a single layer on a channel, in this mode, all notes will be sent to the selected channel. This mode is useful
when you want to go from a to another. You load two different sounds in both channels, and the choice of the channel on the
panel, you can alternately use each sound without extinguishing when switching from one channel to another.
• mode ALL, all information (one or more layers) are made simultaneously to all active channels (i.e. with at least one voice). mode ALL, all information (one or more layers) are made simultaneously to all active channels (i.e. with at least one voice). mode ALL, all information (one or more layers) are made simultaneously to all active channels (i.e. with at least one voice).
This mode is useful for working on complex multilayer sounds. The RDIR function to achieve the same result but more
accurately by linking only two channels for example.

The River, User Manual PAGE 18 PAGE 18
*S TRACKING (NORMAL, TRACKING)
Switches the answer mode potentiometers. In Normal mode, the values are jumping on the physical position of a potentiometer
as soon as one the move. In TRACKING mode, the values move when the knob passes by the stored value.
UNISON
You can link all voices of a channel. The game becomes monophonic. The command DETUNE will detune the voices and You can link all voices of a channel. The game becomes monophonic. The command DETUNE will detune the voices and You can link all voices of a channel. The game becomes monophonic. The command DETUNE will detune the voices and
bigger sound. This button also allows access to the function COMPARE (
COMPARE see Function).
bigger sound. This button also allows access to the function COMPARE (
COMPARE see Function).
bigger sound. This button also allows access to the function COMPARE (
COMPARE see Function).
Remember to put the detune controls to zero if you leave the UNISON mode because the detune remains active, and
there you will feel your River is completely out of tune.
S PANEL
Load the physical values being potentiometers, for from the current state of the panel. For from a basic sound, load one of INIT
programs (SINGLE or MULTI).
2. Load SINGLE or FX 2. Load SINGLE or FX
Check that the selected channel is good that you want to change and that at least one vote is assigned to that channel. press * S Check that the selected channel is good that you want to change and that at least one vote is assigned to that channel. press * S Check that the selected channel is good that you want to change and that at least one vote is assigned to that channel. press * S
LOAD SINGLE to access this menu. Select the location using encoders BANK ( 01-08, FX01-FX02) and SOUND ( 10-20). The LOAD SINGLE to access this menu. Select the location using encoders BANK ( 01-08, FX01-FX02) and SOUND ( 10-20). The LOAD SINGLE to access this menu. Select the location using encoders BANK ( 01-08, FX01-FX02) and SOUND ( 10-20). The LOAD SINGLE to access this menu. Select the location using encoders BANK ( 01-08, FX01-FX02) and SOUND ( 10-20). The LOAD SINGLE to access this menu. Select the location using encoders BANK ( 01-08, FX01-FX02) and SOUND ( 10-20). The
first 8 are reserved to banks SINGLE, the last 2 to banks FX.first 8 are reserved to banks SINGLE, the last 2 to banks FX.first 8 are reserved to banks SINGLE, the last 2 to banks FX.first 8 are reserved to banks SINGLE, the last 2 to banks FX.
Beware, there is no confirmation requested for playing a sound. The channel current settings will be replaced.
Press encoder left to load the sound in the selected channel without changing the settings of effects or the encoder law to load Press encoder left to load the sound in the selected channel without changing the settings of effects or the encoder law to load Press encoder left to load the sound in the selected channel without changing the settings of effects or the encoder law to load Press encoder left to load the sound in the selected channel without changing the settings of effects or the encoder law to load Press encoder left to load the sound in the selected channel without changing the settings of effects or the encoder law to load
the selected sound and apply its effect settings. Wait until the disappearance of the WAIT message before continuing.
3. Saving SINGLE 3. Saving SINGLE
press * S SAVE SINGLE to access this menu. press * S SAVE SINGLE to access this menu. press * S SAVE SINGLE to access this menu. press * S SAVE SINGLE to access this menu.
Select the destination using encoders BANK ( 01-08, FX01-FX02) and SOUND ( 10-20). The first 8 banks are reserved for Select the destination using encoders BANK ( 01-08, FX01-FX02) and SOUND ( 10-20). The first 8 banks are reserved for Select the destination using encoders BANK ( 01-08, FX01-FX02) and SOUND ( 10-20). The first 8 banks are reserved for Select the destination using encoders BANK ( 01-08, FX01-FX02) and SOUND ( 10-20). The first 8 banks are reserved for Select the destination using encoders BANK ( 01-08, FX01-FX02) and SOUND ( 10-20). The first 8 banks are reserved for
programs the last 2 banks (FX) are reserved to the effects and record only the effect settings.
Name the program using the row of eight encoder (encoder 1 by letter / digit).
By pressing and *
S
the name of the selected location will be copied into the editing area. If you change the selection (bank's) By pressing and *
S
the name of the selected location will be copied into the editing area. If you change the selection (bank's) By pressing and *
S
the name of the selected location will be copied into the editing area. If you change the selection (bank's) By pressing and *
S
the name of the selected location will be copied into the editing area. If you change the selection (bank's)
to copy a name, be sure to re-select the target location before confirming his backup.
Beware, there is no confirmation requested for saving a SINGLE. The program in memory in this location will be
permanently replaced.
Confirm the backup by pushing one of the encoders. Wait until the disappearance of
the WAIT message before continuing.

The River, User Manual PAGE 19 PAGE 19
4. Load MULTIS 4. Load MULTIS
press * S LOAD MULTI to access this menu. Select the location using encoders BANK ( 01-02) and SOUND press * S LOAD MULTI to access this menu. Select the location using encoders BANK ( 01-02) and SOUND press * S LOAD MULTI to access this menu. Select the location using encoders BANK ( 01-02) and SOUND press * S LOAD MULTI to access this menu. Select the location using encoders BANK ( 01-02) and SOUND press * S LOAD MULTI to access this menu. Select the location using encoders BANK ( 01-02) and SOUND press * S LOAD MULTI to access this menu. Select the location using encoders BANK ( 01-02) and SOUND press * S LOAD MULTI to access this menu. Select the location using encoders BANK ( 01-02) and SOUND
( 01-20). ( 01-20).
Beware, there is no confirmation requested for reading a multi. All current settings will be replaced.
Confirm loading by pushing one of the encoders. Wait until the disappearance of
the WAIT message before continuing.
5. Saving Multis 5. Saving Multis
press * S MULTI SAVE to access the backup of a multi. press * S MULTI SAVE to access the backup of a multi. press * S MULTI SAVE to access the backup of a multi. press * S MULTI SAVE to access the backup of a multi.
Select the destination using the BANK encoders (01-02) and SOUND (01-20). Name the multi using the row of
encoders 8 (1 encoder by letter / number).
By pressing and *
S ,
the name of the selected location will be copied into the editing area. If you change the selection (bank's) to By pressing and *
S ,
the name of the selected location will be copied into the editing area. If you change the selection (bank's) to By pressing and *
S ,
the name of the selected location will be copied into the editing area. If you change the selection (bank's) to By pressing and *
S ,
the name of the selected location will be copied into the editing area. If you change the selection (bank's) to By pressing and *
S ,
the name of the selected location will be copied into the editing area. If you change the selection (bank's) to
copy a name, be sure to re-select the target location before confirming his backup.
Beware, there is no confirmation requested for the backup of a MULTI. The program in memory in this location will
be permanently replaced.
Confirm the backup by pushing one of the encoders. Wait until the disappearance of
the WAIT message before continuing.
6. Sound Options 6. Sound Options
press * S OPTIONS to access the settings related to sound and saved with it. press * S OPTIONS to access the settings related to sound and saved with it. press * S OPTIONS to access the settings related to sound and saved with it. press * S OPTIONS to access the settings related to sound and saved with it.
DLfo Mode (Channel Last Key)
mode Channel, the DLFO is applied to all notes. mode Last Key the DLFO is applied only on the last note played. This allows, mode Channel, the DLFO is applied to all notes. mode Last Key the DLFO is applied only on the last note played. This allows, mode Channel, the DLFO is applied to all notes. mode Last Key the DLFO is applied only on the last note played. This allows, mode Channel, the DLFO is applied to all notes. mode Last Key the DLFO is applied only on the last note played. This allows, mode Channel, the DLFO is applied to all notes. mode Last Key the DLFO is applied only on the last note played. This allows,
among others, to simulate a Polyphonic aftertouch.
BEND RANGE (0 ... 12)
Sets the pitch bend range of action in semitones. As this function is related to the program, each channel may have a different
range of pitch bend. MP mode it is important to select the same value on the MPE controller, 12 is recommended on both sides. range of pitch bend. MP mode it is important to select the same value on the MPE controller, 12 is recommended on both sides. range of pitch bend. MP mode it is important to select the same value on the MPE controller, 12 is recommended on both sides.
MPE
MPE Z Y
Selects the parameter to be modulated by action on the Z and Y dimension of the MPE controller. For almost all parameters,
two versions are available: the second halves the modulation depth to "soften" the sensitivity of the game.
Cutoff, Cutoff / 2 Frequency Filter
Emphasis, emphasis / 2 Resonance Filter
Filter Lfo, LFO Filter / 2 Amplitude modulation LFO Filter
Lfo spleen, spleen Lfo / 2 LFO speed
Osc1 mix, Mix Osc1 / 2 Level of the VCO 1
Other manuals for The River
1
Table of contents
Other Baloran Synthesizer manuals