Barisieur Barisieur Black Installation and operating manual

1
BARISIEUR
SAFETY
GUIDE

2
CONTENTS
4 English
15 Dutch
26 French
38 German
50 Italian
62 Norwegian
73 Spanish
84 Turkish
96 Russian
108 Danish
119 Arabic
123 Japanese

4
5
ENEN
READ ALL INSTRUCTIONS CAREFULLY BEFORE USING THE
BARISIEUR.
Read this guide for important health and safety information and the
terms of the Limited Warranty that apply to the Barisieur device that
you have purchased. Keep all printed guides for future reference.
Failure to follow instructions and properly set up, use, and care for this
product can increase the risk of serious injury or death, or damage to
the device or devices. Keep guide in a place where you can find and
refer to.
IMPORTANT SAFETY NOTES
THIS BARISIEUR IS FOR HOUSEHOLD USE ONLY.
THE APPLIANCE IS INTENDED TO PREPARE BEVERAGES ACCORDING
TO THESE INSTRUCTIONS.
THE BARISIEUR IS NOT INTENDED FOR USE BY PERSONS
(INCLUDING CHILDREN) WITH REDUCED PHYSICAL, SENSORY OR
MENTAL CAPABILITIES, OR LACK OF EXPERIENCE AND KNOWLEDGE,
UNLESS THEY HAVE BEEN GIVEN SUPERVISION OR INSTRUCTION
CONCERNING USE OF THE BARISIEUR BY A PERSON RESPONSIBLE
FOR THEIR SAFETY. CHILDREN SHOULD BE SUPERVISED TO ENSURE
THAT THEY DO NOT PLAY WITH THE BARISIEUR.
DO NOT USE THE BARISIEUR FOR ANYTHING OTHER THAN ITS
INTENDED USE.
THIS DEVICE MAY CONTAIN SMALL PARTS WHICH MAY BE A CHOKING
HAZARD TO CHILDREN. KEEP SMALL PARTS AWAY FROM CHILDREN.
SAFETY CHECK
FAILURE TO FOLLOW INSTRUCTIONS AND PROPERLY SET UP, USE,
AND CARE FOR THIS PRODUCT CAN INCREASE THE RISK OF SERIOUS
INJURY OR DEATH, OR DAMAGE TO THE DEVICE OR DEVICES.
FAILURE TO COMPLY WITH THE MENTIONED PRECAUTIONS AND
INSTRUCTIONS COULD AFFECT THE SAFE OPERATION OF THIS
BARISIEUR.
BARISIEUR LTD CANNOT ACCEPT RESPONSIBILITY FOR ANY
DAMAGE OR INJURY CAUSED BY IMPROPER OR INCORRECT USE, OR
FOR REPAIRS CARRIED OUT BY UNAUTHORISED PERSONNEL.
1. Once the product is unpacked check for any damage. Do not use
the Barisieur if it has been dropped or damaged. In case of damage,
take the unit in for examination and/or repair by an authorised service
agent. Get in touch at Info@barisieur.com.
2. CAUTION: Risk of electrical shock and fire. Make sure that nothing
other than the boiling vessel provided in the package is touching
induction surface.
3. Do not put anything into any openings which may block exits for
water flow as this could cause damage to the device and risk of injury
to the user.
4. Always ensure that the voltage on the rating label corresponds to
the mains voltage in your home.
5. Always operate the Barisieur on a smooth, even, horizontal, stable
surface. The surface must be resistant to heat and fluids, like water,
coffee, tea, milk or similar.
6. Check the power cord and plug regularly for any damage. If the cord
or plug is damaged, the product must be discarded or the damaged
plug it must be replaced by the manufacturer or qualified person to
avoid electrical hazard.
7. Never immerse the Barisieur electrical housing in water or any
other liquid for cleaning purposes.
8. Remove the plug from the socket by gripping the plug. Do not pull
on the cord to disconnect the Barisieur from the mains.
9. Do not use accessory attachments that are not recommended or
supplied with the Barisieur
10. Do not let the cord hang over the edge of a table or counter.
Ensure that the cord is not in a position where it can be pulled on
inadvertently.

6
7
ENEN
11. Do not allow the cord to touch hot surfaces and do not place on or
near a hot gas or electric burner or in a heated oven.
12. Keep the cord away from heat and damp.
13. Do not use the Barisieur on a gas or electric cooking top or over or
near an open flame
14. Use of an extension cord with this Barisieur is not recommended.
15. Do not carry the Barisieur by the power cord.
16. If the machine is not working properly or there is some technical
issue switch the machine off and refer to the trouble shooter table. If a
solution cannot be found then contact customer service and return to
an authorised agent.
17. Do not use external automatic timers in conjunction with the
Barisieur.
Operation
INITIAL SET-UP
Fig. 1 Fig. 2 Fig. 3 Fig. 4 Fig. 5
1. Unpack the Barisieur carefully removing all foam and packaging
away from accessories.
2. Place the unit on a larger surface for more space for set up.
3. Wash all the accessories that will contain water before first use.
4. Place all the accessories in their correct positions as shown in the
diagram above.
5. Plug in the unit to the AC 220-240v mains supply using power cord
provided.
6. The Barisieur must be earthed before switching on.
7. Wait for the display to initiate and display the time and symbols.
8. Remove the bung with transfer tube from the boiling vessel and
fill with water to the MAX line. DO NOT UNDER OR OVER FILL THE
BOILING VESSEL.
9. Place the bung back into the boiling vessel until a positive feeling
snap has occurred. Make sure all protrusions are aligned in the bung
and glass. (Fig 1)
10. Place the boiling vessel back to the wooden tray in the correct
position shown. Make sure all protrusions are aligned on the vessel
bottom and wood. (Fig 2)
11. Put ground coffee or loose-leaf tea in the filter and rotate the filter
arm clockwise so that the filter and funnel are in position above the
cup. (Fig 3)
12. Make sure the transfer tube is aligned and the exit is positioned
over the filter and funnel. (Fig 4)
13. Remove the milk vessel and fill to the MAX line. Snap the bung
back into place to make sure the milk will stay fresh. The cooling
device will not initiate if no milk is present in the vessel as the system
is intelligent and will sense when an opaque fluid is present.
14. Long press (for 3 seconds) the make button in any mode to start
the brewing process.
15. The machine will take approximately 5 minutes depending on
water temperature and environment to finish the brewing process.
(Fig 5)
16. THE BARISIEUR MUST BE AT LEAST 30 CM[DSN3] AWAY FROM
THE BED AND IN A POSITION WHERE IT CANNOT BE ACCIDENTALLY
KNOCKED OVER OR DAMAGED.
WARNINGS
8
9
ENEN
The device is a heating device and so will be hot to the touch. Do not
pick up the boiling vessel during the boiling process as injury and
burning will occur. The boiling vessel, filter, and glass ware should be
left to cool for 2 minutes once the boiling process has finished before
handling.
SETTING ALARM AND TIME
ALARM
1. To set the Alarm time - long press (2 seconds) the rotary control
on the right of the machine until the buzzer sounds and the ALARM
symbol is flashing on the display then let go.
2. The ALARM mode is now operational;
3. Use the rotary control and rotate to change the hours then press
once to move along to the minute segment.
4. Rotate to change the minute digits.
5. Then press once to finish setting the alarm.
6. To check the ALARM time set short press the rotary control.
TIME
1. To set the time; long press (4 seconds) the rotary control on the
right of the machine until the buzzer sounds and the TIME symbol is
flashing on the display.
2. The TIME mode is now operational and use the rotary control and
rotate to choose between AM of PM. press rotary control to go to next
setting.
3. Set the hours by rotating the rotary control button and press once to
move along to the minute segment.
4. Rotate to change the minute digits.
5. Then a press to finish the process of setting the time.
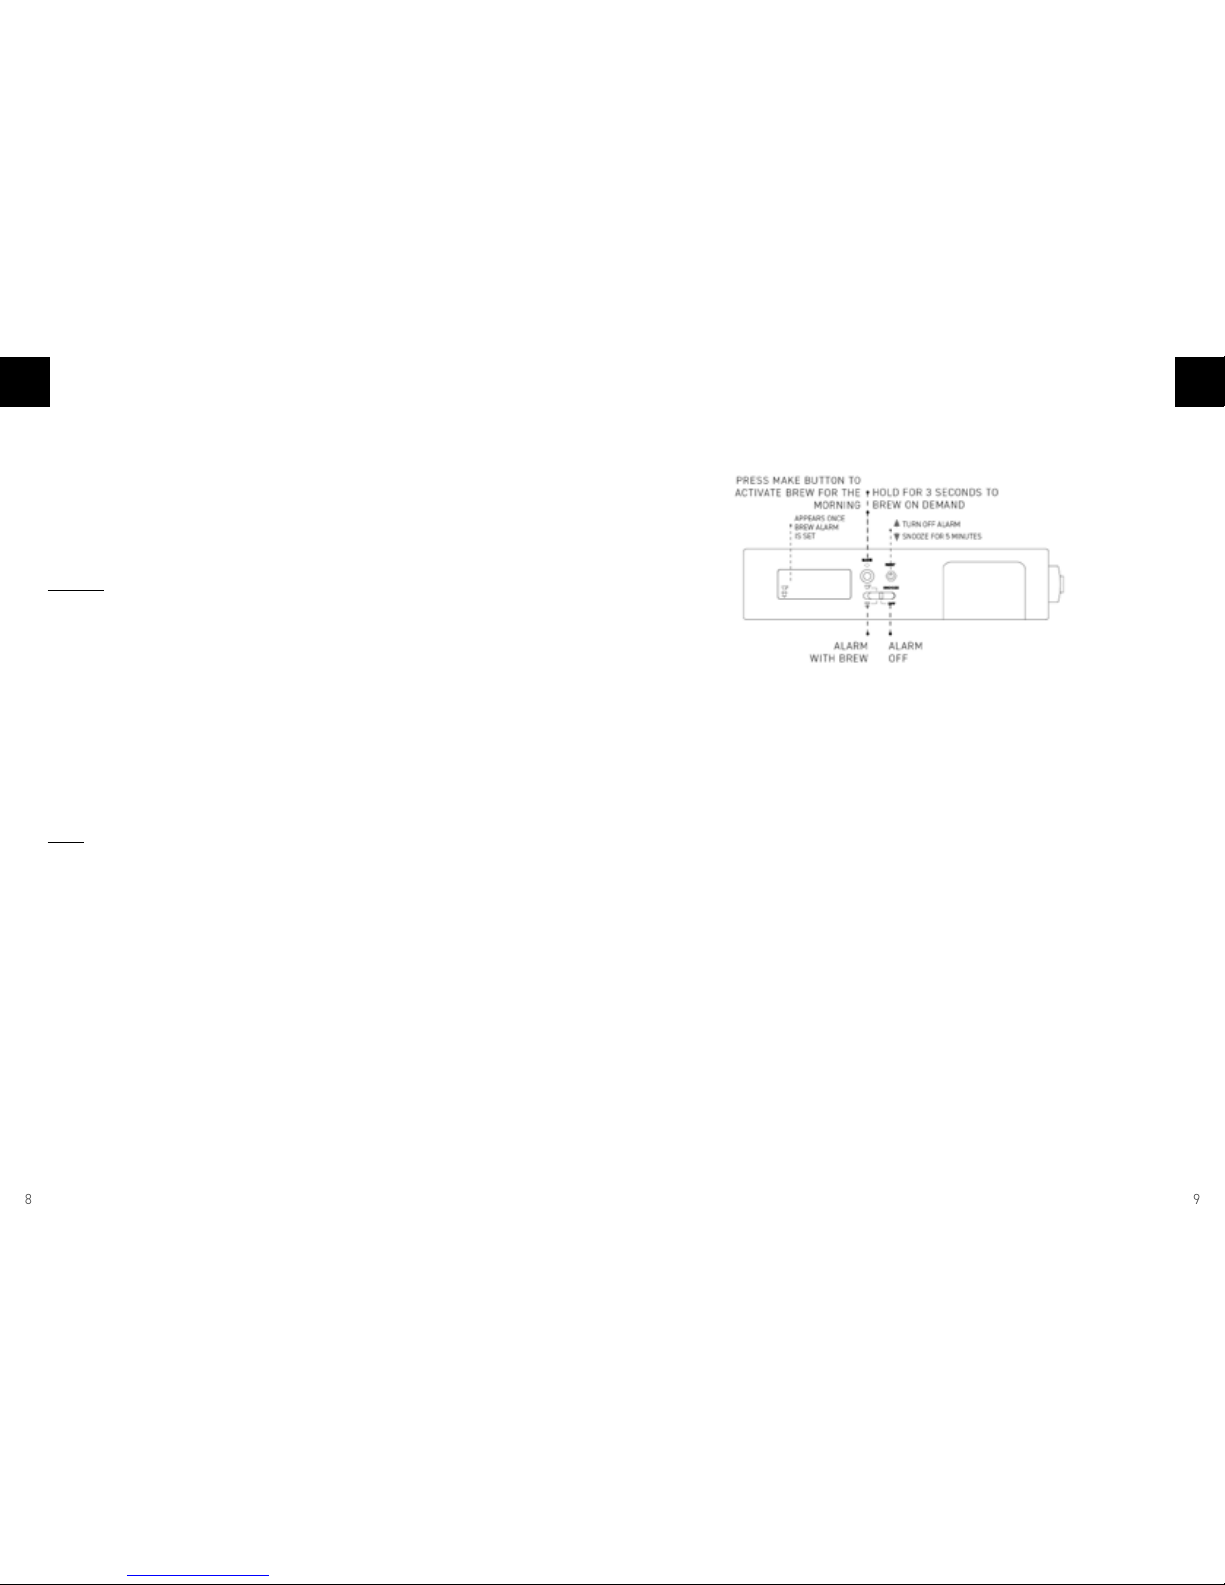
OPERATION MODES
1. OFF Mode turns all alarms and boiling off
2. ALARM mode turns only alarms set on; but does not boil/brew.
3. ALARM + BOILING turns on alarm set and is the initial set for boiling
set. To confirm boiling set short press the MAKE button. The cup
symbol will illuminate when boiling set has been confirmed.
4. Once A+B mode has been set, boiling will only occur ONCE. You must
press make every night in order to turn cup symbol on and expect
a morning brew. Cup Symbol will turn off until the MAKE button is
pressed again to set boil on.
5. SNOOZE toggle snoozes the ALARM for 5 minutes.
6. RESET toggle resets the ALARM and will sound again 24hrs later in
A+B and A modes. The ALARM is only off in the OFF mode.
Warning
THIS DOUBLE USER ACTION ON A+B MODE IS A SAFETY
REQUIREMENT TO MAKE SURE
THAT BOILING MODE HAS NOT BEEN SET ACCIDENTALLY.
10
11
ENEN
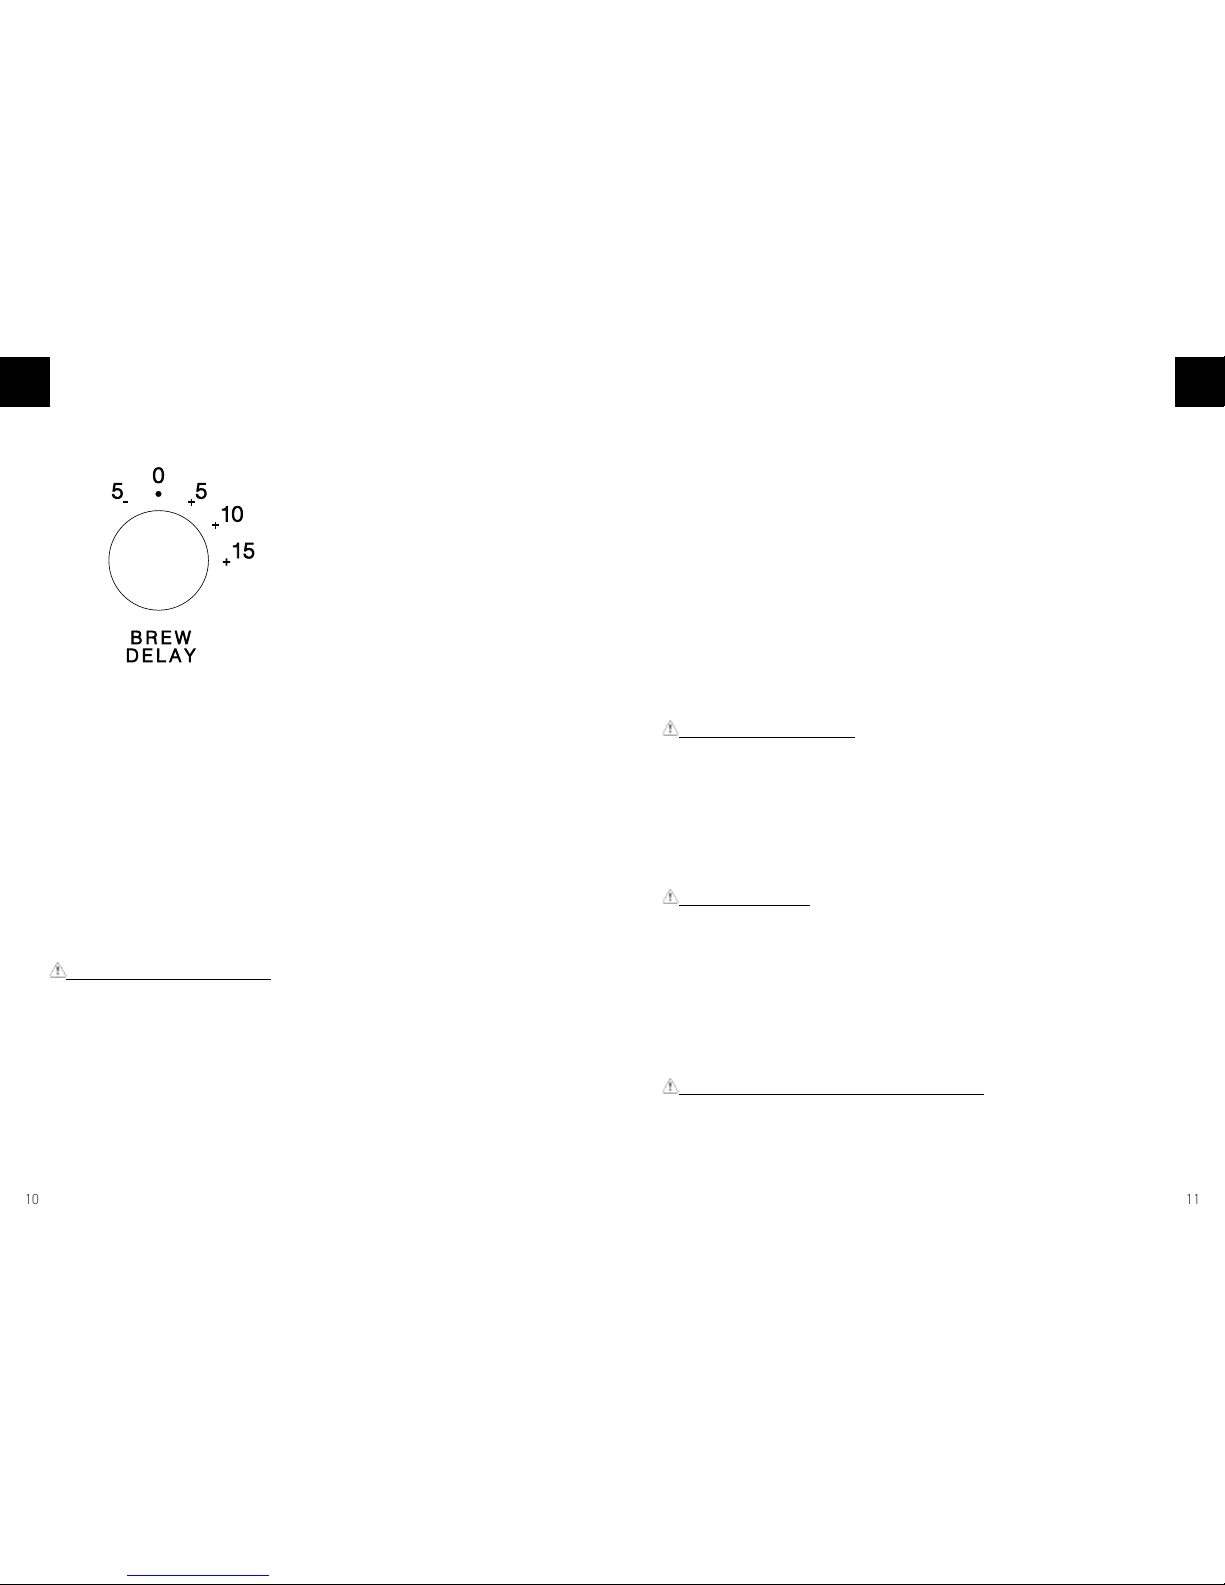
BREW DELAY
The brew delay provides functionality for separating the alarm time to
the boiling time. By rotating this control, the boil time can be delayed
or advanced to the alarm time.
This means you can wake up to freshly brewed tea or coffee.
1. 5: Set boiling time by 5 minutes before the alarm sounds
2. 0: Boiling will start on the alarm sound
3. 5: Boiling will start 5 minutes after the alarm
4. 10: Boiling will start 10 minutes after the alarm
5. 15: Boiling will start 15 minutes after the alarm
Warning: AC Adapter Safety
Failure to take the following precautions can result in serious injury or
death from electric shock or fire or in damage to the device. To select
an appropriate power source for your device:
· Use only the power supply unit, plug adapters, and AC power cord
that came supplied with the device or that you received from an
authorized Barisieur source or retailer.
· Do not use non-standard power sources, such as generators or
inverters, even if the voltage and frequency appear acceptable. Only
use AC power provided by a standard wall outlet.
· Do not overload your wall outlet, extension cord, power strip, or
other electrical receptacle. Confirm that they are rated to handle the
total current (in amps [A]) drawn by the device (indicated on the power
supply unit) and any other devices that are on the same circuit.
· On devices where the AC prongs are removable and where the
power supply uses a universal adapter, before plugging the AC
adapter into a power outlet, make sure the prong assembly is of the
proper configuration for the power outlet and fully seated into the
adapter[DSN4].
For devices with an AC power cord that connects to the power supply,
always connect the power cord according to the following instructions:
1) Plug the AC power cord into the power supply until it seats fully.
2) Plug the other end of the AC power cord into the wall outlet (if you
have an adapter – plug it into the adapter first)
Warning: Battery Safety
This device contains a built-in battery, improper use of which may
result in explosion. Do not open, puncture, mutilate, or dispose of
the product in fire. Do not leave the device in direct sunlight for an
extended period, which could cause melting or battery damage. The
battery in this device is not user replaceable and should only be
replaced by Barisieur or a Barisieur Authorized Provider.
Warning: Hazards
Do not expose it to rain or moisture. Do not attempt to dry device with
a hair dryer or a microwave oven.
The glassware is fragile and could break if the Barisieur is dropped
or receives a significant impact. To reduce the risk of cuts if the glass
chips or cracks, do not touch or attempt to remove the broken glass.
Cracked or chipped glass due to misuse or abuse is not covered under
the product’s limited warranty.
Caution: Parts of this device are magnetic
It may attract metallic materials. To reduce the likelihood of magnetic
fields interfering with compass readings, disrupting the proper
operation of pacemakers, or corrupting magnetically stored data, do

12
13
ENEN
not place credit cards or other magnetic storage media or magnetically
sensitive devices near this device.
Persons with pacemakers:
· Should always keep the device more than 15 cm (6 inches) from the
pacemaker when the wireless device is turned on.
· If you have any reason to suspect that interference is taking place,
turn the device off immediately.
Other Medical Devices
If you use any other personal medical device, consult the medical
device manufacturer or your physician to determine if it is appropriate
for you to use other electronic devices near your medical device.
Caution: Heat Related Concerns
THE DEVICE MAY BECOME VERY HOT DURING NORMAL USE.
· Set up your device on a stable work surface that allows for adequate
air circulation under and around the device.
· Use caution when operating your device near a pillow, blanket, or
other soft material, because the material can block the airflow which
may result in the device overheating.
· This appliance has been designed for indoor and non-extreme
temperature conditions use only.
· Protect the appliance from direct sunlight effect, prolonged water
splash and humidity.
· This is a household appliance only. It is not intended to be used in:
staff kitchen areas in shops, offices and other working environments;
farm houses; by clients in hotels, motels and other residential type
environments; unless agreed upon with Barisieur ltd.
Caution: Cleaning and Maintenance
NEVER ATTEMPT TO MOVE OR CLEAN THE BARISIEUR UNTIL IT HAS
COMPLETELY COOLED.
The boiling vessel should be rinsed daily if used. We recommend
rinsing the boiling vessel before filling is up to get rid of any old water
sitting in the vessel.
· Electricity and water together is dangerous and can lead to fatal
electrical shocks.
· Ensure the Barisieur is unplugged from the mains before cleaning.
· Extreme caution must be used when moving an appliance containing
hot liquids.
· Do not use any strong cleaning agent or solvent cleaner. use a damp
cloth and mild cleaning agent to clean the surface of the appliance.
· You must be careful when cleaning the transfer tube as it is very
delicate.
· Do not leave water in the boiling vessel for long periods, as this will
encourage lime scale build-up and rust.
· Disconnect by pulling out the plug and not by pulling the cord itself
or the cord may become damaged.
· Never touch the cord with wet hands.
· Never immerse the appliance or part of it in water or other liquid.
· Never put the appliance or part of it in a dishwasher.
· Do not open the appliance. hazardous voltage inside!
· The use of accessory attachments not recommended by the
manufacturer may result in fire, electric shock or injury to persons.
avoid possible harm when operating the appliance
· Never leave the appliance unattended during operation.
· A damaged appliance can cause electrical shocks, burns and fire.
· Do not put fingers under coffee outlet, risk of scalding.
· Cleaning and user maintenance shall not be made by children under
16, unless supervised by an adult.
· Make sure objects are dry after cleaning before re-using the product
· The outside of the unit can be cleaned with a soft moistened cloth
with mild detergent solution. if you use soap to clean the glassware,
the glassware should then be rinsed with clean water.
De-scaling
We understand that excessive lime scale build-up will hurt The
Barisieur, not to mention it doesn’t look good. We do not recommend
descaling the machine and you do so at your own risk.

14
EN
We recommend physically cleaning the glassware instead of using
de-scaling agent.
You can use a pipe cleaner to clean the tubes, boiling vessel, filter
and cup; or you can purchase a cleaning kit from our website - www.
Barisieur.com.
Basic data:
(1) Parameters:
Voltage:50/60Hz160~260VAC(±5VAC);
Working environment:-10~45°C;
Standby power: 220Vunder 1W;
Power: 500W(±40w)
Power cord: VDE certified
Noise:Coffee machine brewing <45db, When only cooling<35db
Certificate: CE
(2) Basic function:
Induction heating
Dry burn protect
Overheat protect
Temperature sensor failure protect
Milk cooling
Milk infared sensor
Time, alarm
Display
Display automatic adjust light
Beep warn
Beep volume adjust
System reset

15
NL
LEES ALLE INSTRUCTIES ZORGVULDIG DOOR VOORDAT U DE
BARISIEUR GEBRUIKT.
Lees deze handleiding voor belangrijke informatie over gezondheid
en veiligheid en de voorwaarden van de beperkte garantie die van
toepassing is op het Barisieur-apparaat dat u hebt gekocht. Bewaar
alle handleidingen voor toekomstig gebruik.
Als u de instructies niet volgt en dit product niet correct instelt,
gebruikt en verzorgt, kan het risico op ernstig letsel of overlijden of
schade aan het apparaat of apparaten worden verhoogd. Houd de
handleiding voor toekomstige verwijzing.
BELANGRIJKE VEILIGHEIDSAANWIJZINGEN
DEZE BARISIEUR IS ALLEEN VOOR HUISHOUDELIJK GEBRUIK.
HET APPARAAT IS BEDOELD VOOR DRANKEN TE BEREIDEN VOLGENS
DEZE INSTRUCTIES.
DE BARISIEUR IS NIET BEDOELD VOOR GEBRUIK DOOR PERSONEN
(MET INBEGRIP VAN KINDEREN) MET VERMINDERDE LICHAMELIJKE,
SENSORISCHE OF MENTALE VERMOGENS, OF GEBREK AAN
ERVARING EN KENNIS, TENZIJ ZIJ ONDER TOEZICHT INSTRUCTIES
HEBBEN GEHAD OVER HET GEBRUIK VAN DE BARISIEUR DOOR
IEMAND DIE VOOR HUN VEILIGHEID AANSPRAKELIJK IS . KINDEREN
MOGEN NIET MET DE BARISIEUR SPELEN.
GEBRUIK DE BARISIEUR ALLEEN VOOR HET BEOOGDE GEBRUIK
DIT TOESTEL KAN KLEINE ONDERDELEN BEVATTEN DIE EEN
GEVAAR VOOR KINDEREN KUNNEN VEROORZAKEN. HOUD KLEINE
ONDERDELEN BUITEN BEREIK VAN KINDEREN.
VEILIGHEIDSCONTROLE
Bij gebrek aan de instructies te volgen van het correct instellen,
gebruik en onderhoud van dit product, kan het risico op ernstig letsel
of overlijden of schade aan het apparaat of apparaten verhogen.

16
17
NLNL
dat het snoer niet in een plek is waar het per ongeluk aan getrokken
kan worden.
11. Laat het snoer niet in contact komen met warme oppervlakken
en plaats het apparaat niet op of nabij een warm gas -/ elektrische
fornuis of een hete oven.
12. Houd het snoer uit de buurt van hitte en vocht.
13. Plaats de Barisieur niet op een gas- of elektrische kookplaat of in
de buurt van een open vlam.
14. Het gebruik van een verlengsnoer met deze Barisieur is niet
aanbevolen
15. Pak de Barisieur niet bij het snoer op.
16. Als de machine niet goed werkt of als er een technisch probleem is,
schakel de machine uit en raadplicht de probleemoplossing tabel. Als
een oplossing niet kan worden gevonden, neem dan contact op met de
klantenservice en retourneer naar een erkende dealer.
17. Gebruik geen externe automatische timers in combinatie met de
Barisieur.
WERKING
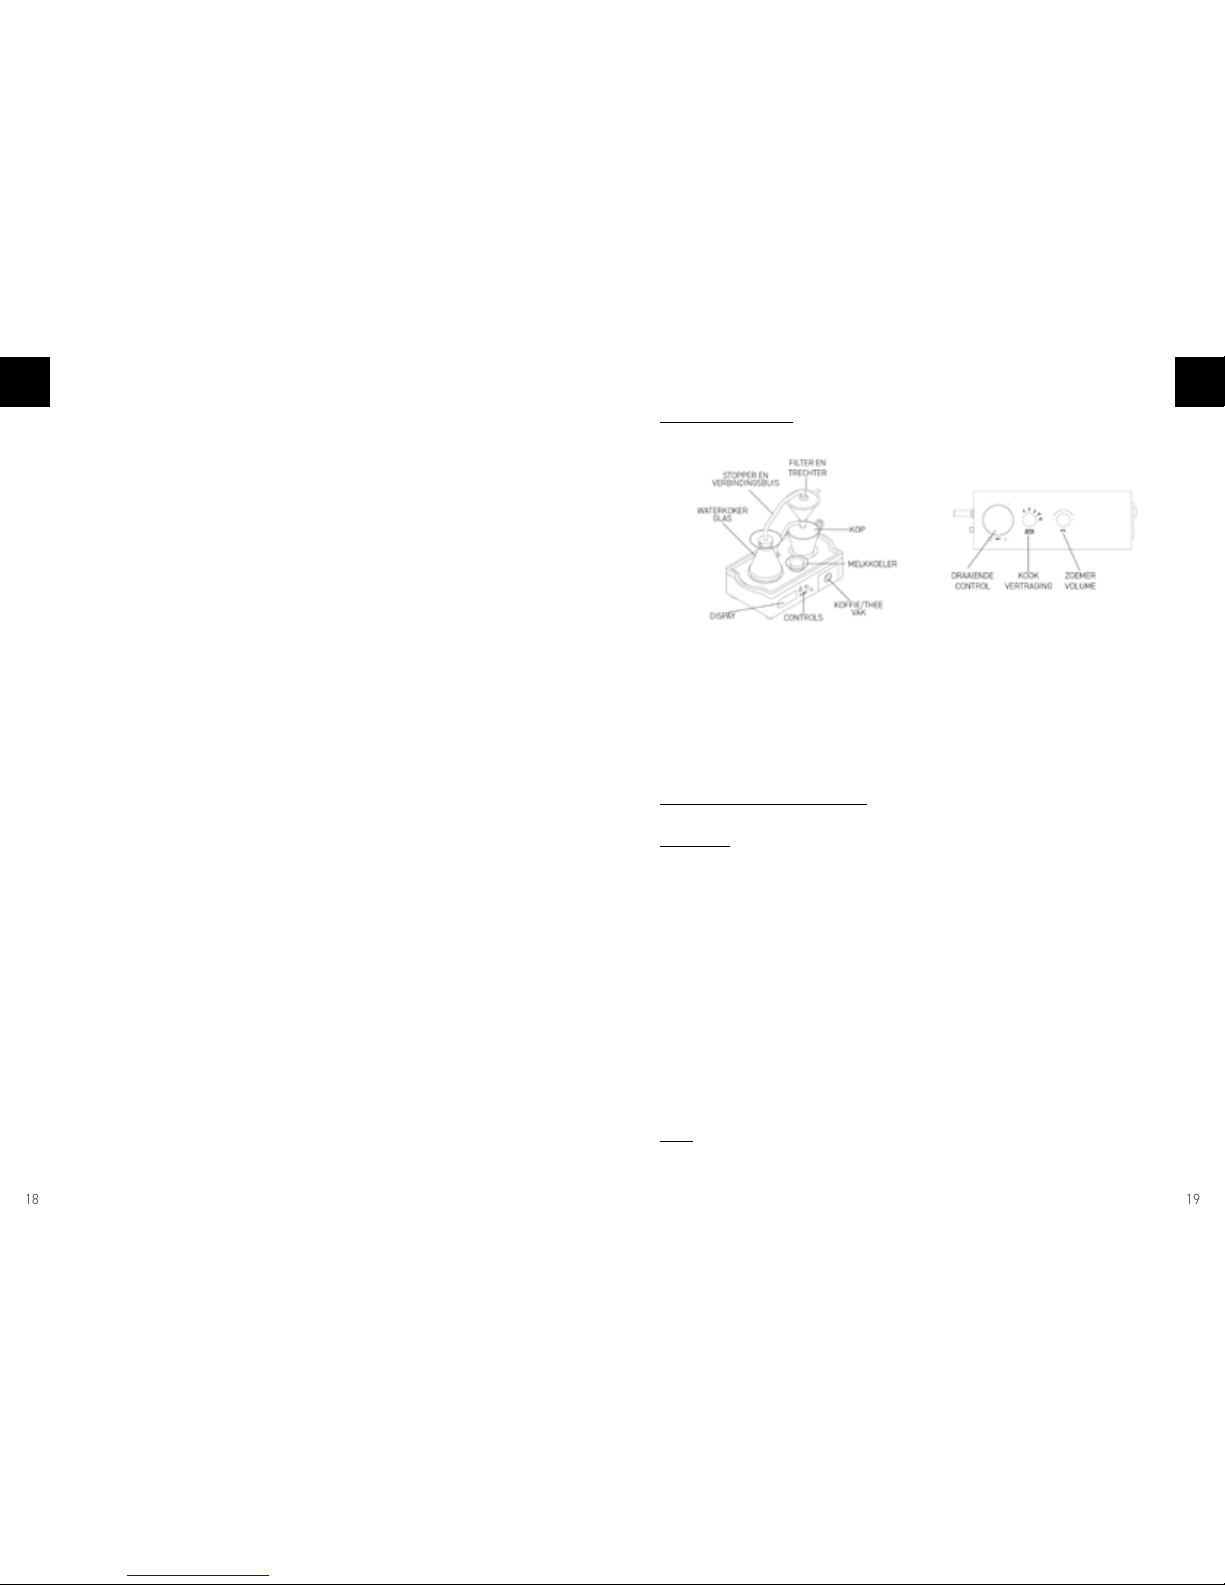
Initiële setup
Fig. 1 Fig. 2 Fig. 3 Fig. 4 Fig. 5
1. Pak de Barisieur uit en verwijder voorzichtig alle piepschuim
verpakking van de onderdelen
2. Plaats het apparaat op een groot, plat oppervlak.
3. Was alle onderdelen waarin water gebruikt wordt.
4. Plaats alle onderdelen in hun juiste stand, zoals aangegeven in het
diagram hierboven.
5. Steek de stekker in het stopcontact ( netspanning van de AC 220-
240V) .
6. De Barisieur moet geaard zijn voordat het apparaat aangezet wordt.
BARISIEUR LTD CANNOT ACCEPT RESPONSIBILITY FOR ANY
DAMAGE OR INJURY CAUSED BY IMPROPER OR INCORRECT USE, OR
FOR REPAIRS CARRIED OUT BY UNAUTHORISED PERSONNEL.
Niet-naleving van de genoemde voorzorgsmaatregelen en instructies
kan de veilige werking van deze Barisieur beïnvloeden.
Barisieur ltd kan niet aansprakelijkheid gehouden worden voor
eventuele schade of letsel veroorzaakt door onjuist gebruik of voor
reparaties uitgevoerd door onbevoegd personeel.
1. Zodra het product is uitgepakt, controleer of er sprake is van
schade. Gebruik de Barisieur niet als het is gevallen of beschadigd. In
geval van beschadiging, breng het apparaat terug voor onderzoek en
/ of reparatie door een erkende serviceagent. Neem contact op Info@
barisieur.com
2. Let op: Gevaar voor elektrische schokken en brand. Zorg ervoor dat
alleen het waterkoker glas wordt geplaatst op het inductieoppervlak.
3. stop niets in openingen die de uitgangen voor water en stoom
kunnen blokkeren, dit kan schade aan het apparaat veroorzaken en
het risico op letsel van de gebruiker veroorzaken.
4. Controleer altijd of de spanning op het typeplaatje overeenkomt met
de netspanning in uw huis.
5. Gebruik de Barisieur altijd op een gladde, vlakke, horizontale,
stabiele ondergrond. Het oppervlak moet bestand zijn tegen warmte
en vloeistoffen, zoals water, koffie, thee melk en dergelijke.
6. Controleer het snoer en stekker regelmatig voor eventuele schade.
Als het snoer of de stekker beschadigd is, moet het vervangen worden
door de fabrikant of een gekwalificeerde persoon om elektrische
gevaren te voorkomen
7. Gebruik nooit water of ander vloeistoffen voor het reinigen van de
electrische behuizing
8. Haal de stekker uit het stopcontact, trek niet aan het snoer, om de
Barisieur uit het stopcontact te verwijderen.
9. Gebruik geen verlengsnoer, meervoudige stopcontacten of adapters.
10. Laat het snoer niet over de rand van een tafel hangen. Zorg ervoor
18
19
NLNL
WAARSCHUWING
Het apparaat is een verwarmingsapparaat en wordt heel heet. Pak het
waterkoker glas niet op tijdens het kook proces, aangezien er letsel
en verbranding kan optreden. Het waterkoker glas, filter en glazen
kop moet zeker 2 minuten afkoelen na het kook proces voordat het
aangeraakt kan worden.
WEKKER EN TIJD INSTELLE
WEKKER
1. Om de wekkertijd in te stellen, druk de bedieningsknop in (2
seconden) totdat de zoemer klinkt en het wekker symbool knippert,
laat los.
2. U kunt de wekker nu instellen.
3. Draai de bedieningsknop voor het uur tijdstip in te stellen, druk een
keer op de knop, daarna kunt u het minuten tijdstip instellen.
4. Draai de bedieningsknop naar het gewenste minuten cijfer.
5. Druk de knop een keer in en de wekkertijd is ingesteld.
6. Om de ingestelde wekkertijd te controleren, druk een keer op de
draaiknop.
TIJD
1. Om de tijd in te stellen, druk de bedieningsknop lang in (4
7. Wacht op het verlichten van het display dat de tijd en symbolen
weergeeft.
8. Pak de stopper met de verbindingsbuis uit het waterkoker glas en
vul het glas met water tot aan de MAX-streep. Pas op: Niet onder- of
overvullen.
9. Plaats de stopper terug in het waterkoker glas totdat het klikt. Zorg
ervoor dat alles in rechte lijn is met de stopper en het glas. (Fig 1)
10. Plaats het waterkoker glas op de houten plank in de juiste positie.
Zorg ervoor dat alles op een lijn geplaatst is met de bodem en het
hout (Fig 2)
11. Vul de filter met gemalen koffie of losse thee en draai de filterarm,
met de klok mee, zodat de filter en de trechter boven de beker staan
(fig. 3)
12. Zorg ervoor dat de pijp midden boven de filter en trechter geplaatst
is.
13. Verwijder het melkvakje en vul tot aan MAX-streep. Doe de stopper
erop om ervoor te zorgen dat de melk koud blijft. Het koelapparaat zal
niet starten als er geen melk aanwezig is in het vakje, het systeem is
intelligent en zal detecteren wanneer er een ondoorzichtige vloeistof
aanwezig is.
14. Druk de “make” knop lang in ( 3 seconden) in elk model om het
brouwproces te starten.
15. Het brouwproces duurt ongeveer 5 minuten, afhankelijk van de
temperatuur van het water en temperatuur van de omgeving.
16. The Barisieur moet op zijn minst 30 cm van het bed geplaatst
worden en ergens waar het niet per ongeluk om kan vallen of
beschadigd.

20
21
NLNL
beginstand voor koken. Druk op de MAKE-knop om het brouwproces
te beginnen. Het symbool van een kopje verlicht en het brouwproces
is bevestigd.
4. In de A+B stand, het brouwproces functioneerd maar EEN keer. Voor
een verse kop thee of koffie elke morgen, moet u elke avond de MAKE
knop indrukken zodat het symbol voor kopje verlicht.
5. SNOOZE/Dutten: Bij snooze wisselt de wekker 5 minuten.
6. Reset zet de wekker weer, de wekker gaat na 24 uur af in de A +
B-stand en A-stand. De wekker is alleen uit in de OFF stand.
WAARSCHUWING
DEZE DUBBELE ACTIE IN A + B-STAND IS EEN
VEILIGHEIDSMAATREGEL OM ERVOOR TE ZORGEN DAT DE
KOOKSTAND NIET PER ONGELUK IS INGESTELD.
BROUW VERTRAGING
Met de brouw vertraging functie kunt u de tijd tussen het af gaan van
de wekker en de tijd van het begin van het brouwproces instellen.
Dit betekend, dat als u wakker wordt, de thee of koffie is al klaar.
seconden), totdat de zoemer klinkt en het TIME symbol knippert.
2. U kunt nu de tijd zetten. Draai de knop voor te kiezen tussen AM of
PM. Druk een keer op de knop.
3. Draai de bedieningsknop naar het gewenste uur tijdstip, druk een
keer op de knop, daarna kunt u het minuten tijdstip instellen.
4. Draai de bedieningsknop naar het gewenste minuten cijfer.
5. Druk de knop een keer in en de klok is ingesteld.
1. To set the time; long press (4 seconds) the rotary control on the
right of the machine until the buzzer sounds and the TIME symbol is
flashing on the display.
2. The TIME mode is now operational and use the rotary control and
rotate to choose between AM of PM. press rotary control to go to next
setting.
3. Set the hours by rotating the rotary control button and press once to
move along to the minute segment.
4. Rotate to change the minute digits.
5. Then a press to finish the process of setting the time.
OPERATION MODES
1. OFF stand, zet alles uit, wekker en koken.
2. WEKKER/ALARM stand functioneerd alleen voor de wekker.
3. WEKKER en KOKEN stand funtioneerd voor wekker en is de

22
23
NLNL
Plaats het toestel niet in direct zonlicht gedurende een lange periode,
de batterij kan smelten of beschadigd raken. De batterij in dit apparaat
mag alleen door Barisieur of een geautoriseerde Barisieur dealer
vervangen worden.
WAARSCHUWING: Gevaren
Stel het apparaat niet bloot aan regen of vocht. Probeer niet het
apparaat te drogen met een fohn of in de magnetron. Het glaswerk is
breekbaar en kan breken als de Barisieur valt of door een significante
impact. Als het glas breekt of barst, ben voorzichtig met de scherven.
Gebroken of gebarsten glas veroorzaakt door misbruik is niet gedekt
onder de garantie van het product.
VOORZICHTIG: Sommige onderdelen van dit product zijn magnetisch.
Het kan magnetische materialen aantrekken. Om de kans op
magnetische veldeninterferentie te verminderen bij bijvoorbeeld
kompasmetingen, de juiste werking van pacemakers of door
magnetisch opgeslagen gegevens te beschadigen, plaatst geen
creditcards of andere magnetische opslagmedia of magnetisch
gevoelige apparaten in de buurt van dit product.
Mensen met pacemakers:
• Moeten het toestel altijd meer dan 15 cm van de pacemaker af
houden wanneer het draadloze apparaat is aangezet.
• Als u een reden hebt om te vermoeden dat er storing optreedt, zet u
het apparaat onmiddellijk uit.
Andere medische apparatus
Als u andere persoonlijke medische apparatus gebruikt, raadpleeg
de gebruiksaanwijzing van dat product of vraag uw arts of de
apparatus geschikt is om het met meerdere electronische producten
te gebruiken.
VOORZICHTIG: Hitte gerelateerde zorgen.
DIT APPARAAT KAN TIJDENS HET NORMALE GEBRUIK ZEER HEET
WORDEN.
• Zet uw apparaat op een stabiel werkoppervlak dat luchtcirculatie
onder en rondom het apparaat toelaat.
• Wees voorzichtig wanneer u uw toestel in de buurt van een kussen,
deken of ander zacht materiaal gebruikt, omdat het materiaal de
1. 5: Begint het brouwproces 5 minuten voordat de wekker afgaat.
2. 0: brouwproces begint als de wekker afgaat.
3. 5: brouwproces begint 5 minuten nadat de wekker afgaat
4. 10: Brouwproces begint 10 minuten nadat de wekker afgaat
5. 15: brouwproces begint 15 minuten nadat de wekker afgaat
WAARSCHUWING: AC Adapter veiligheid
Als u de volgende voorzorgsmaatregelen niet treft, kan dit leiden
tot ernstig letsel of overlijden door elektrische schokken, brand of
schade aan het apparaat. Selecteer een geschikte stroombron voor
uw apparaat.
• Gebruik alleen de stroomvoorziening, de stekkeradapters en het
netsnoer dat met het apparaat wordt geleverd of die u hebt ontvangen
van een geautoriseerde Barisieur bron of dealer.
• Gebruik geen niet-standaard voedingsbronnen, zoals generatoren
of converters, zelfs als de spanning en de frequentie acceptabel zijn.
Gebruik alleen de stroomvoorziening die wordt geleverd door een
standaard stopcontact.
• Overbelast uw stopcontact, verlengsnoer NIET.
Bevestig dat ze zijn ingesteld om de totale stroom (in ampère (A) van
het apparaat (aangegeven op de voeding) en alle andere apparaten
die op hetzelfde circuit zitten, kunnen verwerken.
• Voor apparaten waar de AC-stekker uitneembaar is en waar de
voeding een universele adapter gebruikt, voordat u de stekker in een
stopcontact steekt, moet u ervoor zorgen dat de stekker volledig in de
adapter zit.
Voor apparaten met een AC netsnoer die op het stopcontact aansluit,
sluit u het netsnoer altijd aan volgens de volgende instructies:
1) Steek het netsnoer in de stroomvoorziening tot het volledig zit.
2) Steek het andere uiteinde van het netsnoer in het stopcontact
WAARSCHUWING: Batterij veiligheid
Dit toestel bevat een ingebouwde batterij, onjuist gebruik kan leiden
tot explosie. Maak het product niet open of verwijder het in vuur.

24
25
NLNL
• Open het apparaat niet, gevaarlijke spanning binnen.
• Het gebruik van aanvullende toebehoren die niet door de fabrikant
worden aanbevolen, kan brand, elektrische schokken of persoonlijk
letsel veroorzaken, vermijd mogelijk letsel bij gebruik van het
apparaat.
• Laat het apparat nooit onbewaakt tijdens gebruik.
• Een beschadigd apparaat kan electrische schokken en brand
veroorzaken
• Steek geen vingers onder de koffie afvoer, risico op brandwond.
• Reiniging mag niet door kinderen onder 16 jaar verricht worden,
tenzij onder toezicht van een volwassene.
• Zorg ervoor dat voorwerpen na het reinigen droog zijn voordat u het
apparaat opnieuw gebruikt
• De buitenkant van het apparaat kan met een zachte vochtige doek
met een milde wasmiddeloplossing worden gereinigd. Als u zeep
gebruikt om de glaswerk schoon te maken, dan moet het glaswerk
gespoeld worden met schoon water voor gebruik.
VOORZICHTIG: Ontkalken
Grote kalkschaal opbouw niet goed is voor het apparaat, het ziet ook
niet mooi uit. We raden aan het apparaat te ontkalken, u doet dit op
eigen risico.
We raden aan het glaswerk zelf te reiningen in plaats van een
ontkalkingsmiddel te gebruiken.
Voor het reinigen van de slangen, buizen, filter en kopje kunt u een
pijpreiniger gebruiken, of u kunt een cleaning kit kopen via onze
website - www.Barisieur.com
luchtstroom kan blokkeren en dat kan leiden tot oververhitting van
het toestel.
• Dit apparaat is uitsluitend ontworpen voor gebruik binnen- en in niet-
extreme temperatuuromstandigheden.
• Bescherm het apparaat tegen direct zonlicht, langdurige
waterspetters en vochtigheid.
• Dit apparaat is alleen voor huishoudelijk gebruik. Het is niet bedoeld
voor gebruik in: personeelskeukens in winkels, kantoren en andere
werkomgevingen, landbouwbedrijven, gasten in hotels, motels etc.
Tenzij er een overeenkomst is met Barisieur Ltd.
VOORZICHTIG: Reiniging en onderhoud
PROBEER NOOIT DE BARISIEUR TE VERPLAATSEN OF TE REINIGEN
VOORDAT HET VOLLEDIG AFGEKOELD IS.
Het waterkoker glas moet dagelijks worden afgespoeld, indien
gebruikt. We raden aan om het glas te spoelen voordat u het vult,
zodoende zit er altijd vers water in het glas.
• Combinatie van electriciteit en water is gevaarlijk en kan leiden tot
fatale electrische schokken.
• Zorg ervoor dat de stekker van de Barisieur uit het stopcontact is
verwijderd voordat u het reinigt.
• Ben uiterst voorzichtig bij het verplaatsen van een apparaat gevuld
met hete vloeistoffen.
• Gebruik geen agressieve schoonmaakmiddelen, gebruik een vochtige
doek met mild schoonmaakmiddel voor het oppervlak van het apparat
te reinigen.
• Ben heel voorzichtig met het reinigen van de overdracht buis, want
die is erg delicaat.
• Laat het water niet voor lange tijd in het waterkoker glas, aangezien
dit kalkschaal opbouwt en roest stimuleert.
• Ontkoppel door de stekker uit te trekken en niet door aan het snoer
te trekken, het kan schade aanrichten aan het snoer.
• Raak het snoer nooit met natte handen aan.
• Onderdompel het apparaat, of een gedeelte van het apparaat NOOIT,
in water of ander vloeistof.
• Zet nooit het apparaat , of een deel ervan in de vaatwasser.

26
27
FRFR
LIRE ATTENTIVEMENT TOUTES LES INSTRUCTIONS AVANT
D’UTILISER LE BARISIEUR.
Lisez ce guide pour toutes les informations importantes de sécurité
d’utilisation et les termes de la Garantie limitée qui s’appliquent à
l’appareil Barisieur que vous avez acheté. Conservez tous les guides
imprimés pour référence future. Le non-respect des instructions
d’installation, d’utilisation et de maintenance appropriés pour ce
produit peuvent augmenter le risque de blessures graves ou de mort,
ainsi qu’endommager l’appareil ou les dispositifs. Gardez le guide dans
un endroit où vous pouvez le trouver facilement et le consulter.
CONSIGNES DE SÉCURITÉ IMPORTANTES
CE BARISIEUR EST UNIQUEMENT DESTINÉ A UNE UTILISATION
MÉNAGÈRE.
L’APPAREIL EST DESTINÉ À PRÉPARER DES BOISSONS SELON CES
INSTRUCTIONS CI-DESSOUS.
LE BARISIEUR N’EST PAS DESTINÉ À ÊTRE UTILISÉ PAR DES
PERSONNES (ENFANTS Y COMPRIS) AVEC DES CAPACITÉS
PHYSIQUES, SENSORIELLES OU MENTALES RÉDUITES, SANS
SUFFISAMENT D’EXPÉRIENCE À MOINS D’AVOIR UNE SUPERVISION
OU UNE INSTRUCTION CONCERNANT L’UTILISATION DU BARISIEUR
PAR UNE PERSONNE RESPONSABLE DE SA SÉCURITÉ. LES ENFANTS
DEVRAIENT ETRE SUPERVISES POUR ASSURER QU’ILS NE JOUENT
PAS AVEC LE BARISIEUR.
N’UTILISEZ PAS LE BARISIEUR POUR UNE AUTRE UTILISATIN QUE
L’UTILISATION PRÉVUE.
CE DISPOSITIF PEUT CONTENIR DES PETITES PIÈCES QUI PEUVENT
PRESENTER UN RISQUE D’ETOUFFEMENT AUX ENFANTS. GARDER
LES PETITES PIÈCES LOIN DES ENFANTS
.
CONTRÔLE DE SÉCURITÉ
NEGLIGER DE SUIVRE LES INSTRUCTIONS, CORRECTEMENT
INSTALLER L’APPAREIL, OU CORRECTEMENT MAINTENIR CE PRODUIT
PEUT ENTRAÎNER LE RISQUE DE BLESSURES GRAVES OU DE MORT,
AINSI QU’ENTRAINER DES DOMMAGES AU DISPOSITIF.
NEGLIGER LES PRÉCAUTIONS ET INSTRUCTIONS MENTIONNÉES,
POURRAIT AFFECTER LE FONCTIONNEMENT CORRECTE DU
BARISIEUR.
BARISIEUR LTD NE PEUT PAS ACCEPTER LA RESPONSABILITÉ POUR
TOUT
DOMMAGES OU BLESSURES CAUSÉS PAR UNE UTILISATION
INCORRECTE OU PAR DES RÉPARATIONS
FAITES PAR UNE PERSONNE NON AUTORISÉ.
1. Une fois déballé, vérifiez que le produit ne présente aucun
dommage. N’utilisez pas le Barisieur s’il a été endommagé. En cas de
dommage, faites examiner l’appareil pour réparation par un agent de
service autorisé. Contactez Info@barisieur.com.
2. ATTENTION: Risque d’électrocution et d’incendie. Assurez-vous que
rien d’autre que le récipient d’ébullition fourni dans l’emballage est en
contact avec la surface d’induction.
3. Ne rien placer devant les ouvertures qui peuvent boucher les sorties
d’eau, car cela pourrait endommager l’appareil et risquer de blesser
l’utilisateur.
4. Assurez-vous toujours que la tension sur l’étiquette d’évaluation
correspond à la tension secteur dans votre maison.
5. Toujours utiliser le Barisieur sur une surface plane, uniforme,
horizontale et stable. La surface doit être résistante à la chaleur et aux
liquides, comme l’eau, le café, le thé, le lait ou similaire.
6. Vérifiez le cordon d’alimentation et la prise régulièrement pour tout
dommage. Si le cordon ou la prise sont endommagés, le produit ne
doit pas être utilisé, et le branchement endommagé doit être remplacé
par le fabricant ou une personne qualifiée pour éviter tout risque
d’électrocution.

28
29
FRFR
7. Ne jamais plonger le boîtier électronique du Barisieur dans de l’eau
ou tout autre liquide afin de le nettoyer.
8. Retirez la prise en agrippant la prise elle-même et jamais tirer sur le
cordon pour débrancher le Barisieur de la prise de secteur.
9. N’utilisez pas d’accessoires en conjonction avec l’appareil qui ne
sont pas recommandés ou fournis avec le Barisieur
10. Ne laissez pas le cordon suspendu au bord d’une table ou d’un
comptoir. Assurez-vous que le cordon n’est pas dans une position où il
peut être tiré par inadvertance.
11. Ne laissez pas le cordon toucher des surfaces chaudes et ne le
placez pas sur ou à proximité d’un brûleur à gaz ou électrique ou dans
un four chauffé.
12. Gardez le cordon hors de la chaleur et l’humidité.
13. N’utilisez pas le Barisieur au-dessus d’une cuisinière a gaz ou
électrique ou près d’une flamme nue
14. L’utilisation d’une rallonge avec le Barisieur n’est pas
recommandée.
15. Ne transportez pas le Barisieur par le cordon d’alimentation.
16. Si la machine ne fonctionne pas correctement ou s’il y a un
problème technique, éteignez la machine et faites référence à la table
de dépannage. Si une solution ne peut pas être trouvée, contactez le
service clientèle et retournez le produit à un agent agréé.
17. N’utilisez pas de chronomètres automatiques externes en même
temps que le Barisieur.
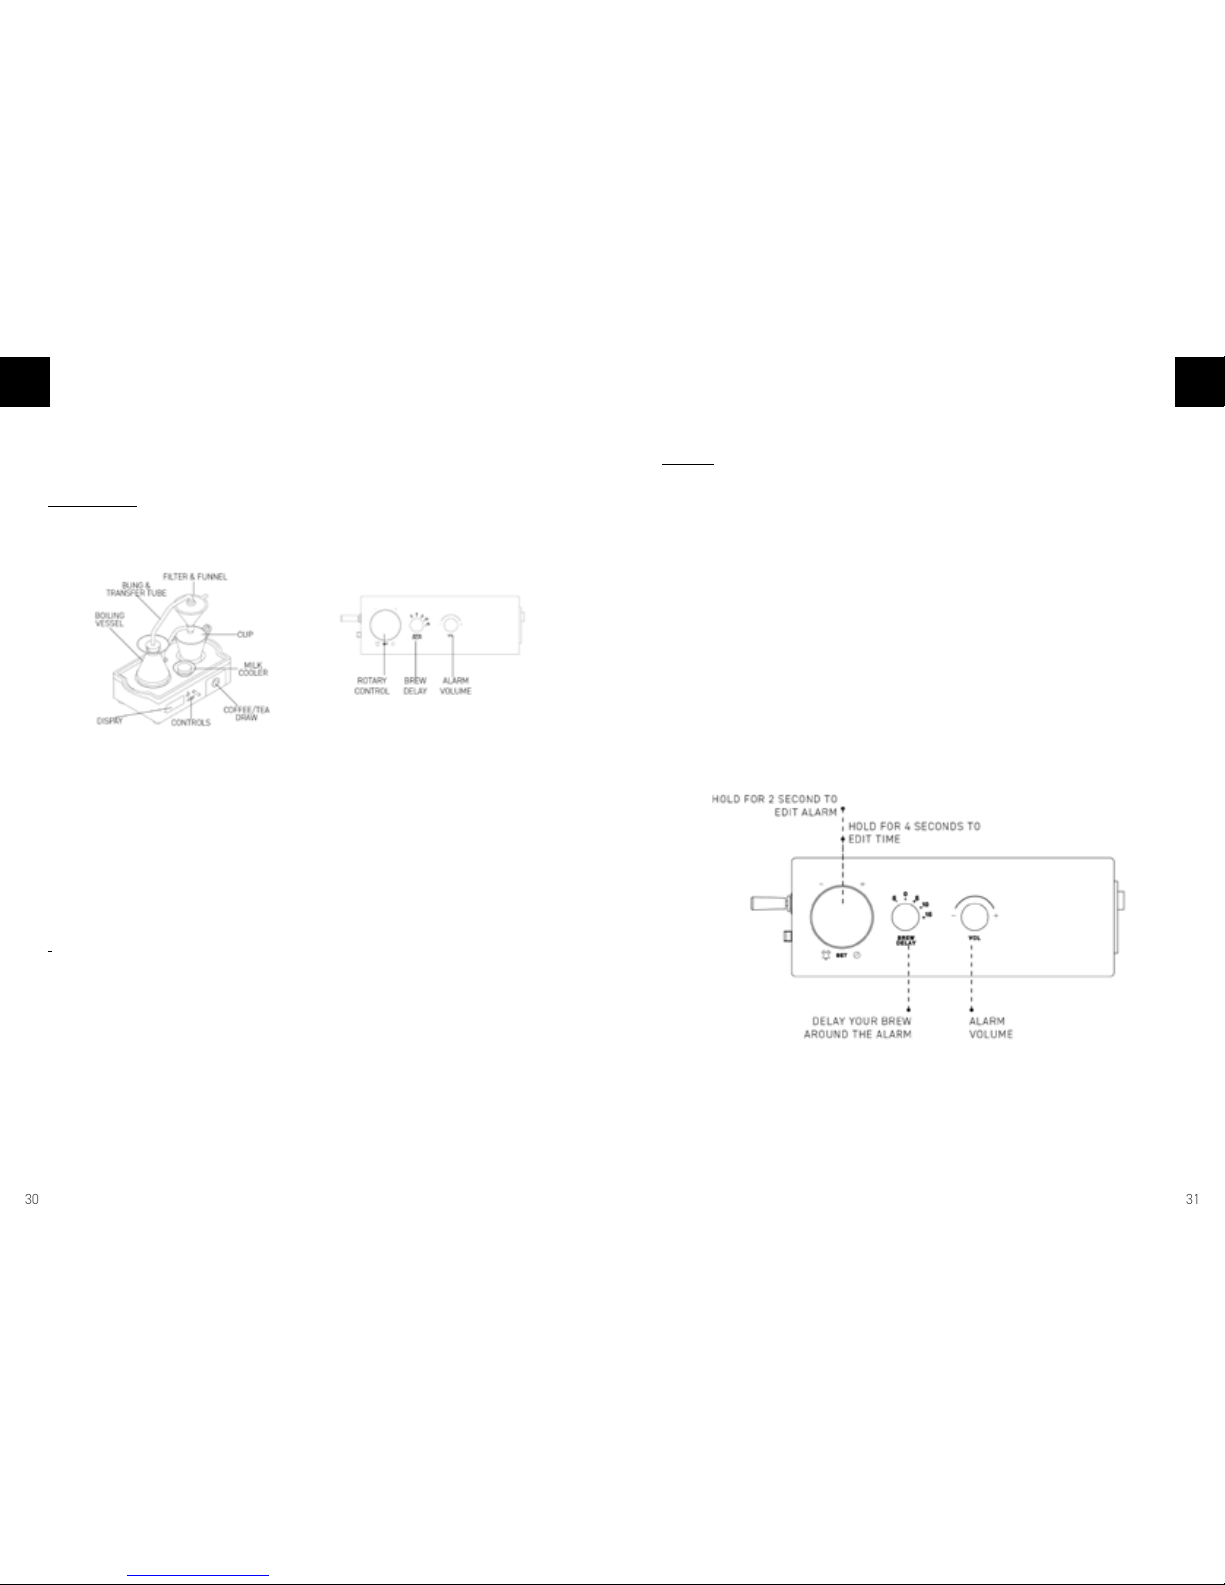
Operation
Fig. 1 Fig. 2 Fig. 3 Fig. 4 Fig. 5
1. Déballez le Barisieur en retirant soigneusement toute la mousse et
l’emballage des accessoires.
2. Placez l’appareil sur une grande surface afin d’avoir plus d’espace
pour la mise en place.
3. Lavez soigneusement tous les accessoires qui vont contenir de l’eau
avant la première utilisation.
4. Placez tous les accessoires dans leurs positions correctes, comme
indiqué sur le schéma ci-dessus.
5. Branchez l’appareil sur l’alimentation secteur AC 220-240v à l’aide
du cordon d’alimentation fourni.
6. Le Barisieur doit être poser sur une surface plate avant de l’allumer.
7. Attendez que l’affichage électronique s’illumine et affiche l’heure et
les symboles.
8. Retirer la bonde avec le tube de transfert du récipient d’ébullition
et remplir avec de l’eau jusqu’à la ligne MAX. NE PAS REMPLIR LE
RÉCIPIENT D’ÉBULLITION AU DE LA OU EN-DESSOUS DE LA BARRE
MAX.
9. Remettre la bonde dans le récipient d’ébullition jusqu’à ce qu’un
click soit entendu. Assurez-vous que toutes les protubérances sont
alignées entre la bonde et le verre. (Fig. 1)
10. Remettre le récipient d’ébullition sur le plateau en bois dans la
position correcte indiquée. Assurez-vous que toutes les protubérances
sont alignées entre le fond du navire et le bois. (Figure 2)
11. Mettre du café moulu ou du thé à feuilles mobiles dans le filtre et
faire pivoter le bras du filtre dans le sens des aiguilles d’une montre
afin que le filtre et l’entonnoir soient en position au-dessus de la tasse.
(Fig. 3)
12. Assurez-vous que le tube de transfert est aligné et la sortie est
positionnée sur le filtre et l’entonnoir. (Fig. 4)
13. Retirer le vase à lait et le remplir à la ligne MAX. Remettez la
bonde en place pour s’assurer que le lait reste frais. Le dispositif de
refroidissement ne démarre pas s’il n’y a pas de lait dans le récipient
car le système détecte quand un fluide opaque est présent.
14. Appuyez longuement (pendant 3 secondes) sur le bouton de
sélection dans n’importe quel mode pour commencer le processus de
brassage.
15. La machine prend environ 5 minutes en fonction de la température
et de l’environnement de l’eau pour terminer le processus de
brassage. (Fig. 5)
30
31
FRFR
16. LE BARISIEUR DOIT ETRE A AU MOINS 30 CM DE TOUT LIT ET
DANS UNE POSITION OU IL NE PEUT PAS ÊTRE ACCIDEMMENT
COGNÉ OU ENDOMMAGÉ.
WARNINGS
L‘appareil est un appareil de chauffage et il sera chaud au toucher. Ne
pas retirer le récipient d’ébullition pendant le processus d’ébullition
car des blessures et des brûlures se produiront. Le récipient
d’ébullition, le filtre et l L es articles en verre doivent être laissés à
refroidir pendant un minimum de 2 minutes une fois le processus
d’ébullition terminé avant d’être manipulés.
ALARME REVEIL
1. Pour régler l’heure de l’alarme, appuyez longuement (2 secondes)
sur le bouton rotatif à droite de la machine jusqu’à ce que le buzzer
sonne et que le symbole ALARM clignote sur l’affichage puis lâchez.
2. Le mode ALARME est maintenant opérationnel ;
3. Utilisez la commande rotative et tournez-la pour changer les
heures, puis appuyez une fois pour vous déplacer vers le segment
des minutes.
4. Tournez pour modifier les chiffres des minutes.
5. Appuyez ensuite une fois pour terminer le réglage de l’alarme.
6. Pour vérifier l’heure d’ALARME, appuyez brièvement sur la
commande rotative.
TEMPS
1. Pour régler l’heure ; Appuyez longuement (4 secondes) sur la
commande rotative à droite de la machine jusqu’à ce que le buzzer
sonne et que le symbole TIME clignote sur l’affichage.
2. Le mode TIME est maintenant opérationnel. Utilisez le contrôle
rotatif et tournez pour choisir entre AM et PM. Puis appuyez sur la
commande rotative pour passer au prochain réglage.
3. Réglez les heures en tournant le bouton de commande rotatif et
appuyez une fois pour vous déplacer vers le segment des minutes.
4. Tournez pour modifier les chiffres des minutes.
5. Ensuite, appuyez sur pour terminer le processus de réglage de
l’heure.
OPERATION MODES
1. Le mode OFF éteint toutes les alarmes ainsi que le processus
d’ébullition.
2. Le mode ALARME n’allume que les alarmes activées; Mais ne fait
pas bouillir.
3. ALARME + ÉBULLITION allume l’alarme ainsi que l’ensemble initial

32
33
FRFR
pour l’ébullition. Pour confirmer le point d’ébullition, appuyez sur le
bouton MAKE. Le symbole de la tasse s’allume lorsque l’ensemble
d’ébullition a été confirmé.
4. Une fois que le mode A + B a été réglé, l’ébullition ne se produira
qu’une fois. Vous devez appuyer sur faire tous les soirs afin de
transformer le symbole de la tasse et programmer la préparation
d’une tasse pour le lendemain matin. Cup Symbol s’éteint jusqu’à ce
que le bouton MAKE soit de nouveau pressé pour mettre l’ébullition
en marche..
5. SNOOZE permet de répéter l’ALARME dans 5 minutes.
6. RESET réinitialise l’ALARM et retentira 24 heures plus tard dans les
modes A + B et A. L’AÉLARME est uniquement désactivé en mode OFF.
Warning
CETTE DOUBLE ACTION REQUISE DE L’UTILISATEUR DE METTRE
L’APPAREIL EN MODE A + B EST UNE EXIGENCE DE SÉCURITÉ POUR
ASSURER
QUE LE MODE D’ÉBULLITION NE SOIT PAS ENCLENCHÉ DE MANIERE
ACCIDENTELLE.
BREW DELAY
Le délai de préparation permet de séparer l’heure de l’alarme en et le
temps d’ébullition. En tournant ce bouton, le temps d’ébullition peut
être retardé ou avancé par rapport à l’heure de l’alarme.
Cela signifie que vous pouvez vous réveiller avec un thé ou café
fraîchement préparé.
1. 5: Régler le temps d’ébullition 5 minutes avant que l’alarme ne
sonne
2. 0: L’ébullition commencera sur le son de l’alarme
3. 5: L’ébullition commencera 5 minutes après l’alarme
4. 10: L’ébullition commencera 10 minutes après l’alarme
5. 15: L’ébullition commencera 15 minutes après l’alarme
avertissement : sécurité de l’adaptateur de courant
Le non-respect des précautions suivantes peut entraîner des
blessures graves ou la mort par électrocution ou incendie ainsi que
d’endommager l’appareil. Pour sélectionner une source d’alimentation
appropriée pour votre appareil :
• Utilisez uniquement l’unité d’alimentation, les adaptateurs et le
cordon d’alimentation fourni avec l’appareil que vous avez reçu d’une
source ou d’un parti autorisé par Barisieur.
• N’utilisez pas de sources d’alimentation non standard, telles que
des générateurs ou des onduleurs, même si la tension et la fréquence
semblent acceptables. Utilisez uniquement une alimentation secteur
fournie par une prise murale standard.
• Ne pas surcharger votre prise murale, votre rallonge, votre
alimentation électrique ou toute autre prise électrique. Confirmez
qu’ils sont évalués pour gérer le courant total (en ampères [A])
dessiné par l’appareil (indiqué sur l’unité d’alimentation) et tous les
autres dispositifs qui se trouvent sur le même circuit.
• Sur les périphériques où les clés à courant alternatif sont amovibles
et où l’alimentation utilise un adaptateur universel, avant de brancher
l’adaptateur secteur dans une prise de courant, assurez-vous que
l’ensemble de broche est bien configuré pour la prise de courant et est
bien installé dans l’adaptateur.
Pour les appareils avec un cordon d’alimentation secteur qui se

34
35
FRFR
connecte à l’alimentation électrique, connectez toujours le cordon
d’alimentation conformément aux instructions suivantes:
1) Branchez le cordon d’alimentation secteur dans l’alimentation
électrique jusqu’à ce qu’il s’arrête complètement.
2) Branchez l’autre extrémité du cordon d’alimentation secteur
dans la prise murale (si vous avez un adaptateur - branchez-le dans
l’adaptateur d’abord)
Avertissement: Sécurité des piles
Cet appareil contient une batterie intégrée, dont une utilisation
incorrecte peut entraîner une explosion. Ne pas ouvrir, perforer,
mutiler ou jeter le produit au feu. Ne laissez pas l’appareil sous la
lumière directe du soleil pendant une période prolongée, ce qui
pourrait causer des dommages à la fusion ou à la batterie. La batterie
de cet appareil n’est pas remplaçable par l’utilisateur et ne doit être
remplacée que par Barisieur ou par un fournisseur autorisé par
Barisieur
Avertissement: Risques
N’exposez pas l’appareil à la pluie ou à l’humidité. N’essayez pas de
sécher l’appareil avec un sèche-cheveux ou un four à micro-ondes.
La verrerie est fragile et pourrait se briser si Barisieur chute ou a
un impact important. Pour réduire le risque de coupure, si les verre
craque ou se fissure, ne pas toucher ou tenter d’enlever le verre cassé.
Le verre fissuré ou ébréché en raison d’abus n’est pas couvert par la
garantie limitée du produit.
Attention: Certaines parties de cet appareil sont magnétiques
L’appareil peut attirer des matériaux métalliques. Pour réduire la
probabilité que les champs magnétiques interfèrent avec les lectures
de la boussole, perturbent le bon fonctionnement des meneurs de
train ou corrompent les données enregistrées magnétiquement,
ne placez pas de cartes de crédit ou d’autres supports de stockage
magnétiques ou des dispositifs magnétiquement sensibles à proximité
de ce périphérique.
Les personnes utilisant un stimulateur cardiaques:
• Devraient toujours garder l’appareil à plus de 15 cm (6 pouces) du
stimulateur cardiaque lorsque le périphérique sans fil est allumé.
• Si vous avez des raisons de penser que des interférences se
produisent, éteignez immédiatement l’appareil.
Autres dispositifs médicaux
Si vous utilisez un autre appareil médical personnel, consultez le
fabricant de l’appareil médical ou votre médecin pour déterminer s’il
vous convient d’utiliser d’autres appareils électroniques près de votre
appareil médical.
Attention: Risques liées à la chaleur
LE DISPOSITIF PEUT ETRE TRÈS CHAUD DURANT UNE UTILISATION
NORMALE.
• Configurez votre appareil sur une surface de travail stable qui permet
une circulation d’air adéquate sous et autour de l’appareil.
• Soyez prudent lorsque vous utilisez votre appareil près d’un oreiller,
d’une couverture ou d’un autre matériau souple, car le matériau peut
bloquer le flux d’air ce qui peut entraîner une surchauffe du dispositif.
• Cet appareil a été conçu pour des conditions de température
intérieures et non extrêmes.
• Protégez l’appareil de l’effet direct du soleil, des éclaboussures
prolongées et de l’humidité.
• Il s’agit d’un appareil ménager uniquement. Il n’est pas destiné à être
utilisé dans: les espaces de cuisine, dans les magasins, les bureaux et
autres environnements de travail; Maisons de ferme; Par les clients
dans les hôtels, motels et autres environnements de type résidentiel;
Sauf accord avec Barisieur ltd
Attention: nettoyage et maintenance
NE JAMAIS TENTER DE DÉPLACER OU DE NETTOYER LE BARISIEUR
JUSQU’À CE QU’IL SOIT COMPLETEMENT REFROIDI.
Le récipient d’ébullition doit être rincé quotidiennement s’il est utilisé.
Nous recommandons de rincer le récipient à ébullition avant que
le remplissage ne soit éliminé de toute vieille eau assise dans le

36
37
FRFR
récipient.
• Le contacte entre l’électricité et l’eau est dangereux et peut conduire
à des chocs électriques mortels.
• Assurez-vous que le Barisieur est débranché du secteur avant de le
nettoyer.
• Une extrême prudence doit être utilisée lors du déplacement d’un
appareil contenant des liquides chauds.
• N’utilisez pas d’agent nettoyant ou de nettoyant pour solvants.
Utiliser un chiffon humide et un agent de nettoyage doux pour nettoyer
la surface de l’appareil.
• Vous devez faire attention lorsque vous nettoyez le tube de transfert
car il est très délicat.
• Ne laissez pas l’eau dans le récipient d’ébullition pendant de longues
périodes, car cela peut conduire à l’accumulation de rouille et de
calcaire.
• Débranchez l’appareil en retirant le bout de la prise et non en tirant
le cordon lui-même ou le cordon risque d’être endommagé.
• Ne jamais toucher le cordon avec les mains mouillées.
• Ne plongez jamais l’appareil ou une partie de celui-ci dans de l’eau ou
d’un autre liquide.
• Ne placez jamais l’appareil ou une partie de l’appareil dans le lave-
vaisselle.
• Ne pas ouvrir l’appareil. L’intérieur contient une tension électrique
dangeureuse!
• L’utilisation d’accessoires non recommandés par le fabricant peut
provoquer un incendie, une électrocution ou des blessures. Éviter tout
dommage éventuel lors de l’utilisation de l’appareil
• Ne laissez jamais l’appareil sans surveillance pendant le
fonctionnement.
• Un appareil endommagé peut provoquer des chocs électriques, des
brûlures et des incendies.
• Ne mettez pas les doigts sous la prise de café, ceci présente un
risque de brulure.
• Le nettoyage et l’entretien de l’appareil ne doit pas être effectué par
des enfants de moins de 16 ans, à moins qu’ils ne soient surveillés
par un adulte.
• Assurez-vous que les objets sont secs après le nettoyage avant de
réutiliser le produit
• L’extérieur de l’appareil peut être nettoyé avec un chiffon doux et
humide avec une solution détergente douce. Si vous utilisez du savon
pour nettoyer la verrerie, la verrerie doit ensuite être rincée avec de
l’eau propre.
Attention: détartrage
Nous comprenons que l’accumulation excessif de calcaire nuira au
Barisieur. Nous ne recommandons pas de détartrer la machine et vous
le faites à votre risques et périls.
Nous recommandons de nettoyer physiquement la verrerie au lieu
d’utiliser un agent de détartrage.
Vous pouvez utiliser un nettoyeur de tuyaux pour nettoyer les tubes,
le récipient d’ébullition, le filtre et la tasse; Vous pouvez également
acheter un kit de nettoyage à partir de notre site Web - www.Barisieur.
com.
Other manuals for Barisieur Black
1
This manual suits for next models
1
Table of contents
Other Barisieur Coffee Maker manuals


