Barrett 4000 Series User manual
BCM40507/04
(For s/w v1.6.5 and above)
© Barrett Communications
4000 Series IP Connectivity /
Networking Guide
Includes instructions for Ethernet Adapters, WiFi Adapters (P/N
BCO40508) and Barrett 4050 Remote Control app
BARRETT


3
Contents
INTRODUCTION 1...........................................................................................5
Guide Overview............................................................................................. 6
Terms and Abbreviations ............................................................................... 7
The Barrett WiFi Adaptors ............................................................................. 9
Connection Details ...................................................................................... 10
WIRELESS SET-UP SCENARIOS 2........................................................ 11
Connecting the WiFi Adaptor to the Transceiver ......................................... 12
Setting up the Transceiver as a WiFi Access Point................................... 12
WPS Push Button ................................................................................... 14
Connecting ............................................................................................ 15
SCENARIO 1 - WiFi Access Point Setup with Windows/iOS/Android Devices 16
For Windows PCs ................................................................................... 16
For iOS Devices ...................................................................................... 18
For Android Devices............................................................................... 19
Using the Barrett 4050 Remote Control App ......................................... 20
SCENARIO 2 - WiFi Client Mode................................................................... 23
Setting up the transceiver as WiFi Client................................................ 24
Setting up the PC................................................................................... 26
ETHERNET SET-UP SCENARIOS 3 ....................................................... 27
SCENARIO 3 - Ethernet Adaptor/Switch/PC.................................................. 28
Setting up a Static IP Address on Windows 10 Professional.................. 29
Setting up a Static IP Address on a 4050 Transceiver ............................ 32
Conguration ........................................................................................ 32
SCENARIO 4 - Ethernet Adapter/Switch/DHCP Server/PC.............................. 35
Enabling a DHCP Generated IP Address on a 4050 Transceiver .............. 37
Network Status...................................................................................... 37
SCENARIO 5 - Ethernet Adapter/Router (VPN)/Internet/Router/PC................ 38

4
APPENDICES 4................................................................................... 41
APPENDIX 1 - Recommended Network Specications ................................. 42
Minimum requirements: ........................................................................ 42
Recommended:...................................................................................... 42
APPENDIX 2 - Setting up DHCP on Windows 10 Professional ...................... 43
APPENDIX 3 - Setting up Port Forwarding in your Router............................ 46
APPENDIX 4 - Allowing Ports with a Firewall on Windows 10 Professional.. 48
APPENDIX 5 - Setting up a VPN................................................................... 50
General Settings .................................................................................... 50
Advanced Settings ................................................................................. 53
APPENDIX 6 - Finding your Transceiver’s IP Address .................................... 54
APPENDIX 7 - Troubleshooting .................................................................... 55
APPENDIX 8 - The Barrett Break Out Box (BoB)............................................ 56
BoB Front Panel ........................................................................................... 57
BoB Rear Panel ............................................................................................ 58
BoB Set-up .................................................................................................. 59
BoB Name.............................................................................................. 60
Network Conguration.......................................................................... 60
Network Status...................................................................................... 61
Warranty Statement .................................................................................... 62
Contact Details............................................................................................ 64

5
INTRODUCTION 1
This chapter contains the following sections:
• Guide Overview
• Terms and Abbreviations
• The Barrett WiFi Adaptor
• Connection Details

6
INTRODUCTION - HARDWARE
The Barrett 4050 HF SDR Transceiver (P/N BC405000) can interface with:
• USB to Ethernet Adaptor (P/N BCA40505)
• 4050 to USB Adaptor (P/N BCA40502)
• 4050 to Ethernet Adaptor (P/N BCA40503)
• 4050 to Ethernet Adaptor with USB Port (P/N BCA40504)
• WiFi Adapter (P/N BCO40508)
• Barrett Break out Box (discontinued as of April 2019) (P/N BCA40050)
This guide details the rst two options and describes their installation. The BoB
instructions are in an appendix at the rear of the manual. The maximum num-
ber of applications that can connect to one 4050 HF SDR system is ve. A 4050
HF SDR system consists of at least one of two control heads, the transceiver
body and the optional BoB.
Chapter 1 offers denitions and hardware descriptions.
Chapters 2 and 3 provide examples of typical setup scenarios of a transceiver,
network access and/or a computer. Each set-up may need to be congured
differently in accordance with local network operating procedures and security.
Chapter 2 demonstrates how to set up the transceiver wirelessly. Scenario 1
outlines the different applications (apps) that can be used on Windows, iOS,
and Android software via the transceiver’s wireless network and WiFi adaptor.
Scenario 2, however, connects over local WiFi via a router.
Chapter 3 demonstrates four ways of connecting the internet and transceiver
via an Ethernet connection. Scenarios 3 and 4 show how a system could be set
up using a small local area network. This allows multiple operators on the local
area network to control or program the transceiver remotely. These scenarios
show a conguration using a switch and a computer with and without a DHCP
server. The third scenario is set up using a static IP address via an Ethernet cable,
and the transceiver in the fourth scenario uses DHCP protocols.
Scenarios 5 shows how to congure a transceiver over the internet via a VPN
which provides added security. The benet of this set up is that the operator
can be outside the LAN, and have access to the transceiver.
Chapter 4 contains the appendices with additional information on DHCP, port
forwarding and VPNs.
The scenarios given throughout the manual are using Windows 10 Professional
as the operating system. Support can be provided for other Windows operating
systems, ask your network administrator or your dealer for more information.
Guide Overview

7
INTRODUCTION - TERMS AND ABBREVIATIONS
Term Denition
BoB Break out Box (discontinued)
Bonjour Bonjour is Apple’s implementation of zero-conguration
networking, a group of technologies that includes service
discovery, address assignment, and host name resolution.
DHCP Dynamic Host Conguration Protocol
DNS Domain Name Servers are the Internet’s equivalent of a
phone book. They maintain a directory of domain names
and translate them to Internet Protocol (IP) addresses
Firewall A security protocol designed to prevent unauthorised ac-
cess to a private network. Firewalls can be implemented
as hardware or software.
LAN Local Area Network, an example would be an ofce net-
work.
Network Switch A multi-port network bridge that uses hardware address-
es to process and forward data.
Port Forwarding Or port mapping is a name given to the combined tech-
nique of translating the address and/or port number of a
data packet to a new destination, possibly accepting such
packet(s) in a packet lter (rewall), then forwarding the
packet according to the routing table.
Router A networking device that forwards data packets between
computer networks. It provides a wired link to the LAN,
and a gateway to external networks, for example the In-
ternet.
Static IP Address A manually congured IP address, sometimes referred to
as a xed IP address.
TCP Transmission Control Protocol
UDP User Datagram Protocol
VPN A Virtual Private Network is a private network that extends
across a public network or Internet and is usually secured
at each end. It enables users to send and receive data
across shared or public networks as if their computing
devices were directly connected to the private network.
WAN Wide Area Network, an example would be the Internet.
Terms and Abbreviations

8
INTRODUCTION - TERMS AND ABBREVIATIONS
WiFi Wireless Fidelity
WiFi Access Point
/ Router
Enables wireless network packet forwarding and routing,
and serves as an access point in a local area network. It
works much like a wired router but replaces wires with
wireless radio signals to communicate within and pro-
vides a gateway to an external network (Internet).
9
INTRODUCTION - WIFI ADAPTOR
The Barrett WiFi Adaptors
(P/N: BCO40508)
The WiFi Adaptors are necessary to connect the Barrett 4050 HF SDR Trans-
ceiver (P/N BC405000) via WiFi to external devices such as tablets, smart
phones and PCs or to external networks. External devices can control the
Barrett 4050 HF SDR Transceiver using the Barrett 4000 series Remote Control
Software which is available for iOS, Android and Windows.
Two WiFi adaptors are supplied by Barrett. An Edimax adaptor for use with WiFi
Access Point mode and a TP-Link adaptor for use with WiFi Client mode. Only
one may be used at any time.
See page 12 for examples of how to set up the Barrett 4050 HF SDR Trans-
ceiver to utilise WiFi.
Note: it is not possible to operate both the Wi and Ethernet adapters simultane-
ously.
Access Point
(Edimax)
WiFi Client
(TP-Link)
OR
10
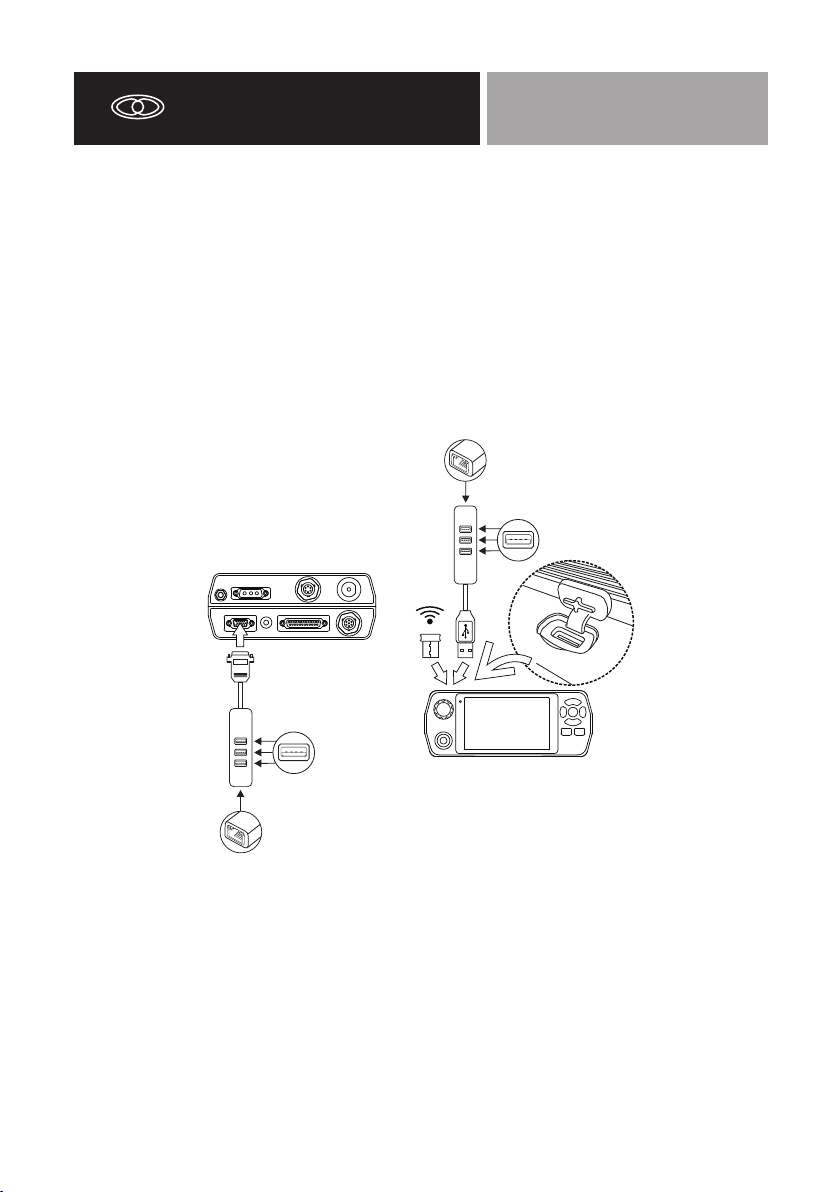
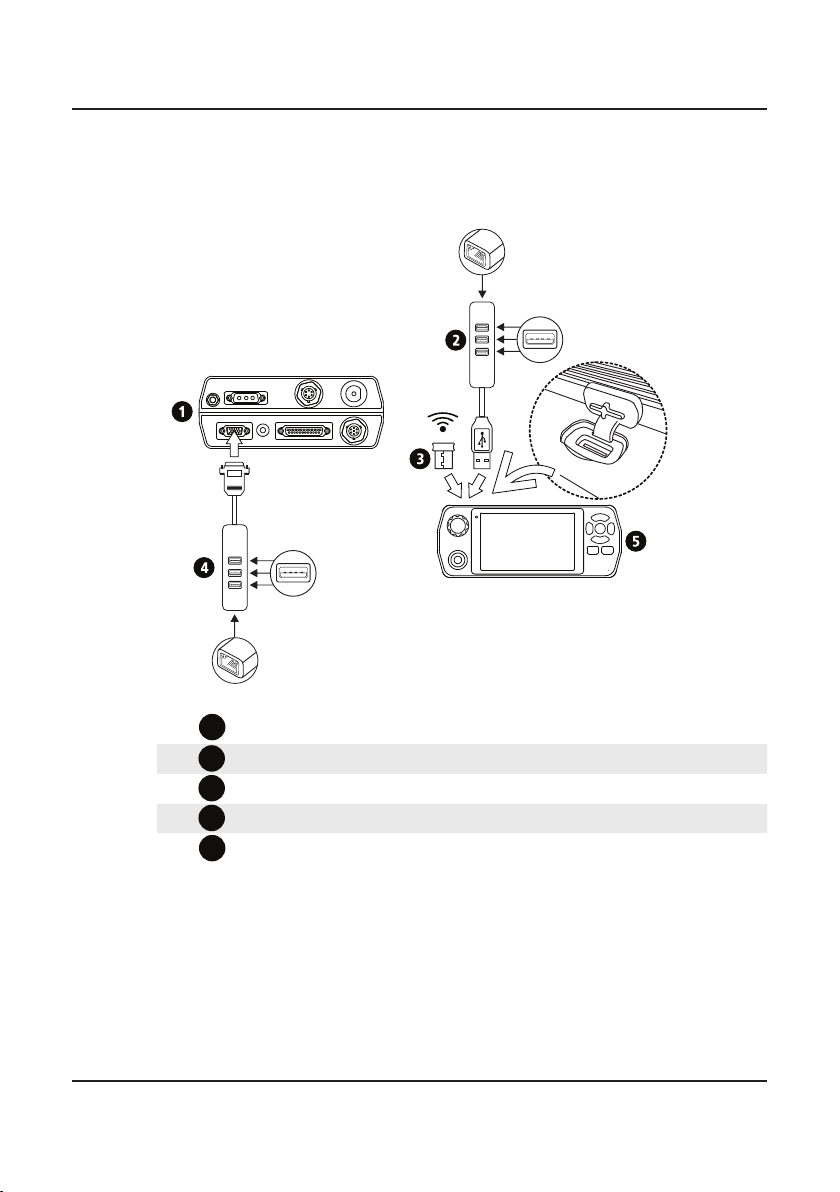
INTRODUCTION - CONNECTION DETAILS
Connection Details
This diagram represents all possible connections between the Barrett 4050 HF
SDR Transceiver and an IP network.
1
Barrett 4050 HF SDR Transceiver (rear) (P/N BC405000)
2USB to Ethernet Adaptor with USB ports (P/N BCA40505)
3
WiFi Adaptor (P/N BCO40508)
4
4050 to USB Adaptor (P/N BCA40504)
5
Barrett 4050 HF SDR Transceiver (front) (P/N BC405000)

11
WIRELESS SET-UP SCENARIOS 2
This chapter contains the following sections:
• Connecting the WiFi Adaptor to the Transceiver
• Scenario 1 - WiFi Access Point set up for Windows, iOS and Android
Devices
• Scenario 2 - WiFi Client Mode

12
WIRELESS SETUP SCENARIOS - WIFI ACCESS POINT SETUP
Connecting the WiFi Adaptor to the Transceiver
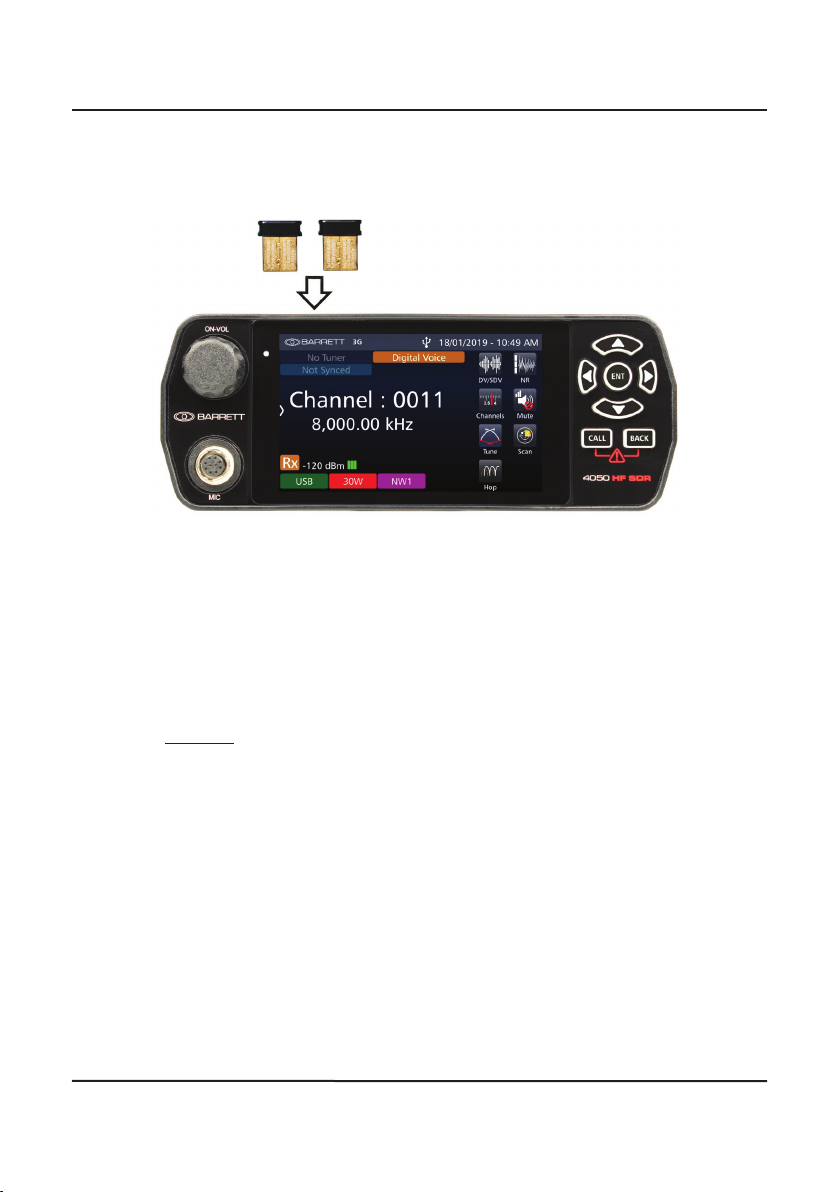
Prior to beginning the installation,
ensure the Edimax WiFi adapter is
inserted in the USB socket located
on the top of the front panel of
the transceiver.
Setting up the Transceiver as a WiFi Access Point
From the Barrett 4050
HF SDR Transceiver’s Set-
tings screen, tap Network
to display the Network Set-
tings screen.
Tap Operation Mode from the
Network Settings screen to dis-
play the Operation Mode screen.
Select WiFi Access Point.
Tap Conguration from the
Network Settings screen to dis-
play the WiFi Access Point screen.
The sub-menus are described
below.

13
WIRELESS SETUP SCENARIOS - WIFI ACCESS POINT SETUP
Password
Tap Password from the WiFi
Access Point screen to display
the WiFi Access Point Password
screen.
Tap the appropriate characters
from the keyboard into the WiFi
Access Point Password eld.
NOTE: the password must be
between 8 and 63 characters long.
SSID
Tap SSID (Service Set Identier)
from the WiFi Access Point screen
to display the WiFi Access Point
SSID screen.
Tap the appropriate characters
from the keyboard into the WiFi
Access Point SSID eld. The char-
acters are limited to A-Z, a-z, 0-9,
“.”, “_” and “ “ [space].
Tap to save and return to the WiFi Access Point screen.
Access Point Channel
Tap Access Point Channel from
the WiFi Access Point screen to
display the Access Point Channel
screen.
Select from channel 0 to 13.
Channel 0 is for automatic assign-
ment
Tap to save and return to the WiFi Access Point screen.
14
WIRELESS SETUP SCENARIOS - WIFI ACCESS POINT SETUP
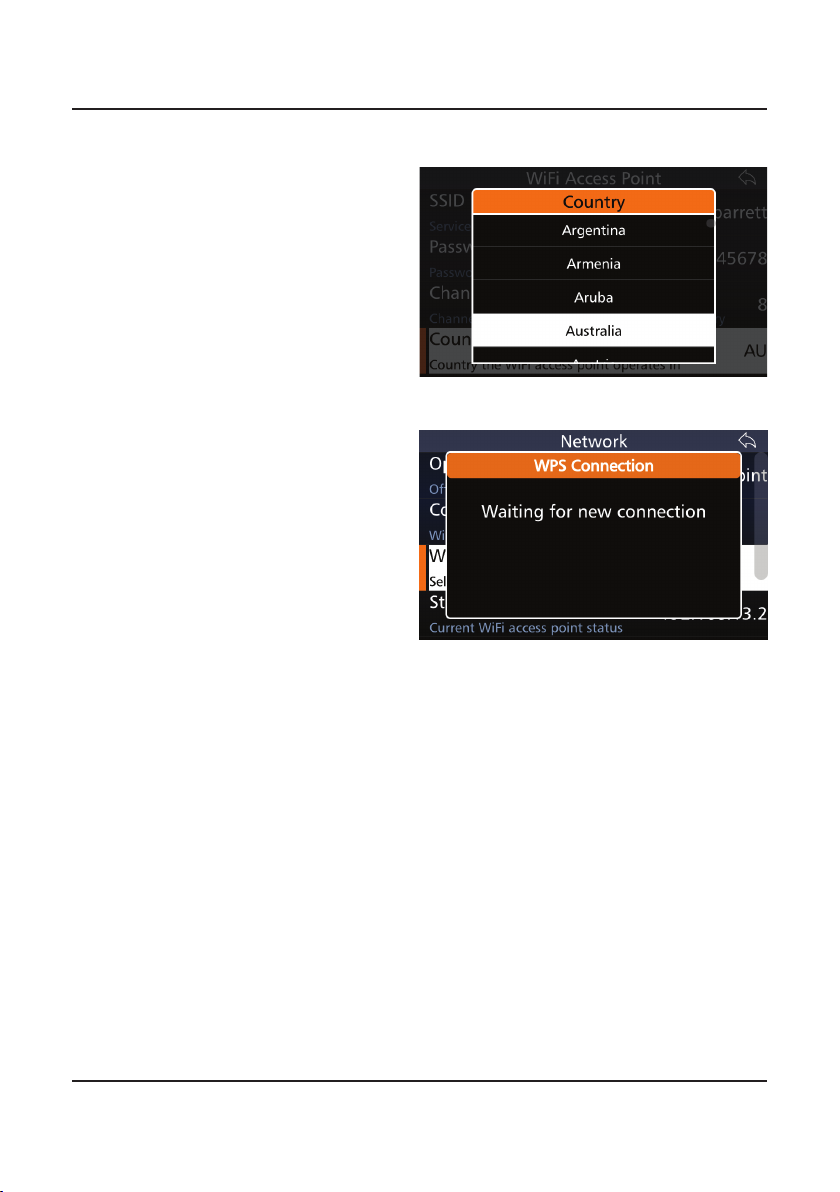
Country
This is to ensure that the channels
selected abide by location specic
frequency regulations.
Tap Country from the WiFi
Access Point screen to display the
Country screen.
Select the appropriate country.
WPS Push Button
Tap WPS Push Button (WiFi
Protected Setup) from the WiFi
Access Point Mode screen to dis-
play the WPS Connection screen.
This option will initiate the WiFi
protection setup.
NOTE: This is an advanced feature
not required for the basic function-
ality of the app or transceiver. To
know more, please contact your
system administrator.

15
WIRELESS SETUP SCENARIOS - WIFI ACCESS POINT SETUP
Note: the transceiver must be congured as a WiFi Access Point for this to be suc-
cessful.
1a. Click the WiFi icon on the
task bar, located on the bottom
right hand corner of Windows.
b. Click on the name of the WiFi net-
work, for example, “Barrett”.
This is the access point which was
set during the WiFi access point
setup on the transceiver.
For iOS devices, go to Settings <
WiFi.
For Android devices, either swipe
down from the top of the screen
and select WiFi or go to Settings <
WiFi.
2. Type the password which was
set up during the WiFi access point
setup.
Note: Ensure to enter the password as
‘network security key’ rather than ‘PIN
from the router label’.
Click Next.
The computer will then login to the
transceiver’s access point.
Note: If you cannot login to the trans-
ceiver as a WiFi access point, check
the password in the access point
setup under network settings on the
transceiver. (see page 12)
Connecting
16
WIRELESS SETUP SCENARIOS - SCENARIO 1
SCENARIO 1 - WiFi Access Point Setup with Win-
dows/iOS/Android Devices
For Windows PCs
This allows the operator to both program the transceiver via the Barrett 4050 HF
SDR Programming Software (P/N BCA40001) and use the Barrett 4050 Remote
Control application to access the functionality of the transceiver remotely from
their PC.
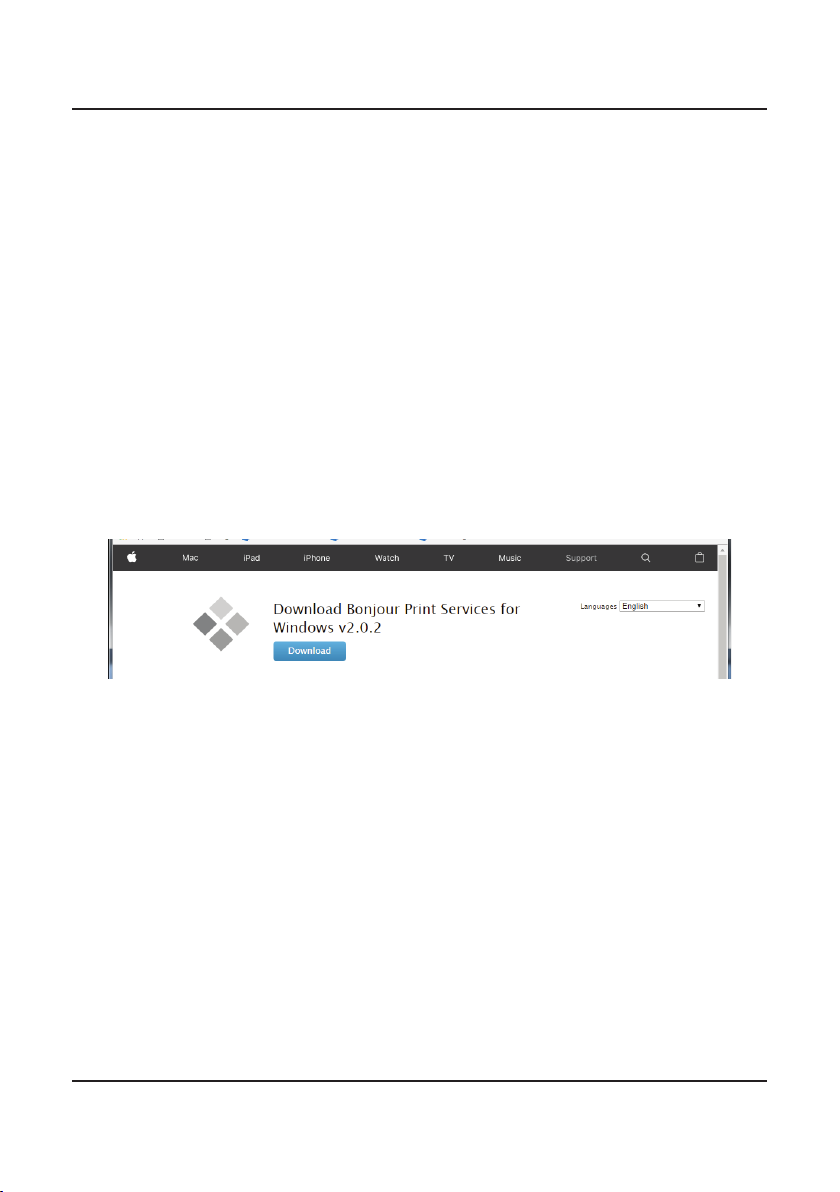
It is highly recommended to install the Bonjour app prior to installing the Bar-
rett 4050 Remote Control app.
1. Download the BonjourPSSetup.exe from:
https://support.apple.com/kb/DL999
2. Follow the online instructions to install the Bonjour app.
Note: If Bonjour is not installed, no Barrett 4050 HF SDR transceivers will be linked
in the connection screen.
The Barrett 4050 Remote Control app for Windows is provided exclusively by
Barrett Communications (P/N BCO40516). This can be purchased separately.

17
WIRELESS SETUP SCENARIOS - SCENARIO 1
Installing the Barrett 4050 Remote Control (Windows) App
Note: Windows 7 is the minimum system requirement for running this app
1. To install the app, dou-
ble-click the Barrett 4050
Remote Control Setup.exe
le and follow the prompts.
The nal installation screen
is shown opposite with a
reminder to install the Bon-
jour app, (link provided on
the previous page).
Existing installations will be
updated
2. Select the Open Barrett
4050 Remote Control
checkbox and click Finish to
display the Connect to SDR
screen.
4. Select the device to connect
to and tap or type in
a specic IP address if the
required transceiver does not
appear. Finding your trans-
ceiver’s IP address is provided
in Appendix 5.
To nd out more about this app,
turn to the Basic App Features
section on page 21.

18
WIRELESS SETUP SCENARIOS - SCENARIO 1
For iOS Devices
The Barrett 4050 Remote Control
app may be downloaded from the
App Store (search Barrett 4050).
Download and installation should
begin automatically.
Please note, that a minimum of iOS
10 is required to run this app.
Turn to page 20 for the Using the
Barrett 4050 Remote Control sec-
tion of this guide.

19
WIRELESS SETUP SCENARIOS - SCENARIO 1
For Android Devices
Please note, a minimum of Android version 5.0 (Lollipop) is required to run this app.
There are two ways to download the Barrett 4050 Remote Control app for
Android devices. The rst is via the Google Play store. Search “Barrett 4050”.
The second is downloading the app directly from the control head of the trans-
ceiver.
Ensure that all previous versions of the Barrett 4050 Remote Control app have
been uninstalled before beginning.
1. Insert a USB stick into either the top of the transceiver front panel or via the
appropriate adaptor and select “Settings<Export<Export Android Apps”.
2. Plug in the USB stick via a USB to micro-USB (On-the-Go) adaptor into the
mobile device. The built in le manager should pop up and allow access to
the les on the USB stick. If not, go to “My Files< USB Device”
3. Select “Barrett 4050 Remote Control.apk” and acknowledge the installa-
tion of an unknown app (i.e. not installed through Google PlayStore).
4. Open the app and acknowledge the permission requests for microphone
use and storage access.
Downloading the Barrett 4050 Remote Control App

20
WIRELESS SETUP SCENARIOS - SCENARIO 1
To open the app, tap the icon
on the wireless device or double
click the short cut from the desktop.
The Connect to SDR screen will
appear on start-up.
You may need to type over the
transceiver IP address (192.168.3.2
in the example) or simply select the
transceiver you wish to connect to
and tap to connect.
The Connecting screen will disap-
pear and be replaced by the screen
on the right.
Using the Barrett 4050 Remote Control App
This manual suits for next models
8
Table of contents
Popular Adapter manuals by other brands


DeLOCK
DeLOCK 62955 user manual

Wilder Technologies
Wilder Technologies QSFP-DD user manual

Brocade Communications Systems
Brocade Communications Systems BR-1010 Administrator's guide

TRENDnet
TRENDnet TU2-ETG Quick installation guide

Hamlet
Hamlet HNUMF100 user manual

Schwaiger
Schwaiger PowerLine PLC502M user manual


