Bauhn ATV60UHDW-1122 User manual

User Manual
AFTER SALES SUPPORT
1300 002 534
tempo.org/support
MODEL: ATV60UHDW-1122 PRODUCT CODE: 710512 11/2022
AUS
MODEL: ATV60UHDW-1122
60”

2
Welcome
Congratulations on your purchase!
This manual tells you all you need to know about using your new BAUHN®product.
Please take special note of any important safety and usage information presented with the symbol.
All products brought to you by BAUHN®are manufactured to the highest standards of performance and safety and,
as part of our philosophy of customer service and satisfaction, are backed by our comprehensive 1 Year Warranty.
Domestic use only: This product is intended for indoor domestic use only. It is not suitable for commercial, industrial
or outdoor use. Do not use this product for anything other that its intended purpose, and only use it as described in
this manual.
We hope you will enjoy using your purchase for many years to come.

3
Contents
Welcome 2
Unpack and Prepare 4
What's in the Box 4
Important Tips 5
Attaching the Stand 6
Wall-Mounting the TV 7
Connect to Power 8
Connect your Antenna 8
Controls and Connections 9
Get to Know your TV 9
Buttons on the TV 9
Ports on the TV 10
Remote Control 12
Setup 12
Using the Remote Control 13
Remote Pairing 13
Magic Remote 14
Pairing the Remote 16
On-Screen Set Up 17
LG ThinQ App 18
Advanced Controls
(TV Setting Menus) 19
Picture 21
Sound 24
Programmes 26
Connection 28
General 30
Accessibility 34
Support 35
High Dynamic Range (HDR) 36
Smart TV 37
Web Browser 38
TV Guide 39
Recording 40
Using Instant Recording 41
Using the TV Scheduler 41
Programme Scheduling 42
Manual Scheduling 42
Using Live Playback
(Real-time Playback) 42
USB Mode 43
Set Up 43
Viewing Photos and Videos 44
Photo Player 44
Video Player 45
Playing Music 46
Music Player 46
Troubleshooting 47
Specications 50
Compliance and
Responsible Disposal 51
Warranty Information 52
Repair and Refurbished
Goods or Parts Notice 53

4 | UNPACK AND PREPARE
See the flap of the box
for how to handle the TV
without damaging it!
Unpack and Prepare
What's in the Box
In the box you will find:
A. 60" 4K Ultra HD Smart TV
B. Magic Remote
C. AA Activ Energy Batteries (2)
D. TV Stands (2)
E. Screws for TV Stands (4)
F. Warning Sheet
G. TV Toppling Safety Message
H. Quick Start Guide
I. Warranty Certificate
J. General Safety Warnings
K. User Manual
You will need (not included):
• Phillips-head screwdriver (for stand installation)
• Someone to help you lift and install your TV
• Antenna cable (to watch live TV)
• Broadband internet connection (to use smart apps)
Before installing your new TV, check you have everything needed.
E

UNPACK AND PREPARE | 5
Important Tips
• Place the TV on a level surface.
• Place the TV away from any source that may generate heat or vibrations.
• Make sure there is enough space around vents for airflow.
• The remote control works up to 5 metres away from the TV.
• Unplug the TV before cleaning it.
• Clean using a dry cloth only - do not use water or chemicals.
• Use only the power supply provided.
• It is highly recommended to use safety straps for securing the TV in place.
• Keep liquid, children and pets away from the TV at all times.

6 | UNPACK AND PREPARE
Unless you are wall-mounting the TV, you will need to
attach its stand/legs.
1. Lay the TV face-down on a soft, flat surface (like the
sofa, or a towel on a table) larger than the TV itself.
2. Match the stands to the installation points on the
underside of the TV.
3. Attach the stands to the TV at the installation points
using the screws provided. (Grab a screwdriver for
this bit).
Attaching the Stand
• This TV is heavy! We recommend asking
someone to help you lift it.
• Unplug the TV from the power outlet before
installing or removing the stand.
• DO NOT place the TV standing upright without
its stand attached; it could damage the remote
sensor at the bottom of the TV.
• Only touch the frame, not the screen.
• It is highly recommended to use safety straps for
securing the TV.
CAUTION!
Do not apply
excessive force as
you might damage
the screw holes.

UNPACK AND PREPARE | 7
400mm
Back of the TV
400mm
Wall-Mounting the TV
The TV comes with holes on the back panel for use with
wall-mounting brackets (bracket not included).
Use four standard M6*10mm screws (or longer,
depending on the mounting bracket) to wall-mount this
TV (screws are not included).
• Unplug the TV from the power outlet
before wall-mounting.
• Contact a professional for assistance with
wall-mounting the TV.
Required
• VESA Mounting
Bracket
• 4 x M6*10mm
screws (or longer
as required)
The screws in the package are for securing the TV stand
only. If you are wall-mounting the TV, consult a qualified
installer for advice on bracket support and wall support.

8 | UNPACK AND PREPARE
Free-to-airTVinHD(HighDenition)
High Definition (HD) channels
provide the best viewing quality and
are available with a digital antenna
connection.
TV channels in Ultra HD resolution are
not currently available in Australia.
Therefore when you watch HD
broadcast signals on an Ultra HD TV,
the picture can appear 'soft' and lacks
the detail you see when watching the
same content on an HD TV.
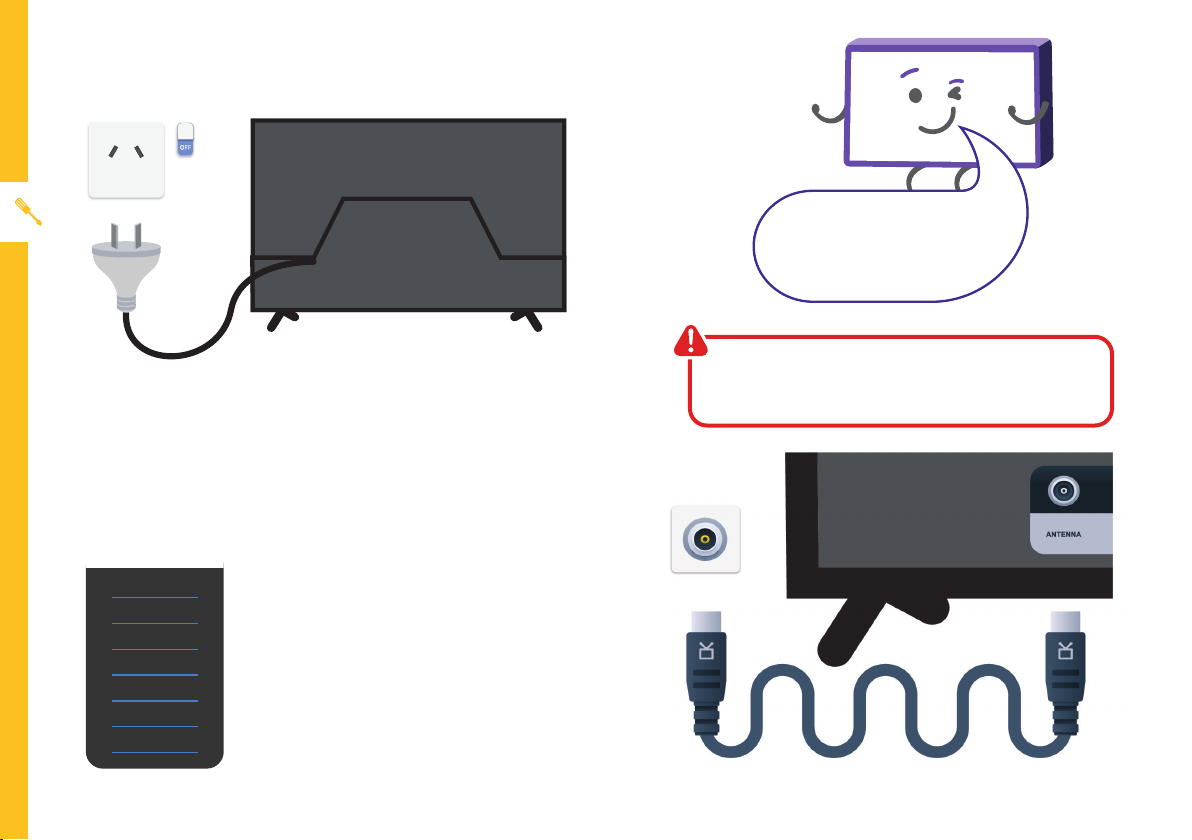
Connect to Power
Make sure the TV is switched off at the power outlet
until you have finished connecting your cables.
Connect your Antenna
Antenna cable not included.
Don't forget to plug in the TV
to the power outlet. Leave
the power switched off until
installation is finished.
ABC HD
SBS ONE HD
7HD
9HD
10 HD
PRIME7 HD
WIN HD
Example
HD Channels

CONTROLS AND CONNECTIONS | 9
Controls and Connections
Buttons on the TV
Get to Know your TV
1
3
5
7
6
4
2
1. SOURCE: Change the input source.
2. MENU: Enter the settings menu.
3. VOL +: Increase volume level.
4. VOL -: Decrease volume level.
5. CH+: Select the next channel.
6. CH-: Select the previous channel.
7. /I : Switch the TV on or to standby.
On/Standby light and Remote sensor
Back of TV

10 | CONTROLS AND CONNECTIONS
Ports on the TV
1
HDMI
Use a high-speed
HDMI cable for
best picture and
sound quality.
SOUND
PICTURE
COMPUTER
All-digital connection between the TV and any HDMI device.
Supports Ultra HD. Requires a HDMI cable (not included).
2USB
STORAGE
Plug in a USB stick/drive to PVR record and pause live TV. Play
media files stored on your USB storage device (supported file
codecs and extensions may vary). Update the TV software via USB.
Note: Time-shift function requires a USB-HDD for storage.
3
Headphone
Jack
SOUND
Connect to your headphones, amplifier or audio device, using an
AUX cable (not included).
23
1
Table of contents
Other Bauhn UHD TV manuals


